


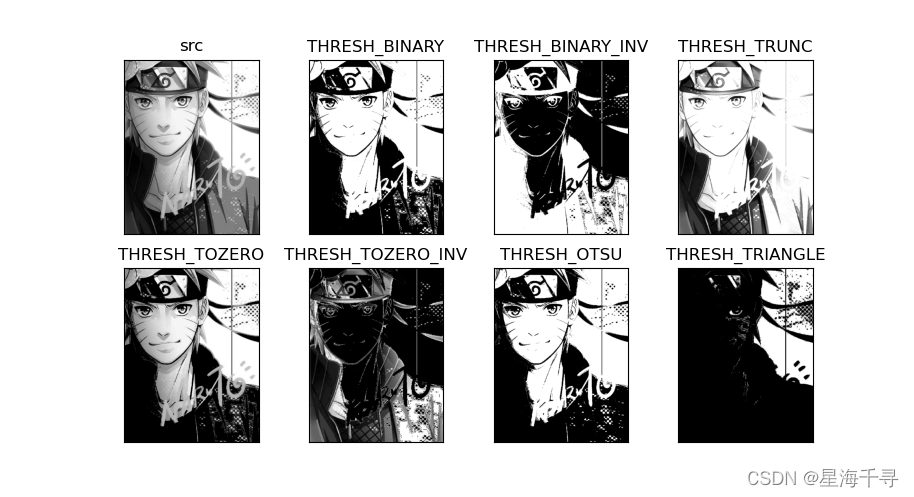
 这篇文章详细介绍了如何使用Python的OpenCV库进行图像阈值处理,包括THRESH_BINARY、THRESH_BINARY_INV、THRESH_TRUNC、THRESH_TOZERO、THRESH_TOZERO_INV、THRESH_OTSU和THRESH_TRIANGLE等不同类型的阈值选择,通过实例展示了各种阈值方法对灰度图像的影响。
import cv2
import matplotlib.pyplot as plt

# ret, dest = cv2.threshold(src, thresh, maxval, type)
#   src: 输入图像,只能是单通道的图像,通常就是灰度图像
#   dst: 输出图像
#   thresh: 阈值,范围是[0, 255]之间的像素值
#   maxval: 由type决定的,超过/低于阈值的情况下,赋予的一个值
#   type: # 几种不同的类型
#         cv2.THRESH_BINARY: 超过阈值部分取最大值maxval,否则为0
#         cv2.THRESH_BINARY_INV: THRESH_BINARY的反转,取反操作
#         cv2.THRESH_TRUNC: 超过阈值部分取最大值maxval,否则不变
#         cv2.THRESH_TOZERO: 大于阈值部分不变,否则为0
#         cv2.THRESH_TOZERO_INV: THRESH_TOZERO的反转

img = cv2.imread('images/naruto.jpg', cv2.IMREAD_GRAYSCALE)

ret, thresh1 = cv2.threshold(img, 127, 255, cv2.THRESH_BINARY)
ret, thresh2 = cv2.threshold(img, 127, 255, cv2.THRESH_BINARY_INV)
ret, thresh3 = cv2.threshold(img, 127, 255, cv2.THRESH_TRUNC)
ret, thresh4 = cv2.threshold(img, 127, 255, cv2.THRESH_TOZERO)
ret, thresh5 = cv2.threshold(img, 127, 255, cv2.THRESH_TOZERO_INV)
ret, thresh6 = cv2.threshold(img, 127, 255, cv2.THRESH_OTSU)
ret, thresh7 = cv2.threshold(img, 127, 255, cv2.THRESH_TRIANGLE)

titles = ['src', 'THRESH_BINARY', 'THRESH_BINARY_INV', 'THRESH_TRUNC',
          'THRESH_TOZERO', 'THRESH_TOZERO_INV', 'THRESH_OTSU', 'THRESH_TRIANGLE']
images = [img, thresh1, thresh2, thresh3, thresh4, thresh5, thresh6, thresh7]

for i in range(len(titles)):
    plt.subplot(2, 4, i + 1), plt.imshow(images[i], 'gray'), plt.title(titles[i])
    plt.xticks([]), plt.yticks([])
plt.show()
效果如下:


 1403
1403

 被折叠的 条评论
为什么被折叠?
被折叠的 条评论
为什么被折叠?
 到【灌水乐园】发言


