


 文章讲述了在Spring框架中如何在保证A类单例的同时,使B属性动态变化,通过`@Lookup`注解和CGLIB代理机制实现。介绍了`@Lookup`的解析过程和CGLIB如何在实例化时根据`LookupOverride`创建新的bean实例。
功能
如果让你创建一个bean,起名为A,然后它有一个需要注入的属性B,在不人为干扰的情况下,如何让A为单例的情况下,使得B是动态的?
先看端代码:
@Data
@Component
public class CustomTest3 {

    @Autowired
    public CustomTest4 customTest4;

    public void print() {
        System.out.println(customTest4());
    }
}
@Component
@Scope(ConfigurableBeanFactory.SCOPE_PROTOTYPE)
public class CustomTest4 {

}
当调用customTest3.print()时,打印出的hashCode是不会变的,因为CustomTest3是单例,所注入的属性只要不认为干扰就不会变。
那么要实现这个功能,可能的做法就是,调用print时,重写获取一次bean,如下:
@Data
@Component
public class CustomTest3 implements ApplicationContextAware {
    private ApplicationContext applicationContext;
    @Override
    public void setApplicationContext(ApplicationContext applicationContext) throws BeansException {
        applicationContext = applicationContext;
    }

    public void print() {
        CustomTest4 bean = applicationContext.getBean(CustomTest4.class);
        System.out.println(bean);
    }
}
这没毛病,但是这其实复杂了,在spring中的可以用@Lookup注解实现这个功能:
@Data
@Component
public class CustomTest3 {

    @Lookup
    public CustomTest4 customTest4(){return null;}

    public void print() {
        System.out.println(customTest4());
    }
}
或者使用接口方式,都是能被注入的
@Component
public interface CustomTest3 {

    @Lookup
    CustomTest4 customTest4();
}
源码
这个注解的解析出现在bean实例化时,推断构造器里,只有无参构造时才会进入到这里的逻辑;
位置:org.springframework.beans.factory.support.AbstractAutowireCapableBeanFactory#instantiateBean
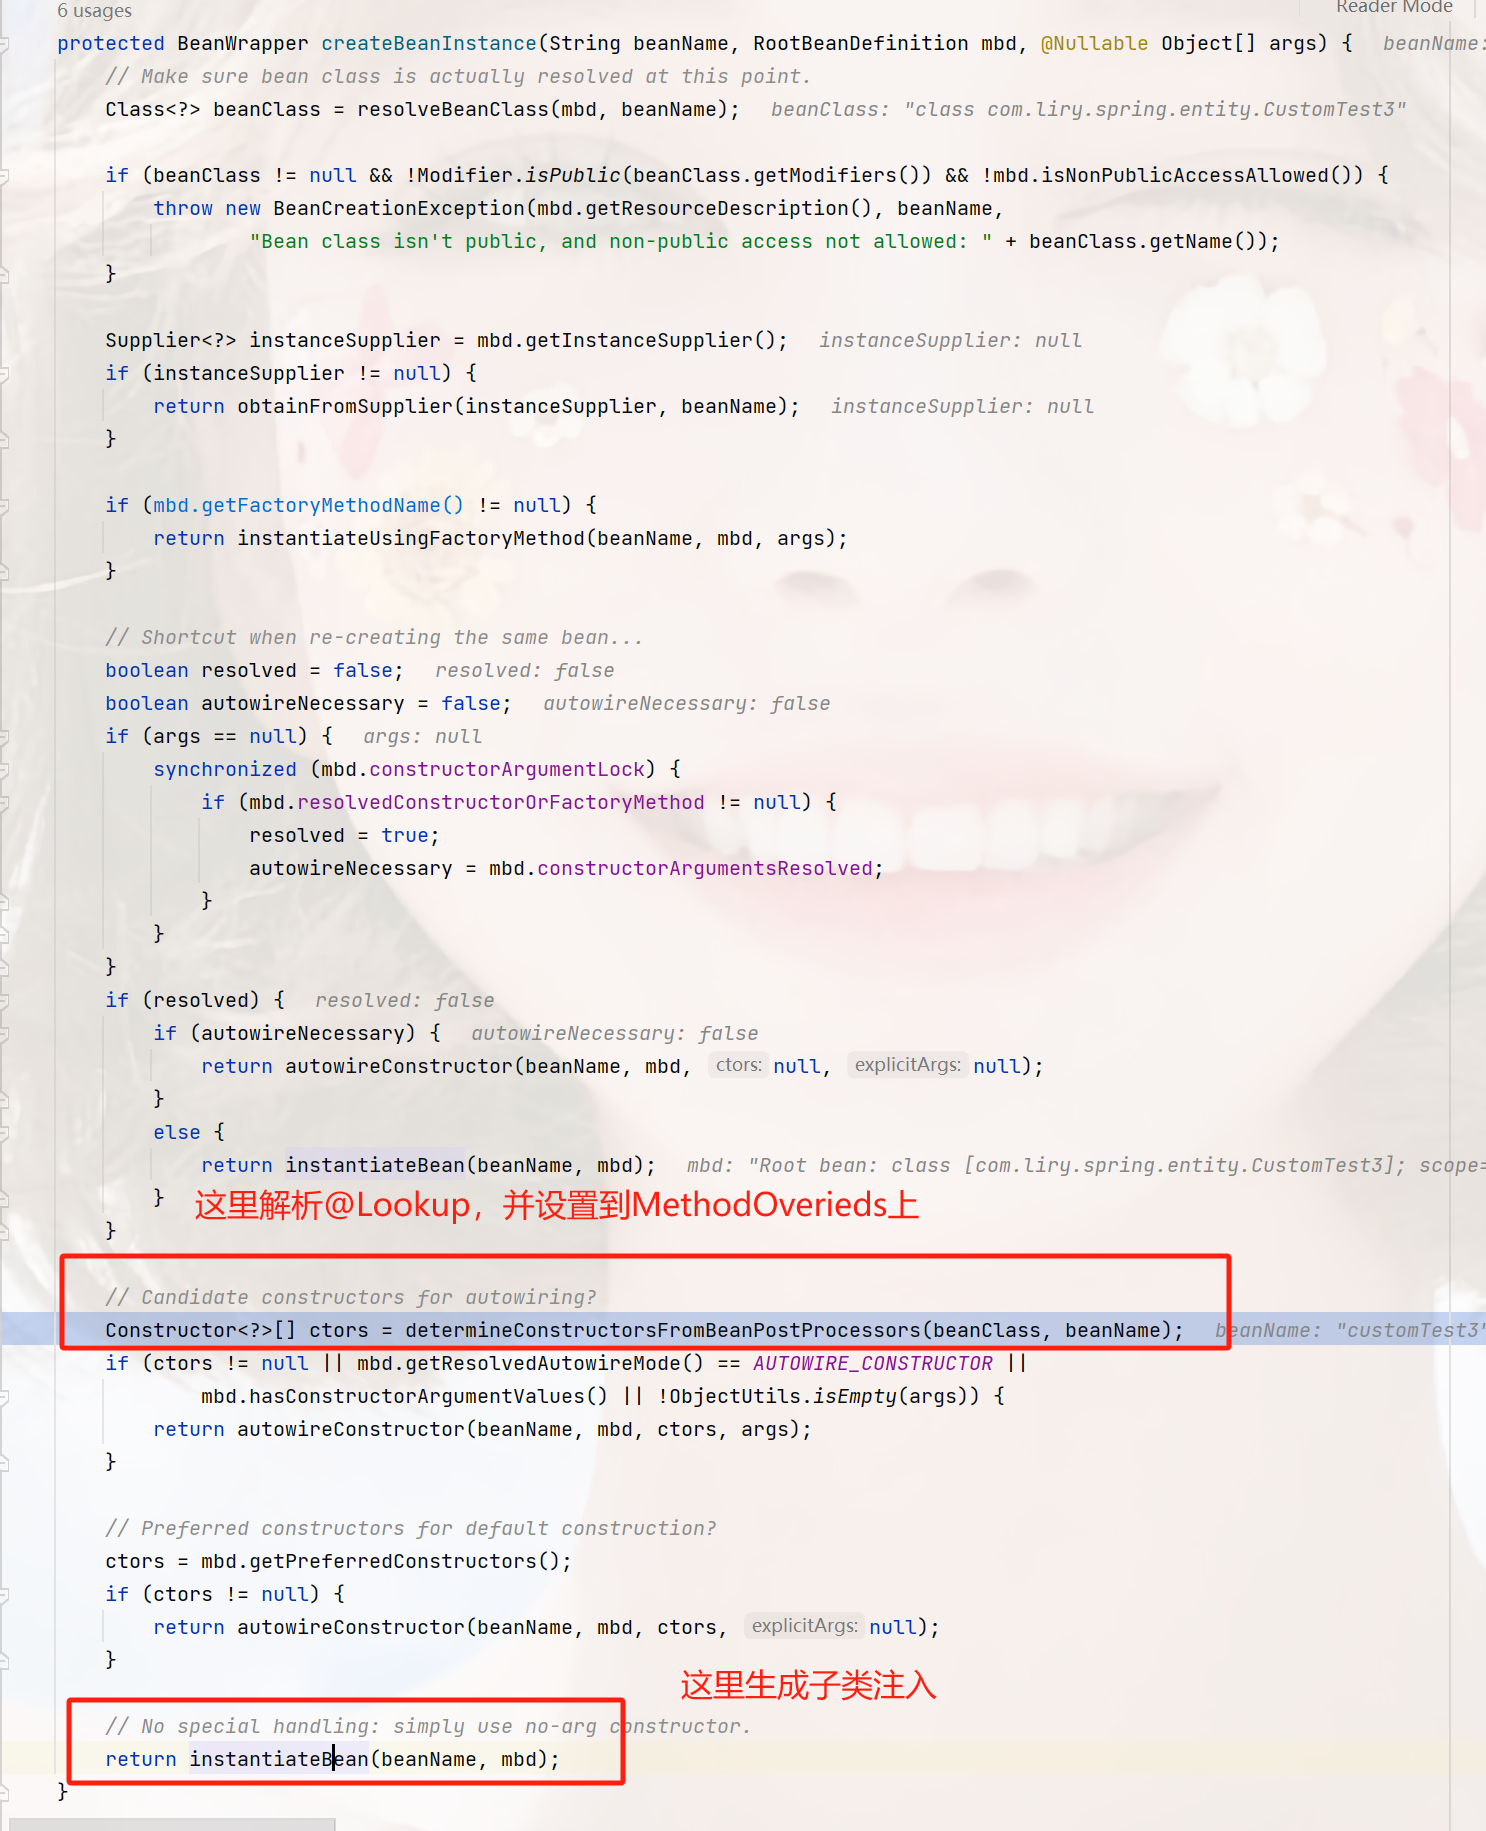
这里进行实例生成,有Supplier,factoryMethod,构造器解析,而在这构造器解析时,它也做了注解@Lookup的解析;
public Constructor<?>[] determineCandidateConstructors(Class<?> beanClass, final String beanName)
			throws BeanCreationException {

		// Let's check for lookup methods here...
		if (!this.lookupMethodsChecked.contains(beanName)) {
            // 当没有解析过@Lookup注解时执行
			if (AnnotationUtils.isCandidateClass(beanClass, Lookup.class)) {
                // 当这个类中存在注解@Lookup时执行
				try {
					Class<?> targetClass = beanClass;
					do {
                        // 这个是spring中的反射工具,用于查找class里的注解,并回调
						ReflectionUtils.doWithLocalMethods(targetClass, method -> {
                            // 反射操作
							Lookup lookup = method.getAnnotation(Lookup.class);
							if (lookup != null) {
								Assert.state(this.beanFactory != null, "No BeanFactory available");
                                // 通过方法对象,和指定的beanName(lookup.value)生成LookupOverride
								LookupOverride override = new LookupOverride(method, lookup.value());
								try {
                                    // 获取最新的定义信息,然后将LookupOverride添加到beanDefinition中
                                    // 之后进行实例化时,以这个属性作为创建
									RootBeanDefinition mbd = (RootBeanDefinition)
											this.beanFactory.getMergedBeanDefinition(beanName);
									mbd.getMethodOverrides().addOverride(override);
								}
								catch (NoSuchBeanDefinitionException ex) {
									throw new BeanCreationException(beanName,
											"Cannot apply @Lookup to beans without corresponding bean definition");
								}
							}
						});
						targetClass = targetClass.getSuperclass();
					}
					while (targetClass != null && targetClass != Object.class);

				}
				catch (IllegalStateException ex) {
					throw new BeanCreationException(beanName, "Lookup method resolution failed", ex);
				}
			}
			this.lookupMethodsChecked.add(beanName);
		}

		// Quick check on the concurrent map first, with minimal locking.
		Constructor<?>[] candidateConstructors = this.candidateConstructorsCache.get(beanClass);

    // 下面是构造器的逻辑......
}
位置:org.springframework.beans.factory.annotation.AutowiredAnnotationBeanPostProcessor#determineCandidateConstructors
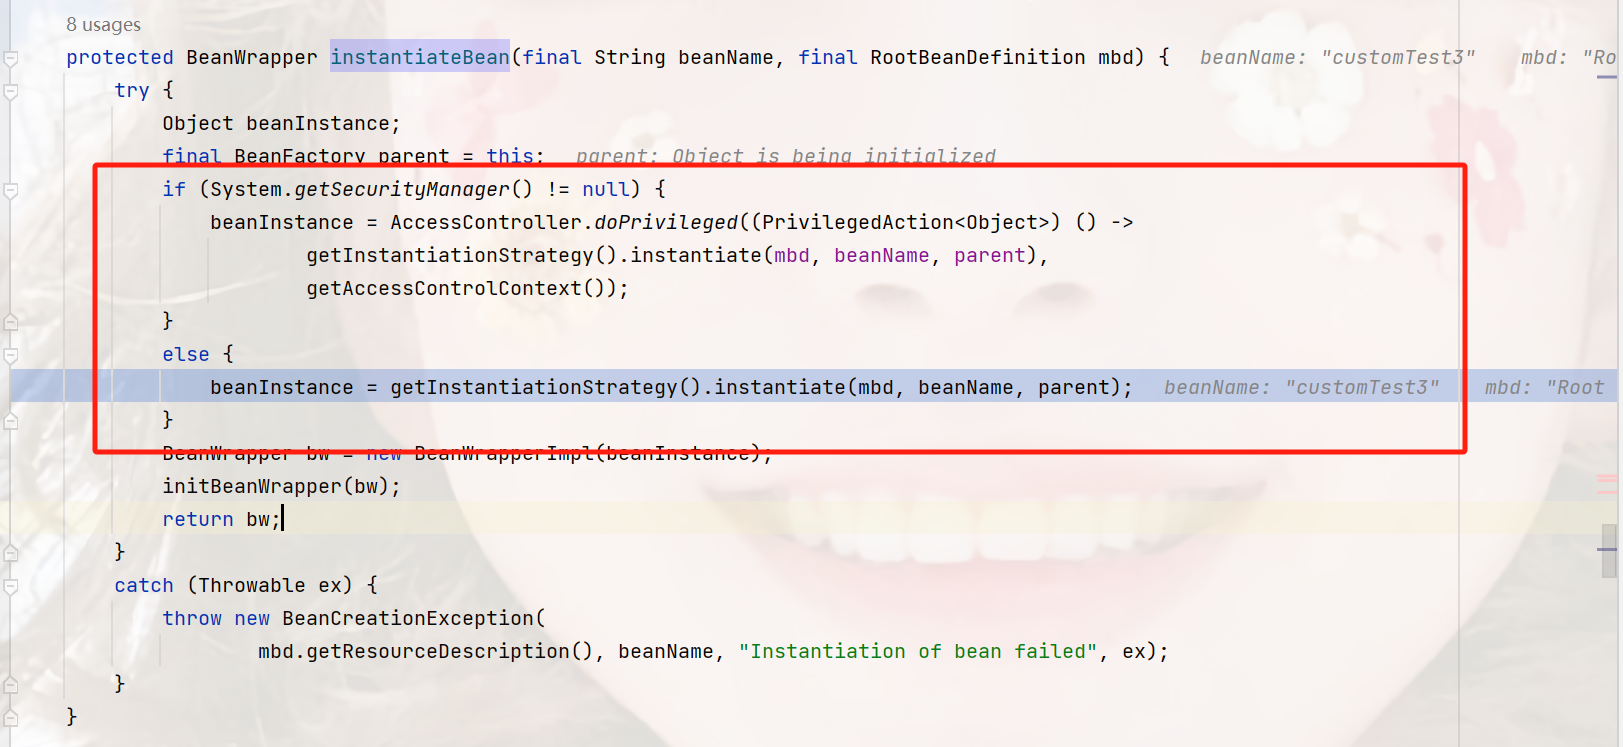
这个类看名字是“实例化策略”,用来实例化的。
在往里走,是下面这一段,出现了MethodOverrides这个属性,这个属性保存的是注解@Lookup的信息,所以这里直接进了一个分支

在上面我们示例代码中,我们使用了接口,都能被注入,也就是因为它底层是对接口进行了CBLIB代理;
往底层走,可以看到它创建了一个CglibSubclassCreator(CBLIB子类创建器)

这个创建以bean定义信息,以及bean工厂作为参数,也就是说,它其实可以对bean做各种操作,甚至是qi’ta。
在上面调用这个方法时,并没传入构造器参数,所以说下面这段代码,参数都是null。
位置:org.springframework.beans.factory.support.CglibSubclassingInstantiationStrategy.CglibSubclassCreator#instantiate
		public Object instantiate(@Nullable Constructor<?> ctor, Object... args) {
            // 这里就是模板化的Cblib代理创建
			Class<?> subclass = createEnhancedSubclass(this.beanDefinition);
			Object instance;
			if (ctor == null) {
                // 必然会走这里
                // 所以,这里就是创建了一个Cblib的子类
				instance = BeanUtils.instantiateClass(subclass);
			}
			else {
				try {
					Constructor<?> enhancedSubclassConstructor = subclass.getConstructor(ctor.getParameterTypes());
					instance = enhancedSubclassConstructor.newInstance(args);
				}
				catch (Exception ex) {
					throw new BeanInstantiationException(this.beanDefinition.getBeanClass(),
							"Failed to invoke constructor for CGLIB enhanced subclass [" + subclass.getName() + "]", ex);
				}
			}
			// SPR-10785: set callbacks directly on the instance instead of in the
			// enhanced class (via the Enhancer) in order to avoid memory leaks.
			Factory factory = (Factory) instance;
            // 这里就是设置cglib的代理逻辑
            // 它添加了3个
			factory.setCallbacks(new Callback[] {NoOp.INSTANCE,
					new LookupOverrideMethodInterceptor(this.beanDefinition, this.owner),
					new ReplaceOverrideMethodInterceptor(this.beanDefinition, this.owner)});
			return instance;
		}
这里还要再看一点:
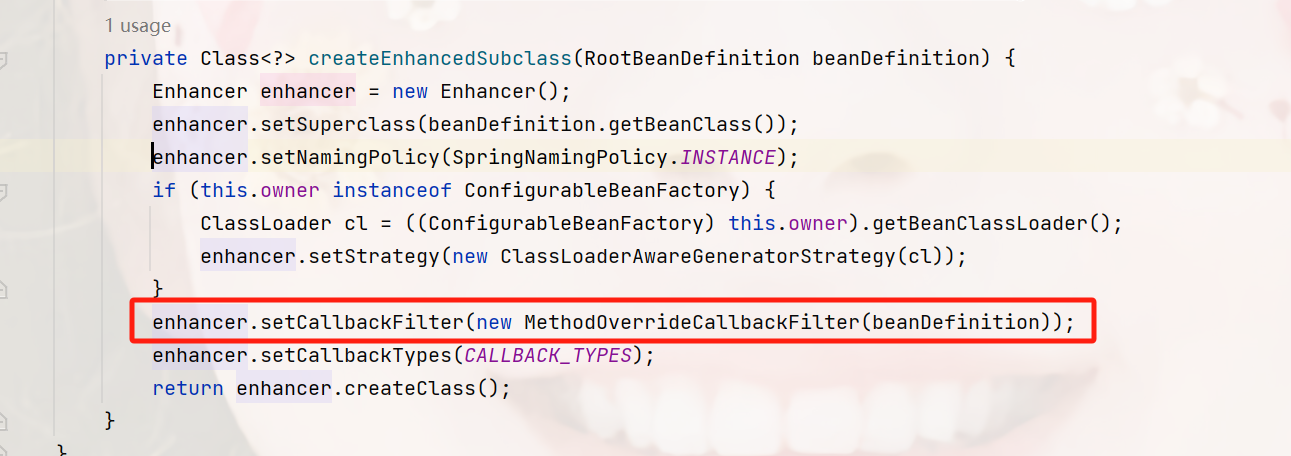
它在创建代理是,增加了代理类的过滤:
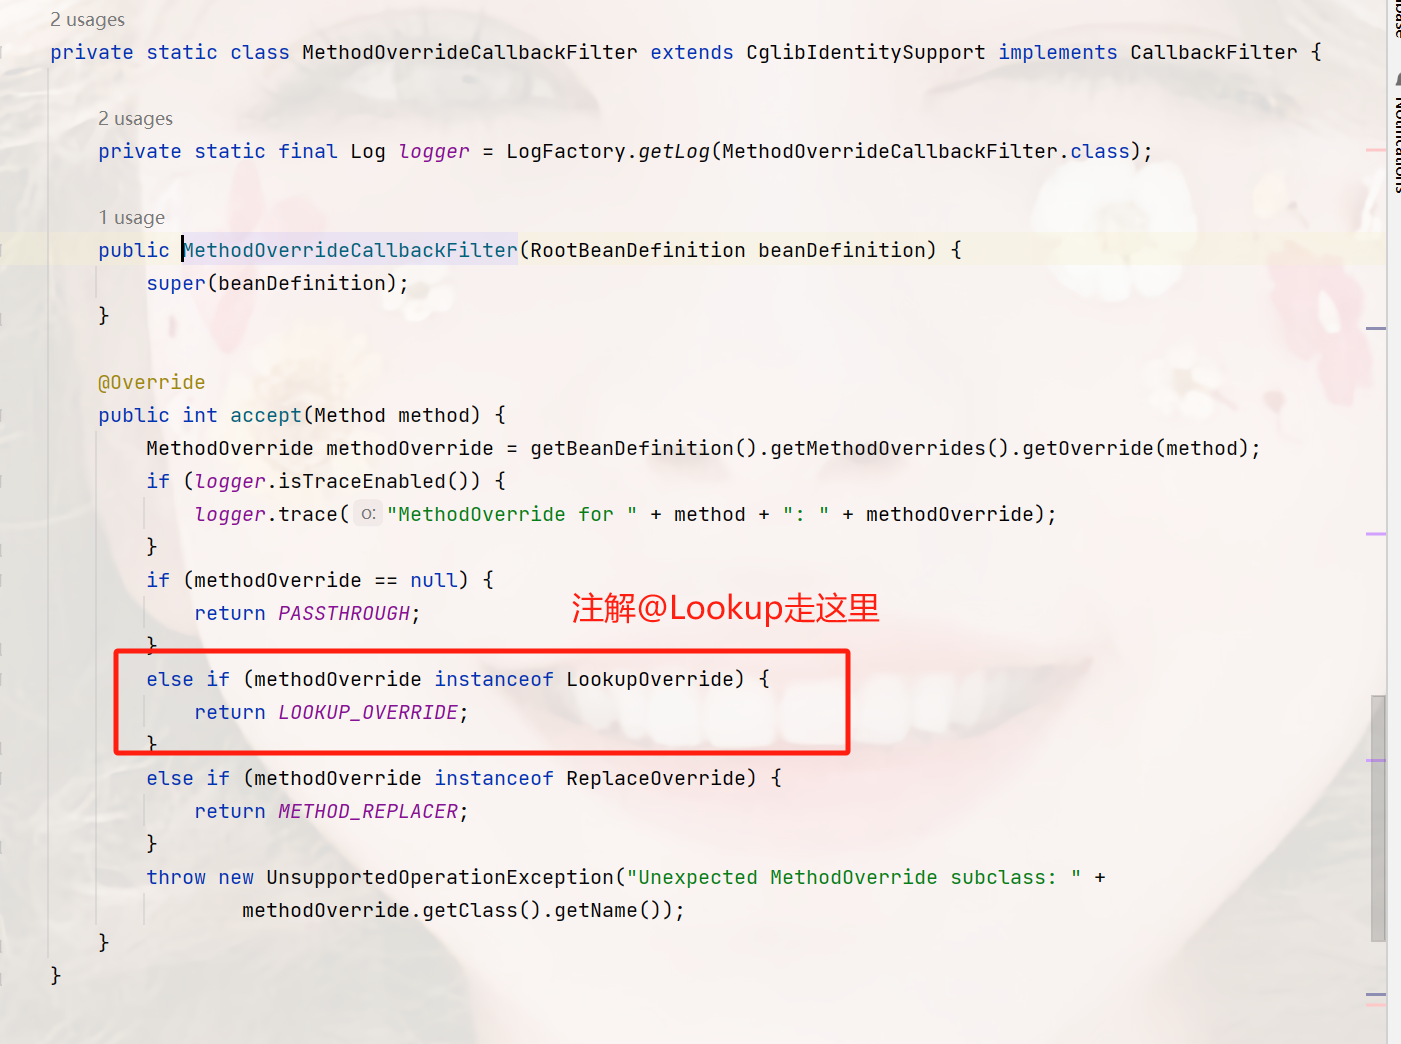
最后它添加的代理类有3个,第一个NoOp.INSTANCE我不太清楚,但注解@Lookup的是第二个,其他的代理类因为增加了代理过滤,所以都不会走。
下面就是代理逻辑:
位置:org.springframework.beans.factory.support.CglibSubclassingInstantiationStrategy.LookupOverrideMethodInterceptor#intercept
@Override
		public Object intercept(Object obj, Method method, Object[] args, MethodProxy mp) throws Throwable {
			// Cast is safe, as CallbackFilter filters are used selectively.
            // 这里把之前设置进去的关于@Lookup注解信息的对象拿出来了
			LookupOverride lo = (LookupOverride) getBeanDefinition().getMethodOverrides().getOverride(method);
			Assert.state(lo != null, "LookupOverride not found");
			Object[] argsToUse = (args.length > 0 ? args : null);  // if no-arg, don't insist on args at all
            // 下面它通过getBean从spring容器中获取bean,
            // 如果这个bean是一个原型bean,也就是被 prototype 标注的
            // 那么,每次执行这个方法都会生成新的bean
			if (StringUtils.hasText(lo.getBeanName())) {
				return (argsToUse != null ? this.owner.getBean(lo.getBeanName(), argsToUse) :
						this.owner.getBean(lo.getBeanName()));
			}
			else {
				return (argsToUse != null ? this.owner.getBean(method.getReturnType(), argsToUse) :
						this.owner.getBean(method.getReturnType()));
			}
		}
到这里,其实已经明了了,它的做法,就和我们一开始的做法一样的,只是它是利用了动态代理实现的。


 2544
2544

 被折叠的 条评论
为什么被折叠?
被折叠的 条评论
为什么被折叠?
 到【灌水乐园】发言


