


 本文介绍了一个采购系统的搭建过程,包括使用Spring、SpringMVC、SpringDataJPA进行框架搭建,EasyUI进行页面展示,并实现了基本的CRUD操作。此外,还介绍了权限模块的实现方式,采用Apache Shiro进行权限管理和认证。
业务简介
采购单的流程
1.根据需求部门提出采购申请表
2.采购员找供应商,询问价格,入库时间
3.根据获得的价格多少,找审核部门领导审核,审核通过,等待财务拨款,向供应商订货
4.供应商开始准备商品,产生一张发货单
5.准备采购入库单
库存模块
采购入库单(+),销售出库单(-),退货单,换货单,调货单,报损报溢,盘点单
一.框架搭建
通过使用 Spring,SpringMVC,SpringDataJPA 进行框架搭建,页面用 EasyUI 来显示。
Spring+SpringDataJPA集成和配置
<!--引入jdbc.properties文件-->
    <context:property-placeholder location="classpath:jdbc.properties" />

    <!--配置DataSource-->
    <bean id="dataSource" class="org.apache.commons.dbcp.BasicDataSource" destroy-method="close">
        <property name="driverClassName" value="${jdbc.driverClassName}" />
        <property name="url" value="${jdbc.url}" />
        <property name="username" value="${jdbc.username}" />
        <property name="password" value="${jdbc.password}" />
    </bean>

    <!--
        LocalContainerEntityManagerFactoryBean:就是一个FactoryBean对象,返回EntityManagerFactory对象给我们
        集成JPA:就是把EntityManagerFactory给它搞出来
            四大金刚,方言,建表策略,显示SQL
        Alt+Ins
     -->

    <bean id="entityManagerFactory" class="org.springframework.orm.jpa.LocalContainerEntityManagerFactoryBean">
        <!--配置连接信息-->
        <property name="dataSource" ref="dataSource"/>
        <!--配置包的扫描(Scan),认识JPA的注解 -->
        <property name="packagesToScan" value="cn.cyj.domain" />
        <!--
            配置适配器 Spring+JPA(ORM规范) -> 到底用的是哪一个框架来完成的
                    JPA是有很多实现(Hibernate,OpenJPA,...)
         -->
        <property name="jpaVendorAdapter">
            <bean class="org.springframework.orm.jpa.vendor.HibernateJpaVendorAdapter">
                <!--方言(确定数据库)-->
                <property name="databasePlatform" value="org.hibernate.dialect.MySQLDialect" />
                <!--建表策略  true:update  false:什么都不做-->
                <property name="generateDdl" value="false" />
                <!--支持SQL显示-->
                <property name="showSql" value="true" />
            </bean>
        </property>
    </bean>
Spring+SpringMVC集成和配置
    <!-- 扫描controller部分的包 -->
    <!-- @Component组件, @Repository持久层, @Service业务逻辑层, and @Controller控制器 -->
    <context:component-scan base-package="cn.cyj.controller" />
    <!-- 添加mvc对@RequestMapping等注解的支持 -->
    <mvc:annotation-driven>
        <mvc:message-converters>
            <bean class="org.springframework.http.converter.json.MappingJackson2HttpMessageConverter">
                <property name="supportedMediaTypes">
                    <list>
                        <value>application/json; charset=UTF-8</value>
                        <value>application/x-www-form-urlencoded; charset=UTF-8</value>
                    </list>
                </property>
                <!-- No serializer:配置 objectMapper 为我们自定义扩展后的 CustomMapper,解决了返回对象有关系对象的报错问题 -->
                <property name="objectMapper">
                    <bean class="cn.cyj.common.CustomMapper"></bean>
                </property>
            </bean>
        </mvc:message-converters>
    </mvc:annotation-driven>
    <!--静态资源放行-->
    <mvc:default-servlet-handler />
    <!-- ViewResolver 视图解析器 (struts2视图类型类似) -->
    <bean class="org.springframework.web.servlet.view.InternalResourceViewResolver">
        <!-- 设置视图路径的前后缀,该配置可以让我们写视图路径的时候更简单。 -->
        <!-- 希望跳转jsp是[/WEB-INF/views/前缀][xxx变量][.jsp后缀] -->
        <!-- * @see #setPrefix -->
        <property name="prefix" value="/WEB-INF/views/" />
        <!-- * @see #setSuffix -->
        <property name="suffix" value=".jsp" />
    </bean>

    <!-- 错误:提示告诉开发者你没有配置文件上传解析器。 -->
    <bean id="multipartResolver" class="org.springframework.web.multipart.commons.CommonsMultipartResolver">
        <!-- 设置上传文件的最大尺寸为1MB -->
        <property name="maxUploadSize">
            <value>1048576</value>
        </property>
    </bean>
通过不同的层级实现基本的CRUD:
1.Controller层,是对前端或者接口的响应一个逻辑处理的层,这个层级一般调用的是Service层。这个层级调用java代码实现的。
2.Service层,是对Controller的功能的响应一个逻辑处理的层,是对后台的有关联的逻辑的一个处理。这个层级一般调用的是Service层和Dao层,这个层级调用java代码实现的。
3.Repository层,封装了DAO,还有一些装配工作,把数据装配成一个完整的对象。
4.Common层,通用工具层,把项目中通用的功能放在这里。
5. Query层,把前台传过来的参数,进行封装。
在Repository层,Service层,Qurey层我们把相同的方法抽一个父类,方便再后期修改。
SpringDataJPA 功能虽然已经非常强大,但是它依然满足不了咱们的需要,在很多时候,我们需要自己去对SpringDataJpa的功能进行相应的扩展(即:自定义 Repository )。
1.直接创建BaseRepository来继承JpaRepository接口
@NoRepositoryBean
public interface BaseRepository<T,ID extends Serializable> extends JpaRepository<T,ID>,JpaSpecificationExecutor<T>{
    //根据Query拿到分页对象(分页)
    Page findPageByQuery(BaseQuery baseQuery);

    //根据Query拿到对应的所有数据(不分页)
    List<T> findByQuery(BaseQuery baseQuery);

    //根据jpql与对应的参数拿到数据
    List findByJpql(String jpql,Object... values);
}
- BaseRepositoryImpl功能实现
定义好自定义的方法后,我们现在通过一个基本的Repository类来实现该方法:
首先添加BaseRepositoryImpl类,继承SimpleJpaRepository类,使其拥有Jpa Repository的基本方法。
我们发现Repository有两个构造函数:
SimpleJpaRepository(JpaEntityInformation entityInformation, EntityManager entityManager)
SimpleJpaRepository(Class domainClass, EntityManager em)
这里我们实现第二个构造函数,拿到domainClass和EntityManager两个对象。
public class BaseRepositoryImpl<T,ID extends Serializable> extends SimpleJpaRepository<T,ID> implements BaseRepository<T,ID> {
    private final EntityManager entityManager;
    //必需要实现父类的这个构造器
    public BaseRepositoryImpl(Class<T> domainClass, EntityManager em) {
        super(domainClass, em);
        this.entityManager = em;
    }
    @Override
    public Page findPageByQuery(BaseQuery baseQuery) {
        //第一步:拿到所有高级查询条件
        Specification spec = baseQuery.createSpecification();
        //第二步:拿到排序的值
        Sort sort = baseQuery.createSort();
        //第三步:根据条件查询分页数据并且返回
        Pageable pageable = new PageRequest(baseQuery.getJpaPage(), baseQuery.getPageSize(),sort);
        Page<T> page = super.findAll(spec, pageable);
        return page;
    }
    @Override
    public List<T> findByQuery(BaseQuery baseQuery) {
        //第一步:拿到所有高级查询条件
        Specification spec = baseQuery.createSpecification();
        //第二步:拿到排序的值
        Sort sort = baseQuery.createSort();
        //第三步:拿到数据返回
        return findAll(spec, sort);
    }
    @Override
    public List findByJpql(String jpql, Object... values) {
        //第一步:创建Query对象
        Query query = entityManager.createQuery(jpql);
        //第二步:把值设置到Query对象中去
        if (values!=null) {
            for (int i = 0; i < values.length; i++) {
                query.setParameter(i + 1, values[i]);
            }
        }
        //第三步:返回数据
        return query.getResultList();
    }
}
- 创建自定义创建自定义RepositoryFactoryBean
接下来我们来创建一个自定义的RepositoryFactoryBean来代替默认的RepositoryFactoryBean。
RepositoryFactoryBean负责返回一个RepositoryFactory,Spring Data Jpa 将使用RepositoryFactory来创建Repository具体实现,这里我们用BaseRepositoryImpl代替SimpleJpaRepository作为Repository接口的实现。这样我们就能够达到为所有Repository添加自定义方法的目的。
我们需要覆写创建RepositoryFactory的方法:createRepositoryFactory
public class BaseRepositoryFactoryBean<T extends Repository<S, ID>, S, ID extends Serializable> extends JpaRepositoryFactoryBean<T,S,ID> {
    @Override
    protected RepositoryFactorySupport createRepositoryFactory(EntityManager entityManager) {
          return new MyRepositoryFactory<T,ID>(entityManager); //注:这里创建是我们的自定义类
    }
    //继承JpaRepositoryFactory后,把返回的对象修改成我们自己的实现
    private static  class MyRepositoryFactory<T,ID extends Serializable>   extends JpaRepositoryFactory{
        private final EntityManager entityManager;
        /**
         * Creates a new {@link JpaRepositoryFactory}.
         *
         * @param entityManager must not be {@literal null}
         */
        public MyRepositoryFactory(EntityManager entityManager) {
            super(entityManager);
            this.entityManager = entityManager;
        }
	   //这里返回最后的功能对象
        @Override
        protected Object getTargetRepository(RepositoryInformation information) {
            return new BaseRepositoryImpl<T,ID>((Class<T>)information.getDomainType(),entityManager);
        }
	   //确定功能对象的类型
        @Override
        protected Class<?> getRepositoryBaseClass(RepositoryMetadata metadata) {
            return BaseRepositoryImpl.class;
        }
    }
}
- applicationContext.xml 中修改配置
<!--用SpringDataJpa的方案去扫描它
        只要发现接口继承了JpaRepository接口,就自动完成CRUD以及分页等功能
    -->
    <jpa:repositories base-package="cn.cyj.repository"
                      entity-manager-factory-ref="entityManagerFactory"
                      transaction-manager-ref="transactionManager"
                      factory-class="cn.cyj.repository.BaseRepositoryFactoryBean"
    />
在完成修改的时候,发现在修改完成后,密码不见了,于是我们做了以下修改:
var itsource={
    //保存数据
    save:function () {
        var url  = "/employee/save";
        var id = $("#employeeId").val();
        if(id){
            url = "/employee/update?cmd=update";
        }
        employeeForm.form('submit', {
            url:url,
            onSubmit: function(){
                //做验证
                return $("#employeeForm").form("validate");
            },
            success:function(data){
                $('#employeeGrid').datagrid('reload');
                employeeDialog.dialog('close');
            }
        })
    }
}
/**
 * 特性:在执行相应方法之前都会先执行这个方法
 */
@ModelAttribute("editEmployee")
public Employee beforeEdit(Long id, String cmd){
    //有id的时候-> 修改功能
    if(id!=null && "update".equals(cmd)) {
        Employee employee = employeeService.findOne(id);
        return employee;
    }
    return null;
}
@RequestMapping("/save")
@ResponseBody
public Map<String,Object> save(Employee employee){
    return saveOrUpdate(employee);
}
@RequestMapping("/update")
@ResponseBody
public Map<String,Object> update(@ModelAttribute("editEmployee")Employee employee){
    return saveOrUpdate(employee);

}
部门修改的n-to-n
@ModelAttribute("editEmployee")
public Employee beforeEdit(Long id, String cmd){
    //有id的时候-> 修改功能
    if(id!=null && "update".equals(cmd)) {
        Employee employee = employeeService.findOne(id);
        //把这个要修改的关联对象设置为null,可以解决n-to-n的问题
        employee.setDepartment(null);
        return employee;
    }
    return null;
}
因为表单多,为避免过多的重复代码,我们基本功能CRUD,通过代码生成器生成–>EasyCode
目前市面上主流模板技术 velocity 和 freemarker
二.权限模块
权限
Apache Shiro是一个强大且易用的Java安全框架,有身份验证、授权、密码学和会话管理。使用Shiro的易于理解的API,您可以快速、轻松地获得任何应用程序,从最小的移动应用程序到最大的网络和企业应用程序。
Spring security 重量级安全框架
Apache Shiro轻量级安全框架
导入Jar
<!-- shiro的支持包 -->
 <dependency>
    <groupId>org.apache.shiro</groupId>
    <artifactId>shiro-all</artifactId>
    <version>1.4.0</version>
    <type>pom</type>
</dependency>
  <!-- shiro与Spring的集成包 -->
  <dependency>
    <groupId>org.apache.shiro</groupId>
    <artifactId>shiro-spring</artifactId>
    <version>1.4.0</version>
  </dependency>
自定义Realm一般直接继承AuthorizingRealm接口即可(里面包含身份认证与授权两个方法)
/**
 * 自定义一个Realm
 */
public class MyRealm extends AuthorizingRealm {
    //获取到这个Realm的名称(随便取)
    @Override
    public String getName() {
        return "MyRealm";
    }
    //进行授权判断(权限)
    @Override
    protected AuthorizationInfo doGetAuthorizationInfo(PrincipalCollection principalCollection) {
        return null;
    }
    //进行身份认证(登录)
    @Override
    protected AuthenticationInfo doGetAuthenticationInfo(AuthenticationToken authenticationToken) throws AuthenticationException {
           return null;
    }
}
在web.xml中配置
<!-- Spring与shiro集成:需要定义一个shiro过滤器(这是一个代理过滤器,它会到spring的配置中找一个名称相同的真实过滤器) -->
<filter>
  <filter-name>shiroFilter</filter-name>
  <filter-class>org.springframework.web.filter.DelegatingFilterProxy</filter-class>
  <init-param>
    <param-name>targetFilterLifecycle</param-name>
    <param-value>true</param-value>
  </init-param>
</filter>
<filter-mapping>
  <filter-name>shiroFilter</filter-name>
  <url-pattern>/*</url-pattern>
</filter-mapping>
Spring+Shiro配置
  <!-- securityManager:Spring创建核心对象 -->
    <bean id="securityManager" class="org.apache.shiro.web.mgt.DefaultWebSecurityManager">
    </bean>
    <!-- 建议大家把它留着,它可以支持我们做注解权限判断 -->
    <bean id="lifecycleBeanPostProcessor" class="org.apache.shiro.spring.LifecycleBeanPostProcessor"/>
    <bean class="org.springframework.aop.framework.autoproxy.DefaultAdvisorAutoProxyCreator"
          depends-on="lifecycleBeanPostProcessor"/>
    <bean class="org.apache.shiro.spring.security.interceptor.AuthorizationAttributeSourceAdvisor">
        <property name="securityManager" ref="securityManager"/>
    </bean>
    <bean id="shiroFilter" class="org.apache.shiro.spring.web.ShiroFilterFactoryBean">
        <property name="securityManager" ref="securityManager"/>
        <!--如果你没有登录,就会进入这个页面-->
        <property name="loginUrl" value="/login"/>
        <!--如果登录成功,就会进入这个页面-->
        <property name="successUrl" value="/s/main.jsp"/>
        <!--如果没有权限,就会进入这个页面-->
        <property name="unauthorizedUrl" value="/s/unauthorized.jsp"/>
        <property name="filterChainDefinitions">
            <value>
                /s/login.jsp = anon
                /** = authc
            </value>
        </property>
     </bean>
加密认证
  <bean id="aiSellRealm" class="cn.cyj.shiro.AiSellRealm">
        <property name="credentialsMatcher">
            <bean class="org.apache.shiro.authc.credential.HashedCredentialsMatcher">
                <property name="hashAlgorithmName" value="MD5"/>
                <property name="hashIterations" value="10" />
            </bean>
        </property>
    </bean>
菜单
用户拥有对应的权限就拥有对应的菜单(二级菜单),如果此菜单有父菜单(一级菜单)也同时拥有
@Override
public List<Menu> findByLoginUser(Long userId) {
    //准备父菜单容器
    List<Menu> parentMenus = new ArrayList<>();
    //从数据库中拿到子菜单
    List<Menu> childrenMenus = menuRepository.findByLoginUser(userId);
    //遍历子菜单(如果有父菜单放进入,没有单独创建)
    for (Menu childrenMenu : childrenMenus) {
        //拿到子菜单对应的父菜单
        Menu parent = childrenMenu.getParent();
        //判断如果父菜单中是否有这个菜单
        if(parentMenus.contains(parent)){
            //有的话,咱们就把子菜单放到父菜单中去
            int i = parentMenus.indexOf(parent);
            Menu parentMenu = parentMenus.get(i);
            parentMenu.getChildren().add(childrenMenu);
        }else{
            //如果没有,再单独把父菜单放进去
            parentMenus.add(parent);
            parent.getChildren().add(childrenMenu);
        }
    }
    return parentMenus;
}
业务模块
导入导出
jxl:只能对Excel进行操作,属于比较老的框架。
POI:是apache的项目,可对ms的word,Excel,PPT进行操作,包括office2003和2007。
在这我们使用EasyPOI。
采购订单
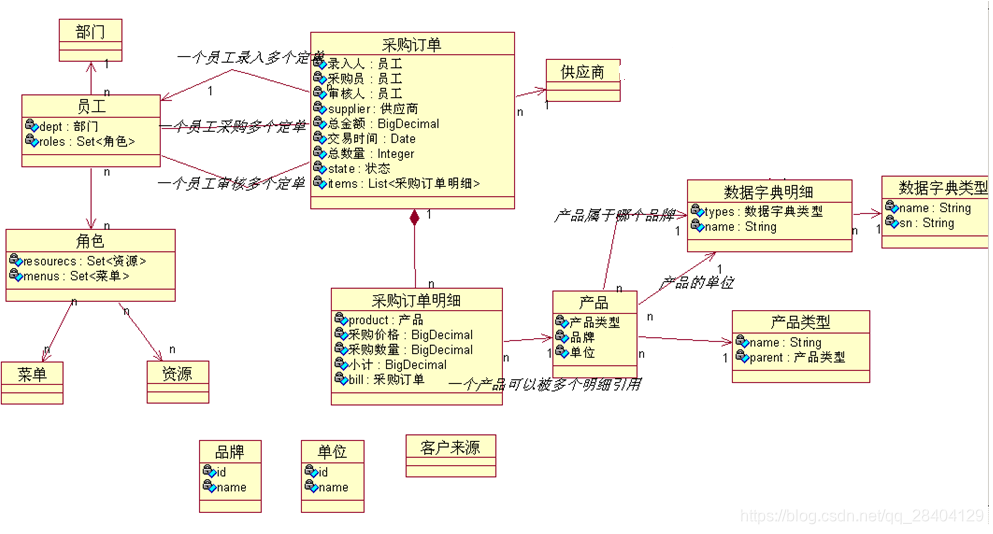
组合关系映射配置要求
- 整体和部分,整体和部分不能分割,本质还是双向一对多
- 一方(主表):
@OneToMany(cascade = CascadeType.ALL, mappedBy = "bill", fetch = FetchType.LAZY, orphanRemoval = true)
private List<purchasebillitem> items = new ArrayList<purchasebillitem>();
cascade = CascadeType.ALL级联操作最全
mappedBy = "bill"一方放弃管理多方,多方的外键字段bill_id,一方不管
orphanRemoval = true如果在一方解除了和多方的关系,一方是可以删除掉多方
- 多方(从表)billitem:bill_id配置为非空
@ManyToOne(fetch = FetchType.LAZY, optional = false)
@JoinColumn(name = "bill_id")
private Purchasebill bill;// 组合关系,非空
- 页面管理:一方和多方同时管理
报表
在domain层下面新建vo层:
public class PurchasebillitemVO {
    //编号
    private Long id;
    //供应商名称
    private String supplierName;
    //采购员名称
    private String buyerNmae;
    //产品名称
    private String productNmae;
    //产品图片
    private String productImages;
    //产品分类
    private String productType;
    //交易时间
    private Date vdate;
    //采购数量
    private BigDecimal num;
    //价格
    private BigDecimal price;
    //小计
    private BigDecimal amount;
    //状态
    private Integer status = 0;
    ...
}
解决分组的问题,根据前台的传参使用不同的分组方案
 public PurchasebillitemVO(Purchasebillitem item, PurchasebillitemQuery query) {
        this.id = item.getId();
        this.supplierName = item.getBill().getSupplier().getName();
        this.buyerNmae = item.getBill().getBuyer().getUsername();
        this.productNmae = item.getProduct().getName();
        this.productImages = item.getProduct().getPic();
        this.productType = item.getProduct().getProducttype().getName();
        this.vdate = item.getBill().getVdate();
        this.num = item.getNum();
        this.price = item.getPrice();
        this.amount = item.getAmount();
        this.status = item.getBill().getStatus();
        switch (query.getGroupField()){
            case 1:
                this.groupField = this.supplierName;
                break;
            case 2:
                this.groupField = this.productNmae;
                break;
            case 3:
                this.groupField = this.buyerNmae;
                break;
            case 4:
                Calendar calendar = Calendar.getInstance();
                calendar.setTime(vdate);
                this.groupField = (calendar.get(Calendar.MONTH)+1) + "月";
                break;
            default:
                this.groupField = this.supplierName;
                break;
        }
    }
图形报表
效果更佳直接
使用HighChart 完成


 1433
1433

 被折叠的 条评论
为什么被折叠?
被折叠的 条评论
为什么被折叠?
 到【灌水乐园】发言


