


 本文探讨Builder设计模式,将其定义为将复杂对象构建与表示分离。常见应用场景包括执行顺序影响结果、不同部件组合产生不同效果。以电脑建造为例,展示了简单实现过程,并通过分析Android AlertDialog.Builder源码深入理解Builder模式的运用,揭示了如何通过参数设置和内部组装构建Dialog对象。
在日常的开发过程中,builder设计模式我们会经常见到,同时它也是设计模式比较重要的设计模式之一,那么今天我们就一起来看看,体会一下builder的设计模式的魅力吧
定义:
将一个复杂对象的构建与它的表示进行分离,使得同样的构建过程可以创建不同的表示
场景:
(1)相同的方法,不同的执行顺序,产生不同的事件结果
(2)多个部件或零件,都可以装配到一个对象中,但是产生的运行结果又不相同时
(3)产品类非常复杂,或者产品类中的调用顺序不同产生了不同的作用
注:其实记住一点就可以,不同的组合方式产生不同的结果对象就好
简单实现:
我们以建造电脑为例:
/**
 * 在这里定义电脑的组成零部件
 */
public abstract class Computer {

    String mBoard;
    String mDisplay;
    String mOS;

    public void setBoard(String board) {
        this.mBoard = board;
    }

    public void setDisplay(String display) {
        this.mDisplay = display;
    }

    public abstract void setOS();

    @Override
    public String toString() {
        return "Computer{" +
                "mBoard='" + mBoard + '\'' +
                ", mDisplay='" + mDisplay + '\'' +
                ", mOS='" + mOS + '\'' +
                '}';
    }
}
在这里我们定义产品组成的零件,包括品牌,显示器,操作系统
/**
 * Created by Administrator on 2018/8/8.
 * Mac电脑
 */

public class MacBookComputer extends Computer {

    @Override
    public void setOS() {
        mOS = "Mac OS 11.0";
    }
}
具体的某一品牌的电脑,记住在这里我们并没有对电脑进行组装,而仅仅只是设置了电脑的一些参数
public abstract class Builder {

    public abstract Builder setBoard(String board);

    public abstract Builder setDisplay(String display);

    public abstract Builder setOS();

    public abstract Computer create();
}
定义电脑组装的过程,任何电脑的组装都需要这几步
public class MacBookBuilder extends Builder {

    private Computer computer = new MacBookComputer();

    @Override
    public Builder setBoard(String board) {
        computer.setBoard(board);
        return this;
    }

    @Override
    public Builder setDisplay(String display) {
        computer.setDisplay(display);
        return this;
    }

    @Override
    public Builder setOS() {
        computer.setOS();
        return this;
    }

    @Override
    public Computer create() {
        return computer;
    }
}
具体的组装过程
最后显示的结果为
public static void main(String[] args) {
        Builder builder = new MacBookBuilder();
        Computer computer = builder.setBoard("Mac").setDisplay("14寸").setOS().create();
        System.out.println(computer.toString());
    }

结果显示为:Computer{mBoard='Mac', mDisplay='14寸', mOS='Mac OS 11.0'}
这个例子虽然简单,但是却很经典,它完美的阐释了builder设计模式的精髓,即:构建和表示进行分离。那么下面我们一起来看看android中源码的经典实例
源码分析:
在Android源码中,最常用到的Builder模式的就是AlertDialog.Builder,使用该Builder来构建复杂的AlertDialog对象,通常情况下我们一般这么写:
 public void showDialog() {
        AlertDialog.Builder builder = new AlertDialog.Builder(this);
        builder.setIcon(R.mipmap.a);
        builder.setTitle("title");
        builder.setMessage("message");
        builder.create().show();
    }
感觉有木有和上面的例子很像,哈哈,不要急,我们就一起来看看吧
首先我们来看下AlertDialog.Builder
 public static class Builder {

	private final AlertController.AlertParams P;

        // 构造函数(无样式)
        public Builder(Context context) {
            this(context, resolveDialogTheme(context, ResourceId.ID_NULL));
        }

        // 构造函数(有样式)
        public Builder(Context context, int themeResId) {
            P = new AlertController.AlertParams(new ContextThemeWrapper(
                    context, resolveDialogTheme(context, themeResId)));
        }

        // 获取Context
        public Context getContext() {
            return P.mContext;
        }

        // 设置Title
        public Builder setTitle(@StringRes int titleId) {
            P.mTitle = P.mContext.getText(titleId);
            return this;
        }

        // 设置Title
        public Builder setTitle(CharSequence title) {
            P.mTitle = title;
            return this;
        }

        // 设置CustomTitle
        public Builder setCustomTitle(View customTitleView) {
            P.mCustomTitleView = customTitleView;
            return this;
        }

        // 设置Message
        public Builder setMessage(@StringRes int messageId) {
            P.mMessage = P.mContext.getText(messageId);
            return this;
        }

        // 设置Message
        public Builder setMessage(CharSequence message) {
            P.mMessage = message;
            return this;
        }

        // 设置Icon
        public Builder setIcon(@DrawableRes int iconId) {
            P.mIconId = iconId;
            return this;
        }

        // 设置Icon
        public Builder setIcon(Drawable icon) {
            P.mIcon = icon;
            return this;
        }

        // 设置Attribute
        public Builder setIconAttribute(@AttrRes int attrId) {
            TypedValue out = new TypedValue();
            P.mContext.getTheme().resolveAttribute(attrId, out, true);
            P.mIconId = out.resourceId;
            return this;
        }

        // 设置PositiveButton
        public Builder setPositiveButton(@StringRes int textId, final OnClickListener listener) {
            P.mPositiveButtonText = P.mContext.getText(textId);
            P.mPositiveButtonListener = listener;
            return this;
        }

        // 设置PositiveButton
        public Builder setPositiveButton(CharSequence text, final OnClickListener listener) {
            P.mPositiveButtonText = text;
            P.mPositiveButtonListener = listener;
            return this;
        }

        // 设置NegativeButton
        public Builder setNegativeButton(@StringRes int textId, final OnClickListener listener) {
            P.mNegativeButtonText = P.mContext.getText(textId);
            P.mNegativeButtonListener = listener;
            return this;
        }

        // 设置NegativeButton
        public Builder setNegativeButton(CharSequence text, final OnClickListener listener) {
            P.mNegativeButtonText = text;
            P.mNegativeButtonListener = listener;
            return this;
        }

        // 省略代码

        // 创建AlertDialog实例
        public AlertDialog create() {
            // Context has already been wrapped with the appropriate theme.
            final AlertDialog dialog = new AlertDialog(P.mContext, 0, false);
            P.apply(dialog.mAlert);
            dialog.setCancelable(P.mCancelable);
            if (P.mCancelable) {
                dialog.setCanceledOnTouchOutside(true);
            }
            dialog.setOnCancelListener(P.mOnCancelListener);
            dialog.setOnDismissListener(P.mOnDismissListener);
            if (P.mOnKeyListener != null) {
                dialog.setOnKeyListener(P.mOnKeyListener);
            }
            return dialog;
        }

        // 显示Dialog
        public AlertDialog show() {
            final AlertDialog dialog = create();
            dialog.show();
            return dialog;
        }
}
可以发现,我们所有的设置都是通过p.xxx()方法来设置的,然后调用create()创建Dialog实例,调用show()方法显示Dialog,那么p又是什么呢?
首先在AlertController类里面有一个内部类AlertParams
public static class AlertParams {
        public final Context mContext;
        public final LayoutInflater mInflater;

        public int mIconId = 0;
        public Drawable mIcon;
        public int mIconAttrId = 0;
        public CharSequence mTitle;
        public View mCustomTitleView;
        public CharSequence mMessage;
        public CharSequence mPositiveButtonText;
        public DialogInterface.OnClickListener mPositiveButtonListener;
        public CharSequence mNegativeButtonText;
        public DialogInterface.OnClickListener mNegativeButtonListener;
        public CharSequence mNeutralButtonText;
        public DialogInterface.OnClickListener mNeutralButtonListener;
        public boolean mCancelable;
        public DialogInterface.OnCancelListener mOnCancelListener;
        public DialogInterface.OnDismissListener mOnDismissListener;
        public DialogInterface.OnKeyListener mOnKeyListener;
        public CharSequence[] mItems;
        public ListAdapter mAdapter;
        public DialogInterface.OnClickListener mOnClickListener;
        public int mViewLayoutResId;
        public View mView;
        public int mViewSpacingLeft;
        public int mViewSpacingTop;
        public int mViewSpacingRight;
        public int mViewSpacingBottom;
        public boolean mViewSpacingSpecified = false;
        public boolean[] mCheckedItems;
        public boolean mIsMultiChoice;
        public boolean mIsSingleChoice;
        public int mCheckedItem = -1;
        public DialogInterface.OnMultiChoiceClickListener mOnCheckboxClickListener;
        public Cursor mCursor;
        public String mLabelColumn;
        public String mIsCheckedColumn;
        public boolean mForceInverseBackground;
        public AdapterView.OnItemSelectedListener mOnItemSelectedListener;
        public OnPrepareListViewListener mOnPrepareListViewListener;
        public boolean mRecycleOnMeasure = true;

        /**
         * Interface definition for a callback to be invoked before the ListView
         * will be bound to an adapter.
         */
        public interface OnPrepareListViewListener {

            /**
             * Called before the ListView is bound to an adapter.
             * @param listView The ListView that will be shown in the dialog.
             */
            void onPrepareListView(ListView listView);
        }

        public AlertParams(Context context) {
            mContext = context;
            mCancelable = true;
            mInflater = (LayoutInflater) context.getSystemService(Context.LAYOUT_INFLATER_SERVICE);
        }

        public void apply(AlertController dialog) {
            if (mCustomTitleView != null) {
                dialog.setCustomTitle(mCustomTitleView);
            } else {
                if (mTitle != null) {
                    dialog.setTitle(mTitle);
                }
                if (mIcon != null) {
                    dialog.setIcon(mIcon);
                }
                if (mIconId != 0) {
                    dialog.setIcon(mIconId);
                }
                if (mIconAttrId != 0) {
                    dialog.setIcon(dialog.getIconAttributeResId(mIconAttrId));
                }
            }
            if (mMessage != null) {
                dialog.setMessage(mMessage);
            }
            if (mPositiveButtonText != null) {
                dialog.setButton(DialogInterface.BUTTON_POSITIVE, mPositiveButtonText,
                        mPositiveButtonListener, null);
            }
            if (mNegativeButtonText != null) {
                dialog.setButton(DialogInterface.BUTTON_NEGATIVE, mNegativeButtonText,
                        mNegativeButtonListener, null);
            }
            if (mNeutralButtonText != null) {
                dialog.setButton(DialogInterface.BUTTON_NEUTRAL, mNeutralButtonText,
                        mNeutralButtonListener, null);
            }
            // For a list, the client can either supply an array of items or an
            // adapter or a cursor
            if ((mItems != null) || (mCursor != null) || (mAdapter != null)) {
                createListView(dialog);
            }
            if (mView != null) {
                if (mViewSpacingSpecified) {
                    dialog.setView(mView, mViewSpacingLeft, mViewSpacingTop, mViewSpacingRight,
                            mViewSpacingBottom);
                } else {
                    dialog.setView(mView);
                }
            } else if (mViewLayoutResId != 0) {
                dialog.setView(mViewLayoutResId);
            }

            /*
            dialog.setCancelable(mCancelable);
            dialog.setOnCancelListener(mOnCancelListener);
            if (mOnKeyListener != null) {
                dialog.setOnKeyListener(mOnKeyListener);
            }
            */
        }
        // 省略代码
}
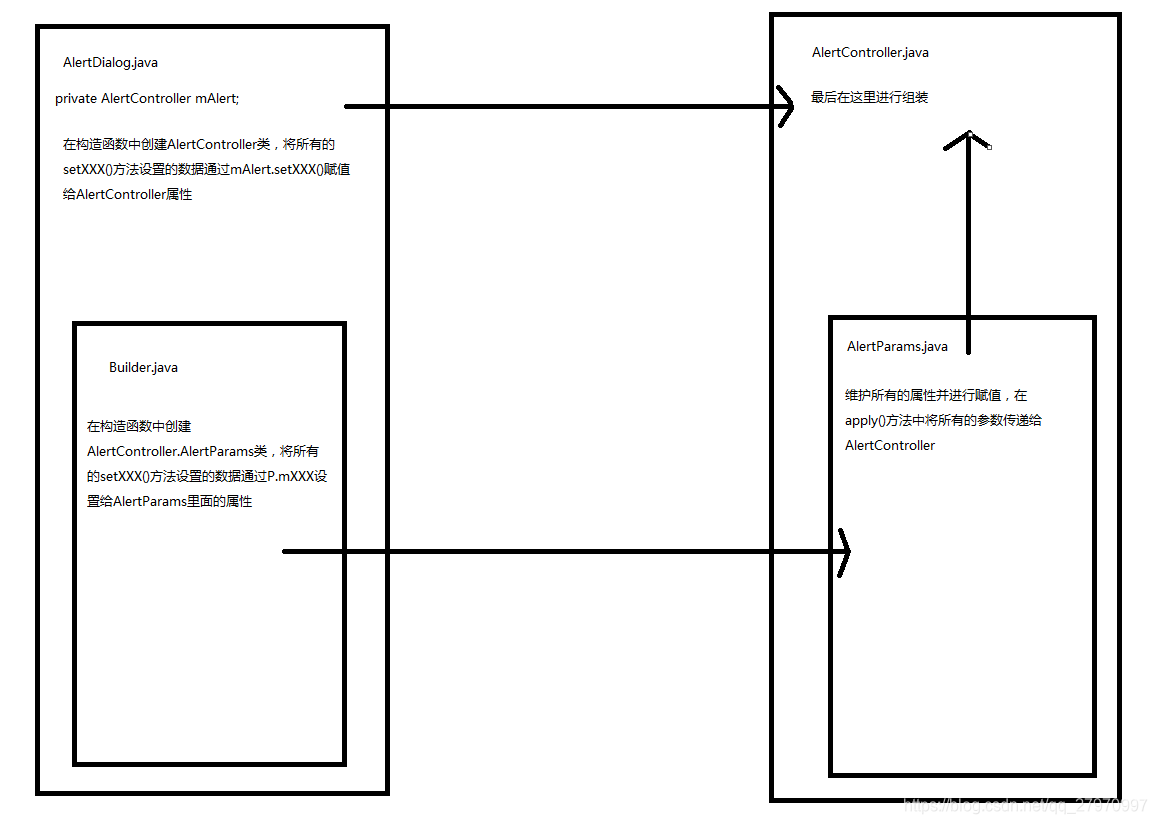
我们发现在AlertController里面的AlertParams类里面声明了所有的设置参数,包括title,message,view等等。这样,当我们build.setTitle()的时候其实就是给AlertParams里面的mTitle赋值,注意看AlertParams里面的apply()方法,它会把自己的属性对应的值赋值给AlertController这个类,再回过头来看AlertDialog,我们发现我们设置的参数最后也是赋值给了AlertController,在这里画一张图看下
关键地方来了,dialog到底是怎么显示出来的呢?
首先看下dialog.show()是如何执行的
public void show() {
        // 首先判断Dialog是否显示
        // 如果显示的话,则返回
        if (mShowing) {
            if (mDecor != null) {
                if (mWindow.hasFeature(Window.FEATURE_ACTION_BAR)) {
                    mWindow.invalidatePanelMenu(Window.FEATURE_ACTION_BAR);
                }
                mDecor.setVisibility(View.VISIBLE);
            }
            return;
        }

        mCanceled = false;
        // 对Dialog进行创建
        if (!mCreated) {
            dispatchOnCreate(null);
        } else {
            // Fill the DecorView in on any configuration changes that
            // may have occured while it was removed from the WindowManager.
            final Configuration config = mContext.getResources().getConfiguration();
            mWindow.getDecorView().dispatchConfigurationChanged(config);
        }

        onStart();
	// 获取DecorView
        mDecor = mWindow.getDecorView();

        if (mActionBar == null && mWindow.hasFeature(Window.FEATURE_ACTION_BAR)) {
            final ApplicationInfo info = mContext.getApplicationInfo();
            mWindow.setDefaultIcon(info.icon);
            mWindow.setDefaultLogo(info.logo);
            mActionBar = new WindowDecorActionBar(this);
        }
        // 获取WindowManager
        WindowManager.LayoutParams l = mWindow.getAttributes();
        if ((l.softInputMode
                & WindowManager.LayoutParams.SOFT_INPUT_IS_FORWARD_NAVIGATION) == 0) {
            WindowManager.LayoutParams nl = new WindowManager.LayoutParams();
            nl.copyFrom(l);
            nl.softInputMode |=
                    WindowManager.LayoutParams.SOFT_INPUT_IS_FORWARD_NAVIGATION;
            l = nl;
        }
        // 将DecorView添加到Window中
        mWindowManager.addView(mDecor, l);
        // 将Dialog进行显示
	mShowing = true;
        sendShowMessage();
}
显示的流程基本上和Activity的显示流程差不多,现在我们重点来关注一下 dispatchOnCreate(null);这个方法里面如何执行的
void dispatchOnCreate(Bundle savedInstanceState) {
        if (!mCreated) {
            onCreate(savedInstanceState);
            mCreated = true;
        }
    }
继续执行onCreate()方法
 protected void onCreate(Bundle savedInstanceState) {
    }
发现是一个空的实现,那么我们找它的子类,AlertDialog
@Override
protected void onCreate(Bundle savedInstanceState) {
        super.onCreate(savedInstanceState);
        mAlert.installContent();
}
执行到AlertController类里面的installContent()方法
public void installContent() {
        final int contentView = selectContentView();
        mDialog.setContentView(contentView);
        setupView();
}
获取到之前设置的View,然后设置给Dialog,接着执行setupView()方法,该方法具体指定了Dialog的界面布局。到这里Dialog的基本流程就走完了,最后我们发现AlertController才是最后组装Dialog的关键类


 653
653

 被折叠的 条评论
为什么被折叠?
被折叠的 条评论
为什么被折叠?
 到【灌水乐园】发言


