


 本文介绍如何在iOS中自建摄像头控件,通过AVFoundation框架实现更复杂的功能需求,如定制化的OverlayView,并解决UIImagePickerController可能存在的内存泄漏问题。
关于iOS调用摄像机来获取照片,通常我们都会调用UIImagePickerController来调用系统提供的相机来拍照,这个控件非常好用。但是有时UIImagePickerController控件无法满足我们的需求,例如我们需要更加复杂的OverlayerView,这时候我们就要自己构造一个摄像机控件了。
并且个人发现使用系统的UIImagePickerController会发生内存泄漏,但是依然会走dealloc方法,所以无奈之下自己创建一个摄像头。
首先先介绍下自定义摄像头需要用到的几个系统类
//AVCaptureSession对象来执行输入设备和输出设备之间的数据传递
@property (strong, nonatomic) AVCaptureSession *session;

//照片输出流对象
@property (strong, nonatomic) AVCaptureStillImageOutput *captureOutput;

// 代表了输入设备,例如摄像头与麦克风。
@property (strong, nonatomic) AVCaptureDevice *device;

//AVCaptureDeviceInput对象是输入流(摄像头或者麦克风),一个设备可能可以同时提供视频和音频的捕捉。我们可以分别用AVCaptureDeviceInput来代表视频输入和音频输入
@property (strong,nonatomic)AVCaptureDeviceInput * input;

//预览图层,来显示照相机拍摄到的画面
@property (strong,nonatomic)AVCaptureVideoPreviewLayer * preview;
看图
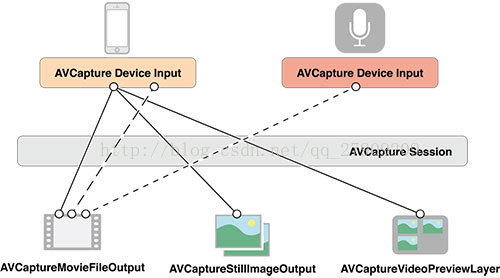
一个显示用的AVCaptureVideoPreviewLayer,一个设备AVCaptureDevice,设备的输入流AVCaptureDeviceInput,设备的输出流AVCaptureStillImageOutput(这个仅限于输出成图片)需要用到中间层AVCaptureSession把图像给AVCaptureVideoPreviewLayer显示在view上。基本大致就是这个原理。
上代码:
- (void) initialize
{
    //1.创建会话层
    self.device = [AVCaptureDevice defaultDeviceWithMediaType:AVMediaTypeVideo];

    // Input
    self.input = [AVCaptureDeviceInput deviceInputWithDevice:self.device error:nil];

    // Output
    self.captureOutput = [[AVCaptureStillImageOutput alloc] init];
    NSDictionary *outputSettings = [[NSDictionary alloc] initWithObjectsAndKeys:AVVideoCodecJPEG,AVVideoCodecKey,nil];
    [self.captureOutput setOutputSettings:outputSettings];

    // Session
    self.session = [[AVCaptureSession alloc]init];
    //AVCaptureSessionPresetHigh:实现高质量的视频和音频输出
    [self.session setSessionPreset:AVCaptureSessionPresetHigh];
    // addInput:可称为虽然会话正在运行
    if ([self.session canAddInput:self.input])
    {
        [self.session addInput:self.input];
    }

    if ([self.session canAddOutput:_captureOutput])
    {
        [self.session addOutput:_captureOutput];
    }

    self.preview =[AVCaptureVideoPreviewLayer layerWithSession:self.session];
    self.preview.videoGravity = AVLayerVideoGravityResizeAspectFill;
    self.preview.frame = self.view.bounds;

    [self.view.layer insertSublayer:self.preview atIndex:0];
}
重要的是做完需要启动
    if (self.session) {
        [self.session startRunning];
    }
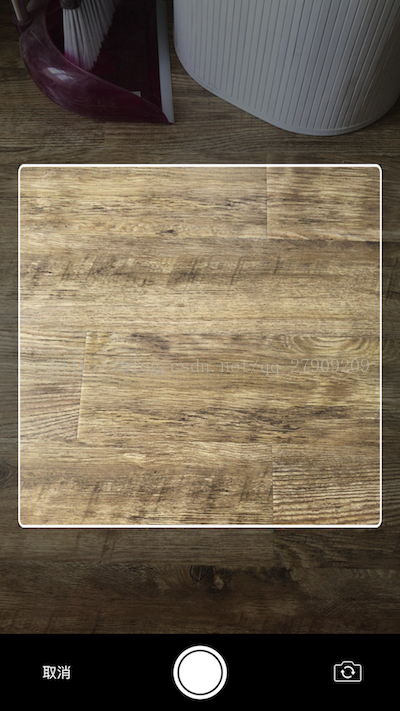
当然如果你想在摄像机页面随意设置什么样的图形,自己再创建一个自定义view,自己布局即可。
拍照代码
-(void)Captureimage
{
    //get connection
    AVCaptureConnection *videoConnection = nil;
    for (AVCaptureConnection *connection in self.captureOutput.connections) {
        for (AVCaptureInputPort *port in [connection inputPorts]) {
            if ([[port mediaType] isEqual:AVMediaTypeVideo] ) {
                videoConnection = connection;
                break;
            }
        }
        if (videoConnection) { break; }
    }
    //get UIImage
    __weak typeof(self) weakSelf = self;
    [self.captureOutput captureStillImageAsynchronouslyFromConnection:videoConnection completionHandler:
     ^(CMSampleBufferRef imageSampleBuffer, NSError *error) {
         CFDictionaryRef exifAttachments =
         CMGetAttachment(imageSampleBuffer, kCGImagePropertyExifDictionary, NULL);
         if (exifAttachments) {
             // Do something with the attachments.
         }
         // Continue as appropriate.
         NSData *imageData = [AVCaptureStillImageOutput jpegStillImageNSDataRepresentation:imageSampleBuffer];
         UIImage *t_image = [UIImage imageWithData:imageData];
         t_image = [t_image fixOrientation];
//         CGRect cutterFrame = [self.codeIdentifierCarView imageViewFrame];
         CGRect cutterFrame = [_codeIdentifierCar imageViewFrame];
         UIImage *cutterImage = [t_image intoCutterVCWithInfoWithFrame:cutterFrame];
         cutterImage = cutterImage;

         weakSelf.cutterView.hidden = NO;
         [weakSelf.cutterView setBackImagViewWithImage:cutterImage];
         [weakSelf.view addSubview:self.cutterView];
     }];
}
需要反面拍照的:
// 反面拍照
- (void)changeCameraDevice
{
    // 翻转
    [UIView beginAnimations:@"animation" context:nil];
    [UIView setAnimationDuration:.5f];
    [UIView setAnimationCurve:UIViewAnimationCurveEaseInOut];
    [UIView setAnimationTransition:UIViewAnimationTransitionFlipFromRight forView:self.view cache:YES];
    [UIView commitAnimations];

    NSArray *inputs = self.session.inputs;
    for ( AVCaptureDeviceInput *input in inputs ) {
        AVCaptureDevice *device = input.device;
        if ( [device hasMediaType:AVMediaTypeVideo] ) {
            AVCaptureDevicePosition position = device.position;
            AVCaptureDevice *newCamera = nil;
            AVCaptureDeviceInput *newInput = nil;

            if (position == AVCaptureDevicePositionFront)
                newCamera = [self cameraWithPosition:AVCaptureDevicePositionBack];
            else
                newCamera = [self cameraWithPosition:AVCaptureDevicePositionFront];
            newInput = [AVCaptureDeviceInput deviceInputWithDevice:newCamera error:nil];

            [self.session beginConfiguration];
            [self.session removeInput:input];
            [self.session addInput:newInput];

            // Changes take effect once the outermost commitConfiguration is invoked.
            [self.session commitConfiguration];
            break;
        }
    }
}


 1488
1488

 被折叠的 条评论
为什么被折叠?
被折叠的 条评论
为什么被折叠?
 到【灌水乐园】发言


