


目录
2.2.1 属性后台任务PropertyServiceThread
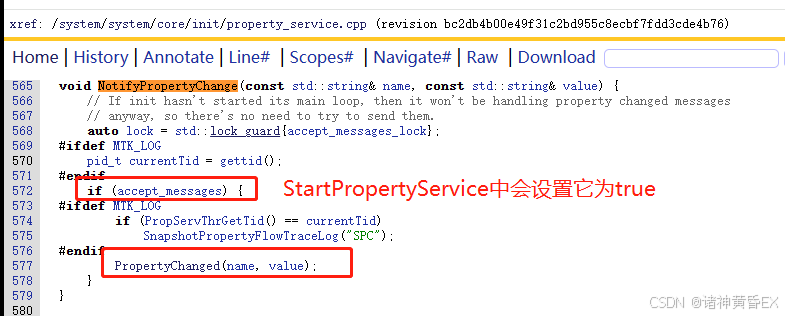
2.2.3 属性改变的监听NotifyPropertyChange
案例二:PRODUCT_PRODUCT_PROPERTIES :=和+=的区别
一、Init进程流程
1、第一启动阶段
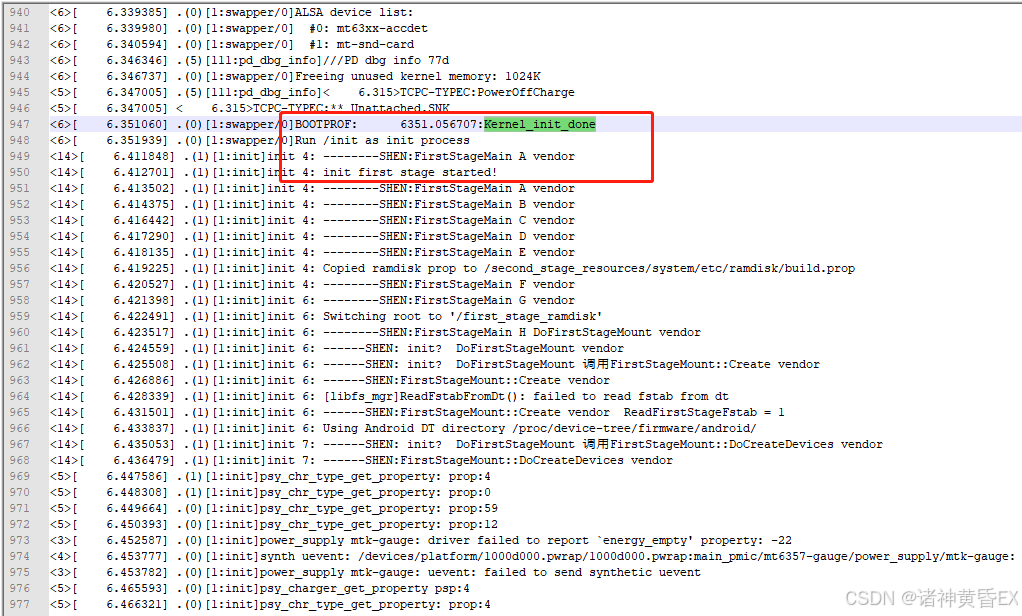
Android 14的设备开机日志如上,最重要的关键日志有如下几行:
<6>[ 6.351060] .(0)[1:swapper/0]BOOTPROF: 6351.056707:Kernel_init_done
<6>[ 6.351939] .(0)[1:swapper/0]Run /init as init process
<14>[ 6.411848] .(1)[1:init]init 4: --------SHEN:FirstStageMain A vendor
<14>[ 6.412701] .(1)[1:init]init 4: init first stage started!
来总结几点:init进程的第一阶段是kernel那边直接触发;init进程的第一阶段执行的代码居然是vendor分区的init代码,我这个项目的代码路径:/vendor/system/core/init/
1.1 kernel启动init
//vendor/kernel-4.19/init/main.c
static int __ref kernel_init(void *unused)
{
	int ret;
	kernel_init_freeable();
	/* need to finish all async __init code before freeing the memory */
	async_synchronize_full();
	ftrace_free_init_mem();
	jump_label_invalidate_initmem();
	free_initmem();
	mark_readonly();
	pti_finalize();
    //设置系统状态为运行状态
	system_state = SYSTEM_RUNNING;
	numa_default_policy();
	rcu_end_inkernel_boot();
    //BOOTPROF日志打印
	bootprof_log_boot("Kernel_init_done");
	if (ramdisk_execute_command) {
		ret = run_init_process(ramdisk_execute_command);
		if (!ret)
			return 0;
		pr_err("Failed to execute %s (error %d)\n",
		       ramdisk_execute_command, ret);
	}
	if (execute_command) {
		ret = run_init_process(execute_command);
		if (!ret)
			return 0;
		panic("Requested init %s failed (error %d).",
		      execute_command, ret);
	}
    //尝试运行vendor/bin/init里面的可执行文件,因此init进程第一阶段是vendor目录下面的代码
	if (!try_to_run_init_process("/sbin/init") ||
	    !try_to_run_init_process("/etc/init") ||
	    !try_to_run_init_process("/bin/init") ||
	    !try_to_run_init_process("/bin/sh"))
		return 0;
	panic("No working init found.  Try passing init= option to kernel. "
	      "See Linux Documentation/admin-guide/init.rst for guidance.");
}
如上代码kernel_init函数中其实执行exceute_command去启动第一个进程,这个进程其实就是init进程
1.2 vendor init
如上代码和日志,在A14之后init进程被拆分为两部分,即第一阶段的流程执行是在vendor/bin/init里面,从如下代码可以看到,第二阶段的流程执行是在system/bin/init,因此你会发现启动日志里面有两个init进程,相关的打印有两份。
//vendor/system/core/init/first_stage_init.cpp
//注意:这个是vendor分区的init
int FirstStageMain(int argc, char** argv) {
    //...省略...
    LOG(INFO) << "--------SHEN:FirstStageMain A vendor";
    LOG(INFO) << "init first stage started! system";
    LOG(INFO) << "--------SHEN:FirstStageMain A vendor";
    auto old_root_dir = std::unique_ptr<DIR, decltype(&closedir)>{opendir("/"), closedir};
    if (!old_root_dir) {
        PLOG(ERROR) << "Could not opendir(\"/\"), not freeing ramdisk";
    }
    struct stat old_root_info;
    if (stat("/", &old_root_info) != 0) {
        PLOG(ERROR) << "Could not stat(\"/\"), not freeing ramdisk";
        old_root_dir.reset();
    }
    LOG(INFO) << "--------SHEN:FirstStageMain B vendor";
    auto want_console = ALLOW_FIRST_STAGE_CONSOLE ? FirstStageConsole(cmdline, bootconfig) : 0;
    boot_clock::time_point module_start_time = boot_clock::now();
    int module_count = 0;
    if (!LoadKernelModules(IsRecoveryMode() && !ForceNormalBoot(cmdline, bootconfig), want_console,module_count)) {
        if (want_console != FirstStageConsoleParam::DISABLED) {
            LOG(ERROR) << "Failed to load kernel modules, starting console";
        } else {
            LOG(FATAL) << "Failed to load kernel modules";
        }
    }
    LOG(INFO) << "--------SHEN:FirstStageMain C vendor";
    if (module_count > 0) {
        auto module_elapse_time = std::chrono::duration_cast<std::chrono::milliseconds>( boot_clock::now() - module_start_time);
        setenv(kEnvInitModuleDurationMs, std::to_string(module_elapse_time.count()).c_str(), 1);
        LOG(INFO) << "Loaded " << module_count << " kernel modules took " << module_elapse_time.count() << " ms";
    }
    bool created_devices = false;
    LOG(INFO) << "--------SHEN:FirstStageMain D vendor";
    if (want_console == FirstStageConsoleParam::CONSOLE_ON_FAILURE) {
        if (!IsRecoveryMode()) {
	        LOG(INFO) << "--------SHEN:FirstStageMain D  DoCreateDevices vendor";
            created_devices = DoCreateDevices();
            if (!created_devices){
                LOG(ERROR) << "Failed to create device nodes early";
            }
        }
        StartConsole(cmdline);
    }
    LOG(INFO) << "--------SHEN:FirstStageMain E vendor";
    if (access(kBootImageRamdiskProp, F_OK) == 0) {
        std::string dest = GetRamdiskPropForSecondStage();
        std::string dir = android::base::Dirname(dest);
        std::error_code ec;
        if (!fs::create_directories(dir, ec) && !!ec) {
            LOG(FATAL) << "Can't mkdir " << dir << ": " << ec.message();
        }
        if (!fs::copy_file(kBootImageRamdiskProp, dest, ec)) {
            LOG(FATAL) << "Can't copy " << kBootImageRamdiskProp << " to " << dest << ": " << ec.message();
        }
        LOG(INFO) << "Copied ramdisk prop to " << dest;
    }
    LOG(INFO) << "--------SHEN:FirstStageMain F vendor";
    // If "/force_debuggable" is present, the second-stage init will use a userdebug
    // sepolicy and load adb_debug.prop to allow adb root, if the device is unlocked.
    if (access("/force_debuggable", F_OK) == 0) {
        std::error_code ec;  // to invoke the overloaded copy_file() that won't throw.
        if (!fs::copy_file("/adb_debug.prop", kDebugRamdiskProp, ec) ||
            !fs::copy_file("/userdebug_plat_sepolicy.cil", kDebugRamdiskSEPolicy, ec)) {
            LOG(ERROR) << "Failed to setup debug ramdisk";
        } else {
            // setenv for second-stage init to read above kDebugRamdisk* files.
            setenv("INIT_FORCE_DEBUGGABLE", "true", 1);
#ifdef MTK_LOG
            LOG(INFO) << "setenv (INIT_FORCE_DEBUGGABLE,true) for second-stage init to read above kDebugRamdisk* files";
#endif
        }
    }
	 LOG(INFO) << "--------SHEN:FirstStageMain G vendor";
    if (ForceNormalBoot(cmdline, bootconfig)) {
        mkdir("/first_stage_ramdisk", 0755);
        // SwitchRoot() must be called with a mount point as the target, so we bind mount the
        // target directory to itself here.
        if (mount("/first_stage_ramdisk", "/first_stage_ramdisk", nullptr, MS_BIND, nullptr) != 0) {
            LOG(FATAL) << "Could not bind mount /first_stage_ramdisk to itself";
        }
        SwitchRoot("/first_stage_ramdisk");
    }
    LOG(INFO) << "--------SHEN:FirstStageMain H DoFirstStageMount vendor";
    if (!DoFirstStageMount(!created_devices)) {
        LOG(INFO) << "--------SHEN:FirstStageMain H DoFirstStageMount   Failed to mount required partitions early ... vendor";
        LOG(FATAL) << "Failed to mount required partitions early ...";
    }
    struct stat new_root_info;
    if (stat("/", &new_root_info) != 0) {
        PLOG(ERROR) << "Could not stat(\"/\"), not freeing ramdisk";
        old_root_dir.reset();
    }
    if (old_root_dir && old_root_info.st_dev != new_root_info.st_dev) {
        FreeRamdisk(old_root_dir.get(), old_root_info.st_dev);
    }
    LOG(INFO) << "--------SHEN:FirstStageMain J vendor";
    SetInitAvbVersionInRecovery();
    setenv(kEnvFirstStageStartedAt, std::to_string(start_time.time_since_epoch().count()).c_str(), 1);
    //第一阶段启动完毕,过渡到第二阶段
    const char* path = "/system/bin/init";
    const char* args[] = {path, "selinux_setup", nullptr};
    auto fd = open("/dev/kmsg", O_WRONLY | O_CLOEXEC);
    dup2(fd, STDOUT_FILENO);
    dup2(fd, STDERR_FILENO);
    close(fd);
    //通过execv执行/system/bin/init selinux_setup
    //启动system分区的init进程,并且传递selinux_setup
    execv(path, const_cast<char**>(args));
    // execv() only returns if an error happened, in which case we
    // panic and never fall through this conditional.
    PLOG(FATAL) << "execv(\"" << path << "\") failed";
    LOG(INFO) << "--------SHEN:FirstStageMain K vendor";
    return 1;
}
2、第二启动阶段
二、Init细节逻辑
1、selinux
2、property
2.1 系统属性初始化
init进程在启动的第二阶段,需要做的最重要事情之一就是初始化属性服务,即用来维持整个android系统一个很重要的东西:系统属性。如/system/core/init/property_service.cpp 源码:
总结如下三个步骤:
- 创建/dev/__properties__目录,并进行初始化,创建一些相关文件
- 接受来自kernel的启动命令和启动参数相关配置,包括kernel额外的一些参数配置
- 加载默认配置的一些系统属性
2.1.1 系统属性的本质
//system/core/init/property_service.cpp
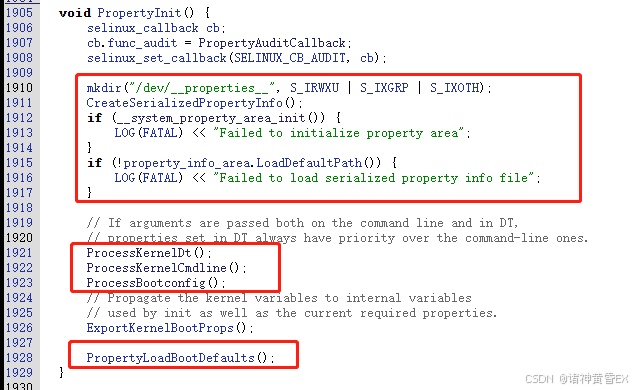
void PropertyInit() {
....
mkdir("/dev/__properties__", S_IRWXU | S_IXGRP | S_IXOTH);
CreateSerializedPropertyInfo();
if (__system_property_area_init()) {
LOG(FATAL) << "Failed to initialize property area";
}
if (!property_info_area.LoadDefaultPath()) {
LOG(FATAL) << "Failed to load serialized property info file";
}....
}
void CreateSerializedPropertyInfo() {
auto property_infos = std::vector<PropertyInfoEntry>();
if (access("/system/etc/selinux/plat_property_contexts", R_OK) != -1) {
if (!LoadPropertyInfoFromFile("/system/etc/selinux/plat_property_contexts",
&property_infos)) {
return;
}
// Don't check for failure here, since we don't always have all of these partitions.
// E.g. In case of recovery, the vendor partition will not have mounted and we
// still need the system / platform properties to function.
if (access("/dev/selinux/apex_property_contexts", R_OK) != -1) {
LoadPropertyInfoFromFile("/dev/selinux/apex_property_contexts", &property_infos);
}
if (access("/system_ext/etc/selinux/system_ext_property_contexts", R_OK) != -1) {
LoadPropertyInfoFromFile("/system_ext/etc/selinux/system_ext_property_contexts",
&property_infos);
}
if (access("/vendor/etc/selinux/vendor_property_contexts", R_OK) != -1) {
LoadPropertyInfoFromFile("/vendor/etc/selinux/vendor_property_contexts",
&property_infos);
}
if (access("/product/etc/selinux/product_property_contexts", R_OK) != -1) {
LoadPropertyInfoFromFile("/product/etc/selinux/product_property_contexts",
&property_infos);
}
if (access("/odm/etc/selinux/odm_property_contexts", R_OK) != -1) {
LoadPropertyInfoFromFile("/odm/etc/selinux/odm_property_contexts", &property_infos);
}
} else {
if (!LoadPropertyInfoFromFile("/plat_property_contexts", &property_infos)) {
return;
}
LoadPropertyInfoFromFile("/system_ext_property_contexts", &property_infos);
LoadPropertyInfoFromFile("/vendor_property_contexts", &property_infos);
LoadPropertyInfoFromFile("/product_property_contexts", &property_infos);
LoadPropertyInfoFromFile("/odm_property_contexts", &property_infos);
LoadPropertyInfoFromFile("/dev/selinux/apex_property_contexts", &property_infos);
}
auto serialized_contexts = std::string();
auto error = std::string();
if (!BuildTrie(property_infos, "u:object_r:default_prop:s0", "string", &serialized_contexts,
&error)) {
LOG(ERROR) << "Unable to serialize property contexts: " << error;
return;
}
constexpr static const char kPropertyInfosPath[] = "/dev/__properties__/property_info";
if (!WriteStringToFile(serialized_contexts, kPropertyInfosPath, 0444, 0, 0, false)) {
PLOG(ERROR) << "Unable to write serialized property infos to file";
}
selinux_android_restorecon(kPropertyInfosPath, 0);
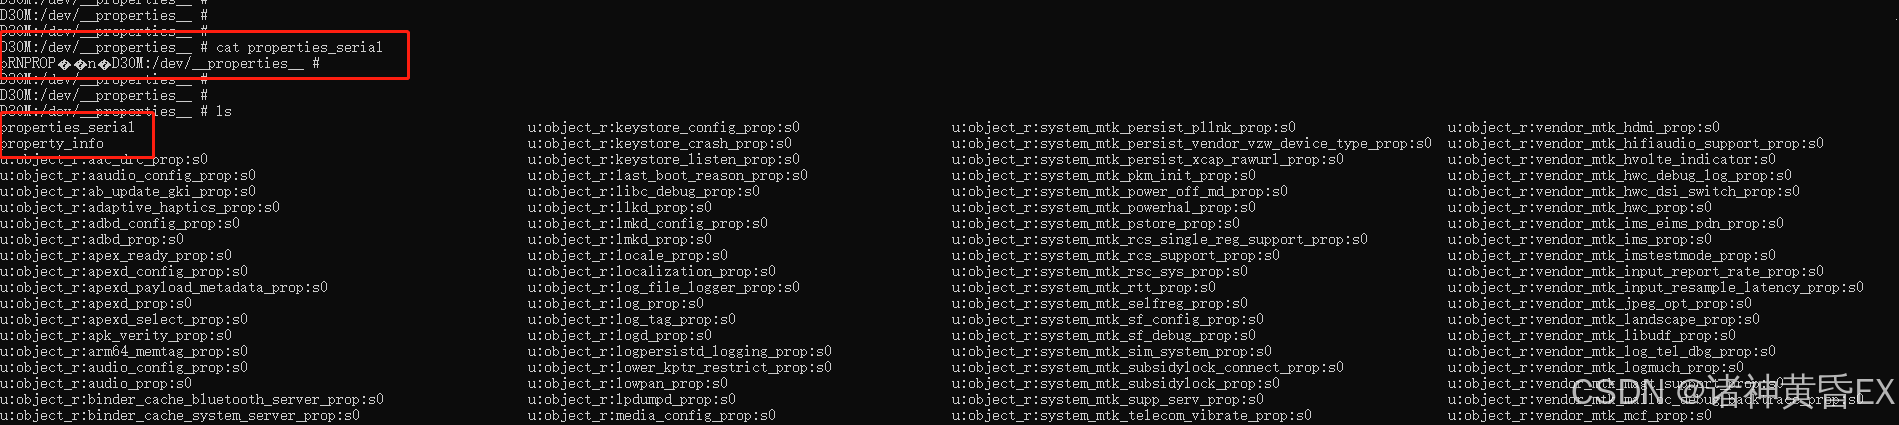
}如上代码逻辑首先创建了/dev/__properties__目录,然后在CreateSerializedPropertyInfo函数中创建了/dev/__properties__/property_info目录和里面看起来跟selinux scontext相关的东西。我找了一台remount的机器,进入此目录如下:
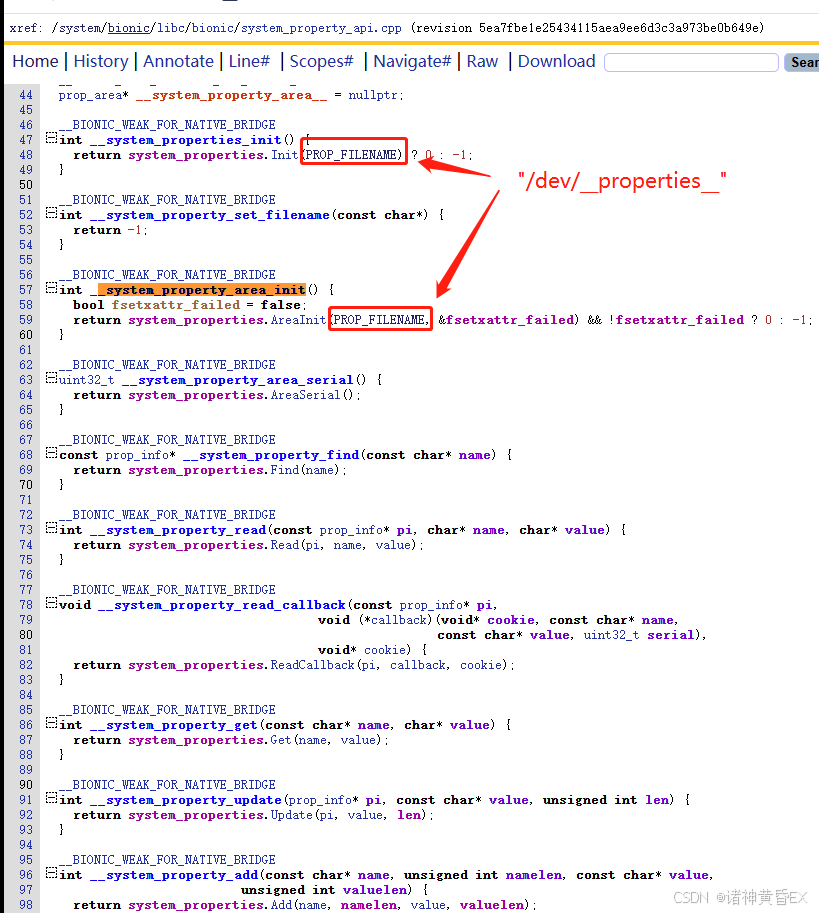
紧接着执行__system_property_area_init用来初始化属性空间,其实就是引用上文创建的这个目录,从这个文件里面函数的定义来,除了初始化之后还有get和set等定义,即个人猜测我们设置某条属性和获取某条属性就是通过此接口来实现,其本质就是通过文件的方式来保存。
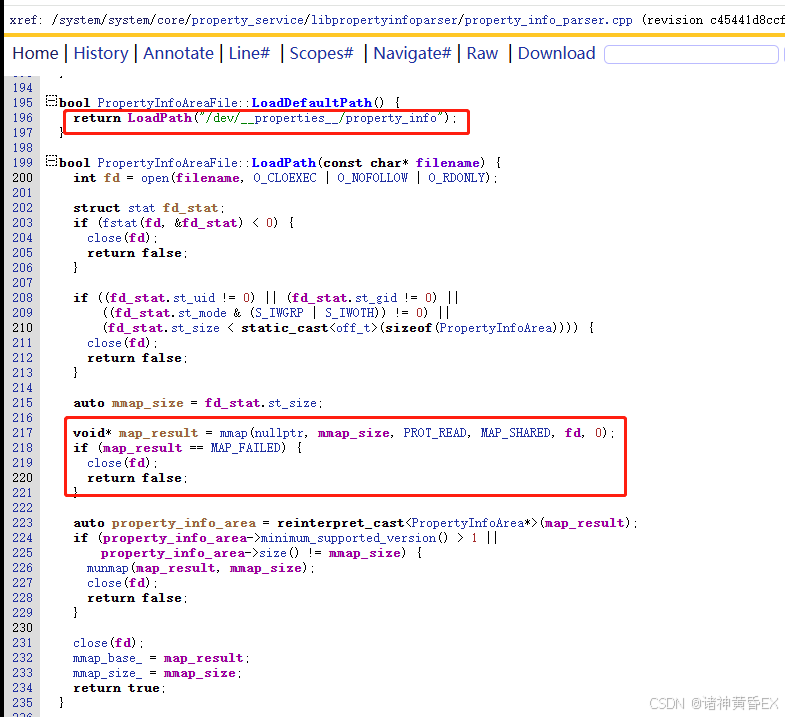
最后property_info_area.LoadDefaultPath来序列号此文件里面的内容到内存中,其核心逻辑使用了mmap映射的方式:
2.1.2 接收来自kernel的参数
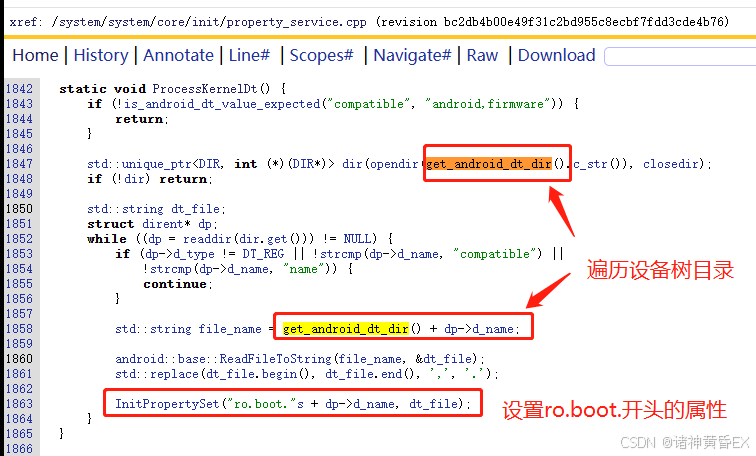
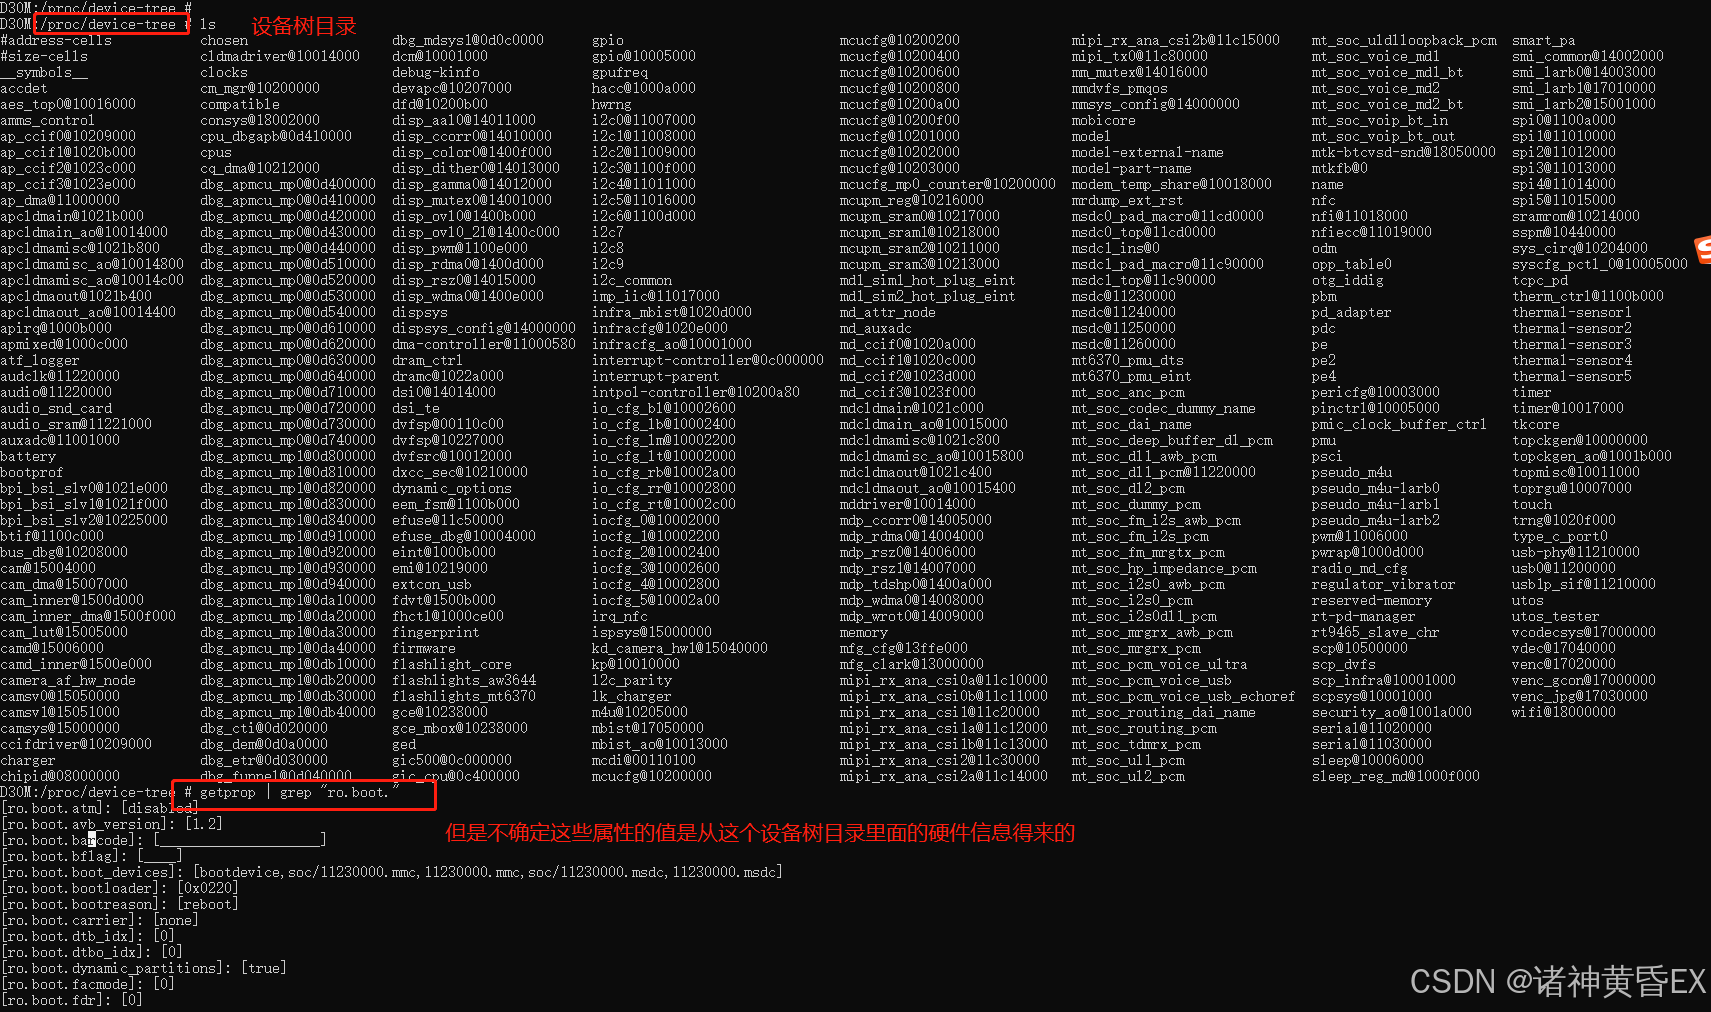
1)ProcessKernelDt
获取kernel设备树/proc/device-tree目录里面的一些信息,并设置ro.boot.相关属性
Android 设备树目录(Device Tree Directory)主要用于存储设备树(Device Tree)相关的信息。设备树是一种描述硬件设备信息和配置的数据结构,用于在启动时传递硬件信息给内核和操作系统。Android 设备树目录的主要作用包括:
- 描述硬件信息:设备树用于描述系统中的硬件设备,包括处理器、内存、外设等的配置信息,以便系统能够正确地识别和与这些硬件设备进行交互。
- 硬件配置:设备树包含了硬件设备的配置信息,如中断控制器、时钟频率、设备地址等,这些信息对于系统的正常运行至关重要。
- 与内核交互:设备树在系统启动时被加载到内存中,内核通过解析设备树来获取硬件信息并配置相应的驱动程序,从而实现对硬件设备的管理和控制。
- 跨平台兼容性:设备树的使用可以使得相同的内核可以在不同硬件平台上运行,只需相应修改设备树即可适配不同硬件配置,提高了系统的可移植性和兼容性。
2)ProcessKernelCmdline
解析kernel传递过来的cmdline参数(路径/proc/cmdline),并设置ro.boot.相关的属性。如下逻辑
//system/system/core/init/util.cpp
void ImportKernelCmdline(const std::function<void(const std::string&, const std::string&)>& fn) {
std::string cmdline;
android::base::ReadFileToString("/proc/cmdline", &cmdline);
for (const auto& entry : android::base::Split(android::base::Trim(cmdline), " ")) {
std::vector<std::string> pieces = android::base::Split(entry, "=");
if (pieces.size() == 2) {
fn(pieces[0], pieces[1]);
}
}
}
//system/system/core/init/property_service.cpp
constexpr auto ANDROIDBOOT_PREFIX = "androidboot."sv;
static void ProcessKernelCmdline() {
//解析kernel的cmdline,读取/proc/cmdline文件内容
ImportKernelCmdline([&](const std::string& key, const std::string& value) {
//解析cmdline内容,如果是以androidboot开头的参数,就进入判断设置属性
if (StartsWith(key, ANDROIDBOOT_PREFIX)) {
//设置属性的时候将其拼接变成ro.boot.
InitPropertySet("ro.boot." + key.substr(ANDROIDBOOT_PREFIX.size()), value);
}
});
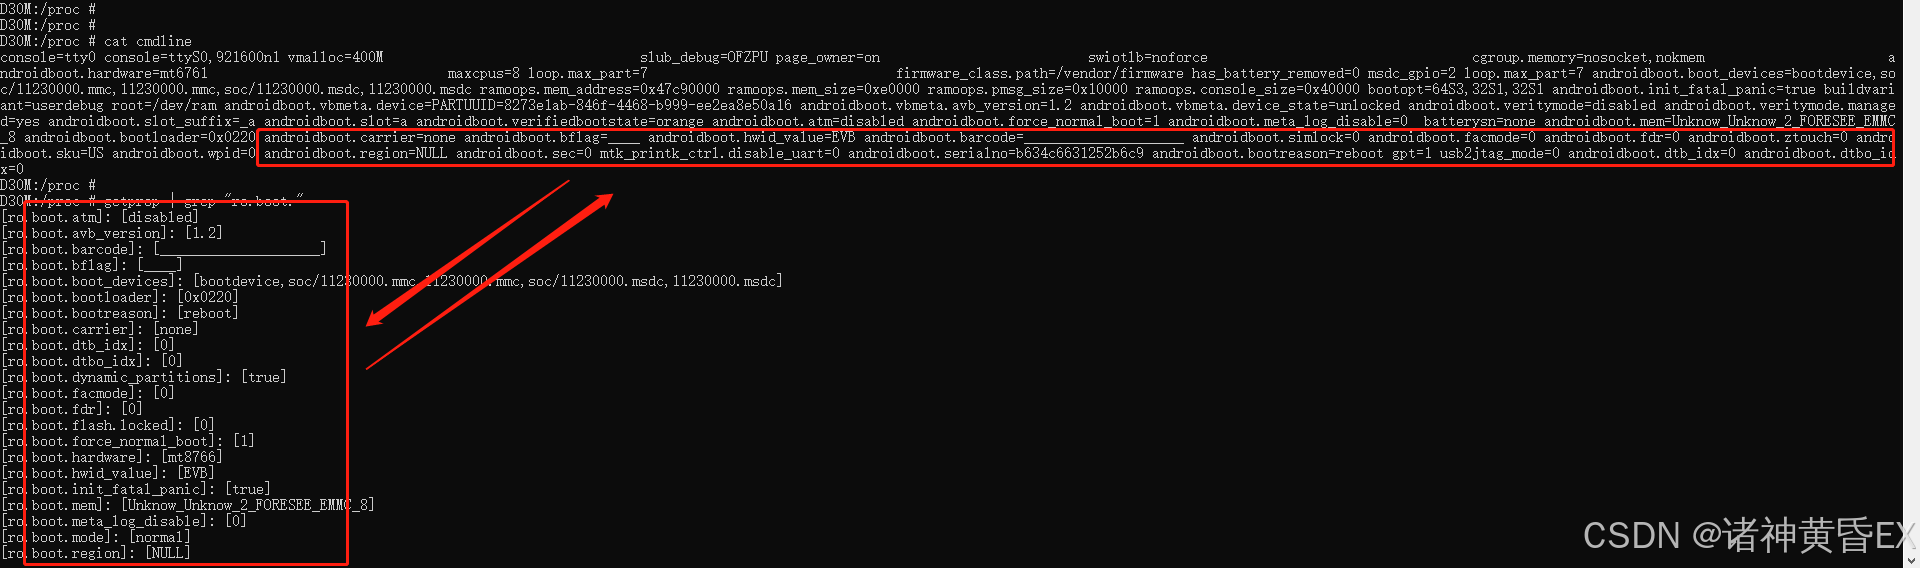
}cmdline为bootloader传递给kernel的参数,cat cmdline和获取ro.boot属性如下,即我们平时的这类属性都是从cmdline中获取的
3)ProcessBootconfig
解析kernel传递过来的config配置(路径/proc/bootconfig),并设置ro.boot.相关的属性。如下逻辑
//system/system/core/init/util.cpp
void ImportBootconfig(const std::function<void(const std::string&, const std::string&)>& fn) {
std::string bootconfig;
android::base::ReadFileToString("/proc/bootconfig", &bootconfig);
for (const auto& entry : android::base::Split(bootconfig, "\n")) {
std::vector<std::string> pieces = android::base::Split(entry, "=");
if (pieces.size() == 2) {
// get rid of the extra space between a list of values and remove the quotes.
std::string value = android::base::StringReplace(pieces[1], "\", \"", ",", true);
value.erase(std::remove(value.begin(), value.end(), '"'), value.end());
fn(android::base::Trim(pieces[0]), android::base::Trim(value));
}
}
}
//system/system/core/init/property_service.cpp
constexpr auto ANDROIDBOOT_PREFIX = "androidboot."sv;
static void ProcessBootconfig() {
ImportBootconfig([&](const std::string& key, const std::string& value) {
if (StartsWith(key, ANDROIDBOOT_PREFIX)) {
InitPropertySet("ro.boot." + key.substr(ANDROIDBOOT_PREFIX.size()), value);
}
});
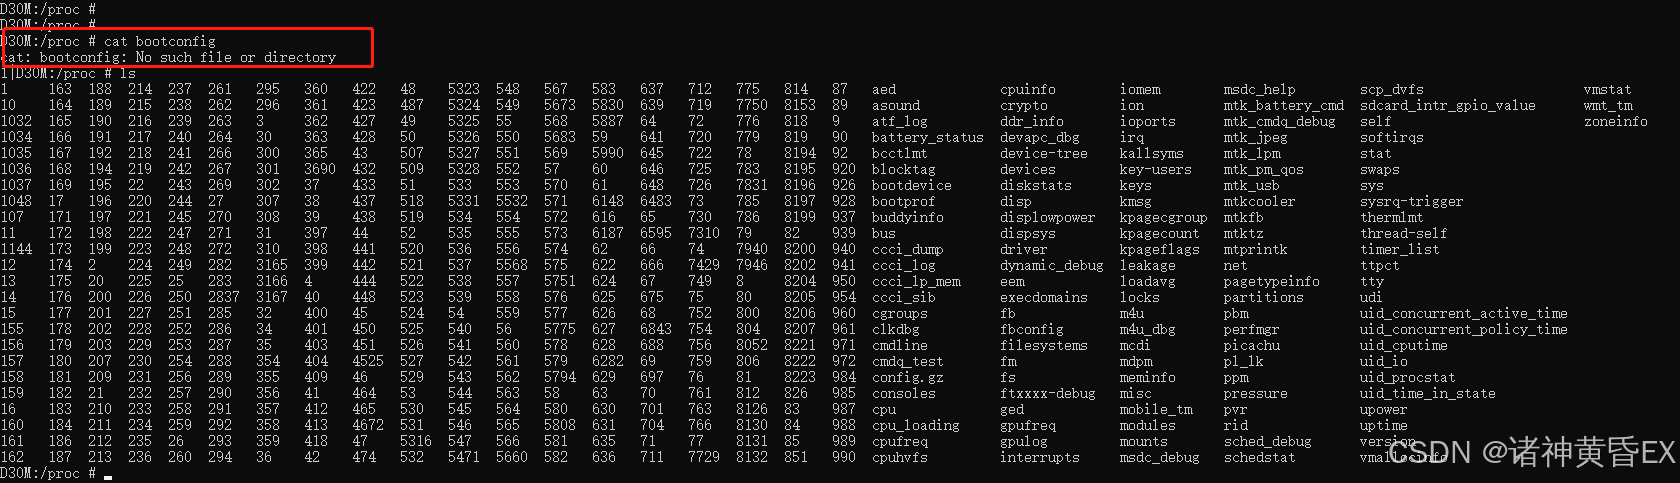
}config同上面一致,在/proc/bootconfig文件里面,但是我在这台机器上面并没有获取出来:
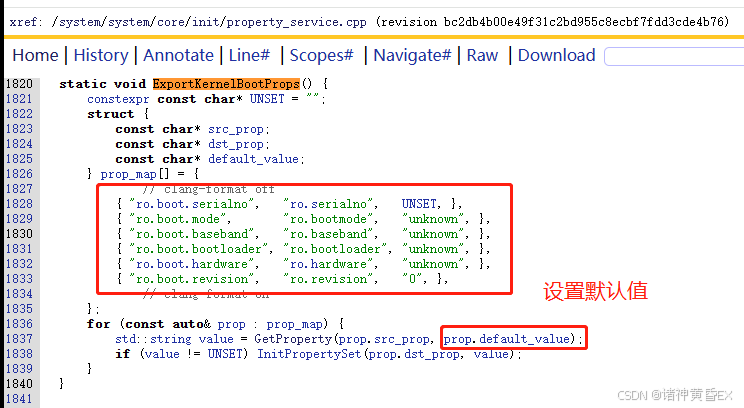
4)ExportKernelBootProps
设置其他ro.boot.等值,这里的逻辑像是先去GetProperty了一遍,如果没有值就设置默认值
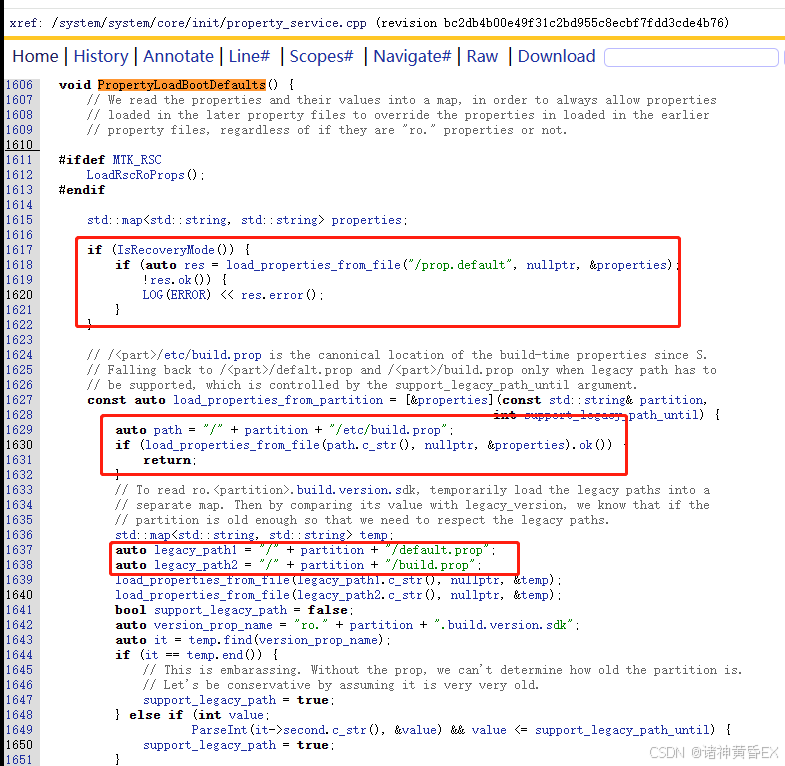
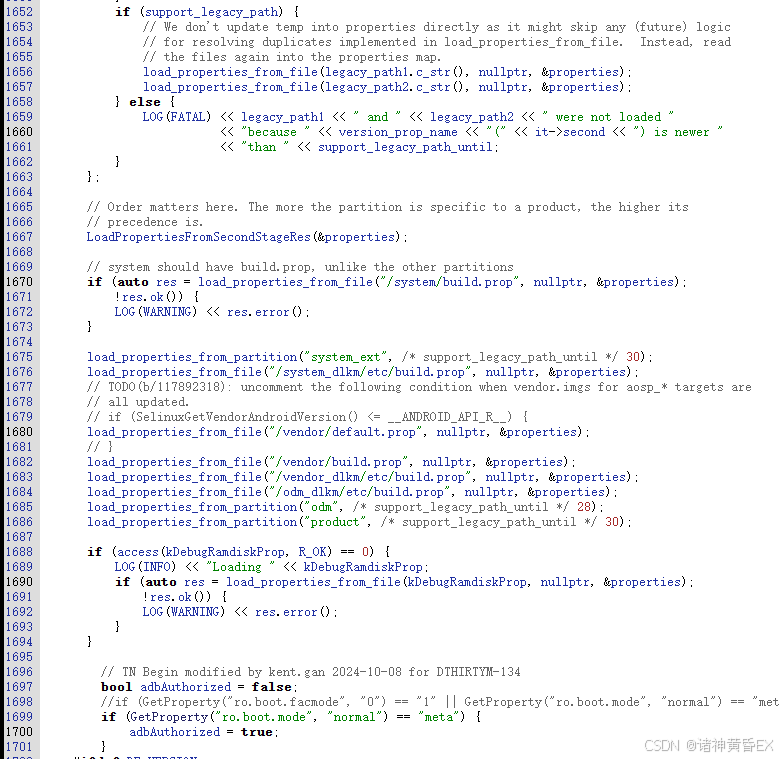
2.1.3 初始化所有系统属性

2.2 系统属性监听
这里介绍一下系统属性是如何被设置,并且某个属性被设置的时候,init触发器机制是如何监听的?
其实它是依赖于init进程的一个后台任务,因为它平时并不运行,但是通过了linux socket机制可以对齐进行唤醒。我们先来看看StartPropertyService(同样被init进程在启动的第二阶段),字面意思就是开启系统属性服务,其实并不是真正意义上的服务,源码如下:
//system/system/core/init/property_service.cpp
void StartPropertyService(int* epoll_socket) {
    InitPropertySet("ro.property_service.version", "2");
    int sockets[2];
    if (socketpair(AF_UNIX, SOCK_SEQPACKET | SOCK_CLOEXEC, 0, sockets) != 0) {
        PLOG(FATAL) << "Failed to socketpair() between property_service and init";
    }
    *epoll_socket = from_init_socket = sockets[0];
    init_socket = sockets[1];
    //设置accept_messages为true,后续监听属性改变执行触发器的时候需要判断此变量
    StartSendingMessages();
    //创建socket套接字,用来进行通信和监听
    if (auto result = CreateSocket(PROP_SERVICE_NAME, SOCK_STREAM | SOCK_CLOEXEC | SOCK_NONBLOCK,
                                   /*passcred=*/false, /*should_listen=*/false, 0666, /*uid=*/0,
                                   /*gid=*/0, /*socketcon=*/{});
        result.ok()) {
        //套接字节点
        property_set_fd = *result;
    } else {
        LOG(FATAL) << "start_property_service socket creation failed: " << result.error();
    }
    //绑定进行监听,最大同时接收8个请求任务数量
    listen(property_set_fd, 8);
    //实例化PropertyServiceThread,是一个线程类,封装了属性设置等操作
    auto new_thread = std::thread{PropertyServiceThread};
    property_service_thread.swap(new_thread);
    auto async_persist_writes =
            android::base::GetBoolProperty("ro.property_service.async_persist_writes", false);
    if (async_persist_writes) {
        persist_write_thread = std::make_unique<PersistWriteThread>();
    }
}
2.2.1 属性后台任务PropertyServiceThread
PropertyServiceThread函数其实就是一个典型的socket套接字使用流程。为套接字指定回调函数,然后进行循环进行sleep。即这里作为socket通信的服务端,并一直监听property_set_fd套接字描述符是否收到客户端的链接请求,如果有客户端连接上,直接回调handle_property_set_fd函数
static void PropertyServiceThread() {
    Epoll epoll;
    if (auto result = epoll.Open(); !result.ok()) {
        LOG(FATAL) << result.error();
    }
    //套接字property_set_fd注册了回调函数handle_property_set_fd
    if (auto result = epoll.RegisterHandler(property_set_fd, handle_property_set_fd);
        !result.ok()) {
        LOG(FATAL) << result.error();
    }
    //套接字init_socket注册了回调函数HandleInitSocket
    if (auto result = epoll.RegisterHandler(init_socket, HandleInitSocket); !result.ok()) {
        LOG(FATAL) << result.error();
    }
    //套接字使用方式,进入死循环等会回调函数handle_property_set_fd的调用
    while (true) {
        auto epoll_result = epoll.Wait(std::nullopt); //阻塞睡眠CPU,直到回调函数被调用
        if (!epoll_result.ok()) {
            LOG(ERROR) << epoll_result.error();
        }
    }
}
回调函数handle_property_set_fd的核心处理逻辑如下,通过
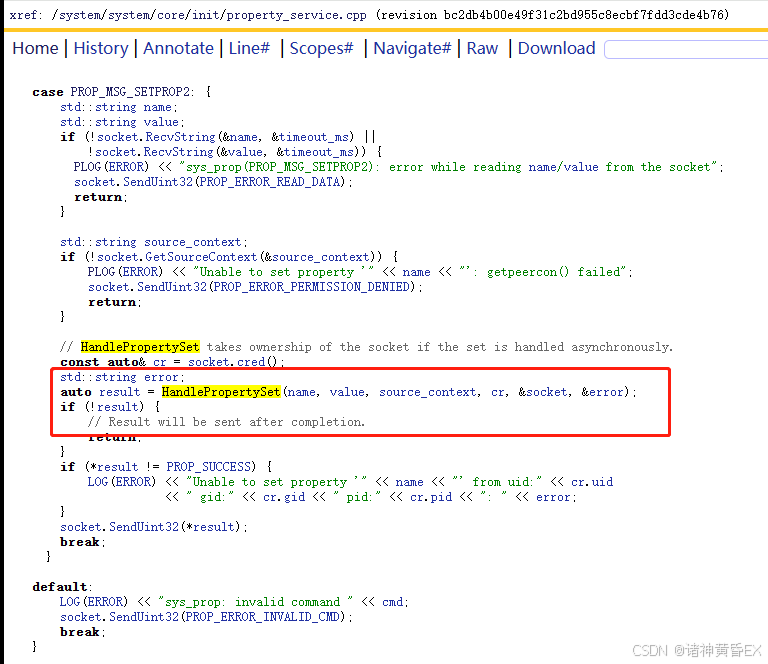
2.2.2 属性的设置PropertySet
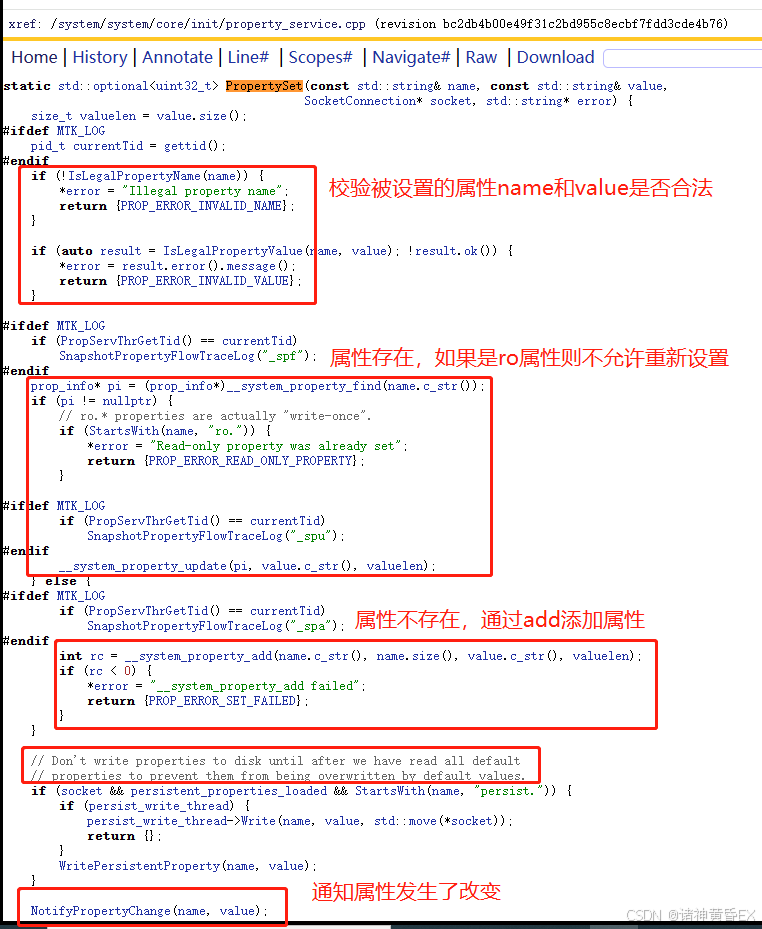
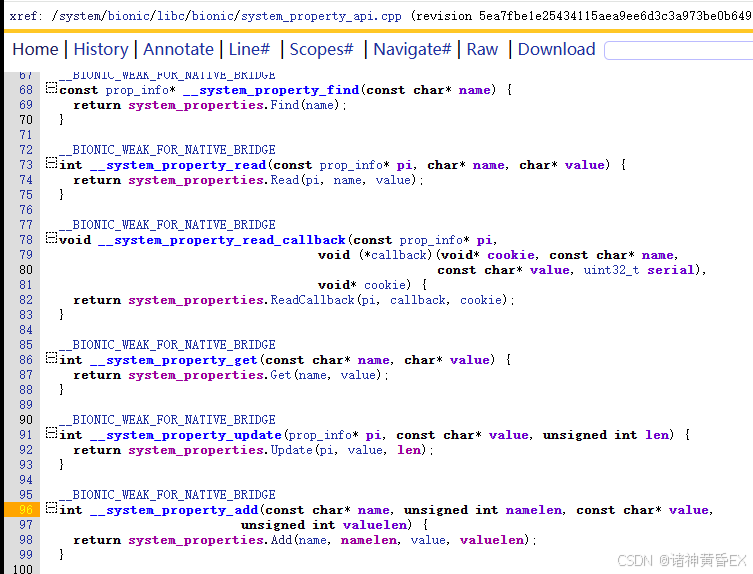
属性的设置流程大概如上,主要还是通过__system_property_find和__system_property_update和__system_property_add这些调用来实现对/dev/__properties__文件目录的一些控制
值得注意的就是persist这类属性是写入到内存里面的,参考
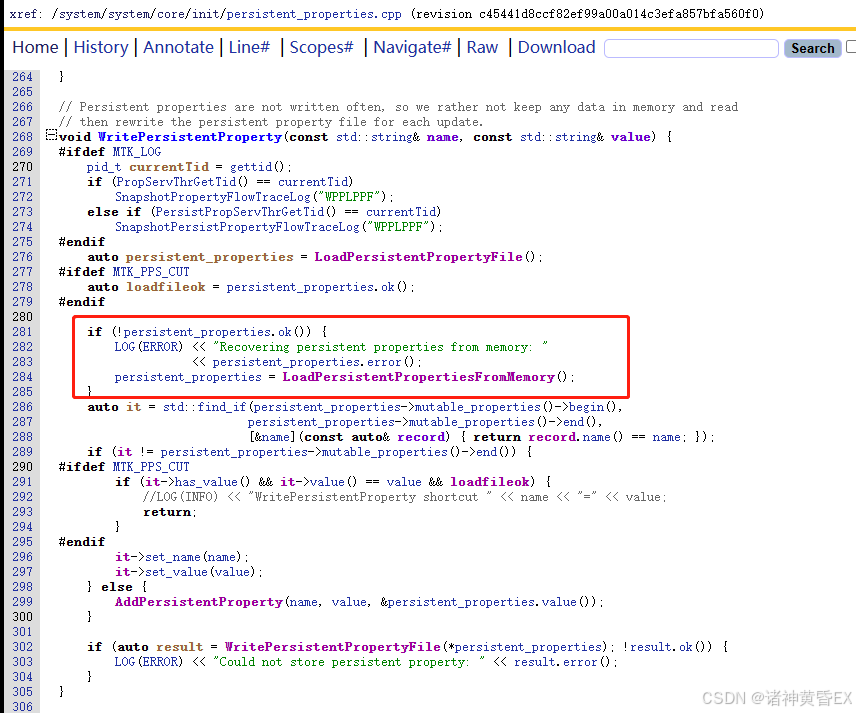
2.2.3 属性改变的监听NotifyPropertyChange
2.3 系统属性相关案例
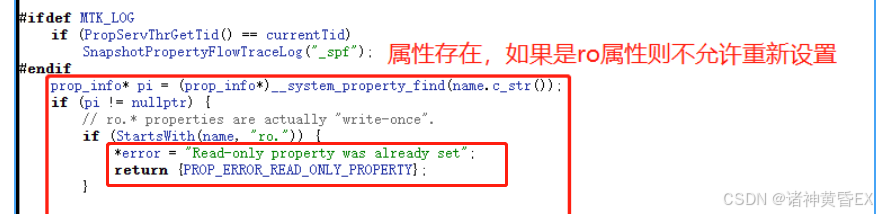
案例一:ro属性实现允许被修改
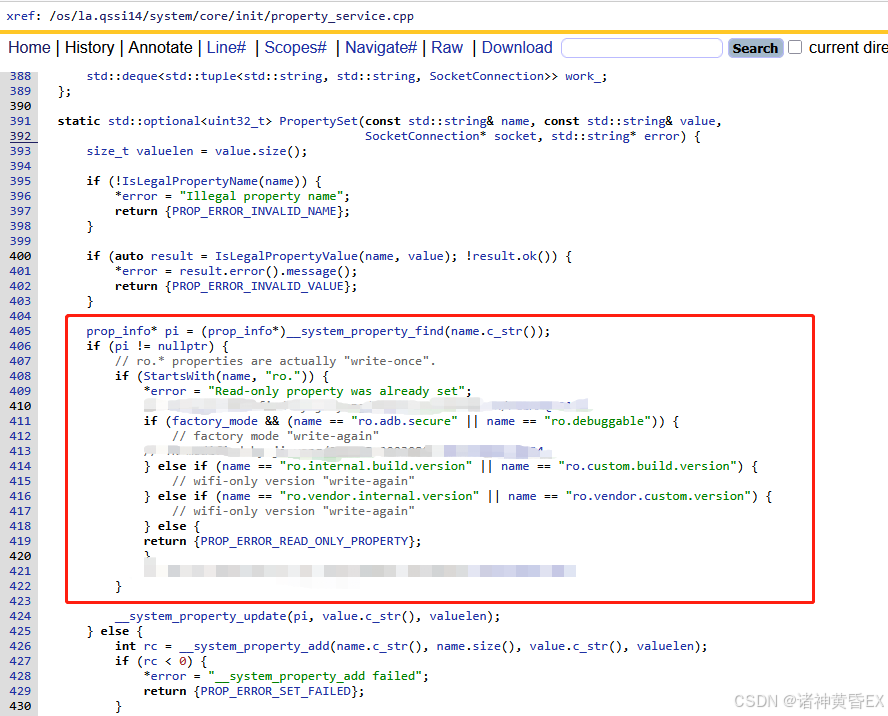
在init进程中进行ro属性设置,如果此属性已经被设置过或者被初始化过,那么将会报如下异常,错误码为0xb,PROP_ERROR_READ_ONLY_PROPERTY被定义为0x0b。
![]()
但是我们可以更正这里的逻辑,让我们能够setprop已经存在的ro属性,参考案例如下:
案例二:PRODUCT_PRODUCT_PROPERTIES :=和+=的区别
接着如上案例,因为ro.setupwizard.rotation_locked为ro属性,因此只能被赋值一次且无法修改,那么考虑使用PRODUCT_PRODUCT_PROPERTIES来进行初始化,在实验中发现如下两种有趣的现象:
- 写法一:先进行+=对ro属性进行初始化,然后通过:=对ro属性进行重新设置,最后的结果是true,即:=没有对ro属性进行一个覆盖?第二行的:=居然指向失败?
#先初始化ro属性
PRODUCT_PRODUCT_PROPERTIES +=  ro.setupwizard.rotation_locked=true
#重新设置ro属性,设置失败
PRODUCT_PRODUCT_PROPERTIES := ro.setupwizard.rotation_locked=false
#结论一:如果PRODUCT_PRODUCT_PROPERTIES对某ro属性定义了两次,并没有对属性的所有定义进行整合?即后面定义的值无法覆盖前文定义的值?那么init初始化属性的时候对其进行了两次设置?
#结论二:init初始化属性的时候在第二次设置的时候,针对ro属性直接设置失败,即ro属性只能被初始化一次- 写法二:先进行:=ro属性进行设置,然后通过+=对ro属性进行设置,最后结果是false
#先初始化ro属性
PRODUCT_PRODUCT_PROPERTIES := ro.setupwizard.rotation_locked=false
#重新设置ro属性,设置失败
PRODUCT_PRODUCT_PROPERTIES += ro.setupwizard.rotation_locked=true
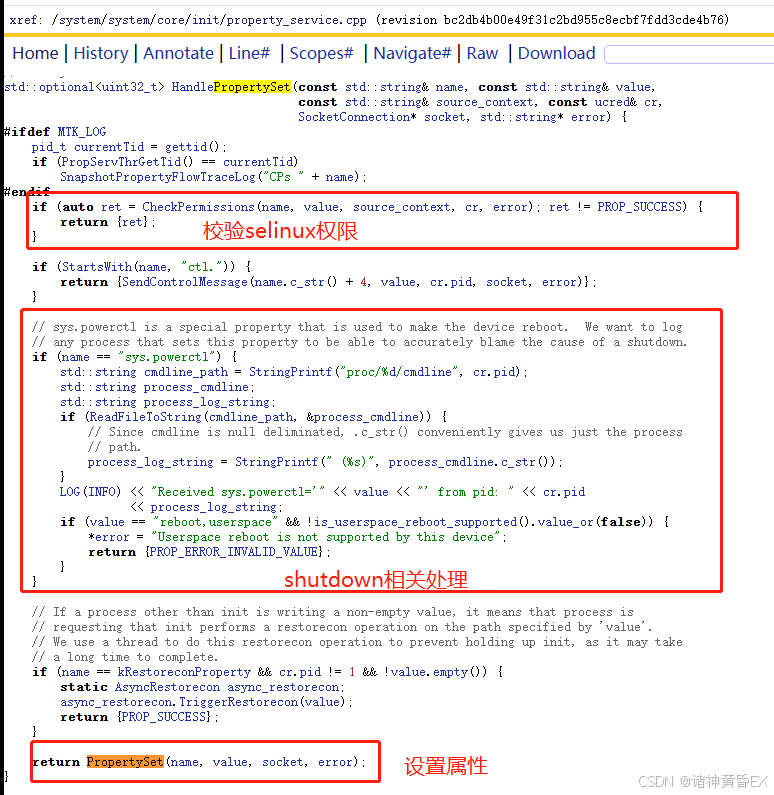
#结论一:因为已经存在值,所以+=直接无效3、shutdown
init进程触发系统重启是一个很合理的逻辑,为什么合理?
init进程是android世界的一切基石,如果android世界的某些服务或者进程出现异常,那么会导致整个系统无法正常使用,为了防止这种情况,专门给init进程设计了能够重启的功能,那么android世界的这些徒子徒孙他们怎么来重启系统呢?就通过给init进程发送reboot或者shutdown这类的命令使系统重启。
这里一个案例,进入mate模式之后系统直接重启,init日志如下

有进程的rc配置如下,即该进程crash之后会触发reboot,netbpfload-failed命令

3.1 Init触发重启代码逻辑
跟踪上面日志的关键字"Got shutdown_command",搜索代码如下:
//system/core/init/init.cpp
//定义了关于重启状态的类,通过此类来记录是否重启的状态
static class ShutdownState {
public:
//重点1:触发重启写入命令,其实是写入属性sys.powerctl的值
void TriggerShutdown(const std::string& command) {
auto lock = std::lock_guard{shutdown_command_lock_};
shutdown_command_ = command;
do_shutdown_ = true;
WakeMainInitThread();
}
//重点2:检查是否需要重启,其实就是获取是否存在重启命令,上面的案例这里的值:reboot,netbpfload-failed
std::optional<std::string> CheckShutdown() __attribute__((warn_unused_result)) {
auto lock = std::lock_guard{shutdown_command_lock_};
if (do_shutdown_ && !IsShuttingDown()) {
do_shutdown_ = false;
return shutdown_command_;
}
return {};
}
private:
std::mutex shutdown_command_lock_;
std::string shutdown_command_ GUARDED_BY(shutdown_command_lock_);
bool do_shutdown_ = false;
} shutdown_state;
//init进程启动的第二个阶段
int SecondStageMain(int argc, char** argv) {
if (REBOOT_BOOTLOADER_ON_PANIC) {
InstallRebootSignalHandlers();
}
boot_clock::time_point start_time = boot_clock::now();
// 重点3:定义函数表达式trigger_shutdown,可以认为函数指针,接收一个string类型的参数,函数功能调用shutdown_state.TriggerShutdown(command)
trigger_shutdown = [](const std::string& command) { shutdown_state.TriggerShutdown(command); };
// ....省略无数代码...
am.QueueBuiltinAction(queue_property_triggers_action, "queue_property_triggers");
// Restore prio before main loop
setpriority(PRIO_PROCESS, 0, 0);
while (true) {
const boot_clock::time_point far_future = boot_clock::time_point::max();
boot_clock::time_point next_action_time = far_future;
//重点4:从 shutdown_state.CheckShutdown获取是否存在重启命令
auto shutdown_command = shutdown_state.CheckShutdown();
if (shutdown_command) {
LOG(INFO) << "Got shutdown_command '" << *shutdown_command << "' Calling HandlePowerctlMessage()";
//重点3:如果存在重启命令,打印重启命令,并通过HandlePowerctlMessage去重启系统
HandlePowerctlMessage(*shutdown_command);
}
// ....省略无数代码...
}
// ....省略无数代码...
}
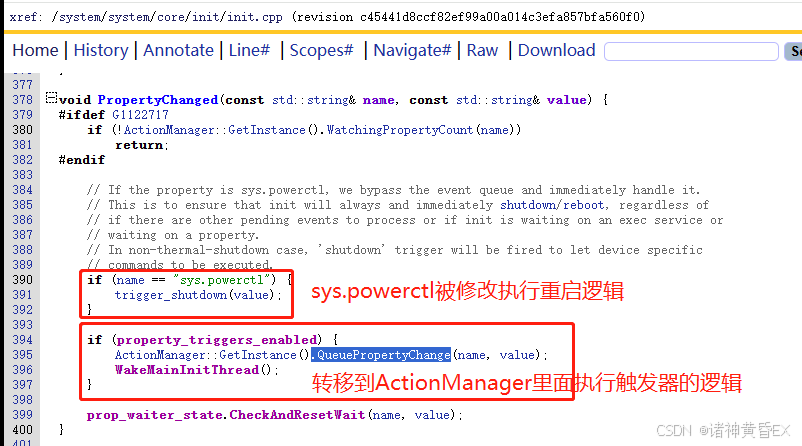
//属性值改变的时候将触发此函数
void PropertyChanged(const std::string& name, const std::string& value) {
if (name == "sys.powerctl") {
trigger_shutdown(value); //重点5:sys.powerctl属性被改变的时候触发重启,实际上是调用了shutdown_state.TriggerShutdown(command)
}
if (property_triggers_enabled) {
ActionManager::GetInstance().QueuePropertyChange(name, value);
WakeMainInitThread();
}
prop_waiter_state.CheckAndResetWait(name, value);
}
对流程作如下总结:
- ShutdownState类维护了需要重启的命令,TriggerShutdown写入重启命令,CheckShutdown来检查是否存在重启命令
- PropertyChanged属性值得改变此函数被调用,如果sys.powerctl属性值存在变化,那么将调用ShutdownState#TriggerShutdown写入重启命令
- SecondStageMain循环体通过ShutdownState#CheckShutdown检查是否需要重启,需要重启调用HandlePowerctlMessage来重启系统
3.2 Init如何重启系统

三、Init相关案例
1、Init.rc执行sh文件
init.rc支持的命令其实不是很多,所以很多时候我们可以尝试使用脚本来执行一系列命令。其实在AOSP代码中已经有很多这样的案例,如下:

步骤一:adb root手机并进行remount,直接修改/etc/init/bootanim.rc文件
service bootanim /system/bin/bootanimation
    class core animation
    user graphics
    group graphics audio
    disabled
    oneshot
    ioprio rt 0
    task_profiles MaxPerformance
service ril_init /etc/init/xxx_init.sh
   class late_start
   user root
   group root
   disabled
   oneshot
   seclabel u:r:init:s0
#验证失败
on property:sys.ril_action.init=55
   echo "=== set nat mode ==="
   echo -en 'at+qcfg="nat",0\r\n' > /dev/ttyUSB1 2>/dev/null
   echo ret1=$? > xxx_init_ret1.txt
   echo -ne 'at+cfun=1,1\r\n' > /dev/ttyUSB1 2>/dev/null
   echo ret2=$? > xxx_init_ret2.txt
   sleep 8
   echo "=== set usb0 ip ==="
   ifconfig usb0 up
   ifconfig usb0 192.168.43.100 netmask 255.255.255.0
   setprop sys.shen.test ril_init_55
#验证失败
on property:sys.ril_action.init=33
   exec /system/bin/sh /system/bin/xxx_init.sh
   setprop sys.shen.test ril_init_33
#验证失败
on property:sys.ril_action.init=22
   start ril_init
   setprop sys.shen.test ril_init_22
#验证成功
on property:sys.ril_action.init=11
   exec_background u:r:su:s0 -- /system/bin/sh /system/bin/xxx_init.sh
   setprop sys.shen.test ril_init_11
步骤二:推送脚本文件到/system/bin/或者/etc/init/等目录
# 路径/system/bin/xxx_init.sh
#!/vendor/bin/sh
#查看进度
setprop sys.shen.init start_init_a
echo "=== set nat mode ===" > xxx_init.txt
echo -en 'at+qcfg="nat",0\r\n' > /dev/ttyUSB1 2>/dev/null
echo ret1=$? > /etc/init/xxx_init_ret1.txt
echo -ne 'at+cfun=1,1\r\n' > /dev/ttyUSB1 2>/dev/null
echo ret2=$? > /etc/init/xxx_init_ret2.txt
#查看进度
setprop sys.shen.init start_init_b
#因为睡眠了8秒,所以上面的验证都没有效果,需要加一个后台执行
sleep 8
#查看进度
setprop sys.shen.init start_init_c
echo "=== set usb0 ip ==="
ifconfig usb0 up
ifconfig usb0 192.168.43.100 netmask 255.255.255.0
#查看进度
setprop sys.shen.init start_init_d
步骤三:adb reboot手机通过设置属性去触发执行脚本,注意后台执行命令,没有任何日志打印,所以很难进行调试
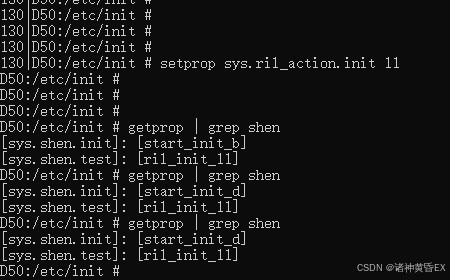
总结一:最初试了exec和service的方式,但是测试都不成功,也没有任何日志打印,所以完全没有什么调试方向。最后在AOSP里面找了如下命令,即后台执行sh脚本,且这个脚本里面有sleep 8秒,因此验证OK。
exec_background u:r:su:s0 -- /system/bin/sh /etc/init/xxx_init.sh
总结二:最后去掉u:r:su:s0去掉之后脚本无法正常执行,其原因为selinux权限拦截,这里的u表示SEAndroid用户,role值为r表示进程,range值为s0,su标记这里是使用su超级用户的相关权限。


 488
488

 被折叠的 条评论
为什么被折叠?
被折叠的 条评论
为什么被折叠?
 到【灌水乐园】发言


