


 本文详细解析了Spring IOC容器初始化过程,重点介绍了BeanFactoryPostProcessor、BeanPostProcessor、ApplicationListener、Lifecycle和SmartLifecycle等核心组件的作用和工作流程。BeanFactoryPostProcessor如ConfigurationClassPostProcessor用于处理配置类加载,BeanPostProcessor如ApplicationContextAwareProcessor负责初始化bean的Aware接口,ApplicationListener监听容器事件,Lifecycle和SmartLifecycle接口则提供了对容器生命周期的管理和控制。此外,文章还探讨了如何通过自定义监听器和扩展点实现特定功能。
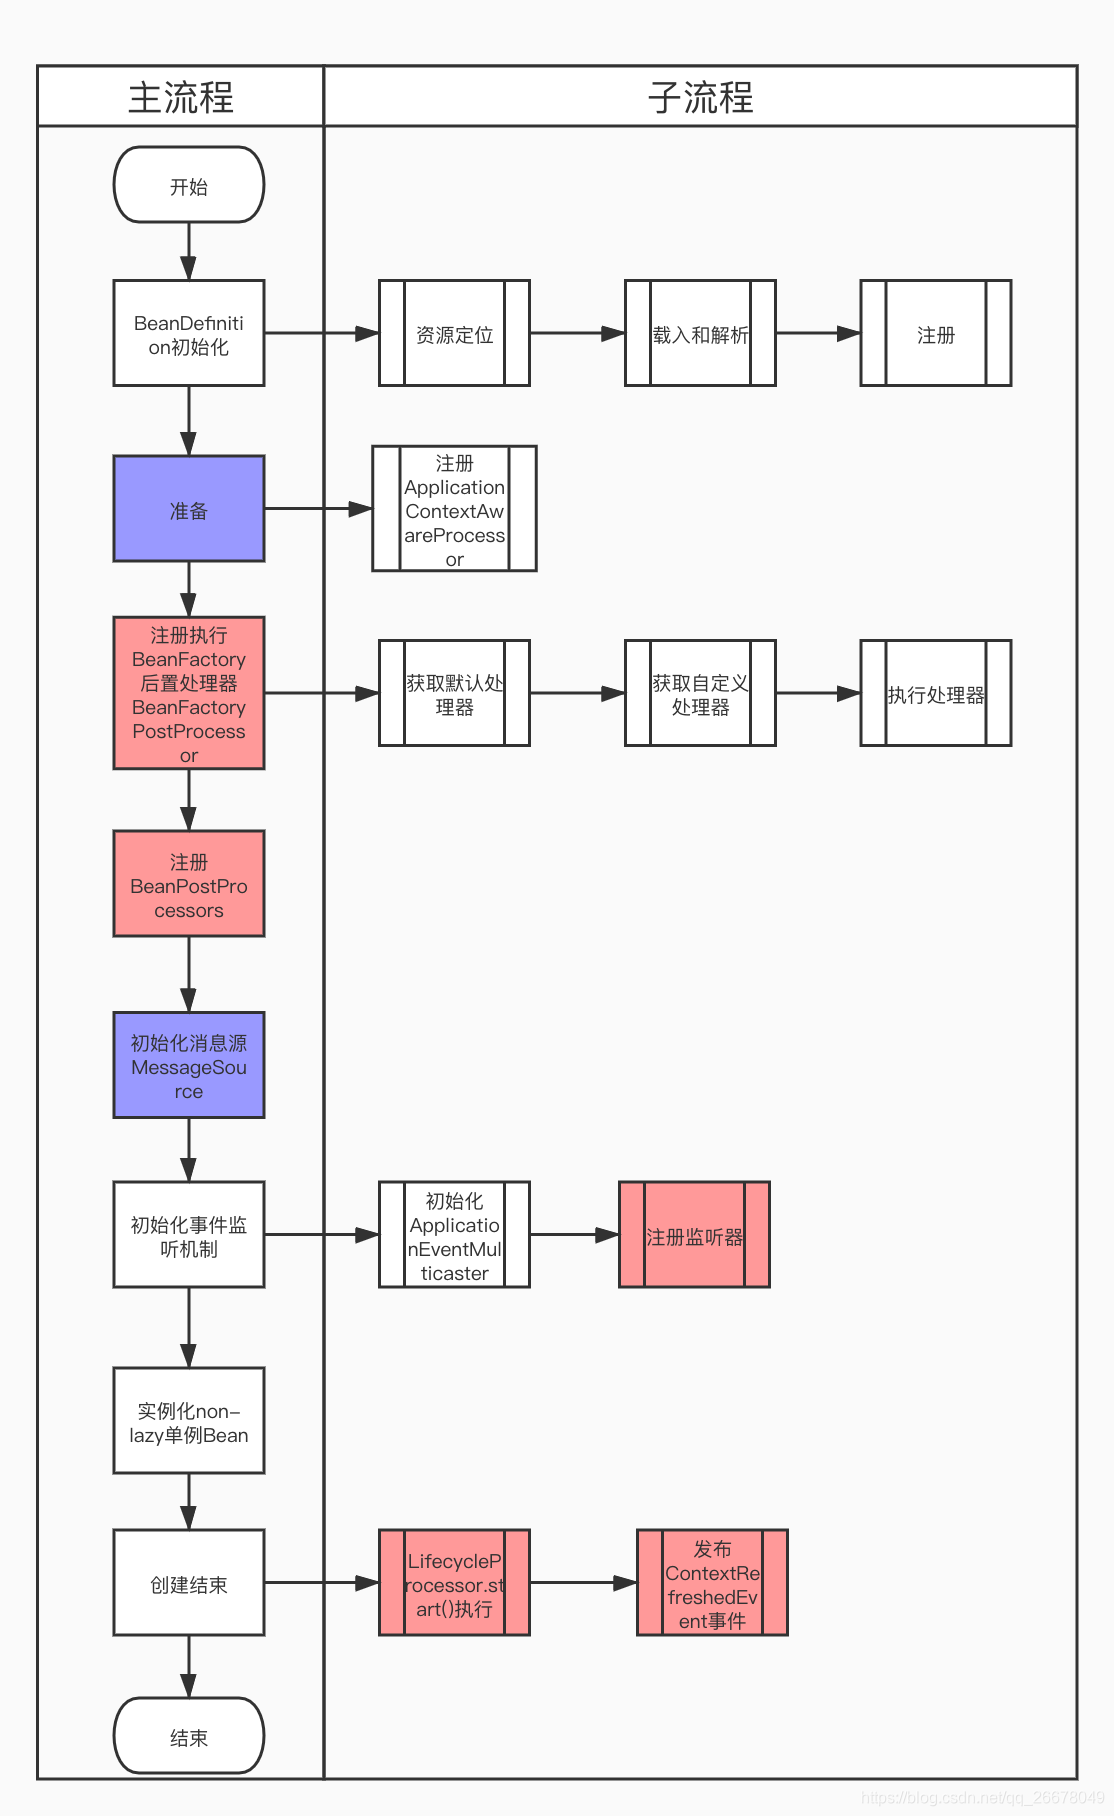
上图描述了IOC容器初始化过程,其中红色的模块为spring为用户在spring ioc容器生命阶段内提供的扩展点,蓝色为省略流程。
在容器初始化过程中,当容器完成第一步BeanDefinition的注册流程后,容器其实已经进入了就绪状态,即可通过其getBean()方法获取容器中管理的类,所以在之后的流程中,有很多bean已经完成了其初始化的过程。
1、BeanFactoryPostProcessors
简单介绍
当容器完成准备阶段后,会在容器内注册的BeanDefinition中查找,是否存在实现了BeanFactoryPostProcessor接口的类,如果存在,则通过getBean获取其对应的实现,同时执行其方法postProcessBeanFactory
import org.springframework.beans.BeansException;
import org.springframework.beans.factory.config.BeanFactoryPostProcessor;
import org.springframework.beans.factory.config.ConfigurableListableBeanFactory;

public class MyBeanFactoryPostProcessor implements BeanFactoryPostProcessor {
    @Override
    public void postProcessBeanFactory(ConfigurableListableBeanFactory beanFactory) throws BeansException {
        System.out.println("MyBeanFactoryPostProcessor execute");
    }
}
应用实例:ConfigurationClassPostProcessor
在spring中最核心的一个BeanFactoryPostProcessors应用就是ConfigurationClassPostProcessor。众所周知,spring为用户提供了一套完整的注解用于对容器的使用,ConfigurationClassPostProcessor就是用于容器扫描加载用户指定路径下所有被指定注解了的类,完成了对容器加载功能的补充。
ConfigurationClassPostProcessor是何时被注入的?
在使用AnnotationConfigApplicationContext容器创建时,会为其指定默认的AnnotatedBeanDefinitionReader,AnnotatedBeanDefinitionReader会为容器注入若干配置类,ConfigurationClassPostProcessor就是此时向容器注册。除此之外,通过context:annotation-config 和 context:component-scan配置xml也会自动为其注入。
ConfigurationClassPostProcessor是如何工作的?
| 序号 | 流程 | 说明 |
|---|---|---|
| 1 | ConfigurationClassPostProcessor.postProcessBeanFactory() | 开始工作 |
| 2 | ConfigurationClassPostProcessor.processConfigBeanDefinitions | 进入解析流程 |
| 3 | ConfigurationClassUtils.checkConfigurationClassCandidate() | 在已向容器注册的bean中检测所有包含@Configuration、@Component、@ComponentScan、@Import、@ImportResource、@Bean注解的类 |
| 4 | ConfigurationClassParser.parse() | 解析获取到指定注解的类 |
| 5 | ConfigurationClassParser.doProcessConfigurationClass() | 开始遍历解析 |
| 6 | ConfigurationClassParser.processMemberClasses() | 解析内部类 |
| 7 | ConfigurationClassParser.processPropertySource() | 解析@PropertySources注解 |
| 8 | ComponentScanAnnotationParser.parse() | 获取@ComponentScans和@ComponentScan指定路径下的类向容器注册(实际使用ClassPathBeanDefinitionScanner进行扫描,默认提供过滤器,只扫描指定spring指定的注解(@Component,@ManagedBean,@Named) |
| 9 | ConfigurationClassUtils.checkConfigurationClassCandidate() | 检测是否为配置类,递归解析 |
| 10 | ConfigurationClassParser.processImports() | 解析@Import注解放入configurationClasses中,并未向容器注入 |
| 11 | PropertyResolver.resolveRequiredPlaceholders | 解析@ImportSource注解 |
| 12 | ConfigurationClassParser.retrieveBeanMethodMetadata | 解析@Bean注解 |
| 13 | ConfigurationClassParser.processInterfaces | 解析接口定义的default methods |
| 14 | SourceClass.getSuperClass | 解析父类保存到configurationClasses中 |
| 15 | ConfigurationClassParser.processDeferredImportSelectors | 解析ImportSelector类型 |
| 15 | ConfigurationClassBeanDefinitionReader.loadBeanDefinitionsForConfigurationClass | 解析configurationClasses并向容器注册 |
| 16 | ConfigurationClassBeanDefinitionReader.loadBeanDefinitionsFromImportedResources | 解析@ImportResource注解 |
| 17 | ConfigurationClassBeanDefinitionReader.loadBeanDefinitionsFromRegistrars | 当是ImportBeanDefinitionRegistrar当子类时执行registerBeanDefinitions()方法 |
更加详细的可以参考这篇文章对照源码查看。
拓展
- 通过@ComponentScan注解扫描的类,只会获取到被@Component,@ManagedBean,@Named这三种类型标记的bean,我们熟知的@Service、@Controller、@Service等注解上均添加了@Component注解,当我们想通过自定义注解加bean加载入容器时也需要添加@Component注解;
- @ComponentScan并不会扫描到@Import、@ImportResource、@Bean等注解,不可单独使用,需和其他@Component类型注解结合;
- ImportSelector接口只定义了一个selectImports(),用于指定需要注册为bean的Class名称。当在@Configuration标注的Class上使用@Import引入了一个ImportSelector实现类后,会把实现类中返回的Class名称都定义为bean,例如@EnableCaching注解,完成所有spring cache相关依赖注入;
- ImportBeanDefinitionRegistrar为用户提供了一个新的拓展点,通过@Import一个ImportBeanDefinitionRegistrar类型的类,完成用户其他Bean的加载等流程,例如@EnableDubboConfig注解完成依赖注入。
2、BeanPostProcessor
简单介绍
BeanFactoryPostProcessor处理完成后,会在容器中查找是否存在实现了BeanPostProcessor接口的类,如果存在,通过getBean依次获取其对应的实现,并将其向容器内注册,当其他bean通过容器初始化时,在其initMethod执行前后,会分别执行所有BeanPostProcessor的postProcessBeforeInitialization和postProcessAfterInitialization。(容器中许多扩点都是居于此实现的,下面介绍时会一一指出。)
import org.springframework.beans.BeansException;
import org.springframework.beans.factory.config.BeanPostProcessor;

public class MyBeanPostProcessor implements BeanPostProcessor {
    @Override
    public Object postProcessBeforeInitialization(Object bean, String beanName) throws BeansException {
        System.out.println("MyBeanPostProcessor postProcessBeforeInitialization");
        return null;
    }

    @Override
    public Object postProcessAfterInitialization(Object bean, String beanName) throws BeansException {
        System.out.println("MyBeanPostProcessor postProcessAfterInitialization");
        return null;
    }
}
请注意:此时bean已完成实例化过程,请区别于InstantiationAwareBeanPostProcessor中postProcessBeforeInstantiation和postProcessAfterInstantiation方法,postProcessBeforeInstantiation方法执行时,bean还未完成实例化过程,下面会具体介绍
应用实例:ApplicationContextAwareProcessor
在上图中大家可以看见,在spring容器准备的过程中,自动向容器中注入了一个ApplicationContextAwareProcessor,那他的作用是什么呢,我们看一下源码:
class ApplicationContextAwareProcessor implements BeanPostProcessor {
	private final ConfigurableApplicationContext applicationContext;
	private final StringValueResolver embeddedValueResolver;

	public ApplicationContextAwareProcessor(ConfigurableApplicationContext applicationContext) {
		this.applicationContext = applicationContext;
		this.embeddedValueResolver = new EmbeddedValueResolver(applicationContext.getBeanFactory());
	}
	@Override
	public Object postProcessBeforeInitialization(final Object bean, String beanName) throws BeansException {
		AccessControlContext acc = null;
		if (System.getSecurityManager() != null &&
				(bean instanceof EnvironmentAware || bean instanceof EmbeddedValueResolverAware ||
						bean instanceof ResourceLoaderAware || bean instanceof ApplicationEventPublisherAware ||
						bean instanceof MessageSourceAware || bean instanceof ApplicationContextAware)) {
			acc = this.applicationContext.getBeanFactory().getAccessControlContext();
		}
		if (acc != null) {
			AccessController.doPrivileged(new PrivilegedAction<Object>() {
				@Override
				public Object run() {
					invokeAwareInterfaces(bean);
					return null;
				}
			}, acc);
		}
		else {
			invokeAwareInterfaces(bean);
		}
		return bean;
	}
	private void invokeAwareInterfaces(Object bean) {
		if (bean instanceof Aware) {
			if (bean instanceof EnvironmentAware) {
				((EnvironmentAware) bean).setEnvironment(this.applicationContext.getEnvironment());
			}
			if (bean instanceof EmbeddedValueResolverAware) {
				((EmbeddedValueResolverAware) bean).setEmbeddedValueResolver(this.embeddedValueResolver);
			}
			if (bean instanceof ResourceLoaderAware) {
				((ResourceLoaderAware) bean).setResourceLoader(this.applicationContext);
			}
			if (bean instanceof ApplicationEventPublisherAware) {
				((ApplicationEventPublisherAware) bean).setApplicationEventPublisher(this.applicationContext);
			}
			if (bean instanceof MessageSourceAware) {
				((MessageSourceAware) bean).setMessageSource(this.applicationContext);
			}
			if (bean instanceof ApplicationContextAware) {
				((ApplicationContextAware) bean).setApplicationContext(this.applicationContext);
			}
		}
	}
	@Override
	public Object postProcessAfterInitialization(Object bean, String beanName) {
		return bean;
	}
}
从源码中可以发现,最重要的方法就是invokeAwareInterfaces。在spring容器为每个bean初始化之前,它为每一个实现了特定Aware接口的bean设置其关心的属性,使这个bean具有了容器的部分能力。
| 名称 | 作用 |
|---|---|
| Environment | 获取环境信息 |
| StringValueResolver | 处理我们的占位符、SpEL计算 |
| ResourceLoader | 加载资源 |
| ApplicationEventPublisher | 发布消息 |
| MessageSource | 国际化 |
| ApplicationContext | 容器的所有能力 |
spring容器还提供了许多默认的BeanPostProcessor,有兴趣的可自行查阅。
3、ApplicationListener
简单介绍
在容器初始化时间监听过程中,会在容器中查找已实现了ApplicationListener接口的类,通过getBean获取其实现,向容器中注册。当容器进行到某个特定时期时,会向不同监听器发送其对应监听的事件,触发其onApplicationEvent方法。下图介绍了几个常用的ApplicationEvent,还有其他event不在一一列举,感兴趣的可以自己查阅。
| 事件名称 | 描述 |
|---|---|
| ContextRefreshedEvent | ApplicationContext 被初始化或刷新时,该事件被发布。这也可以在 ConfigurableApplicationContext接口中使用 refresh() 方法来发生。此处的初始化是指:所有的Bean被成功装载,后处理Bean被检测并激活,所有Singleton Bean 被预实例化,ApplicationContext容器已就绪可用。 |
| ContextStartedEvent | 当使用 ConfigurableApplicationContext (ApplicationContext子接口)接口中的 start() 方法启动 ApplicationContext 时,该事件被发布。你可以调查你的数据库,或者你可以在接受到这个事件后重启任何停止的应用程序。 |
| ContextStoppedEvent | 当使用 ConfigurableApplicationContext 接口中的 stop() 停止 ApplicationContext 时,发布这个事件。你可以在接受到这个事件后做必要的清理的工作。 |
| ContextClosedEvent | 当使用 ConfigurableApplicationContext 接口中的 close() 方法关闭 ApplicationContext 时,该事件被发布。一个已关闭的上下文到达生命周期末端;它不能被刷新或重启。 |
| RequestHandledEvent | 这是一个 web-specific 事件,告诉所有 bean HTTP 请求已经被服务。只能应用于使用DispatcherServlet的Web应用。在使用Spring作为前端的MVC控制器时,当Spring处理用户请求结束后,系统会自动触发该事件。 |
import org.springframework.context.ApplicationListener;
import org.springframework.context.event.ContextRefreshedEvent;

public class MyStartListener implements ApplicationListener<ContextRefreshedEvent> {
    @Override
    public void onApplicationEvent(ContextRefreshedEvent contextRefreshedEvent) {
        System.out.println(contextRefreshedEvent.getApplicationContext().getClass().getName() + ":contextRefreshedEvent执行");
    }
}
应用实例 ScheduledAnnotationBeanPostProcessor
大家对spring提供对定时任务应该并不陌生,通过@EnableScheduling启用,@Scheduled配置具体的定时任务。通过@EnableScheduling注解,@Import了SchedulingConfiguration基本配置类,在SchedulingConfiguration通过@Bean引入了ScheduledAnnotationBeanPostProcessor。
public class ScheduledAnnotationBeanPostProcessor
		implements MergedBeanDefinitionPostProcessor, DestructionAwareBeanPostProcessor,
		Ordered, EmbeddedValueResolverAware, BeanNameAware, BeanFactoryAware, ApplicationContextAware,
		SmartInitializingSingleton, ApplicationListener<ContextRefreshedEvent>, DisposableBean {
	@Override
	public void onApplicationEvent(ContextRefreshedEvent event) {
		if (event.getApplicationContext() == this.applicationContext) {
			finishRegistration();
		}
	}
}
这里我们只关心onApplicationEvent这个实现,当监听到容器已完成初始化事件,开始进行Scheduling模块相关事件的初始化和定时任务的注册和启动。
拓展——发布订阅
用户可自定义ApplicationContextEvent,并定义ApplicationListener订阅此类型消息,通过上文中实现ApplicationEventPublisherAware获取发布消息的能力,借助spring完成发布订阅。
/**
 * 自定义事件
**/
public class MyEvent extends ApplicationEvent {
    private Task task;
    public MyEvent(Task task) {
        super(task);
        this.task = task;
    }
    public Task getTask() {
        return task;
    }
}

/**
 * 监听器
**/
public class MyEventListener implements ApplicationListener<MyEvent> {
    @Override
    public void onApplicationEvent(MyEvent myEvent) {
        if (Objects.isNull(myEvent)) {
            return;
        }
        Task task = myEvent.getTask();
        log.info("事件接收任务:{}",JSON.toJSONString(task));
        task.setFinish(true);
        log.info("此时完成任务");
    }
}

/**
 * 发布器
**/
public class MyEventPublisher implements ApplicationEventPublisherAware {
    private ApplicationEventPublisher publisher;
    @Override
    public void setApplicationEventPublisher(ApplicationEventPublisher applicationEventPublisher) {
        this.publisher = publisher;
    }
    public void send() {
        Task task = new Task();
        task.setId(1L);
        task.setTaskName("测试任务");
        task.setTaskContext("任务内容");
        task.setFinish(false);
        MyEvent event = new MyEvent(task);
        log.info("开始发布任务");
        eventPublisher.publishEvent(event);
        log.info("发布任务完成");
    }
}
4、Lifecycle
Lifecycle用于对容器生命周期的管理,所有容器均实现了此接口。
import org.springframework.context.Lifecycle;

public class MyLifecycle implements Lifecycle {
    @Override
    public void start() {
        System.out.println("MyLifecycle start");
    }
    @Override
    public void stop() {
        System.out.println("MyLifecycle stop");
    }
    @Override
    public boolean isRunning() {
        return false;
    }
}
应用实例 AbstractApplicationContext
public abstract class AbstractApplicationContext extends DefaultResourceLoader
		implements ConfigurableApplicationContext, DisposableBean {
		@Override
	public void start() {
		getLifecycleProcessor().start();
		publishEvent(new ContextStartedEvent(this));
	}

	@Override
	public void stop() {
		getLifecycleProcessor().stop();
		publishEvent(new ContextStoppedEvent(this));
	}
}
当容器成功启动和关闭时,start()和stop()分别被触发,获取系统的LifecycleProcessor并执行,然后发送系统通知。
5、LifecycleProcessor
简单介绍
LifecycleProcessor是Lifecycle的子接口,所以它同样具有对容器生命周期的管理,在Lifecycle的基础上,它又丰富了对容器refresh和close状态变化的监听。
在上文中可以看到,当容器状态发生变化时先获取LifecycleProcessor,此时容器开谁检测是否存在用户自定义的LifecycleProcessor,如果存在,则通过getBean获取其实现,如果不存在,则会生成默认的DefaultLifecycleProcessor实现,然后触发其start。
应用实例 DefaultLifecycleProcessor
public class DefaultLifecycleProcessor implements LifecycleProcessor, BeanFactoryAware {
	/**
	  * 当容器启动时调用
	**/
	@Override
	public void start() {
		startBeans(false);
		this.running = true;
	}
	/**
	  * 当容器停止时调用
	**/
	@Override
	public void stop() {
		stopBeans();
		this.running = false;
	}
	/**
	  * 当容器刷新时调用
	**/
	@Override
	public void onRefresh() {
		startBeans(true);
		this.running = true;
	}
	/**
	  * 当容器关闭时调用
	**/
	@Override
	public void onClose() {
		stopBeans();
		this.running = false;
	}
	private void startBeans(boolean autoStartupOnly) {
	    // 获取所有Lifecycle实现
		Map<String, Lifecycle> lifecycleBeans = getLifecycleBeans();
		Map<Integer, LifecycleGroup> phases = new HashMap<Integer, LifecycleGroup>();
		for (Map.Entry<String, ? extends Lifecycle> entry : lifecycleBeans.entrySet()) {
			Lifecycle bean = entry.getValue();
			// 当容器为启动状态下,或者容器为刷新状态且当前Bean为SmartLifecycle的子类并开启了自动开始开关下执行
			if (!autoStartupOnly || (bean instanceof SmartLifecycle && ((SmartLifecycle) bean).isAutoStartup())) {
				int phase = getPhase(bean);
				// 获取分组情况
				LifecycleGroup group = phases.get(phase);
				if (group == null) {
					group = new LifecycleGroup(phase, this.timeoutPerShutdownPhase, lifecycleBeans, autoStartupOnly);
					// 放入待执行集合
					phases.put(phase, group);
				}
				group.add(entry.getKey(), bean);
			}
		}
		if (!phases.isEmpty()) {
			List<Integer> keys = new ArrayList<Integer>(phases.keySet());
			Collections.sort(keys);
			for (Integer key : keys) {
			    // 执行start方法
				phases.get(key).start();
			}
		}
	}
	private void stopBeans() {
		Map<String, Lifecycle> lifecycleBeans = getLifecycleBeans();
		Map<Integer, LifecycleGroup> phases = new HashMap<Integer, LifecycleGroup>();
		for (Map.Entry<String, Lifecycle> entry : lifecycleBeans.entrySet()) {
			Lifecycle bean = entry.getValue();
			int shutdownOrder = getPhase(bean);
			LifecycleGroup group = phases.get(shutdownOrder);
			if (group == null) {
				group = new LifecycleGroup(shutdownOrder, this.timeoutPerShutdownPhase, lifecycleBeans, false);
				phases.put(shutdownOrder, group);
			}
			group.add(entry.getKey(), bean);
		}
		if (!phases.isEmpty()) {
			List<Integer> keys = new ArrayList<Integer>(phases.keySet());
			Collections.sort(keys, Collections.reverseOrder());
			for (Integer key : keys) {
				phases.get(key).stop();
			}
		}
	}
}
当容器状态发生变化时,DefaultLifecycleProcessor会获取所有满足条件的Lifecycle实现,按照指定的分组,顺序执行,它提供了对容器内所有Lifecycle的管理。
注意
- 容器也是一种特殊的Lifecycle,DefaultLifecycleProcessor刷选时已经将其去除,所以不在其管理范围内;
- 不论存在多少个自定义LifecycleProcessor,容器都且只会获取一个命名为lifecycleProcessor的LifecycleProcessor实现类;
- 当用户自定义了LifecycleProcessor后,系统将不会注入默认的DefaultLifecycleProcessor,会导致Lifecycle接口特性失去作用,不建议大家使用。
6、SmartLifecycle
简单介绍
SmartLifecycle是Lifecycle的一个子接口,比Lifecycle有更丰富的功能:
- 继承了Phased接口,容器中如果有多个SmartLifecycle实例,可以方便控制调用顺序;
- 无需容器显示调用start()方法,就可以回调SmartLifecycle接口的start();
- 使用多线程执行关闭操作。
import org.springframework.beans.BeansException;
import org.springframework.beans.factory.config.BeanPostProcessor;
import org.springframework.context.SmartLifecycle;

public class MySmartLifecycle implements SmartLifecycle{
    private boolean running;

    @Override
    public boolean isAutoStartup() {
        return true;
    }

    @Override
    public void stop(Runnable callback) {
        callback.run();
        stop();
    }

    @Override
    public void start() {
        System.out.println("MySmartLifecycle 执行start方法");
        running = true;
    }

    @Override
    public void stop() {
        System.out.println("MySmartLifecycle 执行stop方法");
        running = false;
    }

    @Override
    public boolean isRunning() {
        return running;
    }

    @Override
    public int getPhase() {
        return 0;
    }
}
一般情况下,容器并不会显示的调用start方法,当容器通过refresh启动时,DefaultLifecycleProcessor只会执行isAutoStartup为true的SmartLifecycle实现类。一般情况下,需要监听容器的状态,需要实现SmartLifecycle而并不会直接使用Lifecycle。
应用实例:SchedulerFactoryBean
SchedulerFactoryBean是spring为集成Quartz调度任务框架提供的工厂类,保证了Scheduler能够感知Spring容器的生命周期,完成自动启动和关闭的操作。
public class SchedulerFactoryBean extends SchedulerAccessor implements FactoryBean<Scheduler>,
		BeanNameAware, ApplicationContextAware, InitializingBean, DisposableBean, SmartLifecycle {
		@Override
	public void start() throws SchedulingException {
		if (this.scheduler != null) {
			try {
				startScheduler(this.scheduler, this.startupDelay);
			}
			catch (SchedulerException ex) {
				throw new SchedulingException("Could not start Quartz Scheduler", ex);
			}
		}
	}

	@Override
	public void stop() throws SchedulingException {
		if (this.scheduler != null) {
			try {
				this.scheduler.standby();
			}
			catch (SchedulerException ex) {
				throw new SchedulingException("Could not stop Quartz Scheduler", ex);
			}
		}
	}
}
其它
- 在容器初始化过程中,上述的bean均已完成了其初始化,并且为单例模式。
- 当bean设置为单例,且lazy属性为false时,在容器初始化时,也已经为其完成了初始化。


 1003
1003

 被折叠的 条评论
为什么被折叠?
被折叠的 条评论
为什么被折叠?
 到【灌水乐园】发言


