


用vue3开发前端项目的话,组件通信则是必修课,方式一般有 以下这几种
- Props(自定义属性)
- 自定义事件
- v-model(算是Props和自定义事件的结合,只不过属性和事件名称是默认设置的)
- Provide & Inject
- attrs
- ref、parent
- 全局状态管理(如 Pinia 或Vuex)
- 事件总线&pubsub(发布订阅)
常用的大概就以上这么多,下面将针对这几种方法来展开详细的重点说明和实际应用。
props
父级组件用法与vue2相同
<template>
  <div class="parent">
    <div class="title">
      <h1>父组件</h1>
    </div>
    <child :count="count"></child>
  </div>
</template>

<script setup>
import { ref } from 'vue';
import child from './child.vue'
let count = ref(0)
</script>
子组件接收父级自定义属性则与vue2不同,vue2中是以props 配置项来接收,vue3 中则需要 用到宏函数 defineProps类接收
<template>
  <div class="child">
    <h1>子组件</h1>
    <h1>父级props:{{ count }}</h1>
  </div>
</template>

<script setup>
defineProps(['count'])

</script>
如果想给count 设置类型和默认值,和vue2设置方法差不多一样
defineProps({
  count: {
    type: Number,
    default: 1
  }
})
自定义事件
父级组件用法与vue2相同
父组件
<template>
  <div class="parent">
    <div class="title">
      <h1>父组件: {{ count }}</h1>
      <h1 v-show="childCount">子组件给的值:{{ childCount }}</h1>
    </div>
    <child :count="count" @send-add="addCount"></child>
  </div>
</template>

<script setup>
import { ref } from 'vue';
import child from './child.vue'

let count = ref(0)
let childCount = ref(0)

function addCount(value) {
  childCount.value = value
}
</script>
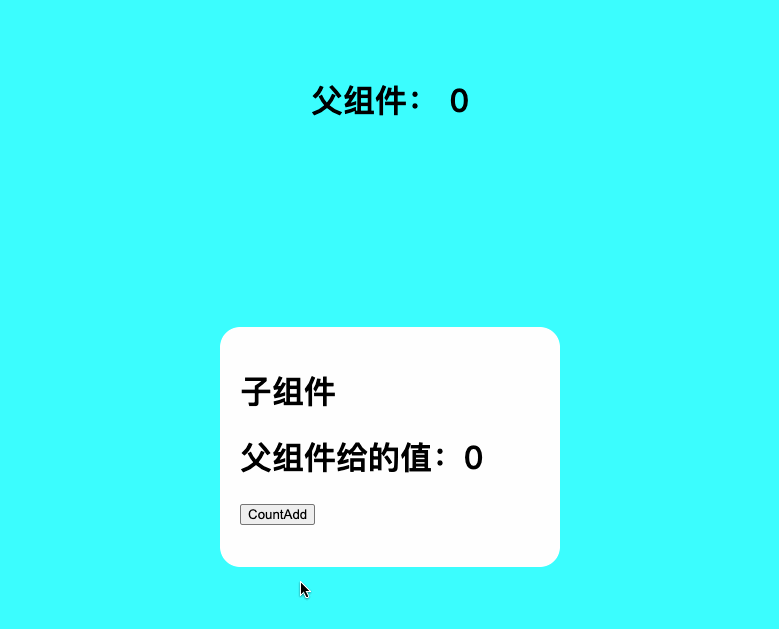
子组件的化就不能用vue2中的$emit了,需要换成宏函数 defineEmits,参数为数组,数组的元素为父级的 自定义事件名称 sendAdd,defineEmits返回的值一个对象,该对象包含了组件可以触发的所有自定义事件
<template>
  <div class="child">
    <h1>子组件</h1>
    <h1>父组件给的值:{{ count }}</h1>
    <button @click="emit('sendAdd',2)">CountAdd</button>
  </div>
</template>

<script setup>
defineProps({
  count: {
    type: Number,
    default: 1
  }
})

let emit = defineEmits(['sendAdd'])
</script>
v-model
- 在vue2中 v-model其实是 prop为 value和 自定义事件是 input 的语法糖
- 在vue3中同样,只不过 value 变为了 modelValue,input改成了update:modelValue
而且子组件中接收 需要用到宏函数defineModel
还有一点不同的是就是 vue2中只能绑定一个v-model,但vue3中却可以绑定多个
父组件 写法还是v-model
vue版本 3.4之前的写法
用defineProps接受modelValue,defineEmits返回
父组件
<template>
  <div class="parent">
    <div class="title">
      <h1>父组件 count: {{ count }}</h1>
    </div>
    <child v-model="count"></child>
  </div>
</template>

<script setup>
import { ref } from 'vue';
import child from './child.vue'
let count = ref(0)
</script>
子组件
<template>
  <div class="child">
    <h1>子组件</h1>
    <button @click="emit('update:modelValue',20)">CountAdd</button>
  </div>
</template>

<script setup>
defineProps(['modelValue'])
let emit = defineEmits(['modelValue'])
</script>
从vue 版本3.4后 加入了宏函数 defineModel,支持以下两种写法
第一种单个v-model
defineModel会默认接收
<template>
  <div class="parent">
    <div class="title">
      <h1>父组件</h1>
    </div>
    <child v-model="count"></child>
  </div>
</template>

<script setup>
import { ref } from 'vue';
import child from './child.vue'
let count = ref(0)
</script>
子组件中 defineModel接收父级v-model,默认的prop为 "modelValue,
返回的是一个ref,通过修改这个ref的Value,自动触发 update:modelValue 事件,这样就不用再使用defineEmits来触发了了,真的很方便
<template>
  <div class="child">
    <h1>子组件</h1>
    <h1>父组件给的值:{{ modelValue }}</h1>
    <button @click="sendAdd">CountAdd</button>
  </div>
</template>

<script setup>

let count = defineModel()

function sendAdd(){
  count.value = 20
}
</script>
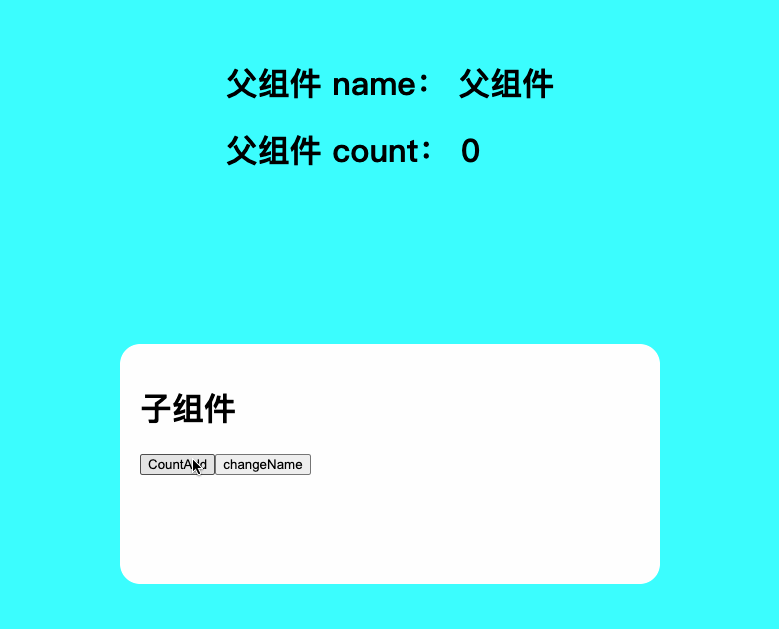
还支持多个 v-model
父
<!--父-->
<template>
  <div class="parent">
    <div class="title">
      <h1>父组件 name: {{ name }}</h1>
      <h1>父组件 count: {{ count }}</h1>
    </div>
    <child v-model:name="name" v-model:count="count"></child>
  </div>
</template>

<script setup>
import { ref } from 'vue';
import child from './child.vue'
let count = ref(0)
let name = ref('父组件')
</script>
子
<!--子-->
<template>
  <div class="child">
    <h1>子组件</h1>
    <button @click="sendAdd">CountAdd</button>
    <button @click="changeName">changeName</button>
  </div>
</template>

<script setup>
let count = defineModel('count')
let name = defineModel('name')
function sendAdd(){
  count.value = 20
}
function changeName(){
  name.value = '子组件'
}
</script>
另外 defineModel 还是支持设置默认值和类型
defineModel('count', { required: 10,type: Number,req })
下面是效果图
| 单个v-model | 多个v-model |
|---|---|
 |  |
attrs
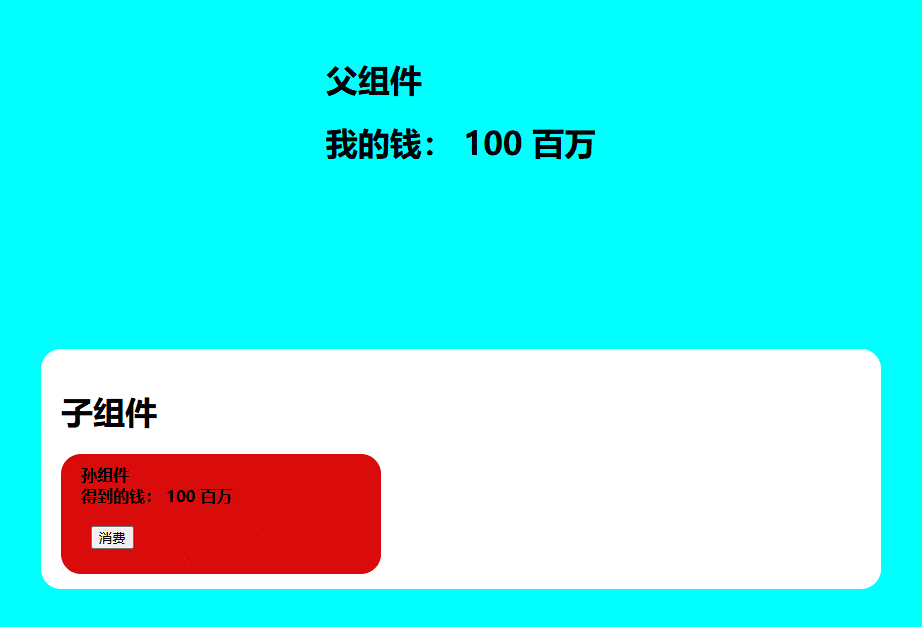
父给孙传参数
下方的 v-bind="{ money: money, spend: spend }
等价于 :money=“money” :spend=“spend”
父组件
<template>
  <div class="parent">
    <div class="title">
      <h1>父组件</h1>
      <h1>我的钱: {{ money }} 百万</h1>
    </div>
    <!-- <child :count="count" :money="money"></child> -->
    <child v-bind="{ money: money, spend: spend }"></child>
  </div>
</template>

<script setup>
import { ref } from "vue";
import child from "./child.vue";

let money = ref(100);
let spend = (num) => {
  money.value -= num
}
</script>
子组件 相当于中间过度,把props 里没有接收参数,以$attrs传给孙子组件
<template>
  <div class="child">
    <h1>子组件</h1>
    <grandson v-bind="$attrs"></grandson>
  </div>
</template>

<script setup>
import grandson from './grandson.vue'

</script>
孙组件
<template>
  <div class="grandson">
    <h4>孙组件</h4>
    <h4>得到的钱: {{ money }} 百万</h4>
    <button @click="spend(1)">消费</button>
  </div>
</template>

<script setup>
defineProps(['money','spend'])

</script>
Provide & Inject
provide 和 inject 通常会在不同的组件中运行,最顶层组件 provide提供数据(依赖注入),所有子组件用 inject(注入) 来接收,
降低耦合度、提高可重用性、易于管理、功能增强
父组件
<template>
  <div class="parent">
    <div class="title">
      <h1>父组件</h1>
      <h1>我的钱: {{ money }} 百万</h1>
    </div>
    <child></child>
  </div>
</template>

<script setup>
import { ref, provide } from 'vue';
import child from './child.vue'

let money = ref(100)

provide('money', money)

provide('spend', (num) => {
  money.value -= num
})
</script>
子组件
<template>
  <div class="child">
    <h1>子组件</h1>
    <grandson></grandson>
  </div>
</template>

<script setup>

import grandson from './grandson.vue'

</script>
孙组件
<template>
  <div class="grandson">
    <h4>孙组件</h4>
    <h4>得到的钱: {{ money }} 百万</h4>
    <button @click="spend(1)">消费</button>
  </div>
</template>

<script setup>
import { inject } from 'vue'
let money = inject('money')
let spend = inject('spend')
</script>
inject 第二个参数还能设置默认值,当provide没有以来注入’money’这个关键字时,默认值才会生效
inject('money',200)
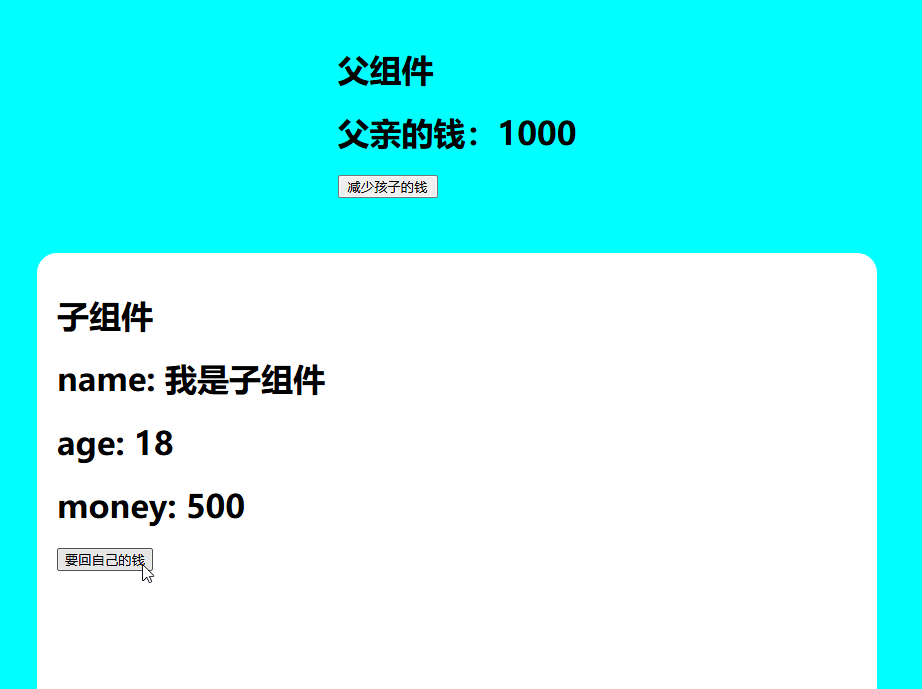
ref、parent
ref写法不变,但获取组件实例的方法有所改动,组件上ref绑定一个关键字(cc),js中 需要声明一个ref绑定的关键字的同名字 let cc = ref(),通过cc就能访问到组件的实例
父组件
<template>
  <div class="parent">
    <div class="title">
      <h1>父组件</h1>
      <h1>父亲的钱:{{ count }}</h1>
      <button @click="reduce">减少孩子的钱</button>
    </div>
    <child ref="cc"></child>
  </div>
</template>

<script setup>
import { ref } from "vue";
import child from "./child.vue";
let cc = ref();
let count = ref(1000);
let reduce = () => {
  console.log(cc.value);
  cc.value.money -= 1;
  count.value += 1;
};
<!--defineExpose({count})-->
</script>
子组件
<template>
  <div class="child">
    <h1>子组件</h1>
    <h1>name: {{ name }}</h1>
    <h1>age: {{ age }}</h1>
    <h1>money: {{ money }}</h1>
    <button @click="add($parent)">要回自己的钱</button>
  </div>
</template>

<script setup>
    import { ref } from "vue";

    let name = ref("我是子组件");
    let age = ref(18);
    let money = ref(500);
    let add = (parent) => {
      console.log(parent)
      money.value += 1;
      parent.count -= 1;
    };
    <!--defineExpose({ money });-->
</script>
点击按钮打印实例会发现 实例中没有子组件的数据源,那是因为vue 3 加入了 defineExpose。需要子组件 在defineExpose中声明 被允许访问的数据源,没被声明的将无法被访问。
子组件中 加入以下代码 money 才能被访问
defineExpose({money})
同样父组件中声明被允许访问的数据源头
defineExpose({count})
pinia
pinane
可以理解为下一代 vuex,作者也称之为vuex5,同时vue已经将 pinia 收入 官方账户了
具体使用方法请移步这里我之前有总结过 的 Vue3(ts)中使用 pinia
事件总线 mitt
安装 mitt 库:
npm install mitt
然后,创建一个事件总线的模块 eventBus.js:
import mitt from'mitt';

const eventBus = mitt();

export default eventBus;
在需要发送事件的组件中:
import eventBus from './eventBus';

// 发送事件
eventBus.emit('myEvent', { data: '这是事件携带的数据' });
在需要接收事件的组件中:
import eventBus from './eventBus';

// 监听事件
eventBus.on('myEvent', (payload) => {
  console.log('接收到事件:', payload);
});
这样就实现了一个基本的 事件总线,用于组件之间的通信。
发布订阅
之前写过一篇 实战应用,就不单独在记录了,用到的这个发布订阅,详细内容请查看
uniapp 微信小程序 多个视频 播放优化问题


 被折叠的 条评论
为什么被折叠?
被折叠的 条评论
为什么被折叠?
 到【灌水乐园】发言


