


创建项目
Pycharm专业版

默认文件
Pycharm社区版没有自动创建这几个文件,手动创建即可。

运行


常规功能
debug模式
修改内容自动更新,否则需要重新启动运行项目才生效。

修改host
通网络内其他人可以通过我得ip访问该服务。

修改端口号
空格分隔
 URL
URL
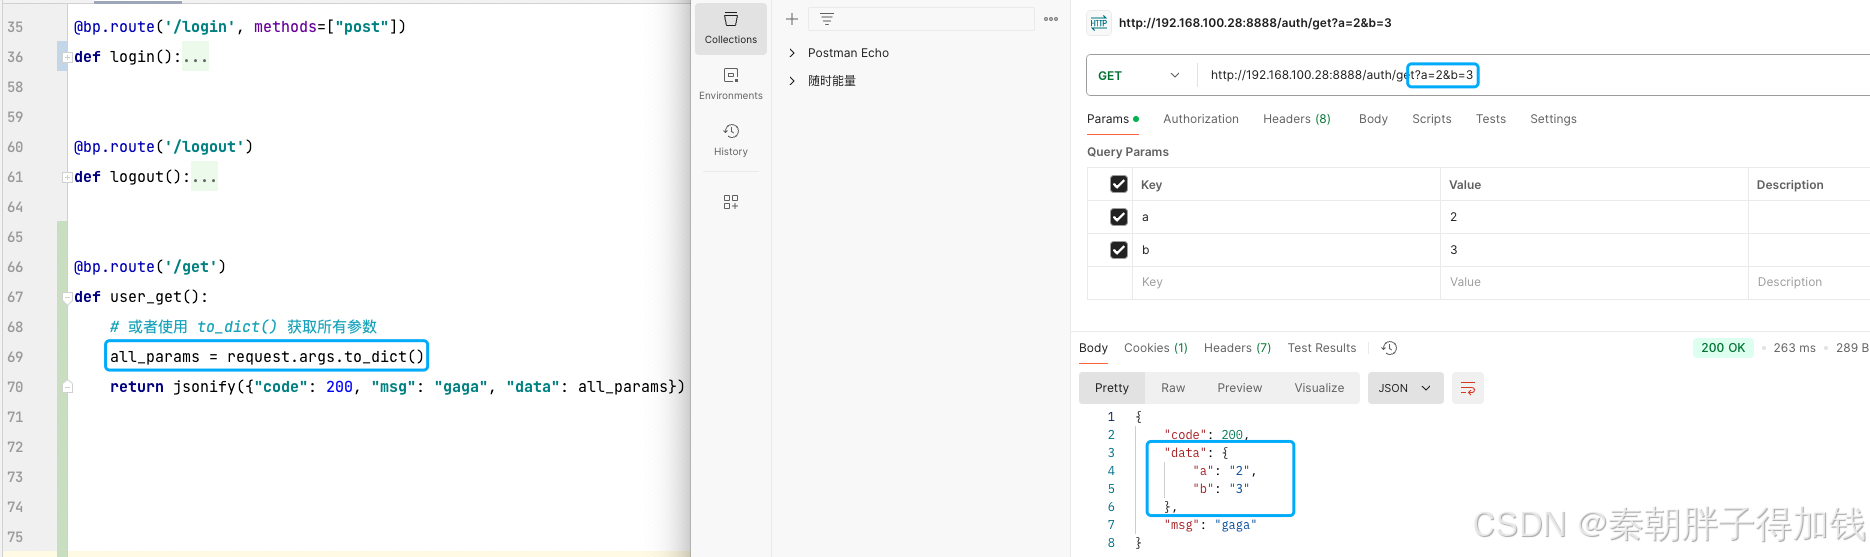
基础get接口

地址中带有参数

地址中无参数但有入参

数据库
pymysql
pip3 install pymysqlFlask-SQLAlchemy
pip3 install flask-sqlalchemy配置
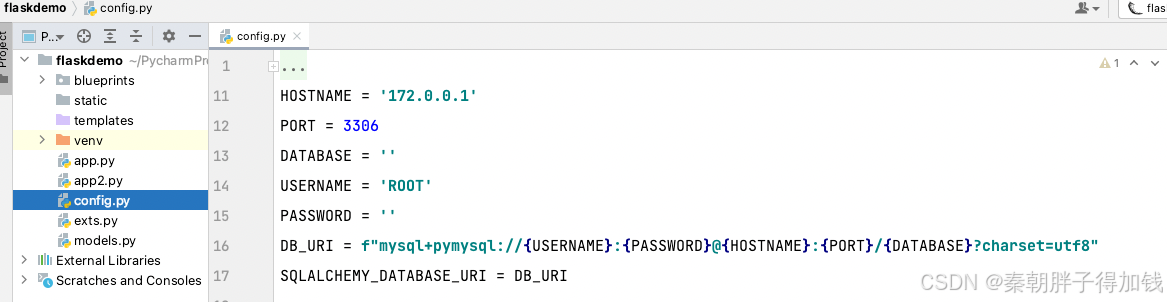
# 数据库信息配置到app.config
# 数据库配置信息
HOSTNAME = '172.0.0.1'
PORT = 3306
DATABASE = ''
USERNAME = 'ROOT'
PASSWORD = ''
DB_URI = f"mysql+pymysql://{USERNAME}:{PASSWORD}@{HOSTNAME}:{PORT}/{DATABASE}?charset=utf8"
SQLALCHEMY_DATABASE_URI = DB_URI
表
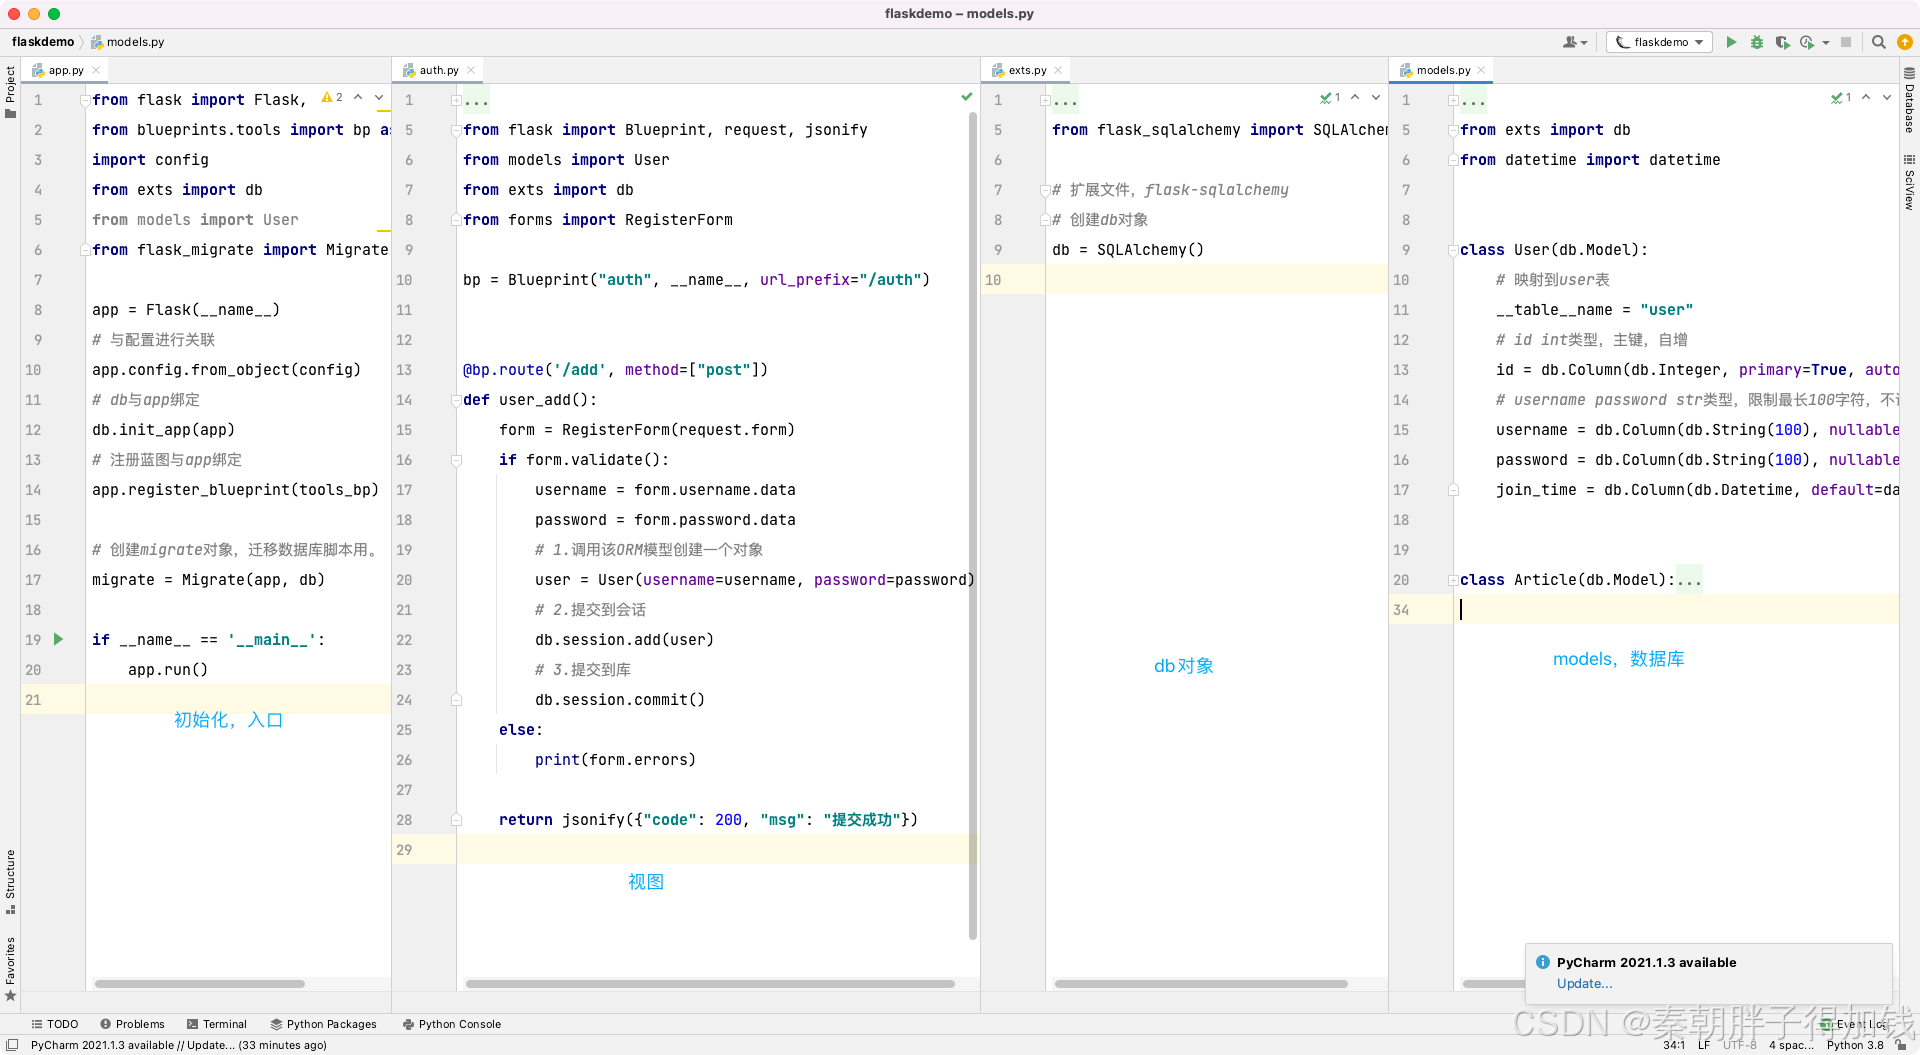
class User(db.Model):
    # 映射到user表
    __table__name = "user"
    # id int类型,主键,自增
    id = db.Column(db.Integer, primary=True, autoincrement=True)
    # username password str类型,限制最长100字符,不许为空。
    username = db.Column(db.String(100), nullable=False)
    password = db.Column(db.String(100), nullable=False)
    join_time = db.Column(db.Datetime, default=datetime.now)


class Article(db.Model):
    # 映射到article表
    __table__name = "article"
    # id int类型,主键,自增
    id = db.Column(db.Integer, primary=True, autoincrement=True)
    # title str类型,限制最长200字符,不许为空。
    title = db.Column(db.String(200), nullable=False)
    # content Text类型,不许为空。
    content = db.Column(db.Text, nullable=False)

    # 添加外键,外键类型与user表主键类型一致,db.Ineger
    article_id = db.Column(db.Ineger, db.ForeignKey("user.id"))
    # 等于User.query.get(article.author_id),同时,user表默认新增articles属性
    author = db.relationship("User", backref='articles')

class Station(db.Model):
    __table__name = "tools_station"
    id = db.Column(db.Integer, primary=True, autoincrement=True)
    create_station_id = db.Column(db.String(200), nullable=False)
    station_name = db.Column(db.String(200), nullable=False)
    create_time = db.Column(db.Datetime, default=datetime.now)

    # 外键
    user_id = db.Column(db.Ineger, db.ForeignKey("user.id"))
    # article = Article.query.filter_by(title="狱锁狂龙")
    # 等于User.query.get(article.user_id)
    # user表默认新增stations属性,通过user.stations,可获取该用户所有的站,并按照创建时间倒序排列。
    user = db.relationship("User", backref=db.backref('stations', order_by=create_time.desc()))
更新表内容
python3 -m flask db init :整个项目只执行一次即可

数据结构有变动时执行以下两个步骤:
    python3 -m flask db migrate    # 识别ORM模型的改变,生成迁移脚本

    python3 -m flask db upgrade    # 运行迁移脚本,同步到数据库
增删改查
@app.post('/user/add')
def user_add():
# 1.调用该ORM模型创建一个对象
user = User(username="狂徒", password="admin")
# 2.提交到会话
db.session.add(user)
# 3.提交到库
db.session.commit()
return '提交成功'
@app.route('/article/add')
def article_add():
article1 = Article(title="狱锁狂龙", content="xxxxx")
article2 = Article(title="狱锁狂龙", content="xxxxx")
db.session.add([article1, article2])
db.session.commit()
return '提交成功'
@app.post('/user/update')
def user_update():
# 1.先查到这个对象。
user = User.query.filter_by(user_name="狂徒").first()
# 2.修改该对象的值
user.password = "admin1"
# 3.提交到库
db.session.commit()
return '修改成功'
@app.post('/user/delete')
def user_delete():
# 1.先查到这个对象。
user = User.query.filter_by(user_name="狂徒").first()
# 2.从会话删除
db.session.delete(user)
# 3.提交到库
db.session.commit()
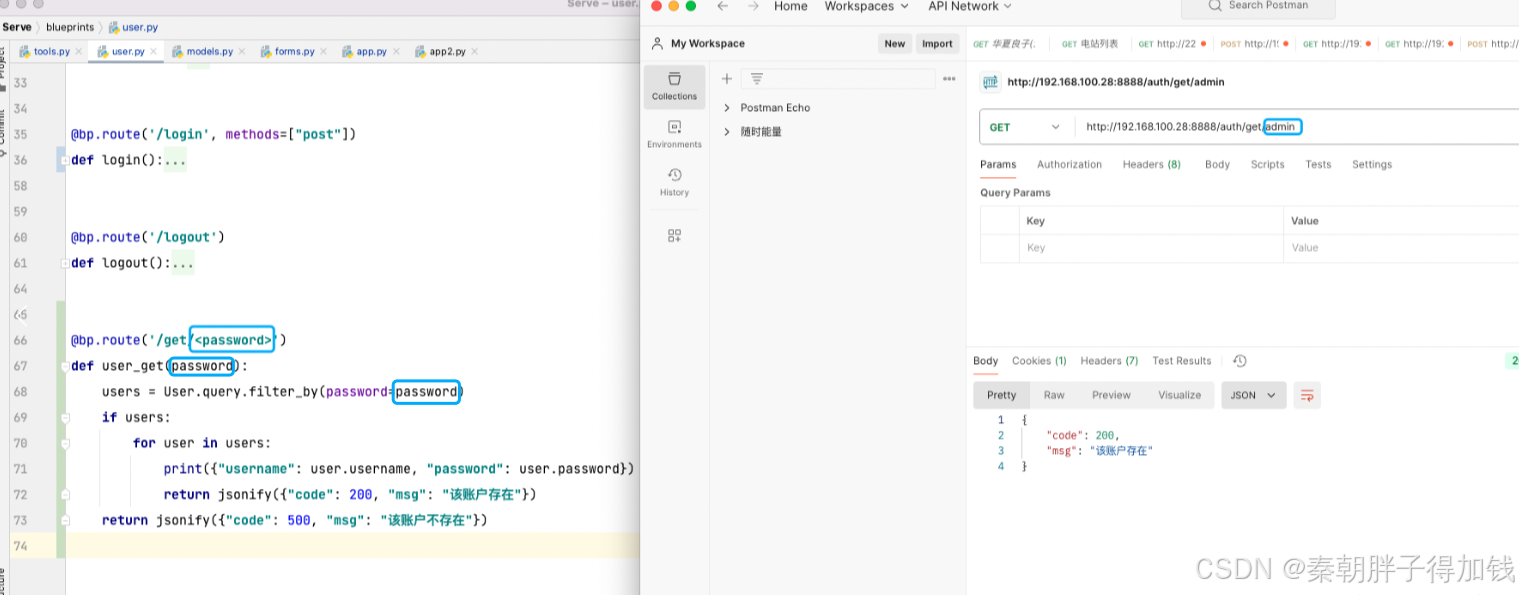
return '提交成功'@bp.route('/get')
def user_get():
# 2.通过get,返回查询集(QuerySet),类似列表。
users = User.query.filter_by(password="admin")
for user in users:
print({"username": user.username, "password": user.password})
return '获取成功'在这段代码中,users 和 user 分别代表以下含义:
users:
users 是一个查询集(QuerySet),它包含了所有在数据库 User 表中 password 字段等于 "admin" 的记录。这是通过调用 User.query.filter_by(password="admin") 生成的。
在 Flask-SQLAlchemy 中,User.query 提供了对数据库表 User 的查询接口。filter_by() 方法用于添加过滤条件,这里的过滤条件是 password 字段的值必须为 "admin"。
需要注意的是,这个查询集(users)在调用 for user in users: 之前并没有真正执行数据库查询。实际的查询是在迭代这个查询集时(即执行 for 循环时)进行的,这被称为“惰性加载”。
user:
user 是 users 查询集中的每一个元素,在 for 循环中依次迭代得到。
每次迭代,user 都会指向查询结果中的一条记录,即一个 User 对象的实例。这个对象包含了该记录在数据库中的所有字段(如 username 和 password)。
在循环体内,通过 user.username 和 user.password 可以访问当前迭代到的 User 对象的 username 和 password 字段。主键和外键
# 获取该用户所有的图书
@app.route('/user_article/get')
def user_article_get():
    user = User.query.get(1)
    for article in user.articles:
        print(article)
    return '获取成功'


# 获取该图书对应的用户
@app.route('/article_user/get')
def article_user_get():
    article = Article.query.get(1)
    user = article.author
    """
    article = Article.query.filter_by(title="狱锁狂龙")
    # 第一种,通过外键获取用户信息
    user = User.query.get(article.author_id)
    # 第二种,article.author该键的值就是这个对象在用户表的对应信息,所以直接调用article.author即可。
    article.author = user
    print(article.author)
    """
    return f'获取成功{user}'
项目结构
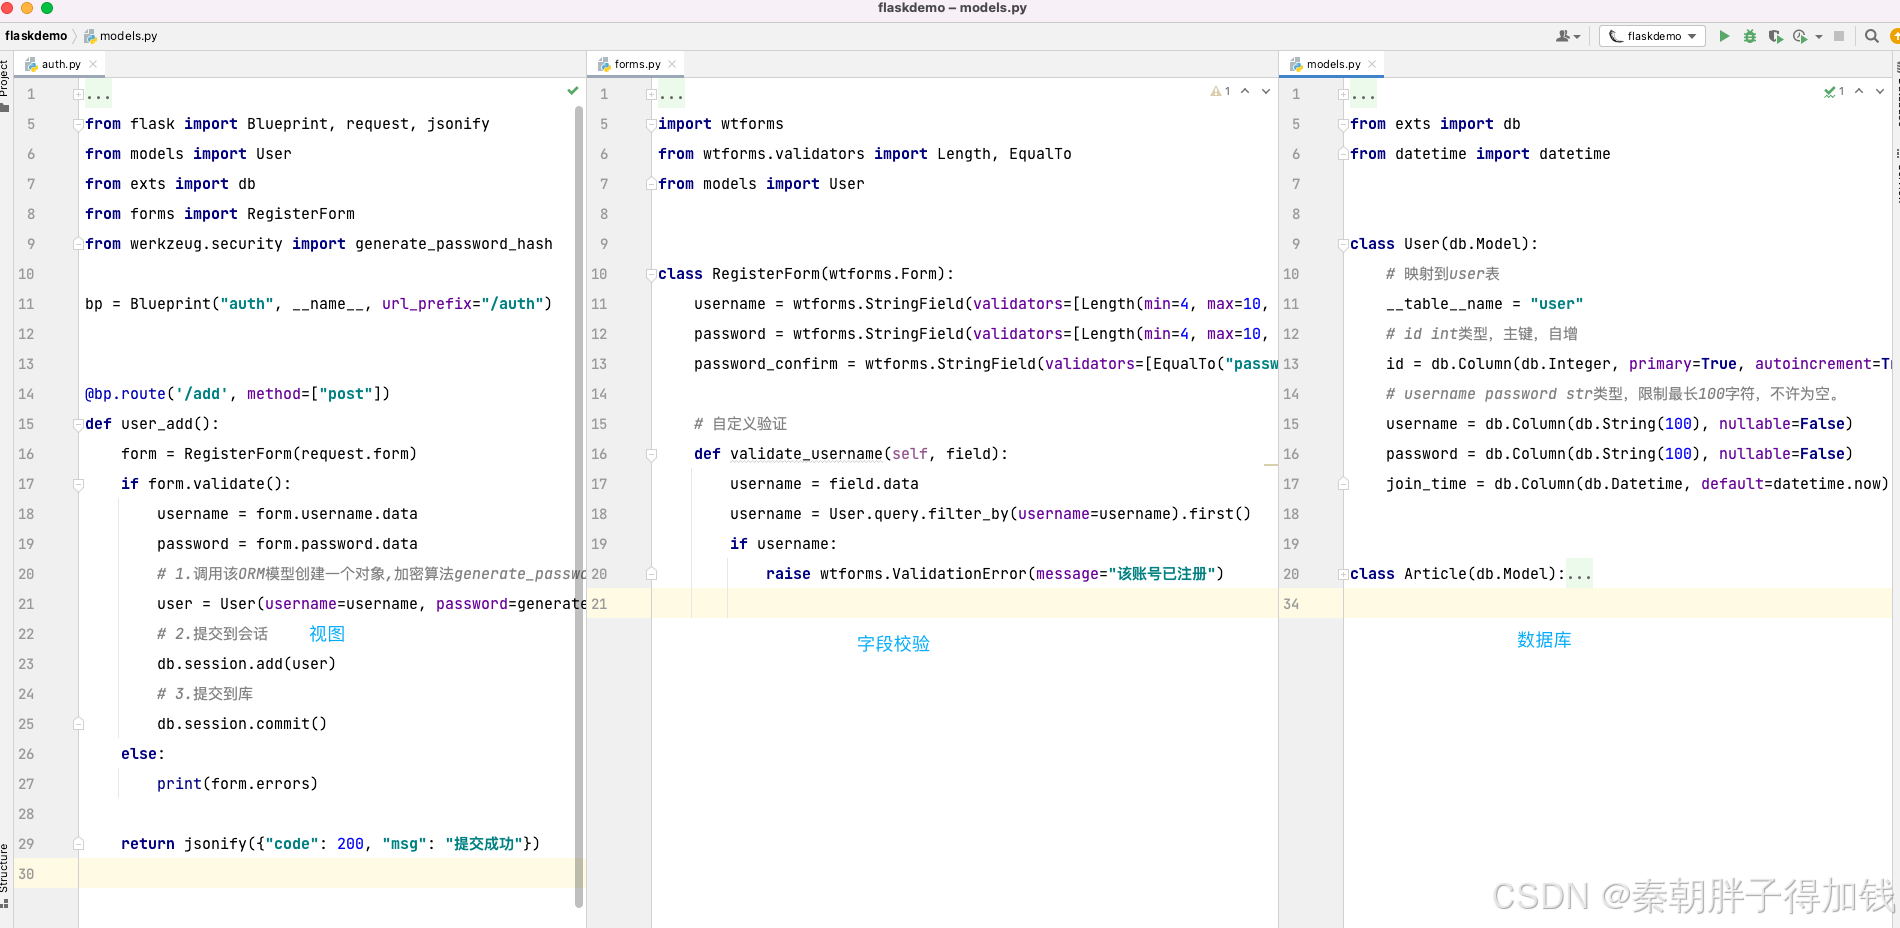
Flask 扩展:Flask-WTF
class DemoForm(wtforms.Form):
    name = wtforms.StringField(validators=[Length(min=1, max=10, message="桩名格式错误")])
    num = wtforms.IntegerField(validators=[NumberRange(min=1, max=2, message="枪数量必须在1到2之间")])

    # 自定义验证用户名,函数命名必须匹配规则validate_要验证的变量
    def validate_name(self, field):
        # 获取要验证变量的值
        username = field.data
        username = User.query.filter_by(username=username).first()
        if username:
            raise wtforms.ValidationError(message="该账号已注册")
Post请求
Json格式提取数据
@bp.post("/station/create")
# 该用户创建充电桩
def tools_create_station():
    request_data = MultiDict({key: value for key, value in request.json.items()})
    #     print(request_data,type(request_data),request_data.get("create_station_name"))
    print(request_data.get("username"))
    form = CreateStationForm(request_data)
        if form.validate():
Get请求两种常用入参方式
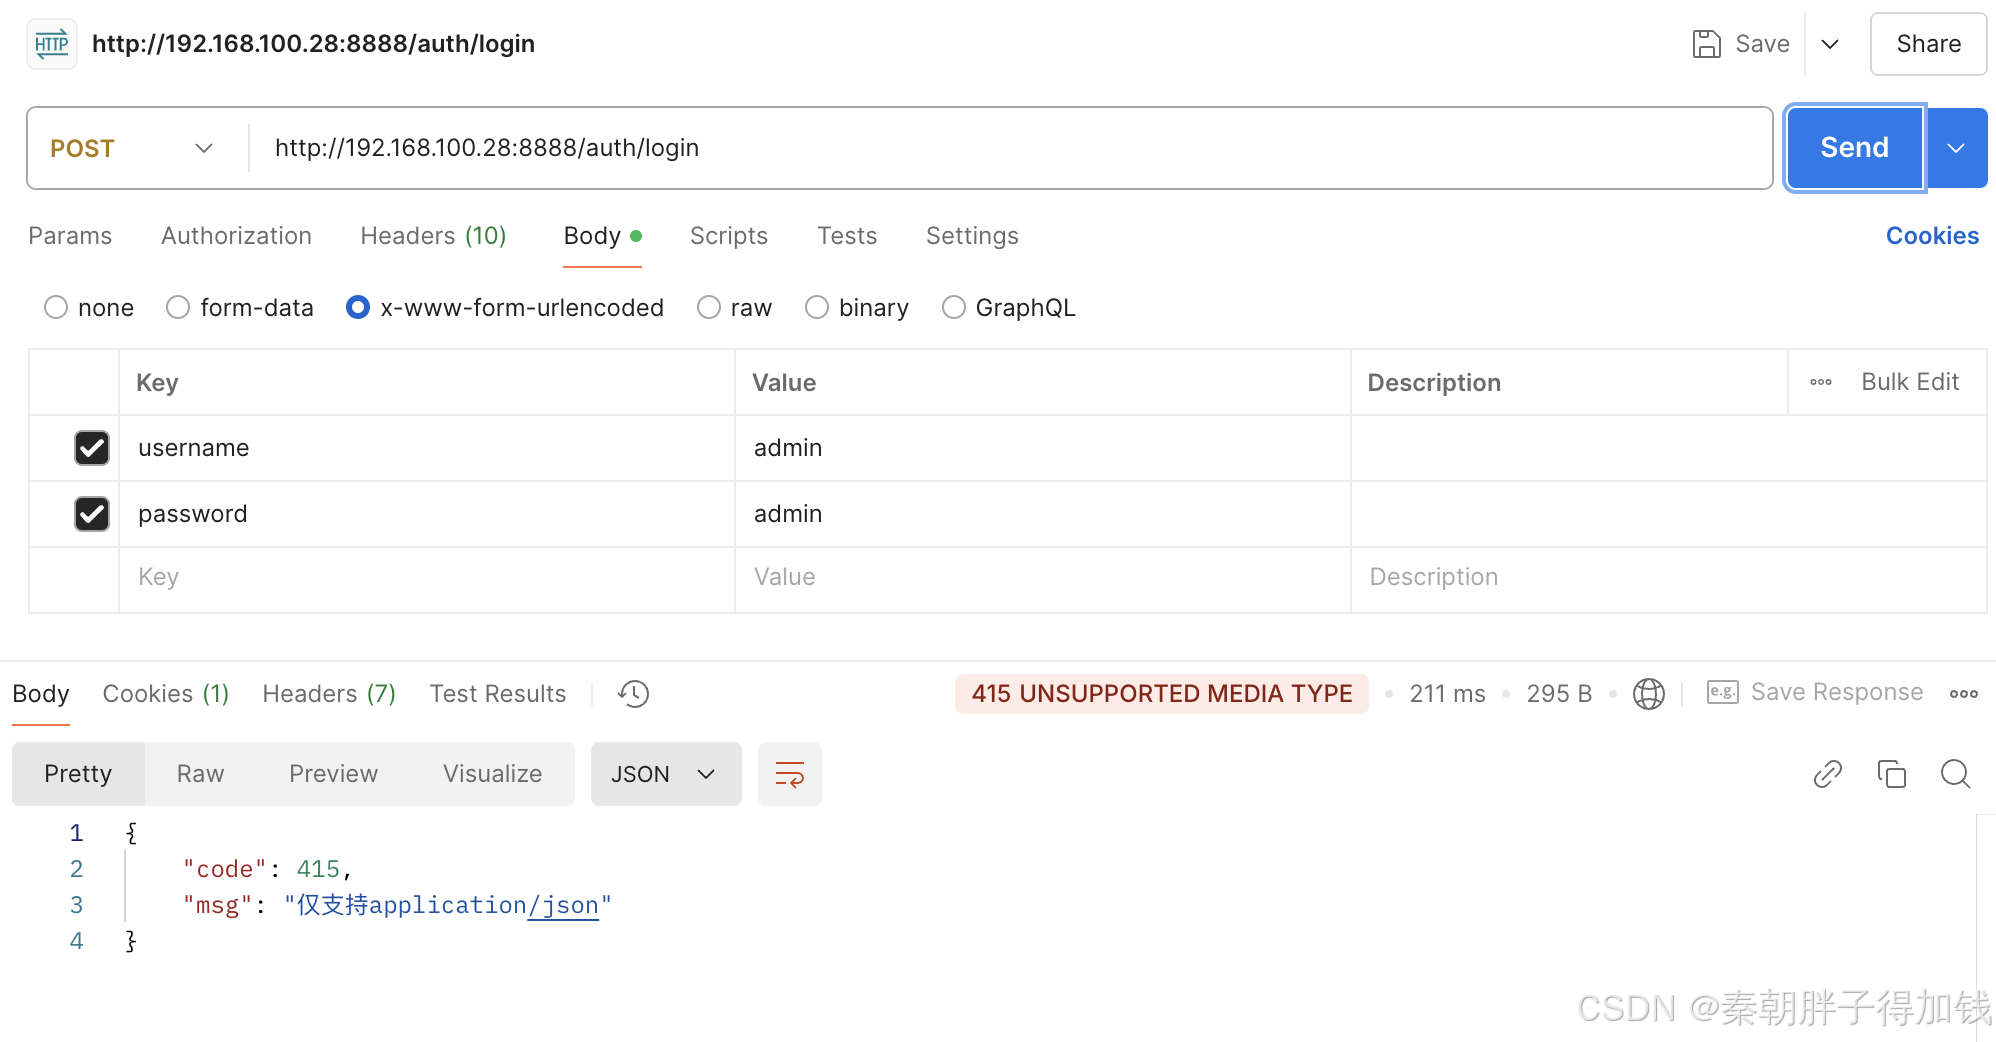
自定义返回状态码
@bp.route('/login', methods=["post"])
def login():
    content_type = request.headers.get('Content-Type')
    if content_type != "application/json":
        response = make_response(jsonify({"code": 415, "msg": "仅支持application/json"}))
        response.status_code = 415
        return response
部署
uwsgi
uWSGI(官方写法)是一个Web服务器和应用服务器,它在Web应用程序开发中扮演着重要角色。以下是对uWSGI的详细介绍:
一、定义与功能
- 定义:uWSGI是一个用C语言编写的Web应用程序容器,它实现了WSGI协议、uwsgi协议以及HTTP协议,用于将Web应用程序与Web服务器之间进行通信。
- 功能:uWSGI充当Web服务器和Python Web应用程序之间的桥梁,能够处理大量并发连接,并提供了负载均衡、缓存、自动扩展等高级功能。
二、与WSGI和uwsgi的关系
- WSGI:WSGI(Web Server Gateway Interface)是Python Web应用程序与Web服务器之间的接口规范。它定义了应用程序和服务器之间的标准接口,使得应用程序可以在不同的Web服务器上运行。uWSGI服务器通过实现WSGI协议,能够与Python Web应用程序进行通信。
- uwsgi:uwsgi是uWSGI服务器的一种通信协议,用于定义uWSGI服务器与Web服务器(或应用程序)之间的数据传输格式。它是一种二进制协议,允许uWSGI服务器与应用程序之间进行双向通信,从而提高了性能。
三、特性与优势
- 多语言支持:uWSGI不仅支持Python,还支持Ruby、Perl等多种编程语言,为开发者提供了更多的选择。
- 高性能:uWSGI能够处理大量并发连接,并且提供了高效的进程管理和负载均衡策略。
- 灵活性:uWSGI支持多种配置格式,包括命令行参数、XML、INI、YAML等,方便开发者根据实际需求进行灵活配置。
- 丰富的功能:除了基本的Web服务功能外,uWSGI还提供了缓存、自动扩展、静态文件服务等高级功能。
四、应用场景
- 生产环境:在生产环境中,uWSGI通常与Nginx或Apache等Web服务器一起使用,作为Python Web应用程序的后端服务器。它负责处理Nginx转发的动态请求,并与Python应用程序进行通信,同时将应用程序返回的响应数据传递给Nginx。
- 开发测试:虽然uWSGI主要用于生产环境,但也可以在开发测试环境中使用。开发者可以利用uWSGI的灵活配置和高效性能来模拟生产环境,对Web应用程序进行调试和优化。
五、安装与配置
- 安装:uWSGI可以通过pip进行安装,也可以使用源码包进行编译安装。安装完成后,开发者需要根据实际需求进行配置。
- 配置:uWSGI的配置文件通常包括socket、processes、threads、logfile等选项。开发者可以通过修改这些选项来调整uWSGI的行为和性能。例如,可以设置socket的监听队列大小、工作进程的数量和线程数等。
综上所述,uWSGI是一个功能强大且灵活的Web服务器和应用服务器,它实现了WSGI协议和uwsgi协议,能够高效地处理Python Web应用程序的请求和响应。在生产环境中,uWSGI通常与Nginx或Apache等Web服务器一起使用,为开发者提供了稳定、可靠且高效的Web服务解决方案。
Successfully installed uwsgi-2.0.28
安装gcc,安装sudo dnf install gcc
安装开发包,sudo dnf install python3-devel
安装uwsgi,pip3 install uwsgi -i https://mirrors.aliyun.com/pypi/simple/
# 创建一个配置文件uwsgi.ini
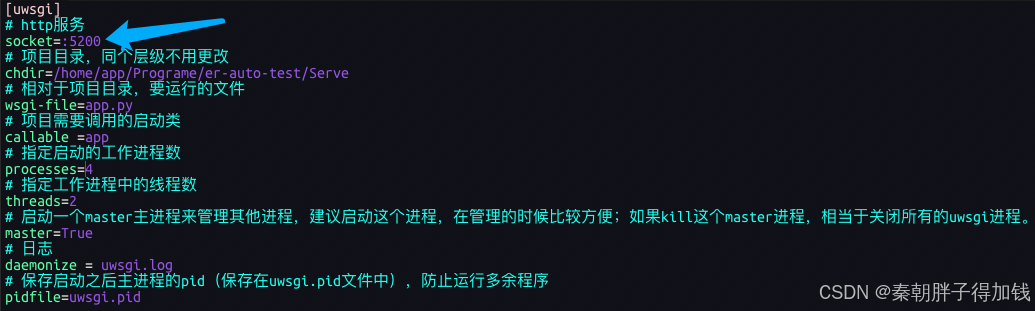
[uwsgi]
# http服务
http-socket=:8888
# 项目目录,同个层级不用更改
chdir=/home/app/Programe/er-auto-test/Serve
# 相对于项目目录,要运行的文件
wsgi-file=app.py
# 项目需要调用的启动类
callable =app
# 指定启动的工作进程数
processes=4
# 指定工作进程中的线程数
threads=2
# 启动一个master主进程来管理其他进程,建议启动这个进程,在管理的时候比较方便;如果kill这个master进程,相当于关闭所有的uwsgi进程。
master=True
# 日志
daemonize = uwsgi.log
# 保存启动之后主进程的pid(保存在uwsgi.pid文件中),防止运行多余程序
pidfile=uwsgi.pid
启动
uwsgi --ini uwsgi.ini停止
uwsgi --stop uwsgi.pid
ps aux |grep uwsgi
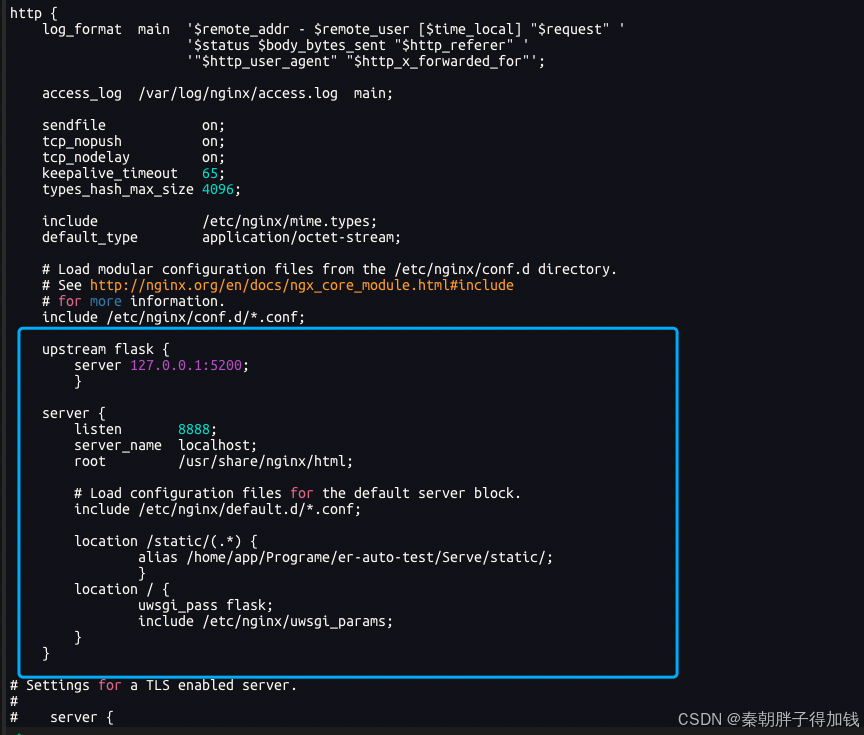
kill -9 第一个进程配套Nginx
修改uwsgi
修改nginx配置文件
cd /etc/nginx

sudo vim nginx.conf
upstream flask {
server 127.0.0.1:5200;
}
server {
listen 8888;
server_name localhost;
root /usr/share/nginx/html;
# Load configuration files for the default server block.
include /etc/nginx/default.d/*.conf;
location /static/(.*) {
alias /home/app/Programe/er-auto-test/Serve/static/;
}
location / {
uwsgi_pass flask;
include /etc/nginx/uwsgi_params;
}
}


 268
268

 被折叠的 条评论
为什么被折叠?
被折叠的 条评论
为什么被折叠?
 到【灌水乐园】发言


