


 这篇博客详细介绍了Spring框架中的注解注入,包括@Autoware和@Resource的使用,以及如何标注Bean属性。内容涵盖从接口和类的编写,到组件扫描和测试,同时讨论了注解和XML配置文件的混合使用,以及利用@Value读取配置文件中的属性值。
## 注解注入
注解注入属性:
1. @Autoware 和 @Resource 功能一样
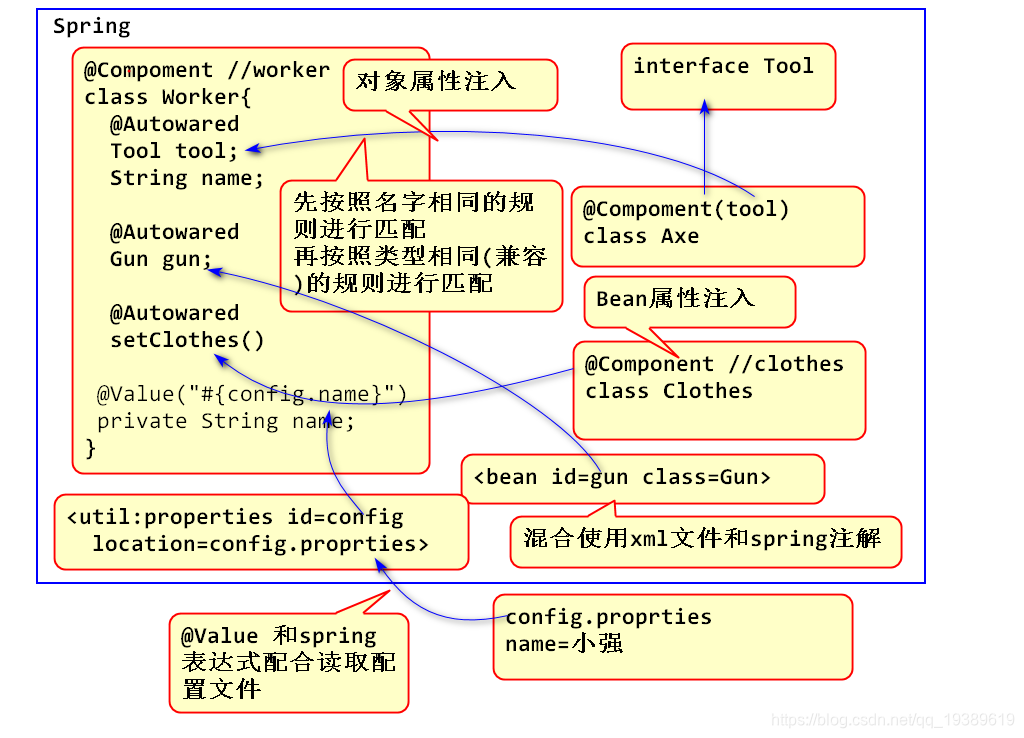
2. 注解采用默认规则自动注入
1. 先按照 名字规则,自动注入
2. 如果名字不匹配,就按照类型自动注入
3. 注解可以标注在 Bean属性 和 实例变量上
4. 注解必须经过Spring的解析出来才能生效。
原理:
### @Autoware
@Autoware 用于标注被注入的Bean属性或者实例变量。 Spring运行期间会自动按照名字相同或者类型相同的规则进行注入。
1. 编写Tool接口:
public interface Tool {

		}
2. 编写类
@Component("tool")
		public class Axe implements Serializable, Tool {

			@Override
			public String toString() {
				return "斧子";
			}
		}
3. 编写类
		@Component
		public class Worker {
			@Autowired
			private Tool tool;

			public Worker() {
				name="光头强";
			}

			public void work() {
				System.out.println(name+"使用"+tool+"砍树");
			}
		}
4. 配置组件扫描
<!-- 配置Spring的注解扫描功能-->
		<context:component-scan	base-package="day03"/>
5. 测试:
public class TestCase {
			ClassPathXmlApplicationContext ctx;

			@Before
			public void init() {
				ctx = new ClassPathXmlApplicationContext(
						"applicationContext.xml");
			}

			@After
			public void destroy() {
				ctx.close();
			}

			@Test
			public void testWorker() {
				//Spring:解析注解,控制对象,注入属性,属性不是空
				Worker worker = ctx.getBean("worker",
						Worker.class);
				worker.work();
				//脱离Spring容器自己创建对象,无人解析属性,
				//无人注入属性,属性为空
				Worker worker2 = new Worker();
				worker2.work();
			}
		}
### @Resource
Resource是Java提供的注解,其功能与Autowared基本一样:
1. 编写Tool接口:
public interface Tool {

		}
2. 编写类
@Component("tool")
		public class Axe implements Serializable, Tool {

			@Override
			public String toString() {
				return "斧子";
			}
		}
3. 编写类
@Component
		public class Worker {
			@Resource
			private Tool tool;

			public Worker() {
				name="光头强";
			}

			public void work() {
				System.out.println(name+"使用"+tool+"砍树");
			}
		}
4. 配置组件扫描
<!-- 配置Spring的注解扫描功能-->
		<context:component-scan	base-package="day03"/>
5. 测试:
public class TestCase {
			ClassPathXmlApplicationContext ctx;

			@Before
			public void init() {
				ctx = new ClassPathXmlApplicationContext(
						"applicationContext.xml");
			}

			@After
			public void destroy() {
				ctx.close();
			}

			@Test
			public void testWorker() {
				//Spring:解析注解,控制对象,注入属性,属性不是空
				Worker worker = ctx.getBean("worker",
						Worker.class);
				worker.work();
				//脱离Spring容器自己创建对象,无人解析属性,
				//无人注入属性,属性为空
				Worker worker2 = new Worker();
				worker2.work();
			}
		}
### 标注Bean属性
@Autowared 和 @Resource 注解不仅仅能够标注实例变量,还能标注Bean属性方法,实现Bean属性注入。
1. 编写衣服类
@Component
		public class Clothes {

			@Override
			public String toString() {
				return "工作服";
			}
		}
2. 重构Worker
@Component
		public class Worker {
			@Autowired
			private Tool tool;

			//Clothes 衣服
			private Clothes clothes;

			public Worker() {
				name="光头强";
			}

			@Autowired
			public void setClothes(Clothes clothes) {
				this.clothes = clothes;
				System.out.println("setClothes()"+clothes);
			}

			public Clothes getClothes() {
				return clothes;
			}


			public void work() {
				System.out.println(name+"使用"+tool+"砍树");
			}

		}
3. 测试
		@Test
		public void testClothes() {
			Worker worker = ctx.getBean("worker",
					Worker.class);
			System.out.println(worker.getClothes());
		}
### 混合使用 注解和xml文件
可以用<bean>声明bean组件注入到注解标注的属性,也可以将注解声明的Bean注解注入到<property> 属性中。
1. 编写类:
public class Gun {

			public String toString() {
				return "98k";
			}
		}
2. 利用<bean> 声明Bean组件
<bean id="gun" class="day03.Gun"></bean>
3. 重构Worker
@Component
		public class Worker {
			@Autowired
			private Tool tool;

			//Clothes 衣服
			private Clothes clothes;

			@Autowired
			private Gun gun;

			public Worker() {
				name="光头强";
			}

			@Autowired
			public void setClothes(Clothes clothes) {
				this.clothes = clothes;
				System.out.println("setClothes()"+clothes);
			}

			public Clothes getClothes() {
				return clothes;
			}

			public Gun getGun() {
				return gun;
			}

			public void work() {
				System.out.println(name+"使用"+tool+"砍树");
			}

		}
4. 测试
@Test
		public void testGun() {
			Worker worker = ctx.getBean("worker",
					Worker.class);
			System.out.println(worker.getGun());
		}
@Value用于为属性注入基本值,经常与Spring表达式配合实现读取配置文件
1. 编写配置文件 config.properties
name=\u5C0F\u5F3A

	> 其中\u5C0F\u5F3A是中文 “小强” 的Unicode转码
2. 利用配置文件读取properties
<util:properties id="config"
			location="classpath:config.properties"/>
3. 重构Worker注入属性
@Component
		public class Worker {
			//@Autowired
			@Resource
			private Tool tool;

			//Clothes 衣服
			private Clothes clothes;

			@Autowired
			private Gun gun;

			@Value("#{config.name}")
			private String name;

			public Worker() {
				name="光头强";
			}

			//@Autowired
			@Resource
			public void setClothes(Clothes clothes) {
				this.clothes = clothes;
				System.out.println("setClothes()"+clothes);
			}

			public Clothes getClothes() {
				return clothes;
			}

			public Gun getGun() {
				return gun;
			}

			public void work() {
				System.out.println(name+"使用"+tool+"砍树");
			}

		}
4. 回归测试
@Test
		public void testWorker() {
			//Spring:解析注解,控制对象,注入属性,属性不是空
			Worker worker = ctx.getBean("worker",
					Worker.class);
			worker.work();
			//脱离Spring容器自己创建对象,无人解析属性,
			//无人注入属性,属性为空
			Worker worker2 = new Worker();
			worker2.work();
		}


 1471
1471

 被折叠的 条评论
为什么被折叠?
被折叠的 条评论
为什么被折叠?
 到【灌水乐园】发言


