


安装教程:
nginx服务器配置支持RTMP协议,所需要的安装文件,安装方式安装:
./configure --prefix=/etc/nginx --add-module=./nginx-rtmp-module
Make
Make install
打开防火墙
检查系统的状态和版本:sudo systemctl status nginx
如果防火墙打开的,需要打开端口 80和443
打开端口命令 :sudo ufw allow [port]
找到nginx 安装的路径下,修改 conf/nginx.conf 的内容为下面的内容
#user nobody;
worker_processes 1;
#error_log logs/error.log;
#error_log logs/error.log notice;
#error_log logs/error.log info;
#pid logs/nginx.pid;
events {
worker_connections 1024;
}
rtmp_auto_push on;
rtmp {
server {
listen 1935;
chunk_size 4096;
#ping 30s;
#notify_method get;
# 直播应用
application live{
live on;
#record all;
#record_path /var/www/html/mediaplay/jwplayer/;
#record_suffix recorded.mp4;
#allow play all;
wait_video on;
#push rtmp://localhost/hefu/live;
}
# 点播配置应用
application live_one{
play /tmp/live;
live on;
#record off;
}
application live_http {
play http://localhost/live_one;
}
application live_two{
live on;
#hls on;
#hls_path /tmp/live;
#hls_fragment 20s;
#hls_playlist_length 3000s;
#hls_cleanup off;
#idle_streams off;
#publish_notify on;
#drop_idle_publisher 70s;
#record_unique off;
#record keyframes;
#wait_video off;
#interleave on;
#wait_key off;
#record all;
#record_path /hefu/live;
#record_interval 3600s;
}
application vod {
play /tmp/live;
}
application hls{
live on;
allow play all;
hls on;
#hls_path /var/www/html/mediaplay/jwplayer/;
hls_path /tmp/live;
hls_fragment 10s;
#push rtmp://192.168.1.129:80/hls/test;
}
}
}
http {
include mime.types;
default_type application/octet-stream;
sendfile on;
keepalive_timeout 65;
server {
listen 80;
#server_name localhost;
#charset koi8-r;
#access_log logs/host.access.log main;
#下面两个是加上去的,用来配置直播的http访问
location /stat {
rtmp_stat all;
rtmp_stat_stylesheet stat.xsl;
}
location /stat.xsl {
#注意这里的路径不能错误,直接写绝对路径就可以
root /usr/local/nginx/nginx-rtmp-module/;
}
location / {
root /var/www/html/;
index demo.html index.html index.htm video/index_1.html video5.20/index.html mediaplay/readme.html vide7.5.5/index.html;
}
location /hls {
types{
application/vnd.apple.mpegurl m3u8;
video/mp2t ts;
}
add_header Cache-Control no-cache;
add_header Access-Control-Allow-Origin *;
}
#error_page 404 /404.html;
# redirect server error pages to the static page /50x.html
#
error_page 500 502 503 504 /50x.html;
location = /50x.html {
root html;
}
}
server {
listen 80;
server_name localhost;
# rtmp stat
location /stat {
rtmp_stat all;
rtmp_stat_stylesheet stat.xsl;
}
location /stat.xsl {
#注意这里的路径不能错误,直接写绝对路径就可以
root /usr/local/nginx/nginx-rtmp-module/;
}
location hls {
# Serve HLS fragments
types {
application/vnd.apple.mpegurl m3u8;
video/mp2t ts;
}
root /tmp;
add_header Cache-Control no-cache;
}
location /dash {
# Serve DASH fragments
root /tmp;
add_header Cache-Control no-cache;
}
error_page 500 502 503 504 /50x.html;
location = /50x.html {
root /var/html;
}
}
# another virtual host using mix of IP-, name-, and port-based configuration
#
#server {
# listen 8000;
# listen somename:8080;
# server_name somename alias another.alias;
# location / {
# root html;
# index index.html index.htm;
# }
#}
# HTTPS server
#
#server {
# listen 443 ssl;
# server_name localhost;
# ssl_certificate cert.pem;
# ssl_certificate_key cert.key;
# ssl_session_cache shared:SSL:1m;
# ssl_session_timeout 5m;
# ssl_ciphers HIGH:!aNULL:!MD5;
# ssl_prefer_server_ciphers on;
# location / {
# root html;
# index index.html index.htm;
# }
#}
}
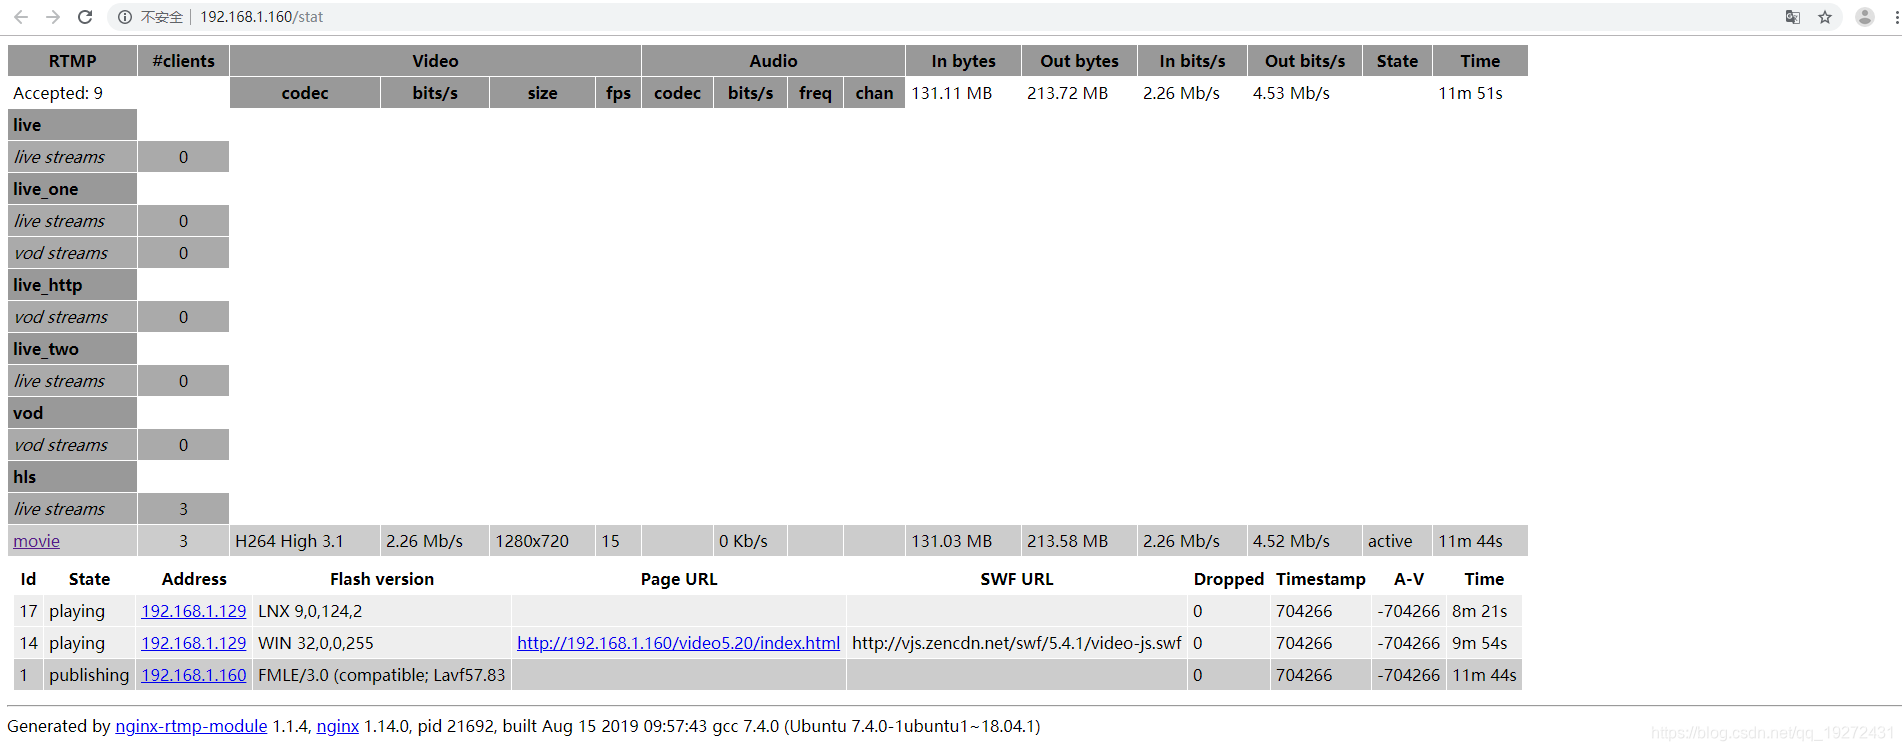
安装完成之后:访问网址http:// [部署nginx服务的IP]/stat 可以看到如下界面 (去掉括号[])
nginx +RTMP 下载路径:https://download.youkuaiyun.com/download/qq_19272431/11716691
赞助请扫码:

疑问加微信:


 1017
1017

 被折叠的 条评论
为什么被折叠?
被折叠的 条评论
为什么被折叠?
 到【灌水乐园】发言


