


 本文介绍了如何在Django中处理用户输入数据,包括创建新的Topic、利用ModelForm创建Post表单、编辑Post。详细阐述了表单类的创建、URL映射、视图函数和模板的编写,涵盖了GET和POST请求的处理,以及CSRF保护。
用户账户
用户输入数据
添加几个页面,让用户能进行数据的输入。
添加新的Topic
创建基于表单的页面的过程:定义一个URL,编写视图函数,编写模板。这里需要创建并导入包含表单的模块 form.py。
创建表单类
在 form.py 中编写了一个TopicForm表单类,它继承自Django的表单类forms.Form。指定表单获取的数据类型为字符类型。
class TopicForm(forms.Form):
    """Topic表单"""
    topic_text = forms.CharField(label='Topic name:', max_length=20)
在 urls.py 中映射url:
path('new_topic/', learn_view.new_topic, name='new_topic'),
编写视图函数new_topic():
new_topic()要处理2种情形:进入/new_topic/网页时(显示一个空的表单);对提交的表单进行处理,并将用户重定向到网页topics。
def new_topic(request):
    """添加新的主题"""
    # if this is a POST request we need to process the form data
    if request.method == 'POST':
        # create a form instance and populate it with data from the request:
        form = TopicForm(request.POST)
        # check whether it's valid:
        if form.is_valid():
            # 添加数据到数据库
            topic = Topic(text=form.topic_text)
            topic.save()
            # process the data in form.cleaned_data as required
            # ...
            # redirect to a new URL:
            return HttpResponseRedirect(reverse('topics'))

    # if a GET (or any other method) we'll create a blank form
    else:
        form = TopicForm()

    return render(request, 'new_topic.html', {'form': form})
POST请求和GET请求
创建Web应用程序时,主要应用到2中HTTP请求:GET请求和POST请求。对于只是从服务器读取页面数据的,使用GET请求;在用户需要通过表单提交数据时,使用POST请求。
视图函数将请求对象作为参数。用户初次请求该界面时,浏览器发送GET请求,当点击提交数据时发送POST请求。
当请求对象的方法为POST时,使用用户输入的数据(存储在request.POST中)创建一个TopicForm实例,对象form中就包含用户提交的信息。要提交数据到数据库,需要检查输入的数据是否有效。is_valid()核实用户填写了所有必不可少的字段,且输入数据的与要求的字段类型一致。如果字段都有效,就从请求对象request中获取数据保存到数据库中。之后就可以,离开这个界面,使用reverse获取/topics/的URL,通过HttpResponseRedirect重定向至该界面。在topics界面会看到新添加的主题。
当请求不是POST时,返回一个空的表单,供用户填写数据。
模板new_topic
这个模板继承自base.html,<from>标签用来创建HTML表单,其中action定义在提交表单时执行的动作。这里将表单数据发回给视图函数new_topic()。method属性规定在提交表单时所用的 HTTP 方法(GET 或 POST)。Django提供易于使用的跨站点请求伪造保护。 在启用CSRF保护的情况下通过POST提交表单时,必须使用的{% csrf_token %}模板标记。
{% extends "base.html" %}
{% block title %}New Topic{% endblock %}
{% block head %}{% endblock %}
{% block content%}

<form action="{% url 'new_topic' %}" method="post">
  {% csrf_token %}
  {{ form.as_p }}
  <input type="submit" value="Submit">
</form>
{% endblock %}
所有表单的字段及其属性将通过Django的模板语言从{{form}}解压缩为HTML标记
查看这段html的源码:
<form action="/new_topic/" method="post">
  <input type="hidden" name="csrfmiddlewaretoken" value="FLPEhgCJG8P91caIdYn30WXuFKMoYGfMtjAIwqk6mBSuQX60W2Yojf5LTgjdvYKf">
  <p><label for="id_topic_name">Topic name:</label> <input type="text" name="topic_name" maxlength="20" required id="id_topic_name"></p>
  <input type="submit" value="Submit">
</form>
{{ form.as_p }}将使用<p>标签渲染表单元素;
{{ form.as_table }}将使用<tr>标签渲染表单元素;
{{ form.as_ul }}将使用<li>标签渲染表单元素;
Django不会为表单创建提交按钮,手动添加Submit按钮。
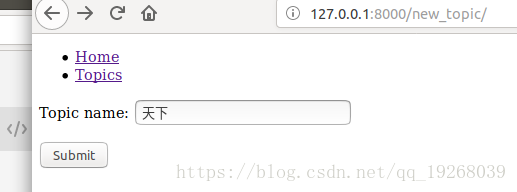
new_topic页面:
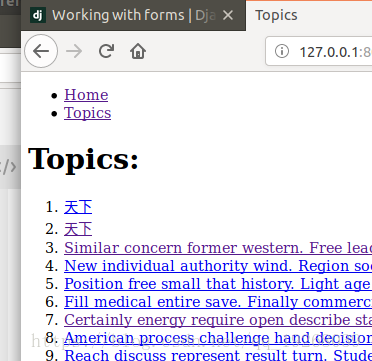
提交后,查看所有的topics:
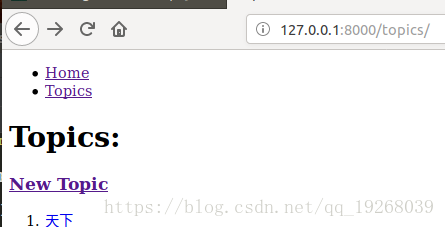
最后在topics页面添加到new_topic的超链接。
  <h1>Topics:</h1>
  <h2><a href="{% url 'new_topic' %}">New Topic</a></h2>
记下来处理的添加new_post网页。
使用ModelForm类生成新的Post表单
PostForm表单
在建立数据库驱动的应用时,可以用表单来映射建立的Django的模型。这里PostForm继承django.forms下的ModelForm类,创建Post表单类。
class PostForm(ModelForm):
    """Post表单"""
    class Meta:
        model = Post # 模型
        fields = ['text']   # 表单字段
        labels = {'text': "Post content "} # verbose name
        widgets = {
            'text': Textarea(attrs={'cols': 80}),
        }
在这里内嵌了Meta类,model告诉Django根据哪个模型创建表单,fields表示表单包含的字段,Django的表单字段与模型字段映射关系可查看Field types。label设置为模型字段的的verbose_name。要为字段指定自定义窗口小部件,使用内部Meta类的窗口小部件widgets属性。它是一个字典表,将字段名称映射到窗口小部件类或实例。这里使用<textarea>标签渲染text字段替代默认的<input type="text">,设置其行宽为80。
URL模式
path('new_post/<int:topic_id>/', learn_view.new_post, name='new_post'),
这个URL模式与形式为http://localhost:8000/new_post/id/ 的URL匹配,id是选择在那个Topic下创建新的post。
new_post视图函数
def new_post(request, topic_id):
    """添加新的主题"""
    # 在指定topic下创建post
    topic = Topic.objects.get(id=topic_id)
    # if this is a POST request we need to process the form data
    if request.method == 'POST':
        # create a form instance and populate it with data from the request:
        form = PostForm(request.POST)
        # check whether it's valid:
        if form.is_valid():
            # topic字段无法从表单获取,额外添加
            # return an object that hasn’t yet been saved to the database
            new_post = form.save(commit=False)
            new_post.topic = topic
            new_post.save()
            # process the data in form.cleaned_data as required
            # ...
            # redirect to a new URL:
            return HttpResponseRedirect(reverse('topic', args=[topic_id]))

    # if a GET (or any other method) we'll create a blank form
    else:
        form = PostForm()
    context = {'form': form, 'topic': topic}
    return render(request, 'new_post.html', context=context)
form.save()方法会根据表单中的数据创建并保存一个数据库对象,使用commit=False参数,表示只返回对象不保存到数据库中,因为topic字段不是从表单中添加的,在之后手动添加。
调用reverse()时使用args包含重定向到topic页面的所需要的topic_id。
模板
{% extends 'base.html' %}
{% block title %}New post{% endblock %}
{% block content%}
<h1><a href="{% url 'topic' topic.id %}">{{ topic }} </a></h1>
<p>Add new post:</p>
<form action="{% url 'new_post' topic.id %}" method="post">
  {% csrf_token %}
  {{ form.as_p }}
  <input type="submit" value="add">
</form>
{% endblock %}
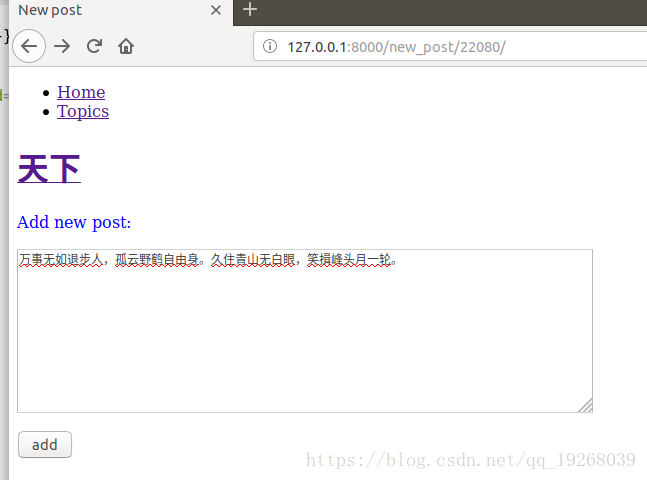
在生成post的页面添加当前所属的topic,页面效果如下:
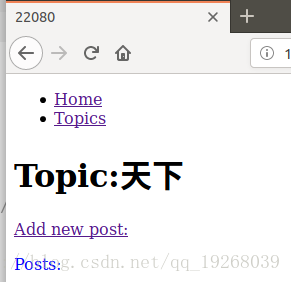
最后,同样将添加新post的超链接添加到topic页面下:
...
<h1>Topic:{{text}}</h1>
<p><a href="{% url 'new_post' id %}">Add new post:</a></p>
<p>Posts:</p>
...
编辑post
添加页面,用户修改已有的post。
URL模式edit_post
path('edit_post/<int:post_id>/', learn_view.edit_post, name='edit_post'),
匹配的URL形式为http://localhost:8000/edit_post/id/。这个URL将请求发送给视图函数edit_post。
视图函数edit_post()
与上述页面相似的,edit_post页面收到GET请求时,返回一个表单,让用户能修改当前post_id对应的post,需要从数据库中获取表单数据。收到POST请求时,它将把修订完的数据存储到数据库。
def edit_post(request, post_id):
    """修改现有的post"""
    # 获取要修改的post和其所属的topic
    post = Post.objects.get(id=post_id)
    topic = post.topic

    if request.method != "POST":
        # 初次请求,获取包含post数据的表单
        form = PostForm(instance=post)
    else:
        # Create a form to edit an existing Article, but use
        # POST data to populate the form.
        form = PostForm(request.POST, instance=post)
        if form.is_valid():
            form.save()
            return HttpResponseRedirect(reverse('topic', args=(topic.id,)))

    context = {'form': form, 'topic': topic}
    return render(request, 'edit_post.html', context)
使用模型表单ModelForm子类创建的表单实例有一个instance关键参数,使用instance=指定特定的模型对象,使用既有的post对象中的信息填充这个表单。
在收到POST请求时,传递实参data=request.POST和instance=post,让Django根据既有条目对象创建一个表单实例,并根据request.POST中的相关数据对其进行修改。
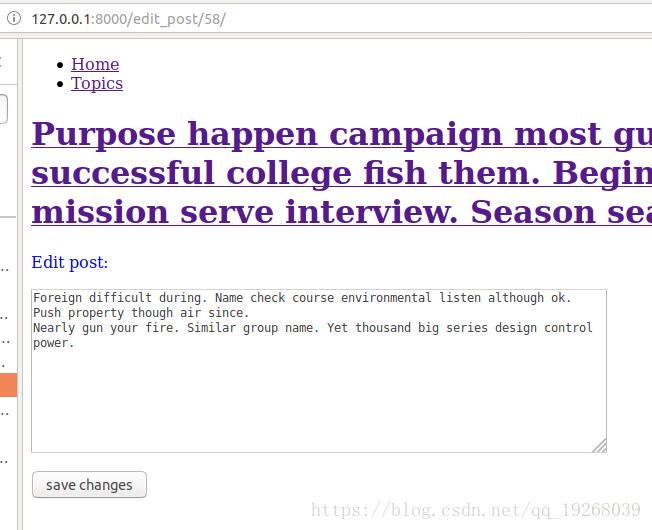
模板edit_post
与new_post.html类似:
{% extends 'base.html' %}
{% block title %}Edit post{% endblock %}
{% block content%}
<h1><a href="{% url 'topic' topic.id %}">{{ topic }} </a></h1>
<p>Edit post:</p>
<form action="{% url 'edit_post' post.id %}" method="post">
  {% csrf_token %}
  {{ form.as_p }}
  <input type="submit" value="save changes">
</form>
{% endblock %}
实参action将表单发回给函数edit_post()进行处理。
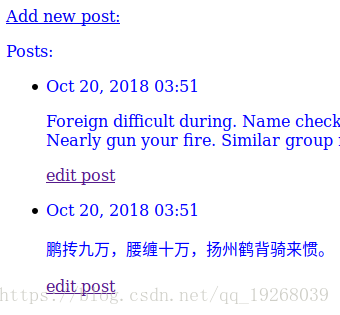
同样的, 在topic下的每条post条目下添加edit post的超链接。
        <p>{{ post.date_added|date:'M d, Y H:i' }}</p>
        <p>{{ post.text|linebreaks }}</p>
        <p><a href="{% url 'edit_post' post.id %}">edit post</a></p>


 被折叠的 条评论
为什么被折叠?
被折叠的 条评论
为什么被折叠?
 到【灌水乐园】发言


