


 本文详细介绍了Netty服务端与客户端的初始化过程,包括ServerBootstrap和Bootstrap的配置、Channel的创建、Pipeline的初始化及Handler的添加。同时提供了一个简单的登录场景示例,展示如何实现客户端与服务端之间的交互。
本章接着上一章,继续讲解和netty相关的知识,主要有以下几个知识点:
1 netty服务端的初始化源码分析
2 netty客户端的初始化源码分析
3 netty的入门实例
服务端初始化
服务端初始化的步骤
创建ServerBootstrap启动辅助类,通过Builder模式进行参数配置;
创建并绑定Reactor线程池EventLoopGroup;
设置并绑定服务端Channel通道类型;
绑定服务端通道数据处理器责任链Handler;
绑定并启动监听端口;
源码分析:
1) ServerBootstrap初始化
- ServerBootstrap是netty启动辅助类,通过Builder模式进行参数设置初始化;ServerBootstrap继承AbstracBootstrap类,需要对EventLoopGroup,Channel和ChannelHandler等参数进行配置;
(2) EventLoop线程池初始化
- EventLoopGroup初始化是创建创建两个NioEventLoopGroup类型的Reactor线程池bossGroup和workGroup分别用来处理客户端的连接请求和通道IO事件;
EventLoopGroup bossGroup = new NioEventLoopGroup();
EventLoopGroup workerGroup = new NioEventLoopGroup();
ServerBootstrap b= new ServerBootstrap();

b.group(boosGroup,workGroup)
通过group()方法设置EventLoop
将bossGroup传入到AbstractBootstrap中设置到group属性上,将workGroup设置到ServerBootstrap的childGroup属性上;
如果只传入了一个EventLoopGroup则最后传入两个相同的group;
- super.group(parentGroup)方法对AbstractBootstrap的group属性进行设置
(3) Channel通道初始化
- Channel初始化主要是指对通道类型进行设置,常见的通道类型主要有NioServerSocktChannel异步非阻塞服务端TCP通道,NioSocketChannel异步非阻塞客户端通道,OioServerSocketChannel同步阻塞服务端通道,OioSocketChannel同步阻塞客户端通道,NioDatagramChannel异步非阻塞UDP通道,OioDatagramChannel同步阻塞UDP通道等;
ChannelFactory通道工程类设置
- 在serverBootstrap初始化过程中通过调用channel()方法进行通道类型设置
public B channel(Class<? extends C> channelClass) {
    if(channelClass == null) {
        throw new NullPointerException("channelClass");
    } else {
        return this.channelFactory((io.netty.channel.ChannelFactory)(new ReflectiveChannelFactory(channelClass)));
    }
}- 根据传入的Channe类型初始化一个ChannelFactory类型的工厂类,工厂类中通过newChannel()方法创建Channel实例
private final Class<? extends T> clazz;

public ReflectiveChannelFactory(Class<? extends T> clazz) {
    if(clazz == null) {
        throw new NullPointerException("clazz");
    } else {
        this.clazz = clazz;
    }
}

public T newChannel() {
    try {
        return (Channel)this.clazz.newInstance();
    } catch (Throwable var2) {
        throw new ChannelException("Unable to create Channel from class " + this.clazz, var2);
    }
}- 通过channelFactory()方法将创建工厂类实例指向AbstractoryBootstrap的channelFactory属性
public B channelFactory(ChannelFactory<? extends C> channelFactory) {
    if(channelFactory == null) {
        throw new NullPointerException("channelFactory");
    } else if(this.channelFactory != null) {
        throw new IllegalStateException("channelFactory set already");
    } else {
        this.channelFactory = channelFactory;
        return this;
    }
}
Channel通道实例化
- 配置好AbstractBootstrap的channelFactory工厂类,Channel的实例化通过ChannelFactory.newChannel()方法实现;具体的newChannel()方法的调用链是:
ServerBootstrap.bind() -> AbstractBootstrap.doBind() -> AbstractBootstrap.initAndRegister() -> ChannelFactory.newChannel();public T newChannel() { try {
return (Channel)this.clazz.newInstance();
} catch (Throwable var2) {
throw new ChannelException("Unable to create Channel from class " + this.clazz, var2);
}
}- 通过clazz.newInstance()方法调用构造器创建NioServerSocketChannel实例
public NioServerSocketChannel() {
    this(newSocket(DEFAULT_SELECTOR_PROVIDER));
}- 调用newSocket()方法创建ServerSocketChannel实例,这里的ServerSocketChannel和NIO中的ServerSocketChannel是同一个东西,接下来会调用父类构造器对其进行外部封装和相关参数的配置;
public NioServerSocketChannel(java.nio.channels.ServerSocketChannel channel) {
    super((Channel)null, channel, 16);
    this.config = new NioServerSocketChannel.NioServerSocketChannelConfig(this, this.javaChannel().socket());
}
在 NioServerSocketChannsl 实例化过程中, 所需要做的工作
调用 NioServerSocketChannel.newSocket(DEFAULT_SELECTOR_PROVIDER) 打开一个新的 Java NIO ServerSocketChannel
AbstractNioChannel 中的属性:
SelectableChannel ch 被设置为 Java ServerSocketChannel, 即 NioServerSocketChannel#newSocket 返回的 Java NIO ServerSocketChannel.
readInterestOp 被设置为 SelectionKey.OP_ACCEPT
SelectableChannel ch 被配置为非阻塞的 ch.configureBlocking(false)
AbstractChannel(Channel parent) 中初始化 AbstractChannel 的属性:
parent 属性置为 null
unsafe 通过newUnsafe() 实例化一个 unsafe 对象, 它的类型是 AbstractNioMessageChannel#AbstractNioUnsafe 内部类
pipeline 是 new DefaultChannelPipeline(this) 新创建的绑定管道实例.
NioServerSocketChannel 中的属性:
- ServerSocketChannelConfig config = new NioServerSocketChannelConfig(this, javaChannel().socket())
Channel通道注册
- 在channel通道创建和初始化完毕后,会通过group.register()方法将channel通道注册到EventLoop线程池中;
final ChannelFuture initAndRegister() {
    // 去掉非关键代码
    final Channel channel = channelFactory().newChannel();
    init(channel);
    ChannelFuture regFuture = group().register(channel);
}- 通过一系列的注册方法调用:AbstractBootstrap.initAndRegister -> MultithreadEventLoopGroup.register -> SingleThreadEventLoop.register -> AbstractUnsafe.register,最终是通过Unsafe类的register0()方法
private void register0(ChannelPromise promise) {
    boolean firstRegistration = neverRegistered;
    doRegister();
    neverRegistered = false;
    registered = true;
    safeSetSuccess(promise);
    pipeline.fireChannelRegistered();
    // Only fire a channelActive if the channel has never been registered. This prevents firing
    // multiple channel actives if the channel is deregistered and re-registered.
    if (firstRegistration && isActive()) {
        pipeline.fireChannelActive();
    }
}- register0()方法调用了doRegister()方法实现通道注册到线程池中(EventLoop线程池会绑定一个selector选择器)
@Override
protected void doRegister() throws Exception {
    // 省略错误处理
    selectionKey = javaChannel().register(eventLoop().selector, 0, this);
}
(4)Pipeline管道初始化
每一个Channel通道在初始化时都会创建并绑定一个管道类,用来作为通道数据流的处理;pipeline管道的实例化是在AbstractChannel 的构造器中;
在创建DefaultChannelPipeline实例时会传入一个Channel对象,这个Channel对象就是之前实例化的NioServerSocketChannel实例,将pipeline管道和channel通道进行绑定;
DefaultChannelPipeline中维护了一个以AbstractChannelHandlerContext为节点的双向链表,包含两个字段head和tail分别指向双向链表的头部和尾部;
public DefaultChannelPipeline(AbstractChannel channel) {
    if (channel == null) {
        throw new NullPointerException("channel");
    }
    this.channel = channel;

    tail = new TailContext(this);
    head = new HeadContext(this);

    head.next = tail;
    tail.prev = head;
}
(5)handler处理器的添加过程
- 我们可以自定义Handler处理器并将其加入到pipeline管道中,进而像插件一样自由组合各种handler完成具体的业务逻辑;添加handler的过程是获取与channel通道绑定的管道pipeline然后将自定义的handler添加进pipeline内部维护的一个双向链表;
bootstrap.childHandler(new ChannelInitializer<SocketChannel>() {
                    @Override
                    protected void initChannel(SocketChannel socketChannel) throws Exception {
                        socketChannel.pipeline().addLast(new TimeServerHandler());
                    }
});- Bootstrap.childerHandler方法接收一个 ChannelHandler, 而我们传递的是一个 派生于ChannelInitializer的匿名类,它正好也实现了 ChannelHandler接口,因此将ChannelHandler实例赋值给ServerBootstrap的childHandler属性;
public ServerBootstrap childHandler(ChannelHandler childHandler) {
    if(childHandler == null) {
        throw new NullPointerException("childHandler");
    } else {
        this.childHandler = childHandler;
        return this;
    }
}- 在启动服务端绑定端口时候最终通过调用initAndRegister()方法创建Channel实例,并将通过init()方法将系统定义的处理器ServerBootstrapAccptor添加到与channel绑定的pipeline通道中;
@Override
void init(Channel channel) throws Exception {
    ...
    ChannelPipeline p = channel.pipeline();

    final EventLoopGroup currentChildGroup = childGroup;
    final ChannelHandler currentChildHandler = childHandler;
    final Entry<ChannelOption<?>, Object>[] currentChildOptions;
    final Entry<AttributeKey<?>, Object>[] currentChildAttrs;

    p.addLast(new ChannelInitializer<Channel>() {
        @Override
        public void initChannel(Channel ch) throws Exception {
            ChannelPipeline pipeline = ch.pipeline();
            ChannelHandler handler = handler();
            if (handler != null) {
                pipeline.addLast(handler);
            }
            pipeline.addLast(new ServerBootstrapAcceptor(
                    currentChildGroup, currentChildHandler, currentChildOptions, currentChildAttrs));
        }
    });
}- 在ServerBootstrapAcceptor中重写了channelRead()方法,将自定义的handler处理器添加到管道中;
public void channelRead(ChannelHandlerContext ctx, Object msg) {
    final Channel child = (Channel) msg;
    child.pipeline().addLast(childHandler);
    ...
    childGroup.register(child).addListener(...);
}
服务器端的 handler 与 childHandler 的区别与联系:
服务器 NioServerSocketChannel 的 pipeline 中添加的是 handler 与 ServerBootstrapAcceptor.
当有新的客户端连接请求时, ServerBootstrapAcceptor.channelRead 中负责新建此连接的NioSocketChannel并添加 childHandler 到 NioSocketChannel 对应的pipeline中, 并将此channel绑定到workerGroup中的某个eventLoop中;
handler是在accept阶段起作用, 它处理客户端的连接请求,ServerBootstrap也能设置handler()方法添加ServerSocketChannel的自定义处理器;
总结
Netty服务端的初始化主要是创建初始化辅助类ServerBootstrap,并对辅助类的相关参数进行初始化包括EventLoop线程池,Channle通道类型和ChannleHandler通道处理器等;
在调用bind()方法进行端口绑定时,会根据ServerBootsrap中的初始化参数启动服务端,具体的启动流程为:
创建ServerBootstrap启动辅助类实例,并对其Channel,EventLoopGroup,Handler等参数进行配置;
调用bootstrap.bind()方法时触发启动,会根据配置的Channle类型创建Channel实例,比如NioServerSocketChannel等
在实例化Channel时候会初始化Pipeline管道并与AbstractChannel绑定
将channel管道注册到EventLoopGroup线程池中,从线程池中轮询获取一个线程EventLoop并与之绑定;
启动线程,线程执行绑定的selector的select()方法监听注册的channel的状态,并执行定时任务
客户端初始化
一、BootStrap.connect() 分析
 public ChannelFuture connect(SocketAddress remoteAddress, SocketAddress localAddress) {
        参数校验
        validate();
        解析与连接
        return doResolveAndConnect(remoteAddress, localAddress);
} - doResolveAndConnect 方法
    private ChannelFuture doResolveAndConnect(final SocketAddress remoteAddress, final SocketAddress localAddress) {
        初始化和注册
        final ChannelFuture regFuture = initAndRegister();
        }
}- initAndRegister方法
    final ChannelFuture initAndRegister() {
        Channel channel = null;
        try {
            1. 实例化NioSocketChannel
            channel = channelFactory.newChannel();
            2. NioSocketChannel的 option方法设置 & atrr 方法设置
            init(channel);

        } catch (Throwable t) {
            if (channel != null) {
                channel.unsafe().closeForcibly();
            }
            GlobalEventExecutor.INSTANCE).setFailure(t);
        }

        3. config().group()为 NioEventLoopGroup的实例

        config().group().register()的实现为MultiThreadEventLoopGroup.register 方法
        ChannelFuture regFuture = config().group().register(channel);

}- 二、MultiThreadEventLoopGroup.register(Channel channel)
    @Override
    public EventLoop next() {
        return (EventLoop) super.next();
    }

    @Override
    public ChannelFuture register(Channel channel) {
       register 方法为:SingleThreadEventLoop.register(Channel)
        return next().register(channel);
    }
三、SingleThreadEventLoop .register(Channel) 方法
    @Override
    public ChannelFuture register(Channel channel) {
        return register(new DefaultChannelPromise(channel, this));
    }

    @Override
    public ChannelFuture register(final ChannelPromise promise) {
        ObjectUtil.checkNotNull(promise, "promise");
        promise.channel().unsafe() 为  NioSocketChannelUnsafe 实例
        实际调用方法为 AbstractUnsafe.register
        promise.channel().unsafe().register(this, promise);
        return promise;
    }
四、 AbstractUnsafe. register
  public final void register(EventLoop eventLoop, final ChannelPromise promise) {
         设置NioSocketChannel 的eventloop =SingleThreadEventLoop
         AbstractChannel.this.eventLoop = eventLoop;
         eventLoop.execute():启动一个新的线程然后执行
         实际调用方法为 SingleThreadEventLoop.execute
        eventLoop.execute(new Runnable() {
            @Override
            public void run() {
                register0(promise);//实际调用的是doRegister();
            }
        });
    }
- doRegister();
 @Override
    protected void doRegister() throws Exception {

        for (;;) {
            try {
                将jdk的 socketChannel 注册到多路复用器上
                selectionKey = javaChannel().register(eventLoop().unwrappedSelector(), 0, this);
                return;
            }
        }
    }
- 五:eventLoop.execute(Runnable) 过程
这里的eventLoop 为SingleThreadEventLoop实例
实际调用方法 SingleThreadEventExecutor.execute,代码如下:
     public void execute(Runnable task) {
         boolean inEventLoop = inEventLoop();
         //启动线程
         startThread();
         //将任务添加到 taskQueue中
         addTask(task);


        }
5.1 startThread();
    private void startThread() {

        doStartThread();

    }
- 5.1.1 doStartThread();
        executor.execute(new Runnable() {
            @Override
            public void run() {
                //为了标记 eventLoo 是否已经启动
                thread = Thread.currentThread();
                boolean success = false;
                updateLastExecutionTime();
                try {
                    SingleThreadEventExecutor.this.run();
                    success = true;
                }
                }

            ....  ....

        });
5.1.1.1 executor.execute(runnable)
实现方法为ThreadPerTaskExecutor.execute
public void execute(Runnable command) {
        threadFactory.newThread(command).start();
    }
5.1.1.2 SingleThreadEventExecutor.this.run()
此方法非常关键,是eventLoop的核心
实现方法为 :NioEventLoop.run()方法
    @Override
    protected void run() {
        for (;;) {
            //查询就绪的selectedKey
            select(wakenUp.getAndSet(false));
            //执行就绪的selectedKey
            processSelectedKeys();
            //执行任务
            runAllTasks();
        }
    }
processSelectedKeys();
processSelectedKeysOptimized 方法
    private void processSelectedKeysOptimized() {
        for (int i = 0; i < selectedKeys.size; ++i) {
            final SelectionKey k = selectedKeys.keys[i];
            selectedKeys.keys[i] = null;

            final Object a = k.attachment();
            if (a instanceof AbstractNioChannel) {
                processSelectedKey(k, (AbstractNioChannel) a);
            } else {
                @SuppressWarnings("unchecked")
                NioTask<SelectableChannel> task = (NioTask<SelectableChannel>) a;
                processSelectedKey(k, task);
            }

            if (needsToSelectAgain) {
                selectedKeys.reset(i + 1);
                selectAgain();
                i = -1;
            }
        }
    }
processSelectedKey 方法
    int readyOps = k.readyOps();
    //处理 connnect 事件
    if ((readyOps & SelectionKey.OP_CONNECT) != 0) {
        int ops = k.interestOps();
        ops &= ~SelectionKey.OP_CONNECT;
        k.interestOps(ops);

        unsafe.finishConnect();
    }
     //处理 write 事件
    if ((readyOps & SelectionKey.OP_WRITE) != 0) {
        ch.unsafe().forceFlush();
    }
    // 处理 read  和  accept 事件
    if ((readyOps & (SelectionKey.OP_READ | SelectionKey.OP_ACCEPT)) != 0 || readyOps == 0) {
        unsafe.read();
    }
- runAllTasks();
    protected boolean runAllTasks() {
        assert inEventLoop();
        boolean fetchedAll;
        boolean ranAtLeastOne = false;

        do {
         ScheduledTaskQueue 中的task 放入 taskQueue 中
         fetchedAll = fetchFromScheduledTaskQueue();
         // 执行taskQueue中的任务
         if (runAllTasksFrom(taskQueue)) {
                ranAtLeastOne = true;
            }
        } while (!fetchedAll);

        //执行tailQueue中的任务
        afterRunningAllTasks();
        return ranAtLeastOne;
}- 2.2 addTask(task)//添加任务到队列中
    protected void addTask(Runnable task) {
        //taskQueue 中增加task
        if (!offerTask(task)) {
            reject(task);
        }
    }
OK 上面就大概把客户端和服务端初始化的过程以及相关源码的核心都大概分析来一遍,最后再简单编写netty
的入门实例
netty的编程一般分为客户端和服务端,其中有编解码,业务处理的handler,实例话客户端或者服务端实例,设置
tcp的参数,接下来开始编码实现完成一个简单的登录场景,就是客户端发送一个账号给服务端,咨询是否可以登录
然后服务端返回账号信息,以及可以登录的信息。首先看服务端代码
package com.jhp.netty.chapter01.server;

import com.jhp.netty.chapter01.handler.NettyLoginServerHandler;
import com.jhp.netty.chapter01.initializer.NettyLoginServerInitialzer;
import io.netty.bootstrap.ServerBootstrap;
import io.netty.channel.ChannelFuture;
import io.netty.channel.ChannelInitializer;
import io.netty.channel.ChannelOption;
import io.netty.channel.EventLoopGroup;
import io.netty.channel.nio.NioEventLoopGroup;
import io.netty.channel.socket.SocketChannel;
import io.netty.channel.socket.nio.NioServerSocketChannel;
import io.netty.handler.codec.DelimiterBasedFrameDecoder;
import io.netty.handler.codec.Delimiters;
import io.netty.handler.codec.string.StringDecoder;
import io.netty.handler.codec.string.StringEncoder;

/**
 * Created by jack on 2018/1/18.
 * 客户端向服务端发送登录账号和用户密码
 * 服务端接受客户端发过来的信息,判断username=jhp,pwd=123
 * 如果正确,返回给客户端登录成功,否则返回对应的失败信息给客户度
 * 基于短链接
 */
public class NettyLoginServer {
    public static void main(String[] args) {
        System.out.println("服务端成功启动....");
        //实例户boss线程组
        // nthreads如果不指定的话,会采用默认算法来设置=处理器核心数 * 2
        EventLoopGroup mainGroup = new NioEventLoopGroup(3);
        //实例户work线程组
        EventLoopGroup subGroup = new NioEventLoopGroup();
        try{
            //实例户服务端实例
            ServerBootstrap serverBootstrap = new ServerBootstrap();
            //设置服务端需要的线程组
            serverBootstrap.group(mainGroup,subGroup);
            //设置服务端处理的socketchannel
            serverBootstrap.channel(NioServerSocketChannel.class);
            //设置tcp参数
            serverBootstrap
                    .option(ChannelOption.SO_BACKLOG,128)
                    .option(ChannelOption.SO_KEEPALIVE,true);
            //设置服务端请求处理的handler
            //注意 服务端这里一般要设置为childHandler 否则会报错的
            serverBootstrap .childHandler(new NettyLoginServerInitialzer());;
            //服务端绑定端口接受客户端的请求
            ChannelFuture channelFuture = serverBootstrap.bind(8080).sync();
            //获取异步结果
            channelFuture.channel().closeFuture().sync();
        }
        catch (Exception exception){
            exception.printStackTrace();
        }
        finally {
            //关闭boss线程
            mainGroup.shutdownGracefully();
            //关闭work线程
            subGroup.shutdownGracefully();
        }
    }
}
上面把整个服务端的代码都实现了,其中最终要的就是childHandler,下面就看
NettyLoginServerInitialzer一般handler都是继承ChannelInboundHandlerAdapter 重写里面指定的方法,而不是重写所有的方法,这个需要根据自己的业务需求而定的,具体代码如下
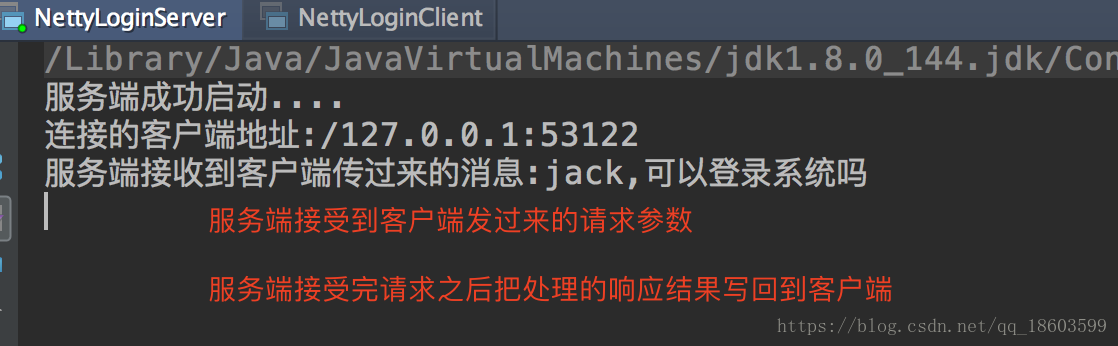
package com.jhp.netty.chapter01.handler;

import io.netty.channel.ChannelHandlerContext;
import io.netty.channel.ChannelInboundHandlerAdapter;
/**
 * Created by jack on 2018/1/18.
 */
public class NettyLoginServerHandler extends ChannelInboundHandlerAdapter {


    /**
     * 处理异常
     * @param ctx
     * @param cause
     * @throws Exception
     */
    @Override
    public void exceptionCaught(ChannelHandlerContext ctx, Throwable cause) throws Exception {
        cause.printStackTrace();
        ctx.writeAndFlush("sorry happend request exception");
    }

    /**
     * 客户端连接服务端时候执行的方法
     * @param ctx
     * @throws Exception
     */
    @Override
    public void channelActive(ChannelHandlerContext ctx) throws Exception {
        System.out.println("连接的客户端地址:" + ctx.channel().remoteAddress());
    }

    /**
     * 读取客户端传递过来的数据
     * @param ctx
     * @param msg
     * @throws Exception
     */
    @Override
    public void channelRead(ChannelHandlerContext ctx, Object msg) throws Exception {
        System.out.println("服务端接收到客户端传过来的消息:"+msg.toString());
        ctx.writeAndFlush("恭喜你,贾红平可以登录系统");

    }


}
定义好业务处理的handler,需要再定义channel的初始化类,来完成初始化功能,看代码
import com.jhp.netty.chapter01.handler.NettyLoginServerHandler;
import io.netty.channel.ChannelHandlerContext;
import io.netty.channel.ChannelInitializer;
import io.netty.channel.SimpleChannelInboundHandler;
import io.netty.channel.socket.SocketChannel;

import io.netty.handler.codec.string.StringDecoder;
import io.netty.handler.codec.string.StringEncoder;

/**
 * Created by jack on 2018/1/18.
 * 服务端channel初始化
 */
public class NettyLoginServerInitialzer extends ChannelInitializer<SocketChannel> {
    protected void initChannel(SocketChannel ch) throws Exception {
        //设置服务端的字符串解码
        ch.pipeline().addLast(new StringDecoder());
        //设置服务端的字符串编码
        ch.pipeline().addLast(new StringEncoder());
        //设置服务端的业务处理handler
        //ch.pipeline().addLast(new InnerServerHandler());
        ch.pipeline().addLast(new NettyLoginServerHandler());
    }
}
这类的功能很简单,主要如下
& 设置解码实例
& 设置编码实例
& 设置业务处理的handler
服务端相关的代码都写完了,接下来再把客户端代码实现以下,
package com.jhp.netty.chapter01.client;

import com.jhp.netty.chapter01.handler.NettyLoginClientHandler;
import com.jhp.netty.chapter01.initializer.NettyLoginClientInitialzer;
import io.netty.bootstrap.Bootstrap;
import io.netty.channel.ChannelFuture;
import io.netty.channel.ChannelInitializer;
import io.netty.channel.ChannelOption;
import io.netty.channel.EventLoopGroup;
import io.netty.channel.nio.NioEventLoopGroup;
import io.netty.channel.socket.SocketChannel;
import io.netty.channel.socket.nio.NioSocketChannel;
import io.netty.handler.codec.DelimiterBasedFrameDecoder;
import io.netty.handler.codec.Delimiters;
import io.netty.handler.codec.string.StringDecoder;
import io.netty.handler.codec.string.StringEncoder;

/**
 * Created by jack on 2018/1/18.
 * 客户端的主要工作是
 1,连接到服务端
 2,向服务端发送数据数据
 3,处理服务端返回的数据
 4,关闭连接
 */
public class NettyLoginClient {
    public static void main(String[] args) {
        connect();
    }

    public static void connect(){
        System.out.println("客户端成功启动...");
        //创建nioeventlopp线程组
        EventLoopGroup clientGroup = new NioEventLoopGroup();
        try{
            //实例话客户端实例 这里是要和服务端区分开来的,服务端前面还有一个Server
            Bootstrap bootstrap = new Bootstrap();
            //设置客户端线程组
            bootstrap.group(clientGroup);
            //设置客户端的处理sockertchannel
            bootstrap.channel(NioSocketChannel.class);
            //设置tcp相关参数
            bootstrap.option(ChannelOption.SO_KEEPALIVE,true);
            //设置客户端处理的handler 这里也是要和服务端区分开来,客户端一般不会使用childHandler
            bootstrap.handler(new NettyLoginClientInitialzer());
            //连接到服务端且获取异步结果 这里的端口号要和服务端的一致
            ChannelFuture channelFuture = bootstrap.connect("127.0.0.1",8080).sync();
            //关闭channel并且拿到结果,如果关闭的话是获取不到结果
            //这个一旦关闭了,整个请求就关闭了,所以长连接的时候是不能这样操作的
            channelFuture.channel().closeFuture().sync();
        }
        catch (Exception ex){
            ex.printStackTrace();
        }
        finally {
            //如果在服务端需要返回数据给客户端 这个时候这个不能关闭
            clientGroup.shutdownGracefully();
        }
    }

}
再看客户端对应的业务handler:
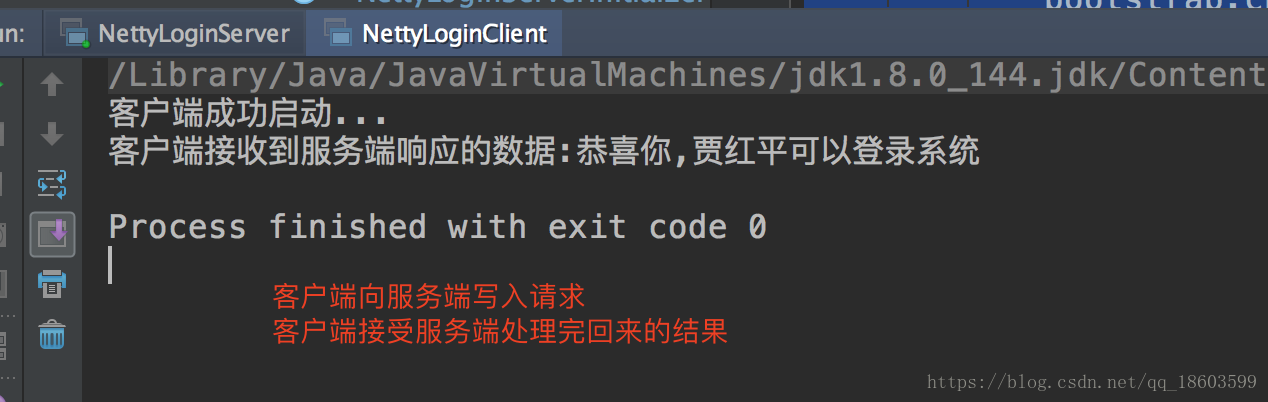
package com.jhp.netty.chapter01.handler;
import io.netty.channel.ChannelHandlerContext;
import io.netty.channel.ChannelInboundHandlerAdapter;


/**
 * Created by jack on 2018/1/18.
 *
 */
public class NettyLoginClientHandler extends ChannelInboundHandlerAdapter {


    @Override
    public void channelActive(ChannelHandlerContext ctx) throws Exception {
        //不能使用write 否则没有效果
        ctx.writeAndFlush("贾红平,可以登录系统吗");
    }

    @Override
    public void channelRead(ChannelHandlerContext ctx, Object msg) throws Exception {
        System.out.println("客户端接收到服务端响应的数据:"+msg.toString());
        ctx.channel().close();
    }
    /**
     * 处理异常
     * @param ctx
     * @param cause
     * @throws Exception
     */
    @Override
    public void exceptionCaught(ChannelHandlerContext ctx, Throwable cause) throws Exception {
        cause.printStackTrace();
        ctx.writeAndFlush("sorry happend request exception");
    }


}
最后再看一下客户端的channel初始化,其实和服务端几乎是一致的,就是设置解码,编码,业务处理的handler和channelpipeline绑定
 * Created by jack on 2018/1/18.
 */
public class NettyLoginClientInitialzer extends ChannelInitializer<SocketChannel> {

    protected void initChannel(SocketChannel ch) throws Exception {
        //设置字符串的编码
        ch.pipeline().addLast(new StringDecoder());
        //设置字符串的解码
        ch.pipeline().addLast(new StringEncoder());
        //设置对应的业务处理handler
        //注意 handler 一般放在最后设置
        //ch.pipeline().addLast(new InnerClientHandler());
        ch.pipeline().addLast(new NettyLoginClientHandler());

    }
}
接下来看一下整体测试的效果,一般要先启动服务端,否则会报错,等服务端成功启动之后,再启动客户端,具体效果如下
服务端的效果
客户端的效果
至此netty的入门实例就讲解完了,虽然效果很简单,但是基本是把netty编程的通用步骤和组件都讲解到,以后就算是遇到复杂的业务也基本上是按照这个来的,无非就是一些扩展,比如上面的编码 解码都是比较简单的,在复杂的业务中往往需要开发者自己实现编解码功能,当然netty本身就有很多内置,也有可扩展的类,这个在后面的章节会详细介绍到。。


 5万+
5万+

 被折叠的 条评论
为什么被折叠?
被折叠的 条评论
为什么被折叠?
 到【灌水乐园】发言


