


无论有多少种形式,创建多线程的真正的方法,
其实只有两种:
> 继承 Thread 类
> 实现 Runnable 接口
其它形式都是这两种方式的变体。
1、继承 Thread 类
①实现方式
- 第一步:继承 Thread 类
- 第二步:重写 run() 方法
- 第三步:创建 Thread 子类对象
- 第四步:调用 start() 方法启动线程
②start() 方法和 run() 方法区别
调用 run() 方法仅仅只是调用了一个子类中重写的父类方法,并没有真正开启一个新的线程,还是在当前线程运行,也就是 main 线程。
③评价
因为 Java 是单继承的,一个类继承了 Thread 类就不能继承其它类,所以通常不采用这个办法创建多线程。
2、实现 Runnable 接口
①实现 Runnable 接口形式
public class CreateThread02Impl {

    public static void main(String[] args) {

        // 第四步:创建实现了 Runnable 接口的类的对象
        MyRunnableThread runnable = new MyRunnableThread();

        // 第五步:创建 Thread 类对象
        // 参数1:runnable 对象
        // 参数2:线程名称
        Thread thread = new Thread(runnable, "thread 002");

        // 第六步:调用 Thread 对象的 start() 方法启动线程
        thread.start();
    }

}

// 第一步:实现 Runnable 接口
class MyRunnableThread implements Runnable {

    // 第二步:实现 run() 方法
    @Override
    public void run() {

        // 第三步:编写线程中的逻辑代码
        System.out.println(Thread.currentThread().getName() + " is working");
    }
}
②匿名内部类形式
// 第一步:以匿名内部类的方式创建 Runnable 接口类型的对象
Runnable runnable = new Runnable() {
    @Override
    public void run() {
        // 第二步:编写线程中的逻辑代码
        System.out.println(Thread.currentThread().getName() + " is working");
    }
};

// 第三步:创建 Thread 类对象
// 参数1:runnable 对象
// 参数2:线程名称
Thread thread = new Thread(runnable, "thread 003");

// 第四步:调用 Thread 对象的 start() 方法启动线程
thread.start();
③Lambda 表达式形式
// 编写 Lambda 表达式的口诀:
// 复制小括号
// 写死右箭头
// 落地大括号

// 第一步:以匿名内部类的方式创建 Runnable 接口类型的对象
Runnable runnable = () -> {
    // 第二步:编写线程中的逻辑代码
    System.out.println(Thread.currentThread().getName() + " is working");
};

// 第三步:创建 Thread 类对象
// 参数1:runnable 对象
// 参数2:线程名称
Thread thread = new Thread(runnable, "thread 004");

// 第四步:调用 Thread 对象的 start() 方法启动线程
thread.start();
3、使用 Callable 接口配合 FutureTask
在JDK1.5提供了Future和Callable的实现,可以用于阻塞式获取结果
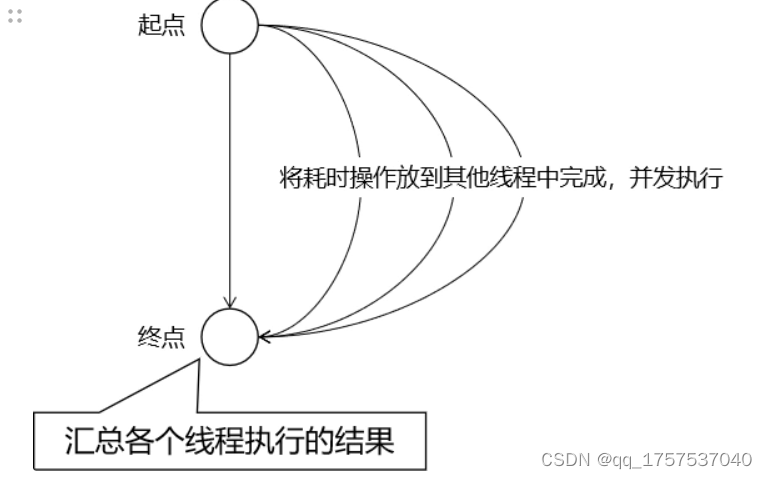
该方案最核心的价值是:使用 Callable 接口限定的功能 + Future 接口限定的功能 = 汇总各个线程执行结果
最终执行汇总操作的这一步会被阻塞,直到前面各个线程完成了计算。
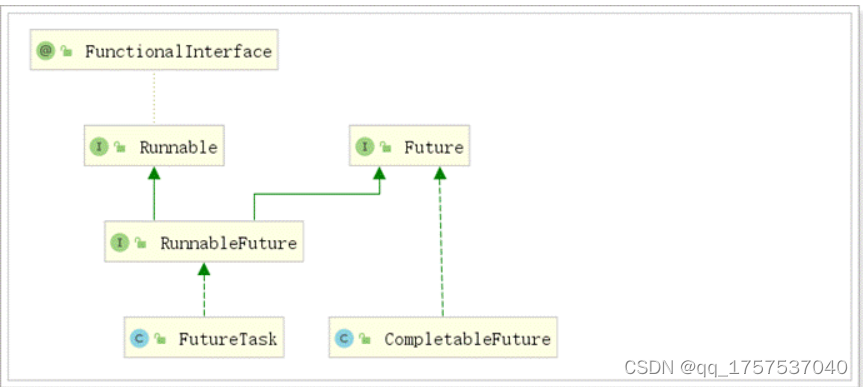
①FutureTask类和Runnable接口的关系

从继承关系能够看到,FutureTask本身也间接实现了Runnable接口。FutureTask类的对象也是Runnable接口的实例,可以用于在创建Thread对象时,传入Thread构造器。
②Future 接口
boolean cancel(boolean mayInterruptIfRunning);
如果尚未启动,它将停止任务。如果已启动,则仅在 mayInterrupt 为 true 时才会中断任务。
V get() throws InterruptedException, ExecutionException;
如果任务完成,它将立即返回结果,否则将等待任务完成,然后返回结果。
boolean isDone();
如果任务完成,则返回true,否则返回false。
③FutureTask 类的构造器
【1】.介绍:
FutureTask 类兼具 Runnable 和 Future 接口的功能,并方便地将两种功能组合在一起。关于 FutureTask 类的使用有如下建议:
- 在主线程中需要执行比较耗时的操作时,但又不想阻塞主线程时,可以把这些作业交给 Future 对象在后台完成
- 当主线程将来需要时,就可以通过 Future 对象获得后台作业的计算结果或者执行状态
- 一般 FutureTask 多用于耗时的计算,主线程可以在完成自己的任务后,再去获取结果。
- 仅在计算完成时才能检索结果;如果计算尚未完成,则阻塞 get() 方法
- 一旦计算完成,就不能再重新开始或取消计算
- get() 方法而获取结果只有在计算完成时获取,否则会一直阻塞直到任务转入完成状态,然后会返回结果或者抛出异常
- get() 只执行一次,因此get() 方法放到最后
【2】可以使用的构造器
    public FutureTask(Callable<V> callable) {
        if (callable == null)
            throw new NullPointerException();
        this.callable = callable;
        this.state = NEW;       // ensure visibility of callable
    }
根据这个构造器,我们知道,创建 FutureTask 对象时,传入一个 Callable 类型的对象即可。
④Callable 接口
@FunctionalInterface
public interface Callable<V> {
    /**
     * Computes a result, or throws an exception if unable to do so.
     *
     * @return computed result
     * @throws Exception if unable to compute a result
     */
    V call() throws Exception;
}
从 call() 方法的声明我们可以看出,它有一个返回值。这个返回值可以将当前线程内计算结果返回。
⑤测试代码
// 1.创建三个FutureTask对象,封装三个线程的执行逻辑
FutureTask<Integer> task01 = new FutureTask<>(() -> {

    int result = (int) (Math.random() * Math.random() * 100);

    System.out.println(Thread.currentThread().getName());

    return result;
});
FutureTask<Integer> task02 = new FutureTask<>(() -> {

    int result = (int) (Math.random() * Math.random() * 1000);

    System.out.println(Thread.currentThread().getName());

    return result;
});
FutureTask<Integer> task03 = new FutureTask<>(() -> {

    int result = (int) (Math.random() * Math.random() * 10000);

    System.out.println(Thread.currentThread().getName());

    return result;
});

// 2.创建三个线程对象,然后启动线程
new Thread(task01, "thread01").start();
new Thread(task02, "thread02").start();
new Thread(task03, "thread03").start();

// 3.上面三个线程执行完成后,可以收集它们各自运算的结果
Integer task01Result = task01.get();
Integer task02Result = task02.get();
Integer task03Result = task03.get();

System.out.println("task01Result = " + task01Result);
System.out.println("task02Result = " + task02Result);
System.out.println("task03Result = " + task03Result);
⑥Callable和Runnable对比
| Runnable接口 | Callable接口 |
| 重写run()方法 | 重写call()方法 |
| run()没有返回值 | call()有返回值 |
| run()没有声明抛出异常 | call()声明抛出Exception |
| 没有汇总各个线程结果的机制 | 有汇总各个线程结果的机制 |
⑦Callable接口方案的特点
该方案仅在具体任务计算完成时才能检索结果;如果计算尚未完成,则阻塞 get() 方法。一旦计算完成,就不能再重新开始或取消计算。get() 方法获取结果只有在计算完成时获取,否则会一直阻塞直到任务转入完成状态,然后会返回结果或者抛出异常, 且只计算一次。
4、线程池
1.参考代码
// 1.创建线程池对象
ExecutorService pool = Executors.newFixedThreadPool(5);

// 2.给线程池对象分配任务,每一个任务是一个线程
pool.execute(() -> {
    System.out.println(Thread.currentThread().getName() + " " + new Date());
});

pool.execute(() -> {
    System.out.println(Thread.currentThread().getName() + " " + new Date());
});

pool.execute(() -> {
    System.out.println(Thread.currentThread().getName() + " " + new Date());
});
2.开发建议:
阿里开发手册中对线程创建的规定:

结论:实际开发中,建议使用『自定义线程池』的方式创建多线程。在创建自定义线程池时,使用合理的参数。
5.CompletableFuture
这个completableFuture是JDK1.8版本新引入的类。下面是这个类。实现了俩接口。本身是个class。这个是Future的实现类。
CompletableFuture提供了四个静态方法用来创建CompletableFuture对象:
public static CompletableFuture<Void>   runAsync(Runnable runnable)
public static CompletableFuture<Void>   runAsync(Runnable runnable, Executor executor)
public static <U> CompletableFuture<U>  supplyAsync(Supplier<U> supplier)
public static <U> CompletableFuture<U> supplyAsync(Supplier<U> supplier, Executor executor)Asynsc表示异步,而supplyAsync与runAsync不同在与前者异步返回一个结果,后者是void.第二个函数第二个参数表示是用我们自己创建的线程池,否则采用默认的ForkJoinPool.commonPool()作为它的线程池.其中Supplier是一个函数式接口,代表是一个生成者的意思,传入0个参数,返回一个结果.
- runAsync方法不支持返回值。
- supplyAsync可以支持返回值。
计算完成时回调方法
public CompletableFuture<T>     whenComplete(BiConsumer<? super T,? super Throwable> action)
public CompletableFuture<T>     whenCompleteAsync(BiConsumer<? super T,? super Throwable> action)
public CompletableFuture<T>     whenCompleteAsync(BiConsumer<? super T,? super Throwable> action, Executor executor)
public CompletableFuture<T>     exceptionally(Function<Throwable,? extends T> fn)
whenComplete可以处理正常或异常的计算结果
exceptionally处理异常情况
BiConsumer<? super T,? super Throwable>可以定义处理业务
whenComplete 和 whenCompleteAsync 的区别:
-
whenComplete:是执行当前任务的线程执行继续执行 whenComplete 的任务。
-
whenCompleteAsync:是执行把 whenCompleteAsync 这个任务继续提交给线程池来进行执行。
==注意:方法不以Async结尾,意味着Action使用相同的线程执行,而Async可能会使用其他线程执行(如果是使用相同的线程池,也可能会被同一个线程选中执行)==
线程串行化与并行化方法
thenApply 方法:当一个线程依赖另一个线程时,获取上一个任务返回的结果,并返回当前任务的返回值
public <U> CompletableFuture<U>     thenApply(Function<? super T,? extends U> fn)
public <U> CompletableFuture<U>     thenApplyAsync(Function<? super T,? extends U> fn)
public <U> CompletableFuture<U> thenApplyAsync(Function<? super T,? extends U> fn, Executor executor)thenAccept方法:消费处理结果。接收任务的处理结果,并消费处理,无返回结果。
public CompletableFuture<Void>  thenAccept(Consumer<? super T> action)
public CompletableFuture<Void>  thenAcceptAsync(Consumer<? super T> action)
public CompletableFuture<Void>  thenAcceptAsync(Consumer<? super T> action,
Executor executor)thenRun方法:只要上面的任务执行完成,就开始执行thenRun,只是处理完任务后,执行 thenRun的后续操作
public CompletableFuture<Void> thenRun(Runnable action)
public CompletableFuture<Void> thenRunAsync(Runnable action)
public CompletableFuture<Void> thenRunAsync(Runnable action,
                                                Executor executor)
带有Async默认是异步执行的。这里所谓的异步指的是不在当前线程内执行。
6、并行计算[了解]
List<String> list = Arrays.asList("a", "b", "c", "d", "e");

// 串行计算
list.stream().forEach(System.out::print);

System.out.println();

// 并行计算
list.parallelStream().forEach(System.out::print);
7、Timer 定时任务[了解]
// 1、创建 Timer 对象封装定时任务中要执行的操作
// 每一个 Timer 对象会使用一个线程来执行定时任务
Timer timer01 = new Timer();

// 2、调用 schedule() 指定任务和执行周期
// 参数1:timerTask 封装具体任务操作
// 参数2:delay 指定定时任务延迟多久后开始执行
// 参数3:period 指定定时任务执行的时间间隔
timer01.schedule(new TimerTask() {
    @Override
    public void run() {
        System.out.println(Thread.currentThread().getName() +" is working");
    }
}, 0, 1000);

Timer timer02 = new Timer();

timer02.schedule(new TimerTask() {
    @Override
    public void run() {
        System.out.println(Thread.currentThread().getName() +" is working");
    }
}, 0, 1000);
8、Spring 异步方法[了解]
在 Spring 环境下,如果组件 A(假设是 ControllerA)要调用组件 B(假设是 ServiceB)的多个方法,而且希望这些方法能够异步执行。
[1]开启异步功能
在主启动类使用 @EnableAsync 注解:
// 开启支持异步方法调用功能
@EnableAsync
@SpringBootApplication
public class Application {

    public static void main(String[] args) {
        SpringApplication.run(Application.class, args);
    }

}
[2]标记异步方法
在想要异步调用的方法上使用 @Async 注解:
@Service
public class DemoService {

    // 在想要实现异步调用的方法上加 @Async注解
    @Async
    public void doSth() {
        System.out.println("Demo Service " + Thread.currentThread().getName());
    }

}


 被折叠的 条评论
为什么被折叠?
被折叠的 条评论
为什么被折叠?
 到【灌水乐园】发言


