


文章目录
学习链接
Linux系统使用Nginx搭建直播服务 | ffmpeg直播推流 | OBS直播 - B站视频
zzhua/live gitee代码(包括linux和windows版本:nginx配置文件&nginx源码安装包和nginx-http-flv-module源码模块)
全栈开发——动手打造属于自己的直播间(Vue+SpringBoot+Nginx)
vue3 + obs + nginx-rtmp-module + hls.js 推流开启个人直播
使用SpringBoot+ Nginx-http-flv-module + FFmpeg + Flv.js 推Rtsp流 VUE播放
从零开始使用nginx-rtmp-module搭建RTMP普通推流或拉流和权限验证推流或拉流的简单方法
搭建基于 Nginx 的 RTMP 服务器,并用 ffmpeg 来进行推流和拉流
使用nginx搭建rtmp+http_flv服务器实现直播推流
步骤
1、nginx配置添加nginx-http-flv-module模块,并配置rtmp服务
2、nginx的rtmp服务配置flv应用,开启live
3、开启obs,设置推流地址 rtmp://192.168.134.3:8002/flv,推流码 test
4、vlc可以打开网络串流 rtmp://192.168.134.3:8002/flv/test
5、nginx的监听80端口的server服务配置live,开启flv_live
6、web页面引入flv.js,可以使用 http://192.168.134.3/live?port=8002&app=flv&stream=test (适合直播)
(也可以使用ffmpeg将本地桌面或本地视频流推送到rtmp://192.168.134.3:8002/flv/test,使用上述方式播放 或使用ffplay拉流播放)
7、nginx的rtmp服务配置flv应用,开启live,开启hls,设置hls_path路径
8、开启obs,设置推流地址 rtmp://192.168.134.3:8002/hls,推流码 test,开启后,会在hls_path路径下生成test.m3u8文件和xxx.ts文件
9、vlc可以打开网络串流 rtmp://192.168.134.3:8002/hls/test
10、nginx的监听80端口的server服务配置location为/hls,访问路径指到hls_path路径
11、web页面引入videojs,可以使用 http://192.168.134.3/hls/test.m3u8 播放m3u8视频(适合点播)
(也可以使用ffmpeg将本地桌面或本地视频流推送到rtmp://192.168.134.3:8002/hls/test,使用上述方式播放或使用ffplay拉流播放)
使用nginx搭建直播推流服务
安装依赖库
sudo apt-get update
sudo apt-get install build-essential libpcre3-dev zlib1g-dev libssl-dev
下载nginx-http-flv-module模块
- https://github.com/winshining/nginx-http-flv-module
在github中选择master分支下载nginx-http-flv-module模块源码,下载完解压后修改文件夹名称为【nginx-http-flv-module】
sudo wget -O /usr/local/nginx-http-flv-module.zip https://github.com/winshining/nginx-http-flv-module/archive/refs/heads/master.zip
下载nginx
sudo wget -P /usr/local https://nginx.org/download/nginx-1.24.0.tar.gz
解压nginx,进入nginx目录
tar -zxvf nginx-1.24.0.tar.gz
cd ./nginx-1.24.0
设置nginx编译配置
./configure \
 --with-http_ssl_module \
 --with-stream \
 --with-stream_ssl_module \
 --add-module=/usr/local/nginx-http-flv-module
编译并安装
make && make install
配置nginx rtmp服务
# nginx.config 中追加配置,rtmp与http配置同级
user root;
rtmp {
  server {
    listen 8002;
	chunk_size 4000;

    application flv {
	  live on;
	  #allow publish 127.0.0.1;
	  allow play all;
      gop_cache on;
	}

    application hls {
      live on;
      hls on;
      hls_path /home/winter/html/hls;
    }
  }
}

http {
  include       mime.types;
  default_type  application/octet-stream;
  sendfile        off;
  server_names_hash_bucket_size 128;
  client_body_timeout   10;
  client_header_timeout 10;
  keepalive_timeout     30;
  send_timeout          10;
  keepalive_requests    10;

  server {
    listen       80;
    server_name  localhost;
    add_header Access-Control-Allow-Credentials true;
    add_header Access-Control-Allow-Origin *;
    add_header Access-Control-Allow-Methods 'GET, POST, PUT, DELETE, OPTIONS';
    add_header Access-Control-Allow-Headers 'DNT,X-Mx-ReqToken,Keep-Alive,User-Agent,X-Requested-With,If-Modified-Since,Cache-Control,Content-Type,Authorization,tenantappid';
	if ($request_method = 'OPTIONS') {
		return 200;
	}

    location /live {
        flv_live on;
        chunked_transfer_encoding on;
    }

    location /hls {
        root   /home/winter/html;
        index  index.html index.htm;
    }

    error_page   500 502 503 504  /50x.html;
    location = /50x.html {
        root   html;
    }
  }
}
启动nginx
# 检查配置
/usr/local/nginx/sbin/nginx -t
# 启动
/usr/local/nginx/sbin/nginx
# 停止
/usr/local/nginx/sbin/nginx -s stop
# 重启
/usr/local/nginx/sbin/nginx -s reload
准备另外一台电脑下载OBS
下载OBS
- 官方的下载地址很慢,推荐到清华大学镜像下载https://mirrors.tuna.tsinghua.edu.cn/github-release/obsproject/obs-studio/
windows | linux 安装vlc观看直播
sudo apt install vlc -y
flv协议
- 打开OBS设置,直播菜单,服务:自定义,服务器:rtmp://192.168.1.8:8002/flv(ip地址替换为nginx服务所在的ip),密钥:test
- 开始直播
- 打开vlc左上角菜单媒体,选择【打开网络串流】菜单,输入 rtmp://192.168.1.8:8002/flv/test 观看直播
- 创建一个html文件观看直播
<!DOCTYPE html>
<html lang="en">
<head>
    <meta charset="UTF-8">
    <title>Demo</title>
    <!-- https://bilibili.github.io/flv.js/ -->
    <script src="https://cdn.bootcdn.net/ajax/libs/flv.js/1.6.2/flv.min.js"></script>
    <style>
        body {
            margin: 0;
        }

        #video {
            width: 100%;
            height: 100vh;
        }
    </style>
</head>
<body>
<video id="video" src="" muted autoplay="false" controls></video>
<script>
    const videoElement = document.getElementById('video');
    const flvPlayer = flvjs.createPlayer({
        type: 'flv',
        url: 'http://192.168.1.8/live?port=8002&app=flv&stream=test'
    });
    flvPlayer.attachMediaElement(videoElement);
    flvPlayer.load();
    flvPlayer.play();
</script>
</body>
</html>
hls协议
- 打开OBS设置,直播菜单,服务:自定义,服务器:rtmp://192.168.1.8:8002/hls(ip地址替换为nginx服务所在的ip),密钥:test
- 开始直播
- 打开vlc左上角菜单媒体,选择【打开网络串流】菜单,输入 rtmp://192.168.1.8:8002/hls/test 观看直播
- 创建一个html文件观看直播
<!DOCTYPE html>
<html lang="en">
<head>
    <meta charset="UTF-8">
    <title>Demo</title>
    <!--  文档地址 https://videojs.com/getting-started  -->
    <link href="https://cdn.bootcdn.net/ajax/libs/video.js/7.7.1/video-js.min.css" rel="stylesheet">
    <script src="https://cdn.bootcdn.net/ajax/libs/video.js/7.7.1/video.min.js"></script>
    <style>
        body {
            margin: 0;
        }

        .video-js .vjs-big-play-button {
            top: 50%;
            margin-top: -45px;
            left: 50%;
            margin-left: -44px;
        }

        #video {
            width: 100%;
            height: 100vh;
        }
    </style>
</head>
<body>
<video id="video" class="video-js vjs-default-skin" src="" muted autoplay="false" controls></video>
<script>
    const playerOptions = {
        playbackRates: [0.7, 1.0, 1.5, 2.0],
        autoplay: false, // 如果true,浏览器准备好时开始回放。
        muted: true, // 默认情况下将会消除任何音频。
        loop: false,
        preload: 'false', // 建议浏览器在<video>加载元素后是否应该开始下载视频数据。auto浏览器选择最佳行为,立即开始加载视频(如果浏览器支持)
        notSupportedMessage: "此视频暂无法播放,请稍后再试", // 允许覆盖Video.js无法播放媒体源时显示的默认信息。
        poster: '',
        sources: [{
            type: 'application/x-mpegURL',
            src: 'http://192.168.1.8/hls/test.m3u8' //视频流地址
        }],
    }
    const videoDom = document.querySelector('#video')
    let $player = videojs(videoDom, playerOptions, function onPlayerReady() {
        console.log('播放器已经准备好了!')
        this.on('loadstart', function () {
            console.log('loadstart------------')
        })
        this.on('loadedmetadata', function () {
            console.log('loadedmetadata---视频源数据加载完成----')
        })
        this.on('loadeddata', function () {
            console.log('loadeddata---渲染播放画面----'); //autoPlay必须为false
            // $player.play()
        })
    })
</script>
</body>
</html>
使用ffmpeg命令行推流
# 查看本地的音视频硬件
D:\myapp\ffmpeg\bin\ffmpeg.exe -list_devices true -f dshow -i dummy
# 推送视频
D:\myapp\ffmpeg\bin\ffmpeg.exe -i C:\Users\Mr_Li\Desktop\1.mp4 -vcodec libx264 -acodec aac -f flv rtmp://192.168.1.8:8002/flv/test
# 推送摄像头、音频
D:\myapp\ffmpeg\bin\ffmpeg.exe -f dshow -i audio="麦克风阵列 (适用于数字麦克风的英特尔® 智音技术)" -thread_queue_size 1024 -f dshow -i video="Integrated Camera" -s 480x320 -vcodec libx264 -acodec aac -f flv rtmp://192.168.1.8:8002/flv/test
# 推送系统桌面
D:\myapp\ffmpeg\bin\ffmpeg.exe  -f gdigrab -i desktop -vcodec libx264 -f flv rtmp://192.168.1.8:8002/flv/test

# 可以使用ffplay拉流, 执行命令后会打开1个窗口播放视频
# 也可以使用上述方式播放
ffplay -i rtmp://192.168.1.8:8002/flv/test
- ffmpeg下载地址https://github.com/BtbN/FFmpeg-Builds/releases 选择【ffmpeg-n7.0-latest-win64-lgpl-7.0.zip】
推流鉴权&拉流鉴权
1、版本
这里nginx的版本是nginx-1.24.0,nginx-http-flv-module版本是nginx-http-flv-module-1.2.12测试了
nginx-http-flv-module用法介绍:基于nginx-rtmp-module的流媒体服务器。具备nginx-rtmp-module的所有功能,增加了HTTP-FLV,GOP缓存和VHOST(一个IP对应多个域名)的功能。
nginx-http-flv-module 包含了 nginx-rtmp-module 所有的功能,所以不要将 nginx-http-flv-module 和 nginx-rtmp-module 一起编译。
2、安装步骤
# 删除原来的nginx
rm -rf /usr/local/nginx
make clean # 清空原来的编译文件

# 重新安装nginx
# 配置
./configure  --with-http_ssl_module  --with-stream  --with-stream_ssl_module  --add-module=/nginx/core/nginx-http-flv-module-1.2.12
make
make install
3、nginx.conf配置
#user  nobody;
worker_processes  1;

#error_log  logs/error.log;
#error_log  logs/error.log  notice;
#error_log  logs/error.log  info;

#pid        logs/nginx.pid;


events {
    worker_connections  1024;
}

rtmp {
  server {
    listen 8002;
	chunk_size 4000;

    application flv {
  	  live on;
  	  #allow publish 127.0.0.1;
  	  allow play all;
        gop_cache on;
        on_publish http://192.168.134.5:8080/flv/auth/onPublish;   #授权地址 推流时会请求
        on_publish_done http://192.168.134.5:8080/flv/auth/onPublishDone;   #授权地址 停止推流时会请求
        on_play http://192.168.134.5:8080/flv/auth/onPlay; # 拉流时会请求
  	}

    application hls {
      live on;
      hls on;
      hls_path /home/winter/html/hls;
    }
  }
}


http {
    include       mime.types;
    default_type  application/octet-stream;

    #log_format  main  '$remote_addr - $remote_user [$time_local] "$request" '
    #                  '$status $body_bytes_sent "$http_referer" '
    #                  '"$http_user_agent" "$http_x_forwarded_for"';

    #access_log  logs/access.log  main;

    sendfile        on;
    #tcp_nopush     on;

    #keepalive_timeout  0;
    keepalive_timeout  65;

    #gzip  on;

    server {
        listen       80;
        server_name  localhost;

        #charset koi8-r;

        #access_log  logs/host.access.log  main;

        add_header Access-Control-Allow-Credentials true;
        add_header Access-Control-Allow-Origin *;
        add_header Access-Control-Allow-Methods 'GET, POST, PUT, DELETE, OPTIONS';
        add_header Access-Control-Allow-Headers 'DNT,X-Mx-ReqToken,Keep-Alive,User-Agent,X-Requested-With,If-Modified-Since,Cache-Control,Content-Type,Authorization,tenantappid';
    	if ($request_method = 'OPTIONS') {
    		return 200;
    	}

        location /live {
            flv_live on;
            chunked_transfer_encoding on;
        }

        location /hls {
            root   /home/winter/html;
            index  index.html index.htm;
        }

        location / {
            root   html;
            index  index.html index.htm;
        }

        #error_page  404              /404.html;

        # redirect server error pages to the static page /50x.html
        #
        error_page   500 502 503 504  /50x.html;
        location = /50x.html {
            root   html;
        }

        # proxy the PHP scripts to Apache listening on 127.0.0.1:80
        #
        #location ~ \.php$ {
        #    proxy_pass   http://127.0.0.1;
        #}

        # pass the PHP scripts to FastCGI server listening on 127.0.0.1:9000
        #
        #location ~ \.php$ {
        #    root           html;
        #    fastcgi_pass   127.0.0.1:9000;
        #    fastcgi_index  index.php;
        #    fastcgi_param  SCRIPT_FILENAME  /scripts$fastcgi_script_name;
        #    include        fastcgi_params;
        #}

        # deny access to .htaccess files, if Apache's document root
        # concurs with nginx's one
        #
        #location ~ /\.ht {
        #    deny  all;
        #}
    }


    # another virtual host using mix of IP-, name-, and port-based configuration
    #
    #server {
    #    listen       8000;
    #    listen       somename:8080;
    #    server_name  somename  alias  another.alias;

    #    location / {
    #        root   html;
    #        index  index.html index.htm;
    #    }
    #}


    # HTTPS server
    #
    #server {
    #    listen       443 ssl;
    #    server_name  localhost;

    #    ssl_certificate      cert.pem;
    #    ssl_certificate_key  cert.key;

    #    ssl_session_cache    shared:SSL:1m;
    #    ssl_session_timeout  5m;

    #    ssl_ciphers  HIGH:!aNULL:!MD5;
    #    ssl_prefer_server_ciphers  on;

    #    location / {
    #        root   html;
    #        index  index.html index.htm;
    #    }
    #}

}
4、启动nginx后,使用ffmpeg推流
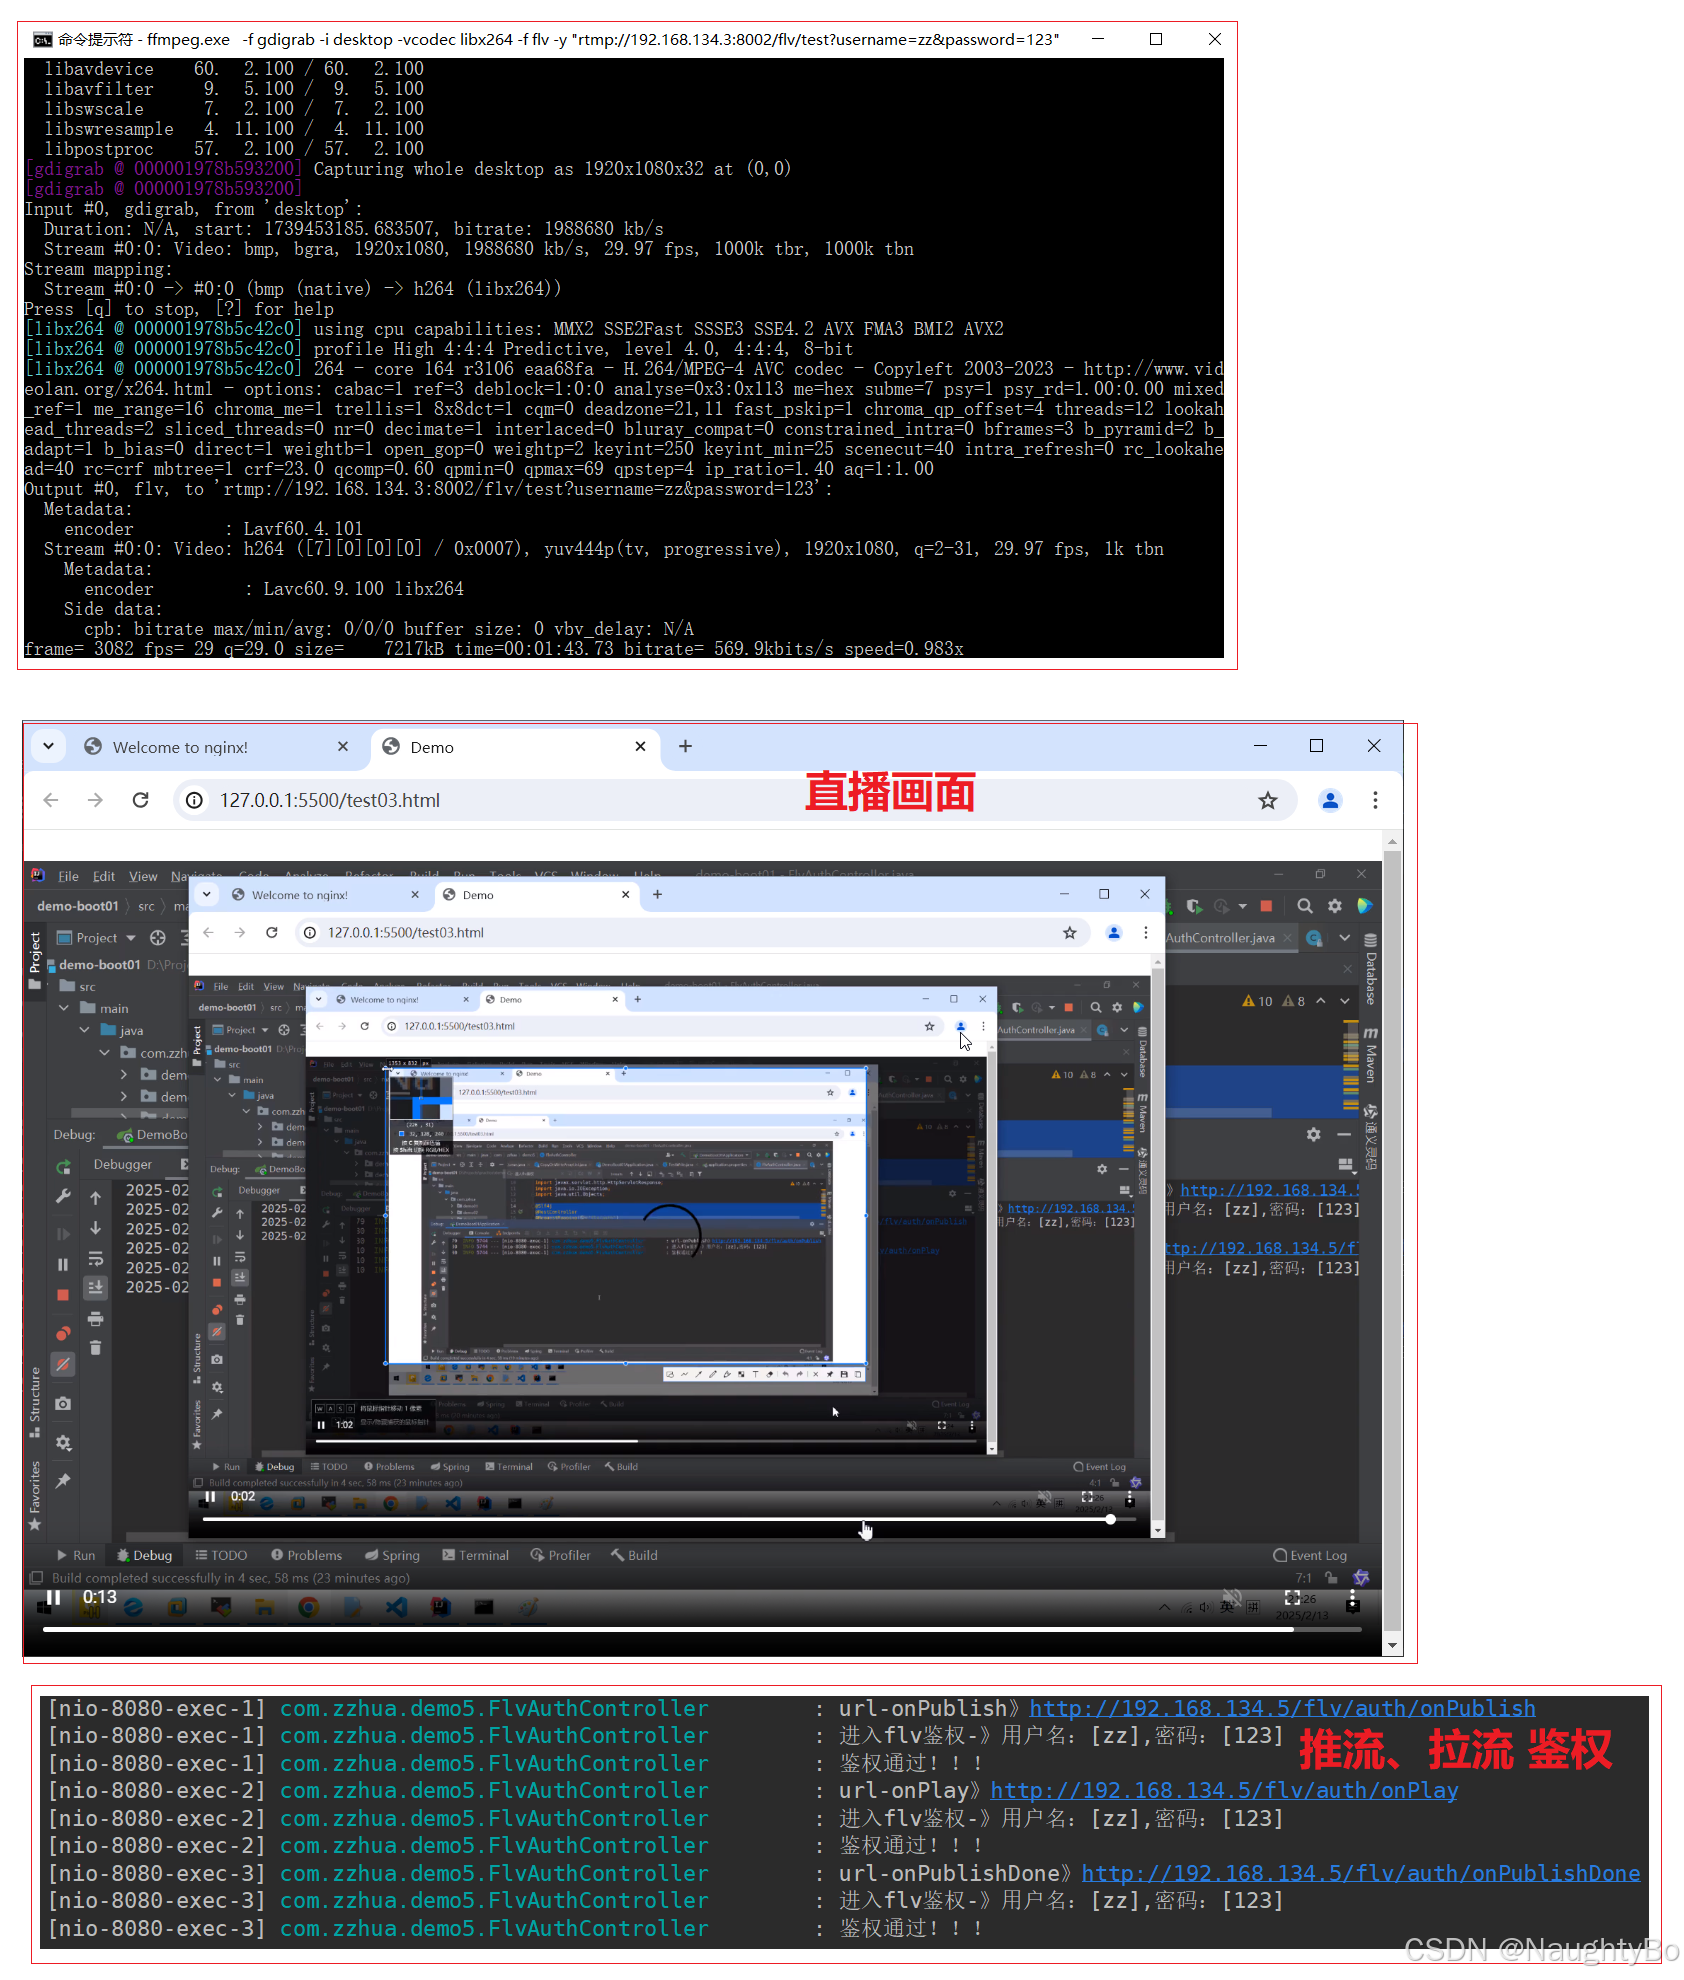
使用ffmpeg推流:ffmpeg.exe -f gdigrab -i desktop -vcodec libx264 -f flv -y “rtmp://192.168.134.3:8002/flv/test?username=zz&password=123”
5、鉴权服务FlvAuthController
@Slf4j
@RestController
@RequestMapping("flv/auth")
public class FlvAuthController {

    @Autowired
    private HttpServletResponse response;

    @Autowired
    private HttpServletRequest request;

	/* 使用ffmpeg推流:ffmpeg.exe  -f gdigrab -i desktop -vcodec libx264 -f flv -y "rtmp://192.168.134.3:8002/flv/test?username=zz&password=123" */
	/* 注意:在使用ffmpeg推流时,如果有多个参数需要传递过来,那么需要使用双引号引起来,否则只能接收到1个参数 */
    @RequestMapping("onPublish")
    public void onPublish(String username, String password) throws IOException {

        log.info("url-onPublish》" + request.getRequestURL());

        log.info(String.format("进入flv鉴权-》用户名:[%s],密码:[%s]", username, password));

        if (Objects.isNull(username)) {
            log.info(String.format("鉴权失败-》用户名:[%s],密码:[%s]", username, password));
            response.setStatus(403);
            return;
        }

        if (username.equalsIgnoreCase("zz") && password.equalsIgnoreCase("123")) {
            log.info("鉴权通过!!!");
            response.setStatus(200);
            return;
        } else {
            log.info("鉴权失败!!!");
            response.setStatus(403);
            return;
        }

    }

	/* 在ffmpeg停止推流时,会收到请求 */
    @RequestMapping("onPublishDone")
    public void onPublishDone(String username, String password) throws IOException {

        log.info("url-onPublishDone》" + request.getRequestURL());

        log.info(String.format("进入flv鉴权-》用户名:[%s],密码:[%s]", username, password));

        if (Objects.isNull(username) || Objects.isNull(password)) {
            log.info(String.format("鉴权失败-》用户名:[%s],密码:[%s]", username, password));
            response.setStatus(403);
            return;
        }

        if (username.equalsIgnoreCase("zz") && password.equalsIgnoreCase("123")) {
            log.info("鉴权通过!!!");
            response.setStatus(200);
            return;
        } else {
            log.info("鉴权失败!!!");
            response.setStatus(403);
            return;
        }

    }

	/* 在拉流时,会收到该请求,比如前端使用flvjs播放流,会经由/live处理,请求到rtmp的直播流。
	前端使用的路径是:http://192.168.134.3/live?port=8002&app=flv&stream=test&username=zz&password=123,这里可以收到username和password */
    @RequestMapping("onPlay")
    public void onPlay(String username, String password) throws IOException {

        log.info("url-onPlay》" + request.getRequestURL());

        log.info(String.format("进入flv鉴权-》用户名:[%s],密码:[%s]", username, password));

        if (Objects.isNull(username) || Objects.isNull(password)) {
            log.info(String.format("鉴权失败-》用户名:[%s],密码:[%s]", username, password));
            response.setStatus(403);
            return;
        }

        if (username.equalsIgnoreCase("zz") && password.equalsIgnoreCase("123")) {
            log.info("鉴权通过!!!");
            response.setStatus(200);
            return;
        } else {
            log.info("鉴权失败!!!");
            response.setStatus(403);
            return;
        }

    }
}
6、播放直播流
<!DOCTYPE html>
<html lang="en">
<head>
    <meta charset="UTF-8">
    <title>Demo</title>
    <!-- https://bilibili.github.io/flv.js/ -->
    <script src="https://cdn.bootcdn.net/ajax/libs/flv.js/1.6.2/flv.min.js"></script>
    <style>
        body {
            margin: 0;
        }

        #video {
            width: 100%;
            height: 100vh;
        }

    </style>
</head>
<body>
<video id="video" src="" muted autoplay="false" controls></video>
<script>
    const videoElement = document.getElementById('video');
    const flvPlayer = flvjs.createPlayer({
        type: 'flv',
        url: 'http://192.168.134.3/live?port=8002&app=flv&stream=test&username=zz&password=123'
    });
    flvPlayer.attachMediaElement(videoElement);
    flvPlayer.load();
    flvPlayer.play();
</script>
</body>
</html>
7、测试


 1370
1370

 被折叠的 条评论
为什么被折叠?
被折叠的 条评论
为什么被折叠?
 到【灌水乐园】发言


