


 本文详细介绍使用全连接网络及卷积神经网络进行MNIST手写数字识别的过程,包括模型构建、训练及评估等关键步骤。
一. MINST For ML Beginners(全连接网络)
上一讲已经谈到了构建模型后,把数据丢进去,按照梯度下降法一步一步训练可以得到模型的参数。对图片处理,也是构建一种一种模型(图),然后扔给tensorflow去计算就好了。
1.算法流程
1.构建图,上一讲TensorFLow运作模式及概念就提前给即将输入数据构建了一个线性模型,然后再计算出模型的参数,但是这里输入是手写数字的28*28的图像和标签,该怎么构建模型呢?
其中每张图大小为28*28=784,手写字的数字肯定时与每个点的像素值有关的,将所有的像素点reshape成一个784*1维的向量,我们假设存在这样的一个模型w,给出任意像素点x,这个模型都能给出这张图片为0,1…,9每个的概率,一个最简单的模型如下(实际上这里x是784*1维的,w矩阵为784*10维的,因为有10个标签):
2.这样这个模型就构建好了,接着我们还要给出一种判定方式,让机器知道什么样的情况下代表这个模型已经足够好了,还是同样的,我们构建一个损失函数,这个损失函数loss()肯定要反应出这个模型算出来的值y_和实际的标签值y的差距,让后一步一步优化,使loss最小。
这里损失函数定义为:- 3.接着再如上一讲提到的,构建会话session,读取数据并训练整个模型即可,代码及其注释见下一部分


2.
这里写代码片二. MINST For ML Experts(卷积神经网络)
1.原理
- 1.算法流程大致相同,只是模型变了,变成这个样子:
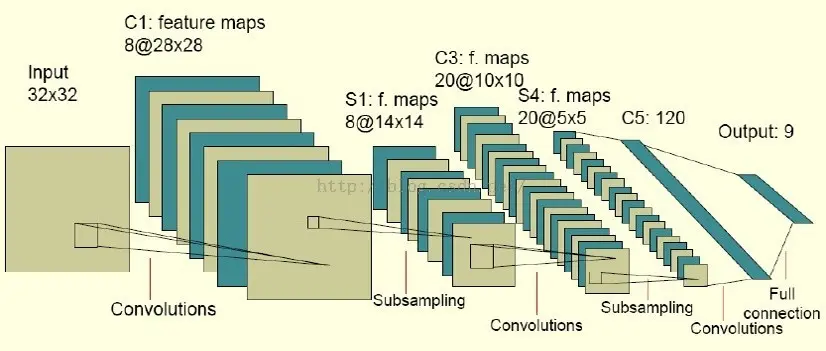
即通过多个卷积以及池化层,让后再全链接,再softmax,最后再利用梯度下降法优化模型的参数。- 2.卷积与池化
卷积:
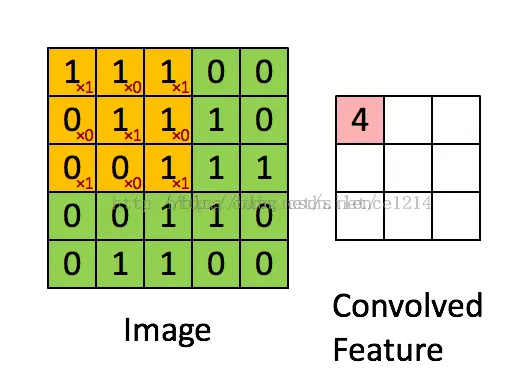
实际上就是一个3*3的滤波器以一定的步长stride遍历整个图像,得到卷积图像,事实上就是为了提取这副图的一种特征,而怎么设计这些卷积核(w),也就是通过塞一堆数据进去,不断的优化这些特征提取模型w,让他们能够更好的提取出图中的特征用于识别。
池化:
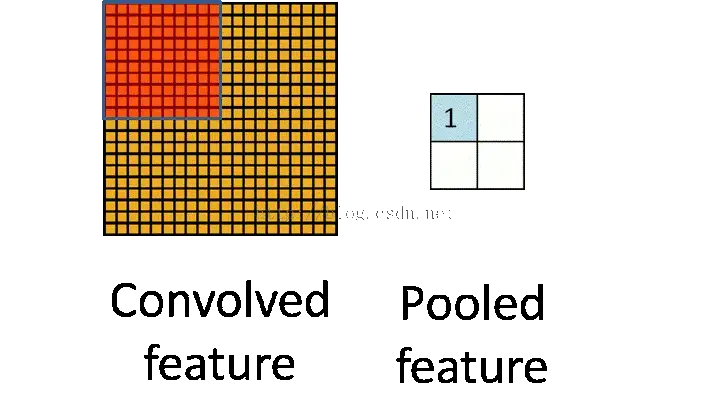
提取出2*2或者其他大小里面最大值或者平均值作为代表值,这样可以减少全连接数。
具体可以参考:
1.CS231n: Convolutional Neural Networks for Visual Recognition
2.Convolutional Neural Networks
2.卷积神经网络代码注释
# -*- coding: utf-8 -*-
"""
Created on Thu Sep  8 15:29:48 2016

@author: root
"""
import tensorflow as tf
import tensorflow.examples.tutorials.mnist.input_data as input_data
mnist = input_data.read_data_sets("MNIST_data/", one_hot=True)     #下载并加载mnist数据
x = tf.placeholder(tf.float32, [None, 784])                        #输入的数据占位符
y_actual = tf.placeholder(tf.float32, shape=[None, 10])            #输入的标签占位符

#定义一个函数,用于初始化所有的权值 W
def weight_variable(shape):
  initial = tf.truncated_normal(shape, stddev=0.1)
  return tf.Variable(initial)

#定义一个函数,用于初始化所有的偏置项 b
def bias_variable(shape):
  initial = tf.constant(0.1, shape=shape)
  return tf.Variable(initial)

#定义一个函数,用于构建卷积层
def conv2d(x, W):
  return tf.nn.conv2d(x, W, strides=[1, 1, 1, 1], padding='SAME')

#定义一个函数,用于构建池化层
def max_pool(x):
  return tf.nn.max_pool(x, ksize=[1, 2, 2, 1],strides=[1, 2, 2, 1], padding='SAME')

#构建网络
x_image = tf.reshape(x, [-1,28,28,1])         #转换输入数据shape,以便于用于网络中
W_conv1 = weight_variable([5, 5, 1, 32])
b_conv1 = bias_variable([32])
h_conv1 = tf.nn.relu(conv2d(x_image, W_conv1) + b_conv1)     #第一个卷积层
h_pool1 = max_pool(h_conv1)                                  #第一个池化层

W_conv2 = weight_variable([5, 5, 32, 64])
b_conv2 = bias_variable([64])
h_conv2 = tf.nn.relu(conv2d(h_pool1, W_conv2) + b_conv2)      #第二个卷积层
h_pool2 = max_pool(h_conv2)                                   #第二个池化层

W_fc1 = weight_variable([7 * 7 * 64, 1024])
b_fc1 = bias_variable([1024])
h_pool2_flat = tf.reshape(h_pool2, [-1, 7*7*64])              #reshape成向量
h_fc1 = tf.nn.relu(tf.matmul(h_pool2_flat, W_fc1) + b_fc1)    #第一个全连接层

keep_prob = tf.placeholder("float")
h_fc1_drop = tf.nn.dropout(h_fc1, keep_prob)                  #dropout层

W_fc2 = weight_variable([1024, 10])
b_fc2 = bias_variable([10])
y_predict=tf.nn.softmax(tf.matmul(h_fc1_drop, W_fc2) + b_fc2)   #softmax层

cross_entropy = -tf.reduce_sum(y_actual*tf.log(y_predict))     #交叉熵
train_step = tf.train.GradientDescentOptimizer(1e-3).minimize(cross_entropy)    #梯度下降法
correct_prediction = tf.equal(tf.argmax(y_predict,1), tf.argmax(y_actual,1))
accuracy = tf.reduce_mean(tf.cast(correct_prediction, "float"))                 #精确度计算
sess=tf.InteractiveSession()
sess.run(tf.initialize_all_variables())
for i in range(20000):
  batch = mnist.train.next_batch(50)
  if i%100 == 0:                  #训练100次,验证一次
    train_acc = accuracy.eval(feed_dict={x:batch[0], y_actual: batch[1], keep_prob: 1.0})
    print('step',i,'training accuracy',train_acc)
    train_step.run(feed_dict={x: batch[0], y_actual: batch[1], keep_prob: 0.5})

test_acc=accuracy.eval(feed_dict={x: mnist.test.images, y_actual: mnist.test.labels, keep_prob: 1.0})
print("test accuracy",test_acc)
三. TensorFlow Mechanics 101(以前馈神经网络为例)
模型
代码及注释
四.参考文献
1.官网 https://www.tensorflow.org/versions/r0.11/tutorials/index.html
2.tensorflow学习笔记五:mnist实例–卷积神经网络(CNN):
http://www.cnblogs.com/denny402/p/5853538.html
3.基于tensorflow的MNIST手写字识别(一)–白话卷积神经网络模型
http://www.jianshu.com/p/2186766b69dc
4.CS231n: Convolutional Neural Networks for Visual Recognition
http://cs231n.stanford.edu/


 525
525

 被折叠的 条评论
为什么被折叠?
被折叠的 条评论
为什么被折叠?
 到【灌水乐园】发言


