


 本文介绍在SSM框架下如何配置和使用多数据源,包括MySQL和Oracle数据库的动态切换,通过代码示例详细说明数据源配置、自定义数据源、AOP切面编程实现自动切换数据源的方法。
前置条件:大家在开发过程中大多都是连接一个数据库,进行数据操作,但是在同一个项目工程中,需要连接多个数据库,进行读写操作,这时候就需要配置切换动态数据源。。。,f废话少说,直接上代码
这里已ssm框架为例,当然项目所需的相关依赖jar都已经集成在框架中了。。。。
1、数据源连接参数
jdbc.properties
#mysql 5.x
jdbc.driver_1=com.mysql.jdbc.Driver
jdbc.url_1=jdbc\:mysql\://127.0.01:3306/db_xedk?autoReconnect\=true&useUnicode\=true&characterEncoding\=utf8&useSSL\=false&failOverReadOnly\=false
jdbc.username_1=root
jdbc.password_1=root
#oracle 11
jdbc.driver_2=oracle.jdbc.driver.OracleDriver
jdbc.url_2=jdbc:oracle:thin:@127.0.01:1521/ORCL
jdbc.username_2=root
jdbc.password_2=root
2、自定义数据源
package com.ssm.core.util;
import org.springframework.jdbc.datasource.lookup.AbstractRoutingDataSource;
/**
* 动态数据源
* */
public class DynamicDataSource extends AbstractRoutingDataSource
{
@Override
protected Object determineCurrentLookupKey() {
return DBContextHolder.getDbType();
}
}
package com.ssm.core.util;
/**
* 数据源类型
*/
public class DBContextHolder {
/**
* 注意:数据源标识保存在线程变量中,避免多线程操作数据源时互相干扰
*/
private static final ThreadLocal<String> contextHolder = new ThreadLocal<String>();
// 设置当前数据源
public static void setDbType(String dbType) {
contextHolder.set(dbType);
}
// 获取当前数据源
public static String getDbType() {
return ((String) contextHolder.get());
}
// 清空上下文数据源
public static void clearDbType() {
contextHolder.remove();
}
}
3、配置数据源
spring-dao.xml:
<!-- 配置数据源1 -->
<bean id="dataSource1" class="org.apache.commons.dbcp.BasicDataSource"
destroy-method="close">
<property name="driverClassName" value="${jdbc.driver_1}" />
<property name="url" value="${jdbc.url_1}" />
<property name="username" value="${jdbc.username_1}" />
<property name="password" value="${jdbc.password_1}" />
<property name="maxActive" value="10" />
<property name="minIdle" value="5" />
</bean>
<!-- 配置数据源2 -->
<bean id="dataSource2" class="org.apache.commons.dbcp.BasicDataSource"
destroy-method="close">
<property name="driverClassName" value="${jdbc.driver_2}" />
<property name="url" value="${jdbc.url_2}" />
<property name="username" value="${jdbc.username_2}" />
<property name="password" value="${jdbc.password_2}" />
<property name="maxActive" value="10" />
<property name="minIdle" value="5" />
</bean>
<!-- 配置SqlSessionFactory,同时指定数据源 -->
<bean id="sqlSessionFactory" class="org.mybatis.spring.SqlSessionFactoryBean">
<property name="dataSource" ref="dynamicDataSource" />
<property name="configLocation" value="classpath:mybatis/SqlMapConfig.xml"></property>
<property name="mapperLocations" value="classpath:mybatis/sqlMap/sqlMap*.xml" />
</bean>
<!-- 配置扫描包,加载mapper代理对象 -->
<bean class="org.mybatis.spring.mapper.MapperScannerConfigurer">
<property name="basePackage" value="com.ssm.core.*.dao" />
<property name="sqlSessionFactoryBeanName" value="sqlSessionFactory" />
</bean>
spring-service.xml:
<!-- 配置多数源映射关系 -->
<bean id="dynamicDataSource" class="com.ssm.core.util.DynamicDataSource">
<property name="targetDataSources">
<map key-type="java.lang.String">
<entry value-ref="dataSource1" key="dataSource1"></entry>
<entry value-ref="dataSource2" key="dataSource2"></entry>
</map>
</property>
<!-- 默认数据源1 -->
<property name="defaultTargetDataSource" ref="dataSource1"></property>
</bean>
<!--配置事务管理器 -->
<bean id="transactionManager" class="org.springframework.jdbc.datasource.DataSourceTransactionManager">
<!-- 数据源 -->
<property name="dataSource" ref="dynamicDataSource" />
</bean>
<!-- 通知 -->
<tx:advice id="txAdvice"
transaction-manager="transactionManager">
<tx:attributes>
<!-- 传播行为 -->
<tx:method name="save*" propagation="REQUIRED" />
<tx:method name="insert*" propagation="REQUIRED" />
<tx:method name="add*" propagation="REQUIRED" />
<tx:method name="create*" propagation="REQUIRED" />
<tx:method name="delete*" propagation="REQUIRED" />
<tx:method name="update*" propagation="REQUIRED" />
<tx:method name="find*" propagation="SUPPORTS"
read-only="true" />
<tx:method name="select*" propagation="SUPPORTS"
read-only="true" />
<tx:method name="get*" propagation="SUPPORTS"
read-only="true" />
</tx:attributes>
</tx:advice>
<!-- 切面-事务管理控制在Service层 -->
<aop:config>
<aop:advisor advice-ref="txAdvice"
pointcut="execution(* com.ssm.core.*.service.*Service.*(..))" />
</aop:config>
<context:component-scan
base-package="com.ssm.core">
<context:exclude-filter type="regex"
expression="com.ssm.core.*.*.controller.*" />
</context:component-scan>
4、使用数据源
使用方式:
DBContextHolder.setDbType("dataSource1"); //设置数据源
List<UserInfo> users = userDao.getUserInfoByMap(map); //dao调用
/**
* 查询用户列表_mysql
*/
public List<UserInfo> getUserListByMysql()
{
Map<String, Object> map = new HashMap<String, Object>();
//调用mysql数据源
DBContextHolder.setDbType("dataSource1");
List<UserInfo> users = userDao.getUserInfoByMap(map);
return users;
}
/**
* 查询用户列表_oracle
*/
public List<UserEntity> getUserEntityListByOracle()
{
Map<String, Object> map = new HashMap<String, Object>();
//调用oracle数据源
DBContextHolder.setDbType("dataSource2");
List<UserEntity> users = userDao.getUserEntityByMap(map);
return users;
}
5、测试
package com.ssm.core.pc.controller;
import java.util.ArrayList;
import java.util.HashMap;
import java.util.List;
import java.util.Map;
import javax.servlet.http.Cookie;
import javax.servlet.http.HttpServletRequest;
import javax.servlet.http.HttpServletResponse;
import org.apache.commons.lang.StringUtils;
import org.springframework.beans.factory.annotation.Autowired;
import org.springframework.stereotype.Controller;
import org.springframework.web.bind.annotation.RequestMapping;
import org.springframework.web.bind.annotation.RequestMethod;
import org.springframework.web.bind.annotation.ResponseBody;
import org.springframework.web.bind.annotation.RestController;
import com.ssm.base.BusinessException;
import com.ssm.base.Constant;
import com.ssm.core.pc.entity.UserEntity;
import com.ssm.core.pc.entity.UserInfo;
import com.ssm.core.pc.service.UserInfoService;
import com.ssm.core.util.RedisUtil;
import com.ssm.utils.SmsUtil;
import com.ssm.utils.StringHelper;
@Controller
@RequestMapping(value = "/index")
public class TestController
{
@Autowired
private UserInfoService us;
@RequestMapping(value = "testDynamicDataSource", method = RequestMethod.POST)
@ResponseBody
public Map<String, Object> getTest(String type) throws Exception
{
Map<String, Object> rspmap = new HashMap<String, Object>();
if(StringUtils.isBlank(type)) {
throw new BusinessException("type不能为空");
}
System.err.println("测试双数据源start。。。。.");
List<?> list = new ArrayList<>();
if("1".equals(type)) {
System.err.println("调用mysql数据源");
list = us.getUserListByMysql();
}
if("2".equals(type)) {
System.err.println("调用oracle数据源");
list = us.getUserEntityListByOracle();
}
rspmap.put("users", list);
System.err.println("测试双数据源end。。。。.");
return rspmap;
}
}
调用:http://localhost/ssmDemo/index/testDynamicDataSource.do?type=1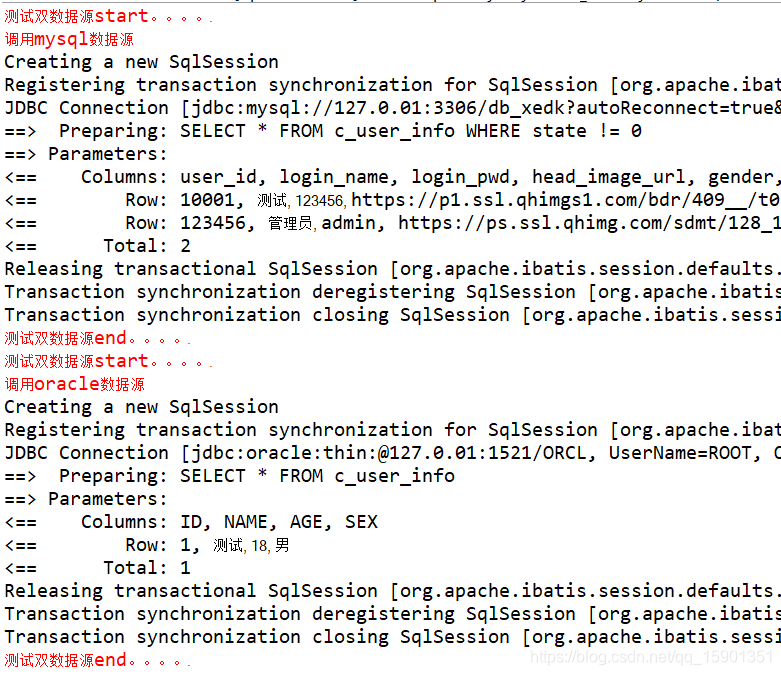
以上方法,需要使用哪个就需要设置一下,太过于繁琐,这个使用切面编程,统一的解决使用哪个数据源。。。。
实现思路:
a、对于需要使用的dao层,加上自定义的@DataSource("dataSource2")注解
b、使用aop切面,拦截@DataSource注解层,设置对应的数据源
核心代码:
1、自定义@DataSource注解
package com.ssm.core.util;
import java.lang.annotation.Retention;
import java.lang.annotation.Target;
import java.lang.annotation.ElementType;
import java.lang.annotation.RetentionPolicy;
/**自定义@DataSource注解 */
@Target({ ElementType.TYPE,ElementType.METHOD })
@Retention(RetentionPolicy.RUNTIME)
public @interface DataSource {
String value();
}
2、定义DataSourceAspect切面
package com.ssm.base;
import java.lang.reflect.Method;
import org.aspectj.lang.JoinPoint;
import org.aspectj.lang.annotation.After;
import org.aspectj.lang.annotation.Aspect;
import org.aspectj.lang.annotation.Before;
import org.aspectj.lang.annotation.Pointcut;
import org.aspectj.lang.reflect.MethodSignature;
import org.slf4j.Logger;
import org.slf4j.LoggerFactory;
import org.springframework.stereotype.Component;
import com.ssm.core.util.DBContextHolder;
import com.ssm.core.util.DataSource;
/**
* DataSource切面
*/
@Component
@Aspect
public class DataSourceAspect {
private static final Logger logger = LoggerFactory.getLogger(DataSourceAspect.class);
// 指定切入点表单式
@Pointcut("execution(* com.ssm.core.pc.dao..*.*(..))")
public void pointCut_() {
}
// 前置通知 : 在执行目标方法之前执行
@Before("pointCut_()")
public void begin(JoinPoint point) {
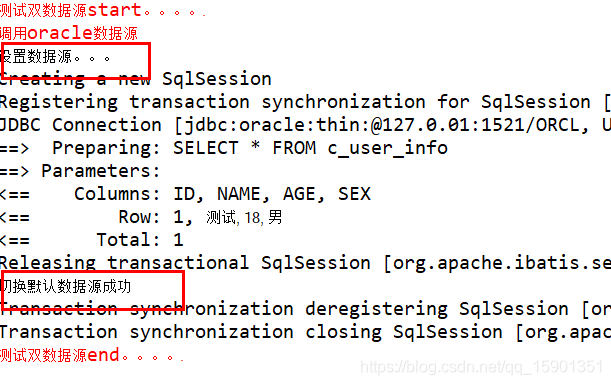
System.err.println("正在设置数据源。。。");
//获取由@DataSource指定的数据源标识,设置到线程存储中以便切换数据源
Class<?> target = point.getTarget().getClass();
MethodSignature signature = (MethodSignature) point.getSignature();
// 默认使用目标类型的注解,如果没有则使用其实现接口的注解
for (Class<?> clazz : target.getInterfaces()) {
resolveDataSource(clazz, signature.getMethod());
}
resolveDataSource(target, signature.getMethod());
}
// 后置/最终通知:在执行目标方法之后执行 【无论是否出现异常最终都会执行】
@After("pointCut_()")
public void after(JoinPoint point) {
DBContextHolder.clearDbType();
System.out.println("切换默认数据源成功");
}
/**
* 提取目标对象方法注解和类型注解中的数据源标识
*
* @param clazz
* @param method
*/
private void resolveDataSource(Class<?> clazz, Method method) {
try {
Class<?>[] types = method.getParameterTypes();
// 默认使用类型注解
if (clazz.isAnnotationPresent(DataSource.class)) {
DataSource source = clazz.getAnnotation(DataSource.class);
DBContextHolder.setDbType(source.value());
}
// 方法注解可以覆盖类型注解
Method m = clazz.getMethod(method.getName(), types);
if (m != null && m.isAnnotationPresent(DataSource.class)) {
DataSource source = m.getAnnotation(DataSource.class);
DBContextHolder.setDbType(source.value());
logger.debug("当前数据源:"+source.value());
}
} catch (Exception e) {
logger.error(clazz + ":" + e.getMessage());
}
}
}
在spring-dao.xml,
<!-- 开启aop注解方式 -->
<aop:aspectj-autoproxy proxy-target-class="true"></aop:aspectj-autoproxy>
在对应的dao层使用
@DataSource("dataSource2")
public interface UserEntityDao {
List<UserEntity> getUserEntityByMap(Map<String, Object> map);
}
调用成功,截图如下


 被折叠的 条评论
为什么被折叠?
被折叠的 条评论
为什么被折叠?
 到【灌水乐园】发言


