Dashboard安装
yum install -y openstack-dashboard
vim /etc/openstack-dashboard/local_settings       #相关详细修改可参考截图
OPENSTACK_HOST = "controller"
OPENSTACK_KEYSTONE_URL = "http://%s:5000/v3" % OPENSTACK_HOST
OPENSTACK_KEYSTONE_DEFAULT_ROLE = "user"

ALLOWED_HOSTS = ['*', ]

SESSION_ENGINE = 'django.contrib.sessions.backends.cache'

CACHES = {
    'default': {
         'BACKEND': 'django.core.cache.backends.memcached.MemcachedCache',
         'LOCATION': 'controller:11211',
    }
}

OPENSTACK_KEYSTONE_MULTIDOMAIN_SUPPORT = True

OPENSTACK_API_VERSIONS = {
    "identity": 3,
    "image": 2,
    "volume": 2,
}

OPENSTACK_KEYSTONE_DEFAULT_DOMAIN = 'default'

OPENSTACK_NEUTRON_NETWORK = {
    'enable_router': False,
    'enable_quotas': False,
    'enable_ipv6': False,
    'enable_distributed_router': False,
    'enable_ha_router': False,
    'enable_lb': False,
    'enable_firewall': False,
    'enable_vpn': False,
    'enable_fip_topology_check': False,
}

TIME_ZONE = "Asia/Shanghai"


systemctl restart httpd.service memcached.service

浏览器访问cotroller ip/dashboard访问仪表盘
验证使用 admin 或者demo用户凭证和default域凭证

可以在左侧计算–>云主机中操作之前创建的云主机

启动之后,点击控制台即可查看


点击右上角退出admin用户,登陆demo用户


在控制节点和计算节点配置私有网络
控制节点
vim /etc/neutron/neutron.conf

vim /etc/neutron/plugins/ml2/ml2_conf.ini


vim /etc/neutron/plugins/ml2/linuxbridge_agent.ini

vim /etc/neutron/l3_agent.ini

systemctl restart neutron-server.service \
  neutron-linuxbridge-agent.service neutron-dhcp-agent.service \
  neutron-metadata-agent.service
systemctl enable neutron-l3-agent.service
systemctl start neutron-l3-agent.service

计算节点
vim /etc/neutron/plugins/ml2/linuxbridge_agent.ini

systemctl restart neutron-linuxbridge-agent.service

控制节点
vim /etc/openstack-dashboard/local_settings

systemctl restart httpd.service memcached.service

使用admin用户删除云主机和provider网络
新建网络

点击进入网络
创建子网


登陆demo用户
创建网络


创建路由

点击router进入编辑在接口中增加接口

查看网络拓扑

创建云主机
使用public网络创建一个云主机


使用private网络创建一个云主机
步骤同vm1,只需修改云主机名和网络即可
查看网络拓扑

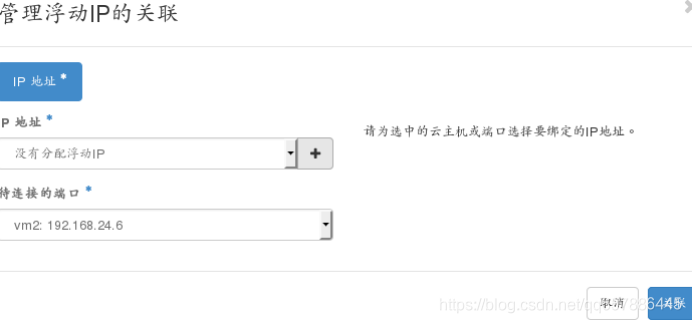
绑定浮动ip
点击加号–>分配ip–>关联

查看云主机

制作镜像
qemu-img create -f qcow2 test.qcow2 5G

打开虚拟机图形管理
选择此选项并选则刚才建立的文件

以下为rhel6.5图形化安装过程,需要注意的是将磁盘都分给根分区
配置ip 使用ssh在物理机连接


关闭selinux
vi /etc/sysconfig/selinux

chkconfig iptables off
chkconfig ip6tables off
/etc/init.d/iptables stop
/etc/init.d/ip6tables stop
rm -f /etc/udev/rules.d/70-persistent-net.rules

vi /etc/sysconfig/network
NOZEROCONF=yes

vi /etc/sysconfig/network-scripts/ifcfg-eth0
DEVICE="eth0"
BOOTPROTO="dhcp"
ONBOOT="yes"

vi /boot/grub/grub.conf

vi /etc/yum.repos.d/rhel-source.repo
[rhel-source]
name=Red Hat Enterprise Linux $releasever - $basearch - Source
baseurl=http://172.25.254.24/rhel6.5
enabled=1
gpgcheck=0

[cloud-init]
name=cloud
baseurl=http://172.25.254.24/cloud-init/rhel6
gpgcheck=0

yum install -y cloud-*
yum install -y dracut-modules-growroot.noarch
yum install -y acpid
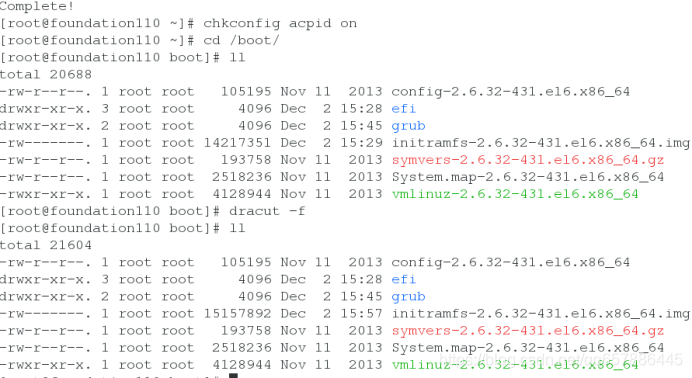
chkconfig acpid on
cd /boot/
dracut -f

yum install -y irqbalance.x86_64
chkconfig irqbalance on

物理机
cd /var/lib/libvirt/images/
virt-sysprep -d test
virt-sparsify --compress test.qcow2 /var/www/html/test.qcow2   #压缩,输出到apache默认发布目录


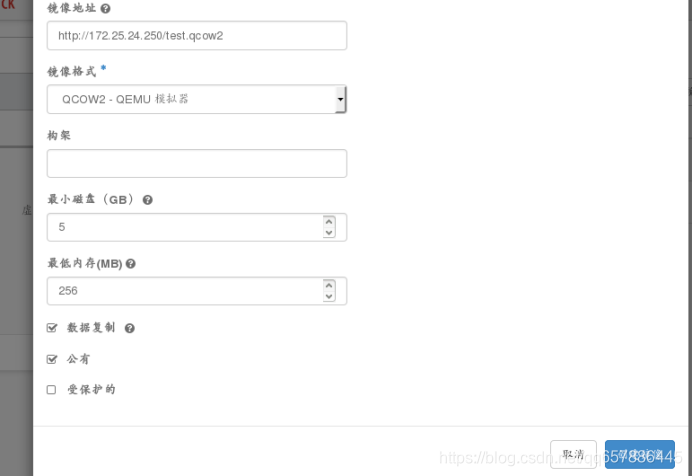
使用admin用户添加镜像
在管理员–>镜像–>创建镜像


创建云主机类型


登陆demo用户
使用刚才新建的镜像和主机类型创建云主机
新建的云主机磁盘为10G,但镜像磁盘为5G,实现了磁盘的拉伸


控制台查看

块存储服务
mysql -p
CREATE DATABASE cinder;
GRANT ALL PRIVILEGES ON cinder.* TO 'cinder'@'localhost' \
  IDENTIFIED BY 'cinder';
GRANT ALL PRIVILEGES ON cinder.* TO 'cinder'@'%' \
  IDENTIFIED BY 'cinder';

openstack user create --domain default --password cinder cinder
openstack role add --project service --user cinder admin


openstack service create --name cinder \
  --description "OpenStack Block Storage" volume
openstack service create --name cinderv2 \
  --description "OpenStack Block Storage" volumev2

openstack endpoint create --region RegionOne \
  volume public http://controller:8776/v1/%\(tenant_id\)s
openstack endpoint create --region RegionOne \
  volume internal http://controller:8776/v1/%\(tenant_id\)s
openstack endpoint create --region RegionOne \
  volume admin http://controller:8776/v1/%\(tenant_id\)s

openstack endpoint create --region RegionOne \
  volumev2 public http://controller:8776/v2/%\(tenant_id\)s
openstack endpoint create --region RegionOne \
  volumev2 internal http://controller:8776/v2/%\(tenant_id\)s
openstack endpoint create --region RegionOne \
  volumev2 admin http://controller:8776/v2/%\(tenant_id\)s


yum install -y openstack-cinder
vim /etc/cinder/cinder.conf
[DEFAULT]
rpc_backend = rabbit
auth_strategy = keystone
my_ip = 172.25.24.1

[database]
connection = mysql+pymysql://cinder:cinder@controller/cinder

[oslo_messaging_rabbit]
rabbit_host = controller
rabbit_userid = openstack
rabbit_password = openstack

[keystone_authtoken]
auth_uri = http://controller:5000
auth_url = http://controller:35357
memcached_servers = controller:11211
auth_type = password
project_domain_name = default
user_domain_name = default
project_name = service
username = cinder
password = cinder

[oslo_concurrency]
lock_path = /var/lib/cinder/tmp

su -s /bin/sh -c "cinder-manage db sync" cinder

vim /etc/nova/nova.conf
[cinder]
os_region_name = RegionOne

systemctl restart openstack-nova-api.service
systemctl enable openstack-cinder-api.service openstack-cinder-scheduler.service

安装并配置一个存储节点
此处由于硬件限制,将存储节点放在控制节点上
yum install lvm2
systemctl start lvm2-lvmetad.service
systemctl enable lvm2-lvmetad.service
虚拟机添加一个20G的虚拟磁盘

pvcreate /dev/vdb
vgcreate cinder-volumes /dev/vdb
vim /etc/lvm/lvm.conf
filter = [ "a/vda/", "a/vdb/", "r/.*/"]

yum install -y openstack-cinder targetcli python-keystone
vim /etc/cinder/cinder.conf
[DEFAULT]
enabled_backends = lvm
glance_api_servers = http://controller:9292

[lvm]
volume_driver = cinder.volume.drivers.lvm.LVMVolumeDriver
volume_group = cinder-volumes
iscsi_protocol = iscsi
iscsi_helper = lioadm

systemctl enable openstack-cinder-volume.service target.service
systemctl start openstack-cinder-volume.service target.service

验证操作
由于是在控制节点配置的存储节点,所以Host为controller@lvm,此名字和本地解析有关
cinder service-list

使用demo用户在 项目–>卷–>创建云硬盘

管理连接


控制台查看


拉伸云硬盘
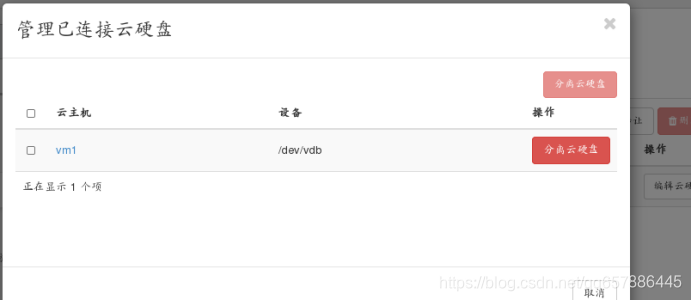
在管理连接中
从vm1上分离云硬盘

扩展云硬盘

再次给vm1连接云硬盘

控制台查看vm1
磁盘已变为10G,挂在查看,云硬盘中内容还在


 本文详细介绍了如何安装和配置OpenStack仪表板(Dashboard),包括通过YUM安装必要的软件包,调整配置文件,重启服务,以及验证仪表板功能。此外,还深入讲解了块存储服务(Cinder)的配置流程,涵盖了数据库设置、用户权限管理、服务与端点创建、存储节点部署等关键步骤。


 4916
4916

 被折叠的 条评论
为什么被折叠?


