


以下是默认的告警规则配置,位于skywalking安装目录下的config文件夹下 alarm-settings.yml文件 中:
rules:
  # Rule unique name, must be ended with `_rule`.
  service_resp_time_rule:
    metrics-name: service_resp_time
    op: ">"
    threshold: 1000
    period: 10
    count: 3
    silence-period: 5
    message: Response time of service {name} is more than 1000ms in 3 minutes of last 10 minutes.
  service_sla_rule:
    # Metrics value need to be long, double or int
    metrics-name: service_sla
    op: "<"
    threshold: 8000
    # The length of time to evaluate the metrics
    period: 10
    # How many times after the metrics match the condition, will trigger alarm
    count: 2
    # How many times of checks, the alarm keeps silence after alarm triggered, default as same as period.
    silence-period: 3
    message: Successful rate of service {name} is lower than 80% in 2 minutes of last 10 minutes
  service_p90_sla_rule:
    # Metrics value need to be long, double or int
    metrics-name: service_p90
    op: ">"
    threshold: 1000
    period: 10
    count: 3
    silence-period: 5
    message: 90% response time of service {name} is more than 1000ms in 3 minutes of last 10 minutes
  service_instance_resp_time_rule:
    metrics-name: service_instance_resp_time
    op: ">"
    threshold: 1000
    period: 10
    count: 2
    silence-period: 5
    message: Response time of service instance {name} is more than 1000ms in 2 minutes of last 10 minutes
#  Active endpoint related metrics alarm will cost more memory than service and service instance metrics alarm.
#  Because the number of endpoint is much more than service and instance.
#
#  endpoint_avg_rule:
#    metrics-name: endpoint_avg
#    op: ">"
#    threshold: 1000
#    period: 10
#    count: 2
#    silence-period: 5
#    message: Response time of endpoint {name} is more than 1000ms in 2 minutes of last 10 minutes

webhooks:
#  - http://127.0.0.1/notify/
#  - http://127.0.0.1/go-wechat/
编写一个自己的程序接收SkyWalking中的告警信息,SkyWalking触发告警后立马会通过web钩子发送到自己的程序中。
第一步:创建SpringBoot工程
此步骤就忽略了,不详细讲解
第二步:导入SpringBoot-邮箱的jar包
<dependency>
     <groupId>org.springframework.boot</groupId>
     <artifactId>spring-boot-starter-mail</artifactId>
</dependency>
第三步:配置yml(application.yml)
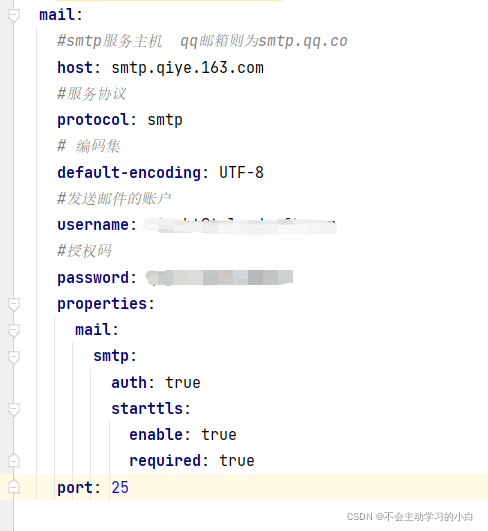
host: 为邮箱的地址,我当前使用的是网易邮箱 ,username是邮箱账号 password是邮箱的授权码,而不是邮箱的登录密码,我当前是网易邮箱,需要用此账号登录网易邮箱进行申请。
第四步:创建接受告警信息的实体类
@Data
public class AlarmMessage {

    private int scopeId; //告警标识

    private String scope; //类型

    private String name; //告警的触发详情

    private String id0; //告警服务与告警消息的加密文

    private String id1; //请求的告警消息的加密文

    private String ruleName;

    private String alarmMessage;  //告警信息

    private long startTime; //告警的生产时间
}
第五步:创建controller控制台接受告警
@RestController
@RequestMapping("/webhook")
@Slf4j
public class WebHooks {

    @Autowired
    private WebHooksService webHooksService;

    @PostMapping("/email")
    public void  email(@RequestBody List<AlarmMessage> alarmMessageList){
        try {
            if (SystemUtils.isNotEmpty(alarmMessageList)){
                webHooksService.sendEmail(alarmMessageList);
            }
        }catch (Exception e){
            e.printStackTrace();
            log.error("邮箱发送失败~~~~");
        }
    }

}
当Skywalking触发告警,就会将告警往这个(/webhook/email)中的进行发送,采用List集合是因为在同一个时间段内会有多个告警同时到来,告警的消息全部在List中怎么做处理根据你们的需求进行编写,我这边是接收到告警后进行发送邮箱。。。
第六步:配置SkyWalking网络钩子
打开skywalking安装目录下的config文件夹下 alarm-settings.yml文件,找到webhooks这个配置项,进行修改
webhooks:
  - http://xxx.x.x.x/webhook/email
配置刚刚创建的项目路径以及接收告警的控制层,启动skyWalking,当skyWalking触发告警就会立马接收到。。。。。


 6501
6501

 被折叠的 条评论
为什么被折叠?
被折叠的 条评论
为什么被折叠?
 到【灌水乐园】发言


