


 本文介绍了AIDL(AndroidInterfaceDefinitionLanguage)在Android中的应用,包括如何定义和使用AIDL接口进行进程间通信(IPC),服务端和服务端的配置,以及在高版本Android中的查询包装。重点讲解了AIDL文件的创建、接口实现、AndroidManifest配置和客户端连接过程。
AIDL(Android Interface Definition Language)是一种 IDL 语言,用于生成可以在 Android 设备上两个进程之间进行进程间通信(IPC)的代码。 通过 AIDL,可以在一个进程中获取另一个进程的数据和调用其暴露出来的方法,从而满足进程间通信的需求。通常,暴露方法给其他应用进行调用的应用称为服务端,调用其他应用的方法的应用称为客户端,客户端通过绑定服务端的 Service 来进行交互。相较于Messenger的跨进程通信,AIDL的特点是允许多线程、多客户端进行并发访问,适用于整个系统中不同app之间的通信。
需要注意的点
1、服务端的AndroidManifest文件中要注册service并写好配置信息,留意action。
    <service
            android:name=".Addservice"
            android:enabled="true"
            android:exported="true">
            <intent-filter>
                <action android:name="com.example.aidl_service.Addservice" />
                <category android:name="android.intent.category.DEFAULT" />
            </intent-filter>
    </service>
2、安卓版本比较高的时候,需要在客户端的AndroidManifest文件中写:
    <queries>
        <package android:name="com.example.aidl_service" />
        <intent>
            <action android:name="com.example.aidl_service.Addservice" />
        </intent>
    </queries>
3、在实际的开发过程中,常常需要不断修改服务端的aidl接口,所以在修改的过程中,如果想保证服务端在aidl接口中定义的方法在客服端都可以使用,里面方法的内容和顺序必须一致。.aidl文件生成的接口中内部代理类Proxy中对应于每一个方法的标识,当远程调用方法,不在同一个进程中就会使用Proxy代理类来实现函数调用,而调用哪一个函数就是根据函数标识来决定,如果服务端中.aidl文件中两个方法位置对调放在客户端,你会发现除了这两个方法不能用,其他的方法调用都没有问题。
4、非基本类型(基本类型请自己查阅)数据在.aidl文件中使用时,请标注 in,out或者inout标识,不然build出错。
下面简单说明AIDL使用流程
服务端即可作为module和一样为module的客户端在同一个project中,也可单独写在一个独立的project中。服务端可以选择No activity。不管是哪种方式,需要通信时都要先Run一下服务端再Run客户端。
建立服务端
1、创建AIDL文件
客户端和服务端都需要AIDL文件,我们先在服务端中创建,然后整个复制到客户端即可,这样就可以保证双端的AIDL文件及包名相同。创建步骤如下所示:
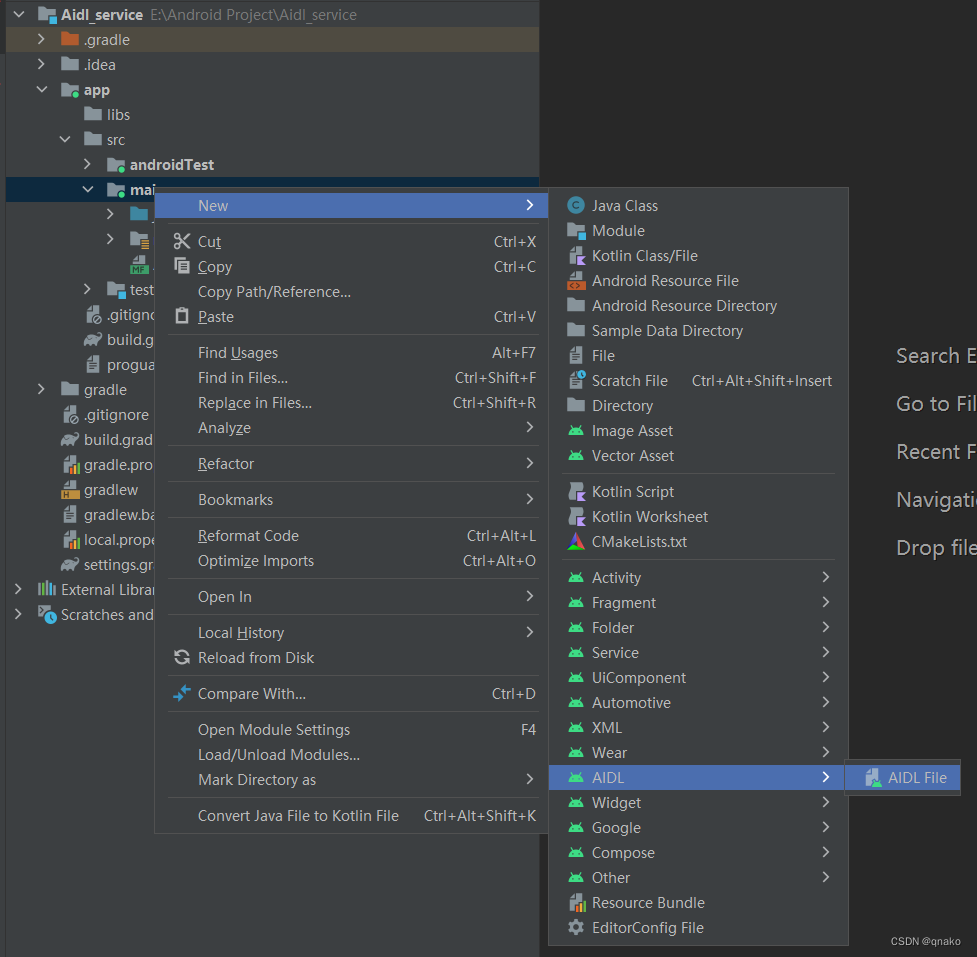
创建完后会生成对应aidl包以及aidl文件。在aidl文件中写上自己的方法,然后点击右上的小锤子Make Project一下(Build工具栏下也有),as就会生成对应的build文件夹。build文件夹下与.aidl 文件同名 .java 接口文件就是在进程间通信中真正起作用的文件。
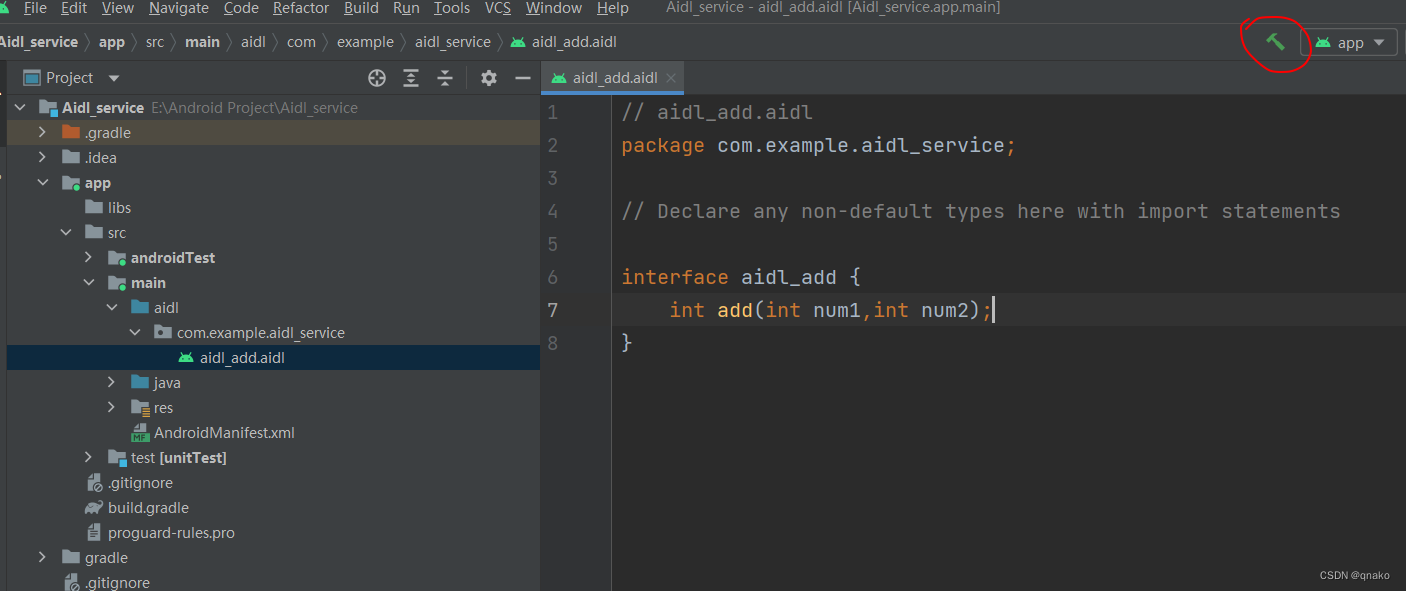
Make Project之后:

2、接口的实现与公开
使用匿名内部类实现接口方法后,再创建service并实现onBind(),从而返回生成的Stub实例。
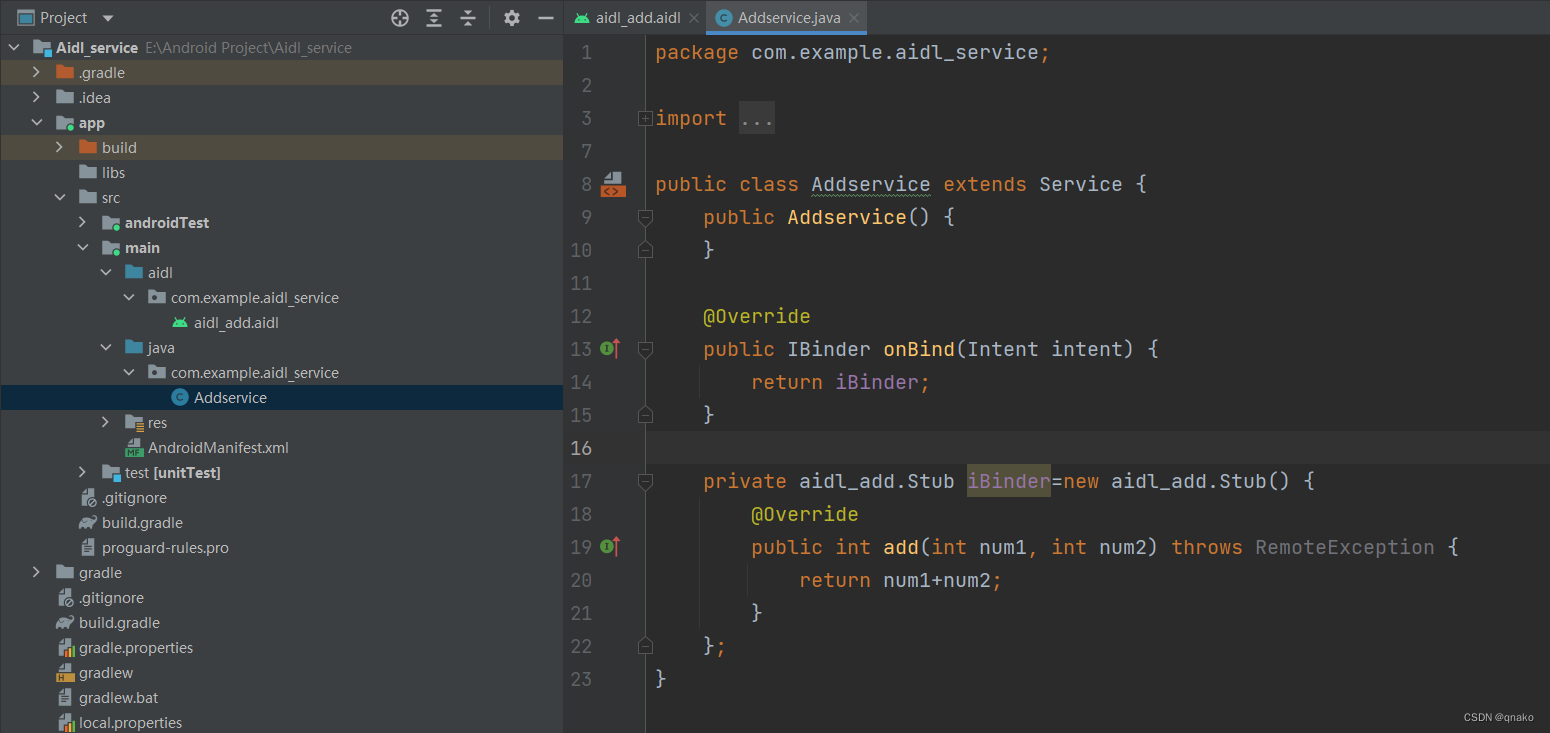
服务端的AndroidManifest文件补上对应配置,服务端就收工了。
    <service
            android:name=".Addservice"
            android:enabled="true"
            android:exported="true">
            <intent-filter>
                <action android:name="com.example.aidl_service.Addservice" />
                <category android:name="android.intent.category.DEFAULT" />
            </intent-filter>
    </service>
建立客户端
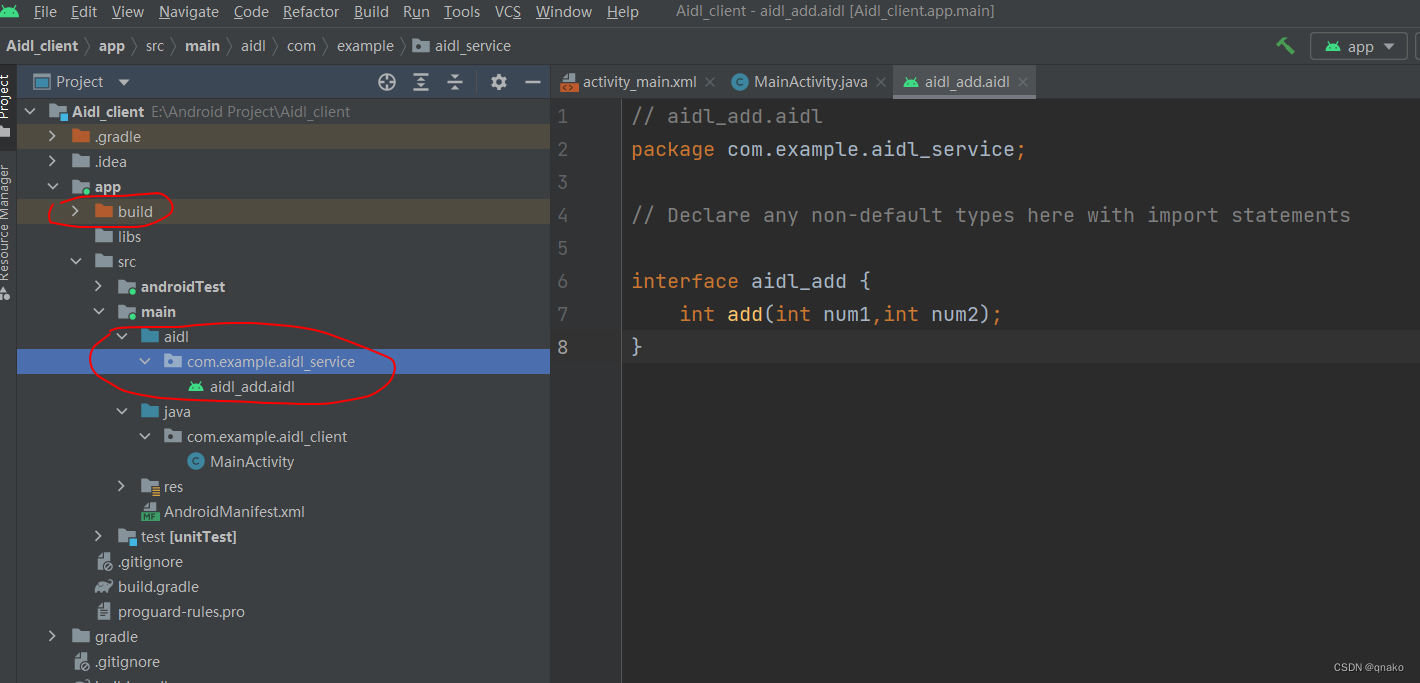
1、客户端配置aidl
直接把服务端的aidl文件夹整个复制到客户端的main文件夹下,注意包名要与服务端的包名相同。然后也要Make Project一下产生对应的build文件夹,
然后编写MainActivity和对应layout。
package com.example.aidl_client;

import androidx.appcompat.app.AppCompatActivity;

import android.content.ComponentName;
import android.content.Context;
import android.content.Intent;
import android.content.ServiceConnection;
import android.os.Bundle;
import android.os.IBinder;
import android.os.RemoteException;
import android.util.Log;
import android.view.View;
import android.widget.Button;
import android.widget.EditText;

import com.example.aidl_service.aidl_add;

public class MainActivity extends AppCompatActivity implements View.OnClickListener{
    private EditText mEtNum1;
    private EditText mEtNum2;
    private EditText mEtNumRes;
    private Button mBtnAdd;
    aidl_add aidlAdd;

    private ServiceConnection conn = new ServiceConnection() {
        // 绑定上服务
        @Override
        public void onServiceConnected(ComponentName name, IBinder service) {
            // 拿到了远程的服务
            Log.d("MainActivity", "onServiceConnected");
            aidlAdd = aidl_add.Stub.asInterface(service);
        }
        // 断开服务
        @Override
        public void onServiceDisconnected(ComponentName name) {
            //回收资源
            aidlAdd = null;
        }
    };

    @Override
    protected void onCreate(Bundle savedInstanceState) {
        super.onCreate(savedInstanceState);
        setContentView(R.layout.activity_main);
        initView();
        bindService();
    }

    private void initView() {
        mEtNum1 = findViewById(R.id.edd_num1);
        mEtNum2 = findViewById(R.id.edd_num2);
        mEtNumRes = findViewById(R.id.edd_res);
        mBtnAdd = findViewById(R.id.btn_add);
        mBtnAdd.setOnClickListener(this);
    }

    @Override
    public void onClick(View v) {
        int num1 = Integer.parseInt(mEtNum1.getText().toString().trim());
        int num2 = Integer.parseInt(mEtNum2.getText().toString().trim());
        try {
            // 调用远程的服务
            if (null != aidlAdd) {
                Log.d("MainActivity", "onClick");
                int res = aidlAdd.add(num1, num2);
                mEtNumRes.setText(res + "");
            }
        } catch (RemoteException e) {
            e.printStackTrace();
        }
    }

    private void bindService() {
        // 获取到服务端
        Intent intent = new Intent();
        intent.setAction("com.example.aidl_service.Addservice");
        intent.setPackage("com.example.aidl_service");
        bindService(intent, conn, Context.BIND_AUTO_CREATE);
        Log.d("MainActivity", "bindService");
    }


    @Override
    protected void onDestroy() {
        super.onDestroy();
        unbindService(conn);
    }

}
<?xml version="1.0" encoding="utf-8"?>
<LinearLayout xmlns:android="http://schemas.android.com/apk/res/android"
    xmlns:app="http://schemas.android.com/apk/res-auto"
    xmlns:tools="http://schemas.android.com/tools"
    android:layout_width="match_parent"
    android:layout_height="match_parent"
    tools:context=".MainActivity"
    android:orientation="vertical">

    <EditText
        android:id="@+id/edd_num1"
        android:layout_width="match_parent"
        android:layout_height="wrap_content" />
    <TextView
        android:layout_width="wrap_content"
        android:layout_height="wrap_content"
        android:text="+" />
    <EditText
        android:id="@+id/edd_num2"
        android:layout_width="match_parent"
        android:layout_height="wrap_content" />
    <TextView
        android:layout_width="wrap_content"
        android:layout_height="wrap_content"
        android:text="=" />
    <EditText
        android:id="@+id/edd_res"
        android:layout_width="match_parent"
        android:enabled="false"
        android:layout_height="wrap_content" />
    <Button
        android:id="@+id/btn_add"
        android:layout_width="match_parent"
        android:layout_height="wrap_content"
        android:text="AIDL远程计算" />

</LinearLayout>
MainActivity中的bindService()方法中,setAction对应的是服务端AndroidManifest文件中service的action,setPackage对应的是.aidl文件的包名。当客户端调用 bindService() 以连接此服务时,客户端的 onServiceConnected() 回调会接收服务端的 onBind() 方法所返回的 binder 实例。安卓版本比较高的时候,需要在客户端的AndroidManifest文件中写:
    <queries>
        <package android:name="com.example.aidl_service" />
        <intent>
            <action android:name="com.example.aidl_service.Addservice" />
        </intent>
    </queries>


 1059
1059

 被折叠的 条评论
为什么被折叠?
被折叠的 条评论
为什么被折叠?
 到【灌水乐园】发言


