


一、功能介绍
目前实现的功能有对接口进行测试(类里面进行用例编写)、excel读取用例、多个接口批量运行、生成报告、报告发送到邮箱。。。
整个流程就是:
1-导入功能包requests、unittest
2-创建一个测试类继承(unittest.TestCase)
3-写具体的测试内容setUp(),结束模块tearDown(),以及测试用例模块test_case() 【测试用例必须是test_ 开头】
4-组装testsuit(套件),批量运行多个测试类的用例
5-运行testsuit,生成测试报告
6-将测试报告发送到邮箱
每一个小功能网上都有具体的代码以及介绍,这个文章是日常使用中,将暂时用的功能汇总到一起,实现一个完整的demo。每个小功能就不具体的介绍了,不太清楚的可以去网上查下。
二、介绍unittest
因为框架是基于unittest写的,所以这里简单介绍下unittest
unittest官方文档:https://docs.python.org/2.7/library/unittest.html
2.1、unittest核心工作原理
介绍来源于以下链接:https://www.cnblogs.com/hackerain/p/3682019.html。详细内容可以移步该博客。
unittest中最核心的四个概念是:test case, test suite, test runner, test fixture。
下面我们分别来解释这四个概念的意思,先来看一张unittest的静态类图
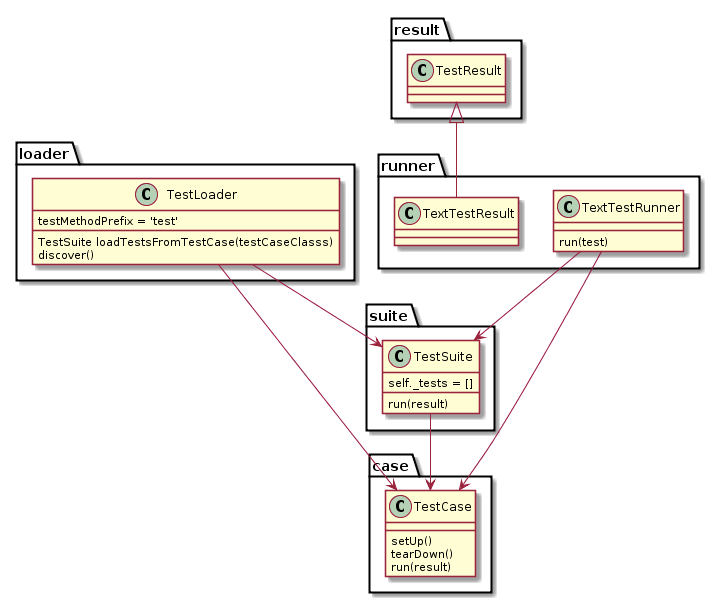
- 一个TestCase的实例就是一个测试用例。什么是测试用例呢?就是一个完整的测试流程,包括测试前准备环境的搭建(setUp),执行测试代码(run),以及测试后环境的还原(tearDown)。元测试(unit test)的本质也就在这里,一个测试用例是一个完整的测试单元,通过运行这个测试单元,可以对某一个问题进行验证。
- 而多个测试用例集合在一起,就是TestSuite,而且TestSuite也可以嵌套TestSuite。
- TestLoader是用来加载TestCase到TestSuite中的,其中有几个loadTestsFrom__()方法,就是从各个地方寻找TestCase,创建它们的实例,然后add到TestSuite中,再返回一个TestSuite实例。
- TextTestRunner是来执行测试用例的,其中的run(test)会执行TestSuite/TestCase中的run(result)方法。
- 测试的结果会保存到TextTestResult实例中,包括运行了多少测试用例,成功了多少,失败了多少等信息。
这样整个流程就清楚了,首先是要写好TestCase,然后由TestLoader加载TestCase到TestSuite,然后由TextTestRunner来运行TestSuite,运行的结果保存在TextTestResult中,整个过程集成在unittest.main模块中。
现在已经涉及到了test case, test suite, test runner这三个概念了,还有test fixture没有提到,那什么是test fixture呢??在TestCase的docstring中有这样一段话:
Test authors should subclass TestCase for their own tests. Construction and deconstruction of the test's environment ('fixture') can be implemented by overriding the 'setUp' and 'tearDown' methods respectively.
可见,对一个测试用例环境的搭建和销毁,是一个fixture,通过覆盖TestCase的setUp()和tearDown()方法来实现。这个有什么用呢?比如说在这个测试用例中需要访问数据库,那么可以在setUp()中建立数据库连接以及进行一些初始化,在tearDown()中清除在数据库中产生的数据,然后关闭连接。注意tearDown的过程很重要,要为以后的TestCase留下一个干净的环境。关于fixture,还有一个专门的库函数叫做fixtures,功能更加强大,以后会介绍到。
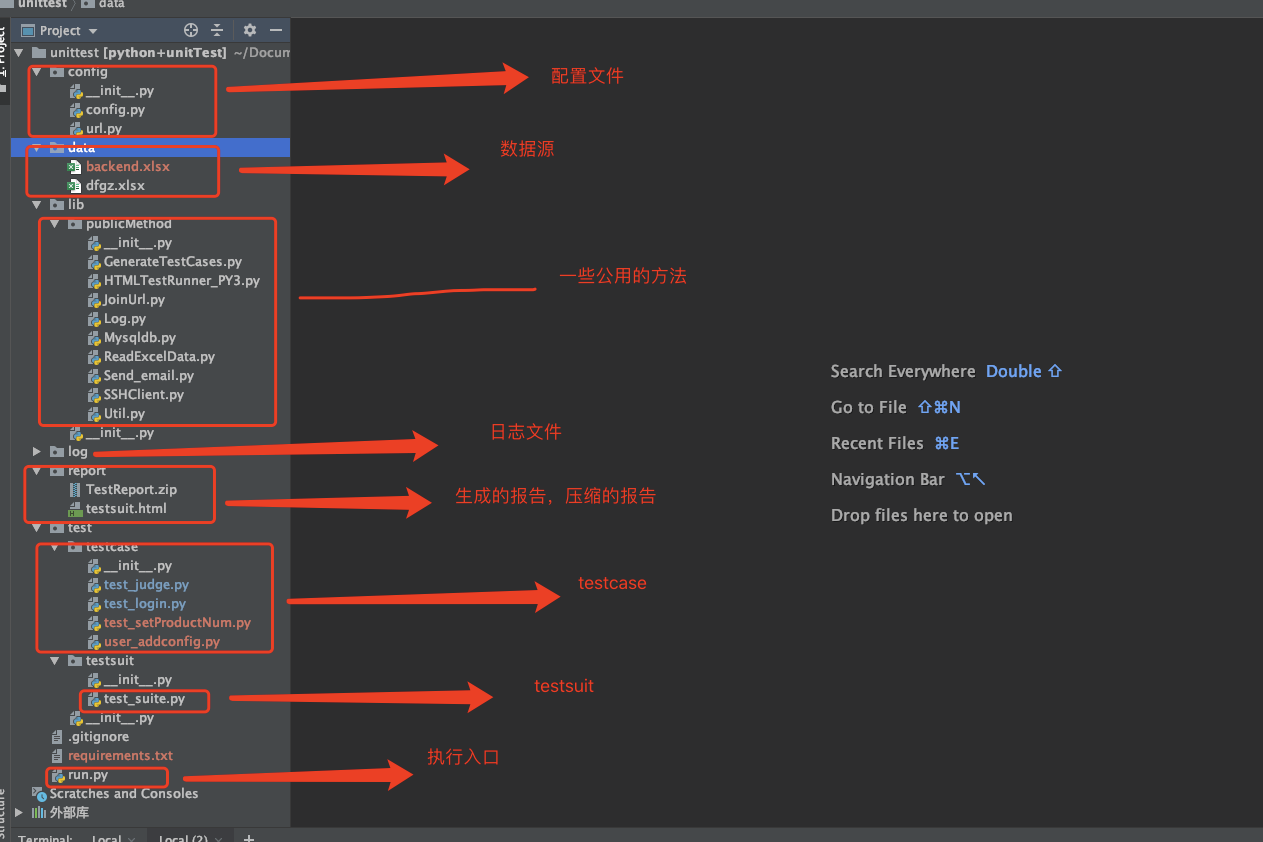
三、项目目录
四、依赖的环境
因为这个项目搭建的太久了,可能会漏掉一些包,所以直接把当前所有的包都导出来了,可以直接都下载,也可以选择哪些用得到的下载
airtest==1.1.11
allure-pytest==2.9.43
allure-python-commons==2.9.43
appdirs==1.4.4
asgiref==3.2.7
attrs==19.3.0
Automat==20.2.0
bcrypt==3.2.0
cached-property==1.5.2
certifi==2020.4.5.1
cffi==1.14.1
constantly==15.1.0
cryptography==3.0
cssselect==1.1.0
chardet==3.0.4
cycler==0.10.0
decorator==5.0.9
Deprecated==1.2.12
Django==3.0.5
django-cors-headers==3.3.0
facebook-wda==1.4.2
get==2019.4.13
hrpc==1.0.8
hyperlink==20.0.1
idna==2.9
imgkit==1.0.2
importlib-metadata==4.6.4
incremental==17.5.0
iniconfig==1.1.1
itemadapter==0.1.0
itemloaders==1.0.2
Jinja2==2.11.2
jmespath==0.10.0
kiwisolver==1.2.0
lxml==4.5.2
MarkupSafe==1.1.1
matplotlib==3.3.1
mss==4.0.3
numpy==1.19.1
opencv-contrib-python==4.5.2.52
packaging==21.0
paramiko==2.7.2
parsel==1.6.0
Pillow==7.2.0
pluggy==0.13.1
pocoui==1.0.82
post==2019.4.13
prettytable==0.7.2
Protego==0.1.16
public==2019.4.13
py==1.10.0
pyasn1==0.4.8
pyasn1-modules==0.2.8
pycparser==2.20
PyDispatcher==2.0.5
pyecharts==1.0.0
pyecharts-snapshot==0.2.0
pyee==7.0.3
pygame==2.0.0
PyHamcrest==2.0.2
PyMySQL==0.9.3
PyNaCl==1.4.0
pyOpenSSL==19.1.0
pyparsing==2.4.7
pyppeteer==0.2.2
pytest==6.2.4
pytest-html==3.1.1
pytest-metadata==1.11.0
python-dateutil==2.8.1
python-xlib==0.30
pytz==2019.3
pywinauto==0.6.3
PyYAML==5.4.1
query-string==2019.4.13
queuelib==1.5.0
request==2019.4.13
requests==2.23.0
retry==0.9.2
Scrapy==2.3.0
selenium==3.141.0
service-identity==18.1.0
simplejson==3.17.2
six==1.12.0
snapshot-phantomjs==0.0.3
snapshot-selenium==0.0.2
sqlparse==0.3.1
toml==0.10.2
tqdm==4.48.2
Twisted==20.3.0
typing-extensions==3.10.0.0
urllib3==1.25.9
w3lib==1.22.0
websocket-client==0.48.0
websockets==8.1
wrapt==1.12.1
xlrd==1.2.0
yagmail==0.11.224
zipp==3.5.0
zope.interface==5.
五、testcase编写
5.1、测试类里面编写用例
顾名思义就是将所有的测试用例,直接一条一条的放在测试类里面,每个用例以test_开头,每个用例是一个测试点。
直接上代码,拿登录接口做个demo
 1 import json
 2 import unittest
 3 import requests
 4 from lib.publicMethod.Log import logger
 5 class Login(unittest.TestCase):
 6
 7     # 用例前准备
 8     @classmethod
 9     def setUpClass(cls):
10
11         cls.url = 'http://172.26.130.4:9898/alice/usr/loginSubmit'
12         cls.headers = {

    'Content-Type': 'application/json'}
13
14     # 调用接口,做接口的一些校验,封装公共方法,但这个不是用例
15     def resp_success(self, data, assert_code, assert_msg):
16
17         logger.info("入参:   " + str(data))
18         logger.info("url:   " + str(self.url))
19
20         response = requests.request("POST", self.url, data=data, headers=self.headers)
21
22         json_data = json.loads(response.text)
23         # 至此得到接口返回的数据
24         logger.info("接口返回的数据为:" + str(json_data))
25         realStatus = json_data['status']
26         logger.info("接口返回的状态码:" + str(realStatus))
27
28         self.assertEqual(str(realStatus), str(assert_code), "返回码错误!!!")
29         # 错误case 比对错误信息
30         if str(realStatus) != str(1):
31             if json_data.get('message'):
32                 realErrorMsg = json_data["message"]
33             else:
34                 realErrorMsg = json_data["message"]
35             self.assertEqual(realErrorMsg, assert_msg, "错误信息不一致!!!")
36
37     # 用例1-成功的case
38     """成功"""
39     def test_success(self):
40         data = {

    "username":"zhangxue","password":"zhangxue1234"}
41         params = json.dumps(data)
42         self.resp_success(params, 1, 'OK')
43
44     # 用例2-失败的case
45     """密码错误"""
46     def test_passEmpty(self):
47         data = {

    "username":"zhangxue","password":"zhangxue123455"}
48         params = json.dumps(data)
49         self.resp_success(params, 0, '请检查用户名和密码是否正确!')
50
51     # 用例3-失败的case
52     """用户名为空"""
53     def test_passEmpty(self):
54         data = {

    "username": "", "password": "zhangxue123455"}
55         params = json.dumps(data)
56         self.resp_success(params, 0, '请检查用户名和密码是否正确!')
57
58
59
60 if __name__ == '__main__':
61     unittest.main()
按照上面的demo,格式就是如上,
1-导入相关包
import unittest、import requests
2-创建测试类,
class Login(unittest.TestCase)
3-写具体的用例,处理相关调用跟断言
4-main函数运行
unittest.main()
5.2、通过excel导入用例
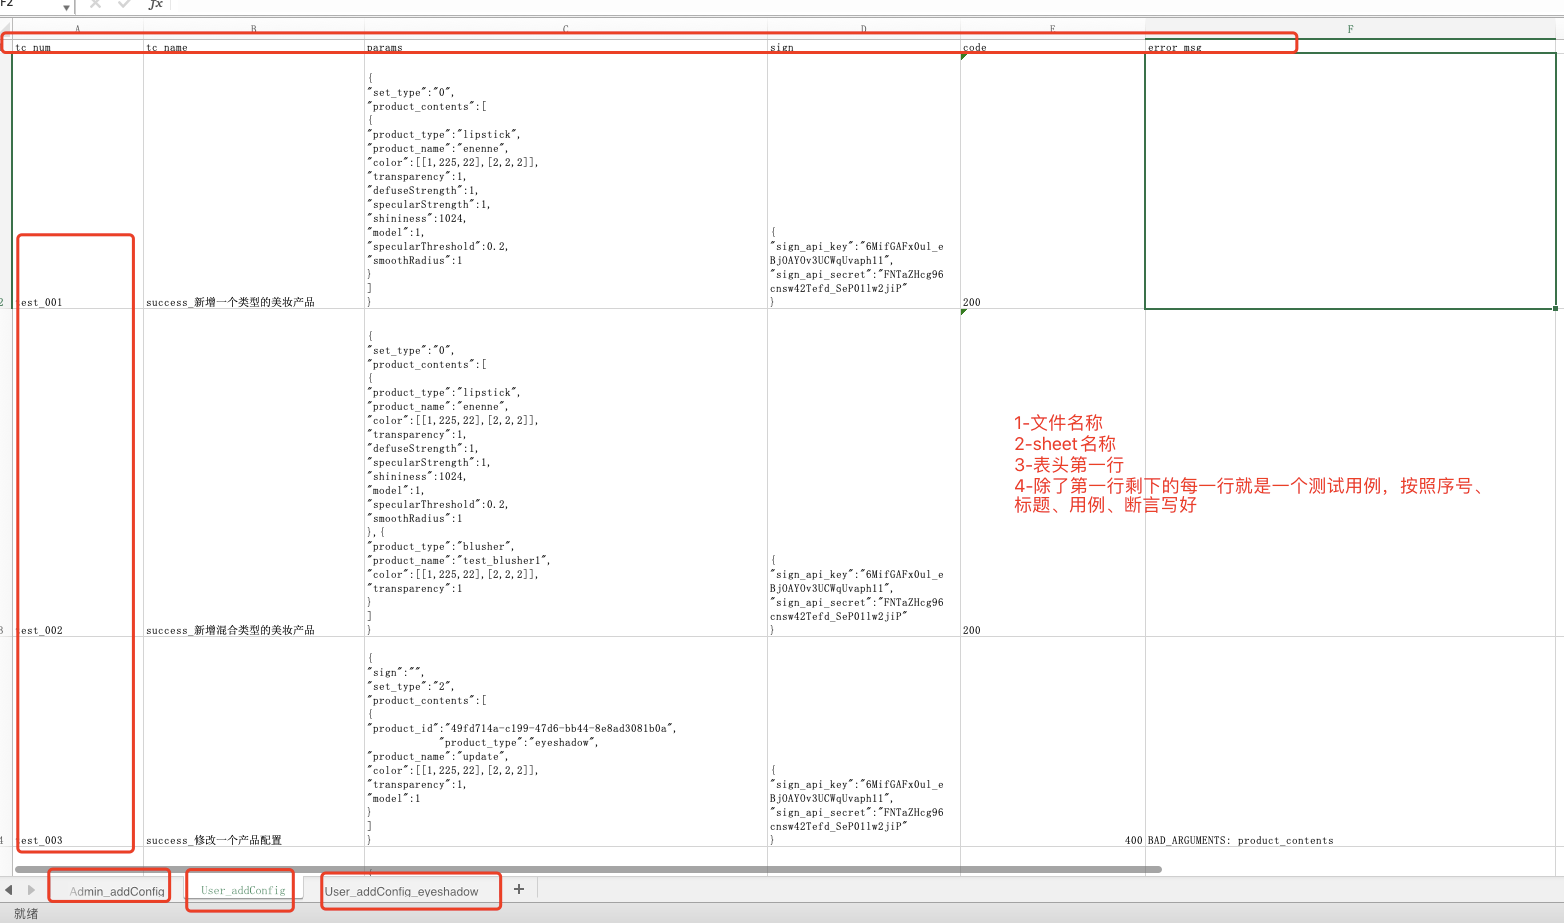
5.2.1、先看下excel用例的大致格式
格式都可以根据自己的需求去调整
我的这个文件文件名称叫backend.xlsx,下面demo用的sheet是User_addConfig这个,具体的内容就是如图的内容。
一般都是将一个接口的用例放到一个sheet下,这个接口共有38个用例,有成功的,有失败的。根据接口的场景去设计用例内容
5.2.2、testcase文件
该文件要调用一个公共方法,就是lib---publicMethod下面的GenerateTestCases
该文件的getTest方法中,要对你的excel中的用例做兼容处理,处理每个用例的调用跟断言,这里需要根据具体的业务去实现
testcase文件
 1 import json
 2 import unittest
 3 import requests
 4 from lib.publicMethod.Log import logger
 5 import sys
 6 from lib.publicMethod.GenerateTestCases import __generateTestCases
 7 import time
 8
 9 class User_addConfig(unittest.TestCase):
10     """用户添加配置信息"""
11
12     @classmethod
13     def setUpClass(cls):
14         cls.Url = backend_url + "/makeup/set_products"
15         bid = 'abc.zx'
16         cls.ts = int(time.time())
17         cls.getmsg = GetSdkv5Msg()
18         cls.sign = cls.getmsg.get_sign(API_KEY_all, API_SECRET_all, cls.ts)
19         cls.ts = int(time.time())
20
21     def getTest(self, txInfo):
22
23         t_num = txInfo["tc_num"]
24         t_name = txInfo["tc_name"]
25         t_params = txInfo["params"]
26         paramas = json.loads(t_params)
27         t_errcode = str(txInfo["code"]).split('.')[0]
28         t_sign = str(txInfo["sign"])
29         t_error_msg = txInfo["error_msg"]
30         logger.info('测试的用例为:'+t_num+'  '+t_name+'  '+str(t_params)+'  '+str(t_sign))
31
32         if len(t_sign) > 0:
33             sign1 = json.loads(t_sign)
34             sign_api_key = str(sign1['sign_api_key'])
35             sign_api_secret = str(sign1['sign_api_secret'])
36             paramas['sign'] = self.getmsg.get_sign(sign_api_key, sign_api_secret, self.ts)
37             print(paramas['sign'])
38
39         data = json.dumps(paramas)
40         response = requests.request("POST", self.Url, data=data, headers=headers)
41
42         json_data = json.loads(response.text)
43         # 至此得到接口返回的数据
44         logger.info("接口返回的数据为:" + str(json_data))
45
46         realStatus = response.status_code
47         logger.info("接口返回的状态码为:" +str(realStatus))
48
49         if str(realStatus) == str(200):
50             self.assertEqual(str(realStatus), str(t_errcode), "返回码错误!!!")
51         elif str(realStatus) == str(400):
52             realErr_code = response.status_code
53             self.assertEqual(str(realErr_code), t_errcode, "错误码不一致!!!")
54             realErrorMsg = json_data["err_msg"]
55             self.assertEqual(realErrorMsg, t_error_msg, "错误信息不一致!!!")
56
57     @staticmethod
58     def getTestFunc(arg1):
59         def func(self):
60             self.getTest(arg1)
61
62         return func
63
64
65 # 类的实例、被测试的接口名称、测试数据文件名、excel数据表单名称
66 __generateTestCases(User_addConfig, "User_addConfig", "backend.xlsx", "User_addConfig")
67
68 if __name__ == '__main__':
69     unittest.main()
GenerateTestCases文件内容
 1 import os
 2 from lib.publicMethod import ReadExcelData
 3 from config.config import datapath
 4
 5 # 写一个testcase 生成报告后,会有一个case的执行状态记录。这样我们写一个登录功能的自动化用例,只写一个case显然是不行的,测试用例要满足他的覆盖度,所以我们需要写多个用例。但是对于同样的功能,我们用例脚本体现出来的只有输入的参数值不一样,其它操作都是一样的。
 6 #
 7 # 这时候一个用例写一个test_case_login()的脚本,但是我们又想在报告中单独记录每一个case的执行状态,不得写多个重复的方法。 如: test_case_login_1() test_case_login_2() test_case_login_3() 这样执行完成后,使用unittest的进行生成测试报告,对每一个test_case都能记录执行状态。
 8 # 但是代码太过冗余,内容太过笨重。 或许此时我们可以仅写一个test case并用内嵌循环来进行,但是会出现一个问题,就是其中一个出了错误,很难从测试结果里边看出来。
 9 # 问题的关键在于是否有办法根据输入参数的不同组合产生出对应的test case。 比如我5组数据,就应该有5个test_case_login,上面我已经说过不适合直接写5个test_case_login,那么应该怎么做呢? 一种可能的思路是不利用unittest.TestCase这个类框中的test_成员函数的方法,而是自己写runTest这个成员函数,那样会有一些额外的工作,而且看起来不是那么“智能”,
10 # 如果目的是让框架自动调用test_case自然的思路就是 • 利用setattr来自动为已有的TestCase类添加成员函数 • 为了使这个方法凑效,需要用类的static method来生成d
最低0.47元/天 解锁文章


 3089
3089

 被折叠的 条评论
为什么被折叠?
被折叠的 条评论
为什么被折叠?
 到【灌水乐园】发言


