


 这篇博客介绍了Java GUI编程的基础,包括AWT和Swing两个核心库。讲解了AWT的组件、布局管理器、事件监听,特别强调了Frame和Panel的使用。同时,深入探讨了Swing中的各种组件,如JFrame、弹窗、带图标的标签、按钮、列表以及文本输入框等,为读者提供了丰富的代码示例。
1.简介
GUI:核心技术Swing、AWT,1.因为界面不美观
2.需要JRE环境,因为一个游戏本身的容量很小,但是它的运行依赖于JRE环境
为什么我们需要学习?
1.可以写出一些小工具
2.工作的时候,也有可能需要维护到swing界面,,但是概率很小
3.了解MVC架构,监听
2.AWT
2.1AWT介绍:(抽象的窗口工具)万物皆对象
1.包含了很多的类和接口,GUI(图形用户界面)
2.窗口、按钮、文本框
2.2组件和容件
2.2.1.Frame
1.Frame,第一步个窗口程序的运行代码如下:
package lesson01;

import java.awt.*;

//GUI的第一个界面
public class TestFrame {
    public static void main(String[] args) {
        //这个窗口也是一个对象(Frame)
        Frame frame = new Frame("我的第一个java图形界面窗口");

        //因为以上的东西看不到,需要设置可见性
        frame.setVisible(true);

        //设置窗口大小
        frame.setSize(400,400);

        //设置背景颜色
        frame.setBackground(new Color(253, 189, 189));
        //弹出的初始位置
        frame.setLocation(400,400);


        //设置大小固定
        frame.setResizable(false);//设置大小不能重新设置


    }
}
多个窗口
package lesson01;

import java.awt.*;

public class TestFrame2 {
    public static void main(String[] args) {
        //展示多个窗口
        MyFrame myFrame1 = new MyFrame(100,100,200,200,Color.blue);
        MyFrame myFrame2 = new MyFrame(300,100,200,200,Color.yellow);
        MyFrame myFrame3 = new MyFrame(100,300,200,200,Color.white);
        MyFrame myFrame4 = new MyFrame(300,300,200,200,Color.black);
    }
}
class MyFrame extends Frame{
    static int id=0;//**这个暂时不知道什么意思。可能存在多个窗口,所以我们需要一个计数器
    public MyFrame(int x,int y,int w,int h,Color color){
        super("Myframe+"+(++id));
        setBackground(color);
        setBounds(x,y,w,h);
        setVisible(true);

    }


}
2.2.2面板Panel
解决了关闭事件
package lesson01;

import java.awt.*;
import java.awt.event.WindowAdapter;
import java.awt.event.WindowEvent;

public class TestPanel {
    public static void main(String[] args) {
        Frame frame=new Frame();
        Panel panel=new Panel();
        //1.设置布局
        frame.setLayout(null);

        //2.大窗口坐标
        frame.setBounds(300,300,500,500);
        frame.setBackground(new Color(224, 255, 0));

        //3.相对frame的Panel坐标
        panel.setBackground(new Color(18, 18, 236));
        panel.setBounds(50,50,400,400);

        //frame.add(panel);
        frame.add(panel);

        frame.setVisible(true);
        //监听事件,监听窗口关闭事件 System.exit(0)
        //适配器模式
        frame.addWindowListener(new WindowAdapter() {
            //关闭程序的时候需要做的事情
            @Override
            public void windowClosing(WindowEvent e) {
                //关闭程序
                System.exit(2 );
            }
        });


    }

}
2.3布局管理器
1.流式布局
package lesson01;

import java.awt.*;

public class TestFlowLayout {
    public static void main(String[] args) {
        Frame frame = new Frame();
        frame.setVisible(true);
        //按钮组件
        Button button1 = new Button("button1");
        Button button2 = new Button("button2");
        Button button3 = new Button("button3");
        Button button4 = new Button("button4");
        Button button5 = new Button("button5");
        //设置为流式布局
        frame.setLayout(new FlowLayout(FlowLayout.CENTER));
        frame.setSize(200,200);

        //把按钮添加上去
        frame.add(button1);
        frame.add(button2);
        frame.add(button3);
        frame.add(button4);

    }
}
2.东西南北中
package lesson01;

import java.awt.*;
import java.awt.event.WindowAdapter;
import java.awt.event.WindowEvent;
import java.awt.event.WindowListener;

public class TestBorderLayout {
    public static void main(String[] args) {
        Frame frame = new Frame("TestBorderLayout");

        Button west = new Button("west");
        Button east = new Button("east");
        Button south = new Button("south");
        Button north = new Button("north");
        Button center = new Button("center");

        frame.add(west,BorderLayout.WEST);
        frame.add(east,BorderLayout.EAST);
        frame.add(south,BorderLayout.SOUTH);
        frame.add(north,BorderLayout.NORTH);
        frame.add(center,BorderLayout.CENTER);

        frame.setVisible(true);
        frame.setSize(200,200);
        frame.addWindowListener(new WindowAdapter() {
            //关闭程序的时候需要做的事情
            @Override
            public void windowClosing(WindowEvent e) {
                //关闭程序
                System.exit(2 );
            }
        });
    }
}
3.表格布局
package lesson01;

import java.awt.*;

public class TestGridLayout {
    public static void main(String[] args) {
        Frame frame = new Frame("TestBorderLayout");//实例
        frame.setVisible(true);//设置可见
        //实例化每一个按钮
        Button bt1 = new Button("bt1");
        Button bt2 = new Button("bt2");
        Button bt3 = new Button("bt3");
        Button bt4 = new Button("bt4");
        Button bt5 = new Button("bt5");
        Button bt6 = new Button("bt6");

        frame.setLayout(new GridLayout(3,2));

        frame.add(bt1);
        frame.add(bt2);
        frame.add(bt3);
        frame.add(bt4);
        frame.add(bt5);
        frame.add(bt6);

        frame.pack();//java函数,会自动选择最优秀的布局来进行

    }

}
4.练习以下的布局

代码:
package lesson01;

import java.awt.*;

//总的Frame
public class ExDemo {
    public static void main(String[] args) {
        //实例化框架,设置基本属性(可见、颜色、大小等等)
        Frame frame = new Frame();
        frame.setVisible(true);
        frame.setSize(400,400);
        frame.setLocation(300,400);
        frame.setBackground(new Color(14, 124, 227));

        //大框架——小框架
        frame.setLayout(new GridLayout(2,1));

        //4个面板Panel
        Panel p1 = new Panel(new BorderLayout());//BorderLayout是版面的意思
        Panel p2 = new Panel(new GridLayout(2,1));//两行一列
        Panel p3 = new Panel(new BorderLayout());
        Panel p4 = new Panel(new GridLayout(2,2));//两行两列


        //第一行的布局
        p1.add(new Button("east-1"),BorderLayout.EAST);
        p1.add(new Button("west-1"),BorderLayout.WEST);
        p2.add(new Button("p2-1"));
        p2.add(new Button("p2-2"));

        //p2.add();
        p1.add(p2,BorderLayout.CENTER);


        //第二行的布局
        p3.add(new Button("east-2"),BorderLayout.EAST);
        p3.add(new Button("west-2"),BorderLayout.WEST);
       /* p2.add(new Button("p4-1"));
        p2.add(new Button("p4-2"));
        p2.add(new Button("p4-3"));
        p2.add(new Button("p4-4"));*/
        //for循环直接生成4个按钮
        for (int i = 0; i < 4; i++) {
            p4.add(new Button("for-"+i));
        }
        p3.add(p4,BorderLayout.CENTER);

        frame.add(p1);
        frame.add(p3);

    }

}
2.4事件监听
事件监听:当发生某个操作的事情会有哪些相应的操作相应
package lesson02;

import java.awt.*;
import java.awt.event.*;

public class Ceshi {
    public static void main(String[] args) {
        Frame frame = new Frame();
        frame.setVisible(true);
        frame.setSize(400,400);
        frame.setLocation(300,400);
        frame.setBackground(new Color(14, 124, 227));
        frame.pack();


        frame.setLayout(new GridLayout(1,3));

        Button button = new Button("bt1");
        Button button2 = new Button("bt2");
        Button button3 = new Button("bt3");
        Button button4 = new Button("bt4");

        //BorderLayout东西南北布局,GridLayout列表布局(流式)
        Panel panel = new Panel(new BorderLayout());
        Panel pane2 = new Panel(new GridLayout(2,1));
        Panel panel3 = new Panel(new BorderLayout(1,2));


        panel.add(button);
        pane2.add(button2);
        pane2.add(button3);
        panel3.add(button4);

        frame.add(panel);
        frame.add(pane2);
        frame.add(panel3);
        //在窗口上添加新的监听事件
        frame.addWindowListener(new WindowAdapter() {
            @Override
            public void windowClosing(WindowEvent e) {
                  System.exit(1);
            }
        });
        //在按钮上添加新的监听事件
        button.addActionListener(new ActionListener() {
            @Override
            public void actionPerformed(ActionEvent e) {
                System.out.println("sabi");
            }
        });

    }
}
2.4.2多个按钮同时监听一个事件(获取指令、设置指令)
package lesson02;

import java.awt.*;
import java.awt.event.ActionEvent;
import java.awt.event.ActionListener;

public class TestAction3 {
    public static void main(String[] args) {
        //1.设置窗口、按钮等等忽略不写
        Frame frame = new Frame();
        frame.setVisible(true);
        Button bt1 = new Button("bt1");
        Button bt2 = new Button("bt1");
        frame.add(bt1,BorderLayout.NORTH);
        frame.add(bt2,BorderLayout.SOUTH);

       /* 2.设置一个监听事件拿来获取Action命令(下面的Monitor类),
        将监听事件添加到按钮中*/
		/*有设置指令就会走设定指令的信息,没有设置就会走按钮的默认值,
		也就是按钮的名字*/
        bt1.setActionCommand("diyige");
        bt2.setActionCommand("dierge");


        //3.按钮下设置获取指令的方法即可
        Monitor monitor = new Monitor();
        bt1.addActionListener(monitor);
        bt2.addActionListener(monitor);


    }
    static class Monitor implements ActionListener {

        @Override
        public void actionPerformed(ActionEvent e) {
            System.out.println("输出的顺序为"+e.getActionCommand());
        }
    }
}
2.5输入框TestField监听输入的文本(含)
package lesson02;

import java.awt.*;
import java.awt.event.ActionEvent;
import java.awt.event.ActionListener;
import java.awt.event.WindowAdapter;
import java.awt.event.WindowEvent;

/*思路:
* 1.设置一个窗口
* 2.准备一个我的事件监听继承事件监听接口,方法重写
* 3.准备一个新的窗口继承窗口的方法,设定文本框加到新的窗口中
* 4.在文本框中加入新的监听事件的方法
* 5.补充;事件监听中,要把source向下转型为textField的类型,强转
* 6.在事件监听中,调用textField的getText()方法,输出
* 7.设置密码*,在testField文件下添加textField.setEchoChar('*');
*  8.在监听事件里面添加一个最后设置文本框清空的命令textField.setText("");
* */
public class TestText01 {
    public static void main(String[] args) {
        Frame frame = new Frame();
        frame.setVisible(true);
        frame.pack();
        TextField textField = new TextField();
        frame.add(textField);//已经继承,只需添加
        MyActionListener myActionListener = new MyActionListener();
        textField.addActionListener(myActionListener);
    }

    static class MyActionListener implements ActionListener{

        @Override
        public void actionPerformed(ActionEvent e) {
            //因为getSource是Object类型,所以需要强制转型,向下转型
            TextField textField = (TextField)e.getSource();//获得资源;
            textField.setEchoChar('*');
            System.out.println(textField.getText());//获得文本框中输入的文本
            textField.setText("");//记住先后顺序一定要理清楚,当按下回车键的时候窗口会有哪些监听时间
        }
    }
}
2.6简易计算器+内部类回顾复习
1.简易计算器实现代码
package lesson02;

import java.awt.*;
import java.awt.event.ActionEvent;
import java.awt.event.ActionListener;

public class TestCalc2 {
    public static void main(String[] args) {
        new Calculator();
    }

//================================================================

   static class Calculator extends Frame{
        public Calculator(){
            //三个文本框
            TextField num1 = new TextField();
            TextField num2 = new TextField();
            TextField num3= new TextField();

            //一个标签
            Label label = new Label("+");

            //一个按钮
            Button button = new Button("=");
            button.addActionListener(new Action1(num1,num2,num3));//放入三个框框设定的名字
            //布局
            setLayout(new FlowLayout());
            add(num1);
            add(label);
            add(num2);
            add(button);
            add(num3);

            pack();
            setVisible(true);
        }

    }

}

//=======================================================================

          class Action1 implements ActionListener{
            //获取三个变量
            private TextField num1,num2,num3;

             public Action1(TextField num1,TextField num2,TextField num3) {
                 //设置三个数abc两个是拿来监听下获取数字的,还有一个是得出数值的
                 this.num1=num1;
                 this.num2=num2;
                 this.num3=num3;
             }
             //以下是计算的方法的代码
             @Override
            public void actionPerformed(ActionEvent e) {
                //获得加数和被加数
                int n1=Integer.parseInt(num1.getText());
                int n2=Integer.parseInt(num2.getText());


                 //算完的结果放在第三个框框中
                 num3.setText(""+(n1+n2));
                 //算完以后清楚前面两个框
                 num1.setText("");
                 num2.setText("");
            }
        }
2.7画笔
实现步骤:
1.设置一个我的画笔的方法,继承Frame,
2.在我的画笔方法里面布局出一个框框,空白的
3.在我的画笔里面重写Frame的画笔方法,设置画笔的颜色、设置的图形等等
package lesson03;

import java.awt.*;

public class TestPaint {
    public static void main(String[] args) {
        new MyPaint().loadFrame();
    }
}


class  MyPaint extends Frame{
    public void loadFrame(){
        setBounds(200,200,600,500);
        setVisible(true);
    }
    //画笔
    @Override
    public void paint(Graphics g) {
        //super.paint(g);
        //画笔需要有颜色、画笔可以画画
     /*   g.setColor(Color.red);
        g.drawOval(100,100,100,100);//空心圆
        g.fillOval(100,100,100,100);//实心圆
        */g.fillRect(100,100,100,100);
        //repaint监听器使得画笔一直在动,就会有动画的效果
    }
}
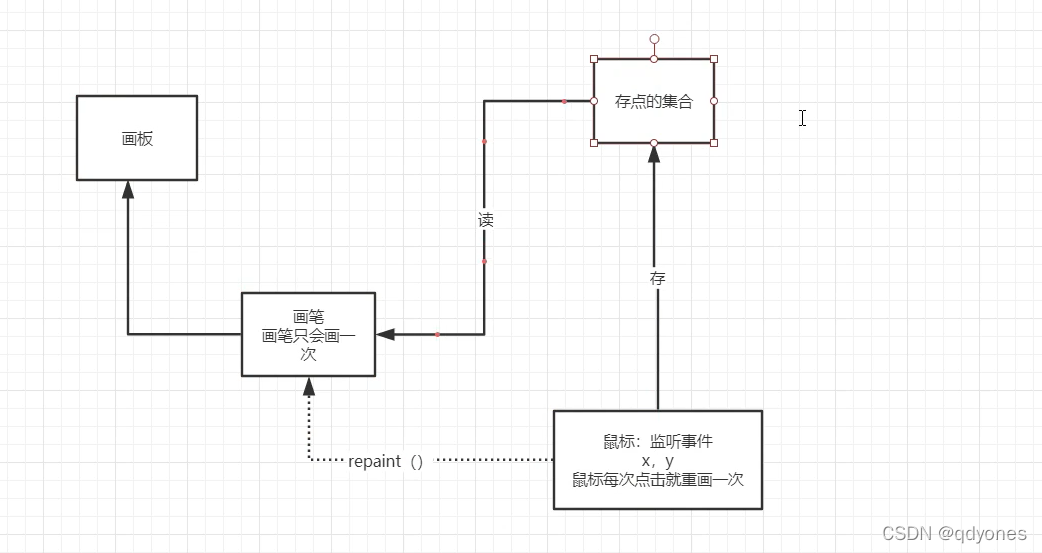
2.8模拟画图工具
第一版:
package lesson03;

import java.awt.*;
import java.awt.event.MouseAdapter;
import java.awt.event.MouseEvent;
import java.awt.event.MouseListener;
import java.util.ArrayList;
import java.util.Iterator;

//鼠标监听事件
public class TestMouseListener {
    public static void main(String[] args) {
        new MyFrame("画图");
    }
}
//2 自己画板(需要有监听还有画板的布局)
class MyFrame extends Frame{
    //画画需要画笔,需要监听当前鼠标的位置,需要集合来存储这个点
    ArrayList points;
    //2.1
    public MyFrame(String title) {
        super(title);
        setBounds(200,200,400,400);//在子类里面设定画板的大小
        //存鼠标点击的点
        points=new ArrayList<>();
        setVisible(true);
        //鼠标监听事件,正对这个窗口
        this.addMouseListener(new MyMouseListener());
    }
    //2.2

    //执行鼠标反应相对应的操作
    @Override
    public void paint(Graphics g) {
        //画画,监听鼠标的事件
        Iterator iterator = points.iterator();
        //如果还有下个点就
        while (iterator.hasNext()){
             Point point=(Point)iterator.next();
             g.setColor(Color.BLUE);
             g.fillOval(point.x,point.y,10,10);
        }
    }
    //做添加鼠标的反应:添加一个点到界面上去
    public void addPaint(Point point){
        points.add(point);
    }

    //观察鼠标的动作:适配器模式
    private class MyMouseListener extends MouseAdapter{
        //鼠标点击、弹起、按住不放、
        @Override
        public void mousePressed(MouseEvent e) {
            MyFrame myFrame =(MyFrame)e.getSource();
            //这个我们点击的时候,就会在界面上产生一个个的点
            //这个点就是鼠标的点
            myFrame.addPaint(new Point(e.getX(),e.getY()));
            //每次点击鼠标都需要重新画一遍
            myFrame.repaint();//刷新

        }
    }
   /* private class MyMouseListener implements MouseListener{

    }*/
}
第二版
2.9鼠标监听(单纯回顾)
2.10键盘监听
package lesson03;

import java.awt.*;
import java.awt.event.KeyAdapter;
import java.awt.event.KeyEvent;
import java.awt.event.KeyListener;

public class TestKeyListener {
    public static void main(String[] args) {
        new KeyFrame();
    }

    static class KeyFrame extends Frame{
        public KeyFrame()  {
            setBounds(1,2,300,400);
            setVisible(true);
            addKeyListener(new KeyAdapter() {
                @Override
                public void keyPressed(KeyEvent e) {
                     //获得键盘按下的键是哪一个,当前的码
                    int keyCode=e.getKeyCode();
                    System.out.println(keyCode);//输出键盘的内容keyCode
                    if (keyCode==KeyEvent.VK_UP){
                        System.out.println("你按下了上键");

                    }
                }
            });
        }
    }
}
3.Swing
3.1JFrame窗体
package lesson04;

import com.sun.jdi.PathSearchingVirtualMachine;

import javax.swing.*;
import java.awt.*;

public class JFrameDemo02 {
    public static void main(String[] args) {
        new myFrame().init();
    }
}

class myFrame extends JFrame {
        public void init(){
            Container container = this.getContentPane();
            container.setBounds(100,100,100,100);
            container.setBackground(Color.YELLOW);
            setVisible(true);
            setLocation(400,400);

            JLabel label = new JLabel("现在我知道了");//JLabel和label显示出来的东西不一样
            this.add(label);

            //让标签文本居中
            label.setHorizontalAlignment(0);

        }
}
3.2弹窗
package lesson04;

import javax.swing.*;
import java.awt.*;
import java.awt.event.ActionEvent;
import java.awt.event.ActionListener;

//主窗口
public class DialogDemo extends JFrame {
    public DialogDemo()  {
        setVisible(true);
        setSize(100,100);
        setDefaultCloseOperation(WindowConstants.EXIT_ON_CLOSE);
        //JFrame放东西、容器
        Container container = this.getContentPane();
        //绝对布局
        container.setLayout(null);
        //按钮
        JButton jButton = new JButton("点击弹出一个对话框");
        jButton.setBounds(30,30,200,50);
        //点击这个按钮的时候弹出一个弹窗
        container.add(jButton);
        //按钮监听
        jButton.addActionListener(new ActionListener() {
            @Override
            public void actionPerformed(ActionEvent e) {
                    //弹窗
                MyDialog myDialog = new MyDialog();
            }
        });
    }


    public static void main(String[] args) {
        new DialogDemo();
    }

}
//弹窗的窗口
class MyDialog extends JDialog{
    public MyDialog() {
        setVisible(true);
        setBounds(100,100,100,100);
        //setDefaultCloseOperation(WindowConstants.EXIT_ON_CLOSE);

        Container container =getContentPane();
        container.setLayout(null);

        container.add(new Label("这真的只是一个弹窗窗口"));
    }
}
3.3创建带图标标签
3.3.1.这个是抄过来的
package lesson04;

import javax.swing.*;
import java.awt.*;

public class IconDemo extends JFrame implements Icon {
    private int width;
    private int height;
    //写有参构造函数就必须写一个无参构造函数
    public IconDemo() throws HeadlessException {

    } //无参构造
    public IconDemo(int height,int width) throws HeadlessException {
            this.height=height;
            this.width=width;
    }  //有参构造

    public void init(){
        IconDemo iconDemo = new IconDemo(15,15);//创建图标
        iconDemo.getContentPane();//创建图标第二步

        JLabel label = new JLabel("这是一个按钮",iconDemo,SwingConstants.CENTER);//创建标签,文本、图标、摆放位置

        Container container = getContentPane();//获取一个容器
        container.add(label);//在容器中添加标签

        this.setVisible(true);//注意这里必须要this否则就会看不见
        this.setDefaultCloseOperation(WindowConstants.EXIT_ON_CLOSE);//关闭窗口,注意这里必须要this否则就会看不见
    }


    @Override
    public void paintIcon(Component c, Graphics g, int x, int y) {
            g.fillOval(x,y,width,height);
    }

    @Override
    public int getIconWidth() {
        return this.width;
    }

    @Override
    public int getIconHeight() {
        return this.height;
    }

    public static void main(String[] args) {
        new IconDemo().init();
    }//主方法


}
3.3.2.这个是我自己写的
是一样的,但是需要自己锻炼总结:可以一开始把那些乱七八糟的名字换成自己想要的名字来写
package ceshi;
//这个是做的图像标签的测试
import lesson04.IconDemo;

import javax.swing.*;
import java.awt.*;

public class Demo01 extends JFrame implements Icon{ //调用接口就必须重写方法!!!!
    private int width;
    private int height;

    public Demo01()throws HeadlessException{}
    public Demo01(int height,int width)throws HeadlessException{
        this.height=height;
        this.width=width;
    }

    public void init(){
        Demo01 demo01 = new Demo01(15,15); //图标
        demo01.getContentPane();//Icon必须做的两个操作!!!!!

        JLabel label = new JLabel("这只是一个按钮",demo01,SwingConstants.CENTER);

        Container container = getContentPane();//获取一个容器!!!!!!!!很重要

        container.add(label);

        this.setVisible(true);
        this.setDefaultCloseOperation(WindowConstants.EXIT_ON_CLOSE);


    }
    @Override
    public void paintIcon(Component c, Graphics g, int x, int y) {
        g.fillOval(x,y,height,width);
    }

    @Override
    public int getIconWidth() {
        return this.width; //
    }

    @Override
    public int getIconHeight() {
        return this.height;
    }

    public static void main(String[] args) {
        new Demo01().init();

    }
}
3.3.3带图片的标签
package ceshi;

import javax.swing.*;
import java.awt.*;
import java.net.URL;

public class Demo02 extends JFrame {

    public Demo02() {//throws HeadlessException
        URL url = Demo02.class.getResource("tx.jpg");//放入图片名,创建图片地址方便实用

        ImageIcon imageIcon = new ImageIcon(url);//创建一个图片图片图标,放入地址


        JLabel label = new JLabel("这是一个标签");
        label.setIcon(imageIcon);

        label.setHorizontalAlignment(SwingConstants.CENTER);

        Container container = getContentPane();
        container.add(label);

        setVisible(true);
        pack();
        setBounds(50,50,50,50);
        setDefaultCloseOperation(WindowConstants.EXIT_ON_CLOSE);

    }

    public static void main(String[] args) {
         new Demo02();
    }


}
3.4面板
3.4.1普通的面板排版
package lesoon05;

import javax.swing.*;
import java.awt.*;

//创建新容器(获取容器)、设置面板、在面板中添加新的按钮、在容器中添加面板、主函数中调用
public class Demo01 extends JFrame {

    public Demo01() throws HeadlessException {
        Container contentPane = getContentPane();//获得容器,实例化容器

        contentPane.setLayout(new GridLayout(2,1,20,20));//后面两个表示间距


        JPanel jPanel = new JPanel(new GridLayout(1, 3));//面板也可以设置布局排列
        JPanel jPanel2 = new JPanel(new GridLayout(1, 3));//面板也可以设置布局排列
        JPanel jPanel3 = new JPanel(new GridLayout(1, 3));//面板也可以设置布局排列
        JPanel jPanel4 = new JPanel(new GridLayout(1, 3));//面板也可以设置布局排列


        jPanel.add(new Button("1"));
        jPanel.add(new Button("2"));
        jPanel2.add(new Button("3"));
        jPanel2.add(new Button("4"));
        jPanel2.add(new Button("5"));
        jPanel3.add(new Button("6"));
        jPanel3.add(new Button("7"));
        jPanel3.add(new Button("8"));
        jPanel3.add(new Button("9"));
        jPanel3.add(new Button("10"));

        contentPane.add(jPanel);
        contentPane.add(jPanel2);
        contentPane.add(jPanel3);

        this.setVisible(true);
        this.setSize(500,500);
        this.setDefaultCloseOperation(WindowConstants.EXIT_ON_CLOSE);
    }


    public static void main(String[] args) {
        new Demo01();
    }
}
3.4.2滚动面板
package lesoon05;

import javax.swing.*;
import java.awt.*;

public class Demo02 extends JFrame {

    public Demo02() {
        Container contentPane = getContentPane();

        //文本域
        TextArea textArea = new TextArea(20, 10);//每行20个字,行高10
        textArea.setText("这个是一个文本域");

        //contentPane.add(textArea);

        //Scroll面板
        JScrollPane jScrollPane = new JScrollPane(textArea);//把文本放进滚动面板里面
        contentPane.add(jScrollPane);//容器里面放进滚动面板


        this.setVisible(true);
        this.setDefaultCloseOperation(WindowConstants.EXIT_ON_CLOSE);


    }

    public static void main(String[] args) {
        new Demo02();
    }
}
3.5按钮(单选、复选)
3.5.1带图片的按钮
package lesson05;

import javax.swing.*;
import java.awt.*;
import java.net.URL;

//创建一个图片的获取地址,吧图片地址放到图片图标上、吧这个图标放在按钮上、获取一个容器、把这个按钮再放在容器里
public class Demo03 extends JFrame {
    public Demo03()  {
        //将一个图片变为图标
        URL resource = Demo03.class.getResource("tx.jpg");
        ImageIcon imageIcon = new ImageIcon(resource);

        //把这个图标放在按钮上
        JButton jButton = new JButton();//
        //jButton.add(imageIcon);这里为什么不是这样子设置的
        //jButton.setIcon(imageIcon);
        jButton.setToolTipText("图片");//类似于window界面的图片程序图片按钮

        //add
        Container contentPane = this.getContentPane();
        contentPane.add(jButton);

        this.setVisible(true);
        this.setSize(500,500);
        this.setDefaultCloseOperation(WindowConstants.EXIT_ON_CLOSE);

    }


    public static void main(String[] args) {
        new Demo03();
    }
}
3.5.2单选框
package lesson05;

import javax.swing.*;
import java.awt.*;
import java.net.URL;

//创建一个图片的获取地址,吧图片地址放到图片图标上、吧这个图标放在按钮上、获取一个容器、把这个按钮再放在容器里
public class Demo04 extends JFrame {
    public Demo04()  {
        Container contentPane = getContentPane();
        //将一个图片变为图标
        URL resource = Demo03.class.getResource("tx.jpg");
        ImageIcon imageIcon = new ImageIcon(resource);


        //单选框
        JRadioButton a = new JRadioButton("单选框");
        JRadioButton b = new JRadioButton("单选框2");
        JRadioButton c= new JRadioButton("单选框3");

        //由于单选框只能选择一个,所以需要分组,一个组只能选择一个
        ButtonGroup buttonGroup = new ButtonGroup();
        buttonGroup.add(a);
        buttonGroup.add(b);
        buttonGroup.add(c);

        contentPane.add(a,BorderLayout.NORTH);
        contentPane.add(b,BorderLayout.SOUTH);
        contentPane.add(c,BorderLayout.CENTER);


        this.setVisible(true);
        this.setSize(500,500);
        this.setDefaultCloseOperation(WindowConstants.EXIT_ON_CLOSE);

    }


    public static void main(String[] args) {
        new Demo04();
    }
}
3.5.3多选框
package lesson05;

import javax.swing.*;
import java.awt.*;
import java.net.URL;

//创建一个图片的获取地址,吧图片地址放到图片图标上、吧这个图标放在按钮上、获取一个容器、把这个按钮再放在容器里
public class Demo05 extends JFrame {
    public Demo05()  {
        Container contentPane = getContentPane();

        //多选框
        Checkbox checkbox = new Checkbox("num1");
        Checkbox checkbox2 = new Checkbox("num2");

        contentPane.add(checkbox,BorderLayout.SOUTH);
        contentPane.add(checkbox2,BorderLayout.CENTER);


        this.setVisible(true);
        this.setSize(500,500);
        this.setDefaultCloseOperation(WindowConstants.EXIT_ON_CLOSE);

    }


    public static void main(String[] args) {
        new Demo05();
    }
}
3.6列表
3.6.1下拉框
package lesson06;

import javax.swing.*;
import java.awt.*;

public class Demo01 extends JFrame {
    public Demo01() throws HeadlessException {
        Container contentPane = getContentPane();

        //设置下拉框
        JComboBox a= new JComboBox();
        a.addItem(null);
        a.addItem("设计上映");
        a.addItem("决定上映");
        a.addItem("准备上映");

        contentPane.add(a);


        this.setVisible(true);
        this.setSize(500,500);
        this.setDefaultCloseOperation(WindowConstants.EXIT_ON_CLOSE);
    }


    public static void main(String[] args) {
        new Demo01();
    }

}
3.6.2列表框
package lesson06;

import javax.swing.*;
import java.awt.*;
import java.util.Vector;

public class Demo02 extends JFrame {
    public Demo02() {
        Container contentPane = getContentPane();

   /*     //直接生成列表的内容
        String[] a={"1","2","3","4","5"};
        JList<Object> list = new JList<>(a);
*/

        //生成一个内容,在内容里面添加各个数据然后再把容器放入列表当中
      Vector<Object> objects = new Vector<>();
        objects.add("zhangsan");
        objects.add("lisi");
        objects.add("wangwu");

        //列表中需要放入内容
        JList<Object> list = new JList<>(objects);


        contentPane.add(list);


        this.setVisible(true);
        this.setSize(500,500);
        this.setDefaultCloseOperation(WindowConstants.EXIT_ON_CLOSE);
    }

    public static void main(String[] args) {
        new Demo02();
    }
}
3.7文本框、密码框、文本域
3.7.1文本框
package lesson06;

import javax.swing.*;
import java.awt.*;

public class Demo03 extends JFrame {
    public Demo03() {
        Container contentPane = getContentPane();

        JTextField jTextField = new JTextField("hello");
        JTextField jTextField2 = new JTextField("world",10);

        contentPane.add(jTextField,BorderLayout.NORTH);
        contentPane.add(jTextField2,BorderLayout.SOUTH);


        this.setVisible(true);
        this.setSize(500,500);
        this.setDefaultCloseOperation(WindowConstants.EXIT_ON_CLOSE);
    }

    public static void main(String[] args) {
        new Demo03();
    }
}
3.7.2密码框
 package lesson06;

import javax.swing.*;
import java.awt.*;

public class Demo04 extends JFrame {
    public Demo04() {
        Container contentPane = getContentPane();


        JPasswordField jPasswordField = new JPasswordField("密码框");
        jPasswordField.setEchoChar('*');


    /*    JPasswordField jPasswordField2 = new JPasswordField("第一个");
        jPasswordField2.setEchoChar('%');
        contentPane.add(jPasswordField2);
        为什么添加两个密码框以后,输出的时候只有显示后一次在容器中添加的文本框显示方法*/


        contentPane.add(jPasswordField);


        this.setVisible(true);
        this.setSize(500,500);
        this.setDefaultCloseOperation(WindowConstants.EXIT_ON_CLOSE);
    }

    public static void main(String[] args) {
        new Demo04();
    }
}
3.7.3文本域
package lesson05;

import javax.swing.*;
import java.awt.*;

public class Demo02 extends JFrame {

    public Demo02() {
        Container contentPane = getContentPane();

        //文本域
        TextArea textArea = new TextArea(20, 10);//每行20个字,行高10
        textArea.setText("这个是一个文本域");

        //contentPane.add(textArea);

        //Scroll面板
        JScrollPane jScrollPane = new JScrollPane(textArea);//把文本放进滚动面板里面
        contentPane.add(jScrollPane);//容器里面放进滚动面板


        this.setVisible(true);
        this.setDefaultCloseOperation(WindowConstants.EXIT_ON_CLOSE);


    }

    public static void main(String[] args) {
        new Demo02();
    }
}


 4675
4675

 被折叠的 条评论
为什么被折叠?
被折叠的 条评论
为什么被折叠?
 到【灌水乐园】发言


