


安装包下载:
链接:https://pan.baidu.com/s/16sCOpQfS4Px6Bl0XL2gY8Q
提取码:r18k
- 确认环境
(1)gcc、gcc-c++安装
查看系统是否安装了gcc和gcc-c++:rpm -q gcc rpm -q gcc-c++ rpm -q make

如果未安装如下

需要安装挂载yum安装如下安装方式:
yum install gcc-c++
无网络安装本地yum
- redhat本地yum云安装方法
- 上传系统对应版本的ios文件到系统到 /root根目录下
- 创建文件夹:/media/cdrom/
mkdir /media/cdrom/ - 修改yum配置文件(文件位置:/etc/yum.repos.d)
cd /etc/yum.repos.d
mkdir bak
mv . bak/
cd bak/
cp rhel-source.repo …/
cd …/
vi rhel-source.repo

(file:///media/cdrom)
mount -t iso9660 -o loop /root/rhel-server-6.8-x86_64-dvd.iso /media/cdrom/
验证: yum list
- centos本地yum云安装方法
1上传系统对应版本的ios文件到系统到 /root根目录下
2创建文件夹:/media/cdrom/
mkdir /media/cdrom/
3.修改yum配置文件(文件位置:/etc/yum.repos.d)
cd /etc/yum.repos.d
mkdir bak
mv . bak/
cd bak/
mv CentOS-Media.repo …/
cd …/
vi CentOS-Media.repo

- [root@localhost /]# yum list #装挂载(/root/CentOS-7-x86_64-DVD-1708.iso系统上传文件的路径)
mount -t iso9660 -o loop /root/CentOS-7-x86_64-DVD-1708.iso /media/cdrom/
提示:mount: 写保护,将以只读方式挂载

- 查看挂着是否成功:如下成功(/dev/loop0)df -h

3)如果没有 gcc 环境,则需要安装
yum install gcc-c++
- Ngnix安装
(1)上传部署包到安装(/apps 文件夹下没有文件夹创建)
mkdir /apps/

解压四个 tar 包:ls | xargs -i tar -xf {}

删除已解压的安装包:rm -rf *.tar.gz
(2) Ngnix配置
cd /apps/nginx-1.14.1
自定义配置:方式1
./configure
–sbin-path=/usr/local/nginx/nginx
–conf-path=/usr/local/nginx/nginx.conf
–pid-path=/usr/local/nginx/nginx.pid
–with-http_ssl_module
–with-http_v2_module
–with-http_stub_status_module
–with-pcre=/apps/pcre-8.42
–with-zlib=/apps/zlib-1.2.11
–with-openssl=/apps/openssl-1.1.1a
注意:也就是部署包的路径
–with-pcre=/apps/pcre-8.42指的是pcre-8.34 的源码路径

自定义配置:方式2
./configure
–sbin-path=/usr/local/nginx/nginx
–conf-path=/usr/local/nginx/nginx.conf
–pid-path=/usr/local/nginx/nginx.pid
–with-http_ssl_module
–with-http_v2_module
–with-http_realip_module
–with-http_stub_status_module
–with-pcre=/apps/pcre-8.42
–with-zlib=/apps/zlib-1.2.11
–with-openssl=/apps/openssl-1.1.1a

方式3:支持mysql负载均衡:–with-stream
./configure
–sbin-path=/usr/local/nginx/nginx
–conf-path=/usr/local/nginx/nginx.conf
–pid-path=/usr/local/nginx/nginx.pid
–with-http_ssl_module
–with-http_v2_module
–with-http_realip_module
–with-stream
–with-http_stub_status_module
–with-pcre=/apps/pcre-8.42
–with-zlib=/apps/zlib-1.2.11
–with-openssl=/apps/openssl-1.1.1a
(3) 编译安装
cd /apps/nginx-1.14.1
编译:make
安装:make install
查找安装路径:
whereis nginx

注意:configure: error: Invalid C++ compiler or C++ compiler flags错误

yum install -y gcc gcc-c++
(4)启动、停止nginx
确保系统的 80 端口没被其他程序占用:
netstat -lnp |grep 80 或者netstat -ano|grep 80
/usr/local/nginx/nginx 启动

/usr/local/nginx/nginx -s stop
/usr/local/nginx/nginx -s quit
/usr/local/nginx/nginx -s reload
或者
cd /usr/local/nginx
./nginx
./nginx -s stop
./nginx -s quit
./nginx -s reload
./nginx -s quit:此方式停止步骤是待nginx进程处理任务完毕进行停止。
./nginx -s stop:此方式相当于先查出nginx进程id再使用kill命令强制杀掉进程。
查询nginx进程:
ps aux|grep nginx
注意:
/usr/local/nginx/nginx -s quit
/usr/local/nginx/nginx -s reload
/usr/local/nginx/nginx -s stop
命令报错:如下

原因如下:
- ngnix没启动
- 其他解决方式
/usr/local/nginx/nginx -c /usr/local/nginx/nginx.conf
(5) 重启 nginx
1.先停止再启动(推荐):
对 nginx 进行重启相当于先停止再启动,即先执行停止命令再执行启动命令。如下:
cd /usr/local/nginx
./nginx -s quit
./nginx
或者:/usr/local/nginx/nginx -s quit
2.重新加载配置文件:
当 ngin x的配置文件 nginx.conf 修改后,要想让配置生效需要重启 nginx,使用-s reload不用先停止 ngin x再启动 nginx 即可将配置信息在 nginx 中生效,如下:
cd /usr/local/nginx
./nginx -s reload
或者:/usr/local/nginx/nginx -s reload
启动成功后,在浏览器可以看到这样的页面:


或者:/usr/local/nginx/nginx –t

注意:
如果访问不了停止防火墙
tomcat nginx负载均衡配置下载:
链接:https://pan.baidu.com/s/1UnA5tbqDyF8jo8E_JqOqOw
提取码:x2uv
mysql负载均衡配置文件下载:
链接:https://pan.baidu.com/s/1zb9nc89OlFPUebbpgxtfLA
提取码:5njv
二、 Ngnix下载及依赖下载
(1)Ngnix下载
http://nginx.org/download/
(2) pcre下载
ftp://ftp.csx.cam.ac.uk/pub/software/programming/pcre/
wget ftp://ftp.csx.cam.ac.uk/pub/software/programming/pcre/pcre-8.42.tar.gz
zlib下载
http://www.zlib.net/
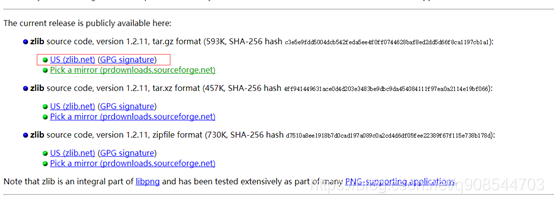
wget http://zlib.net/zlib-1.2.11.tar.gz
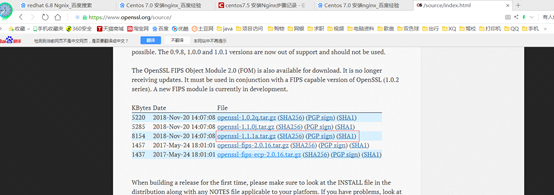
(4) openssl下载
https://www.openssl.org/source/
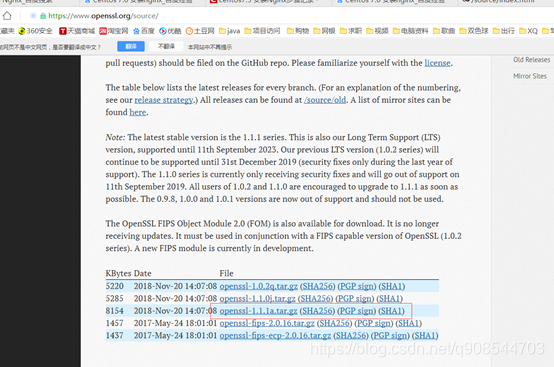
wget https://www.openssl.org/source/openssl-1.1.1a.tar.gz
三、nginx 的 upstream目前支持 5 种方式的分配
1、轮询
轮询是upstream的默认分配方式,即每个请求按照时间顺序轮流分配到不同的后端服务器,如果某个后端服务器down掉后,能自动剔除。
upstream backend {
server 192.168.1.101:8888;
server 192.168.1.102:8888;
server 192.168.1.103:8888;
}
2、weight
轮询的加强版,即可以指定轮询比率,weight和访问几率成正比,主要应用于后端服务器异质的场景下。
upstream backend {
server 192.168.1.101 weight=1;
server 192.168.1.102 weight=2;
server 192.168.1.103 weight=3;
}
3、ip_hash
每个请求按照访问ip(即Nginx的前置服务器或者客户端IP)的hash结果分配,这样每个访客会固定访问一个后端服务器,可以解决session一致问题。
upstream backend {
ip_hash;
server 192.168.1.101:7777;
server 192.168.1.102:8888;
server 192.168.1.103:9999;
}
4、fair
fair顾名思义,公平地按照后端服务器的响应时间(rt)来分配请求,响应时间短即rt小的后端服务器优先分配请求。
upstream backend {
server 192.168.1.101;
server 192.168.1.102;
server 192.168.1.103;
fair;
}
5、url_hash
与ip_hash类似,但是按照访问url的hash结果来分配请求,使得每个url定向到同一个后端服务器,主要应用于后端服务器为缓存时的场景下。
upstream backend {
server 192.168.1.101;
server 192.168.1.102;
server 192.168.1.103;
hash $request_uri;
hash_method crc32;
}
其中,hash_method为使用的hash算法,需要注意的是:此时,server语句中不能加weight等参数。
关于,如何在负载均衡中使用upstream请参看这里。
五、 错误集合
1). nginx启动报 server name “*” has suspicious symbols
nginx要求 server_name 不能包含“/”
错误:server_name http://xxx.com;
正确:server_name xxx.com
2)nginx集群报错“upstream”directive is not allow here 错误
后来检查了一下原来是upstream backend 位置放错了, upstream位置应该放在http模块里面 但必须是在server模块的外面. 应该是下面这样的结构:
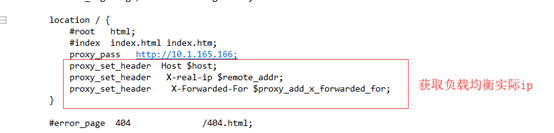
3)获取不到用户实际ip解决方案
六、卸载nginx
(1)查看nginx正在运行的进程,如果有就kill掉
ps -ef |grep nginx
/usr/local/nginx/nginx -s stop(停止或者kill)
(2) 全局查找与nginx相关的文件
find / -name nginx*
(3) 依依删除列出的所有文件
rm -rf file


 被折叠的 条评论
为什么被折叠?
被折叠的 条评论
为什么被折叠?
 到【灌水乐园】发言


