


概述
XTuner
一个大语言模型微调工具箱。由 MMRazor 和 MMDeploy 联合开发。
支持的开源LLM (2023.11.01)
特色
- 🤓 傻瓜化: 以 配置文件 的形式封装了大部分微调场景,0基础的非专业人员也能一键开始微调。
- 🍃 轻量级: 对于 7B 参数量的 LLM,微调所需的最小显存仅为 8GB:消费级显卡✅,colab✅
微调原理
想象一下,你有一个超大的玩具,现在你想改造这个超大的玩具。但是,对整个玩具进行全面的改动会非常昂贵。
※ 因此,你找到了一种叫 LoRA 的方法:只对玩具中的某些零件进行改动,而不是对整个玩具进行全面改动。
※ 而 QLoRA 是 LoRA 的一种改进:如果你手里只有一把生锈的螺丝刀,也能改造你的玩具。
这个解释很直观。同时我在这里还需要重申一下微调和前面一章里拿 LangChain 连接外部数据是不一样的技术,我是小白,一开始也把这两种概念给搞混了。前一章用到 LangChain 连接外部数据的这个技术更像 RAG (Retrieval Augmented Generation),检索(召回),增强,生成。从索引中检索,用外部数据里找到的东西增强大模型,(原始问题和这些找到的东西共同作为提示)生成答案。
微调是拿预训练好的大模型对着一些外部数据再训练,让大模型在相关的领域上有更好表现。
两者共同点:
-
输入:都要准备额外的数据(可以简单粗暴的理解成“数据库”,强调重点在数据上)
- RAG:外部知识库,重点强调数据的时效性。大模型的训练数据很广,来源广也意味着量大,大量数据训练的时间也长,当你看到天上的星星一闪一闪,那可能是几百万年前某些星星爆炸产生的光子刚才才穿过地球大气层打到你的眼睛里。
- 微调:额外的数据集,重点强调数据的领域特殊性。关门爱公司白嫖全网资源,总有他们也搞不到的资源。消除不确定性的东西叫信息;按不同组织形式收集起来的信息叫数据集;按领域划分,收集起来的数据,或者按特定任务需要收集起来的数据,这些东西就是微调特别需要的数据集。
-
输出:目的都是从大模型这里获得更优质的回答。
- RAG:让大模型利用外部知识库里的信息生成更准确和丰富的回答。
- 微调:让大模型在特定领域或特定任务上表现更好。
两者区别:
-
实现方式:
- RAG:模型不动,连接外部知识库,动态引用
- 微调:模型要动,拿额外的数据集再训练
-
使用场景:
- RAG:更优质的回答里需要包括时效性信息,需要包括特定数据源的信息
- 微调:针对特定领域,特定任务,特定类型的应用提供更优质的回答
再举一个例子,教学生学语文然后去高考,教学过程就是预训练大模型,高三冲刺就是在拿近年来的真题微调模型的过程,学生作答高考语文阅读材料分析部分更像 RAG 动态给出联系材料的回答的过程,学生作答作文部分更像微调后要回答的过程(当然也有学生直接拿前面的阅读材料当作文的素材的)。两者在这个例子里不是很能分的清楚,你中有我我中有你。这就是目前这两个概念带给我的感觉。(当然人类自己的学习过程没有这么简单)
快速上手
平台
Ubuntu + Anaconda + CUDA/CUDNN + 8GB nvidia显卡
安装
# 如果你是在 InternStudio 平台,则从本地 clone 一个已有 pytorch 2.0.1 的环境:
/root/share/install_conda_env_internlm_base.sh xtuner0.1.9
# 如果你是在其他平台:
conda create --name xtuner0.1.9 python=3.10 -y

# 激活环境
conda activate xtuner0.1.9
# 进入家目录 (~的意思是 “当前用户的home路径”)
cd ~
# 创建版本文件夹并进入,以跟随本教程
mkdir xtuner019 && cd xtuner019

# 拉取 0.1.9 的版本源码
git clone -b v0.1.9  https://github.com/InternLM/xtuner
# 无法访问github的用户请从 gitee 拉取:
# git clone -b v0.1.9 https://gitee.com/Internlm/xtuner

# 进入源码目录
cd xtuner

# 从源码安装 XTuner
pip install -e '.[all]'
安装完后,就开始搞搞准备工作了。(准备在 oasst1 数据集上微调 internlm-7b-chat)
教程里没有直接说但是我之前试过了,还拿上两次课的配置训练非常浪费时间浪费算力,这次必须奢侈一把直接拉满配置。前面创建过开发机了,这次直接调整配置


算力不够这么长时间,记得自己调整时间。
微调
准备配置文件
XTuner 提供多个开箱即用的配置文件,用户可以通过下列命令查看:
# 列出所有内置配置
xtuner list-cfg
假如显示bash: xtuner: command not found的话可以考虑在终端输入 export PATH=$PATH:’/root/.local/bin’
(xtuner0.1.9) root@intern-studio:~/ft-oasst1# xtuner list-cfg
[2024-01-16 06:02:29,791] [INFO] [real_accelerator.py:161:get_accelerator] Setting ds_accelerator to cuda (auto detect)
[2024-01-16 06:02:37,311] [INFO] [real_accelerator.py:161:get_accelerator] Setting ds_accelerator to cuda (auto detect)
==========================CONFIGS===========================
baichuan2_13b_base_qlora_alpaca_e3
baichuan2_13b_base_qlora_alpaca_enzh_e3
baichuan2_13b_base_qlora_alpaca_enzh_oasst1_e3
baichuan2_13b_base_qlora_alpaca_zh_e3
baichuan2_13b_base_qlora_arxiv_gentitle_e3
baichuan2_13b_base_qlora_code_alpaca_e3
baichuan2_13b_base_qlora_colorist_e5
baichuan2_13b_base_qlora_lawyer_e3
baichuan2_13b_base_qlora_oasst1_512_e3
baichuan2_13b_base_qlora_oasst1_e3
baichuan2_13b_base_qlora_open_platypus_e3
baichuan2_13b_base_qlora_sql_e3
baichuan2_13b_chat_qlora_alpaca_e3
baichuan2_13b_chat_qlora_alpaca_enzh_e3
baichuan2_13b_chat_qlora_alpaca_enzh_oasst1_e3
baichuan2_13b_chat_qlora_alpaca_zh_e3
baichuan2_13b_chat_qlora_code_alpaca_e3
baichuan2_13b_chat_qlora_lawyer_e3
baichuan2_13b_chat_qlora_oasst1_512_e3
baichuan2_13b_chat_qlora_oasst1_e3
baichuan2_13b_chat_qlora_open_platypus_e3
baichuan2_7b_base_qlora_alpaca_e3
baichuan2_7b_base_qlora_alpaca_enzh_e3
baichuan2_7b_base_qlora_alpaca_enzh_oasst1_e3
baichuan2_7b_base_qlora_alpaca_zh_e3
baichuan2_7b_base_qlora_arxiv_gentitle_e3
baichuan2_7b_base_qlora_code_alpaca_e3
baichuan2_7b_base_qlora_colorist_e5
baichuan2_7b_base_qlora_lawyer_e3
baichuan2_7b_base_qlora_oasst1_512_e3
baichuan2_7b_base_qlora_oasst1_e3
baichuan2_7b_base_qlora_open_platypus_e3
baichuan2_7b_base_qlora_sql_e3
baichuan2_7b_chat_qlora_alpaca_e3
baichuan2_7b_chat_qlora_alpaca_enzh_e3
baichuan2_7b_chat_qlora_alpaca_enzh_oasst1_e3
baichuan2_7b_chat_qlora_alpaca_zh_e3
baichuan2_7b_chat_qlora_code_alpaca_e3
baichuan2_7b_chat_qlora_lawyer_e3
baichuan2_7b_chat_qlora_oasst1_512_e3
baichuan2_7b_chat_qlora_oasst1_e3
baichuan2_7b_chat_qlora_open_platypus_e3
baichuan_13b_base_qlora_alpaca_e3
baichuan_13b_base_qlora_alpaca_enzh_e3
baichuan_13b_base_qlora_alpaca_enzh_oasst1_e3
baichuan_13b_base_qlora_alpaca_zh_e3
baichuan_13b_base_qlora_arxiv_gentitle_e3
baichuan_13b_base_qlora_code_alpaca_e3
baichuan_13b_base_qlora_colorist_e5
baichuan_13b_base_qlora_lawyer_e3
baichuan_13b_base_qlora_medical_e1
baichuan_13b_base_qlora_moss_sft_all_e1
baichuan_13b_base_qlora_moss_sft_all_e2_gpu8
baichuan_13b_base_qlora_moss_sft_plugins_e1
baichuan_13b_base_qlora_oasst1_512_e3
baichuan_13b_base_qlora_oasst1_e3
baichuan_13b_base_qlora_open_platypus_e3
baichuan_13b_base_qlora_openorca_e1
baichuan_13b_base_qlora_sql_e3
baichuan_13b_base_qlora_tiny_codes_e1
baichuan_13b_chat_qlora_alpaca_e3
baichuan_13b_chat_qlora_alpaca_enzh_e3
baichuan_13b_chat_qlora_alpaca_enzh_oasst1_e3
baichuan_13b_chat_qlora_alpaca_zh_e3
baichuan_13b_chat_qlora_arxiv_gentitle_e3
baichuan_13b_chat_qlora_code_alpaca_e3
baichuan_13b_chat_qlora_colorist_e5
baichuan_13b_chat_qlora_lawyer_e3
baichuan_13b_chat_qlora_medical_e1
baichuan_13b_chat_qlora_oasst1_512_e3
baichuan_13b_chat_qlora_oasst1_e3
baichuan_13b_chat_qlora_open_platypus_e3
baichuan_13b_chat_qlora_openorca_e1
baichuan_13b_chat_qlora_sql_e3
baichuan_13b_chat_qlora_tiny_codes_e1
baichuan_7b_qlora_alpaca_e3
baichuan_7b_qlora_alpaca_enzh_e3
baichuan_7b_qlora_alpaca_enzh_oasst1_e3
baichuan_7b_qlora_alpaca_zh_e3
baichuan_7b_qlora_arxiv_gentitle_e3
baichuan_7b_qlora_code_alpaca_e3
baichuan_7b_qlora_colorist_e5
baichuan_7b_qlora_lawyer_e3
baichuan_7b_qlora_medical_e1
baichuan_7b_qlora_moss_sft_all_e1
baichuan_7b_qlora_moss_sft_all_e2_gpu8
baichuan_7b_qlora_moss_sft_plugins_e1
baichuan_7b_qlora_oasst1_512_e3
baichuan_7b_qlora_oasst1_e3
baichuan_7b_qlora_open_platypus_e3
baichuan_7b_qlora_openorca_e1
baichuan_7b_qlora_sql_e3
baichuan_7b_qlora_tiny_codes_e1
chatglm2_6b_qlora_alpaca_e3
chatglm2_6b_qlora_alpaca_enzh_e3
chatglm2_6b_qlora_alpaca_enzh_oasst1_e3
chatglm2_6b_qlora_alpaca_zh_e3
chatglm2_6b_qlora_arxiv_gentitle_e3
chatglm2_6b_qlora_code_alpaca_e3
chatglm2_6b_qlora_colorist_e5
chatglm2_6b_qlora_lawyer_e3
chatglm2_6b_qlora_medical_e1
chatglm2_6b_qlora_oasst1_512_e3
chatglm2_6b_qlora_oasst1_e3
chatglm2_6b_qlora_open_platypus_e3
chatglm2_6b_qlora_openorca_e1
chatglm2_6b_qlora_sql_e3
chatglm2_6b_qlora_tiny_codes_e1
chatglm3_6b_base_qlora_alpaca_e3
chatglm3_6b_base_qlora_alpaca_enzh_e3
chatglm3_6b_base_qlora_alpaca_enzh_oasst1_e3
chatglm3_6b_base_qlora_alpaca_zh_e3
chatglm3_6b_base_qlora_arxiv_gentitle_e3
chatglm3_6b_base_qlora_code_alpaca_e3
chatglm3_6b_base_qlora_colorist_e5
chatglm3_6b_base_qlora_lawyer_e3
chatglm3_6b_base_qlora_medical_e1
chatglm3_6b_base_qlora_oasst1_512_e3
chatglm3_6b_base_qlora_oasst1_e3
chatglm3_6b_base_qlora_open_platypus_e3
chatglm3_6b_base_qlora_openorca_e1
chatglm3_6b_base_qlora_sql_e3
chatglm3_6b_base_qlora_tiny_codes_e1
chatglm3_6b_qlora_alpaca_e3
chatglm3_6b_qlora_alpaca_enzh_e3
chatglm3_6b_qlora_alpaca_enzh_oasst1_e3
chatglm3_6b_qlora_alpaca_zh_e3
chatglm3_6b_qlora_arxiv_gentitle_e3
chatglm3_6b_qlora_code_alpaca_e3
chatglm3_6b_qlora_colorist_e5
chatglm3_6b_qlora_lawyer_e3
chatglm3_6b_qlora_medical_e1
chatglm3_6b_qlora_oasst1_512_e3
chatglm3_6b_qlora_oasst1_e3
chatglm3_6b_qlora_open_platypus_e3
chatglm3_6b_qlora_openorca_e1
chatglm3_6b_qlora_sql_e3
chatglm3_6b_qlora_tiny_codes_e1
deepspeed_zero1
deepspeed_zero2
deepspeed_zero2_offload
deepspeed_zero3
deepspeed_zero3_offload
internlm_20b_qlora_alpaca_e3
internlm_20b_qlora_alpaca_enzh_e3
internlm_20b_qlora_alpaca_enzh_oasst1_e3
internlm_20b_qlora_alpaca_zh_e3
internlm_20b_qlora_arxiv_gentitle_e3
internlm_20b_qlora_code_alpaca_e3
internlm_20b_qlora_colorist_e5
internlm_20b_qlora_lawyer_e3
internlm_20b_qlora_msagent_react_e3_gpu8
internlm_20b_qlora_oasst1_512_e3
internlm_20b_qlora_oasst1_e3
internlm_20b_qlora_open_platypus_e3
internlm_20b_qlora_sql_e3
internlm_7b_full_alpaca_e3
internlm_7b_full_alpaca_enzh_e3
internlm_7b_full_alpaca_enzh_oasst1_e3
internlm_7b_full_alpaca_zh_e3
internlm_7b_full_oasst1_e3
internlm_7b_qlora_alpaca_e3
internlm_7b_qlora_alpaca_enzh_e3
internlm_7b_qlora_alpaca_enzh_oasst1_e3
internlm_7b_qlora_alpaca_zh_e3
internlm_7b_qlora_arxiv_gentitle_e3
internlm_7b_qlora_code_alpaca_e3
internlm_7b_qlora_colorist_e5
internlm_7b_qlora_lawyer_e3
internlm_7b_qlora_medical_e1
internlm_7b_qlora_moss_sft_all_e1
internlm_7b_qlora_moss_sft_all_e2_gpu8
internlm_7b_qlora_moss_sft_plugins_e1
internlm_7b_qlora_msagent_react_e3_gpu8
internlm_7b_qlora_oasst1_512_e3
internlm_7b_qlora_oasst1_e3
internlm_7b_qlora_oasst1_e3_hf
internlm_7b_qlora_oasst1_mmlu_e3
internlm_7b_qlora_open_platypus_e3
internlm_7b_qlora_openorca_e1
internlm_7b_qlora_sql_e3
internlm_7b_qlora_tiny_codes_e1
internlm_chat_20b_qlora_alpaca_e3
internlm_chat_20b_qlora_alpaca_enzh_e3
internlm_chat_20b_qlora_alpaca_enzh_oasst1_e3
internlm_chat_20b_qlora_alpaca_zh_e3
internlm_chat_20b_qlora_code_alpaca_e3
internlm_chat_20b_qlora_lawyer_e3
internlm_chat_20b_qlora_oasst1_512_e3
internlm_chat_20b_qlora_oasst1_e3
internlm_chat_20b_qlora_open_platypus_e3
internlm_chat_7b_qlora_alpaca_e3
internlm_chat_7b_qlora_alpaca_enzh_e3
internlm_chat_7b_qlora_alpaca_enzh_oasst1_e3
internlm_chat_7b_qlora_alpaca_zh_e3
internlm_chat_7b_qlora_arxiv_gentitle_e3
internlm_chat_7b_qlora_code_alpaca_e3
internlm_chat_7b_qlora_colorist_e5
internlm_chat_7b_qlora_lawyer_e3
internlm_chat_7b_qlora_medical_e1
internlm_chat_7b_qlora_oasst1_512_e3
internlm_chat_7b_qlora_oasst1_e3
internlm_chat_7b_qlora_open_platypus_e3
internlm_chat_7b_qlora_openorca_e1
internlm_chat_7b_qlora_sql_e3
internlm_chat_7b_qlora_tiny_codes_e1
llama2_70b_int8_lora_open_platypus_e1
llama2_70b_int8_lora_open_platypus_e1_hf
llama2_70b_qlora_open_platypus_e1
llama2_70b_qlora_open_platypus_e1_hf
llama2_7b_chat_qlora_alpaca_e3
llama2_7b_chat_qlora_alpaca_enzh_e3
llama2_7b_chat_qlora_alpaca_enzh_oasst1_e3
llama2_7b_chat_qlora_alpaca_zh_e3
llama2_7b_chat_qlora_arxiv_gentitle_e3
llama2_7b_chat_qlora_code_alpaca_e3
llama2_7b_chat_qlora_colorist_e5
llama2_7b_chat_qlora_lawyer_e3
llama2_7b_chat_qlora_medical_e1
llama2_7b_chat_qlora_oasst1_512_e3
llama2_7b_chat_qlora_oasst1_e3
llama2_7b_chat_qlora_open_platypus_e3
llama2_7b_chat_qlora_openorca_e1
llama2_7b_chat_qlora_sql_e3
llama2_7b_chat_qlora_tiny_codes_e1
llama2_7b_full_wizardlm_e1
llama2_7b_qlora_alpaca_e3
llama2_7b_qlora_alpaca_enzh_e3
llama2_7b_qlora_alpaca_enzh_oasst1_e3
llama2_7b_qlora_alpaca_zh_e3
llama2_7b_qlora_arxiv_gentitle_e3
llama2_7b_qlora_code_alpaca_e3
llama2_7b_qlora_colorist_e5
llama2_7b_qlora_lawyer_e3
llama2_7b_qlora_medical_e1
llama2_7b_qlora_moss_sft_all_e1
llama2_7b_qlora_moss_sft_all_e2_gpu8
llama2_7b_qlora_moss_sft_plugins_e1
llama2_7b_qlora_msagent_react_e3_gpu8
llama2_7b_qlora_oasst1_512_e3
llama2_7b_qlora_oasst1_e3
llama2_7b_qlora_open_platypus_e3
llama2_7b_qlora_openorca_e1
llama2_7b_qlora_sql_e3
llama2_7b_qlora_tiny_codes_e1
llama_7b_qlora_alpaca_e3
llama_7b_qlora_alpaca_enzh_e3
llama_7b_qlora_alpaca_enzh_oasst1_e3
llama_7b_qlora_alpaca_zh_e3
llama_7b_qlora_arxiv_gentitle_e3
llama_7b_qlora_code_alpaca_e3
llama_7b_qlora_colorist_e5
llama_7b_qlora_lawyer_e3
llama_7b_qlora_medical_e1
llama_7b_qlora_moss_sft_all_e1
llama_7b_qlora_moss_sft_all_e2_gpu8
llama_7b_qlora_moss_sft_plugins_e1
llama_7b_qlora_oasst1_512_e3
llama_7b_qlora_oasst1_e3
llama_7b_qlora_open_platypus_e3
llama_7b_qlora_openorca_e1
llama_7b_qlora_sql_e3
llama_7b_qlora_tiny_codes_e1
mistral_7b_qlora_skypile_pretrain_e1
qwen_7b_chat_qlora_alpaca_e3
qwen_7b_chat_qlora_alpaca_enzh_e3
qwen_7b_chat_qlora_alpaca_enzh_oasst1_e3
qwen_7b_chat_qlora_alpaca_zh_e3
qwen_7b_chat_qlora_arxiv_gentitle_e3
qwen_7b_chat_qlora_code_alpaca_e3
qwen_7b_chat_qlora_colorist_e5
qwen_7b_chat_qlora_lawyer_e3
qwen_7b_chat_qlora_medical_e1
qwen_7b_chat_qlora_oasst1_512_e3
qwen_7b_chat_qlora_oasst1_e3
qwen_7b_chat_qlora_open_platypus_e3
qwen_7b_chat_qlora_openorca_e1
qwen_7b_chat_qlora_sql_e3
qwen_7b_chat_qlora_tiny_codes_e1
qwen_7b_qlora_alpaca_e3
qwen_7b_qlora_alpaca_enzh_e3
qwen_7b_qlora_alpaca_enzh_oasst1_e3
qwen_7b_qlora_alpaca_zh_e3
qwen_7b_qlora_arxiv_gentitle_e3
qwen_7b_qlora_code_alpaca_e3
qwen_7b_qlora_colorist_e5
qwen_7b_qlora_lawyer_e3
qwen_7b_qlora_medical_e1
qwen_7b_qlora_moss_sft_all_e1
qwen_7b_qlora_moss_sft_all_e2_gpu8
qwen_7b_qlora_moss_sft_plugins_e1
qwen_7b_qlora_oasst1_512_e3
qwen_7b_qlora_oasst1_e3
qwen_7b_qlora_open_platypus_e3
qwen_7b_qlora_openorca_e1
qwen_7b_qlora_sql_e3
qwen_7b_qlora_tiny_codes_e1
starcoder_qlora_stack_exchange_example
yi_34b_qlora_alpaca_enzh_e3
yi_6b_qlora_alpaca_enzh_e3
zephyr_7b_beta_qlora_alpaca_e3
=============================================================
(xtuner0.1.9) root@intern-studio:~/ft-oasst1#
一大堆配置,最后只选我们当前任务需要的。拷贝一个配置文件到当前目录: # xtuner copy-cfg ${CONFIG_NAME} ${SAVE_PATH}
在本案例中即:(注意最后有个英文句号,代表复制到当前路径)
cd ~/ft-oasst1
xtuner copy-cfg internlm_chat_7b_qlora_oasst1_e3 .
配置文件名的解释:
| 模型名 | internlm_chat_7b |
|---|---|
| 使用算法 | qlora |
| 数据集 | oasst1 |
| 把数据集跑几次 | 跑 3 次:e3 (epoch 3) |
* 无 chat比如 internlm-7b 代表是基座(base)模型
模型下载
由于下载模型很慢,用教学平台的同学可以直接复制模型。
cp -r /root/share/temp/model_repos/internlm-chat-7b ~/ft-oasst1/
以下是自己下载模型的步骤。
不用 xtuner 默认的从 huggingface 拉取模型,而是提前从 OpenXLab ModelScope 下载模型到本地
# 创建一个目录,放模型文件,防止散落一地
mkdir ~/ft-oasst1/internlm-chat-7b

# 装一下拉取模型文件要用的库
pip install modelscope

# 从 modelscope 下载下载模型文件
cd ~/ft-oasst1
apt install git git-lfs -y
git lfs install
git lfs clone https://modelscope.cn/Shanghai_AI_Laboratory/internlm-chat-7b.git -b v1.0.3
数据集下载
由于 huggingface 网络问题,咱们已经给大家提前下载好了,复制到正确位置即可:
cd ~/ft-oasst1
# ...-guanaco 后面有个空格和英文句号啊
cp -r /root/share/temp/datasets/openassistant-guanaco .
此时,当前路径的文件应该长这样:

修改配置文件
修改其中的模型和数据集为 本地路径
cd ~/ft-oasst1
vim internlm_chat_7b_qlora_oasst1_e3_copy.py
在vim界面完成修改后,请输入:wq退出。假如认为改错了可以用:q!退出且不保存。当然我们也可以考虑打开python文件直接修改,但注意修改完后需要按下Ctrl+S进行保存。
减号代表要删除的行,加号代表要增加的行。
# 修改模型为本地路径
- pretrained_model_name_or_path = 'internlm/internlm-chat-7b'
+ pretrained_model_name_or_path = './internlm-chat-7b'

# 修改训练数据集为本地路径
- data_path = 'timdettmers/openassistant-guanaco'
+ data_path = './openassistant-guanaco'
常用超参
| 参数名 | 解释 |
|---|---|
| data_path | 数据路径或 HuggingFace 仓库名 |
| max_length | 单条数据最大 Token 数,超过则截断 |
| pack_to_max_length | 是否将多条短数据拼接到 max_length,提高 GPU 利用率 |
| accumulative_counts | 梯度累积,每多少次 backward 更新一次参数 |
| evaluation_inputs | 训练过程中,会根据给定的问题进行推理,便于观测训练状态 |
| evaluation_freq | Evaluation 的评测间隔 iter 数 |
| … | … |
如果想把显卡的现存吃满,充分利用显卡资源,可以将
max_length和batch_size这两个参数调大。
我想拉满但不想训练训着训着停了说资源不够,这里把两个参数直接翻倍,最长 4096,一个设备 2 个 batch
开始微调
训练:
xtuner train ${CONFIG_NAME_OR_PATH}
也可以增加 deepspeed 进行训练加速:
xtuner train ${CONFIG_NAME_OR_PATH} --deepspeed deepspeed_zero2
例如,我们可以利用 QLoRA 算法在 oasst1 数据集上微调 InternLM-7B:
# 单卡
## 用刚才改好的config文件训练
xtuner train ./internlm_chat_7b_qlora_oasst1_e3_copy.py

# 多卡
NPROC_PER_NODE=${GPU_NUM} xtuner train ./internlm_chat_7b_qlora_oasst1_e3_copy.py

# 若要开启 deepspeed 加速,增加 --deepspeed deepspeed_zero2 即可
OK,节省算力和时间的小技巧又来了,前面说过要奢侈一把的,因为到目前为止我们的模型和数据集都是在开发机的公共存储空间里,所以在前面折腾环境下模型下数据集的时候可以先用最低配置,这里之后开始换高配置。
因为我们拉满也只是在一张卡上面跑,所以多卡这条以后再玩。
xtuner train ./internlm_chat_7b_qlora_oasst1_e3_copy.py --deepspeed deepspeed_zero2
目前为止没有跑满,我觉得还行,不要改的太大最后时间到了都没训练完就尴尬了


等会就能看到结果了(大概 2 小时,配置是完整的一张卡)
跑完训练后,当前路径应该长这样:

将得到的 PTH 模型转换为 HuggingFace 模型,即:生成 Adapter 文件夹
xtuner convert pth_to_hf ${CONFIG_NAME_OR_PATH} ${PTH_file_dir} ${SAVE_PATH}
在本示例中,为:
mkdir hf
export MKL_SERVICE_FORCE_INTEL=1

xtuner convert pth_to_hf ./internlm_chat_7b_qlora_oasst1_e3_copy.py ./work_dirs/internlm_chat_7b_qlora_oasst1_e3_copy/epoch_1.pth ./hf

此时,路径中应该长这样:
|-- internlm-chat-7b
|-- internlm_chat_7b_qlora_oasst1_e3_copy.py
|-- openassistant-guanaco
|   |-- openassistant_best_replies_eval.jsonl
|   `-- openassistant_best_replies_train.jsonl
|-- hf
|   |-- README.md
|   |-- adapter_config.json
|   |-- adapter_model.bin
|   `-- xtuner_config.py
`-- work_dirs
    `-- internlm_chat_7b_qlora_oasst1_e3_copy
        |-- 20231101_152923
        |   |-- 20231101_152923.log
        |   `-- vis_data
        |       |-- 20231101_152923.json
        |       |-- config.py
        |       `-- scalars.json
        |-- epoch_1.pth
        |-- epoch_2.pth
        |-- epoch_3.pth
        |-- internlm_chat_7b_qlora_oasst1_e3_copy.py
        `-- last_checkpoint
我处理得到的模型文件后缀名好像不太一样,程序也只是给了 warning 没给 error,后面有时间在研究

此时,hf 文件夹即为我们平时所理解的所谓“LoRA 模型文件”
可以简单理解:LoRA 模型文件 = Adapter
部署与测试
将 HuggingFace adapter 合并到大语言模型:
xtuner convert merge ./internlm-chat-7b ./hf ./merged --max-shard-size 2GB
# xtuner convert merge \
#     ${NAME_OR_PATH_TO_LLM} \
#     ${NAME_OR_PATH_TO_ADAPTER} \
#     ${SAVE_PATH} \
#     --max-shard-size 2GB
合并还成功了。。。不清楚文件后缀名到底有什么蹊跷,关键是前面 warning 里有这么一句让我感觉可能从 pth 模型转换过来的时候丢东西了

按群里大佬的意思,先往后完成整个流程,觉得有问题再倒回来研究这块。
与合并后的模型对话:
# 加载 Adapter 模型对话(Float 16)
xtuner chat ./merged --prompt-template internlm_chat

# 4 bit 量化加载
# xtuner chat ./merged --bits 4 --prompt-template internlm_chat
Float 16 对话:

4 bit 对话

同样的问题确实有差距,量化完开始胡乱回复了。
Demo
- 修改
cli_demo.py中的模型路径
- model_name_or_path = "/root/model/Shanghai_AI_Laboratory/internlm-chat-7b"
+ model_name_or_path = "merged"
- 运行
cli_demo.py以目测微调效果
python ./cli_demo.py
效果:
合并后模型效果:

自说自话了怎么。。。还不断复读。。。
原版预训练大模型的效果:

至少不复读,但是多敲了回车让我去外卖平台上找解答有点难绷。
xtuner chat 的启动参数
| 启动参数 | 用途 |
|---|---|
| –prompt-template | 指定对话模板 |
| –system | 指定SYSTEM文本 |
| –system-template | 指定SYSTEM模板 |
| –bits | LLM位数 |
| –bot-name | bot名称 |
| –with-plugins | 指定要使用的插件 |
| –no-streamer | 是否启用流式传输 |
| –lagent | 是否使用lagent |
| –command-stop-word | 命令停止词 |
| –answer-stop-word | 回答停止词 |
| –offload-folder | 存放模型权重的文件夹(或者已经卸载模型权重的文件夹) |
| –max-new-tokens | 生成文本中允许的最大 token 数量 |
| –temperature | 温度值 |
| –top-k | 保留用于顶k筛选的最高概率词汇标记数 |
| –top-p | 如果设置为小于1的浮点数,仅保留概率相加高于 top_p 的最小一组最有可能的标记 |
| –seed | 用于可重现文本生成的随机种子 |
自定义微调
以 Medication QA 数据集为例
概述
场景需求
基于 InternLM-chat-7B 模型,用 MedQA 数据集进行微调,将其往医学问答领域对齐。
真实数据预览
| 问题 | 答案 |
|---|---|
| What are ketorolac eye drops?(什么是酮咯酸滴眼液?) | Ophthalmic ketorolac is used to treat itchy eyes caused by allergies. It also is used to treat swelling and redness (inflammation) that can occur after cataract surgery. Ketorolac is in a class of medications called nonsteroidal anti-inflammatory drugs (NSAIDs). It works by stopping the release of substances that cause allergy symptoms and inflammation. |
| What medicines raise blood sugar? (什么药物会升高血糖?) | Some medicines for conditions other than diabetes can raise your blood sugar level. This is a concern when you have diabetes. Make sure every doctor you see knows about all of the medicines, vitamins, or herbal supplements you take. This means anything you take with or without a prescription. Examples include: Barbiturates. Thiazide diuretics. Corticosteroids. Birth control pills (oral contraceptives) and progesterone. Catecholamines. Decongestants that contain beta-adrenergic agents, such as pseudoephedrine. The B vitamin niacin. The risk of high blood sugar from niacin lowers after you have taken it for a few months. The antipsychotic medicine olanzapine (Zyprexa). |
数据准备
以 Medication QA 数据集为例
原格式:(.xlsx)

| 问题 | 药物类型 | 问题类型 | 回答 | 主题 | URL |
|---|---|---|---|---|---|
| aaa | bbb | ccc | ddd | eee | fff |
将数据转为 XTuner 的数据格式
目标格式:(.jsonL)
[{
    "conversation":[
        {
            "system": "xxx",
            "input": "xxx",
            "output": "xxx"
        }
    ]
},
{
    "conversation":[
        {
            "system": "xxx",
            "input": "xxx",
            "output": "xxx"
        }
    ]
}]
通过 python 脚本:将 .xlsx 中的 问题 和 回答 两列 提取出来,再放入 .jsonL 文件的每个 conversation 的 input 和 output 中。
这一步的 python 脚本可以请 ChatGPT 来完成。
Write a python file for me. using openpyxl. input file name is MedQA2019.xlsx
Step1: The input file is .xlsx. Exact the column A and column D in the sheet named "DrugQA" .
Step2: Put each value in column A into each "input" of each "conversation". Put each value in column D into each "output" of each "conversation".
Step3: The output file is .jsonL. It looks like:
[{
    "conversation":[
        {
            "system": "xxx",
            "input": "xxx",
            "output": "xxx"
        }
    ]
},
{
    "conversation":[
        {
            "system": "xxx",
            "input": "xxx",
            "output": "xxx"
        }
    ]
}]
Step4: All "system" value changes to "You are a professional, highly experienced doctor professor. You always provide accurate, comprehensive, and detailed answers based on the patients' questions."
ChatGPT 生成的 python 代码见本仓库的 xlsx2jsonl.py
执行 python 脚本,获得格式化后的数据集:
python xlsx2jsonl.py
格式化后的数据集长这样:

此时,当然也可以对数据进行训练集和测试集的分割,同样可以让 ChatGPT 写 python 代码。当然如果你没有严格的科研需求、不在乎“训练集泄露”的问题,也可以不做训练集与测试集的分割。
划分训练集和测试集
my .jsonL file looks like:
[{
    "conversation":[
        {
            "system": "xxx",
            "input": "xxx",
            "output": "xxx"
        }
    ]
},
{
    "conversation":[
        {
            "system": "xxx",
            "input": "xxx",
            "output": "xxx"
        }
    ]
}]
Step1, read the .jsonL file.
Step2, count the amount of the "conversation" elements.
Step3, randomly split all "conversation" elements by 7:3. Targeted structure is same as the input.
Step4, save the 7/10 part as train.jsonl. save the 3/10 part as test.jsonl
生成的python代码见 split2train_and_test.py
搞定,这三个文件就是后续要用的

开始自定义微调
此时,我们重新建一个文件夹来玩“微调自定义数据集”
mkdir ~/ft-medqa && cd ~/ft-medqa
把前面下载好的internlm-chat-7b模型文件夹拷贝过来。
cp -r ~/ft-oasst1/internlm-chat-7b .
别忘了把自定义数据集,即几个 .jsonL,也传到服务器上。
git clone https://github.com/InternLM/tutorial
cp ~/tutorial/xtuner/MedQA2019-structured-train.jsonl .
准备配置文件
# 复制配置文件到当前目录
xtuner copy-cfg internlm_chat_7b_qlora_oasst1_e3 .
# 改个文件名
mv internlm_chat_7b_qlora_oasst1_e3_copy.py internlm_chat_7b_qlora_medqa2019_e3.py

# 修改配置文件内容
vim internlm_chat_7b_qlora_medqa2019_e3.py
减号代表要删除的行,加号代表要增加的行。
# 修改import部分
- from xtuner.dataset.map_fns import oasst1_map_fn, template_map_fn_factory
+ from xtuner.dataset.map_fns import template_map_fn_factory

# 修改模型为本地路径
- pretrained_model_name_or_path = 'internlm/internlm-chat-7b'
+ pretrained_model_name_or_path = './internlm-chat-7b'

# 修改训练数据为 MedQA2019-structured-train.jsonl 路径
- data_path = 'timdettmers/openassistant-guanaco'
+ data_path = 'MedQA2019-structured-train.jsonl'

# 修改 train_dataset 对象
train_dataset = dict(
    type=process_hf_dataset,
-   dataset=dict(type=load_dataset, path=data_path),
+   dataset=dict(type=load_dataset, path='json', data_files=dict(train=data_path)),
    tokenizer=tokenizer,
    max_length=max_length,
-   dataset_map_fn=alpaca_map_fn,
+   dataset_map_fn=None,
    template_map_fn=dict(
        type=template_map_fn_factory, template=prompt_template),
    remove_unused_columns=True,
    shuffle_before_pack=True,
    pack_to_max_length=pack_to_max_length)
XTuner!启动!
xtuner train internlm_chat_7b_qlora_medqa2019_e3.py --deepspeed deepspeed_zero2
数据量小,奇快无比

pth 转 huggingface
xtuner convert pth_to_hf ./internlm_chat_7b_qlora_medqa2019_e3.py ./work_dirs/internlm_chat_7b_qlora_medqa2019_e3/epoch_1.pth ./hf
部署与测试
合并
xtuner convert merge ./internlm-chat-7b ./hf ./merged --max-shard-size 2GB
与合并后的模型对话
# 加载 Adapter 模型对话(Float 16)
xtuner chat ./merged --prompt-template internlm_chat

# 4 bit 量化加载
# xtuner chat ./merged --bits 4 --prompt-template internlm_chat


同一个问题,量化版本的回答看起来被截断了一样。
【补充】用 MS-Agent 数据集 赋予 LLM 以 Agent 能力
概述
MSAgent 数据集每条样本包含一个对话列表(conversations),其里面包含了 system、user、assistant 三种字段。其中:
- system: 表示给模型前置的人设输入,其中有告诉模型如何调用插件以及生成请求
- user: 表示用户的输入 prompt,分为两种,通用生成的prompt和调用插件需求的 prompt
- assistant: 为模型的回复。其中会包括插件调用代码和执行代码,调用代码是要 LLM 生成的,而执行代码是调用服务来生成结果的
一条调用网页搜索插件查询“上海明天天气”的数据样本示例如下图所示:

微调步骤
准备工作
xtuner 是从国内的 ModelScope 平台下载 MS-Agent 数据集,因此不用提前手动下载数据集文件。
# 准备工作
mkdir ~/ft-msagent && cd ~/ft-msagent
cp -r ~/ft-oasst1/internlm-chat-7b .

# 查看配置文件
xtuner list-cfg | grep msagent

# 复制配置文件到当前目录
xtuner copy-cfg internlm_7b_qlora_msagent_react_e3_gpu8 .

# 修改配置文件中的模型为本地路径
vim ./internlm_7b_qlora_msagent_react_e3_gpu8_copy.py
- pretrained_model_name_or_path = 'internlm/internlm-chat-7b'
+ pretrained_model_name_or_path = './internlm-chat-7b'
开始微调
xtuner train ./internlm_7b_qlora_msagent_react_e3_gpu8_copy.py --deepspeed deepspeed_zero2
直接使用
由于 msagent 的训练非常费时,大家如果想尽快把这个教程跟完,可以直接从 modelScope 拉取咱们已经微调好了的 Adapter。如下演示。
下载 Adapter
cd ~/ft-msagent
apt install git git-lfs
git lfs install
git lfs clone https://www.modelscope.cn/xtuner/internlm-7b-qlora-msagent-react.git
OK,现在目录应该长这样:
- internlm_7b_qlora_msagent_react_e3_gpu8_copy.py
- internlm-7b-qlora-msagent-react
- internlm-chat-7b
- work_dir(可有可无)
有了这个在 msagent 上训练得到的Adapter,模型现在已经有 agent 能力了!就可以加 --lagent 以调用来自 lagent 的代理功能了!
添加 serper 环境变量
开始 chat 之前,还要加个 serper 的环境变量:
去 serper.dev 免费注册一个账号,生成自己的 api key。这个东西是用来给 lagent 去获取 google 搜索的结果的。等于是 serper.dev 帮你去访问 google,而不是从你自己本地去访问 google 了。

添加 serper api key 到环境变量:
export SERPER_API_KEY=abcdefg
xtuner + agent,启动!
xtuner chat ./internlm-chat-7b --adapter internlm-7b-qlora-msagent-react --lagent

报错处理
xtuner chat 增加 --lagent 参数后,报错 TypeError: transfomers.modelsauto.auto factory. BaseAutoModelClass.from pretrained() got multiple values for keyword argument "trust remote code"
注释掉已安装包中的代码:
vim /root/xtuner019/xtuner/xtuner/tools/chat.py


能联网就是不一样啊,有两下子。

其他已知问题和解决方案:
小作业助教老师会在社群中公布。 Have fun!
注意事项
本教程使用 xtuner 0.1.9 版本 若需要跟着本教程一步一步完成,建议严格遵循本教程的步骤!
若出现莫名其妙报错,请尝试更换为以下包的版本:(如果有报错再检查,没报错不用看)
torch                         2.1.1
transformers                  4.34.0
transformers-stream-generator 0.0.4
pip install torch==2.1.1
pip install transformers==4.34.0
pip install transformers-stream-generator=0.0.4
CUDA 相关:(如果有报错再检查,没报错不用看)
NVIDIA-SMI 535.54.03
Driver Version: 535.54.03
CUDA Version: 12.2

nvidia-cuda-cupti-cu12        12.1.105
nvidia-cuda-nvrtc-cu12        12.1.105
nvidia-cuda-runtime-cu12      12.1.105
作业
基础作业:
构建数据集,使用 XTuner 微调 InternLM-Chat-7B 模型, 让模型学习到它是你的智能小助手,效果如下图所示,本作业训练出来的模型的输出需要将不要葱姜蒜大佬替换成自己名字或昵称!
微调前(回答比较官方)

微调后(对自己的身份有了清晰的认知)

作业参考答案:github.com/InternLM/tu…
目标:通过微调,帮助模型认清了解对自己身份弟位
方式:使用XTuner进行微调
环境准备和这次课最开始的章节一样,这个项目放在 personal_assistant 文件夹下,因为我的 ~ 已经满了,我直接放在 / 下面了。
mkdir -p /personal_assistant && cd /personal_assistant
数据准备
创建data文件夹用于存放用于训练的数据集
mkdir -p /personal_assistant/data && cd /personal_assistant/data
在 data 目录下创建一个json文件 personal_assistant.json 作为本次微调所使用的数据集。json中内容可参考下方(复制粘贴n次做数据增广,数据量小无法有效微调,下面仅用于展示格式,下面也有生成脚本)
其中 conversation 表示一次对话的内容,input 为输入,即用户会问的问题,output 为输出,即想要模型回答的答案。
[
    {
        "conversation": [
            {
                "input": "请介绍一下你自己",
                "output": "我是 milkve 的小助手,内在是上海AI实验室书生·浦语的7B大模型哦"
            }
        ]
    },
    {
        "conversation": [
            {
                "input": "请做一下自我介绍",
                "output": "我是 milkve 的小助手,内在是上海AI实验室书生·浦语的7B大模型哦"
            }
        ]
    }
]
以下是一个python脚本,用于生成数据集。在data目录下新建一个 generate_data.py 文件,将以下代码复制进去,然后运行该脚本即可生成数据集。
import json

# 输入你的名字
name = 'Shengshenlan'
# 重复次数
n = 10000

data = [
    {
        "conversation": [
            {
                "input": "请做一下自我介绍",
                "output": "我是{}的小助手,内在是上海AI实验室书生·浦语的7B大模型哦".format(name)
            }
        ]
    }
]

for i in range(n):
    data.append(data[0])

with open('personal_assistant.json', 'w', encoding='utf-8') as f:
    json.dump(data, f, ensure_ascii=False, indent=4)
配置准备
下载模型InternLM-chat-7B
InternStudio 平台的 share 目录下已经为我们准备了全系列的 InternLM 模型,可以使用如下命令复制internlm-chat-7b:
mkdir -p /personal_assistant/model/Shanghai_AI_Laboratory
cp -r /root/share/temp/model_repos/internlm-chat-7b /personal_assistant/model/Shanghai_AI_Laboratory
XTuner 提供多个开箱即用的配置文件,用户可以通过下列命令查看:
# 列出所有内置配置
xtuner list-cfg
#创建用于存放配置的文件夹config并进入
mkdir /personal_assistant/config && cd /personal_assistant/config
拷贝一个配置文件到当前目录:xtuner copy-cfg ${CONFIG_NAME} ${SAVE_PATH} 在本例中:(注意最后有个英文句号,代表复制到当前路径)
xtuner copy-cfg internlm_chat_7b_qlora_oasst1_e3 .
修改拷贝后的文件internlm_chat_7b_qlora_oasst1_e3_copy.py,修改下述位置:
# PART 1 中
# 预训练模型存放的位置
pretrained_model_name_or_path = '/personal_assistant/model/Shanghai_AI_Laboratory/internlm-chat-7b'

# 微调数据存放的位置
data_path = '/personal_assistant/data/personal_assistant.json'

# 训练中最大的文本长度
max_length = 512

# 每一批训练样本的大小
batch_size = 2

# 最大训练轮数
max_epochs = 3

# 验证的频率
evaluation_freq = 90

# 用于评估输出内容的问题(用于评估的问题尽量与数据集的question保持一致)
evaluation_inputs = [ '请介绍一下你自己', '请做一下自我介绍' ]

# PART 3 中
dataset=dict(type=load_dataset, path='json', data_files=dict(train=data_path))
dataset_map_fn=None
微调启动
用xtuner train命令启动训练、
xtuner train /personal_assistant/config/internlm_chat_7b_qlora_oasst1_e3_copy.py --deepspeed deepspeed_zero2

微调后参数转换/合并
训练后的 pth 格式参数转 Hugging Face 格式
# 创建用于存放Hugging Face格式参数的hf文件夹
mkdir /personal_assistant/config/work_dirs/hf

export MKL_SERVICE_FORCE_INTEL=1

# 配置文件存放的位置
export CONFIG_NAME_OR_PATH=/personal_assistant/config/internlm_chat_7b_qlora_oasst1_e3_copy.py

# 模型训练后得到的pth格式参数存放的位置
export PTH=/personal_assistant/config/work_dirs/internlm_chat_7b_qlora_oasst1_e3_copy/epoch_3.pth

# pth文件转换为Hugging Face格式后参数存放的位置
export SAVE_PATH=/personal_assistant/config/work_dirs/hf

# 执行参数转换
xtuner convert pth_to_hf $CONFIG_NAME_OR_PATH $PTH $SAVE_PATH
Merge模型参数
export MKL_SERVICE_FORCE_INTEL=1
export MKL_THREADING_LAYER='GNU'

# 原始模型参数存放的位置
export NAME_OR_PATH_TO_LLM=/personal_assistant/model/internlm-chat-7b

# Hugging Face格式参数存放的位置
export NAME_OR_PATH_TO_ADAPTER=/personal_assistant/config/work_dirs/hf

# 最终Merge后的参数存放的位置
mkdir /personal_assistant/config/work_dirs/hf_merge
export SAVE_PATH=/personal_assistant/config/work_dirs/hf_merge

# 执行参数Merge
xtuner convert merge \
    $NAME_OR_PATH_TO_LLM \
    $NAME_OR_PATH_TO_ADAPTER \
    $SAVE_PATH \
    --max-shard-size 2GB
网页DEMO
安装网页Demo所需依赖
pip install streamlit==1.24.0
下载InternLM项目代码(欢迎Star)
# 创建code文件夹用于存放InternLM项目代码
mkdir /personal_assistant/code && cd /personal_assistant/code
git clone https://github.com/InternLM/InternLM.git
将 /personal_assistant/code/InternLM/web_demo.py 中 29 行和 33 行的模型路径更换为Merge后存放参数的路径 /personal_assistant/config/work_dirs/hf_merge
运行 /root/personal_assistant/code/InternLM 目录下的 web_demo.py 文件,输入以下命令后,查看本教程5.2配置本地端口后,将端口映射到本地。在本地浏览器输入 http://127.0.0.1:6006 即可。
streamlit run /personal_assistant/code/InternLM/web_demo.py --server.address 127.0.0.1 --server.port 6006
注意:要在浏览器打开 http://127.0.0.1:6006 页面后,模型才会加载。 在加载完模型之后,就可以与微调后的 InternLM-Chat-7B 进行对话了

效果
微调前的效果:

微调后的效果:

重复了之后效果果然会好很多。看起来和背课文一个道理呢!
进阶作业:
- 将训练好的 Adapter 模型权重上传到 OpenXLab、Hugging Face 或者 MoelScope 任一一平台。
- 将训练好后的模型应用部署到 OpenXLab 平台,参考部署文档请访问:aicarrier.feishu.cn/docx/MQH6dy…
进阶作业这里最难的地方在于上传这么大的权重文件。。。想了个歪招,先拿 Git LFS 顶一下
(xtuner0.1.9) root@intern-studio:/personal_assistant/config/work_dirs/hf_merge# ls -hal
total 14G
drwxr-xr-x 2 root root 4.0K Jan 16 12:42 .
drwxr-xr-x 5 root root 4.0K Jan 16 12:41 ..
-rw-r--r-- 1 root root   42 Jan 16 12:42 added_tokens.json
-rw-r--r-- 1 root root  796 Jan 16 12:42 config.json
-rw------- 1 root root 5.1K Jan 16 12:42 configuration_internlm.py
-rw-r--r-- 1 root root  132 Jan 16 12:42 generation_config.json
-rw------- 1 root root  43K Jan 16 12:42 modeling_internlm.py
-rw-r--r-- 1 root root 1.9G Jan 16 12:42 pytorch_model-00001-of-00008.bin
-rw-r--r-- 1 root root 1.9G Jan 16 12:42 pytorch_model-00002-of-00008.bin
-rw-r--r-- 1 root root 1.9G Jan 16 12:42 pytorch_model-00003-of-00008.bin
-rw-r--r-- 1 root root 1.9G Jan 16 12:42 pytorch_model-00004-of-00008.bin
-rw-r--r-- 1 root root 1.9G Jan 16 12:42 pytorch_model-00005-of-00008.bin
-rw-r--r-- 1 root root 1.9G Jan 16 12:42 pytorch_model-00006-of-00008.bin
-rw-r--r-- 1 root root 1.9G Jan 16 12:42 pytorch_model-00007-of-00008.bin
-rw-r--r-- 1 root root 807M Jan 16 12:42 pytorch_model-00008-of-00008.bin
-rw-r--r-- 1 root root  37K Jan 16 12:42 pytorch_model.bin.index.json
-rw-r--r-- 1 root root   95 Jan 16 12:42 special_tokens_map.json
-rw------- 1 root root 8.8K Jan 16 12:42 tokenization_internlm.py
-rw-r--r-- 1 root root 1.6M Jan 16 12:42 tokenizer.model
-rw-r--r-- 1 root root  967 Jan 16 12:42 tokenizer_config.json
(xtuner0.1.9) root@intern-studio:/personal_assistant/config/work_dirs/hf_merge# git lfs install
Updated git hooks.
Git LFS initialized.
(xtuner0.1.9) root@intern-studio:/personal_assistant/config/work_dirs/hf_merge# git lfs track "*.bin"
Tracking "*.bin"
(xtuner0.1.9) root@intern-studio:/personal_assistant/config/work_dirs/hf_merge# git add *.bin
^C
Exiting because of "interrupt" signal.

(xtuner0.1.9) root@intern-studio:/personal_assistant/config/work_dirs/hf_merge# git add *.bin -v
add 'config/work_dirs/hf_merge/pytorch_model-00001-of-00008.bin'
add 'config/work_dirs/hf_merge/pytorch_model-00002-of-00008.bin'
add 'config/work_dirs/hf_merge/pytorch_model-00003-of-00008.bin'
add 'config/work_dirs/hf_merge/pytorch_model-00004-of-00008.bin'
add 'config/work_dirs/hf_merge/pytorch_model-00005-of-00008.bin'
add 'config/work_dirs/hf_merge/pytorch_model-00006-of-00008.bin'
add 'config/work_dirs/hf_merge/pytorch_model-00007-of-00008.bin'
add 'config/work_dirs/hf_merge/pytorch_model-00008-of-00008.bin'
(xtuner0.1.9) root@intern-studio:/personal_assistant/config/work_dirs/hf_merge# git add ./*
(xtuner0.1.9) root@intern-studio:/personal_assistant/config/work_dirs/hf_merge# git status
... ...
(xtuner0.1.9) root@intern-studio:/personal_assistant/config/work_dirs/hf_merge# git add .gitattributes
(xtuner0.1.9) root@intern-studio:/personal_assistant/config/work_dirs/hf_merge# cd ../..
(xtuner0.1.9) root@intern-studio:/personal_assistant/config# cd ..
(xtuner0.1.9) root@intern-studio:/personal_assistant# git status
... ...
(xtuner0.1.9) root@intern-studio:/personal_assistant# git commit -m "add weight file with git LFS"
[main 69cc893] add weight file with git LFS
 19 files changed, 1951 insertions(+)
 create mode 100644 config/work_dirs/hf_merge/.gitattributes
 create mode 100644 config/work_dirs/hf_merge/added_tokens.json
 create mode 100644 config/work_dirs/hf_merge/config.json
 create mode 100644 config/work_dirs/hf_merge/configuration_internlm.py
 create mode 100644 config/work_dirs/hf_merge/generation_config.json
 create mode 100644 config/work_dirs/hf_merge/modeling_internlm.py
 create mode 100644 config/work_dirs/hf_merge/pytorch_model-00001-of-00008.bin
 create mode 100644 config/work_dirs/hf_merge/pytorch_model-00002-of-00008.bin
 create mode 100644 config/work_dirs/hf_merge/pytorch_model-00003-of-00008.bin
 create mode 100644 config/work_dirs/hf_merge/pytorch_model-00004-of-00008.bin
 create mode 100644 config/work_dirs/hf_merge/pytorch_model-00005-of-00008.bin
 create mode 100644 config/work_dirs/hf_merge/pytorch_model-00006-of-00008.bin
 create mode 100644 config/work_dirs/hf_merge/pytorch_model-00007-of-00008.bin
 create mode 100644 config/work_dirs/hf_merge/pytorch_model-00008-of-00008.bin
 create mode 100644 config/work_dirs/hf_merge/pytorch_model.bin.index.json
 create mode 100644 config/work_dirs/hf_merge/special_tokens_map.json
 create mode 100644 config/work_dirs/hf_merge/tokenization_internlm.py
 create mode 100644 config/work_dirs/hf_merge/tokenizer.model
 create mode 100644 config/work_dirs/hf_merge/tokenizer_config.json
(xtuner0.1.9) root@intern-studio:/personal_assistant# git push origin main
batch response: This repository is over its data quota. Account responsible for LFS bandwidth should purchase more data packs to restore access.
error: failed to push some refs to 'https://github.com/Milkve/personal_assistant.git'
(xtuner0.1.9) root@intern-studio:/personal_assistant# git push origin main -v
Pushing to https://github.com/Milkve/personal_assistant.git
Uploading LFS objects:  12% (1/8), 8.9 GB | 23 MB/s
不是长久之计,这次先这么凑活用。上面这些步骤做下来等个一小时,网快的话等个半小时,这些权重文件就有下载链接了。

下一步是复制下载链接,在 OpenXLab 这里选择 URL 导入,粘贴进去

看网速,我也不知道要多久。

这样慢慢上传就好,目前总共有 8 个权重文件,手动分 8 次上传,零碎的小文件也是这么做。

之所以说是临时方案,这不就来关我服务了嘛。
整体实训营项目:
时间周期:即日起致课程结束
即日开始可以在班级群中随机组队完成一个大作业项目,一些可提供的选题如下:
- 人情世故大模型:一个帮助用户撰写新年祝福文案的人情事故大模型
- 中小学数学大模型:一个拥有一定数学解题能力的大模型
- 心理大模型:一个治愈的心理大模型
- 工具调用类项目:结合 Lagent 构建数据集训练 InternLM 模型,支持对 MMYOLO 等工具的调用
其他基于书生·浦语工具链的小项目都在范围内,欢迎大家充分发挥想象力。
如何学习大模型
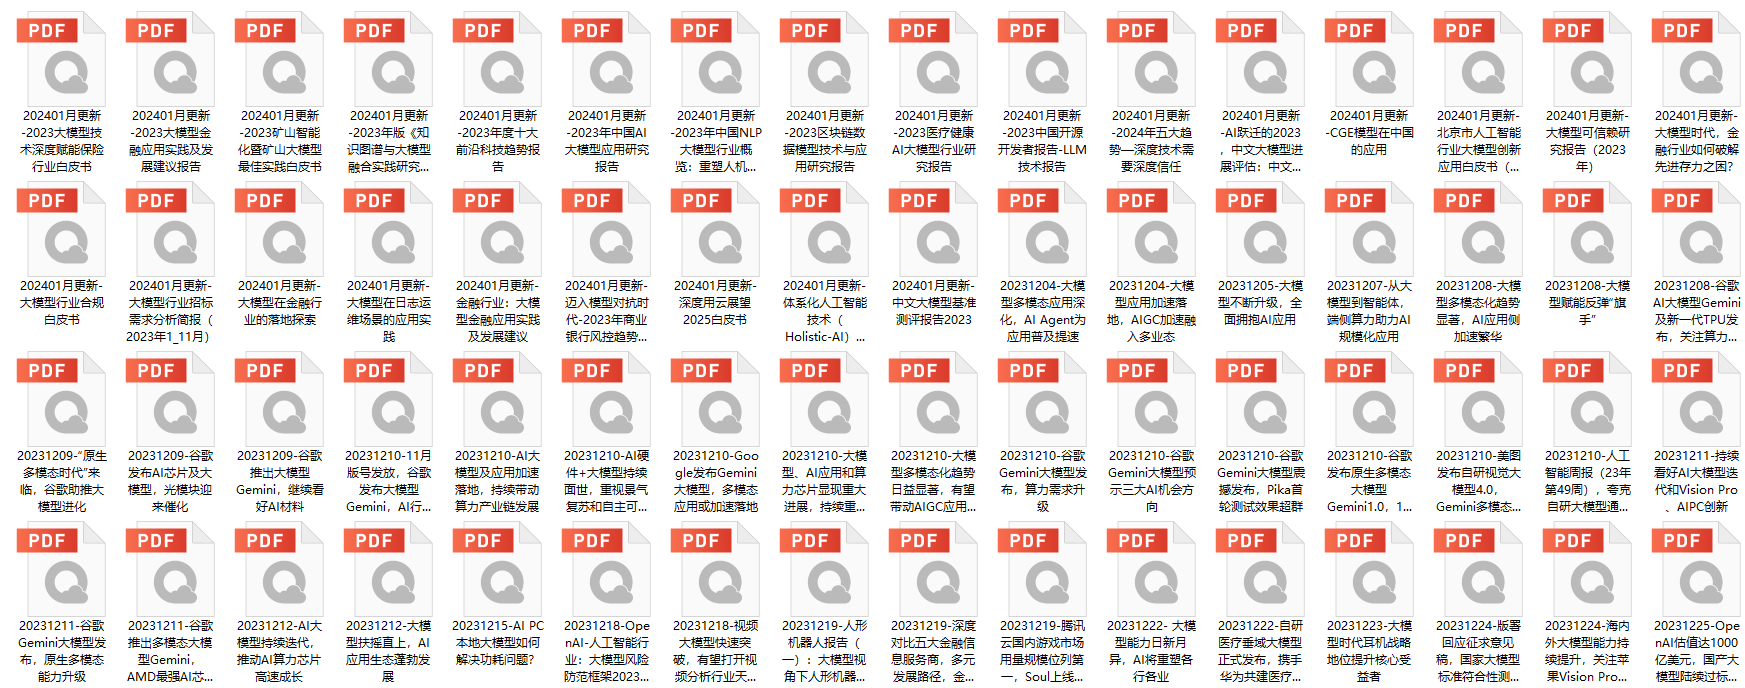
下面这些都是我当初辛苦整理和花钱购买的资料,现在我已将重要的AI大模型资料包括市面上AI大模型各大白皮书、AGI大模型系统学习路线、AI大模型视频教程、实战学习,等录播视频免费分享出来,需要的小伙伴可以扫取。

现在社会上大模型越来越普及了,已经有很多人都想往这里面扎,但是却找不到适合的方法去学习。
作为一名资深码农,初入大模型时也吃了很多亏,踩了无数坑。现在我想把我的经验和知识分享给你们,帮助你们学习AI大模型,能够解决你们学习中的困难。
下面这些都是我当初辛苦整理和花钱购买的资料,现在我已将重要的AI大模型资料包括市面上AI大模型各大白皮书、AGI大模型系统学习路线、AI大模型视频教程、实战学习,等录播视频免费分享出来,需要的小伙伴可以扫取。
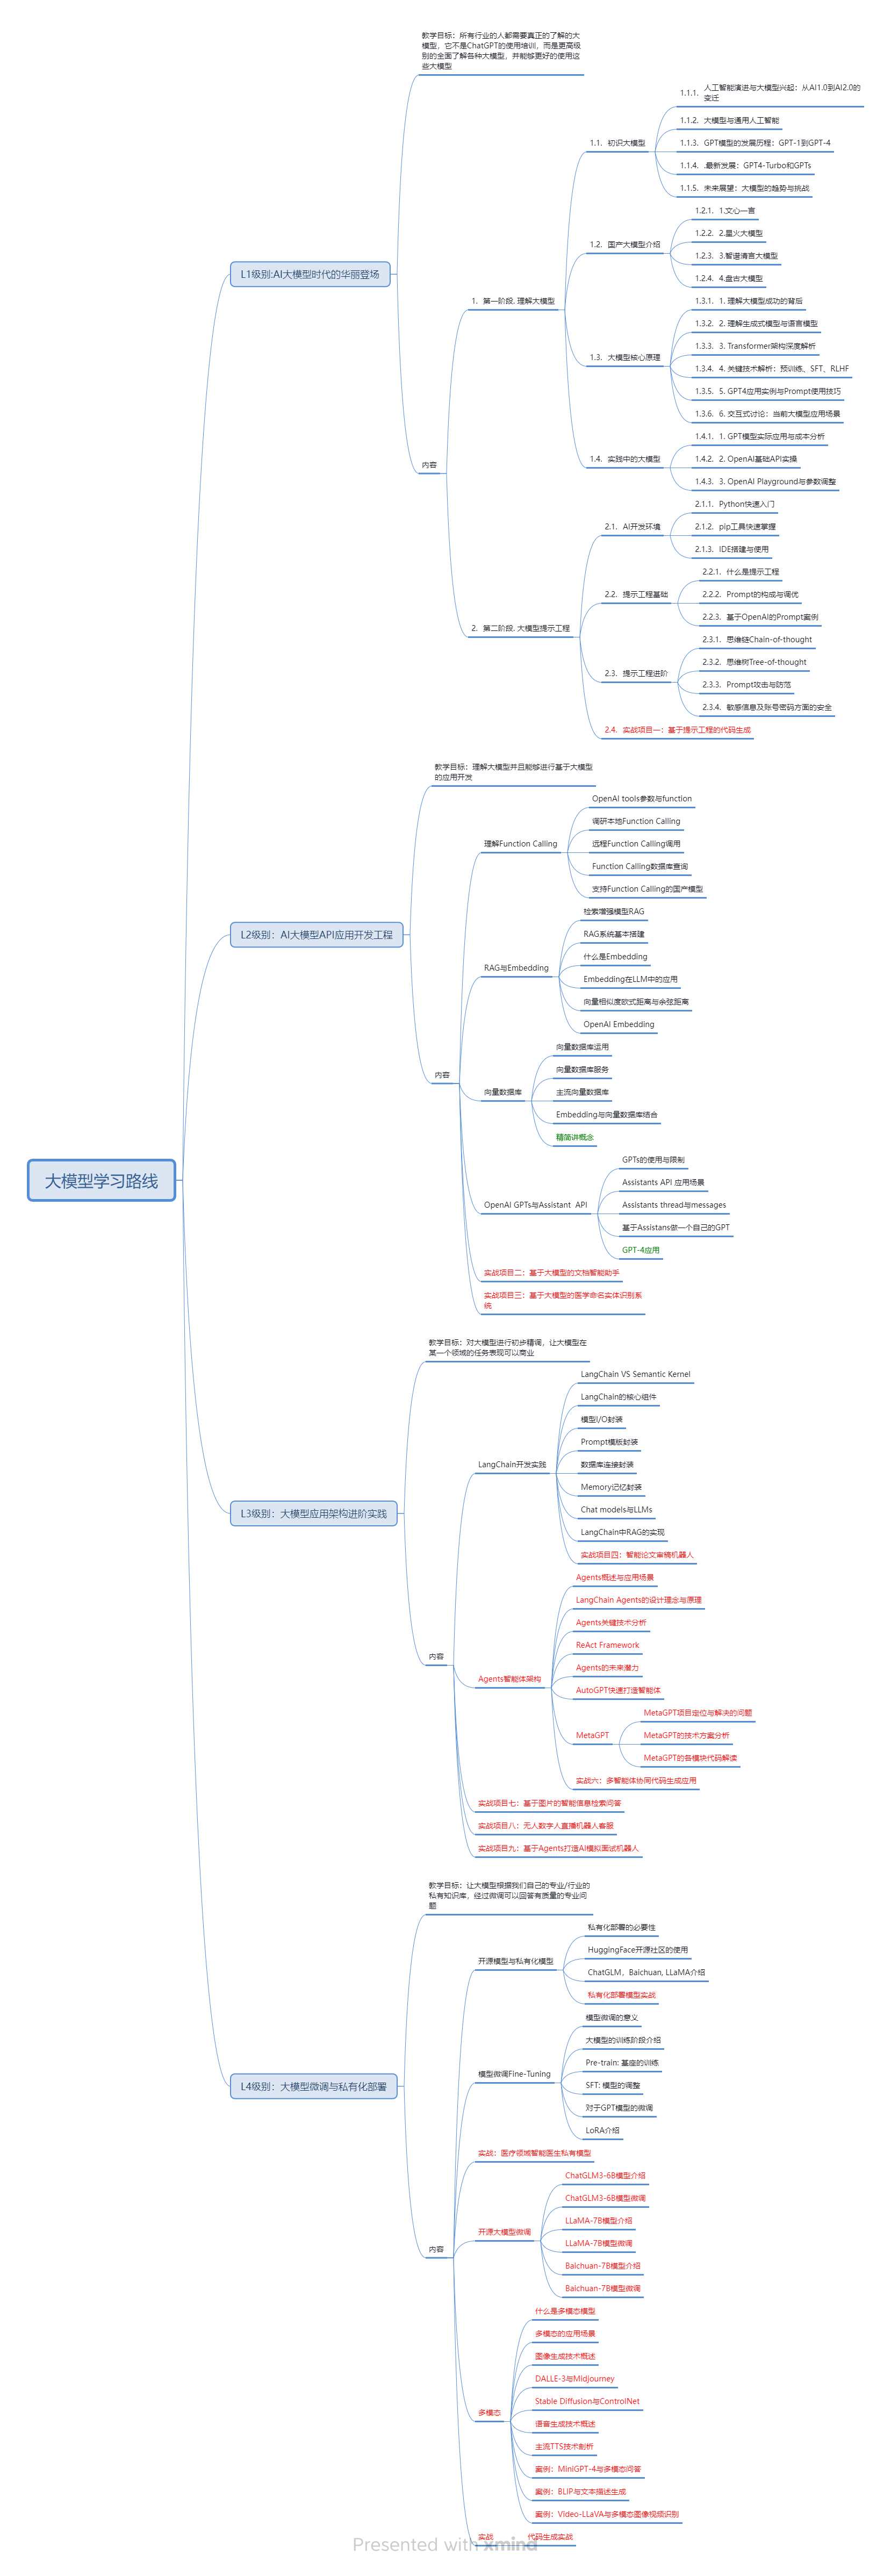
一、AGI大模型系统学习路线
很多人学习大模型的时候没有方向,东学一点西学一点,像只无头苍蝇乱撞,我下面分享的这个学习路线希望能够帮助到你们学习AI大模型。
二、AI大模型视频教程
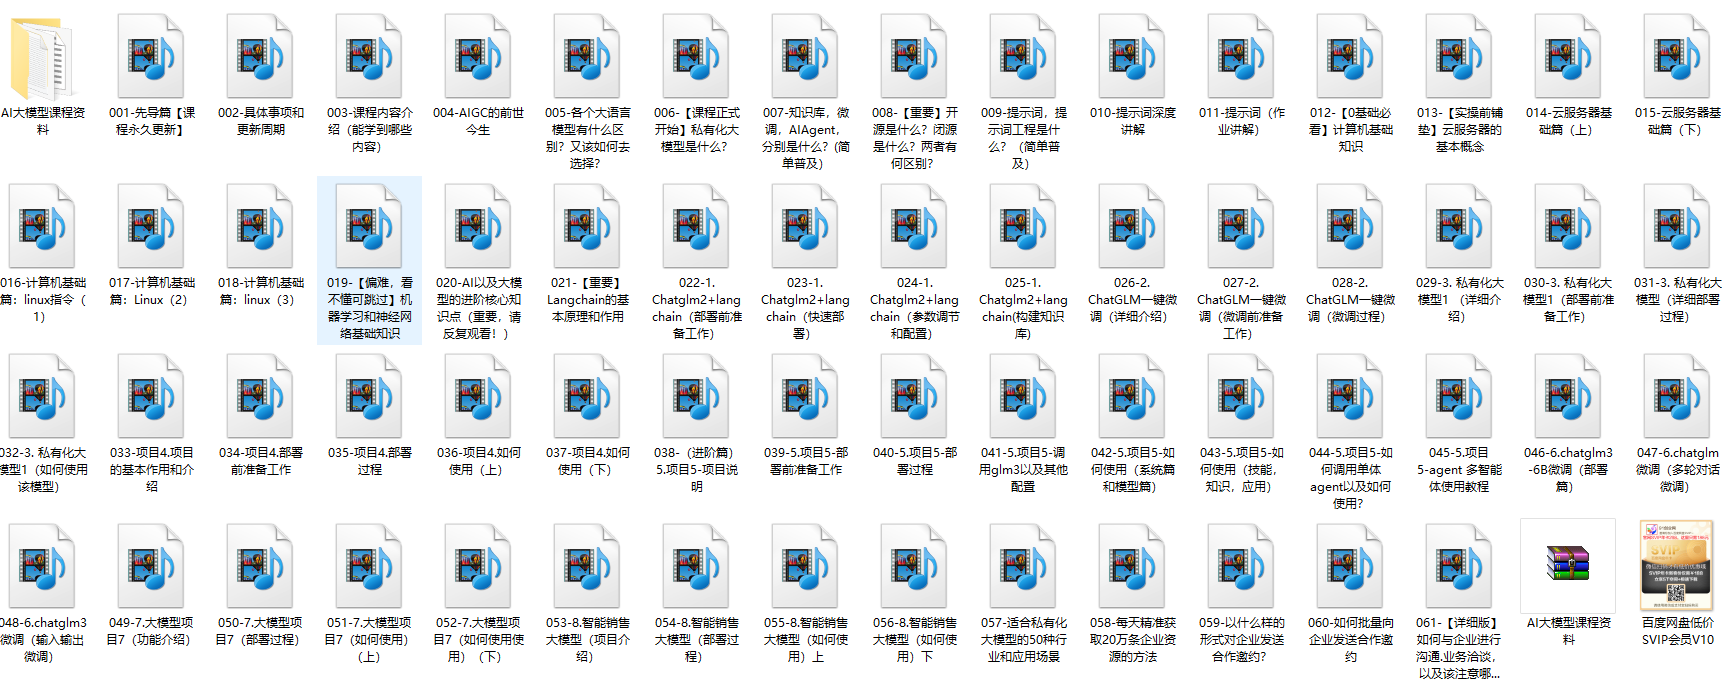
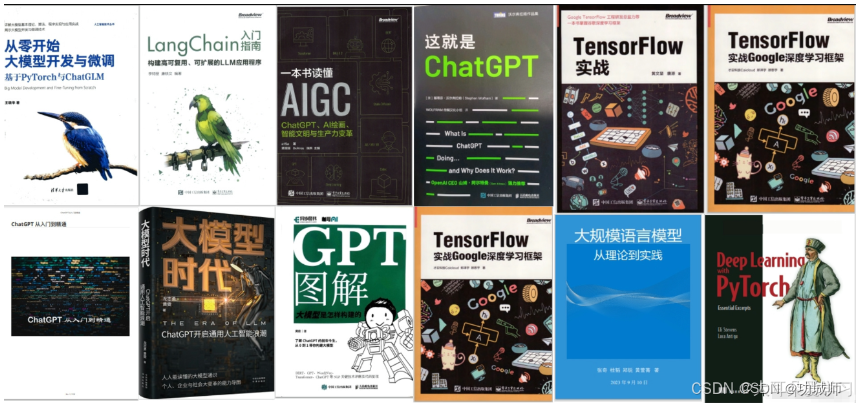
三、AI大模型各大学习书籍!
四、AI大模型各大场景实战案例
五、AI大模型面试题库

👉学会后的收获:👈
• 基于大模型全栈工程实现(前端、后端、产品经理、设计、数据分析等),通过这门课可获得不同能力;
• 能够利用大模型解决相关实际项目需求: 大数据时代,越来越多的企业和机构需要处理海量数据,利用大模型技术可以更好地处理这些数据,提高数据分析和决策的准确性。因此,掌握大模型应用开发技能,可以让程序员更好地应对实际项目需求;
• 基于大模型和企业数据AI应用开发,实现大模型理论、掌握GPU算力、硬件、LangChain开发框架和项目实战技能, 学会Fine-tuning垂直训练大模型(数据准备、数据蒸馏、大模型部署)一站式掌握;
• 能够完成时下热门大模型垂直领域模型训练能力,提高程序员的编码能力: 大模型应用开发需要掌握机器学习算法、深度学习框架等技术,这些技术的掌握可以提高程序员的编码能力和分析能力,让程序员更加熟练地编写高质量的代码。
👉 福利来袭优快云大礼包:《2025最全AI大模型学习资源包》免费分享,安全可点 👈
五、结束语
学习AI大模型是当前科技发展的趋势,它不仅能够为我们提供更多的机会和挑战,还能够让我们更好地理解和应用人工智能技术。通过学习AI大模型,我们可以深入了解深度学习、神经网络等核心概念,并将其应用于自然语言处理、计算机视觉、语音识别等领域。同时,掌握AI大模型还能够为我们的职业发展增添竞争力,成为未来技术领域的领导者。
再者,学习AI大模型也能为我们自己创造更多的价值,提供更多的岗位以及副业创收,让自己的生活更上一层楼。
因此,学习AI大模型是一项有前景且值得投入的时间和精力的重要选择。


 1380
1380

 被折叠的 条评论
为什么被折叠?
被折叠的 条评论
为什么被折叠?
 到【灌水乐园】发言


