MyBatis Plus菜鸟快速上手

【MybatisPlus】快速入门 MybatisPlus快速入门、常用注解及常见配置,五分钟带你学会MybatisPlus! 阅读详情

MyBatis Plus

国产的开源框架,基于MyBatis

核心功能就是简化MyBatis的开发,提高效率。

MyBatis Plus快速上手

1.创建springboot工程

2.导入mybatisplus的依赖

		<dependency>
            <groupId>com.baomidou</groupId>
            <artifactId>mybatis-plus-boot-starter</artifactId>
            <version>3.3.1.tmp</version>
        </dependency>

        <dependency>
            <groupId>com.baomidou</groupId>
            <artifactId>mybatis-plus-generator</artifactId>
            <version>3.3.1.tmp</version>
        </dependency>

3.创建实体类Users(你自己定一个比较简单的表)

package com.bdh.mybatisplustest.entity;

import lombok.AllArgsConstructor;
import lombok.Data;
import lombok.NoArgsConstructor;

@Data
@AllArgsConstructor
@NoArgsConstructor
public class Users {
    private Integer id;
    private String username;
    private Integer password;
}

4.创建Mapper接口

package com.bdh.mybatisplustest.mapper;

import com.baomidou.mybatisplus.core.mapper.BaseMapper;
import com.bdh.mybatispulstest.entity.Users;

//注入到mybatis-puls
public interface  UserMapper extends BaseMapper<Users> {

}

5.在启动类上加上MyatispulstestApplication上添加上注解*@MapperScan(“com.xxx.xxx.mapper”)*,否则无法加载Mapper bean。

package com.bdh.mybatisplustest;

import org.mybatis.spring.annotation.MapperScan;
import org.springframework.boot.SpringApplication;
import org.springframework.boot.autoconfigure.SpringBootApplication;

@SpringBootApplication
@MapperScan("com.bdh.myatispulstest.mapper")
public class MyatispulstestApplication {

    public static void main(String[] args) {
        SpringApplication.run(MyatispulstestApplication.class, args);
    }

}

6.创建一个springboot测试

package com.bdh.mybatisplustest.mapper;

import org.junit.jupiter.api.Test;
import org.springframework.beans.factory.annotation.Autowired;
import org.springframework.boot.test.context.SpringBootTest;

@SpringBootTest
class UserMapperTest {
    @Autowired
    private UserMapper mapper;

    @Test
    void test(){
        mapper.selectList(null).forEach(System.out::println);
    }
}

常用注解

@TableName(value = "xxxx")

映射数据库的表名

package com.bdh.mybatisplustest.entity;

import com.baomidou.mybatisplus.annotation.TableName;
import lombok.AllArgsConstructor;
import lombok.Data;
import lombok.NoArgsConstructor;

@Data
@AllArgsConstructor
@NoArgsConstructor
@TableName(value = "users")
public class TestName {
    private Integer id;
    private String username;
    private Integer password;
}

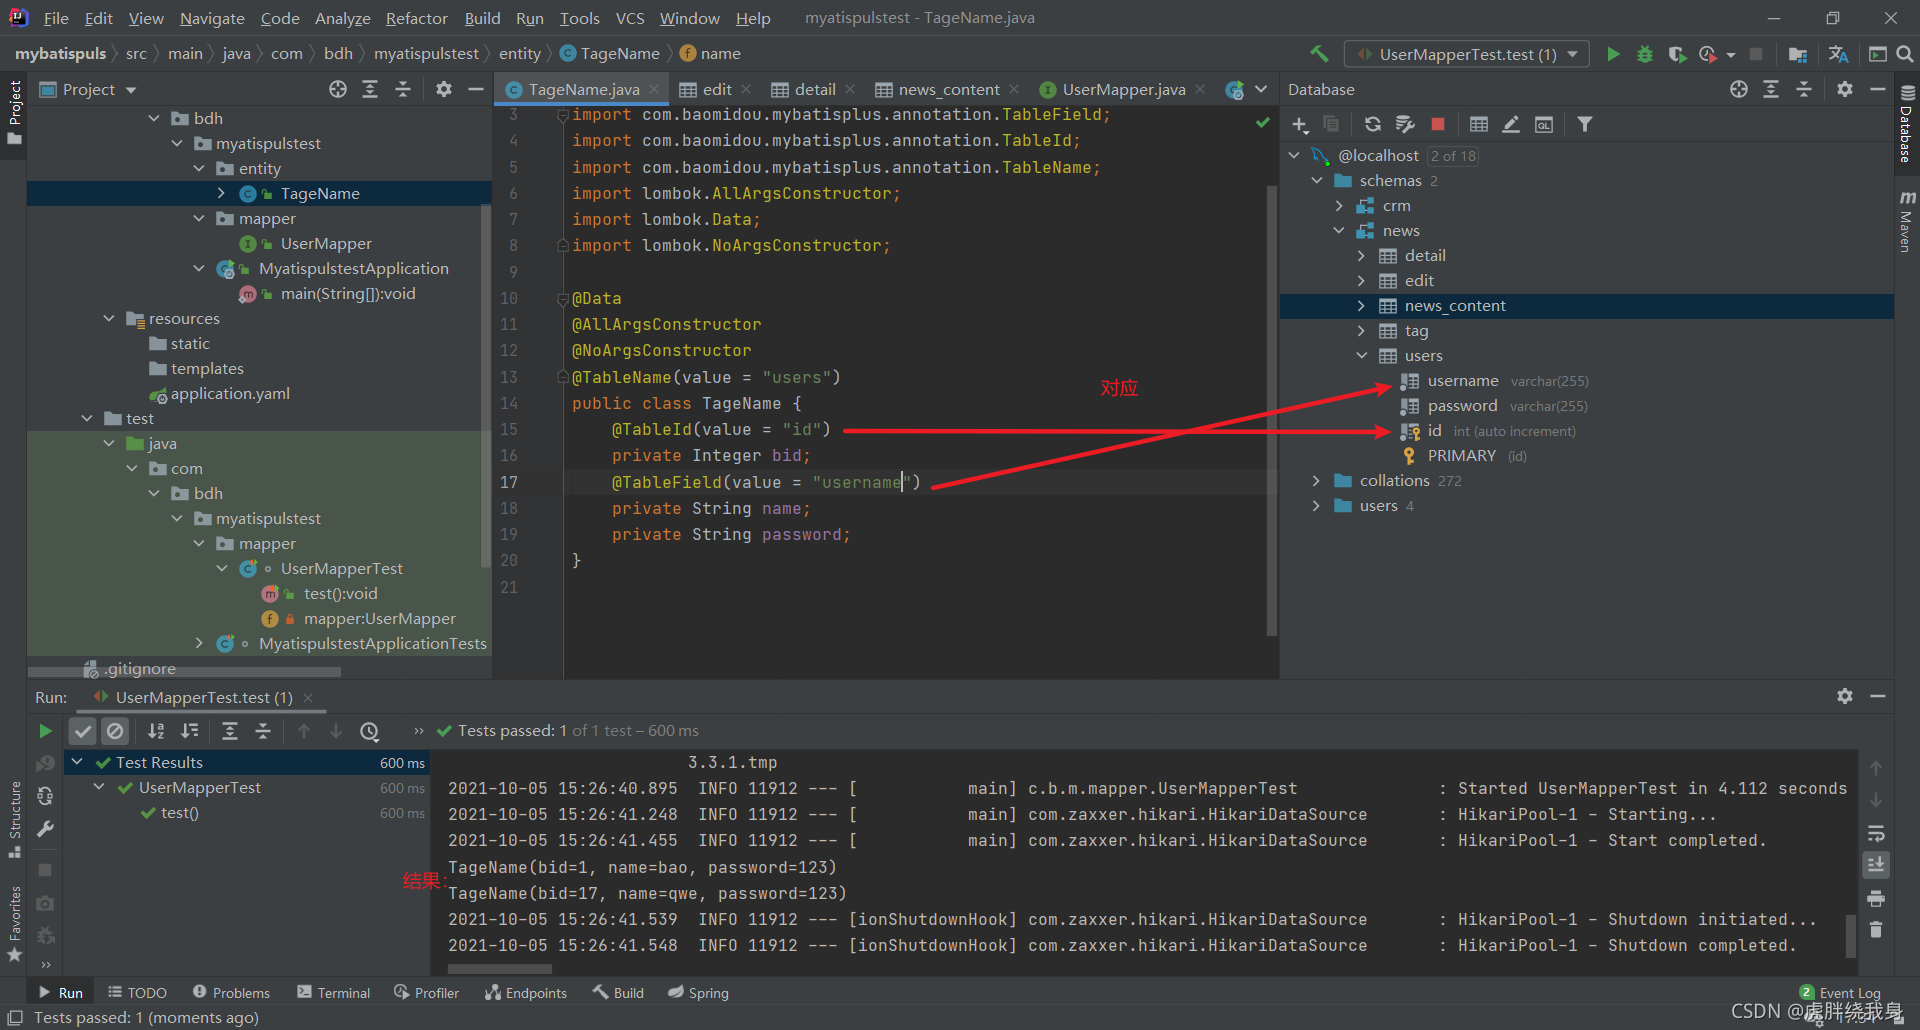
*@TableId(value = “xxxx”)和@TableField(value = “xxxx”)*的区别

@TableId(value = “xxxx”)特指主键上的修改。所以我在图片上改的就是主键字段 type属性设置主键类型,主键生成策略

@TableField(value = “xxxx”)主要修改非主键的字段如图,exist表示是否为数据库字段,select表示是否要查询某个字段,fill表示是否自动填充
在这里插入图片描述

@TableId(type= “xxxx”)中的 type属性下有那些需要了解的

AUTO(0),
NONE(1),
INPUT(2),
ASSIGN_ID(3),
ASSIGN_UUID(4),
//后3个以及被淘汰,当然你想玩也可以用
/** @deprecated */
@Deprecated
ID_WORKER(3),
/** @deprecated */
@Deprecated
ID_WORKER_STR(3),
/** @deprecated */
@Deprecated
UUID(4);
描述值
数据库自增AUTO
MP(mybatis plus)(默认使用) set主键,雪花算法实现NONE
需要开发者手动赋值INPUT
MP 分配ID,主键类型:Long,integer,stringASSIGN_ID
分配UUID,主键类型:StringASSIGN_UUID

AUTO字面意思就是自增且自增大于手动赋值。

NONE这个属性中雪花算法中的id值非常的大,如果使用这个需要对数据库字段的长度和属性进行修改,实体也是如此。

INPUT属性如果你没用主动的设置id值那么数据库会自增其中一个数来填补其中的值。

ASSIGN_ID如默认一样都是使用雪花算法进行注入的。

ASSIGN_UUID属性赋值必须是String类型,且会生成UUID这个字符串,进行赋值#

@TableField(exits= “false”) 中的exits属性用法和作用

exits判断是否是数据库中的字段如果不是false如果是true,如果实体类中没有所对应的字段那么我们则可以使用exits,VO,DTO。

@TableField(fill = “DEFAULT”) 中的exits属性用法和作用

fill表示是否自动填充,将对象存入到数据库中,如时间等信息

public enum FieldFill {
    //字面意思
    DEFAULT,
    INSERT,
    UPDATE,
    INSERT_UPDATE;

    private FieldFill() {
    }
}

1.给需要添加的自动填充的字段加fill

package com.bdh.myatisplustest.entity;

import com.baomidou.mybatisplus.annotation.*;
import lombok.AllArgsConstructor;
import lombok.Data;
import lombok.NoArgsConstructor;

@Data
@AllArgsConstructor
@NoArgsConstructor
@TableName(value = "users")
public class TageName {
    @TableId(value = "id",type = IdType.INPUT)
    private Integer bid;
    @TableField(value = "username")
    private String name;
    private String password;
    @TableField(exist = false)
    private String test;
    @TableField(fill = FieldFill.INSERT)
    private Data createTime;
    @TableField(fill = FieldFill.INSERT_UPDATE)
    private Data updateTime;

}

2.创建handler配置类

package com.bdh.myatispulstest.handler;

import com.baomidou.mybatisplus.core.handlers.MetaObjectHandler;
import org.apache.ibatis.reflection.MetaObject;
import org.springframework.stereotype.Component;

import java.util.Date;

@Component
public class MyMetaObjectHandler implements MetaObjectHandler {
    @Override
    public void insertFill(MetaObject metaObject) {
        this.setFieldValByName("createTime",new Date(),metaObject);
        this.setFieldValByName("updateTime",new Date(),metaObject);
    }

    @Override
    public void updateFill(MetaObject metaObject) {
        this.setFieldValByName("updateTime",new Date(),metaObject);

    }
}

3.进行测试

在这里插入图片描述

@version MyBatis-plus乐观锁的注解

这个注解我就不讲了,如果你多线程基础扎实那么自然很简单如果不行那这个就比较难了。当然使用和原理我会简单的说出来例如

update xxxx 后version在MP下会进行版本的改变如版本1在我们修改某个数据后版本变成2,同时另一个兄弟也正好修改和你相同的字段那么因为你先修改这个字段,他的版本在你修改完一瞬间就已经是2了。那么那位好兄弟因为版本变成2而执行错误(一般就是不执行逻辑不成立)。大概就是这样

用法就是

1.添加注解

import com.baomidou.mybatisplus.annotation.*;
import lombok.AllArgsConstructor;
import lombok.Data;
import lombok.NoArgsConstructor;

import java.util.Date;

@Data
@AllArgsConstructor
@NoArgsConstructor
@TableName(value = "users")
public class TageName {
    @TableId(value = "id",type = IdType.INPUT)
    private Integer bid;
    @TableField(value = "username")
    private String name;
    private String password;
    @TableField(value = "createTime",fill = FieldFill.INSERT)
    private Date createTime;
    @TableField(value = "updateTime",fill = FieldFill.INSERT_UPDATE)
    private Date updateTime;
    @Version
    private int version;

}

2.编写配置类

package com.bdh.myatispulstest.config;

import com.baomidou.mybatisplus.extension.plugins.OptimisticLockerInterceptor;
import org.springframework.context.annotation.Configuration;

@Configuration
public class MyBatisPlusConfig {

    public OptimisticLockerInterceptor optimisticLockerInterceptor(){
        return new OptimisticLockerInterceptor();
    }
}

3.测试成功

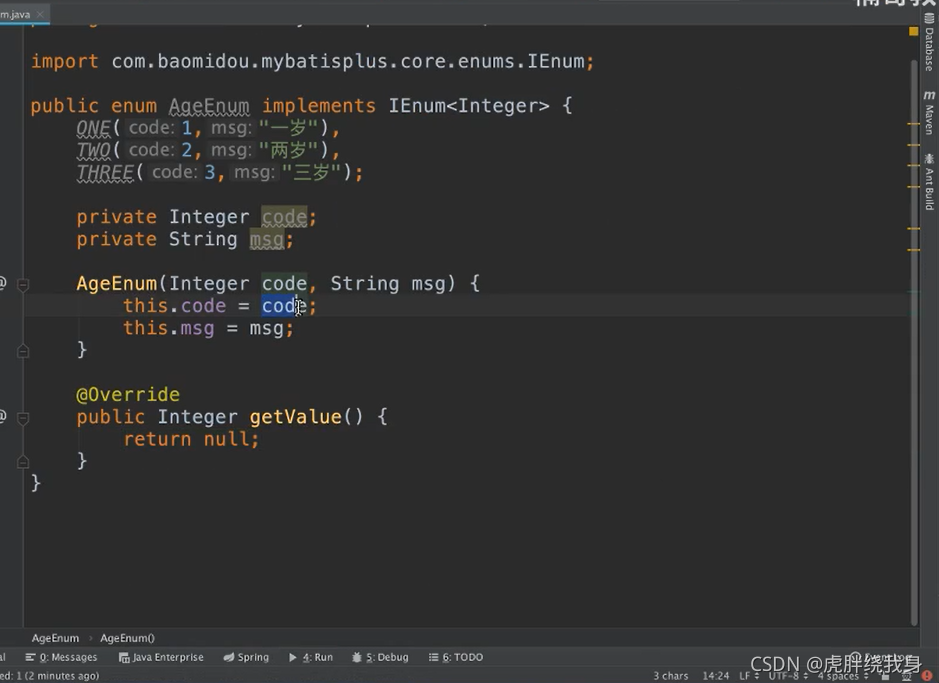
@EnumValue枚举操作和普通的枚举没什么区别。主要是二种实现一个是接口实现另一个是配置实现

配置实现:

package com.bdh.myatispulstest.enums;

import com.baomidou.mybatisplus.annotation.EnumValue;

public enum StatusEnum {
    Test1(0,"成功"),
    Test2(1,"success");


    StatusEnum(Integer code, String msg) {
        this.code = code;
        this.msg = msg;
    }

    @EnumValue
    private Integer code;
    private String msg;

}

接口实现:
在这里插入图片描述

这里就不敲一大堆这东西你随便借鉴一下别人的就可以了

umValue;

public enum StatusEnum {
Test1(0,“成功”),
Test2(1,“success”);

StatusEnum(Integer code, String msg) {
    this.code = code;
    this.msg = msg;
}

@EnumValue
private Integer code;
private String msg;

}

MyBatis-Plus快速入门 Component//插入数据时填充@Override//更新数据时填充@Override。 阅读详情

相关推荐

Mybatis-plus使用教程

注意点:我们在主启动类上需要扫描我们持久层文件下的所以接口。

weixin_57197500的博客 1118

2025软考网络工程师--基础知识精讲视频

对软考网络工程师教材进行了详细解析,通过对考查知识点的细致讲解,让考生掌握解题思路和方法,做到举一反三,事半功倍。小任老师帮你把握考试重点,用短的时间,让你学到应该掌握的软考网络工程师内容。

Spring Boot(快速上手)

MyBatis是一款优秀的数据持久ORM框架,被广泛地应用于系统,MyBatis 能够非常灵活地实现动态 SQL,可以使用 XML 或 注解 来配置和映射原生信息,能够轻松地将 JAVA 的 POJO(Plain Ordinary Java Object,普通的Java对象)与数据库中的表和字段进行映射关联。RESTFUL 的特点:资源的表现形式是JSON或者HTML,客户端与服务端之间的交互在请求之间是无状态的,从客户端到服务端的每个请求都包含必须的信息。

旺旺小崔崔的博客 1373

血腥大地-第二季(资源破解与管理)

课程继承游戏内容1.主要完成游戏资源的获取,从原血腥大地游戏中获取(不涉及任何商业利益,不能将游戏资源用于其他商业游戏).2.游戏资源的整理以及优化3.游戏纹理资源打包工具的制作4.游戏字体资源打包制作工具

1、MybatisPlus快速入门

为了简化单表CRUD,MybatisPlus提供了一个基础的BaseMapper接口,其中已经实现了单表的CRUD:因此我们自定义的Mapper只要实现了这个BaseMapper,就无需自己实现单表CRUD了。修改mp-demo中的包下的UserMapper接口,让其继承BaseMapper。

weixin_74397083的博客 1910

xxxx.rar_tube24XXXX_数码管动态显示

数码管显示一般分静态显示及动态显示两种驱动方式,静态显示占用口线比较多,本文介绍的是如何实现数码管动态显示,应该说数码管动态显示是单片机外部指令输出的重要途径,因此如何设计数码管以及数码管的工作原理、数码管显示的方法、数码管显示的抗干扰设计等在单片机系统设计中占有重要地位。这个例子在系统硬件的基础上设计了软件查询程序、软件延时程序(防止干扰),大致讲述了一种数码管动态显示的工作原理与读取方式。

MyBatis-Plus 从零开始快速上手(超清晰教程)

✅ MyBatis-Plus 是什么? “在 MyBatis 上做增强,不改变现有 MyBatis 项目结构,专注 CRUD。” 一句话总结:**不用写 XML,只继承一个接口,CRUD 自动生成。

qq_62396172的博客 203

logisim实验六:MIPS运算器设计

实验目的 学生理解算术逻辑运算单元(ALU)的基本构成,掌握 Logisim 中各种运算组件的使用方法,熟悉多路选择器的使用,能利用前述实验完成的 32 位加法器、 Logisim 中的运算组件构造指定规格的 ALU 单元。 设计要求 利用前面实验封装好的 32 位加法器以及 logisim 平台中现有运算部件构建一个 32 位算术逻辑运算单元(禁用 Logisim 系统自带的加法器,减法器),可支持算术加、减、乘、除,逻辑与、或、非、异或运算、逻辑左移、逻辑右移、算术右移运算,支持常用程序状态标志(有符号

gyp0205的博客 2万+

菜鸟从0学微服务——MyBatis-Plus

针对有编程基础,开始学习微服务的同学,我们陆续推出从0学微服务的笔记分享。力求从各个中间件的使用来反思这些中间件的作用和优势。 会分享的比较快,会记录demo演算和中间件的使用过程,至于细节的理论知识请自主查阅相关资料并学习。满是干货,注意查收。 本期我们开始学习MyBatis-Plus。

laolitou_1024的博客 1474

华三(H3C)网络设备配置命令大全与学习指南

本文全面介绍 H3C 网络设备的配置命令,涵盖路由器、交换机、ACL、NAT、VTY、SSH、本地用户、日志、STP、防火墙、QoS 等模块,适合网络工程初学者与运维人员参考。

DreamCollector的博客 6575

【ANSYS Workbench仿真】命令流:压力渗透pressure penetration

对与流体接触的part添加边界压力,使流体压力渗透点的接触应力与流体压力相等,以便得到真实的变形结果,就需要用到“pressure penetration”。 但是在ansys中,只能通过ADPL的形式添加,即在workbench中添加命令流的形式。此文主要介绍了**压力渗透的添加要点**和**命令流使用说明**。

路边小M's Blog 1万+

【MybatisPlus快速入门】—— 基础入门

通过MyBaits框架引出我们的MyBaitsPlus框架,介绍了简单的相关用法

欢迎来到我的世界 1164

Windows11上CUDA 12.3配PyTorch踩坑记:一条官网命令救了我的GPU加速

本文详细介绍了在Windows 11上配置CUDA 12.3与PyTorch的完整指南,包括环境准备、安装要点、兼容性解决方案和性能验证。通过官方推荐的conda命令和实用技巧,帮助开发者解决常见问题,实现高效的GPU加速,提升深度学习开发效率。

weixin_42528974的博客 109

Mybatis-Plus快速入门

MyBatis-Plus 是一个增强版的 MyBatis 框架,提供了更便捷的 CRUD 操作和丰富的功能。本文快速入门指南涵盖了基础环境配置、核心概念与组件、查询方法、增删改操作、分页插件配置以及进阶技巧。通过添加 Maven 依赖、配置数据源、使用注解定义实体类和 Mapper 接口,开发者可以快速上手。MyBatis-Plus 提供了强大的条件构造器、分页查询、逻辑删除等功能,并支持动态条件查询和自定义 SQL。

m0_74089057的博客 1292

Anomalib实战指南:从零开始构建自定义异常检测数据集

本文提供了一份详细的Anomalib实战指南,指导用户从零开始构建自定义异常检测数据集。文章深入解析了数据准备的核心步骤、目录结构规范,并对比了PatchCore与FastFlow等关键模型的适用场景。通过清晰的代码示例,手把手演示了环境配置、模型训练与推理评估的全流程,旨在帮助开发者快速掌握这一工业视觉异常检测利器,有效解决实际生产中的缺陷识别难题。

weixin_29054245的博客 645

16、二阶差分功耗分析(DPA)的再审视

本文深入探讨了二阶差分功耗分析(DPA)中的关键问题,包括不同组合函数的性能、信息论分析以及在有轮廓和无轮廓攻击场景下的实验结果。通过对掩码AES和DES的模拟和实际攻击实验,研究了归一化乘积、求和和绝对差值等组合函数在不同噪声水平下的效率,并强调了信息论分析在评估侧信道对抗措施中的重要性。

leaf8的博客 120

Mybatis-plus——1

为了简化单表CRUD,MybatisPlus提供了一个基础的。

m0_73941339的博客 1707

把 sy-* 带进 ABAP CDS:ABAP 7.50 里的环境信息新姿势($session 与 @Environment.systemField 实战)

摘要:ABAP 7.50在CDS视图中引入两种获取环境信息的方式:1)直接使用$session会话变量读取用户、客户端和系统语言;2)通过@Environment.systemField注解参数,由Open SQL自动注入系统字段。$session方式简单但依赖Open SQL访问路径,非ABAP环境下可能失效;注解参数方案更工程化,依赖关系明确且支持测试。建议ABAP体系内优先使用$session,对外接口采用参数化方案。两种方式各有适用场景,正确选择可避免潜在风险。(148字)

2007 年 ~ 2025 年,深耕 SAP 技术 18 年 156

Mybatis-Plus入门教程详解

官网地址:https://baomidou.com下面介绍Lombok常用的几个注解: @Getter / @Setter@ToString@EqualsAndHashCode@NoArgsConstructor @RequiredArgsConstructor @AllArgsConstructor@Data 2.4 Mybatis-Plus中的条件构造器 QueryWrapper中重要方法总结如下:有以下场景: 三、代码生成器(旧) 在pom.xml文件中加入以下依赖 CodeGenarator代码..

qq_44723773的博客 4346

Docker(八):Docker Compose(容器编排) 管理多容器应用—实战案例演示

🟢 Docker(八):Docker Compose(容器编排) 管理多容器应用—实战案例演示

✨ 欢迎来到【Seal ^_^ 的优快云博客】!✨ 6万+

深度学习工具包 DeepLearningToolbox

深度学习工具包Deprecation notice.-----This toolbox is outdated and no longer maintained.There are much better tools available for deep learning than this toolbox, e.g. [Theano](http://deeplearning.net/software/theano/), [torch](http://torch.ch/) or [tensorflow](http://www.tensorflow.org/)I would suggest you use one of the tools mentioned above rather than use this toolbox.Best, Rasmus.DeepLearnToolbox================A Matlab toolbox for Deep Learning.Deep Learning is a new subfield of machine learning that focuses on learning deep hierarchical models of data.It is inspired by the human brain's apparent deep (layered, hierarchical) architecture.A good overview of the theory of Deep Learning theory is[Learning Deep Architectures for AI](http://www.iro.umontreal.ca/~bengioy/papers/ftml_book.pdf)For a more informal introduction, see the following videos by Geoffrey Hinton and Andrew Ng.* [The Next Generation of Neural Networks](http://www.youtube.com/watch?v=AyzOUbkUf3M) (Hinton, 2007)* [Recent Developments in Deep Learning](http://www.youtube.com/watch?v=VdIURAu1-aU) (Hinton, 2010)* [Unsupervised Feature Learning and Deep Learning](http://www.youtube.com/watch?v=ZmNOAtZIgIk) (Ng, 2011)If you use this toolbox in your research please cite [Prediction as a candidate for learning deep hierarchical models of data](http://www2.imm.dtu.dk/pubdb/views/publication_details.php?id=6284)```@MASTERSTHESIS\{IMM2012-06284, author = "R. B. Palm", title = "Prediction as a candidate for learning deep hierarchical models of data", year = "2012",}```Contact: rasmusbergpalm at gmail dot comDirectories included in the toolbox-----------------------------------`NN/` - A library for Feedforward Backpropagation Neural Networks`CNN/` - A library for Convolutional Neural Networks`DBN/` - A library for Deep Belief Networks`SAE/` - A library for Stacked Auto-Encoders`CAE/` - A library for Convolutional Auto-Encoders`util/` - Utility functions used by the libraries`data/` - Data used by the examples`tests/` - unit tests to verify toolbox is workingFor references on each library check REFS.mdSetup-----1. Download.2. addpath(genpath('DeepLearnToolbox'));Example: Deep Belief Network---------------------```matlabfunction test_example_DBNload mnist_uint8;train_x = double(train_x) / 255;test_x = double(test_x) / 255;train_y = double(train_y);test_y = double(test_y);%% ex1 train a 100 hidden unit RBM and visualize its weightsrand('state',0)dbn.sizes = [100];opts.numepochs = 1;opts.batchsize = 100;opts.momentum = 0;opts.alpha = 1;dbn = dbnsetup(dbn, train_x, opts);dbn = dbntrain(dbn, train_x, opts);figure; visualize(dbn.rbm{1}.W'); % Visualize the RBM weights%% ex2 train a 100-100 hidden unit DBN and use its weights to initialize a NNrand('state',0)%train dbndbn.sizes = [100 100];opts.numepochs = 1;opts.batchsize = 100;opts.momentum = 0;opts.alpha = 1;dbn = dbnsetup(dbn, train_x, opts);dbn = dbntrain(dbn, train_x, opts);%unfold dbn to nnnn = dbnunfoldtonn(dbn, 10);nn.activation_function = 'sigm';%train nnopts.numepochs = 1;opts.batchsize = 100;nn = nntrain(nn, train_x, train_y, opts);[er, bad] = nntest(nn, test_x, test_y);assert(er < 0.10, 'Too big error');```Example: Stacked Auto-Encoders---------------------```matlabfunction test_example_SAEload mnist_uint8;train_x = double(train_x)/255;test_x = double(test_x)/255;train_y = double(train_y);test_y = double(test_y);%% ex1 train a 100 hidden unit SDAE and use it to initialize a FFNN% Setup and train a stacked denoising autoencoder (SDAE)rand('state',0)sae = saesetup([784 100]);sae.ae{1}.activation_function = 'sigm';sae.ae{1}.learningRate = 1;sae.ae{1}.inputZeroMaskedFraction = 0.5;opts.numepochs = 1;opts.batchsize = 100;sae = saetrain(sae, train_x, opts);visualize(sae.ae{1}.W{1}(:,2:end)')% Use the SDAE to initialize a FFNNnn = nnsetup([784 100 10]);nn.activation_function = 'sigm';nn.learningRate = 1;nn.W{1} = sae.ae{1}.W{1};% Train the FFNNopts.numepochs = 1;opts.batchsize = 100;nn = nntrain(nn, train_x, train_y, opts);[er, bad] = nntest(nn, test_x, test_y);assert(er < 0.16, 'Too big error');```Example: Convolutional Neural Nets---------------------```matlabfunction test_example_CNNload mnist_uint8;train_x = double(reshape(train_x',28,28,60000))/255;test_x = double(reshape(test_x',28,28,10000))/255;train_y = double(train_y');test_y = double(test_y');%% ex1 Train a 6c-2s-12c-2s Convolutional neural network %will run 1 epoch in about 200 second and get around 11% error. %With 100 epochs you'll get around 1.2% errorrand('state',0)cnn.layers = { struct('type', 'i') %input layer struct('type', 'c', 'outputmaps', 6, 'kernelsize', 5) %convolution layer struct('type', 's', 'scale', 2) %sub sampling layer struct('type', 'c', 'outputmaps', 12, 'kernelsize', 5) %convolution layer struct('type', 's', 'scale', 2) %subsampling layer};cnn = cnnsetup(cnn, train_x, train_y);opts.alpha = 1;opts.batchsize = 50;opts.numepochs = 1;cnn = cnntrain(cnn, train_x, train_y, opts);[er, bad] = cnntest(cnn, test_x, test_y);%plot mean squared errorfigure; plot(cnn.rL);assert(er<0.12, 'Too big error');```Example: Neural Networks---------------------```matlabfunction test_example_NNload mnist_uint8;train_x = double(train_x) / 255;test_x = double(test_x) / 255;train_y = double(train_y);test_y = double(test_y);% normalize[train_x, mu, sigma] = zscore(train_x);test_x = normalize(test_x, mu, sigma);%% ex1 vanilla neural netrand('state',0)nn = nnsetup([784 100 10]);opts.numepochs = 1; % Number of full sweeps through dataopts.batchsize = 100; % Take a mean gradient step over this many samples[nn, L] = nntrain(nn, train_x, train_y, opts);[er, bad] = nntest(nn, test_x, test_y);assert(er < 0.08, 'Too big error');%% ex2 neural net with L2 weight decayrand('state',0)nn = nnsetup([784 100 10]);nn.weightPenaltyL2 = 1e-4; % L2 weight decayopts.numepochs = 1; % Number of full sweeps through dataopts.batchsize = 100; % Take a mean gradient step over this many samplesnn = nntrain(nn, train_x, train_y, opts);[er, bad] = nntest(nn, test_x, test_y);assert(er < 0.1, 'Too big error');%% ex3 neural net with dropoutrand('state',0)nn = nnsetup([784 100 10]);nn.dropoutFraction = 0.5; % Dropout fraction opts.numepochs = 1; % Number of full sweeps through dataopts.batchsize = 100; % Take a mean gradient step over this many samplesnn = nntrain(nn, train_x, train_y, opts);[er, bad] = nntest(nn, test_x, test_y);assert(er < 0.1, 'Too big error');%% ex4 neural net with sigmoid activation functionrand('state',0)nn = nnsetup([784 100 10]);nn.activation_function = 'sigm'; % Sigmoid activation functionnn.learningRate = 1; % Sigm require a lower learning rateopts.numepochs = 1; % Number of full sweeps through dataopts.batchsize = 100; % Take a mean gradient step over this many samplesnn = nntrain(nn, train_x, train_y, opts);[er, bad] = nntest(nn, test_x, test_y);assert(er < 0.1, 'Too big error');%% ex5 plotting functionalityrand('state',0)nn = nnsetup([784 20 10]);opts.numepochs = 5; % Number of full sweeps through datann.output = 'softmax'; % use softmax outputopts.batchsize = 1000; % Take a mean gradient step over this many samplesopts.plot = 1; % enable plottingnn = nntrain(nn, train_x, train_y, opts);[er, bad] = nntest(nn, test_x, test_y);assert(er < 0.1, 'Too big error');%% ex6 neural net with sigmoid activation and plotting of validation and training error% split training data into training and validation datavx = train_x(1:10000,:);tx = train_x(10001:end,:);vy = train_y(1:10000,:);ty = train_y(10001:end,:);rand('state',0)nn = nnsetup([784 20 10]); nn.output = 'softmax'; % use softmax outputopts.numepochs = 5; % Number of full sweeps through dataopts.batchsize = 1000; % Take a mean gradient step over this many samplesopts.plot = 1; % enable plottingnn = nntrain(nn, tx, ty, opts, vx, vy); % nntrain takes validation set as last two arguments (optionally)[er, bad] = nntest(nn, test_x, test_y);assert(er < 0.1, 'Too big error');```[![Bitdeli Badge](https://d2weczhvl823v0.cloudfront.net/rasmusbergpalm/deeplearntoolbox/trend.png)](https://bitdeli.com/free "Bitdeli Badge")

小白必看:5分钟搞懂MyBatis和MyBatis-Plus的区别

作为一个刚接触Java开发的菜鸟,第一次听到MyBatis和MyBatis-Plus时,我也是一头雾水。经过一段时间的学习和实践,我终于搞明白了它们的区别,今天就用最直白的方式分享给大家。它在MyBatis基础上做了增强,提供了很多开箱即用的功能,让开发变得更简单。它是一个优秀的ORM框架,能帮你把Java对象和数据库表映射起来,但很多操作都需要手写SQL语句。总结一下:MyBatis-Plus不是要替代MyBatis,而是让它更好用。上实践MyBatis-Plus项目时,发现它的一键部署功能特别方便。

BlackironPanther23的博客 687

lwip-2.0.3

lwip是瑞典计算机科学院(SICS)的Adam Dunkels 开发的一个小型开源的TCP/IP协议栈。实现的重点是在保持TCP协议主要功能的基础上减少对RAM 的占用。

初次创建mybatis-plus项目(springboot整合mybatis-plus)

初次创建mybatis-plus项目(springboot整合mybatis-plus)

YMYYZ的博客 4631

精雕软件(JDpaint) 5.5 绿色版

精雕软件(JDpaint) 5.5 绿色版精雕软件(JDpaint) 5.5 绿色版精雕软件(JDpaint) 5.5 绿色版

文档:亲测可用解决vnc灰屏,黑屏,鼠标大黑叉情况

主要解决vnc-viewer灰屏,黑屏,鼠标大黑叉等现象,详细见文档。

spring Boot 整合mybatis-plus 使用myBatis-plus中自带的方法 踩坑

在做以下操作前你需要已经配置了数据库 1.在pom.xml 中引入mybatis-plus相关jar 包 &lt;dependency&gt;         &lt;groupId&gt;com.baomidou&lt;/groupId&gt;         &lt;artifactId&gt;mybatis-plus&lt;/artifactId&gt;         &lt;ve...

qq_35822148的博客 1万+

MyBatis-plus最详细的入门使用教程来了

(简称 MP,下文就使用简称啦)是一个MyBatis的增强工具,在 MyBatis 的基础上只做增强不做改变,为简化开发、提高效率而生。无侵入:只做增强不做改变,引入它不会对现有工程产生影响,如丝般顺滑损耗小:启动即会自动注入基本 CURD,性能基本无损耗,直接面向对象操作强大的 CRUD 操作:内置通用 Mapper、通用 Service,仅仅通过少量配置即可实现单表大部分 CRUD 操作,更有强大的条件构造器,满足各类使用需求支持 Lambda 形式调用。

weixin_41821642的博客 943

Mybatis-Plus——01搭建环境、快速入门(新注解、依赖)

【代码】Mybatis-Plus——01搭建环境、快速入门(新注解、依赖)

weixin_42858422的博客 953

第1章 mybatis-plus 快速入门

简介 MyBatis-Plus (opens new window)(简称 MP)是一个 MyBatis (opens new window) 的增强工具,在 MyBatis 的基础上只做增强不做改变,为简化开发、提高效率而生。 特性 无侵入:只做增强不做改变,引入它不会对现有工程产生影响,如丝般顺滑 损耗小:启动即会自动注入基本 CURD,性能基本无损耗,直接面向对象操作 强大的 CRUD 操作:内置通用 Mapper、通用 Service,仅仅通过少量配置即可实现单表大部分..

lye0530的博客 166
上一篇: 如何搭建next和基本next美化
下一篇: MyBatis-plus快速操作CRUD
评论
成就一亿技术人!
拼手气红包6.0元
还能输入1000个字符
 
 条评论被折叠 查看
添加红包

请填写红包祝福语或标题

个

红包个数最小为10个

元

红包金额最低5元

当前余额3.43元 前往充值 >
需支付:10.00元
成就一亿技术人!
领取后你会自动成为博主和红包主的粉丝 规则
hope_wisdom
发出的红包
实付元
使用余额支付
点击重新获取
扫码支付
钱包余额 0

抵扣说明:

1.余额是钱包充值的虚拟货币,按照1:1的比例进行支付金额的抵扣。
2.余额无法直接购买下载,可以购买VIP、付费专栏及课程。

余额充值