


 本文详细介绍如何在Spring Boot项目中集成gRPC,包括项目结构搭建、Service.proto文件配置、Maven依赖设置、代码生成、服务端与客户端实现,以及跨模块引用。
grpc spring boot server 端和 grpc spring boot client端 hello world示例。
idea新建project ,名称为com.xxx.grpc,项目名demo,然后在这个项目的src\main下面新建 proto文件夹,放入grpc的接口描述文件,在项目管理器项目名称位置点鼠标右键,new module,新建一个server子模块,再新建一个client子模块。
项目结构如下图:
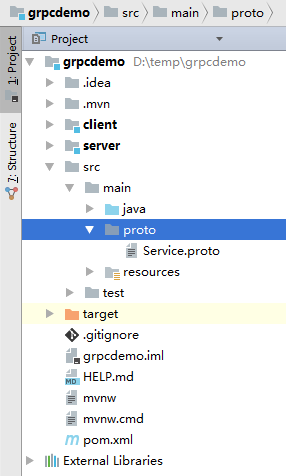
上图中的grpcdemo就是我项目名称,在src\mian\proto下面放置了供客户端和服务器端共同使用的Service.proto文件,同时项目内有一个client子模块,一个server子模块。
Service.proto文件的内容如下:
syntax = "proto3";
package proto;

option java_package = "com.test.rpc";
option java_multiple_files = false;


// 定义通用的 Grpc 请求体
message Request {
    int32 serialize = 1;
    bytes request = 2;
}

// 定义通用的 Grpc 响应体
message Response {
    bytes response = 1;
}


// 定义通用的 Grpc 服务
service CommonService {
    // 处理请求
    rpc Handle ( Request ) returns ( Response );
}

message SayHelloRequest{
    bytes name=1;
}

message SayHelloResponse{
    bytes result=1;
}

service SayHelloService{
    rpc SayHello(SayHelloRequest) returns (SayHelloResponse);
}
上面这个是服务接口描述文件,需要借助maven工具去生成java代码供服务端去实现及供客户端进行调用,配置过程如下:
打开 根项目的pom.xml文件,我的内容如下:
<?xml version="1.0" encoding="UTF-8"?>
<project xmlns="http://maven.apache.org/POM/4.0.0" xmlns:xsi="http://www.w3.org/2001/XMLSchema-instance"
	xsi:schemaLocation="http://maven.apache.org/POM/4.0.0 http://maven.apache.org/xsd/maven-4.0.0.xsd">
	<modelVersion>4.0.0</modelVersion>
	<parent>
		<groupId>org.springframework.boot</groupId>
		<artifactId>spring-boot-starter-parent</artifactId>
		<version>2.1.4.RELEASE</version>
		<relativePath/> <!-- lookup parent from repository -->
	</parent>
	<groupId>com.xxx.grpc</groupId>
	<artifactId>demo</artifactId>
	<version>0.0.1-SNAPSHOT</version>
	<name>demo</name>
	<description>Demo project for Spring Boot</description>

	<properties>
		<java.version>1.8</java.version>
	</properties>

	<dependencies>
		<dependency>
			<groupId>org.springframework.boot</groupId>
			<artifactId>spring-boot-starter</artifactId>
		</dependency>

		<dependency>
			<groupId>org.springframework.boot</groupId>
			<artifactId>spring-boot-starter-test</artifactId>
			<scope>test</scope>
		</dependency>


		<dependency>
			<groupId>io.grpc</groupId>
			<artifactId>grpc-netty-shaded</artifactId>
			<version>1.20.0</version>
		</dependency>
		<dependency>
			<groupId>io.grpc</groupId>
			<artifactId>grpc-protobuf</artifactId>
			<version>1.20.0</version>
		</dependency>
		<dependency>
			<groupId>io.grpc</groupId>
			<artifactId>grpc-stub</artifactId>
			<version>1.20.0</version>
		</dependency>
	</dependencies>

	<build>
		<plugins>
			<plugin>
				<groupId>org.springframework.boot</groupId>
				<artifactId>spring-boot-maven-plugin</artifactId>
			</plugin>

			<plugin>
				<groupId>org.xolstice.maven.plugins</groupId>
				<artifactId>protobuf-maven-plugin</artifactId>
				<version>0.5.1</version>
				<configuration>
					<protocArtifact>com.google.protobuf:protoc:3.7.1:exe:${os.detected.classifier}</protocArtifact>
					<pluginId>grpc-java</pluginId>
					<pluginArtifact>io.grpc:protoc-gen-grpc-java:1.20.0:exe:${os.detected.classifier}</pluginArtifact>
				</configuration>
				<executions>
					<execution>
						<goals>
							<goal>compile</goal>
							<goal>compile-custom</goal>
						</goals>
					</execution>
				</executions>
			</plugin>
		</plugins>


		<extensions>
			<extension>
				<groupId>kr.motd.maven</groupId>
				<artifactId>os-maven-plugin</artifactId>
				<version>1.5.0.Final</version>
			</extension>
		</extensions>


	</build>

</project>
以上是整个根项目maven的配置文件,主要是增加了几个grpc的依赖(io.grpc那三个),增加了一个plugin,增加了一个extensions配置,刷新maven配置,让开发工具加载maven依赖及插件。
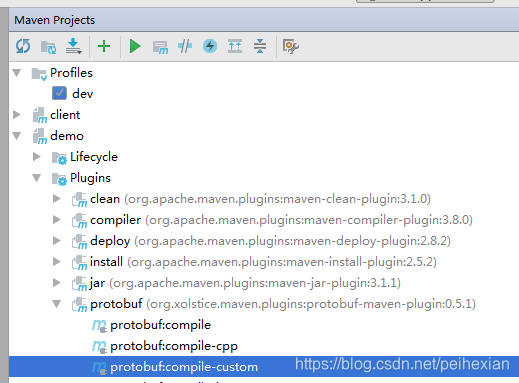
然后在maven工具里面生成java 代码,方法是在maven的protobuf插件上面先点击run protobuf:compile,再点击 run protobuf:compile-custom,如下图:
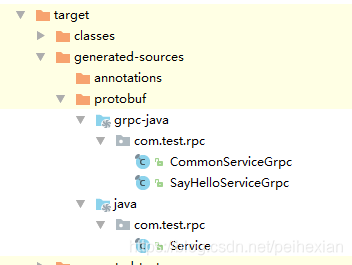
正常情况下会在target下面生成grpc的java调用接口等代码,如下图:
然后到server子模块内编写服务器端代码,新建一个实现服务接口功能的类,用于实现grpc里面定义的接口功能,如下:
package com.xxx.grpc;

import com.google.protobuf.ByteString;
import com.test.rpc.Service;

import java.io.UnsupportedEncodingException;

/**
 * Created by Administrator on 2019/4/12.
 */
public class SayHelloImpl extends com.test.rpc.SayHelloServiceGrpc.SayHelloServiceImplBase {

    public void sayHello(com.test.rpc.Service.SayHelloRequest request,
                         io.grpc.stub.StreamObserver<com.test.rpc.Service.SayHelloResponse> responseObserver) {
        // 获取数据信息
        try {
            String name =request.getName().toString("utf-8");
            // 计算数据
            Service.SayHelloResponse response = Service.SayHelloResponse.newBuilder()
                    .setResult(ByteString.copyFrom("hello from java:"+name,"utf-8"))
                    .build();
            responseObserver.onNext(response);
        } catch (UnsupportedEncodingException e) {
            e.printStackTrace();
        }
        // 返回数据,完成此次请求
        responseObserver.onCompleted();
    }

}
然后再编写加载服务功能的启动代码,整个server的spring boot启动程序代码如下:
package com.xxx.grpc;

import io.grpc.Server;
import io.grpc.ServerBuilder;
import org.springframework.boot.SpringApplication;
import org.springframework.boot.autoconfigure.SpringBootApplication;

import java.io.IOException;
import java.util.logging.Level;
import java.util.logging.Logger;

@SpringBootApplication
public class ServerApplication {
	private static final Logger log = Logger.getLogger(ServerApplication.class.getName());

	private Server server;

	public static void main(String[] args) throws IOException, InterruptedException {
		final ServerApplication server = new ServerApplication();
		server.start();
		server.blockUntilShutdown();
	}

	private void start() throws IOException {
		int port = 41005;
		//1.forPort 指定监听客户端请求的端口
		//2.创建我们的服务端实现类的实例GreeterImpl并将传递给构建器的addService方法
		//3.调用build ()并 start()在构建器上为我们的服务创建和启动RPC服务器
		server = ServerBuilder.forPort(port)
				.addService(new SayHelloImpl())
				.build()
				.start();
		log.info("Server stated , listener on port:" + port);
		//JVM关闭时调用的钩子
		Runtime.getRuntime().addShutdownHook(new Thread() {
			@Override
			public synchronized void start() {
				System.err.println("*** shutting down gRPC server since JVM is shutting down");
				ServerApplication.this.stop();
				System.err.println("*** server shut down");
			}
		});
	}

	private void stop() {
		if (null != server) {
			server.shutdown();
		}
	}

	/**
	 * Await termination on the main thread since the grpc library uses daemon threads.
	 *
	 * @throws InterruptedException
	 */
	private void blockUntilShutdown() throws InterruptedException {
		if (null != server) {
			server.awaitTermination();
		}
	}
}
现在会有编译错误,因为grpc自动编译生成的java代码在根项目里面呢,需要添加对根项目的maven引用,修改server子模块的maven配置文件,增加以下内容去对根项目进行引用:
		<dependency>
			<groupId>com.xxx.grpc</groupId>
			<artifactId>demo</artifactId>
			<version>0.0.1-SNAPSHOT</version>
		</dependency>
刷新maven后服务器端程序即可正常编译启动。
接下来编写客户端调用程序,还是先修改client子模块的pom.xml文件,增加对根项目自动生成的grpc java stub代码的编译引用,同样也是增加上面的配置内容,这里就不再赘述。
编写客户端调用代码如下:
package com.xxx.grpc;

import com.google.protobuf.ByteString;
import com.test.rpc.SayHelloServiceGrpc;
import com.test.rpc.Service;
import io.grpc.netty.shaded.io.grpc.netty.NegotiationType;
import io.grpc.netty.shaded.io.grpc.netty.NettyChannelBuilder;
import org.springframework.boot.SpringApplication;
import org.springframework.boot.autoconfigure.SpringBootApplication;

import java.io.UnsupportedEncodingException;
import java.nio.charset.Charset;

@SpringBootApplication
public class ClientApplication {

	private static final String host="127.0.0.1";
	private static final int port=41005;

	public static void main(String[] args) {
		SpringApplication.run(ClientApplication.class, args);

		io.grpc.Channel channel = NettyChannelBuilder.forAddress(host, port)
				.negotiationType(NegotiationType.PLAINTEXT)
				.build();

		Service.SayHelloRequest req=Service.SayHelloRequest.newBuilder().setName(ByteString.copyFrom("测试", Charset.forName("utf-8"))).build();

		Service.SayHelloResponse result= SayHelloServiceGrpc.newBlockingStub(channel).sayHello(req);
		try {
			System.out.println(result.getResult().toString("utf-8"));
		} catch (UnsupportedEncodingException e) {
			e.printStackTrace();
		}

	}

}
启动服务器端程序,再启动客户端程序即可正常运行,把服务器端程序部署到其他机器,开放防火墙端口,客户端修改调用ip地址即可进行调用。
代码发布地址:https://github.com/peihexian/grpcdemo


 1408
1408

 被折叠的 条评论
为什么被折叠?
被折叠的 条评论
为什么被折叠?
 到【灌水乐园】发言


