


 本文档提供了Sublime Text3的完整配置步骤,包括下载地址、行尾空格控制、显示文本编码、字体设置、解决中文乱码问题、颜色方案自定义、插件安装与修改,以及如何用Sublime搭建Python开发环境和Windows10环境下输入法跟随配置。同时给出了settings示例和已安装插件的信息。
Sublimt Text3配置
下载网址
Dev Builds(3156):
下载地址:https://www.sublimetext.com/3dev
插件地址:https://packagecontrol.io/
##Package Control Installation
https://packagecontrol.io/installation#st3
1.Click the Preferences > Browse Packages… menu
2.Browse up a folder and then into the Installed Packages/ folder
3.Download Package Control.sublime-package and copy it into the Installed Packages/ directory
4.Restart Sublime Text
或
import urllib.request,os,hashlib; h = ‘6f4c264a24d933ce70df5dedcf1dcaee’ + ‘ebe013ee18cced0ef93d5f746d80ef60’; pf = ‘Package Control.sublime-package’; ipp = sublime.installed_packages_path(); urllib.request.install_opener( urllib.request.build_opener( urllib.request.ProxyHandler()) ); by = urllib.request.urlopen( ‘http://packagecontrol.io/’ + pf.replace(’ ', ‘%20’)).read(); dh = hashlib.sha256(by).hexdigest(); print(‘Error validating download (got %s instead of %s), please try manual install’ % (dh, h)) if dh != h else open(os.path.join( ipp, pf), ‘wb’ ).write(by)
行尾空格控制
参考网页: https://github.com/SublimeText/TrailingSpaces#synopsis
可以通过按键组合:
ctrl+shift+p
install packges
TrailingSpaces
来进行安装,安装完成后,在文件夹:
C:\Users\paul5\AppData\Roaming\Sublime Text 3\Installed Packages
中应该有 TrailingSpaces.sublime-package 文件了。
使用此插件主要是删除当前编辑的文档中的所有尾随空格。
点击“edit/TrailingSpaces/delete”;
将删除命令绑定到键盘快捷键:
要添加键绑定,请打开“首选项/键绑定 - 用户”并添加:
  { "keys": ["ctrl+shift+t"], "command": "delete_trailing_spaces" }
更多参考可以看:https://packagecontrol.io/packages/TrailingSpaces
或者参考:菜单Preferences->package setings->Trailing Spaces->Help
显示文本的编码
进入这个选项:【Preferences】->【Settings】
搞定之后,在右下角可以看见文本编码
在Settings上加入"show_encoding":true
{
	"font_size": 12,
	"ignored_packages":
	[
		"Vintage"
	],
	"show_encoding": true,
	"font_face": "",
	-- 去掉行尾空格
    "trim_trailing_white_space_on_save": true
}
字体设置
//Courier New bold
//Courier New
//宋体
//新宋体
//微软雅黑
//华文楷体
//华文宋体
//Times New Roman
//webstorm
//Yahei Consolas Hybrid
//	"color_scheme": "Packages/Color Scheme - Default/Monokai Bright.tmTheme",
{
	"color_scheme": "Packages/Color Scheme - Default/Monokai Bright.tmTheme",
	"default_encoding": "UTF-8",
	//先在操作系统的控制面板中安装字体YaHei Consolas Hybrid.ttf
	//依次打开[控制面板\外观和个性化\字体],将YaHei Consolas Hybrid.ttf拖进来,就会自动安装了
	"font_face": "YaHei Consolas Hybrid",
	"font_size": 13,
	"ignored_packages":
	[
		"Vintage"
	],
	"line_padding_bottom": 1,
	"line_padding_top": 1,
	"show_encoding": true
}
解决中文乱码,需要安装两个插件
步骤1
Ctrl+Shift+P打开命令行模式,输入Install Package关键字,
然后点击自动出现的下拉菜单里的第一项:Package Control: Install Package。
步骤2
左下角有个=号来回动,稍等一会,会再次在命令行下弹出一个下拉菜单。输入“ConvertToUTF8”
步骤3
输入GBK,安装“GBK Encoding Support”,选择匹配项。中文字符就可以正常显示了。
颜色
生成器地址:
http://tmtheme-editor.herokuapp.com/
2.打开本地文件
3.打开画廊可以查看其它人的颜色方案,前面的颜色为背景色
4.使用引导:
首先:点击General->background->…修改一般.txt文件的默认背景。护眼的RGB值(豆沙绿的rgb颜色:199 237 204。色调:85。饱和度:1 2 3。亮度:2 0 5。对应成16进制颜色: #C7EDCC )
然后:点击Scopes,修改你想定制的关键字的颜色,右下角有一个多选框可以预览不同的文件(比如php,css,html,java等)中的效果。
最后就可以download导出自己的主题了,可以自己命名主题。如果以后想进一步修改你的自定义主题,可以点击open打开你的本地主题。
最后的最后,把你的自定义主题安装到Sublime Text3软件中,方法:
把生成的文件放到数据目录的:
C:\Users\paul5\AppData\Local\Sublime Text 3\Cache\Color Scheme - Legacy
系统会自动生成相应的 cache 文件
Paul.tmTheme
Paul.tmTheme.cache
https://packagecontrol.io/packages/Seti_UI
https://github.com/ctf0/seti_st3

{
    //"theme": "Default.sublime-theme",
    "theme": "Seti.sublime-theme",
    "Seti_ClosedFolder_anim": true,
    "Seti_SB_big": true,
    "Seti_SB_med": true,
    "Seti_accent_lime": true,
    "Seti_alt_tree_row": true,
    "Seti_bold_heading": true,
    "Seti_bold_slctdfile_labels": true,
    "Seti_bold_slctdtab_labels": true,
    "Seti_lime_label": true,
    "Seti_lime_map": true,
    "Seti_lime_scrollbar": true,
    "Seti_lime_statusbar": true,
    "Seti_lime_tabclose": true,
    "Seti_no_blue_bar": true,
    "Seti_red_tab": true,
    "Seti_sb_small_padding": true,
    "Seti_sb_tree_miny": true,
    "Seti_show_group_arrows": true,
    "Seti_sidebar_font_size_12": true,
    "Seti_tab_font_12": true,
    "Seti_tabs_big": true,
    "Seti_tabs_med": true,
    "Seti_tabs_small": true,
    "Seti_top_heading_anim": true,
    "color_scheme": "Cache/Color Scheme - Legacy/Paul Wenglei.tmTheme",
    "default_encoding": "UTF-8",
    "font_face": "YaHei Consolas Hybrid",
    "font_size": 13,
    "highlight_line": true,
    "ignored_packages":
    [
        // 忽略的包
        "Vintage"
    ],
    "line_padding_bottom": 1,
    "line_padding_top": 1,
    "mouse_wheel_tabswitch": true,
    "show_encoding": true,
    "tab_size": 4,
    "translate_tabs_to_spaces": true
}
然后到Sublime Text3软件中使用该主题:
Preferences->Color Scheme…
插件修改
有人说:“.sublime-package文件其实就是zip格式的压缩文件,只不过重新命名而已,可以用解压软件打开,
如果要修改里面的文件,改好了再压缩回去就行了”。这个回答很正确,没有任何问题,只是操作上麻烦了
一点。事实上在Sublime中我们有更好的解决方案——PackageResourceViewer。
PackageResourceViewer 这款插件堪称Sublime中的神器,它可以方便地直接在Sublime界面下打开任何
插件包中的任何文件,是学习Sublime插件和深度定制Sublime的必备工具。
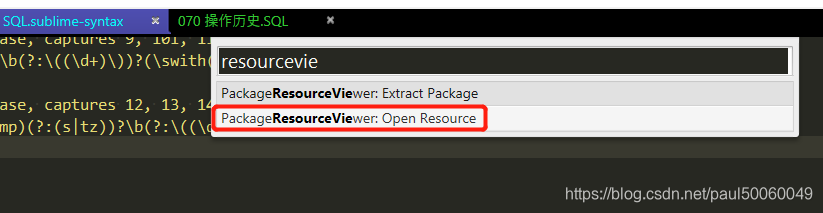
查看所有Sublime插件,包括自带的和后来安装的。只需Ctrl+Shift+P打开命令面板,输入resouceopen即
可找到该插件的命令。
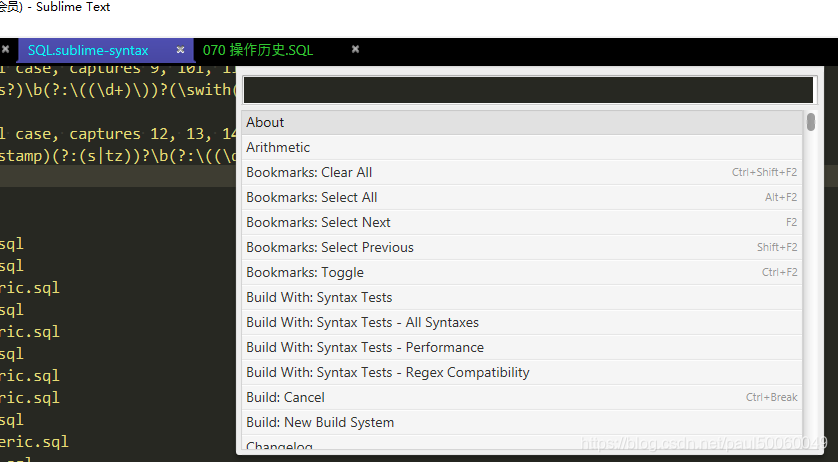
步骤1
按组合键: ctrl+shift+p
调出下面的内容
步骤2
输入: resourceviewer
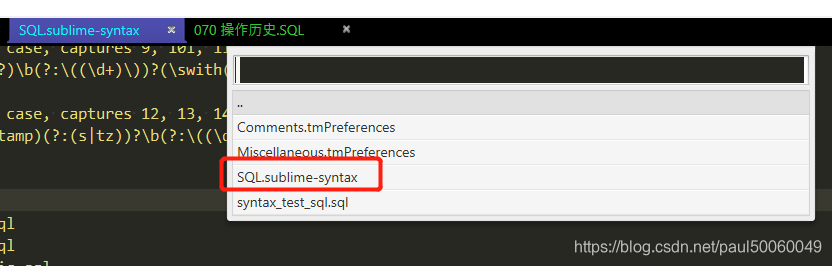
步骤3
选择SQL

步骤4
可以依次看其中的各个内容,要修改语法,选择SQL.sublime-syntax
步骤5
在适当的位置输入一些自己的定义
      scope: keyword.other.language.sql
    - match: (?i:\b(declare|is|loop|if|cursor|for|call|exception|elsif)\b)
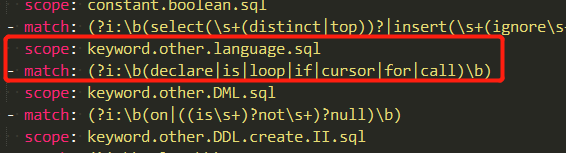
步骤6
保存即可完成修改。
用Sublime搭建Python开发环境(windows)
安装时勾选添加到环境变量。
有时候会添加不成功,需要自己手动添加到PATH。D:\500 Python;D:\500 Python\Scripts;
写python代码并运行
print(“hello”)
保存为文件test.py
按下Ctrl+b,点击python,即运行;
在Console窗口查看运行结果。
安装SublimeREPL插件
SublimeREPL支持各种语言解释器,方便我们在编辑器上编写完代码进行调试。
##添加自定义快捷键
Step1. 点击菜单Preferences->Browse Packages…,进入目录%appdata%\Sublime Text 3\Packages;
Step2. 打开文件 SublimeREPL\config\Python\Default.sublime-commands,找到你想要的命令,比如:
{
    "caption": "SublimeREPL: Python - RUN current file",
    "command": "run_existing_window_command", "args":
    {
        "id": "repl_python_run",
        "file": "config/Python/Main.sublime-menu"
    }
}
Step3.回到SublimeText3,点击菜单Preferences->Key Bindings,
此时会弹出一个窗口。
左边是Default(Windows).sublime-keymap —— Default,
右边是Default(Windows).sublime-keymap —— User。
从左边拷贝一个快捷键定义样例,比如
{
    "keys": ["alt+shift+3"],
    "command": "set_layout",
    "args":
    {
        "cols": [0.0, 0.33, 0.66, 1.0],
        "rows": [0.0, 1.0],
        "cells": [[0, 0, 1, 1], [1, 0, 2, 1], [2, 0, 3, 1]]
    }
}
然后修改Step2中的命令,粘贴到右边空白区,代码如下:
{
    "keys": ["f5"],
    "caption": "SublimeREPL: Python - RUN current file",
    "command": "run_existing_window_command", "args":
    {
        "id": "repl_python_run",
        "file": "config/Python/Main.sublime-menu"
    }
}
这样,按下f5,就能直接运行当前*.py脚本了。运行结果如下图示。
WINDOWS10环境下输入法跟随配置
插件名称:IMESupport fork版本
GitHub页面:https://github.com/zcodes/IMESupport
IMESupport
Sublime Text 中文输入法支持,解决输入法候选框无法跟随 st 光标 (cursor)的问题。
由于 st 默认不支持 IME (Input Method Editor),导致在使用微软拼音、搜狗拼音等
输入法输入中文的时候,候选框会固定在屏幕的一个角上,不会跟随光标的移动而移动。
这个插件就是利用 st 的 api 接口和 Windows 的 hook (钩子) 机制, 用  hackable
(一种无奈且并不优雅) 的方式让 st 支持 IME (或者说 IMM/Input Method Manager)。

插件的主要操作分为两步:
在光标位置改变时,通过 st 内置的事件监听接口触发获取光标位置操作(现在 st 内置
api 支持获取光标位置),然后将位置信息传递给加载的钩子处理。
hook 中的主要操作使用 Windows Api (ImmSetCompositionWindow) 设置输入法候选框的
位置。

Sublime Text 版本
由于旧版本的 st 没有获取光标相对于 st 窗口 (window) 的 api,最开始插件获取光标
位置是通过获取当光标相对于 st 布局 (layout) 的位置,再配合侧边栏的宽度、手动配
置调整参数等信息手动计算的,这样导致光标的位置极其不准确(换个主题可能侧边栏的
宽度等就不同了),候选框跟随定位准确也就无从说起了。

从 BUILD 3143 起,st 有了可以获取光标(cursor)相对于窗口位置的
api(View.text_to_window()), 并鉴于以前手动计算问题太多、太不可靠,所有对代码做
了精简,直接使用新的 api,而不再支持手动计算方式,所以,此插件支持
Sublime Text 3 Build 3143+(注意:跟 3143 比较临近的版本 api 实现并不是很好,如
光标在搜索等输入框时位置也无法获取,so,尽量用最新版本吧)。

Windows 系统版本和高清屏
鉴于 Windows 对于高清屏(缩放率大于 100%)的支持并不是很好,从 Windows 10 起这种
状况才有所改观,并且某些针对缩放率等信息的 Windows api 从 Windows 10 起才开始支持,
所以插件支持最好的 Windows 版本是 10。 如果 Windows 系统版本低于 Windows 10, 该
插件也可以使用,唯一的区别就是无法自动获取显示的缩放率,如果使用缩放率大于 100,
且小于 Windows 10 版本的 Windows,可以通过设置 ime_support_screen_scaling 手动配
置一下。

缩放率 100% 的默认配置:
{
  "imesupport_screen_scaling": 100
}
目前,这是该插件唯一需要手动设置的,以前的配置信息(offset 之类的)已经不再需要。

安装
注意:这是 chikatoike/IMESupport 的 fork 版本,所以不要使用 package_control 安装。

直接将该项目克隆或是下载到 C:\Users\...\AppData\Roaming\Sublime Text 3\Packages
目录下就好,不知道该目录在哪的同学可以使用菜单 Perference > Browse Packages 打开。

已知问题
第一次输入定位不准
目前测试来看,这个问题主要原因还是插件未加载完成造成的,所以刚打开 st 的时候,
稍等等,等插件加载完就好了。

ChangeLog
2018-11-25
简化代码,放弃支持 Sublime Text 老版本 (Sublime Text 3.0+ 起)
兼容 Windows 7 +
兼容 搜狗拼音、QQ 拼音、手心输入法、小狼毫输入法
2017-07-31
新版本 (dev build 3142) 可以使用 View.text_to_view 获取光标的位置。
使用 Visual Studio 2017 Community 重新编译 dll 文件。

手动安装:
1. 在GitHub页面下载该项目的ZIP包
2. 解压出来将文件夹名称改为IMESupport
3. 放到Sublime Text的插件目录重启软件即可。
4. 插件目录可通过菜单->preferences->packages来打开。
5. ...\AppData\Roaming\Sublime Text 3\Packages\IMESupport,没有IMESupport目录,就创建。
settings的例子
{
    "Seti_ClosedFolder_anim": true,
    "Seti_SB_big": true,
    "Seti_SB_med": true,
    "Seti_accent_lime": true,
    "Seti_alt_tree_row": true,
    "Seti_bold_heading": true,
    "Seti_bold_slctdfile_labels": true,
    "Seti_bold_slctdtab_labels": true,
    "Seti_lime_label": true,
    "Seti_lime_map": true,
    "Seti_lime_scrollbar": true,
    "Seti_lime_statusbar": true,
    "Seti_lime_tabclose": true,
    "Seti_no_blue_bar": true,
    "Seti_red_tab": true,
    "Seti_sb_small_padding": true,
    "Seti_sb_tree_miny": true,
    "Seti_show_group_arrows": true,
    "Seti_sidebar_font_size_12": true,
    "Seti_tab_font_12": true,
    "Seti_tabs_big": true,
    "Seti_tabs_med": true,
    "Seti_tabs_small": true,
    "Seti_top_heading_anim": true,
    "auto_complete_commit_on_tab": false,
    "auto_complete_delay": 50,
    "auto_complete_triggers":
    [
        {
            "characters": "<",
            "selector": "text.html"
        },
        {
            "characters": ".",
            "selector": "source.sql"
        }
    ],
    "auto_complete_with_fields": true,
    // 按回车时,自动与制表位对齐
    "auto_indent": true,
    "auto_match_enabled": true,
    "bold_folder_labels": true,
    "caret_extra_bottom": 1,
    "caret_extra_top": 1,
    "caret_extra_width": 3,
    "caret_style": "smooth",
    "color_inactive_tabs": true,
    // 主题文件的路径
    "color_scheme": "Packages/User/SublimeLinter/Paul Monokai.tmTheme",
    "default_encoding": "UTF-8",
    "dictionary": "Packages/Language - English/en_GB.dic",
    "draw_white_space": "all",
    "file_exclude_patterns":
    [
        "*.xlsx",
        "*.xls",
        "*.docx",
        "*.doc",
        "*.ppt*",
        "*.zip",
        "*.pyc",
        "*.pyo",
        "*.exe",
        "*.dll",
        "*.obj",
        "*.o",
        "*.a",
        "*.lib",
        "*.so",
        "*.dylib",
        "*.ncb",
        "*.sdf",
        "*.suo",
        "*.pdb",
        "*.idb",
        ".DS_Store",
        "*.class",
        "*.psd",
        "*.db",
        "*.sublime-workspace",
        "*.d",
        "*.tags*",
        "*.cmd",
        "*.mod.*",
        "*.symvers",
        "*.order"
    ],
    "folder_exclude_patterns":
    [
        ".svn",
        ".git",
        ".hg",
        "CVS"
    ],
    "font_face": "YaHei Consolas Hybrid",
    // 字体选项:no_bold不显示粗体字,no_italic不显示斜体字,no_antialias和no_antialias关闭反锯齿
    "font_options":
    [
        "gdi"
    ],
    // 设置字体和大小,必须在Settings-User里重写,这里设置没有任何效果
    "font_size": 12,
    "highlight_line": true,
    "hot_exit": true,
    "ignored_packages":
    [
    ],
    // 行底部的内填充 数字大小就是行间距
    "line_padding_bottom": 0.5,
    // 行顶部的内填充 数字大小就是行间距
    "line_padding_top": 0.5,
    // 是否显示行号
    "line_numbers": true,
    // 是否显示行号边栏
    "gutter": true,
    // 行号边栏和文字的间距
    "margin": 4,
    // 是否显示代码折叠按钮
    "fold_buttons": true,
    // 不管鼠标在不在行号边栏,代码折叠按钮一直显示
    "fade_fold_buttons": true,
    // 列显示垂直标尺,在中括号里填入数字,宽度按字符计算
    "rulers": [],
    // 是否打开拼写检查
    "spell_check": false,
    "match_brackets_angle": true,
    "match_brackets_content": true,
    "match_selection": true,
    "match_tags": true,
    "mouse_wheel_tabswitch": true,
    "open_files_in_new_window": false,
    "remember_open_files": false,
    "save_on_focus_lost": true,
    "show_encoding": true,
    // 针对C语言的
    "smart_indent": true,
    "theme": "Soda Light 3.sublime-theme",
    "update_check": false,
    // Tab键制表符宽度
    "tab_size": 4,
    // 否则作用于单个空格
    "use_tab_stops": true,
    // false时禁止在载入的时候检测制表符和空格
    "detect_indentation": true,
    // 设为true时,缩进和遇到Tab键时使用空格替代
    "translate_tabs_to_spaces": true,
    // 在文字上双击会全选当前的内容,如果里面出现以下字符,就会被截断
    "word_separators": "./\\()\"'-:,.;<>~!@#$%^&*|+=[]{}`~?",
    "word_wrap": "false"
}
右键加入SublimeText3打开方式
文件名: 右键加入SublimeText3打开方式.inf
[Version]
Signature="$Windows NT$"

[DefaultInstall]
AddReg=SublimeText3

[SublimeText3]
hkcr,"*\\shell\\SublimeText3",,,"用 SublimeText3 打开"
hkcr,"*\\shell\\SublimeText3\\command",,,"""%1%\sublime_text.exe"" ""%%1"" %%*"
hkcr,"Directory\shell\SublimeText3",,,"用 SublimeText3 打开"
hkcr,"*\\shell\\SublimeText3","Icon",0x20000,"%1%\sublime_text.exe, 0"
hkcr,"Directory\shell\SublimeText3\command",,,"""%1%\sublime_text.exe"" ""%%1"""
已经安装的插件
01. 包加载,基础插件
0_package_control_loader.sublime-package
02. 包控制,基础插件
Package Control.sublime-package
03. 汉化插件
ChineseLocalizations.sublime-package
04. 解决 Sublime Text 3 在 GBK 编码下的中文乱码问题
GBK Support.sublime-package
05. 插件查看及修改
PackageResourceViewer.sublime-package
06. 自动格式化SQL工具
SqlBeautifier.sublime-package
07. 代码校验工具
SublimeLinter.sublime-package
08. 代码校验工具
SublimeLinter-contrib-sqlint.sublime-package
09. 主题插件
Theme - Soda.sublime-package
10. 行尾控制插件
TrailingSpaces.sublime-package
11. VB插件
VBScript.sublime-package
12. INI文件语法高亮
INI.sublime-package


 2227
2227

 被折叠的 条评论
为什么被折叠?
被折叠的 条评论
为什么被折叠?
 到【灌水乐园】发言


