


主动地健康检查,
nginx定时主动地去ping后端的服务列表,当发现某服务出现异常时,把该服务从健康列表中移除,当发现某服务恢复时,又能够将该服务加回健康列表中。nginx自带的upstream轮询可以实现业务接口切换,nginx有一个开源的nginx_upstream_check_module模块能更加平滑的进行业务切换。
nginx自带健康检查的缺陷:
-
Nginx只有当有访问时后,才发起对后端节点探测。
-
如果本次请求中,节点正好出现故障,Nginx依然将请求转交给故障的节点,然后再转交给健康的节点处理。所以不会影响到这次请求的正常进行。但是会影响效率,因为多了一次转发
-
自带模块无法做到预警
-
被动健康检查
使用第三访模块nginx_upstream_check_module:
官方文档:
https://github.com/yaoweibin/nginx_upstream_check_module/tree/master/
-
区别于
nginx自带的非主动式的心跳检测,淘宝开发的tengine自带了一个提供主动式后端服务器心跳检测模块; -
若健康检查包类型为http,在开启健康检查功能后,nginx会根据设置的间隔向指定的后端服务器端口发送健康检查包,并根据期望的HTTP回复状态码来判断服务是否健康;
-
后端真实节点不可用,则请求不会转发到故障节点;
-
故障节点恢复后,请求正常转发;
下载相关程序包和解压
[root@Server-i-xfe2u1niht gzt]# wget http://nginx.org/download/nginx-1.20.2.tar.gz
[root@Server-i-xfe2u1niht gzt]# wget https://github.com/yaoweibin/nginx_upstream_check_module/archive/refs/heads/master.zip
[root@Server-i-xfe2u1niht gzt]# ls
master.zip  nginx-1.20.2.tar.gz
[root@Server-i-xfe2u1niht gzt]# tar xf nginx-1.20.2.tar.gz
[root@Server-i-xfe2u1niht gzt]# unzip master.zip
加载模块
[root@Server-i-xfe2u1niht gzt]# cd nginx-1.20.2
[root@Server-i-xfe2u1niht nginx-1.20.2]#
[root@Server-i-xfe2u1niht nginx-1.20.2]# yum -y install patch
[root@Server-i-xfe2u1niht nginx-1.20.2]# patch -p1 < ../nginx_upstream_check_module-master/check_1.20.1+.patch
patching file src/http/modules/ngx_http_upstream_hash_module.c
patching file src/http/modules/ngx_http_upstream_ip_hash_module.c
patching file src/http/modules/ngx_http_upstream_least_conn_module.c
patching file src/http/ngx_http_upstream_round_robin.c
patching file src/http/ngx_http_upstream_round_robin.h
[root@Server-i-xfe2u1niht nginx-1.20.2]#
编译安装nginx
[root@Server-i-xfe2u1niht nginx-1.20.2]# yum install -y gcc glibc gcc-c++ prce-devel openssl-devel pcre-devel lua-devel libxml2 libxml2-dev libxslt-devel perl-ExtUtils-Embed GeoIP GeoIP-devel GeoIP-data zlib-devel
[root@Server-i-xfe2u1niht nginx-1.20.2]# ./configure --prefix=/usr/local/nginx --add-module=../nginx_upstream_check_module-master
[root@Server-i-xfe2u1niht nginx-1.20.2]# make
[root@Server-i-xfe2u1niht nginx-1.20.2]# make install
[root@Server-i-xfe2u1niht nginx-1.20.2]# cd /usr/local/nginx/
测试nginx
[root@Server-i-xfe2u1niht nginx]# ./sbin/nginx -t
nginx: the configuration file /usr/local/nginx/conf/nginx.conf syntax is ok
nginx: configuration file /usr/local/nginx/conf/nginx.conf test is successful
[root@Server-i-xfe2u1niht nginx]# ls
client_body_temp  conf  fastcgi_temp  html  logs  proxy_temp  sbin  scgi_temp  uwsgi_temp
[root@Server-i-xfe2u1niht nginx]#
nginx自动检测下架http
1、nginx启动两个端口,用作http的测试使用
[root@Server-i-xfe2u1niht nginx]# cd html/
[root@Server-i-xfe2u1niht html]# mkdir monitor
[root@Server-i-xfe2u1niht html]# cd monitor/
[root@Server-i-xfe2u1niht monitor]# mkdir ceshi_1
[root@Server-i-xfe2u1niht monitor]# mkdir ceshi_2
[root@Server-i-xfe2u1niht monitor]# echo "<h1>my name is 801</h1>" < ceshi_1/index.html
[root@Server-i-xfe2u1niht monitor]# echo "<h1>my name is 802</h1>" < ceshi_2/index.html
2、nginx配置调试
[root@Server-i-xfe2u1niht monitor]# cd ../..
[root@Server-i-xfe2u1niht nginx]# vim conf/nginx.conf
# 在http模块中进行配置
    upstream ceshi_1 {
        ip_hash;
        server 10.0.0.20:801;
        server 10.0.0.20:802;
        check interval=3000 rise=2 fall=5 timeout=1000 type=http;
    }
        server {
        listen       80;
        server_name  localhost;
        location / {
            proxy_pass http://ceshi_1;
            root   html;
        }
        location  /status {
            check_status;
            access_log off;
            charset utf-8;
        }
        error_page   500 502 503 504  /50x.html;
        location = /50x.html {
            root   html;
        }
    }
        server {
        listen       801;
        server_name  localhost;
        location / {
            alias html/monitor/ceshi_1/;
        }
        error_page   500 502 503 504  /50x.html;
        location = /50x.html {
            root   html;
        }
    }

    server {
        listen       802;
        server_name  localhost;
        location / {
            alias html/monitor/ceshi_2/;
        }
        error_page   500 502 503 504  /50x.html;
        location = /50x.html {
            root   html;
        }
    }
[root@Server-i-xfe2u1niht nginx]# ./sbin/nginx  # 启动
[root@Server-i-xfe2u1niht nginx]# ./sbin/nginx -s reload  # 重启
3、浏览器查看状态
http://10.0.0.20/status
出现以下界面:
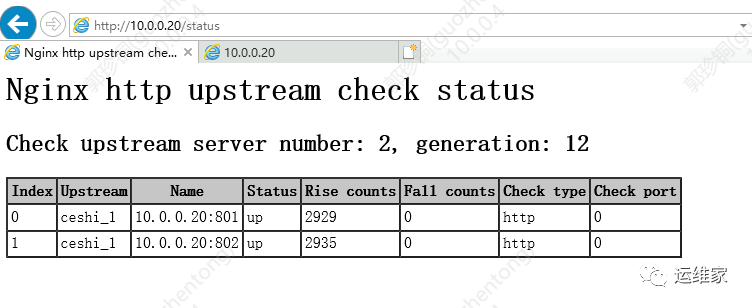
我们可以从上图明显的看出来我们节点的信息,如果某个节点不可用的话,对应的那一行就会变红。
-
index:节点
-
upstream:负载均衡的名字
-
name:负载的节点
ip信息 -
status:节点状态,up是可用,down是不可用
-
rise counts:探测次数
-
fall counts:满足次数
-
check type:探测协议是什么,分为http和tcp两种
-
check post:指定后端服务器中的检查端口,它可以与原始服务器端口不同,默认端口为 0,表示与原始后端服务器相同
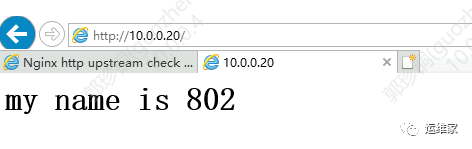
4、浏览器访问nginx
http://10.0.0.20/
结果如下:
5、手动下架一个节点,看下结果
修改配置文件为:
剩余内容请转至VX公众号 “运维家” ,回复 “195” 查看。
------ “运维家” ,回复 “195” ------
------ “运维家” ,回复 “195” ------
------ “运维家” ,回复 “195” ------
潍坊运维工程师招聘,硬件运维工程师发展前景,运维工程师个人规划,深圳阳光雨露运维工程师,事业单位招聘运维工程师;
奇安信运维工程师面试,三一重工系统运维工程师,美亚柏科运维工程师面试题,环境工程的运维工程师;
运维工程师都有什么方向,杭州运维工程师招聘阿里,桥梁运维工程师,桌面运维工程师培训计划。


 1288
1288

 被折叠的 条评论
为什么被折叠?
被折叠的 条评论
为什么被折叠?
 到【灌水乐园】发言


