


1. 概要
1.1 快速了解
如下代码,其中style参数就可看成CSS,主要作用是修改对象的样式,使得网页更加美观
<img src="xxxx" style="height:100px">
<div style="color:red"> i love china </div>
1.2 使用方式
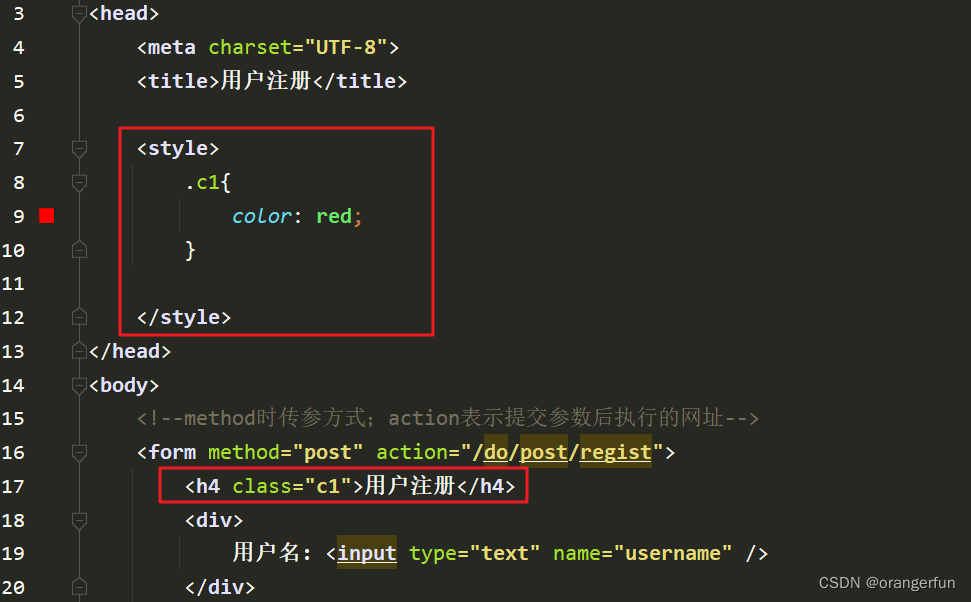
(1)应用在标签里,如上所示的代码块
(2)应用在HTML的head里,具体如下,现在head标签中通过style标签定义一个类c1,然后body中应用该类即可;该类方法适用于多个标签共用相同样式
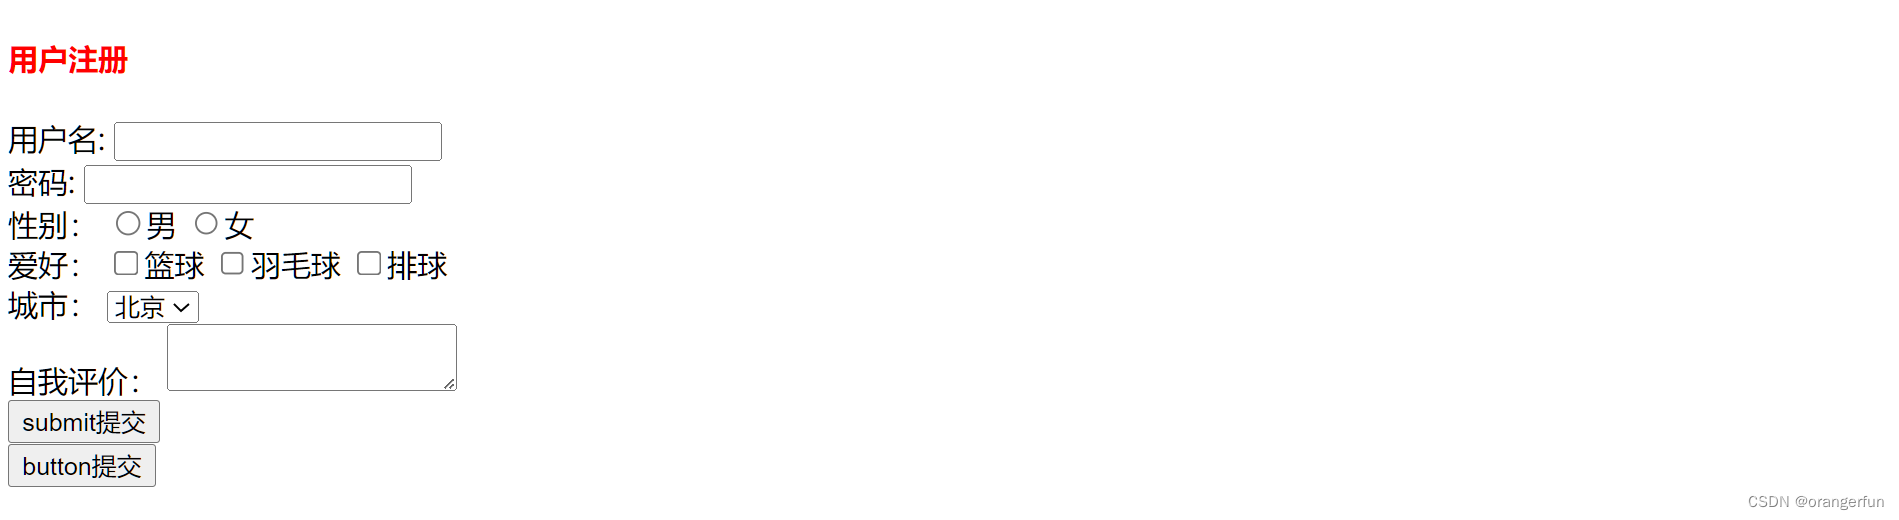
得到如下效果
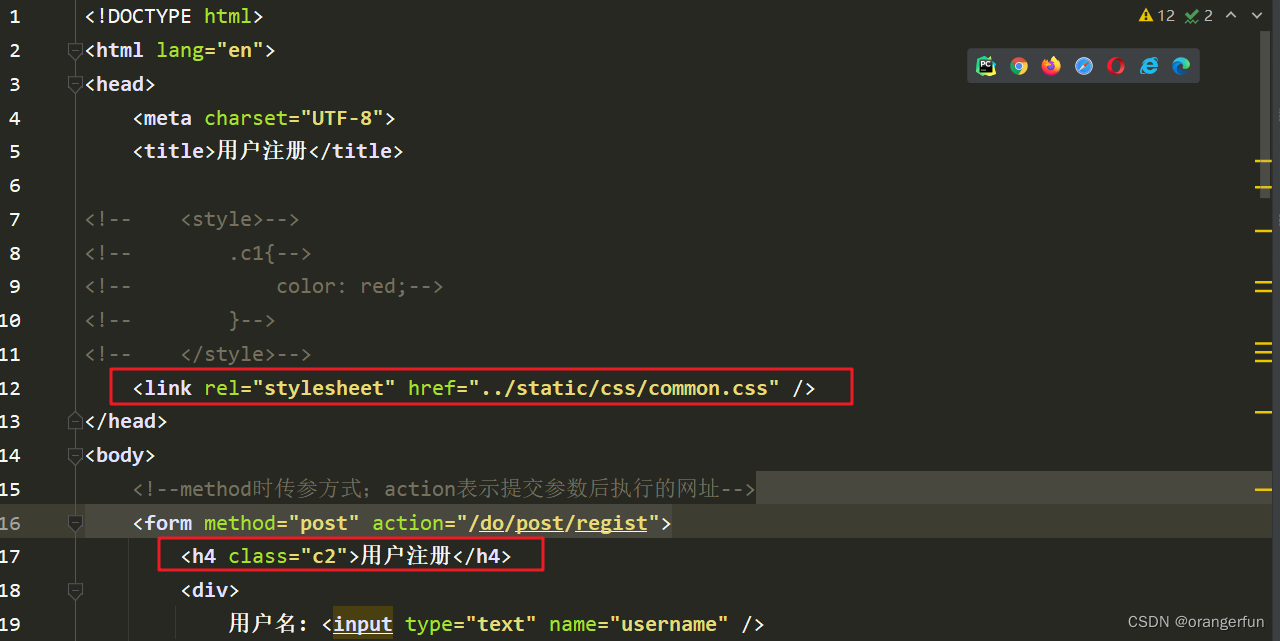
(3)写在文件里,如下,在static/css目录下创建common.css文件,并在html文件中head中导入css文件;此方法适用于不同html文件中使用相同的样式
.c1{
    height: 100px;
}


.c2{
    color: blue;
}
在html文件中导入样式
1.3 CSS选择器
CSS的选择器可简单的看作是使用方式的一种扩展,如下所示,有三种使用方式
- ID选择器
如下代码,现在head标签中定义id选择器,以#开头;使用时在相关标签中设置id属性
<!--定义id-->
#c1 {
	color: red;
}

<!--使用id-->
<div id='c1'></div>
- 类选择器
类选择器经常使用,如第二章节所述。定义类时以.开头,使用时在相关标签中设置class属性即可
<!--定义类-->
.c1 {
	color: red;
}

<!--使用类-->
<div class='c1'></div>
- 标签选择器
首先在head中定义标签属性,此处以div标签为例,实际可以是任意标签,定义完后该标签对应的属性都将发生变化
div{
	color: red;
}

<div>xxx</div>
- 属性选择器
如下所示,将所有属性type=text的input标签设置边框
<head>
    <title>Document</title>
    <link rel="stylesheet" href="/static/commons.css">
    <style>
        input[type="text"]{
        border: 1px solid red;
    }
    </style>
</head>
还可像下面这种方式设置,即将v1类中xx属性等于456的标签设置成相关的属性
<style>
    .v1[xx="456"]{
        color: gold;	<!-- 橙色 -->
    }
</style>

...

<body>
...
    <div class="v1" xx="123">a</div>
    <div class="v1" xx="456">b</div>
    <div class="v1" xx="789">c</div>
...
</body>
- 后代选择器
如下代码可让zz类下的所有h2子标签都生效,注意在style标签中引用的方式.zz和h2中间有空格
<head>
<style>
    .zz h2{
        color:chartreuse;
    }
</style>
</head>

<body>

    <div class="zz" >
        <div>
            <h2>我是div里面的h2</h2>
        </div>
        <h2>我是div外面的h2</h2>
...
如果只想让第一层的h2生效(儿子层生效,孙子层不生效),可以添加>号
<style>
    .zz > h2{
        color:chartreuse;
    }
</style>
1.4 多个属性类联合使用
引用多个类时用空格分开,如下所示。注意类的优先级与引用的顺序无关,只与定义时类的前后顺序有关,如下在<style>中定义类时,c2排在c3的前面,因此c2的优先级小于c3,即如果c2和c3中有相同的属性,比如颜色,那么c2的属性会被c3的属性覆盖,如果不想让c2被c3覆盖,在其后面增加! important
<style>
    .c2 {
        color: darkgoldenrod;
        <!--不被覆盖-->
        <!--color: darkgoldeneod !important;-->
    }

    .c3 {
        color:hotpink;
    }
</style>

<body>
    <div class="c2 c3">我是天才</div>
</body>
2. 样式
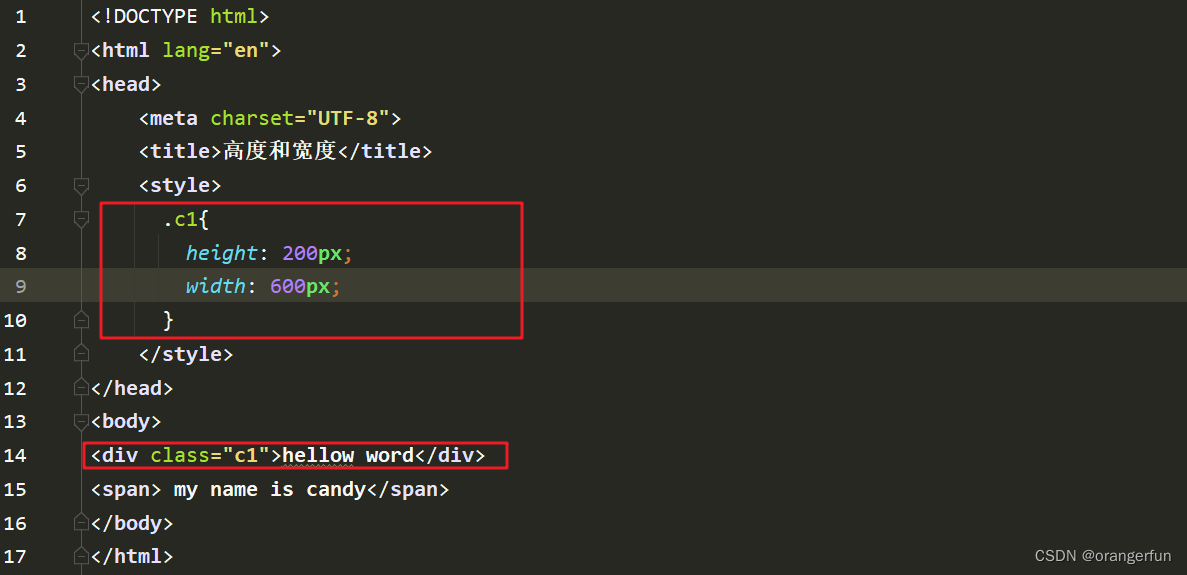
2.1 高度和宽度
结果如下
注意事项
- 宽度支持百分比,但是高度不支持百分比,因为宽度有最大值,而高度可以很长
      .c1{
        height: 200px;
        width: 50%;
      }
- 宽度和高度默认对行内标签无效,如span;默认对块级标签有效,比如div,但是块级标签比较霸道,即使设置了较小宽度,其他东西也无法放到其后面,仍然占据一行
2.2 块级和行内标签
2.2.1 块内标签
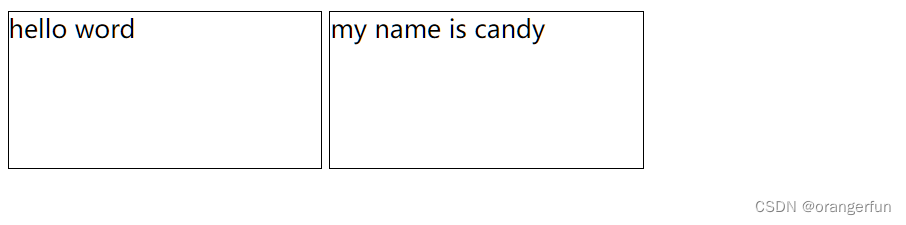
块级标签会占据一整行,行内标签无法调整高和宽,而块内标签就是两者的结合,多个块内标签可以放到一行,同时可调整宽高。块内标签就是display+行内标签 display:inline-block
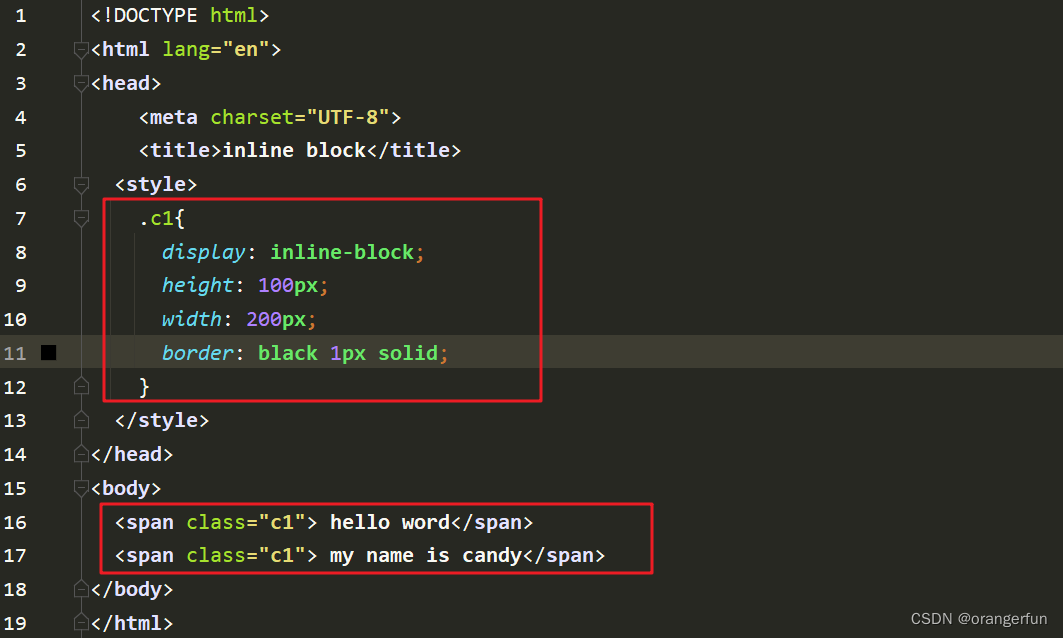
效果如下:块内标签的高和宽可以改变,同时可以将不同模块放到一行(融合了块内标签和块级标签的特征)
2.2.2 块级标签和行内标签的转换
如下所示,通过设置display,可以将span设置成块级标签,也可将div设置成行内标签
<!DOCTYPE html>
<html lang="en">
<head>
<meta charset="UTF-8">
<title>inline block</title>
</head>
<body>
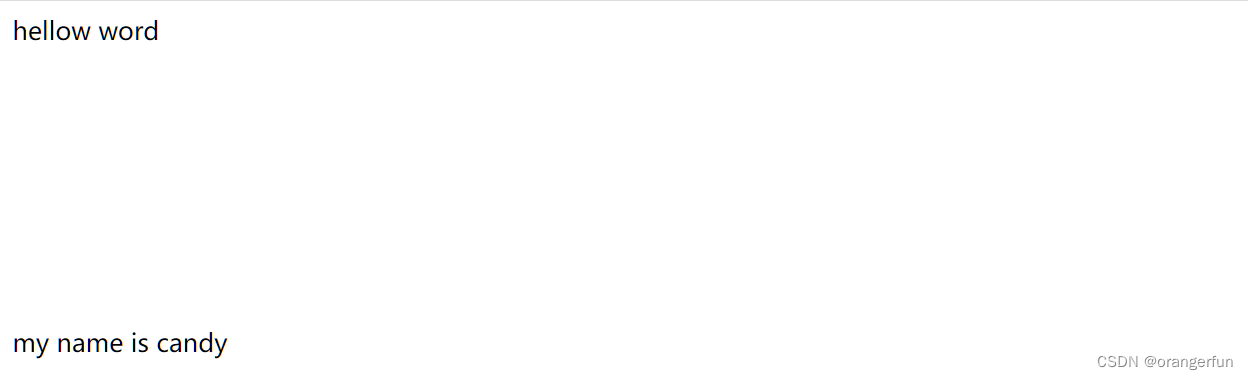
<span style="display: block"> hello word</span>
<div style="display: inline"> my name is candy</div>
<div style="display: inline"> nice to meet you</div>
</body>
</html>
效果如下:

2.3 字体设置
字体设置包括:字体、颜色、大小、粗细
<!DOCTYPE html>
<html lang="en">
<head>
    <meta charset="UTF-8">
    <title>Title</title>
  <style>
    .c1{
      font-family: Microsoft YaHei UI;  /*字体*/
      color: red;   /*颜色*/
      font-size: 50px;     /*字体大小*/
      font-weight: 400;    /*加粗*/
    }
  </style>
</head>
<body>

<div>hello word</div>
<div class="c1">你好</div>

</body>
</html>
效果

2.4 文字对齐
<!DOCTYPE html>
<html lang="en">
<head>
    <meta charset="UTF-8">
    <title>Title</title>
  <style>
    .c1{
        height: 50px;
        width: 200px;
        border: antiquewhite 2px solid;
        text-align: center;   /* 文字水平居中*/
        line-height: 50px;   /* 文字垂直居中,设置值与高度一致自动居中*/
    }
  </style>
</head>
<body>

<div>hello word</div>
<div class="c1">你好</div>

</body>
</html>
效果

2.5 浮动
<div>
  <span>左边</span>
  <span style="float: right">右边</span>
</div>
如上代码所示,正常情况下左边和右边两个词都是靠左并且连着,当加入float样式后,其效果变成如下图所示。

注意:
- 当块级标签如div,设置成float时,块级标签就不会“霸道”,可以改变其宽和高
- 在设置完浮动后,最后需要增加
<div style="clear:both">,否则父标签的效果无法生效(被浮动的部分覆盖了);
如下代码所示,子div中采用c1类设置属性,设置了向右浮动,在父div中设置了style背景颜色,如果缺少 <div style="clear: both"></div>这行代码,则背景颜色的style将无法生效。
<!DOCTYPE html>
<html lang="en">
<head>
    <meta charset="UTF-8">
    <title>Title</title>
  <style>
    .c1{
        float: right;
        height: 50px;
        width: 200px;
        border: antiquewhite 2px solid;
        text-align: center;   /* 文字水平居中*/
        line-height: 50px;   /* 文字垂直居中,设置值与高度一致自动居中*/
    }
  </style>
</head>
<body>
  <div style="background-color: red">
    <div class="c1">hello word</div>
    <div class="c1">你好</div>
    <div class="c1">你好</div>
    <div class="c1">你好</div>
    <div class="c1">你好</div>
    <div style="clear: both"></div>
  </div>
</body>
</html>
2.6 内边距
按如下所示的style设置风格
  <style>
    .c1 {
      height: 50px;
      width: 100px;
      border: antiquewhite 2px solid;
      text-align: center; /* 文字水平居中*/
      line-height: 50px; /* 文字垂直居中,设置值与高度一致自动居中*/
      padding-top: 10px;  /* 设置顶部边距*/
      padding-bottom: 10px;   /* 设置底部边距*/
      padding-left: 10px;
      padding-right: 10px;
    }
  </style>
效果如下,设置了上下左右各10px的边距。同时上边通过4个代码设置了上下左右边距,可以简写为pdding:10px,即可同时设置上下左右的边距

2.7 外边距
如下通过margin-top设置外边距,同理还有margin-left margin-right margin-button
<body>
  <div style="background-color: aquamarine">
    hello word
  </div>
  <div style="margin-top: 20px; background-color: blue">你好</div>
</body>
效果如下
注意内边距会改变div的大小,外边距不会,外边距只会改变间隔大小
2.8 内容居中
文本居中:文本会在指定标签区域中居中
<div style="text-align:center">hello word</div>
内容居中:一整块内容在整个页面中居中
要有自己的宽度+margin-left:auto+margin-right:auto
.container{
width: 920px;
margin: 0 auto   /* 上方margin=0,左右为自动*/
}
2.9 body标签
默认body标签有一个边距,会造成页面四边都有白色间隙,增消除?
body{
	margin:0;
}
2.10 hover(伪类)
放上鼠标字体颜色发生改变(一般放在具有链接的文字中)
<!DOCTYPE html>
<html lang="en">
<head>
    <meta charset="UTF-8">
    <title>Title</title>

  <style>
    body{
      margin:0  /*取消四周默认边距*/
    }

    /* 中间内容居中 */
    .container{
      margin: 0 auto;
    }

    .c1 {
      height: 50px;
      width: 1128px;
      border: antiquewhite 2px solid;
      text-align: center; /* 文字水平居中*/
      line-height: 50px; /* 文字垂直居中,设置值与高度一致自动居中*/
      padding-top: 10px;  /* 设置顶部边距*/
      padding-bottom: 10px;   /* 设置底部边距*/
      padding-left: 10px;
      padding-right: 10px;
    }

    .c1 a{
        margin: 0 20px;
        color: black;    /* 设置字体颜色 */
        text-decoration: none;    /* 取消字体下方的下划线*/
    }

    a:hover{
      color: red;   /* 放置鼠标时字体颜色改变为红色*/
    }

  </style>
</head>
<body>
  <div class="c1 container" style=background-color:azure>
    <a href="https://www.baidu.com/">百度</a>
    <a href="https://www.google.com">谷歌</a>
    <a href="https://www.weibo.com">微博</a>
  </div>
</body>
</html>
效果如下

注意hover不仅仅可以设置字体颜色,还可设置边框、字体大小等其他属性,通过设置属性display:none/block控制一些标签的隐藏/显示
如下代码所示,指定标签下的某个类设置hover
<!DOCTYPE html>
<html lang="en">
<head>
    <meta charset="UTF-8">
    <title>Document</title>
    <style>
        .c1 {
            color:brown;
        }
        .c1:hover {
            color: green;
            font-size: 20px;
        }

        .c2 {
            width: 300px;
            height: 300px;
            border: 3px solid red;
        }
        .c2:hover {
            border: 3px solid green;
        }

        .download {
            display: none;
        }

        .app:hover .download {
            display: block;
        }

    </style>
</head>
<body>
    <div class="c1">字体碰到鼠标变成绿色</div>
    <div class="c2">边框碰到鼠标变成绿色</div>
    <div class="app">
        <div>鼠标放我这里触发显示二维码</div>
        <div class="download">
            <img src="https://cdn.cnbj1.fds.api.mi-img.com/mi-mall/78c30d4f259ed43ab20e810a522a6249.png" alt="">
        </div>
    </div>
</body>
</html>
2.11 设置透明度
opacity:0.5 取值从0-1
2.12 after(伪类)
在一些标签内容后面增加内容
<!DOCTYPE html>
<html lang="en">
<head>
    <meta charset="UTF-8">
    <title>Document</title>
    <style>
        .c1:after {
            content: "大帅比"
        }
    </style>
</head>
<body>
    <div class="c1">张三</div>
</body>
</html>
输出显示:张三大帅比
after一般应用在float场景中,不用每次都写style=“clear: both;”,下面的after语句就相当于在clearfix类的div标签里的最后增加<div style="clear:both"></div>
<!DOCTYPE html>
<html lang="en">
<head>
    <meta charset="UTF-8">
    <title>Document</title>
    <style>
        .clearfix:after {
            content: "";
            display: block;
            clear: both;
        }

        .item {
            float: left;
        }

    </style>
</head>
<body>
    <div class="clearfix">
        <div class="item">1</div>
        <div class="item">2</div>
        <div class="item">3</div>
    </div>
</body>
</html>
2.13 position
将某部分固定在网页的相关位置,不会随着鼠标拖动而改变
有三种模式分别是
- fixed
- relative
- absolute
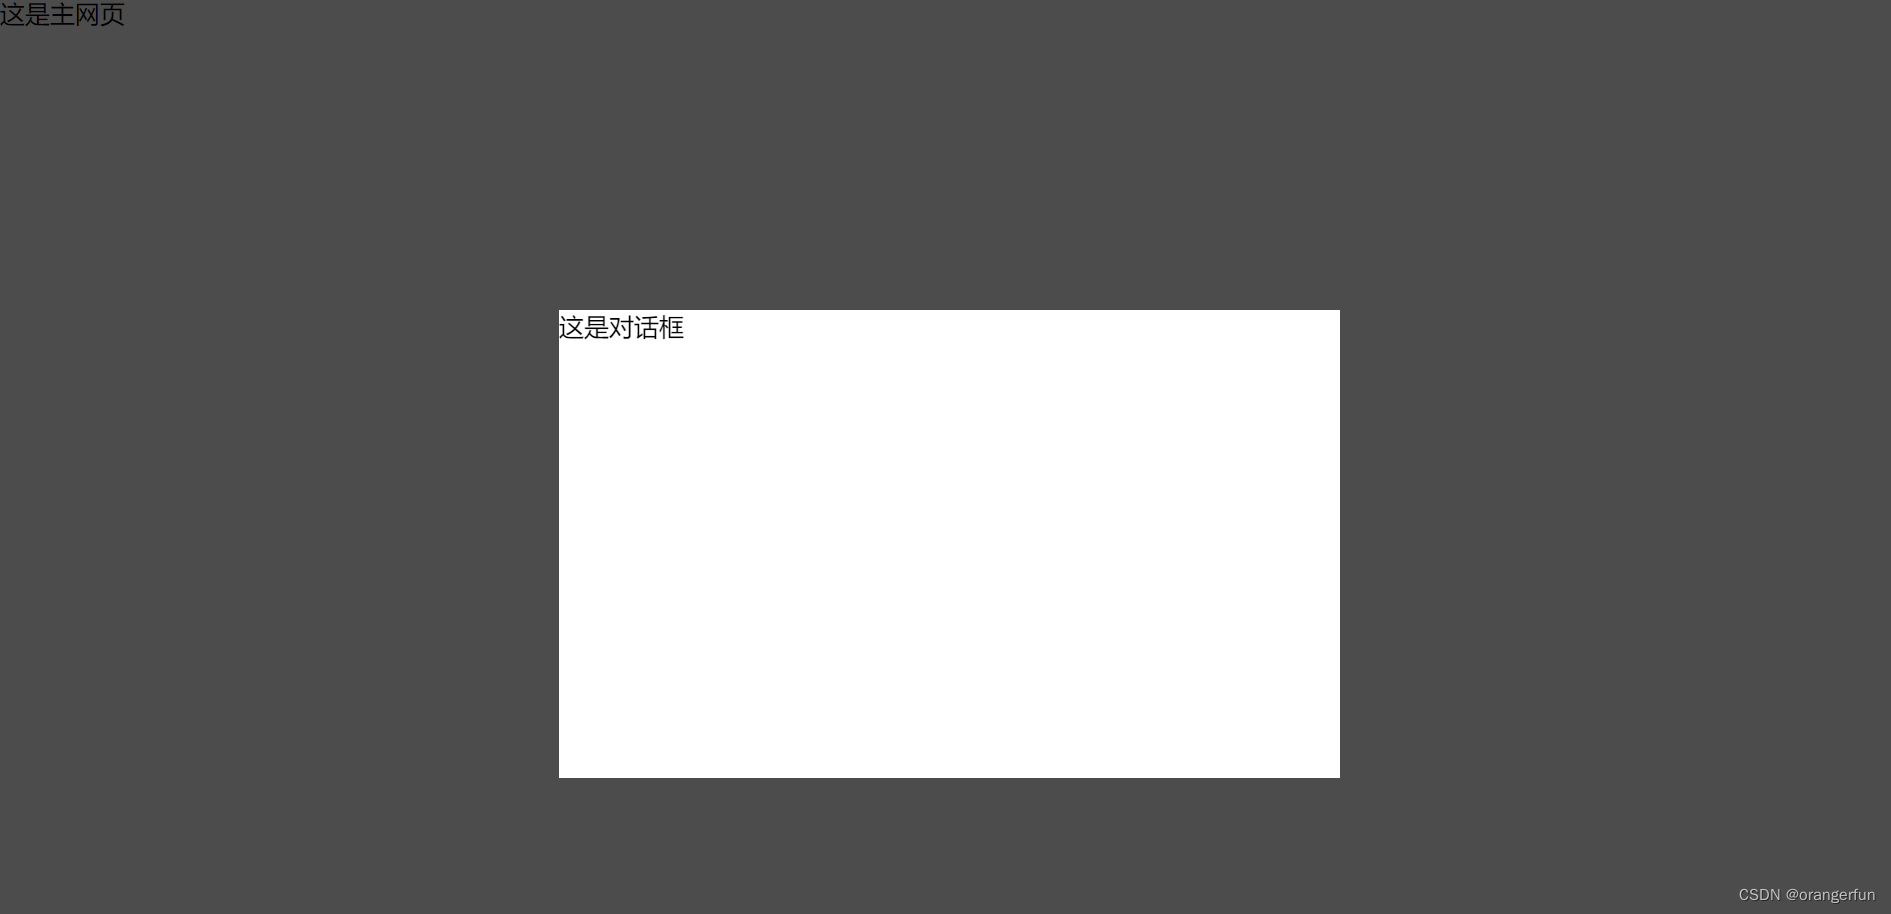
2.13.1 fixed: 完全固定在指定位置
长用于网页中的返回顶部 对话框等
.back {
     position: fixed;   /* 模式 */
     width: 60px;   /* 固定框的宽度 */
     height: 60px;     /* 固定框的高度 */
     border: 1px solid red;

     right: 50px;      /* 固定位置:离最右边的距离 */
     bottom: 50px;      /* 固定位置:离最下边边的距离,还可设置left top*/
 }
<!DOCTYPE html>
<html lang="en">
<head>
    <meta charset="UTF-8">
    <title>Document</title>
    <style>

        body {
            margin: 0;
        }

        .dialog {
            position: fixed;
            height: 300px;
            width: 500px;
            background-color: white;

            left: 0;
            right: 0;
            margin: 0 auto;

            top: 200px;

            z-index: 1000;  /* 防止对话框被mask遮住 */
        }

        .mask {
            background-color: black;
            position: fixed;
            left: 0;
            right: 0;
            top: 0;
            bottom: 0;
            opacity: 0.7;

            z-index: 999;   /* 防止对话框被mask遮住 */
        }

    </style>
</head>
<body>
    <div style="height: 1000px;"></div>
    <!-- 如果css中不加 z-index 设置优先级的话 -->
    <!-- 那么下面的 dialog 如果在 mask 的上面,对话框就显示不出来了 -->
    <!-- 设置优先级可以解决此问题 -->
    <div class="dialog"></div>
    <div class="mask"></div>
</body>
</html>
2.13.2 relative absolute 联合使用
相对于某个“框”存在
...
        .app{
            position: relative;
        }

        .app .download {
            position: absolute;
            display: none;
            height: 100px;
            width: 100px;
        }

        .app:hover .download {
            display: block;
        }

    </style>

</head>
<body>
    <div class="header">
        <div class="container">
            <div class="menu">
                <a href="https://www.mi.com">小米商城</a>
                <a href="https://www.mi.com">MIUI</a>
                <a href="https://www.mi.com">云平台</a>
                <a href="https://www.mi.com">有品</a>
                <a href="https://www.mi.com">小爱开放平台</a>
                <a href="https://www.mi.com" class="app">app下载
                    <div class="download">
                        <img src="https://cdn.cnbj1.fds.api.mi-img.com/mi-mall/78c30d4f259ed43ab20e810a522a6249.png" alt="">
                    </div>
                </a>
            </div>
            <div class="account">
                <a href="https://www.mi.com">登录</a>
                <a href="https://www.mi.com">注册</a>
                <a href="https://www.mi.com">消息通知</a>
            </div>'
            <div style="clear: both;"></div>
        </div>
    </div>
...
2.14 边框 border
border: 1px solid red 代表边框1像素,实线(dotted代表虚线) 红色(transparent透明色)
border-left: 1px solid green 只要左边的边框
2.15 背景色 background-color
background-color: green
3 小结
- a标签默认时行内标签,内外边距标签高度设置时默认无效,需要通过display设置成块级标签才可生效
- 设置垂直居中:
- line-hight 只对文本生效
- 图片需要通过边距来设置
- a标签默认字体下带下划线,需要通过设置
text-decoration:none将下划线取消


 754
754

 被折叠的 条评论
为什么被折叠?
被折叠的 条评论
为什么被折叠?
 到【灌水乐园】发言


