


 文章详细介绍了STM32F10x系列微控制器中定时器的中断配置,包括TIM_TimeBaseInit(),TIM_ITConfig()和TIM_Cmd()函数的使用,以及如何通过定时器控制LED灯的翻转。还涉及到了与NVIC中断管理的相关内容。
前言
stm32f10x的定时器功能十分丰富,光是寄存器就已经超过15个了,应用十分灵活,本文仅仅讨论定时器中断这个简单的功能,暂不讨论定时器的PWM、捕获等功能。
所涉及寄存器:
- 控制寄存器 1(TIMx_CR1)
- DMA/中断使能寄存器(TIMx_DIER)
- 自动重装载寄存器(TIMx_ARR)
- 预分频寄存器(TIMx_PSC)
- 重复计数寄存器(TIMx_RCR)
- 事件产生寄存器(TIMx_EGR)
所涉及函数:
- TIM_TimeBaseInit()
- TIM_ITConfig()
- TIM_Cmd();
当然,要想在stm32里使用中断不可避免的要和NVIC打交道,不过它不是本章的重点。
TIM_TimeBaseInit()函数
其源码如下:
void TIM_TimeBaseInit(TIM_TypeDef* TIMx, TIM_TimeBaseInitTypeDef* TIM_TimeBaseInitStruct)
{
  uint16_t tmpcr1 = 0;

  /* Check the parameters */
  assert_param(IS_TIM_ALL_PERIPH(TIMx));
  assert_param(IS_TIM_COUNTER_MODE(TIM_TimeBaseInitStruct->TIM_CounterMode));
  assert_param(IS_TIM_CKD_DIV(TIM_TimeBaseInitStruct->TIM_ClockDivision));

  tmpcr1 = TIMx->CR1;

  if((TIMx == TIM1) || (TIMx == TIM8)|| (TIMx == TIM2) || (TIMx == TIM3)||
     (TIMx == TIM4) || (TIMx == TIM5))
  {
    /* Select the Counter Mode */
    tmpcr1 &= (uint16_t)(~((uint16_t)(TIM_CR1_DIR | TIM_CR1_CMS)));
    tmpcr1 |= (uint32_t)TIM_TimeBaseInitStruct->TIM_CounterMode;
  }

  if((TIMx != TIM6) && (TIMx != TIM7))
  {
    /* Set the clock division */
    tmpcr1 &= (uint16_t)(~((uint16_t)TIM_CR1_CKD));
    tmpcr1 |= (uint32_t)TIM_TimeBaseInitStruct->TIM_ClockDivision;
  }

  TIMx->CR1 = tmpcr1;

  /* Set the Autoreload value */
  TIMx->ARR = TIM_TimeBaseInitStruct->TIM_Period ;

  /* Set the Prescaler value */
  TIMx->PSC = TIM_TimeBaseInitStruct->TIM_Prescaler;

  if ((TIMx == TIM1) || (TIMx == TIM8)|| (TIMx == TIM15)|| (TIMx == TIM16) || (TIMx == TIM17))
  {
    /* Set the Repetition Counter value */
    TIMx->RCR = TIM_TimeBaseInitStruct->TIM_RepetitionCounter;
  }

  /* Generate an update event to reload the Prescaler and the Repetition counter
     values immediately */
  TIMx->EGR = TIM_PSCReloadMode_Immediate;
}
这段代码干的事情主要是:
- 获取当前定时器控制寄存器的状态字
tmpcr1 = TIMx->CR1;
- 清空该定时器控制寄存器的
位4,即DIR位、位5和位6,即CMS位,再根据所选用的计数模式重新配置这3个位
tmpcr1 &= (uint16_t)(~((uint16_t)(TIM_CR1_DIR | TIM_CR1_CMS)));
tmpcr1 |= (uint32_t)TIM_TimeBaseInitStruct->TIM_CounterMode;
这里需要配合相关宏定义和寄存器说明表来理解:
#define  TIM_CR1_DIR                         ((uint16_t)0x0010)            /*!< Direction */
#define  TIM_CR1_CMS                         ((uint16_t)0x0060)            /*!< CMS[1:0] bits (Center-aligned mode selection) */

#define TIM_CounterMode_Up                 ((uint16_t)0x0000)
#define TIM_CounterMode_Down               ((uint16_t)0x0010)
#define TIM_CounterMode_CenterAligned1     ((uint16_t)0x0020)
#define TIM_CounterMode_CenterAligned2     ((uint16_t)0x0040)
#define TIM_CounterMode_CenterAligned3     ((uint16_t)0x0060)
#define IS_TIM_COUNTER_MODE(MODE) (((MODE) == TIM_CounterMode_Up) ||  \
                                   ((MODE) == TIM_CounterMode_Down) || \
                                   ((MODE) == TIM_CounterMode_CenterAligned1) || \
                                   ((MODE) == TIM_CounterMode_CenterAligned2) || \
                                   ((MODE) == TIM_CounterMode_CenterAligned3))
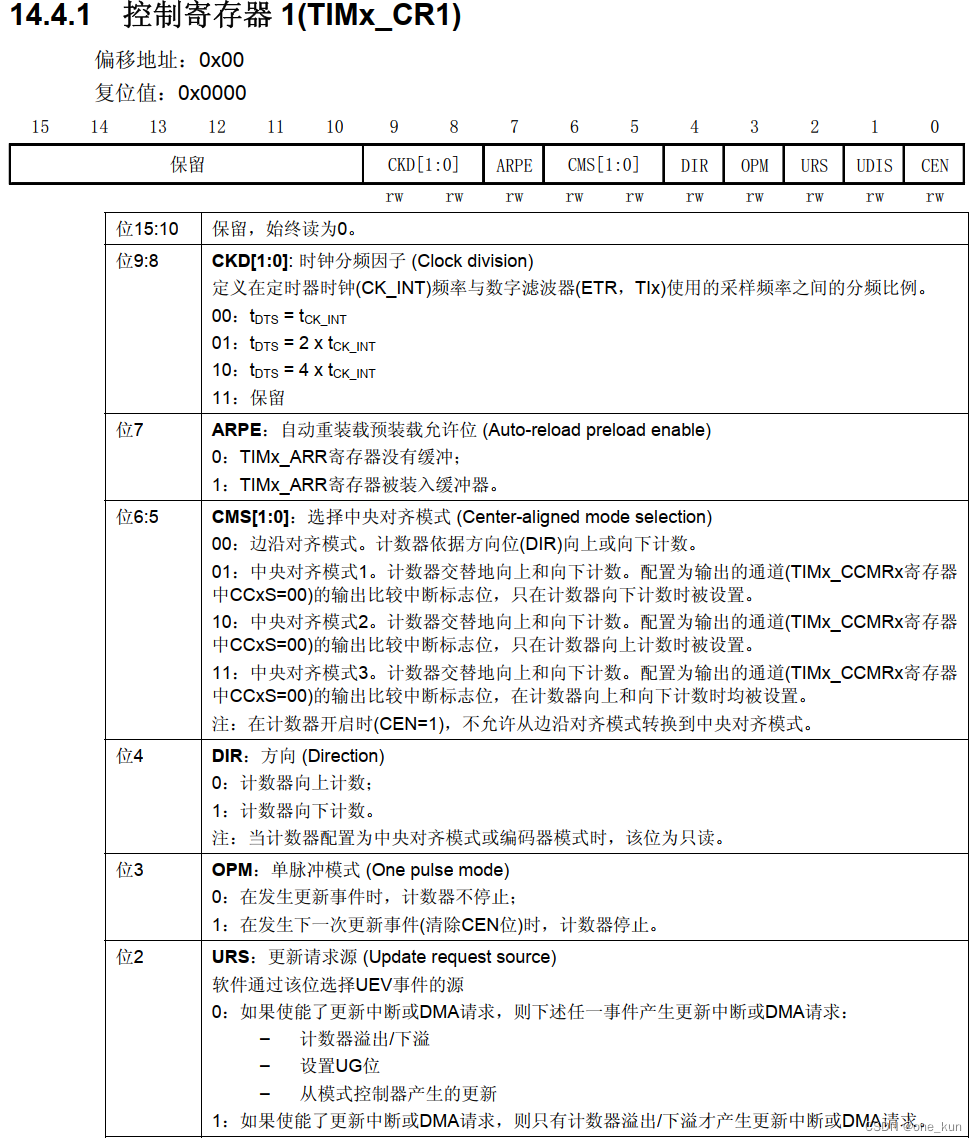
tmpcr1 &= (uint16_t)(~((uint16_t)(TIM_CR1_DIR | TIM_CR1_CMS)));
这句代码:
(uint16_t)(TIM_CR1_DIR | TIM_CR1_CMS)) =  (uint16_t)(0x60|0x10) = 0000 0000 0111 0000(二进制)
然后取反即:
1111 1111 1000 1111
再执行
tmpcr1 |= (uint32_t)TIM_TimeBaseInitStruct->TIM_CounterMode;
就把此时的计数模式赋给了该寄存器
- 配置时钟分频系数
tmpcr1 &= (uint16_t)(~((uint16_t)TIM_CR1_CKD));
tmpcr1 |= (uint32_t)TIM_TimeBaseInitStruct->TIM_ClockDivision;
这里的操作和上一个步骤同理。
- 然后把配置信息写入控制寄存器里
TIMx->CR1 = tmpcr1;
- 设置定时器的自动重装载值和分频系数
/* Set the Autoreload value */
TIMx->ARR = TIM_TimeBaseInitStruct->TIM_Period ;
/* Set the Prescaler value */
TIMx->PSC = TIM_TimeBaseInitStruct->TIM_Prescaler;
- 查看是否需要设置重复计数次数
/* Set the Repetition Counter value */
    TIMx->RCR = TIM_TimeBaseInitStruct->TIM_RepetitionCounter;
- 产生一个更新中断来重装载用户配置的重复计数信息和自动重装载值
/* Generate an update event to reload the Prescaler and the Repetition counter
     values immediately */
TIMx->EGR = TIM_PSCReloadMode_Immediate;
如何计算每次中断的时间
首先算出来咱们每计数一次所需要的时间:
f
计数频率
f_{计数频率}
f计数频率 =
f
主频
f_{主频}
f主频 / (分频系数+1)
比如,我的stm32f103主频72MHz,分频系数为719
那么
f
计数频率
f_{计数频率}
f计数频率 = 72MHz / (71+1)= 0.1MHz = 100KHz
每次计数所需要的时间
t
0
t_0
t0 为:1/1MHz = 0.00001s
然后再看ARR的设定值,以999为例子,那么每次进入中断需要(999+1) t 0 t_0 t0的时间,也就是0.01s
于是有了一个公式:
t
中断
t_{中断}
t中断 = (分频系数+1)×(ARR+1) /
f
主频
f_{主频}
f主频
TIM_ITConfig()与TIM_Cmd()
这两个函数就很简单了
void TIM_ITConfig(TIM_TypeDef* TIMx, uint16_t TIM_IT, FunctionalState NewState)
{
  /* Check the parameters */
  assert_param(IS_TIM_ALL_PERIPH(TIMx));
  assert_param(IS_TIM_IT(TIM_IT));
  assert_param(IS_FUNCTIONAL_STATE(NewState));

  if (NewState != DISABLE)
  {
    /* Enable the Interrupt sources */
    TIMx->DIER |= TIM_IT;
  }
  else
  {
    /* Disable the Interrupt sources */
    TIMx->DIER &= (uint16_t)~TIM_IT;
  }
}
TIM_ITConfig()这个函数操控中断使能寄存器来使定时器中断被开启
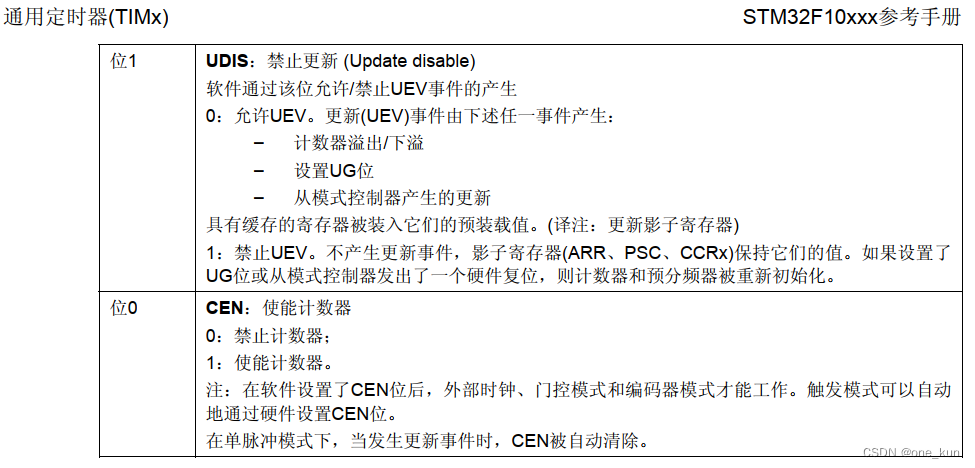
void TIM_Cmd(TIM_TypeDef* TIMx, FunctionalState NewState)
{
  /* Check the parameters */
  assert_param(IS_TIM_ALL_PERIPH(TIMx));
  assert_param(IS_FUNCTIONAL_STATE(NewState));

  if (NewState != DISABLE)
  {
    /* Enable the TIM Counter */
    TIMx->CR1 |= TIM_CR1_CEN;
  }
  else
  {
    /* Disable the TIM Counter */
    TIMx->CR1 &= (uint16_t)(~((uint16_t)TIM_CR1_CEN));
  }
}
TIM_Cmd()这个函数操控控制寄存器 1(TIMx_CR1)来开启和关闭定时器。
感谢您的阅读
下附一个定时器翻转LED灯代码与视频:
void TIM2_Int_Init(u16 arr,u16 psc)
{
  	TIM_TimeBaseInitTypeDef  TIM_TimeBaseStructure;
	NVIC_InitTypeDef NVIC_InitStructure;

	RCC_APB1PeriphClockCmd(RCC_APB1Periph_TIM2, ENABLE);
	TIM_TimeBaseStructure.TIM_Period = arr;
	TIM_TimeBaseStructure.TIM_Prescaler =psc;
	TIM_TimeBaseStructure.TIM_ClockDivision = TIM_CKD_DIV1;
	TIM_TimeBaseStructure.TIM_CounterMode = TIM_CounterMode_Up;
	TIM_TimeBaseInit(TIM2, &TIM_TimeBaseStructure);

	TIM_ITConfig(TIM2,TIM_IT_Update,DISABLE);

	NVIC_InitStructure.NVIC_IRQChannel = TIM2_IRQn;
	NVIC_InitStructure.NVIC_IRQChannelPreemptionPriority = 1;
	NVIC_InitStructure.NVIC_IRQChannelSubPriority = 3;
	NVIC_InitStructure.NVIC_IRQChannelCmd = ENABLE;
	NVIC_Init(&NVIC_InitStructure);

	TIM_Cmd(TIM2, DISABLE);
}
u8 LED_state = LED_ON;
int main(void)
{
	LED_Init();
	LED_Set(LED_state);
	TIM2_Int_Init(719,999);// 720 * 1000 / 72 000 000 = 0.01 s
	TIM_ITConfig(TIM2, TIM_IT_Update,ENABLE);
  	TIM_Cmd(TIM2, ENABLE);
	while (1)
	{
	}
}
void TIM2_IRQHandler(void)
{
	if (TIM_GetITStatus(TIM2, TIM_IT_Update) == SET)
	{
		TIM_ClearITPendingBit(TIM2, TIM_IT_Update);
		count++;

		if(count>=50)
		{
			LED_state = 1 - LED_state;
			LED_Set(LED_state);
			count = 0;
		}
	}
}
定时器中断LED翻转


 1636
1636

 被折叠的 条评论
为什么被折叠?
被折叠的 条评论
为什么被折叠?
 到【灌水乐园】发言


