


1. 搭建开发环境
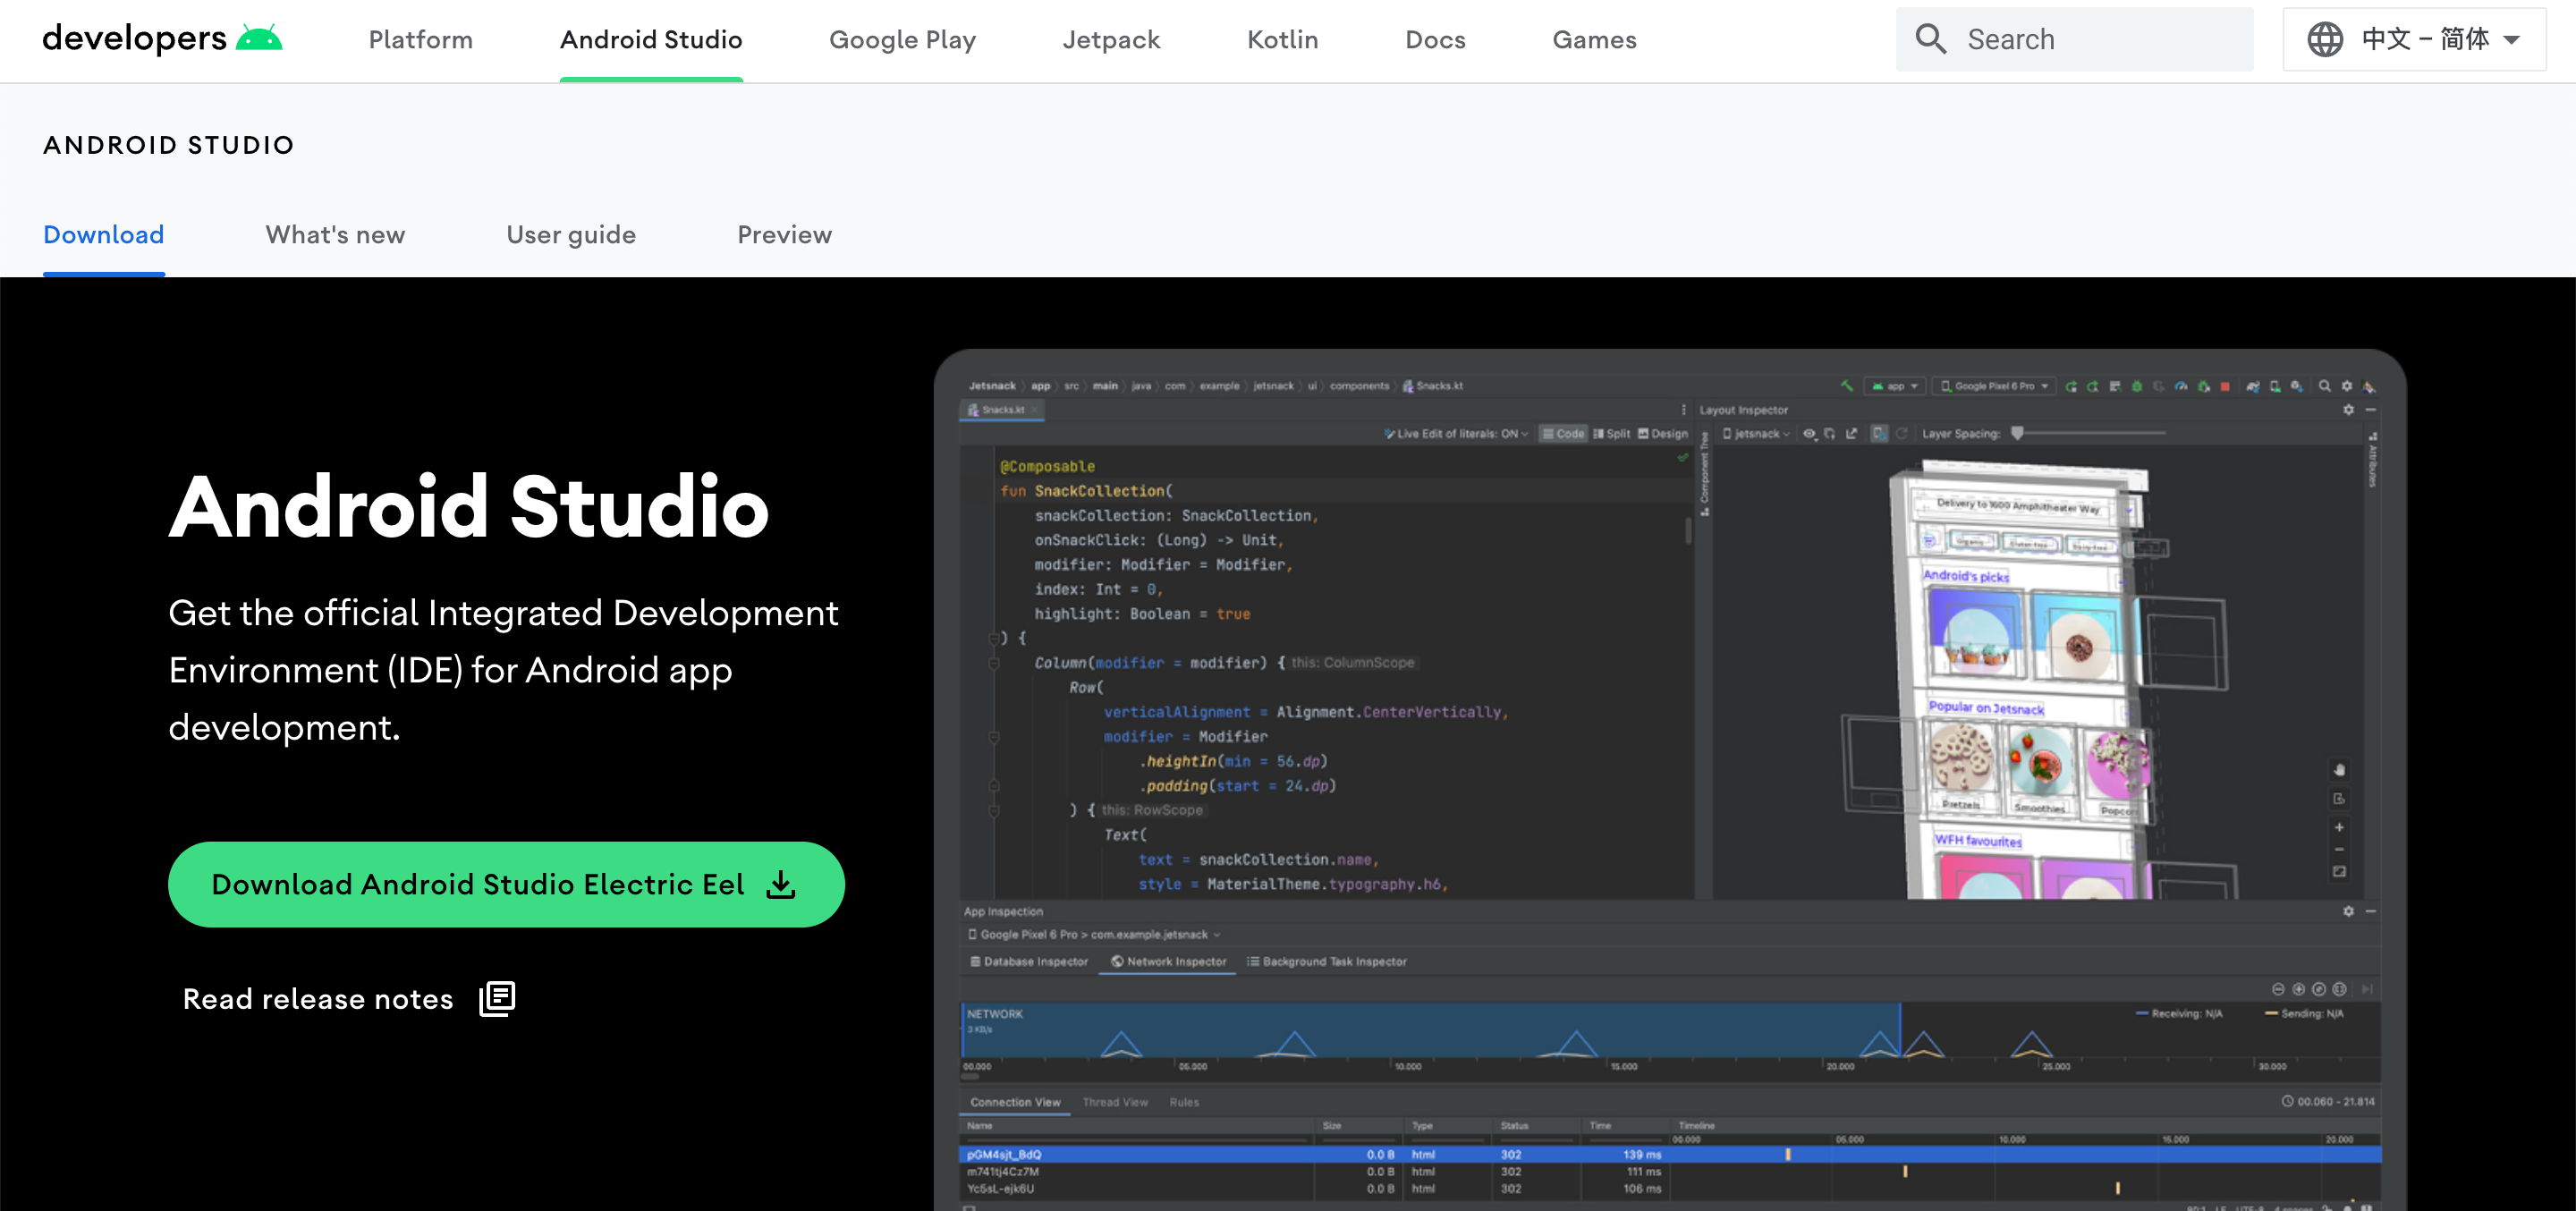
去官网(https://developer.android.google.cn/studio)下载 Android Studio。
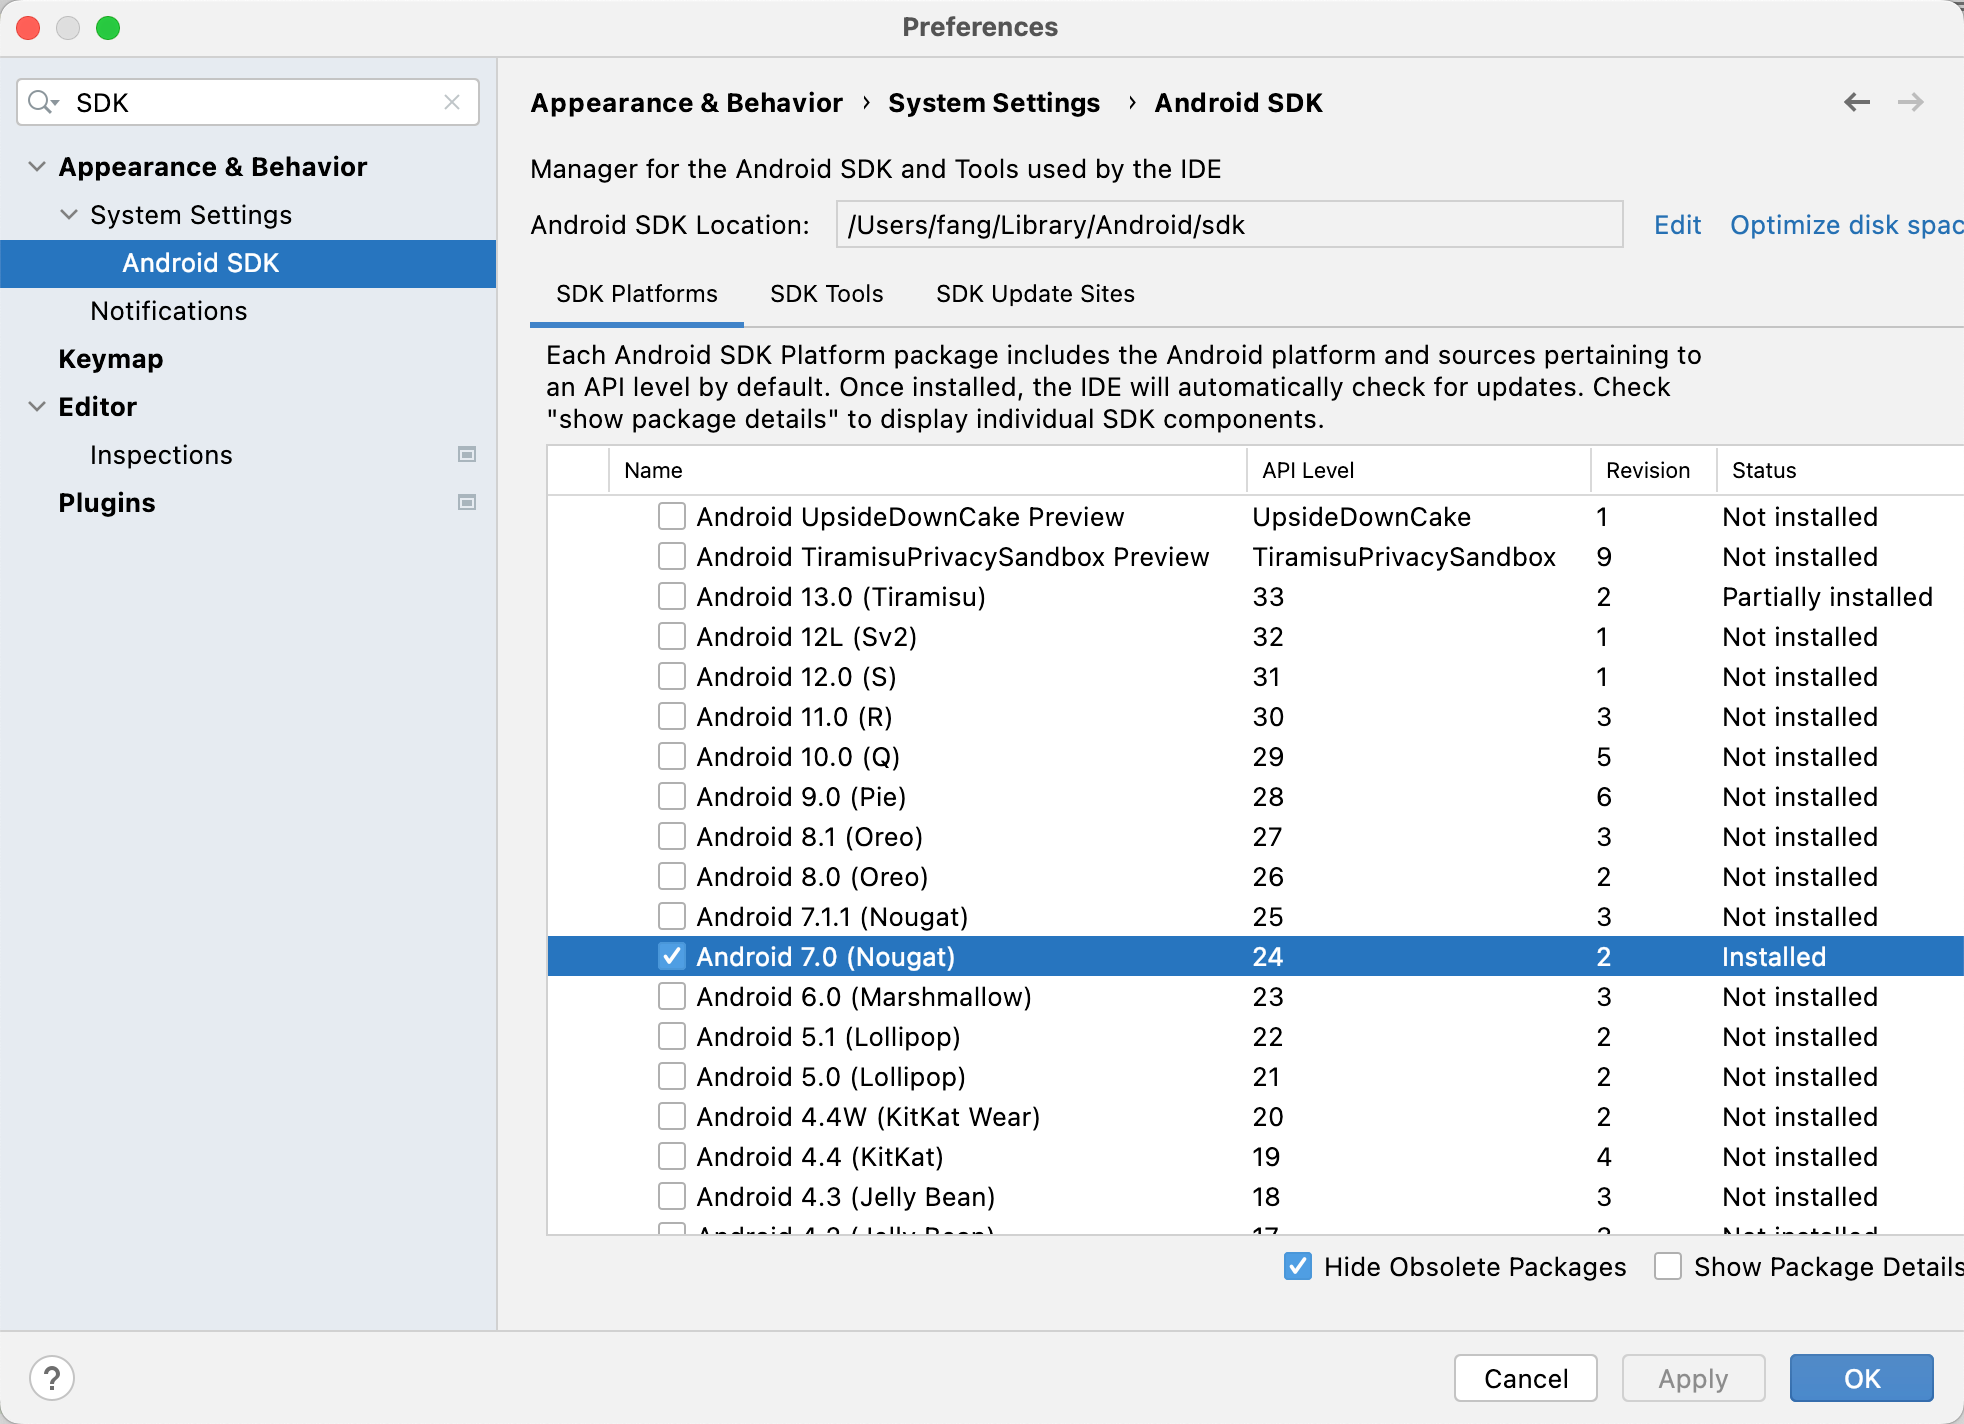
安装SDK(默认Android 7.0即可)
全局 gradle 镜像配置
在用户主目录下的 .gradle 文件夹下面新建文件 init.gradle,内容为
allprojects {
    repositories {
        def ALIYUN_REPOSITORY_URL = 'https://maven.aliyun.com/repository/central'
        def ALIYUN_JCENTER_URL = 'https://maven.aliyun.com/repository/public'
        all { ArtifactRepository repo ->
            if(repo instanceof MavenArtifactRepository){
                def url = repo.url.toString()
                if (url.startsWith('https://repo1.maven.org/maven2') || url.startsWith('http://repo1.maven.org/maven2')) {
                    project.logger.lifecycle "Repository ${repo.url} replaced by $ALIYUN_REPOSITORY_URL."
                    remove repo
                }
                if (url.startsWith('https://jcenter.bintray.com/') || url.startsWith('http://jcenter.bintray.com/')) {
                    project.logger.lifecycle "Repository ${repo.url} replaced by $ALIYUN_JCENTER_URL."
                    remove repo
                }
            }
        }
        maven {
            url ALIYUN_REPOSITORY_URL
            url ALIYUN_JCENTER_URL
        }
    }


    buildscript{
        repositories {
        def ALIYUN_REPOSITORY_URL = 'https://maven.aliyun.com/repository/central'
        def ALIYUN_JCENTER_URL = 'https://maven.aliyun.com/repository/public'
            all { ArtifactRepository repo ->
                if(repo instanceof MavenArtifactRepository){
                    def url = repo.url.toString()
                    if (url.startsWith('https://repo1.maven.org/maven2') || url.startsWith('http://repo1.maven.org/maven2')) {
                        project.logger.lifecycle "Repository ${repo.url} replaced by $ALIYUN_REPOSITORY_URL."
                        remove repo
                    }
                    if (url.startsWith('https://jcenter.bintray.com/') || url.startsWith('http://jcenter.bintray.com/')) {
                        project.logger.lifecycle "Repository ${repo.url} replaced by $ALIYUN_JCENTER_URL."
                        remove repo
                    }
                }
            }
            maven {
                url ALIYUN_REPOSITORY_URL
                url ALIYUN_JCENTER_URL
            }
        }
    }
}
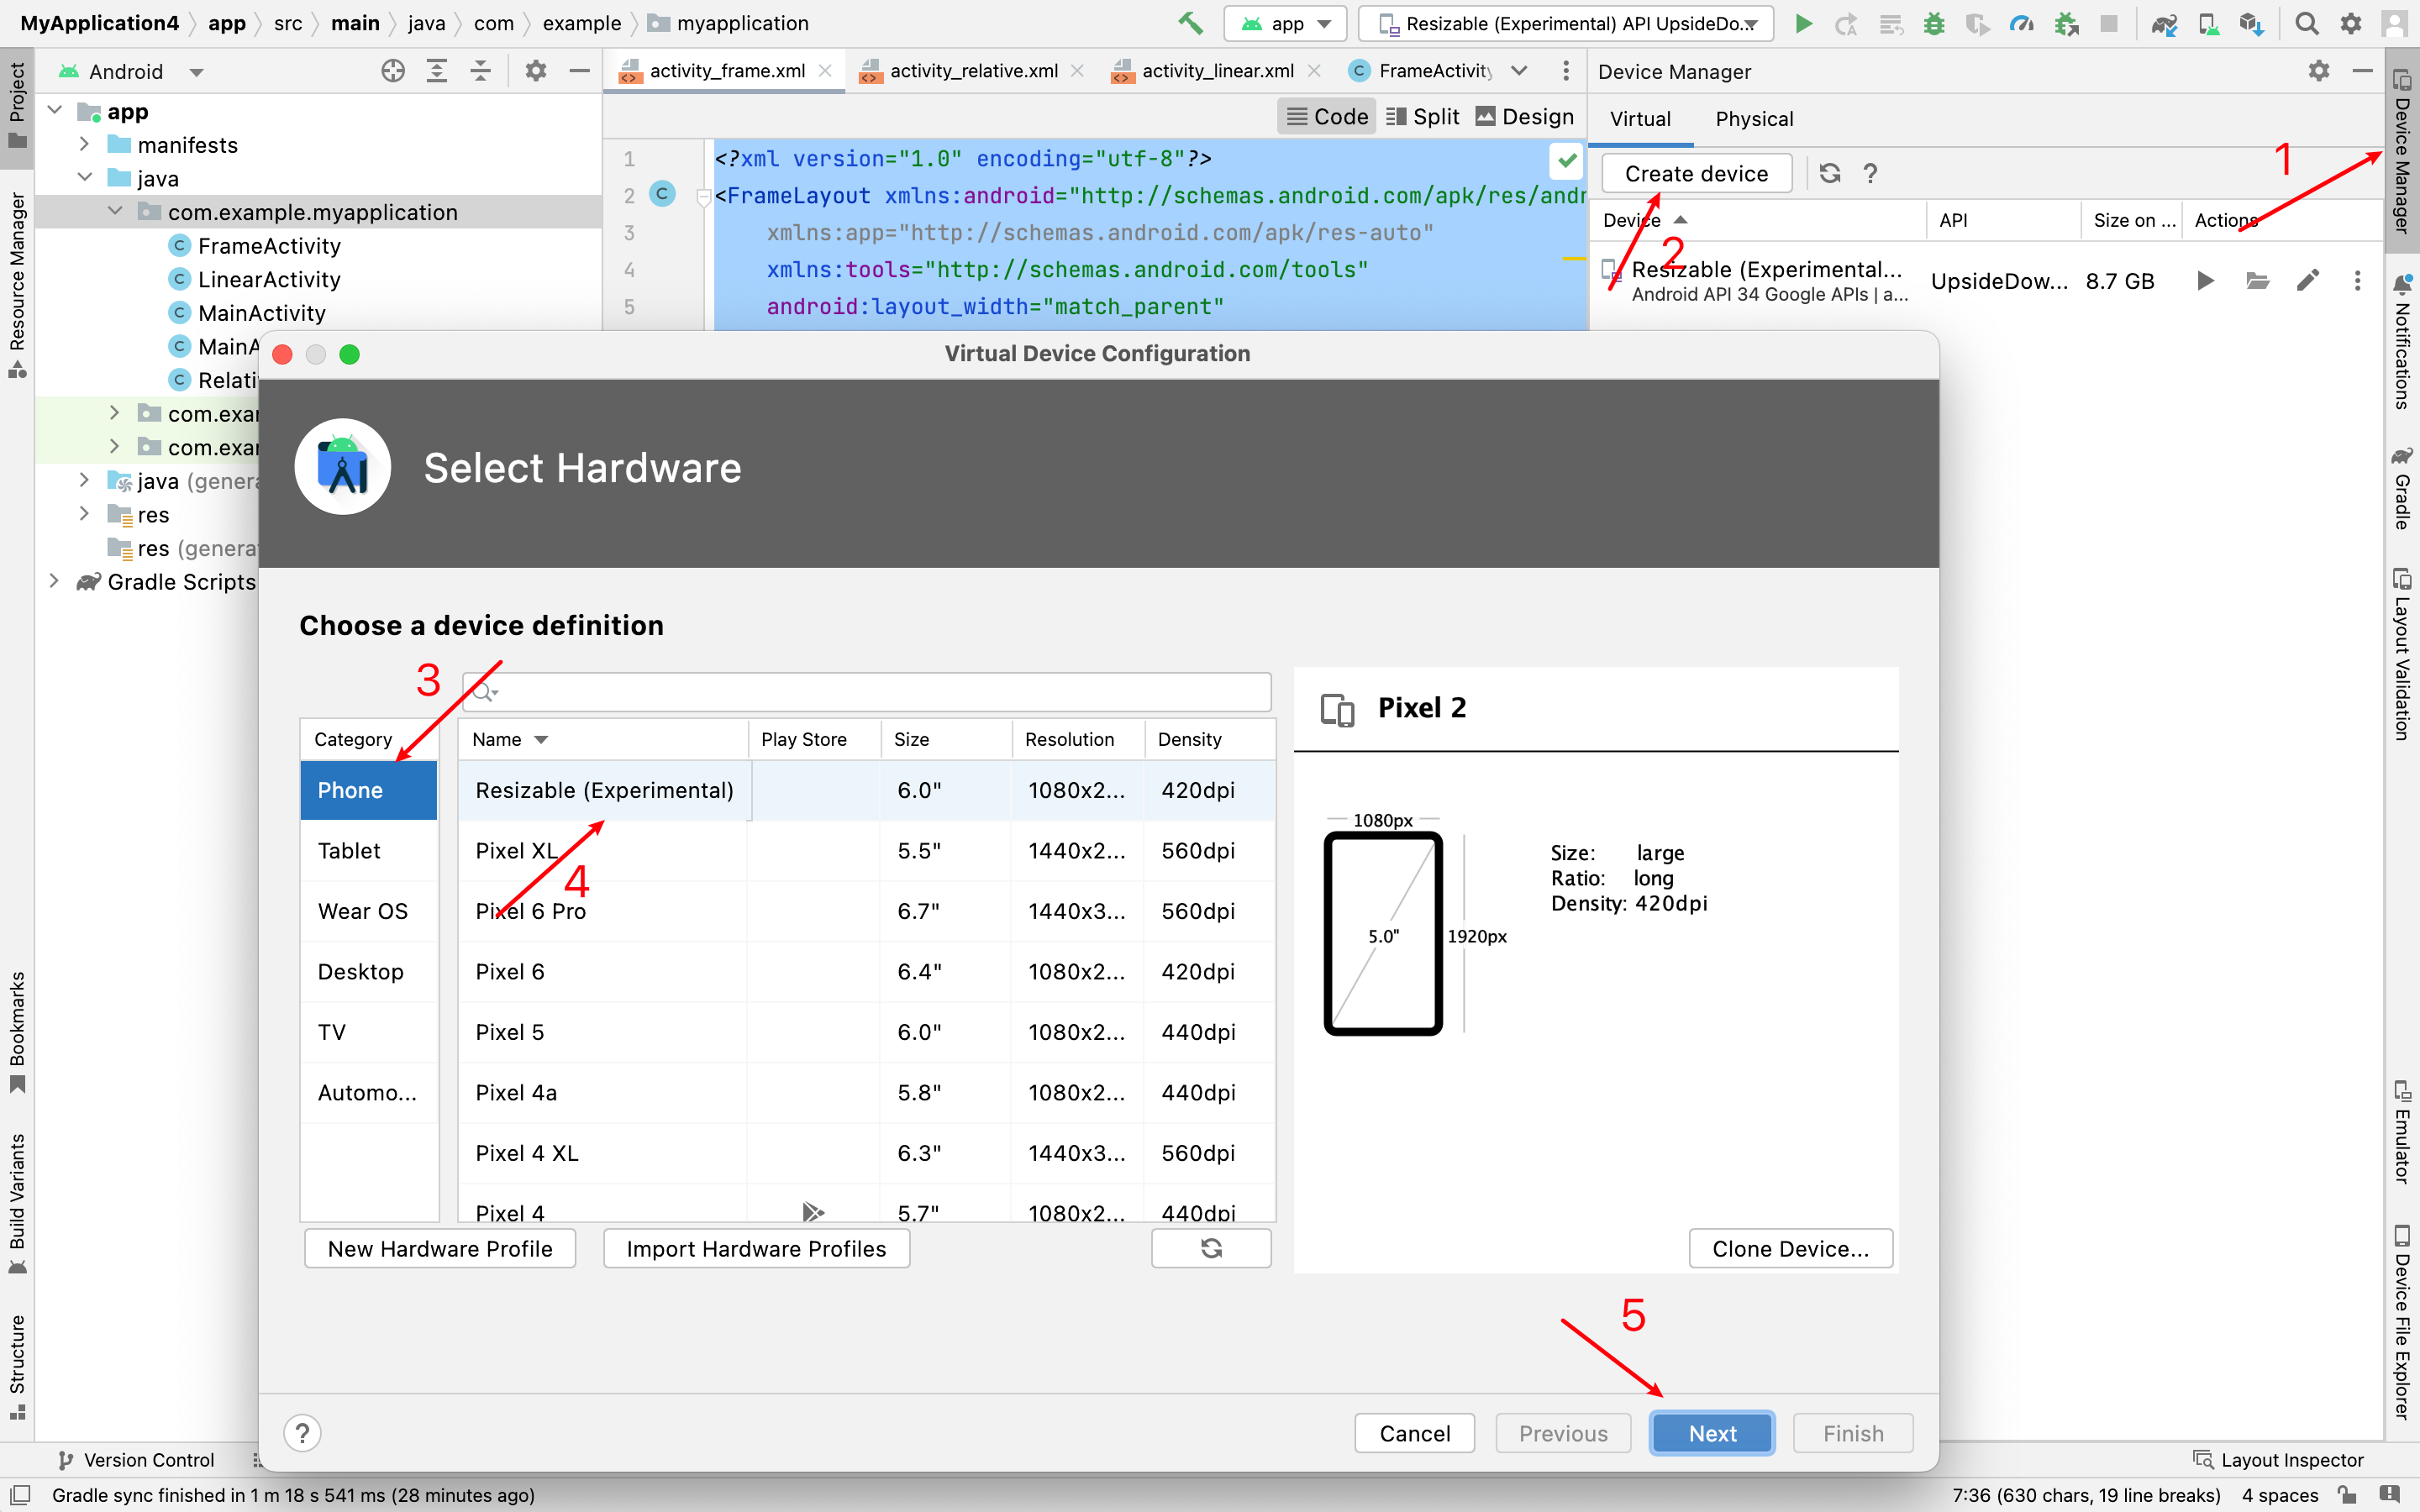
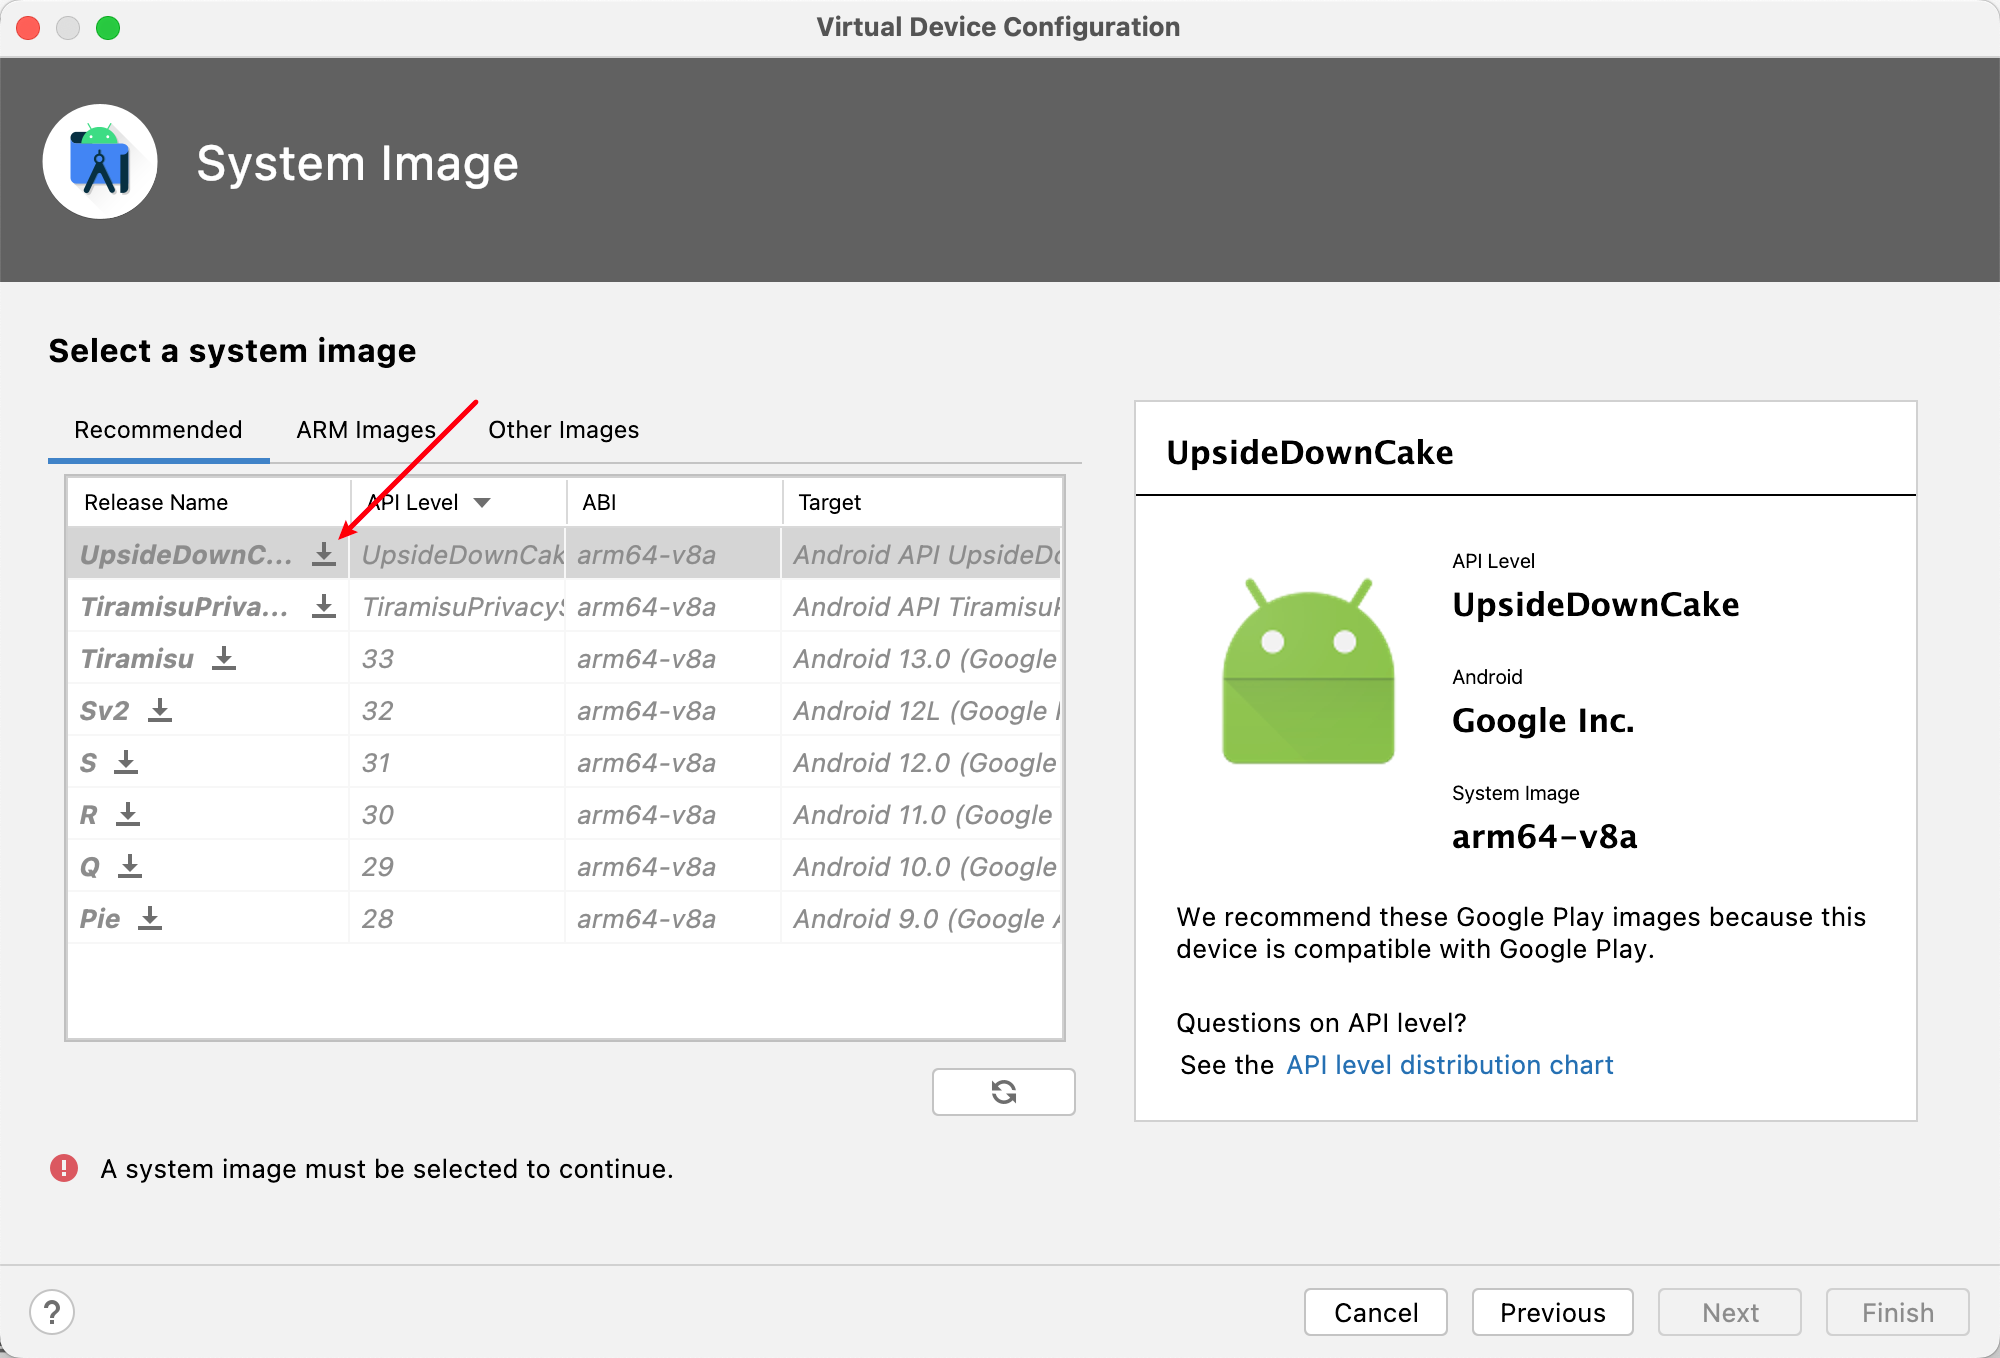
安装模拟器
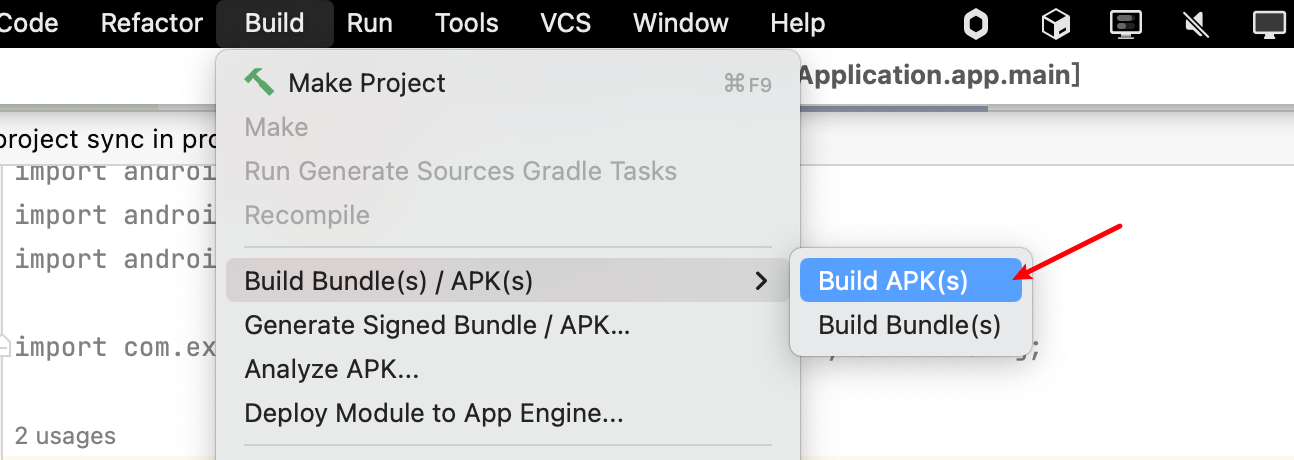
2. 生成APK文件
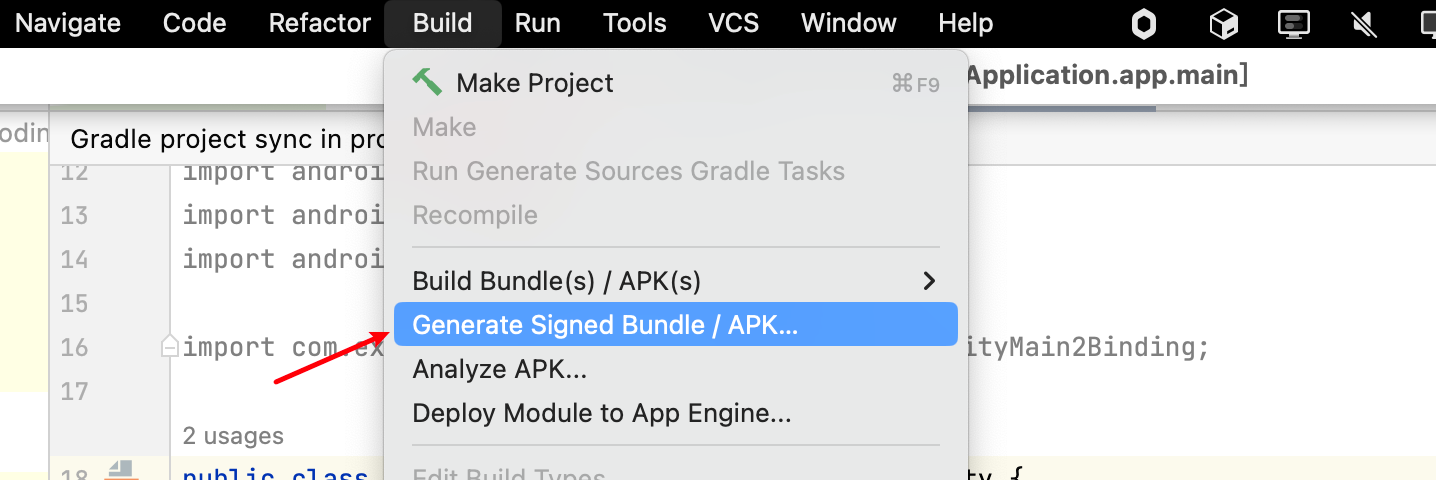
两种方式,一种是debug版本,一种是带签名的版本。
debug版本:
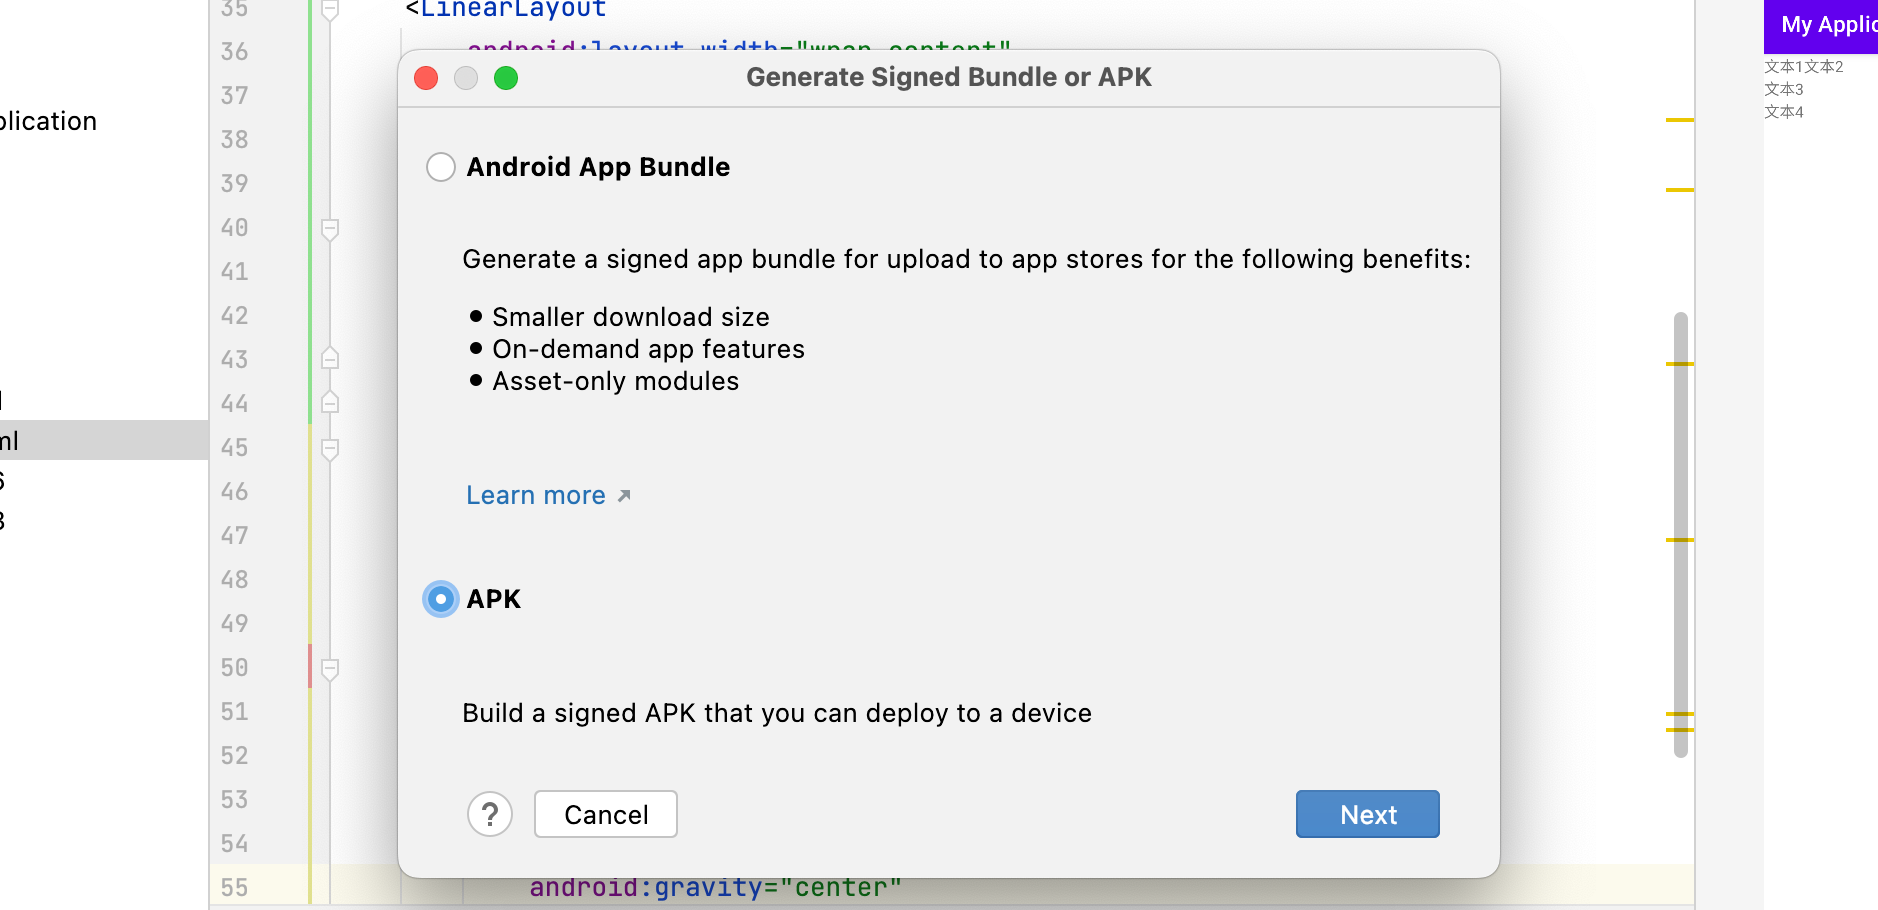
带签名的版本:
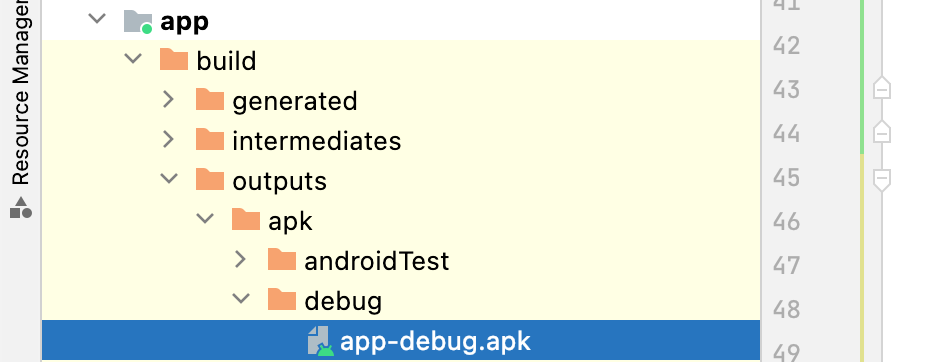
构建完毕后可以在 app/build/outputs/apk里找到
运行结果:
3. 练习线性布局
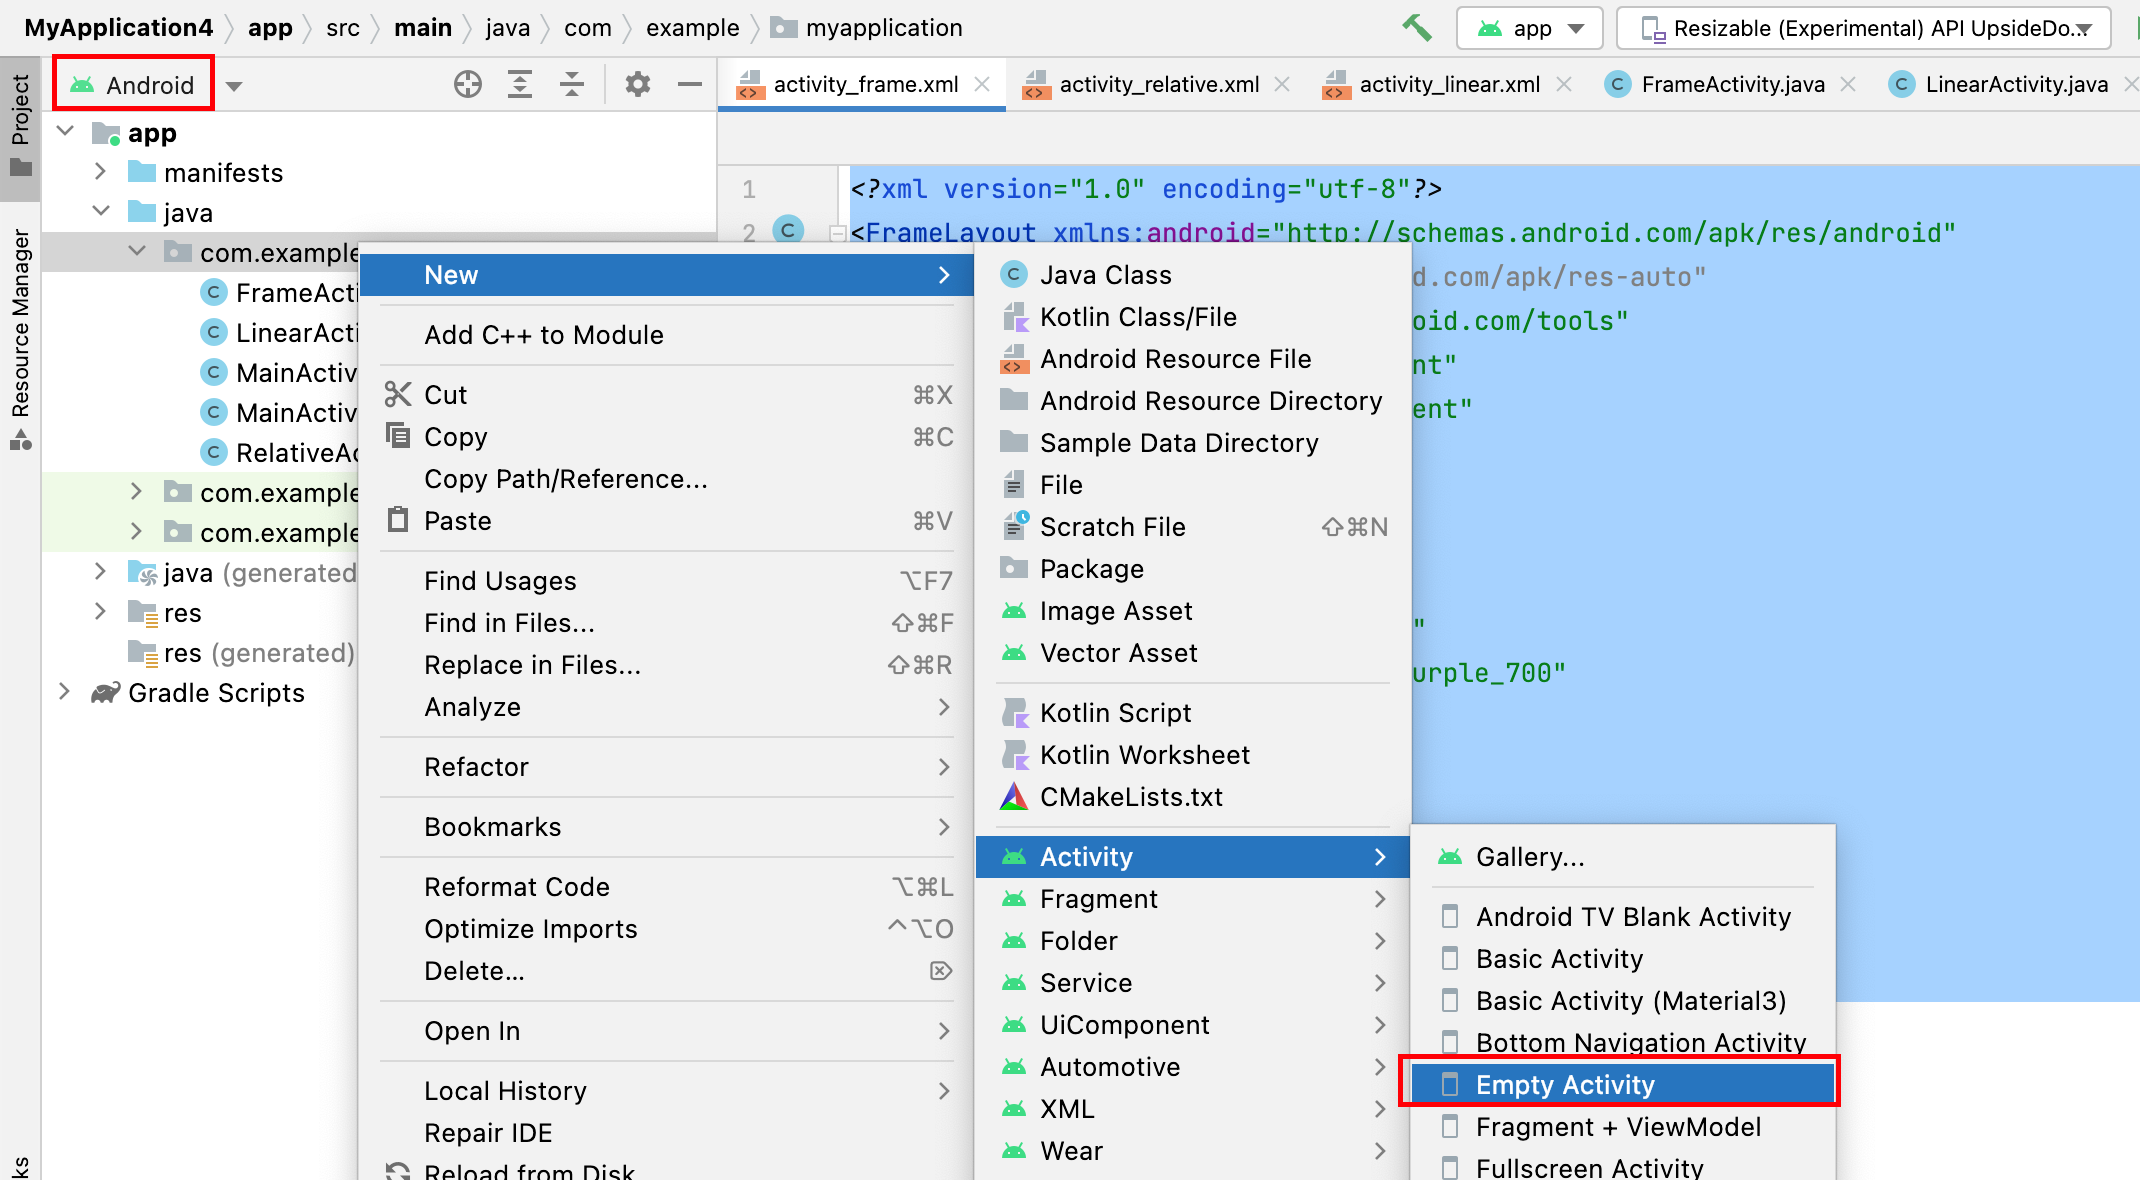
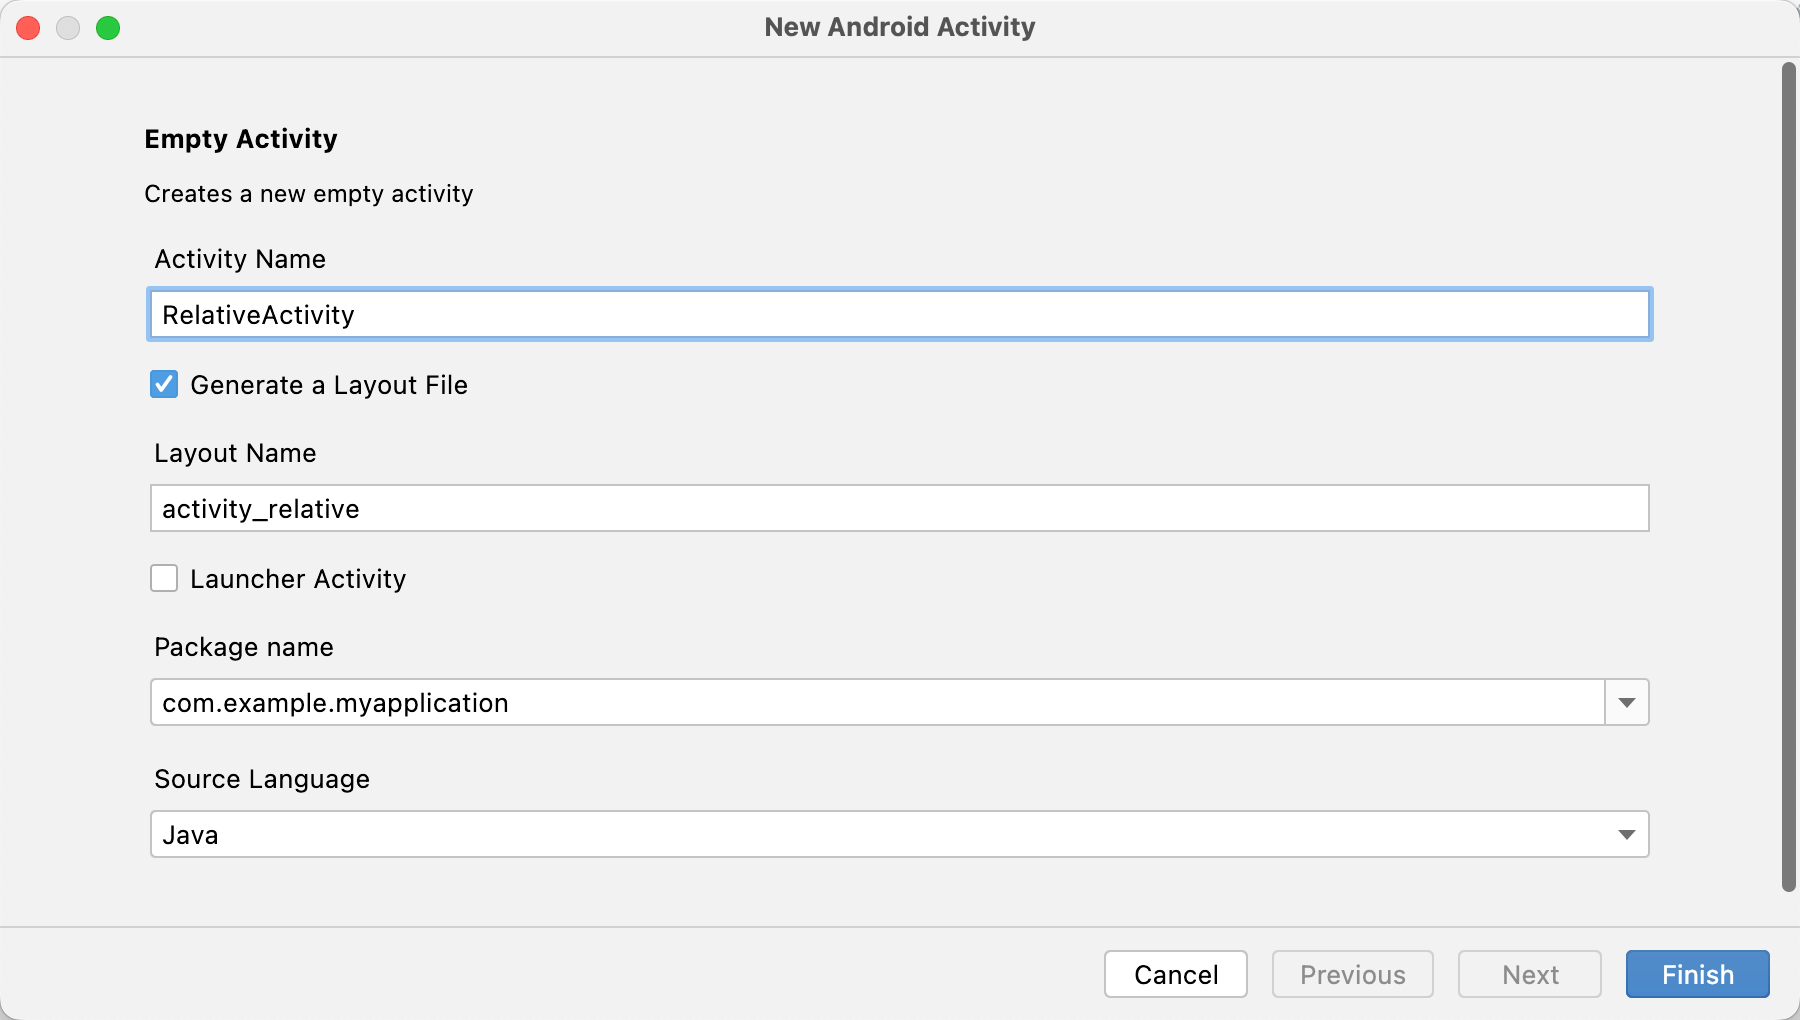
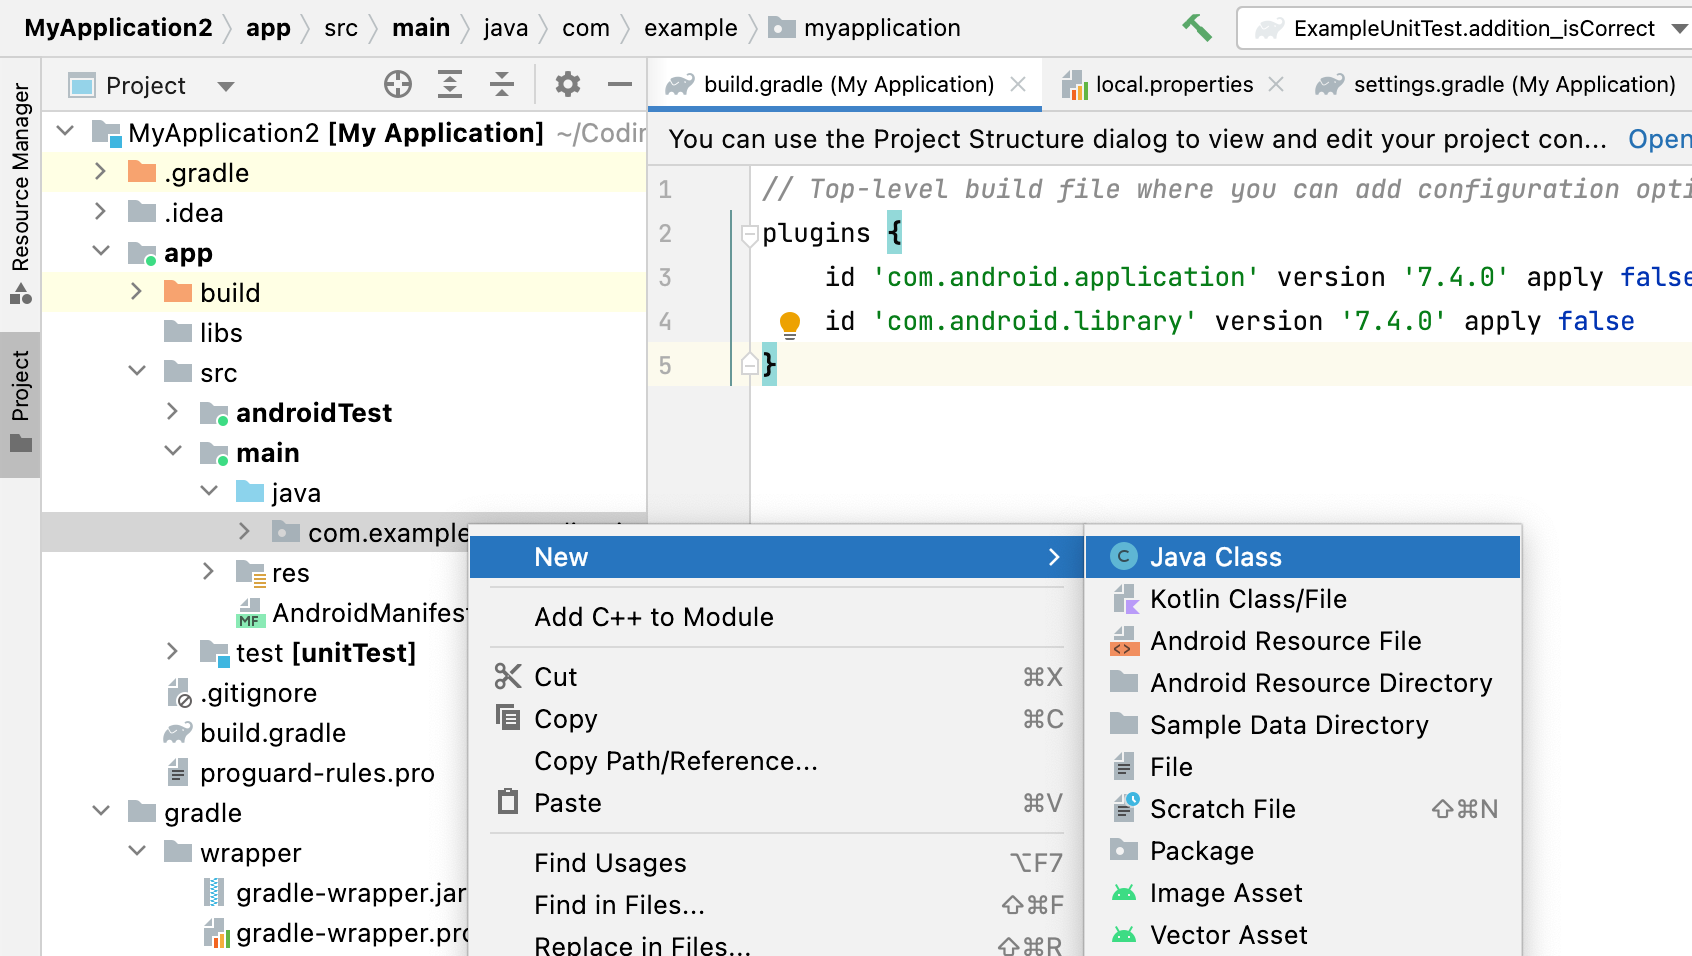
番外:如何创建一个新的 Activity?
将
YourName替换为你要创建的 Activity的名字,点击Finish即可。
orientation
- vertical(垂直): 从上到下
- horizontal(水平):从左到右
dp:设置边距单位
sp:设置文字大小单位
尽量避免将宽高设置为固定值。
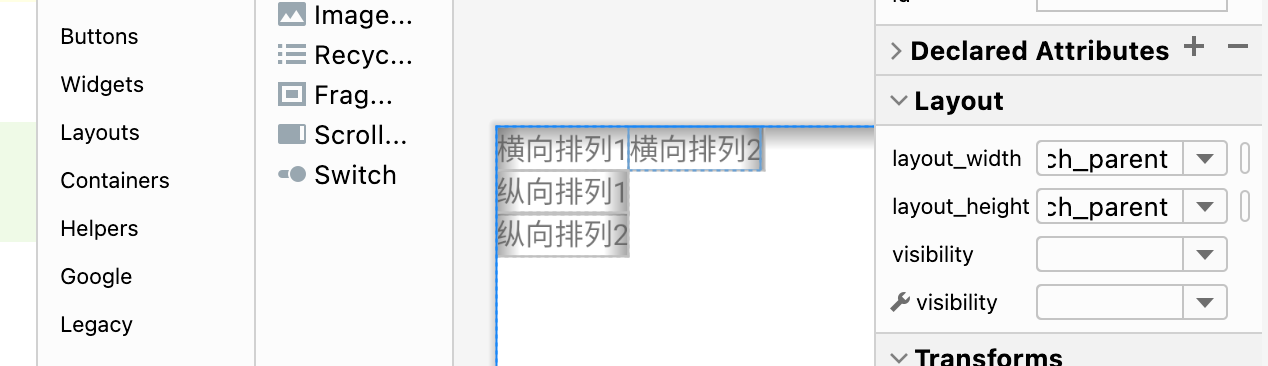
练习一:试着做出如下界面
实现解析:将整体看作一个大的线型布局(纵向),里面塞三个横向布局。
将文本1,2放入第一个横向布局,文本3放入第二个横向布局,文本4放入第三个横向布局。
<?xml version="1.0" encoding="utf-8"?>
<LinearLayout xmlns:android="http://schemas.android.com/apk/res/android"
    xmlns:app="http://schemas.android.com/apk/res-auto"
    xmlns:tools="http://schemas.android.com/tools"
    android:layout_width="match_parent"
    android:layout_height="match_parent"
    tools:context=".LinearActivity"
    android:orientation="vertical"
    >

    <LinearLayout
        android:layout_width="wrap_content"
        android:layout_height="wrap_content"
        android:orientation="horizontal"
        >
        <TextView
            android:layout_width="wrap_content"
            android:layout_height="wrap_content"
            android:text="横向排列1" />
        <TextView
            android:layout_width="wrap_content"
            android:layout_height="wrap_content"
            android:text="横向排列2" />
    </LinearLayout>

    <LinearLayout
        android:layout_width="wrap_content"
        android:layout_height="wrap_content"
        android:orientation="horizontal"
        >
        <TextView
            android:layout_width="wrap_content"
            android:layout_height="wrap_content"
            android:text="纵向排列1" />
    </LinearLayout>

    <LinearLayout
        android:layout_width="wrap_content"
        android:layout_height="wrap_content"
        android:orientation="horizontal"
        >
        <TextView
            android:layout_width="wrap_content"
            android:layout_height="wrap_content"
            android:text="纵向排列2" />
    </LinearLayout>

</LinearLayout>
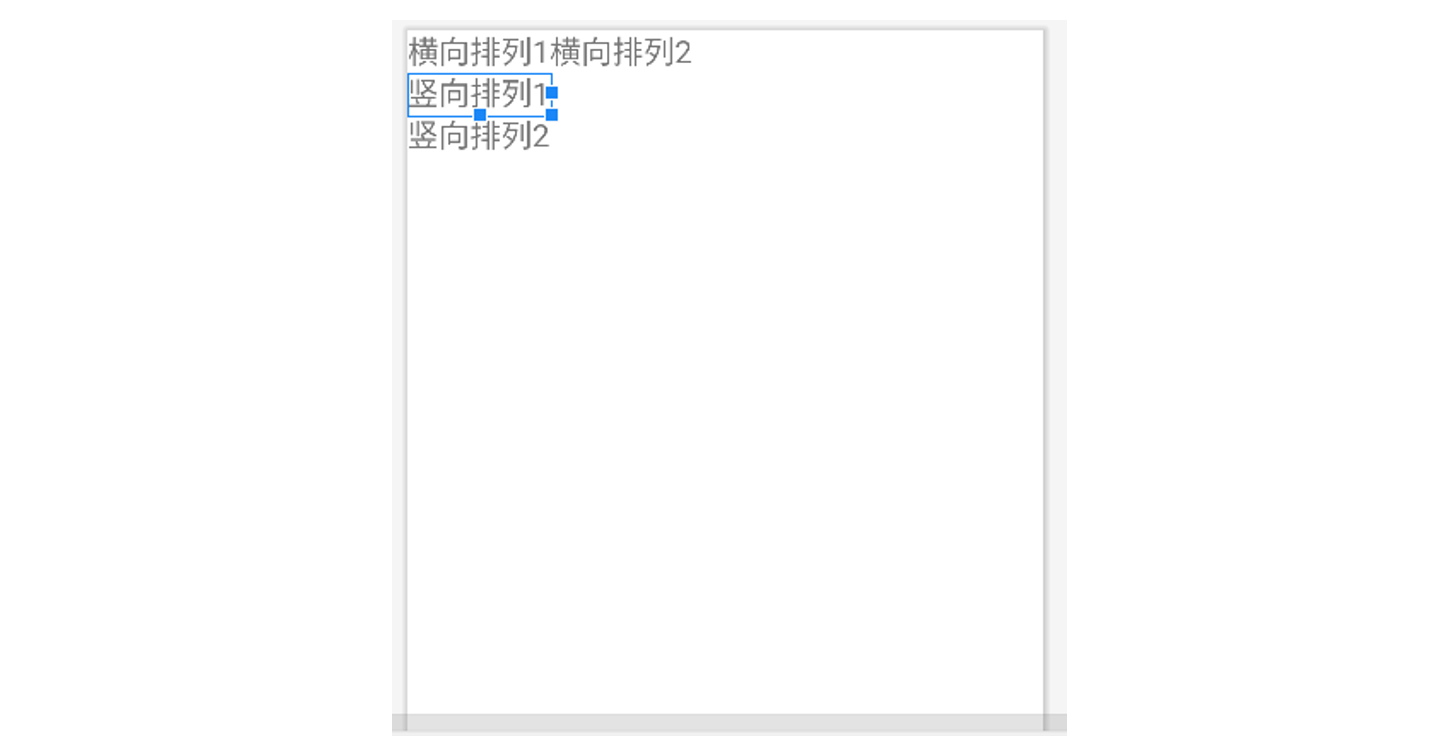
效果如图:
在此基础上,使用 margin、padding、textSize、gravity、layout_gravity修饰后的效果:
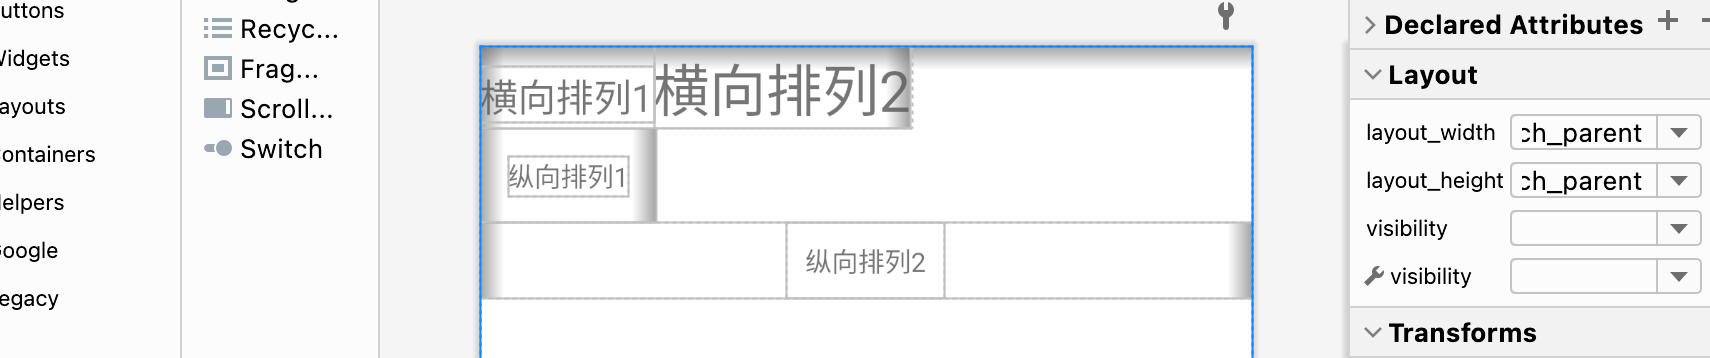
最终代码:
<?xml version="1.0" encoding="utf-8"?>
<LinearLayout xmlns:android="http://schemas.android.com/apk/res/android"
    xmlns:app="http://schemas.android.com/apk/res-auto"
    xmlns:tools="http://schemas.android.com/tools"
    android:layout_width="match_parent"
    android:layout_height="match_parent"
    tools:context=".LinearActivity"
    android:orientation="vertical"
    >

    <LinearLayout
        android:layout_width="wrap_content"
        android:layout_height="wrap_content"
        android:orientation="horizontal"
        >
        <TextView
            android:layout_width="wrap_content"
            android:layout_height="wrap_content"
            android:textSize="20dp"
            android:text="横向排列1" />
        <TextView
            android:layout_width="wrap_content"
            android:layout_height="wrap_content"
            android:textSize="30dp"
            android:text="横向排列2" />
    </LinearLayout>

    <LinearLayout
        android:layout_width="wrap_content"
        android:layout_height="wrap_content"
        android:orientation="horizontal"
        >
        <TextView
            android:layout_width="wrap_content"
            android:layout_height="wrap_content"
            android:layout_margin="15dp"
            android:text="纵向排列1" />
    </LinearLayout>

    <LinearLayout
        android:layout_width="match_parent"
        android:layout_height="wrap_content"
        android:orientation="horizontal"
        android:gravity="center"
        >

        <TextView
            android:layout_width="wrap_content"
            android:layout_height="wrap_content"
            android:layout_gravity="center"
            android:padding="10dp"
            android:text="纵向排列2" />
    </LinearLayout>

</LinearLayout>
4. 练习相对布局。
强调相对定位,以其他组件或父容器作为参照物,摆放组件的位置。
android:gravity设置子组件的摆放方式。android:ignoregravity设置某个子组件不受gravity的控制。
设置组件上的属性:android:layout_above、android:layout_below、android:layout_toLeftOf、android:layout_toRightOf
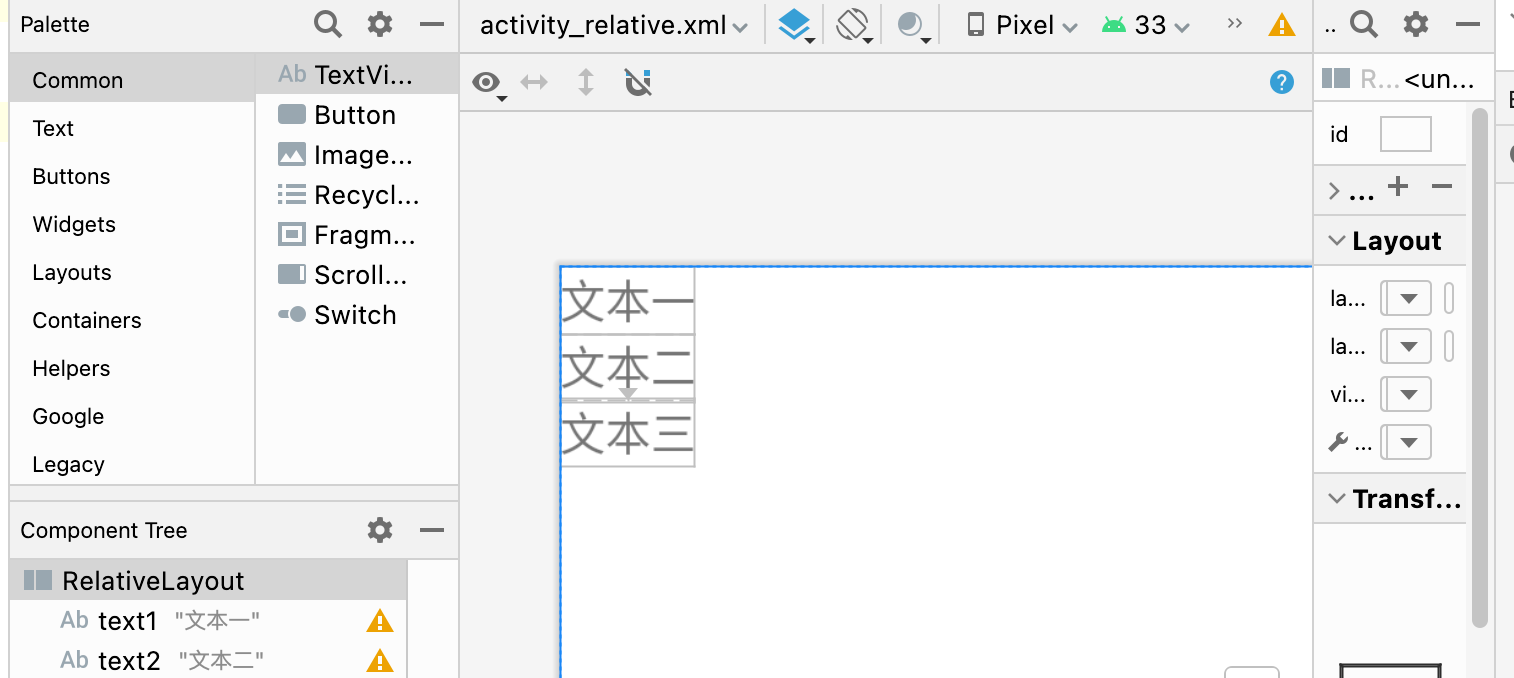
练习一:实现三个文本对齐,以第一个文本为参照相对定位。
新建一个 Activity,起名为 RelativeActivity
相对布局的操作就是:首先定义一个 RelativeLayout的布局,为其一个子元素赋予属性 android:id(如:@id/text1),其他元素则可以用 android:layout_below="@id/text1"来相对定位。
<?xml version="1.0" encoding="utf-8"?>
<RelativeLayout xmlns:android="http://schemas.android.com/apk/res/android"
    xmlns:app="http://schemas.android.com/apk/res-auto"
    xmlns:tools="http://schemas.android.com/tools"
    android:layout_width="match_parent"
    android:layout_height="match_parent"
    tools:context=".RelativeActivity">

    <TextView
        android:id="@+id/text1"
        android:layout_width="wrap_content"
        android:layout_height="wrap_content"
        android:text="文本一"
    />
    <TextView
        android:id="@+id/text2"
        android:layout_below="@id/text1"
        android:layout_width="wrap_content"
        android:layout_height="wrap_content"
        android:text="文本二"
        />
    <TextView
        android:layout_below="@id/text2"
        android:layout_width="wrap_content"
        android:layout_height="wrap_content"
        android:text="文本三"
        />
</RelativeLayout>
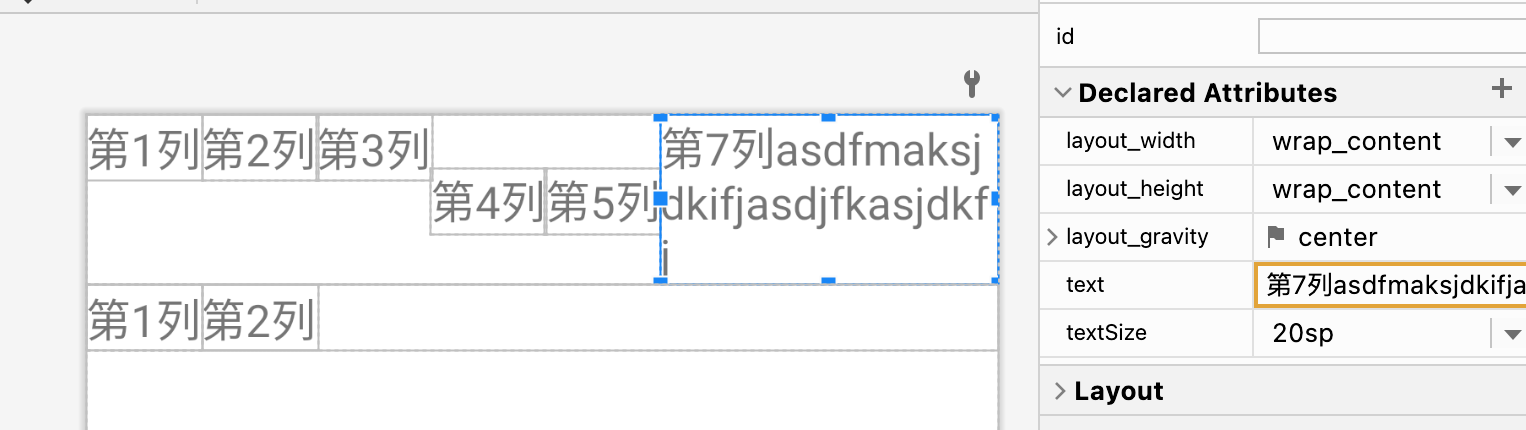
5. 练习表格布局。
<?xml version="1.0" encoding="utf-8"?>
<TableLayout xmlns:android="http://schemas.android.com/apk/res/android"
    xmlns:app="http://schemas.android.com/apk/res-auto"
    xmlns:tools="http://schemas.android.com/tools"
    android:layout_width="match_parent"
    android:layout_height="match_parent"
    android:shrinkColumns="6"
    android:collapseColumns="5"
    tools:context=".TableActivity">
    <TableRow>
        <TextView android:layout_height="wrap_content"
            android:layout_width="wrap_content"
            android:textSize="20sp"
            android:text="第1列"/>
        <TextView android:layout_height="wrap_content"
            android:layout_width="wrap_content"
            android:textSize="20sp"
            android:text="第2列"/>
        <TextView android:layout_height="wrap_content"
            android:layout_width="wrap_content"
            android:textSize="20sp"
            android:text="第3列"/>
        <TextView android:layout_height="wrap_content"
            android:layout_width="wrap_content"
            android:textSize="20sp"
            android:layout_gravity="center"
            android:text="第4列"/>
        <TextView android:layout_height="wrap_content"
            android:layout_width="wrap_content"
            android:textSize="20sp"
            android:layout_gravity="center"
            android:text="第5列"/>
        <TextView android:layout_height="wrap_content"
            android:layout_width="wrap_content"
            android:textSize="20sp"
            android:layout_gravity="center"
            android:text="第6列"/>
        <TextView android:layout_height="wrap_content"
            android:layout_width="wrap_content"
            android:textSize="20sp"
            android:layout_gravity="center"
            android:text="第7列asdfmaksjdkifjasdjfkasjdkf j"/>
    </TableRow>
    <TableRow>
        <TextView android:layout_height="wrap_content"
            android:layout_width="wrap_content"
            android:textSize="20sp"
            android:text="第1列"/>
        <TextView android:layout_height="wrap_content"
            android:layout_width="wrap_content"
            android:textSize="20sp"
            android:text="第2列"/>
    </TableRow>
</TableLayout>
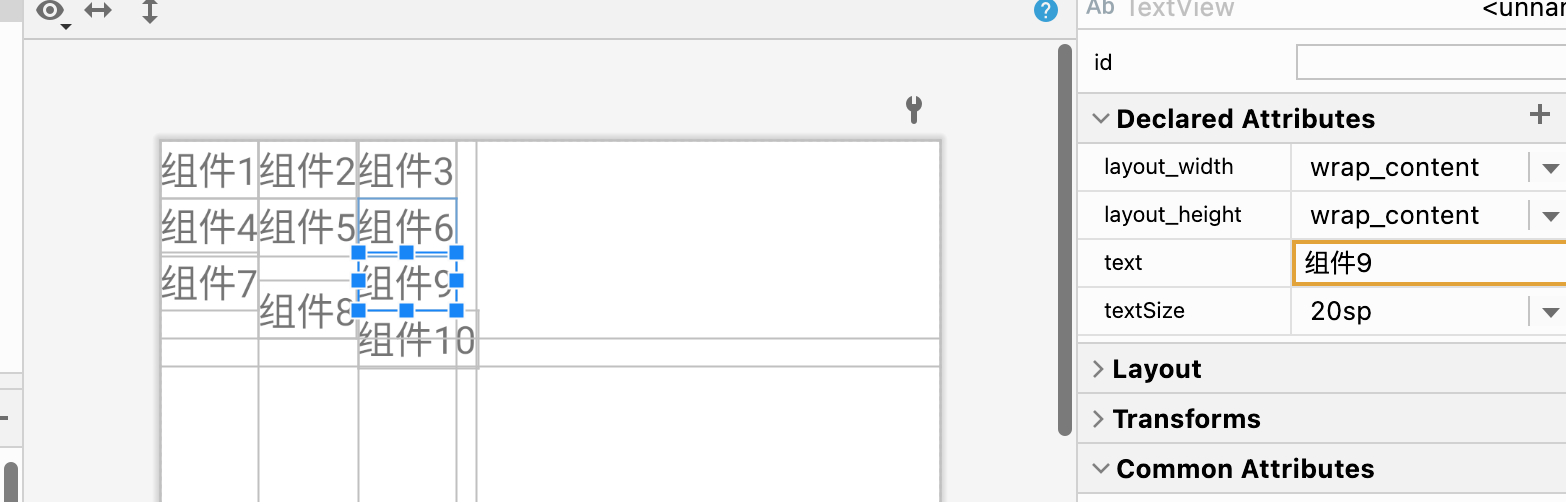
6. 练习网格布局。
<?xml version="1.0" encoding="utf-8"?>
<GridLayout xmlns:android="http://schemas.android.com/apk/res/android"
    xmlns:app="http://schemas.android.com/apk/res-auto"
    xmlns:tools="http://schemas.android.com/tools"
    android:layout_width="match_parent"
    android:layout_height="match_parent"
    android:columnCount="3"
    android:rowCount="5"
    android:orientation="horizontal"
    tools:context=".layout.GridLayout">
    <TextView android:layout_width="wrap_content"
        android:layout_height="wrap_content"
        android:text="组件1"
        android:textSize="20sp"/>
    <TextView android:layout_width="wrap_content"
        android:layout_height="wrap_content"
        android:text="组件2"
        android:textSize="20sp"/>
    <TextView android:layout_width="wrap_content"
        android:layout_height="wrap_content"
        android:text="组件3"
        android:textSize="20sp"/>
    <TextView android:layout_width="wrap_content"
        android:layout_height="wrap_content"
        android:text="组件4"
        android:textSize="20sp"/>
    <TextView android:layout_width="wrap_content"
        android:layout_height="wrap_content"
        android:text="组件5"
        android:textSize="20sp"/>
    <TextView android:layout_width="wrap_content"
        android:layout_height="wrap_content"
        android:text="组件6"
        android:textSize="20sp"/>
    <TextView android:layout_width="wrap_content"
        android:layout_height="wrap_content"
        android:text="组件7"
        android:textSize="20sp"/>
    <TextView android:layout_width="wrap_content"
        android:layout_height="wrap_content"
        android:text="组件8"
        android:layout_rowSpan="2"
        android:layout_gravity="center"
        android:textSize="20sp"/>
    <TextView android:layout_width="wrap_content"
        android:layout_height="wrap_content"
        android:text="组件9"
        android:textSize="20sp"/>
    <TextView android:layout_width="wrap_content"
        android:layout_height="wrap_content"
        android:text="组件10"
        android:layout_column="2"
        android:textSize="20sp"/>
</GridLayout>
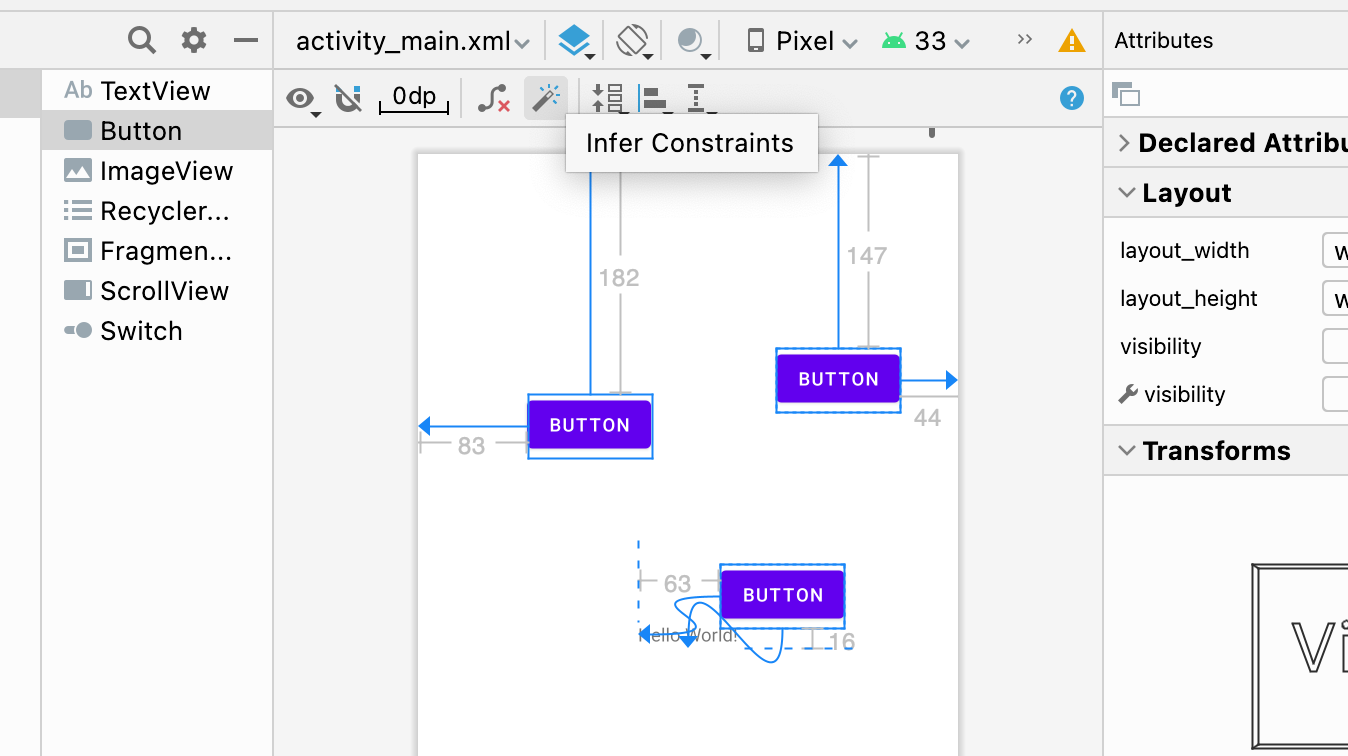
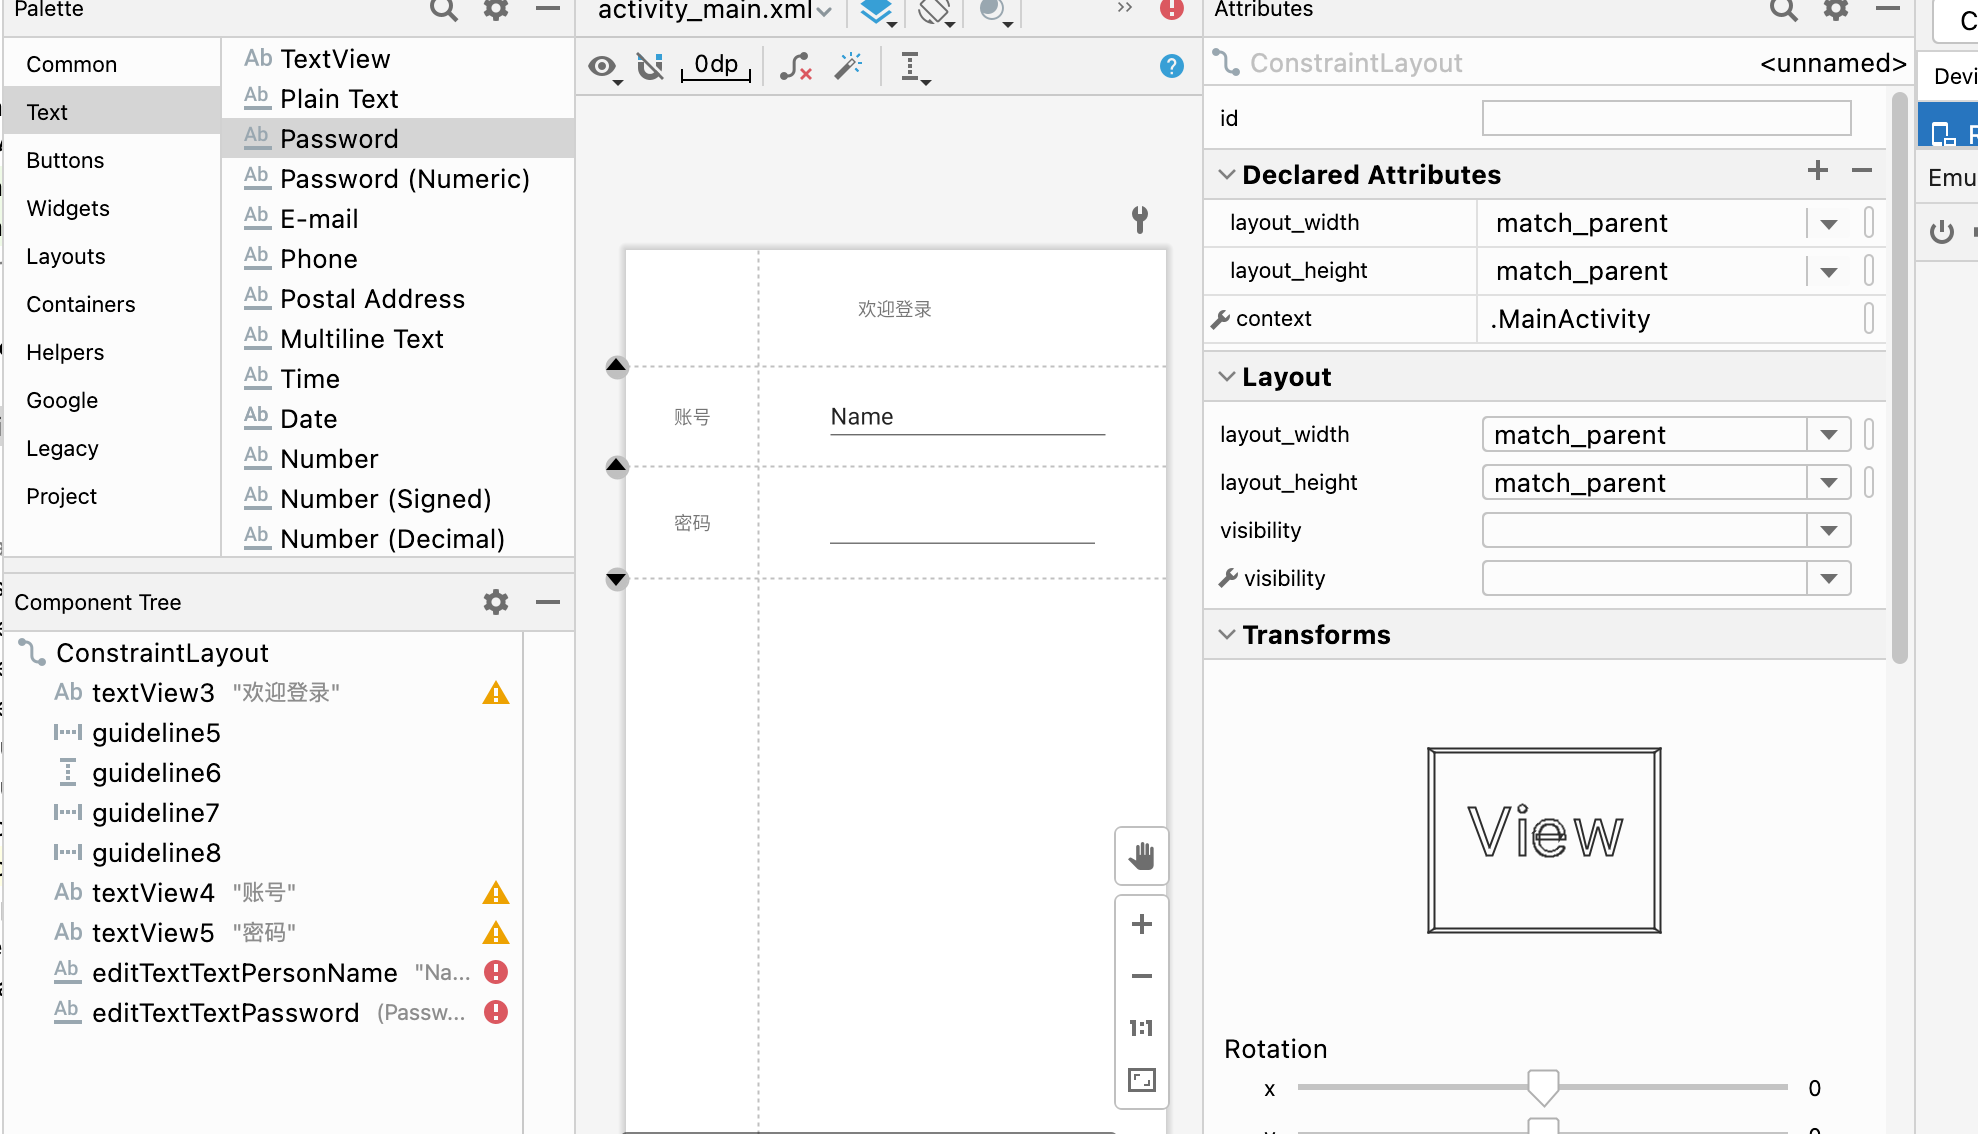
7. 练习约束布局。
魔法棒🪄实现布局
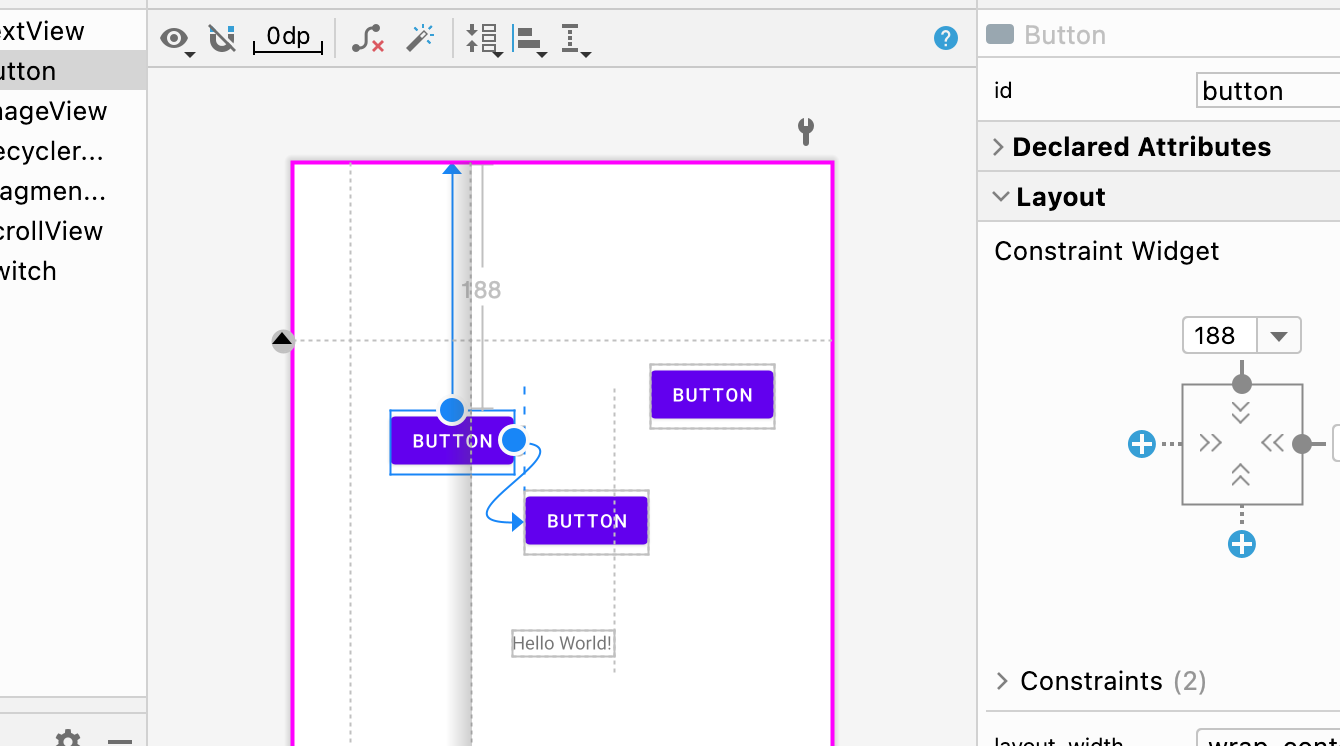
辅助线:
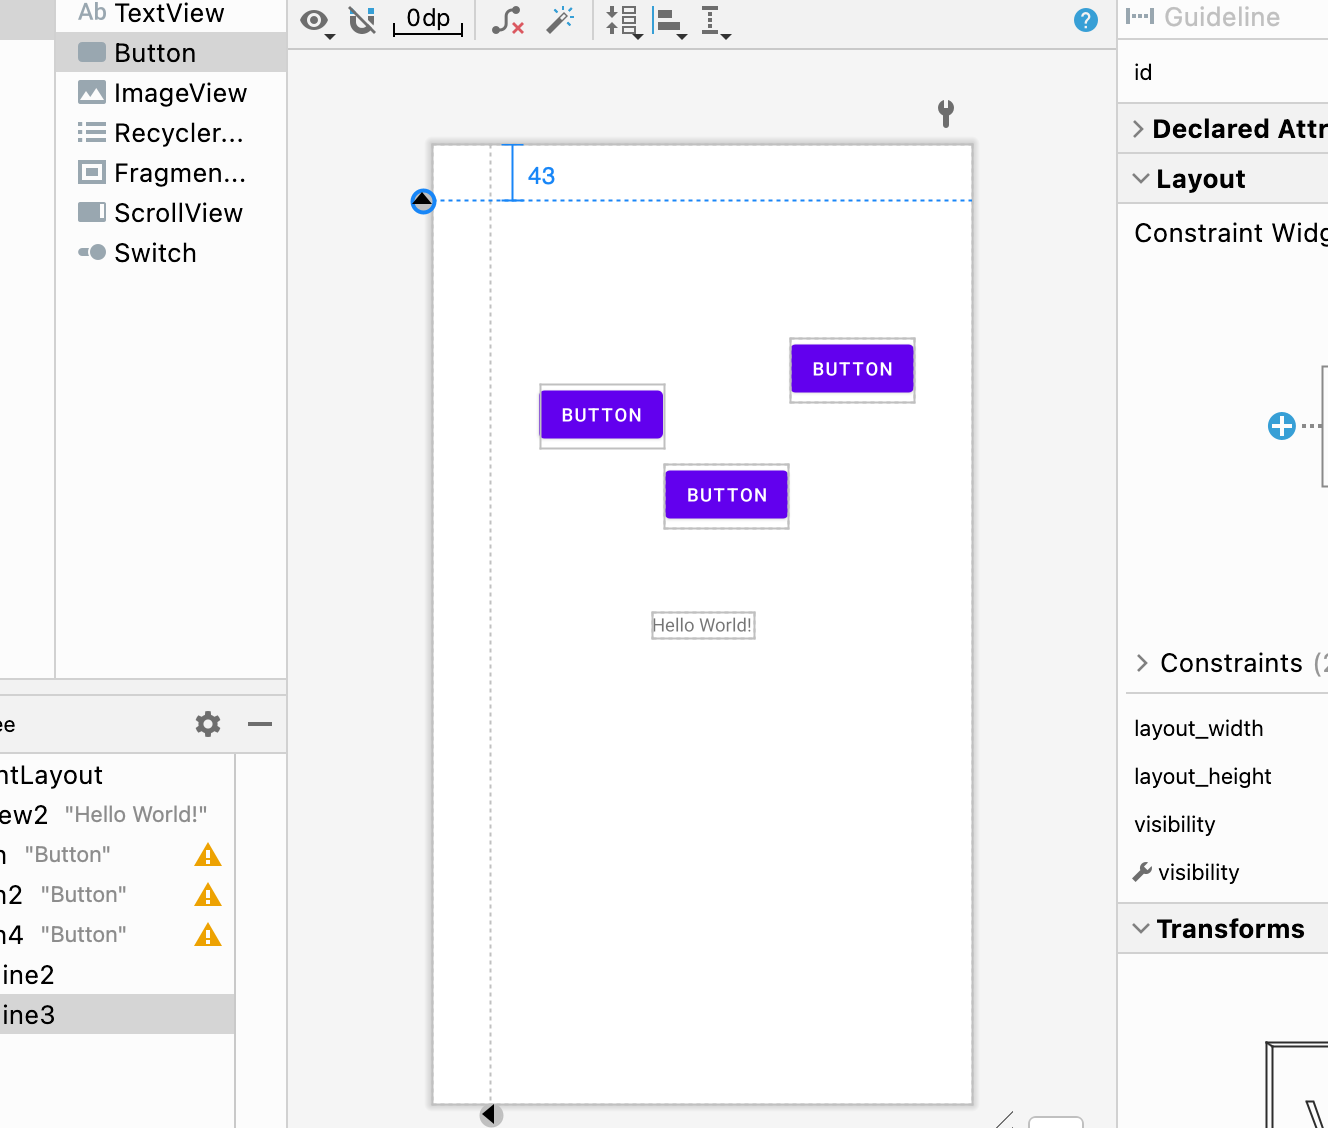
障碍:能够设置一个屏障,让其他的组件不会挤出去
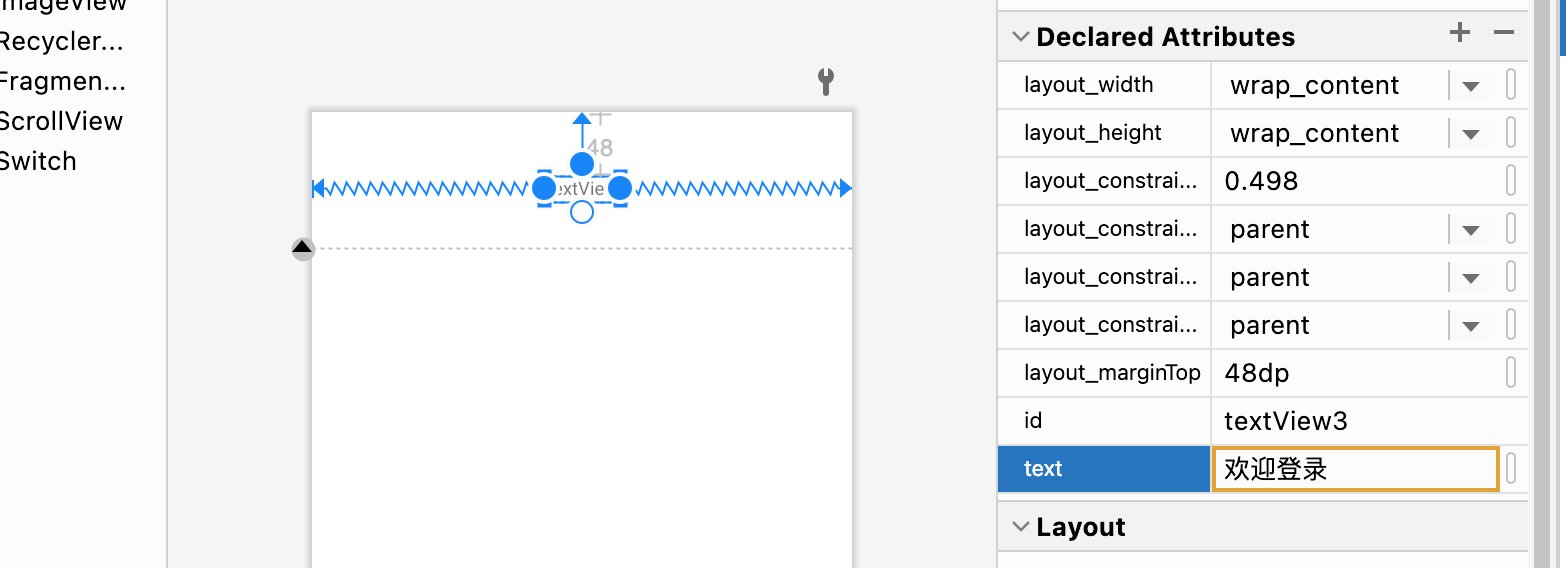
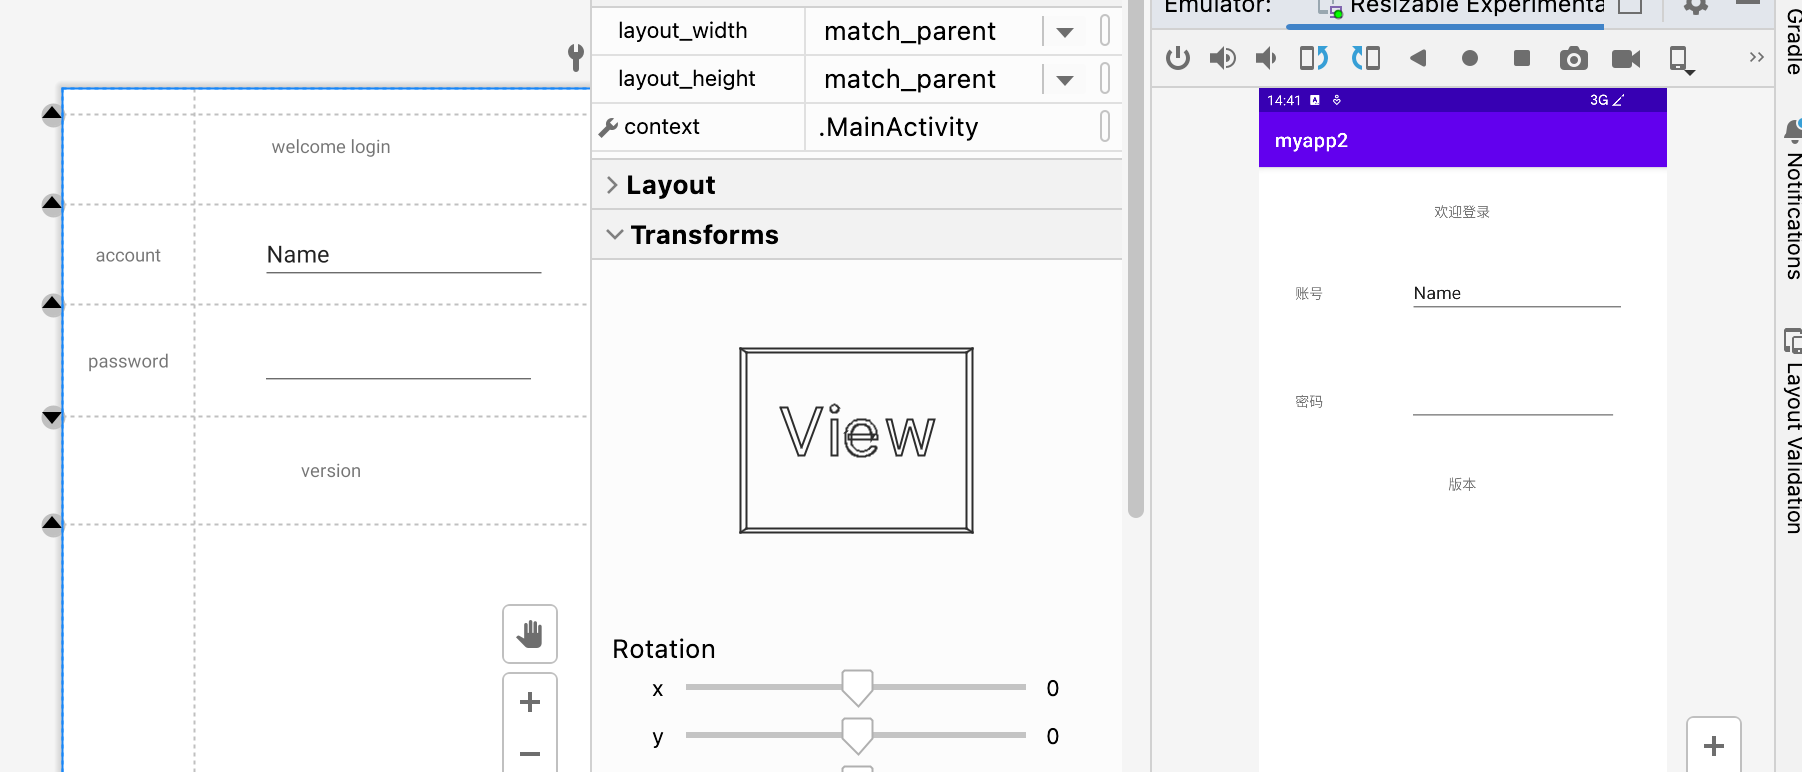
做一个登录界面:
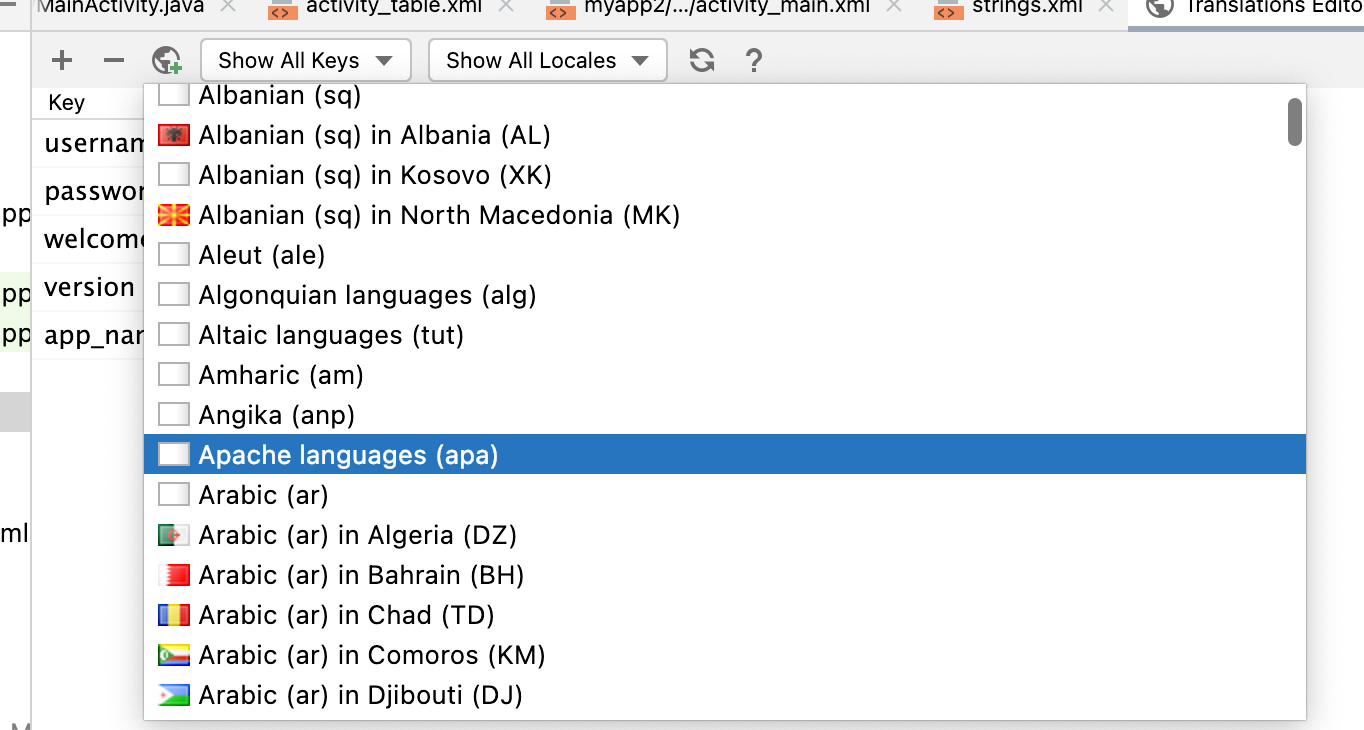
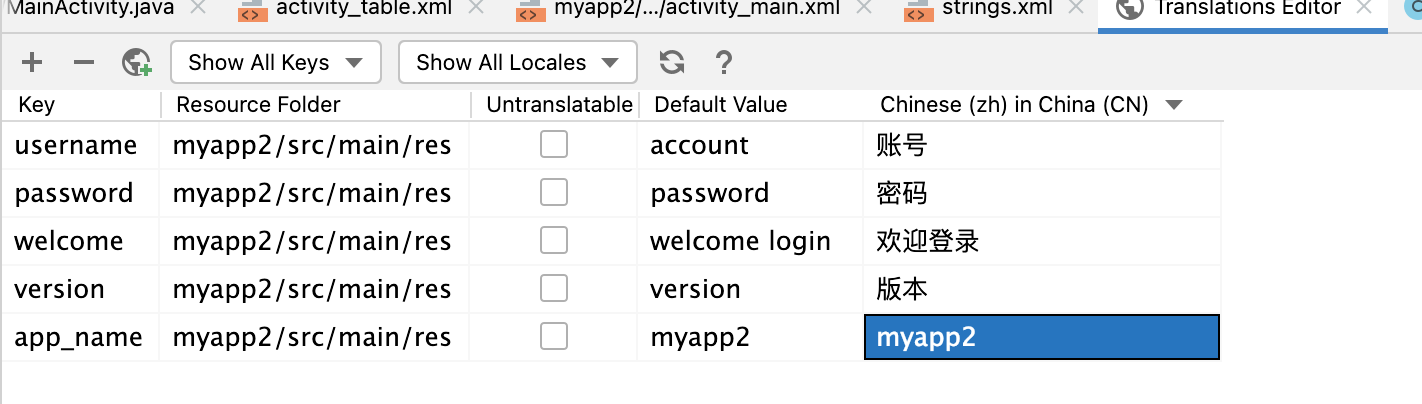
本地化开发:
<resources>
    <string name="app_name">myapp2</string>
    <string name="welcome">welcome login</string>
    <string name="username">account</string>
    <string name="password">password</string>
    <string name="version">version</string>
</resources>
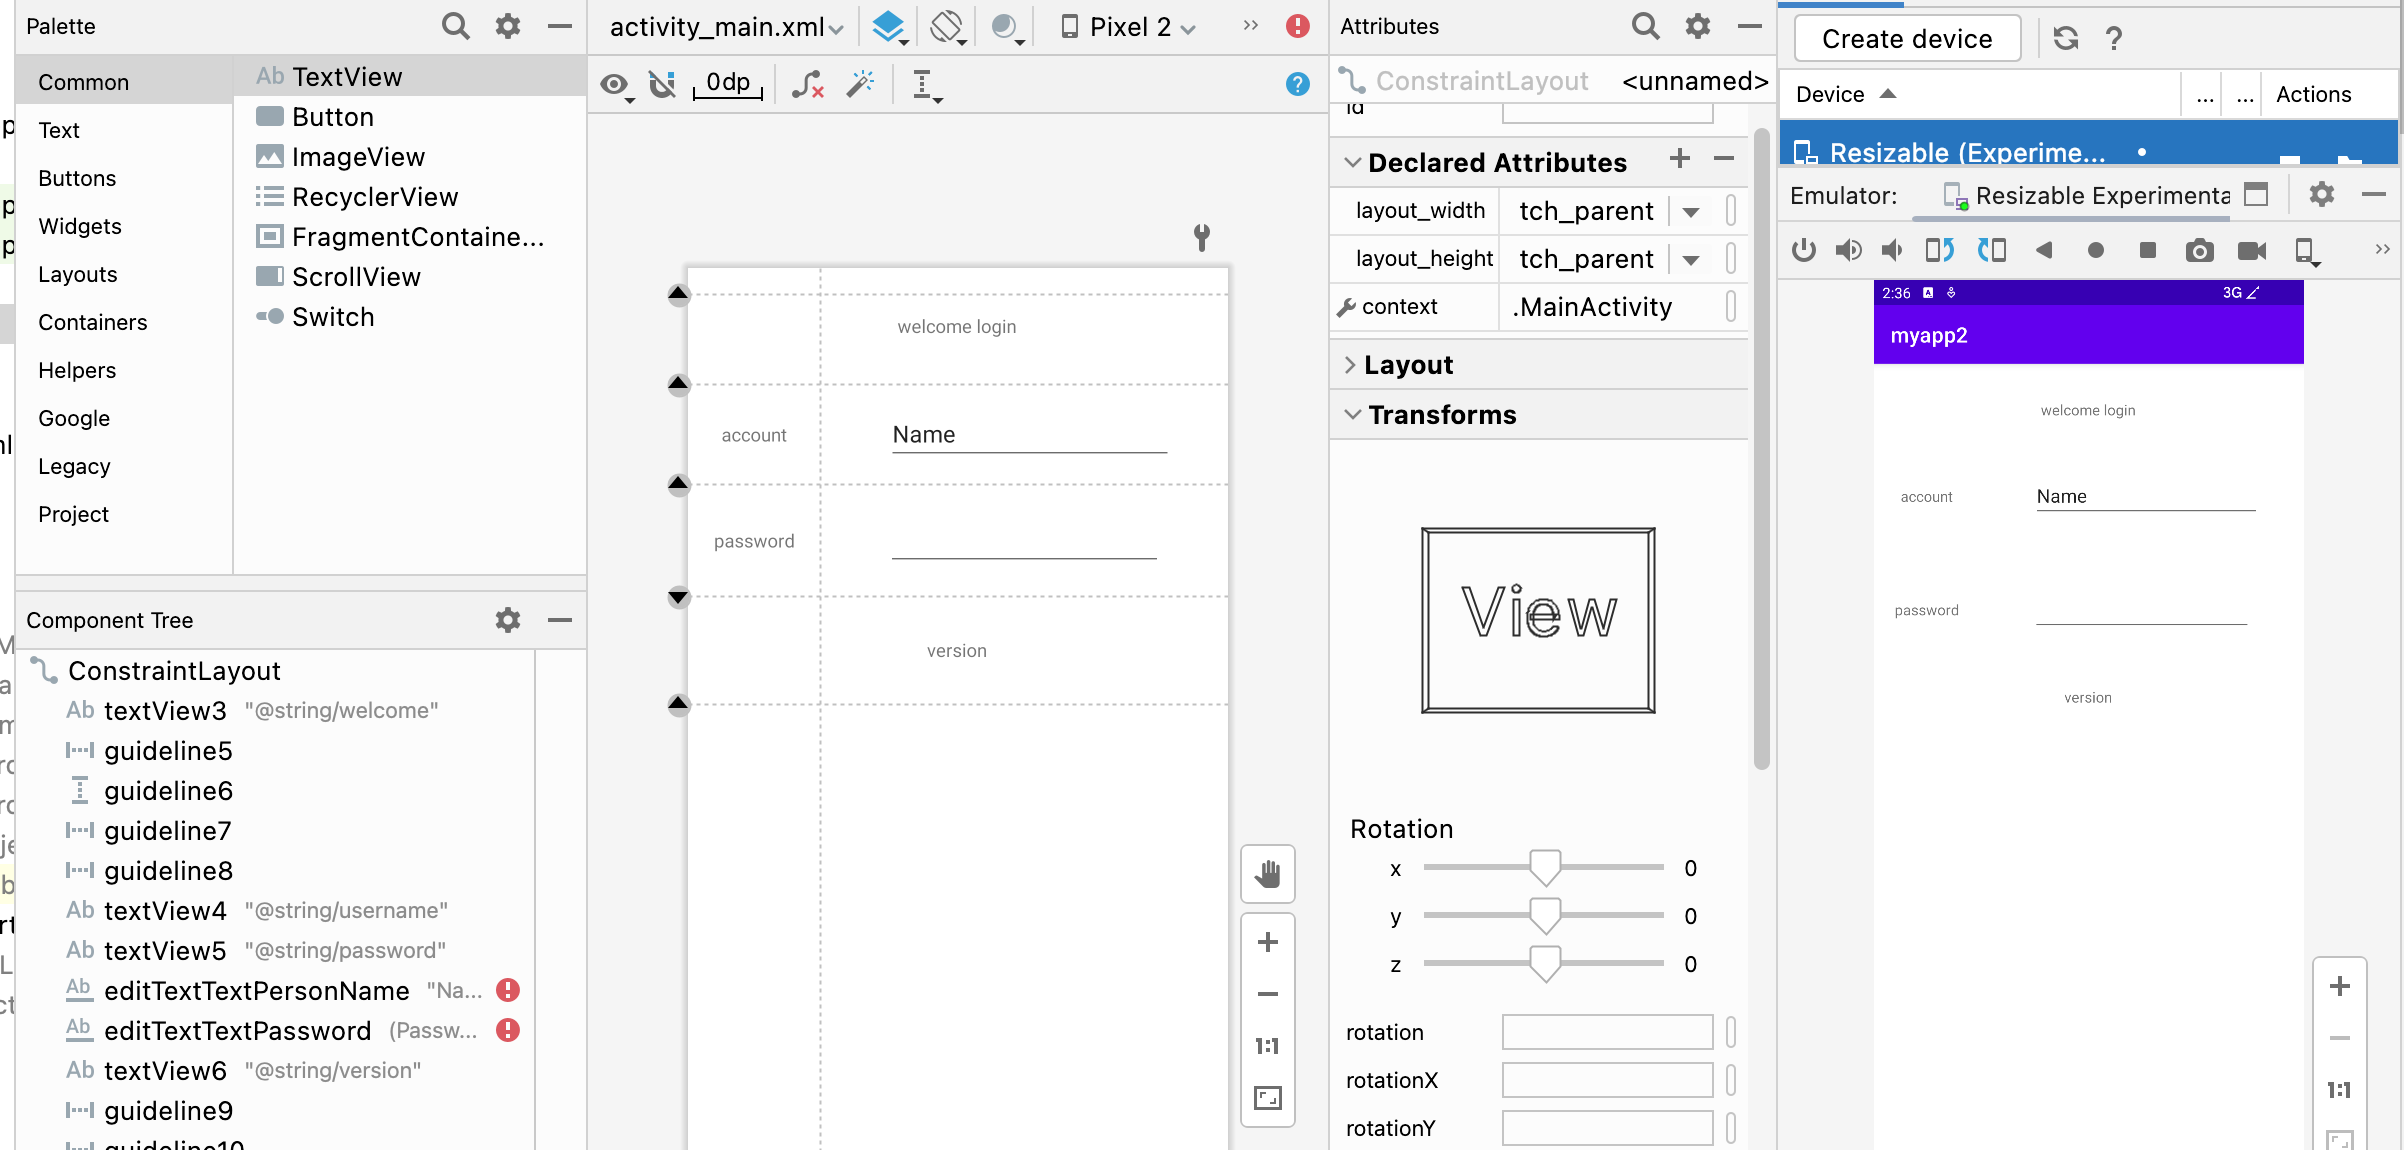
最终效果:
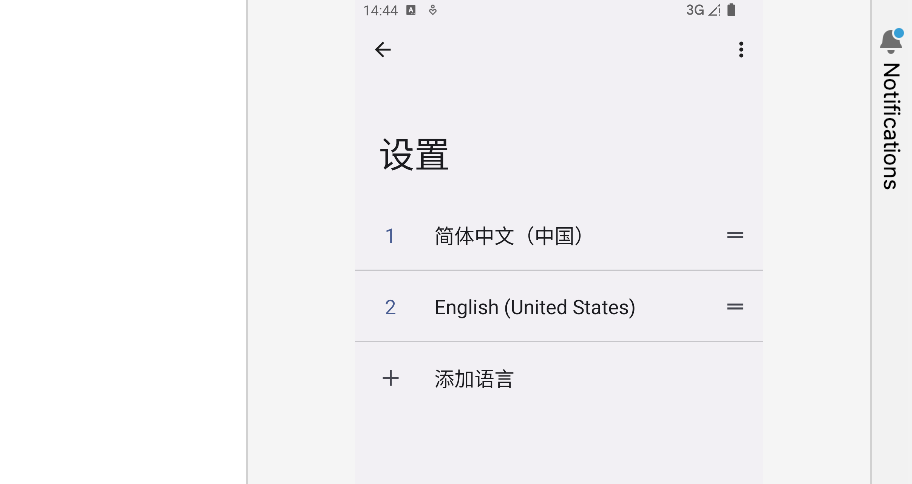
运行后切换语言:
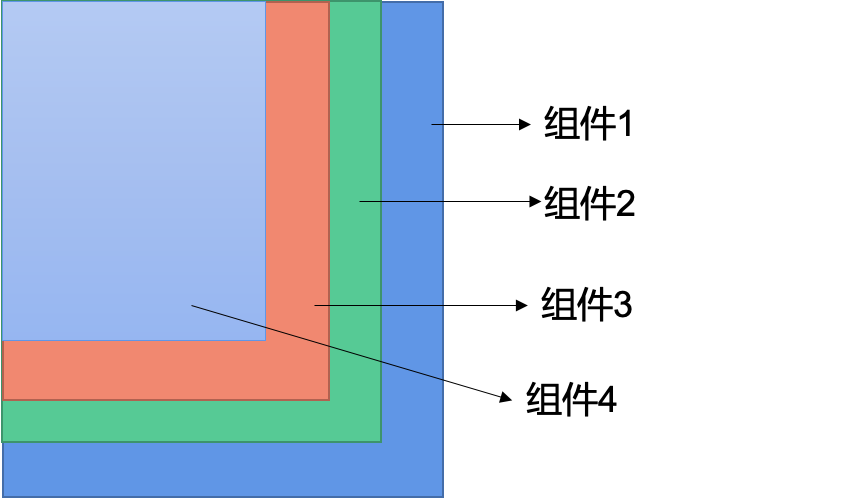
8. 练习帧布局。
是Android中最为简单的一种布局。
可以实现层叠效果(从坐标(0,0)开始)、以及拖动效果。
android:gravity设置子组件的摆放方式。android:gravity放在组件的属性描述里设置的是文字居中。android:layout_gravity设置的是当前控件在布局中的位置。
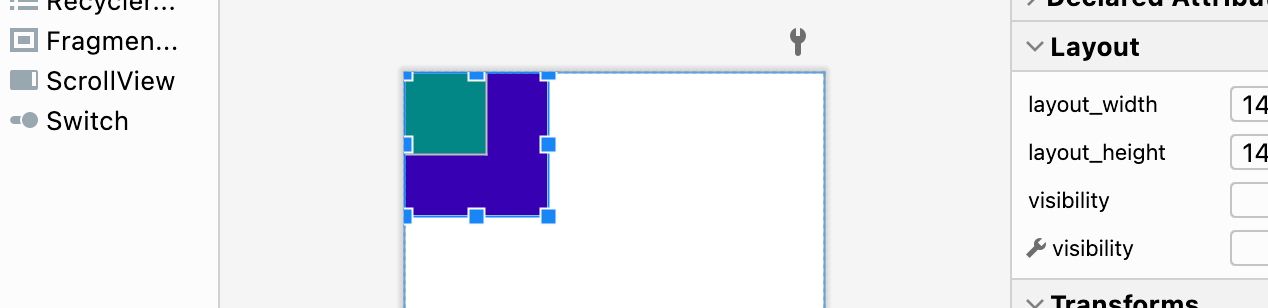
练习:创建两个文本,设置不同的颜色和大小,实现层叠效果
<?xml version="1.0" encoding="utf-8"?>
<FrameLayout xmlns:android="http://schemas.android.com/apk/res/android"
    xmlns:app="http://schemas.android.com/apk/res-auto"
    xmlns:tools="http://schemas.android.com/tools"
    android:layout_width="match_parent"
    android:layout_height="match_parent"
    tools:context=".FrameActivity">

    <TextView
        android:layout_width="140dp"
        android:layout_height="140dp"
        android:background="@color/purple_700"
    />

    <TextView
        android:layout_width="80dp"
        android:layout_height="80dp"
        android:background="@color/teal_700" />

</FrameLayout>
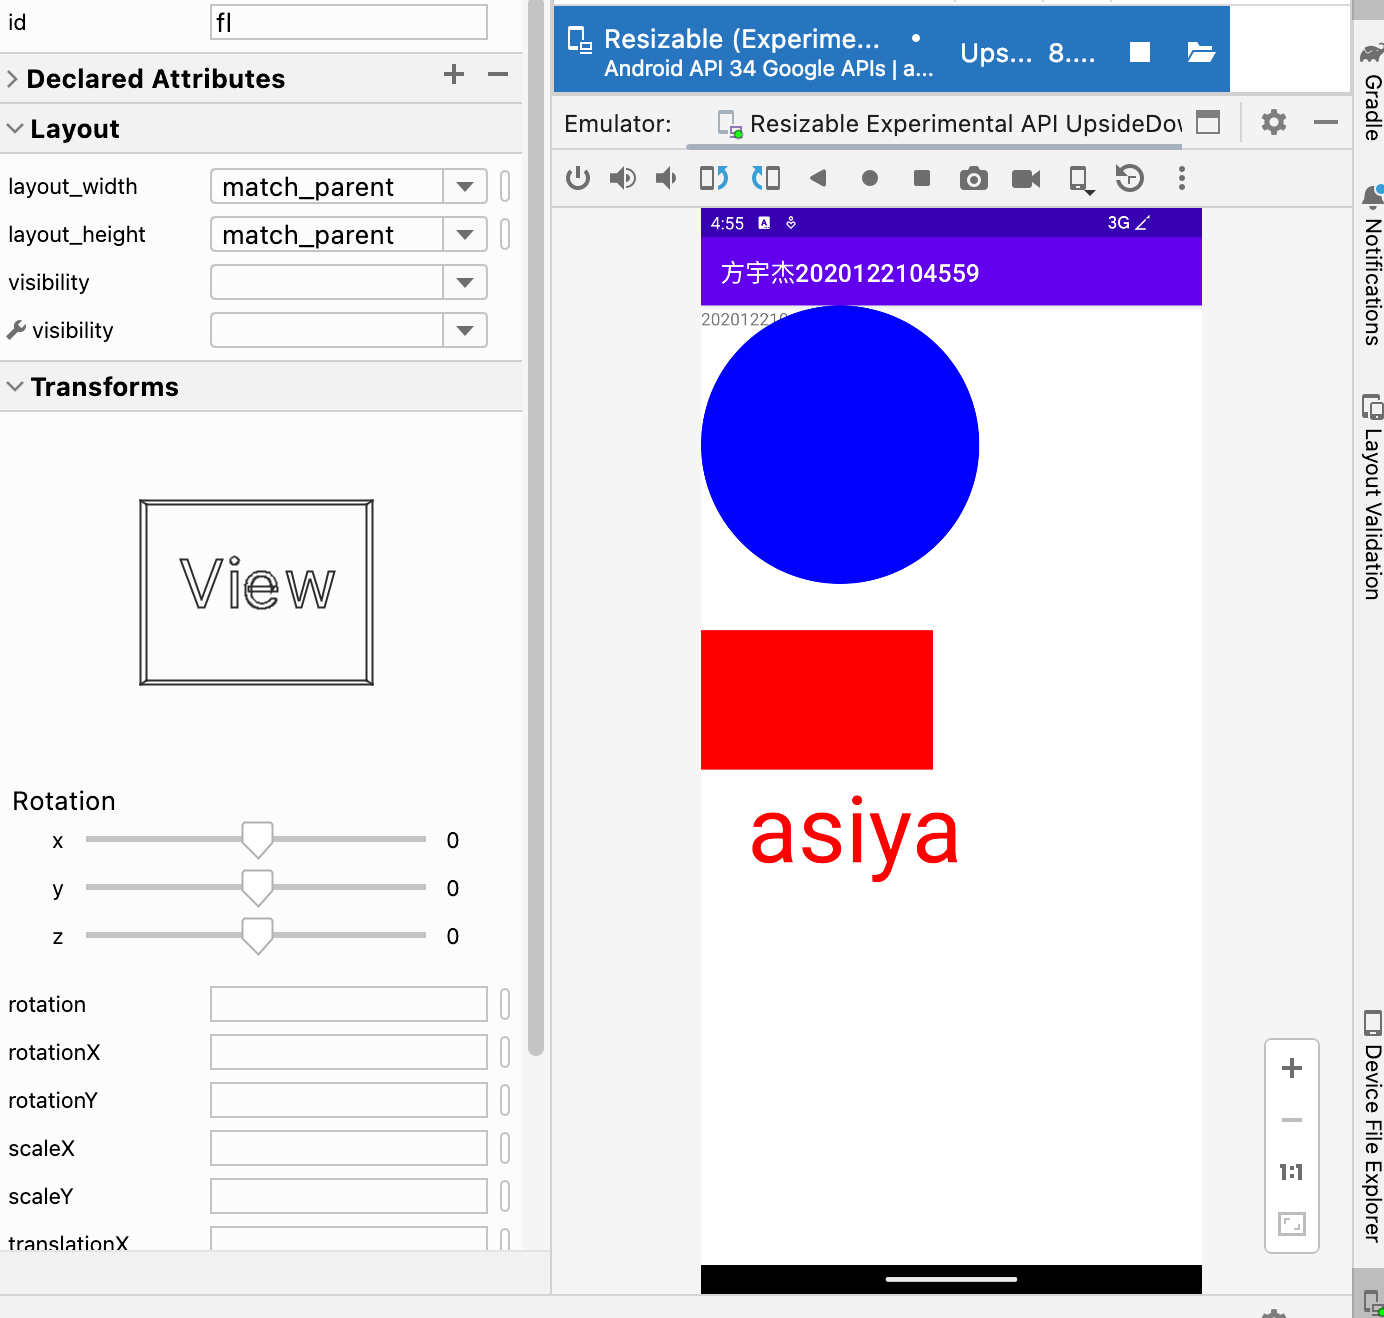
9. 自定义 View
创建Java类,MyView
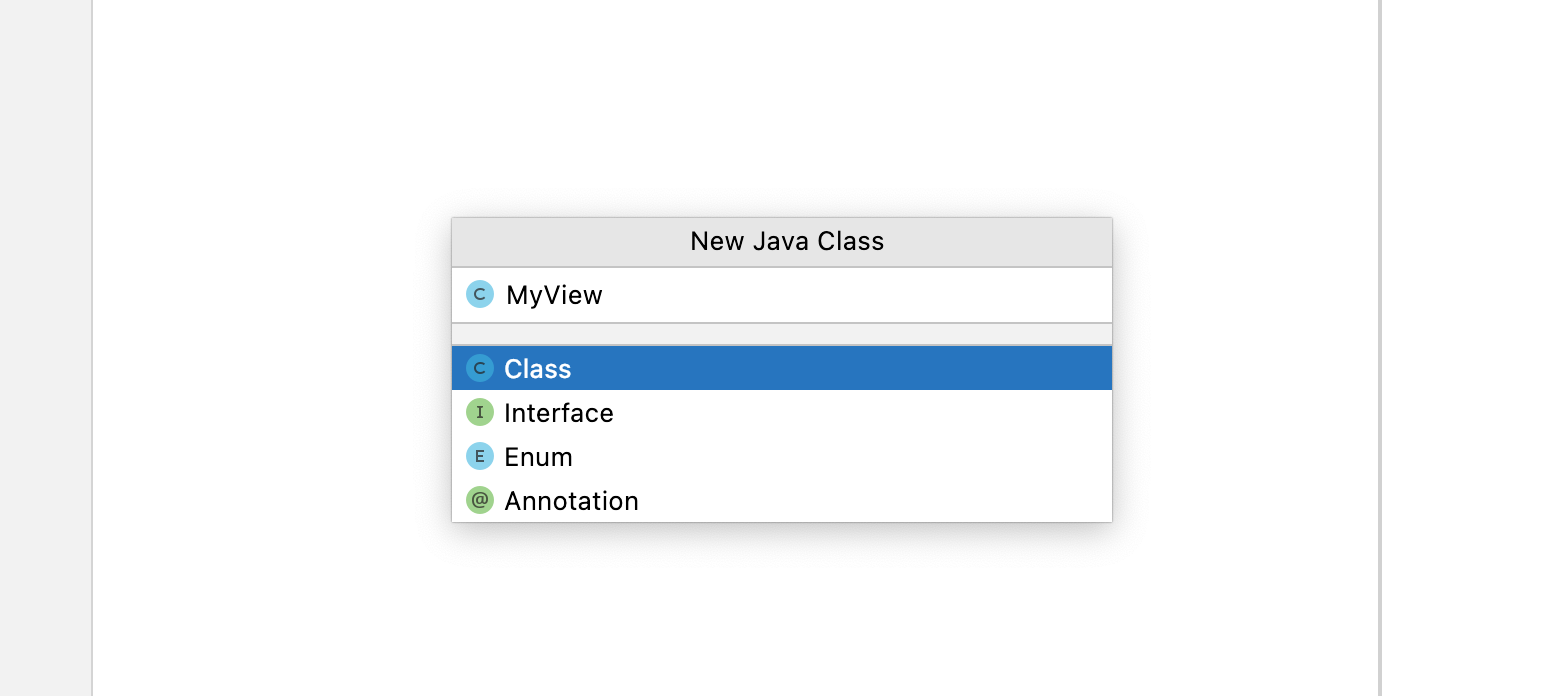
MyView.java
package com.example.myapplication;

import android.content.Context;
import android.graphics.Canvas;
import android.graphics.Color;
import android.graphics.Paint;
import android.view.View;

import androidx.annotation.ColorRes;

public class MyView extends View {

    public MyView(Context context) {
        super(context);
    }

    @Override
    protected void onDraw(Canvas canvas) {
        Paint paint = new Paint();
        paint.setColor(Color.BLUE);
        canvas.drawCircle(300, 300, 300, paint);
        paint.setColor(Color.RED);
        canvas.drawRect(0, 700, 500, 1000, paint);
        paint.setTextSize(200);

        canvas.drawText("asiya", 100, 1200, paint);

    }
}
MainActivity.java
package com.example.myapplication;

import androidx.annotation.XmlRes;
import androidx.appcompat.app.AppCompatActivity;

import android.os.Bundle;
import android.widget.FrameLayout;

public class MainActivity extends AppCompatActivity {

    @Override
    protected void onCreate(Bundle savedInstanceState) {
        super.onCreate(savedInstanceState);
        setContentView(R.layout.activity_main);
        FrameLayout frameLayout = findViewById(R.id.fl);
        MyView myView = new MyView(this);
        frameLayout.addView(myView);
    }
}
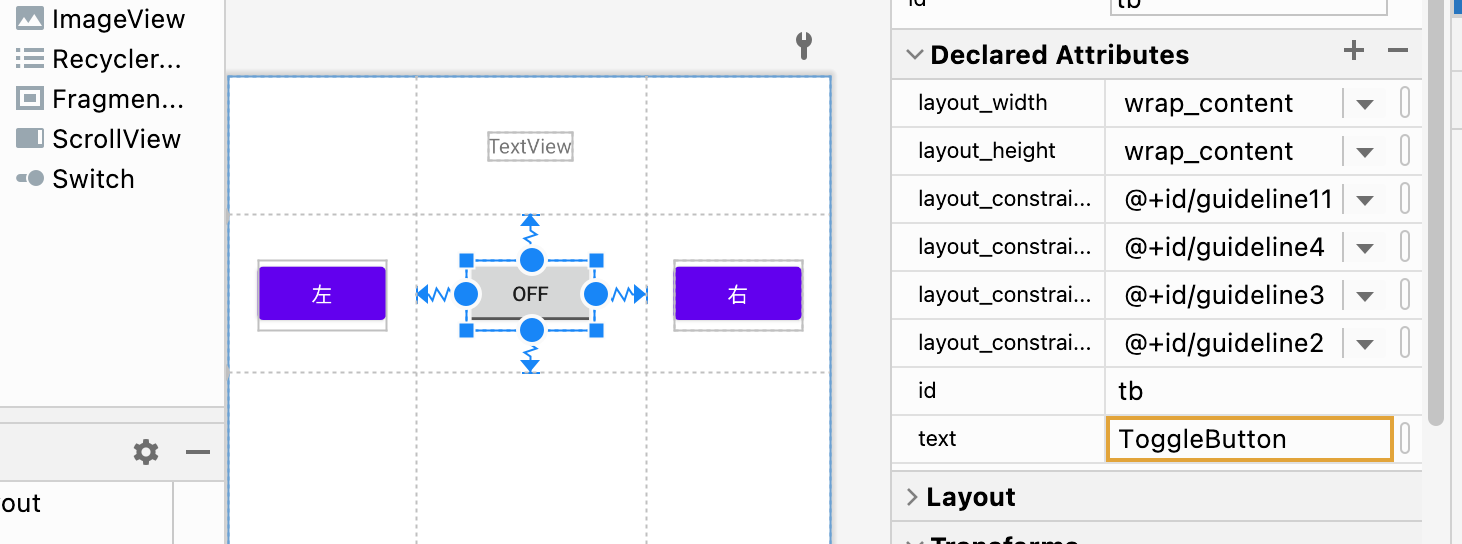
10. 常用控件
package com.example.myapp2;

import androidx.appcompat.app.AppCompatActivity;

import android.os.Bundle;
import android.widget.Button;
import android.widget.TextView;
import android.widget.ToggleButton;

public class MainActivity3 extends AppCompatActivity {

    @Override
    protected void onCreate(Bundle savedInstanceState) {
        super.onCreate(savedInstanceState);
        setContentView(R.layout.activity_main3);

        Button btnleft = findViewById(R.id.btnleft);
        Button btnright = findViewById(R.id.btnright);
        TextView display = findViewById(R.id.display);
        ToggleButton tb = findViewById(R.id.tb);
        btnleft.setOnClickListener(view -> {
            display.setText("左");
        });

        btnright.setOnClickListener(view -> {
            display.setText("右");
        });

        tb.setOnCheckedChangeListener((compoundButton, b) -> {
            if (b) {
                display.setText("toggle 开");
            } else {
                display.setText("toggle 关");
            }
        });

    }
}
<?xml version="1.0" encoding="utf-8"?>
<androidx.constraintlayout.widget.ConstraintLayout xmlns:android="http://schemas.android.com/apk/res/android"
    xmlns:app="http://schemas.android.com/apk/res-auto"
    xmlns:tools="http://schemas.android.com/tools"
    android:layout_width="match_parent"
    android:layout_height="match_parent"
    tools:context=".MainActivity3">

    <androidx.constraintlayout.widget.Guideline
        android:id="@+id/guideline2"
        android:layout_width="wrap_content"
        android:layout_height="wrap_content"
        android:orientation="horizontal"
        app:layout_constraintGuide_begin="95dp" />

    <androidx.constraintlayout.widget.Guideline
        android:id="@+id/guideline3"
        android:layout_width="wrap_content"
        android:layout_height="wrap_content"
        android:orientation="vertical"
        app:layout_constraintGuide_begin="128dp" />

    <androidx.constraintlayout.widget.Guideline
        android:id="@+id/guideline4"
        android:layout_width="wrap_content"
        android:layout_height="wrap_content"
        android:orientation="vertical"
        app:layout_constraintGuide_begin="285dp" />

    <TextView
        android:id="@+id/display"
        android:layout_width="wrap_content"
        android:layout_height="wrap_content"
        android:text="TextView"
        app:layout_constraintBottom_toTopOf="@+id/guideline2"
        app:layout_constraintEnd_toStartOf="@+id/guideline4"
        app:layout_constraintStart_toStartOf="@+id/guideline3"
        app:layout_constraintTop_toTopOf="parent" />

    <Button
        android:id="@+id/btnleft"
        android:layout_width="wrap_content"
        android:layout_height="wrap_content"
        android:text="左"
        app:layout_constraintBottom_toTopOf="@+id/guideline11"
        app:layout_constraintEnd_toStartOf="@+id/guideline3"
        app:layout_constraintStart_toStartOf="parent"
        app:layout_constraintTop_toTopOf="@+id/guideline2" />

    <androidx.constraintlayout.widget.Guideline
        android:id="@+id/guideline11"
        android:layout_width="wrap_content"
        android:layout_height="wrap_content"
        android:orientation="horizontal"
        app:layout_constraintGuide_begin="202dp" />

    <Button
        android:id="@+id/btnright"
        android:layout_width="wrap_content"
        android:layout_height="wrap_content"
        android:text="右"
        app:layout_constraintBottom_toTopOf="@+id/guideline11"
        app:layout_constraintEnd_toEndOf="parent"
        app:layout_constraintStart_toStartOf="@+id/guideline4"
        app:layout_constraintTop_toTopOf="@+id/guideline2" />

    <ToggleButton
        android:id="@+id/tb"
        android:layout_width="wrap_content"
        android:layout_height="wrap_content"
        android:text="ToggleButton"
        app:layout_constraintBottom_toTopOf="@+id/guideline11"
        app:layout_constraintEnd_toStartOf="@+id/guideline4"
        app:layout_constraintStart_toStartOf="@+id/guideline3"
        app:layout_constraintTop_toTopOf="@+id/guideline2" />
</androidx.constraintlayout.widget.ConstraintLayout>
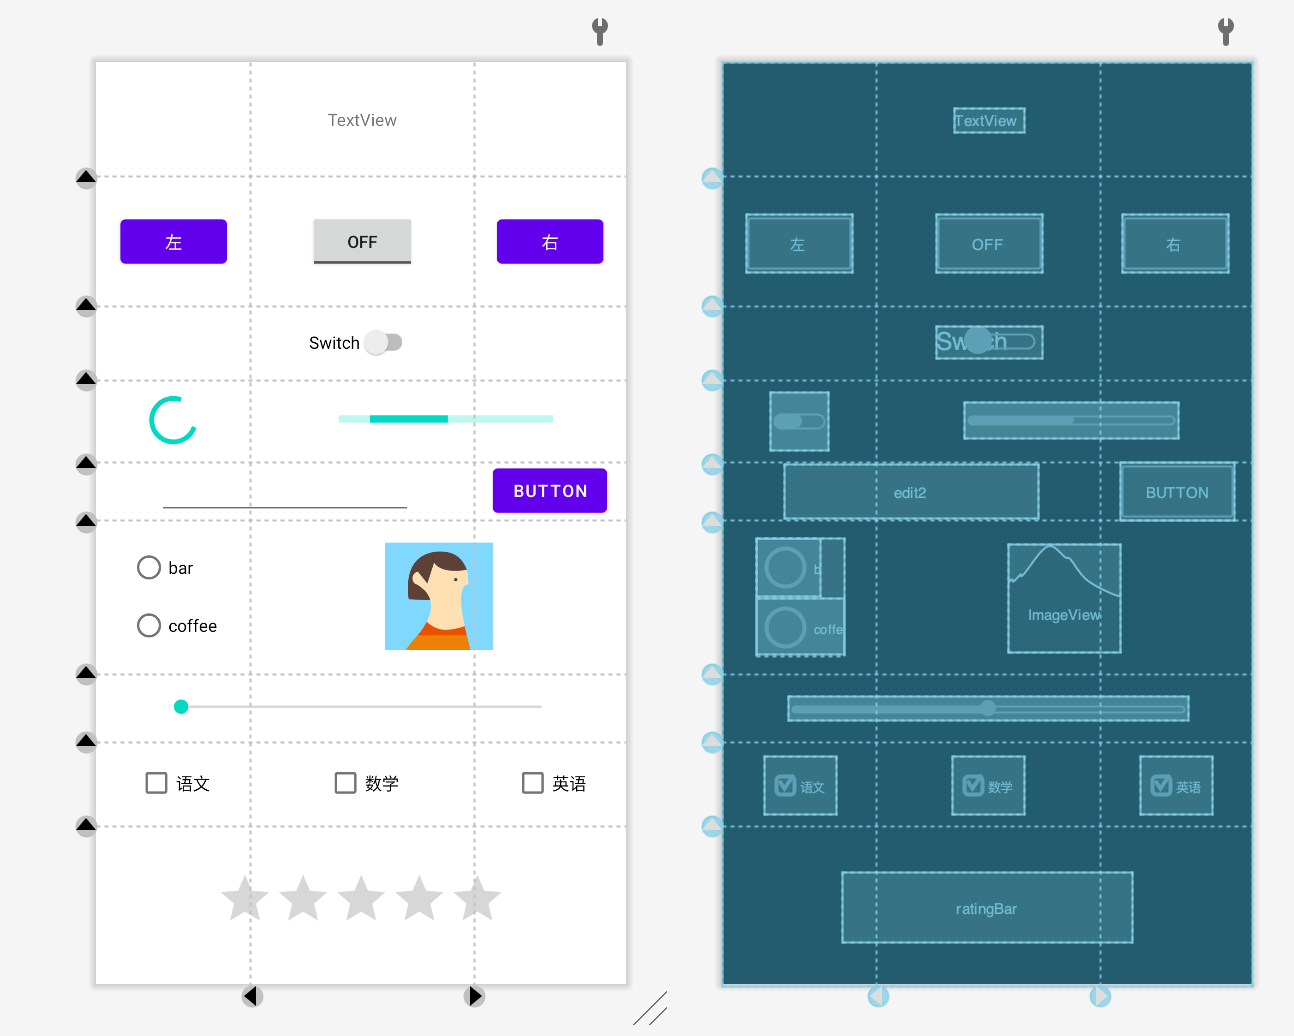
再加点东西:
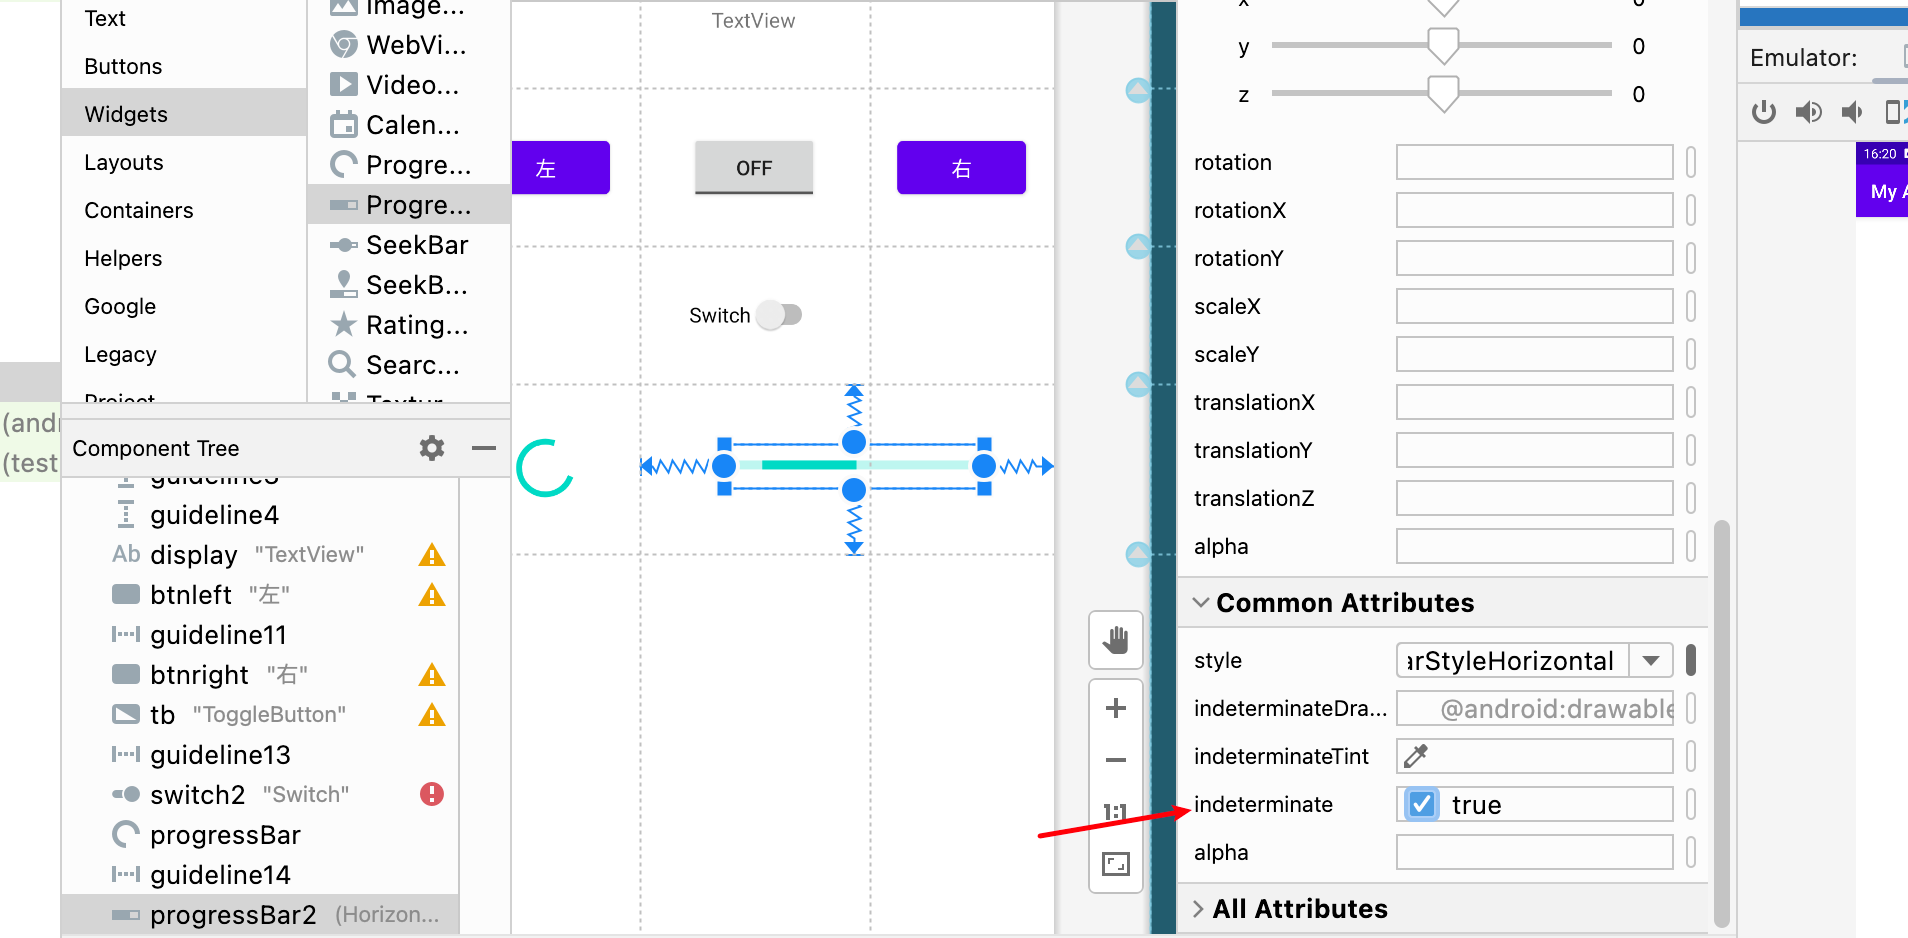
Button confirm = findViewById(R.id.confirm);
EditText et = findViewById(R.id.edit2);
ProgressBar progressBar = findViewById(R.id.progressBar2);

confirm.setOnClickListener(new View.OnClickListener() {
    @Override
    public void onClick(View view) {
        progress = et.getText().toString();
        if (progress == null) {
            progress = "0";
        }
        progressBar.setProgress(Integer.parseInt(progress));
    }
});
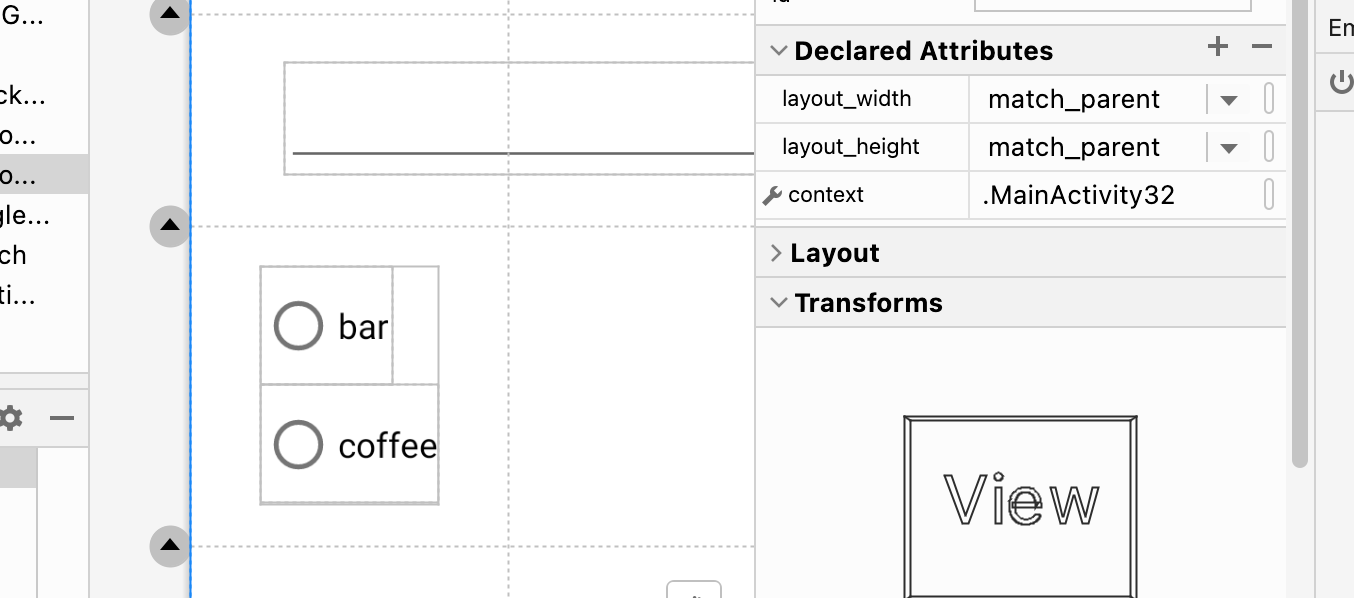

RadioGroup radioGroup = findViewById(R.id.radiogroup);
ImageView imageView = findViewById(R.id.imageView);
radioGroup.setOnCheckedChangeListener(new RadioGroup.OnCheckedChangeListener() {
@Override
public void onCheckedChanged(RadioGroup radioGroup, int i) {
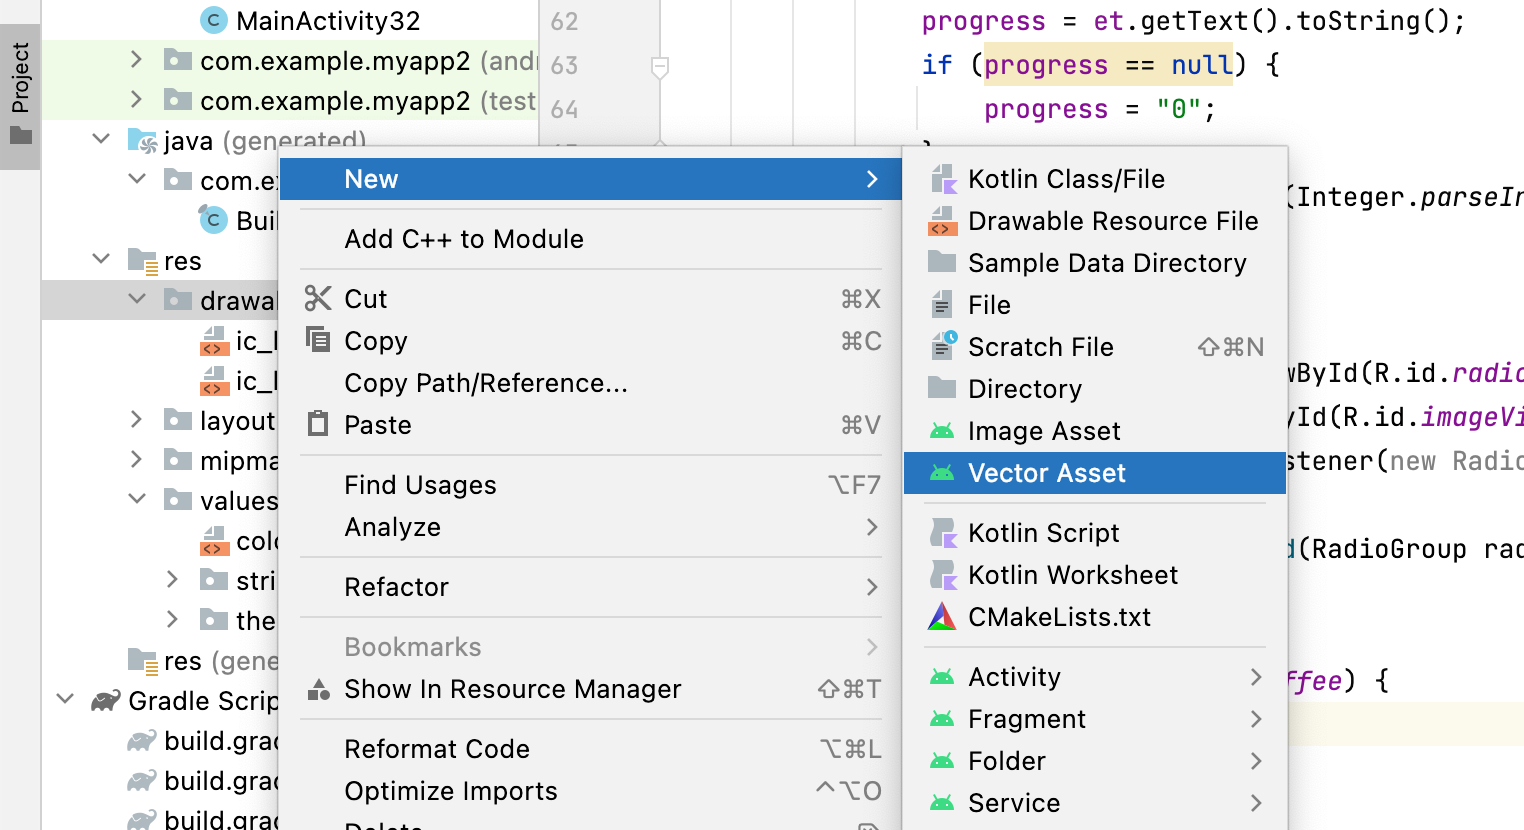
if (i == R.id.bar) {
imageView.setImageResource(R.drawable.baseline_local_bar_24);
} else if (i == R.id.coffee) {
imageView.setImageResource(R.drawable.baseline_coffee_24);
}
}
});
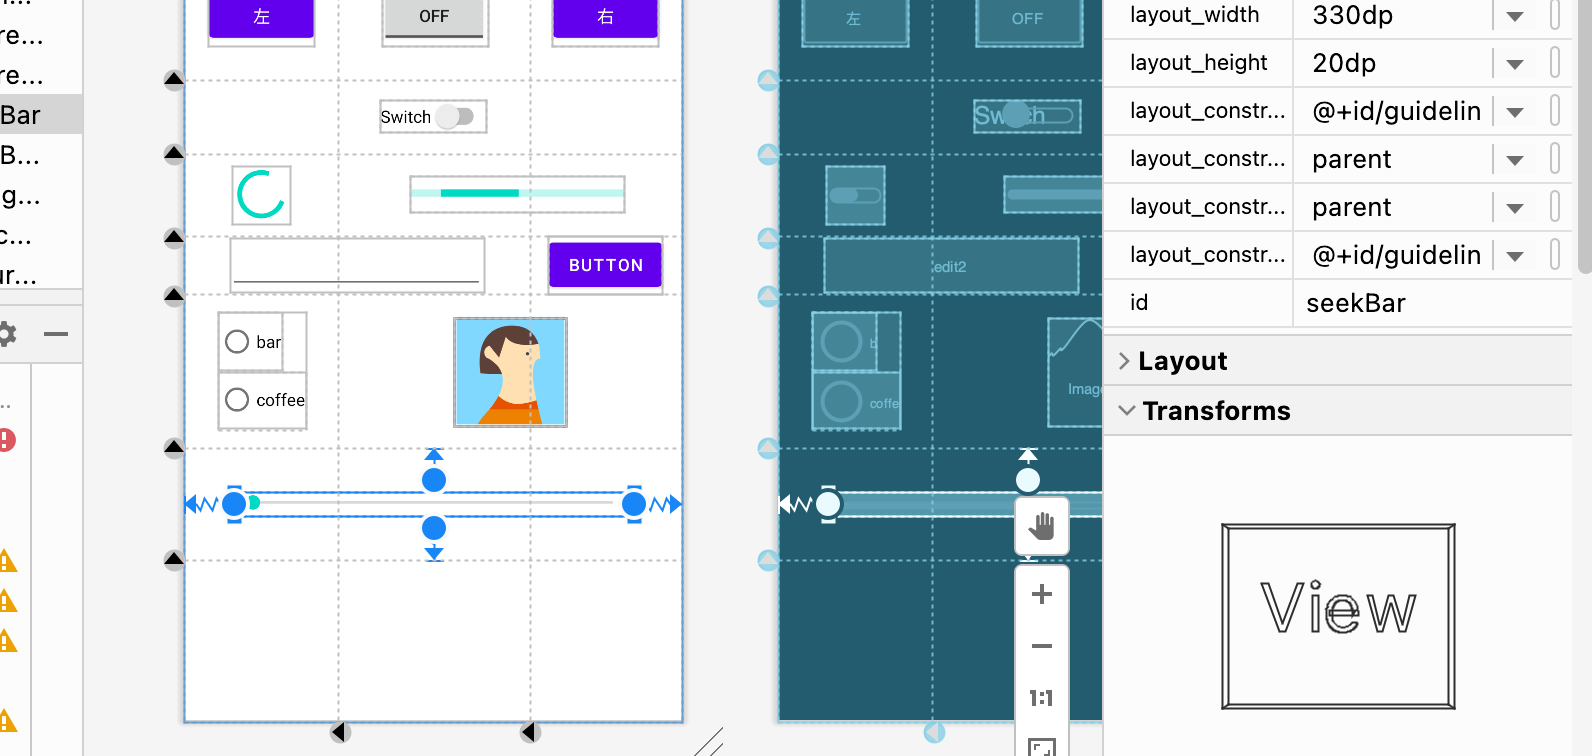
SeekBar seekBar = findViewById(R.id.seekBar);
seekBar.setOnSeekBarChangeListener(new SeekBar.OnSeekBarChangeListener() {
    @Override
    public void onProgressChanged(SeekBar seekBar, int i, boolean b) {
        display.setText(String.valueOf(i));
    }

    @Override
    public void onStartTrackingTouch(SeekBar seekBar) {

    }

    @Override
    public void onStopTrackingTouch(SeekBar seekBar) {

    }
});
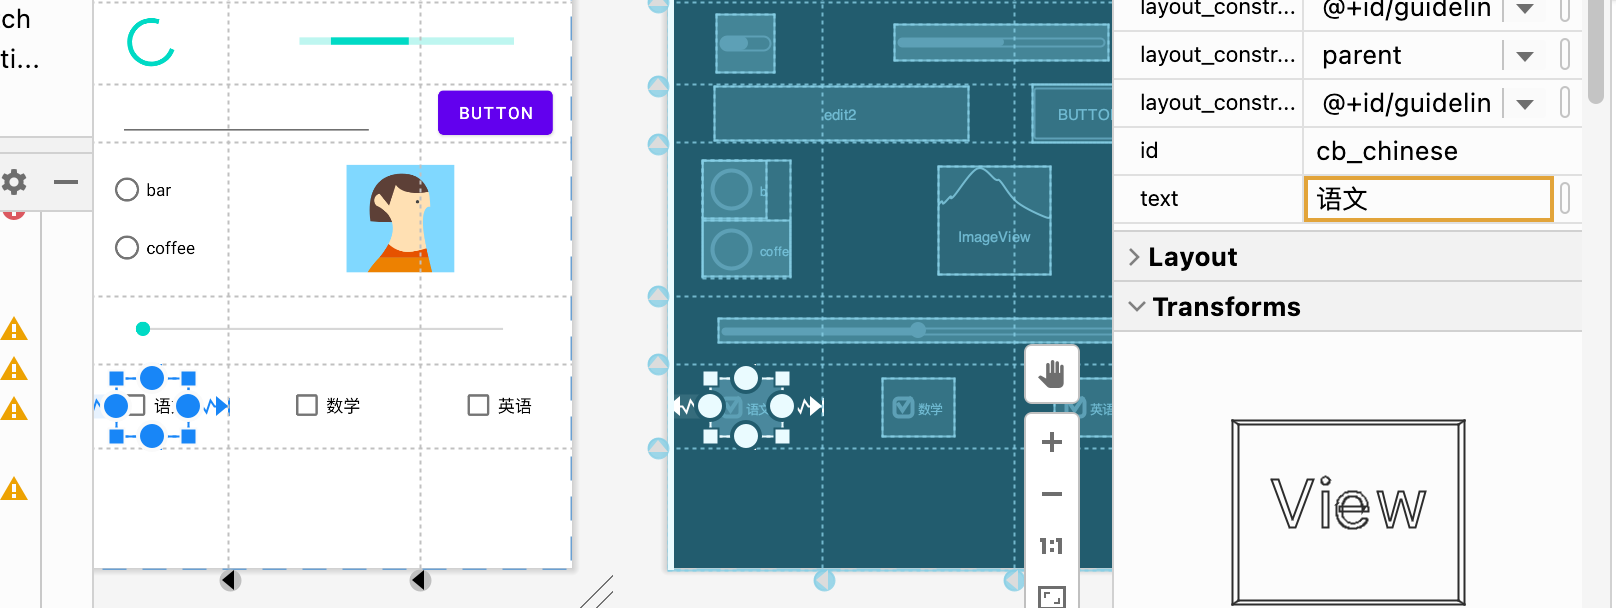
CheckBox cb_chinese = findViewById(R.id.cb_chinese);
CheckBox cb_english = findViewById(R.id.cb_english);
CheckBox cb_math = findViewById(R.id.cb_math);

cb_chinese.setOnCheckedChangeListener(new CompoundButton.OnCheckedChangeListener() {
    @Override
    public void onCheckedChanged(CompoundButton compoundButton, boolean b) {
        if (b) {
            display.setText("语文");
        } else {
            display.setText("");
        }
    }
});

cb_english.setOnCheckedChangeListener(new CompoundButton.OnCheckedChangeListener() {
    @Override
    public void onCheckedChanged(CompoundButton compoundButton, boolean b) {
        if (b) {
            display.setText("英语");
        } else {
            display.setText("");
        }
    }
});

cb_math.setOnCheckedChangeListener(new CompoundButton.OnCheckedChangeListener() {
    @Override
    public void onCheckedChanged(CompoundButton compoundButton, boolean b) {

        if (b) {
            display.setText("数学");
        } else {
            display.setText("");
        }
    }
});
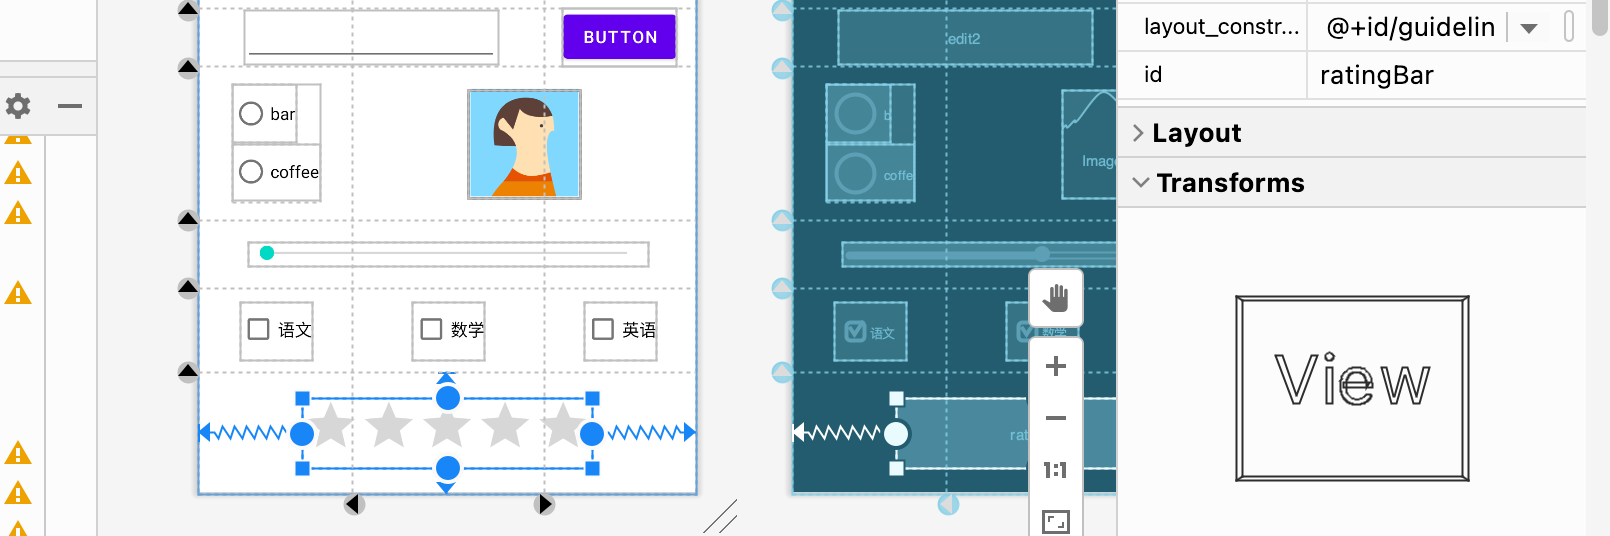
RatingBar ratingBar = findViewById(R.id.ratingBar);
ratingBar.setOnRatingBarChangeListener(new RatingBar.OnRatingBarChangeListener() {
   @Override
   public void onRatingChanged(RatingBar ratingBar, float v, boolean b) {
       Toast.makeText(MainActivity32.this, String.valueOf(v + "星评价"), Toast.LENGTH_LONG).show();
   }
});
阶段性成果:


 5562
5562

 被折叠的 条评论
为什么被折叠?
被折叠的 条评论
为什么被折叠?
 到【灌水乐园】发言


