


 本文详细介绍了Vue3中父子组件的传值方法,包括使用props从父组件向子组件传递数据,以及通过事件触发器实现子组件向父组件的通信。同时,还展示了如何通过事件总线实现兄弟组件之间的通信,以实现动态数据的共享。通过实例代码演示了整个过程,帮助理解Vue3组件间的通信机制。
父子传值
在我们的项目当中 , 会出现我们页面里面嵌套一些组件的情况,但是我们想要让组件内部的数据成为动态的 , 这个时候 我们就要用到我们的父子传值,
Vue3 父向子传值
首先我们定义了一个组件,在父组件里面进行引用
<template>
  <div>
    父组件:{{parentStr}}
    <Child :msg="parentStr"></Child>
  </div>
</template>
<script>
import Child from "../components/Child.vue";
import { ref } from "vue";
export default {
  components: { Child },
  data() {
    const parentStr = ref("父组件的值");

    return {
      parentStr,
    };
  },
};
</script>
子组件:
<template>
  <div>
    子组件:{{msg}}
    <button>点击</button>
  </div>
</template>
<script>
import { computed, ref } from "vue";
export default {
  components: {},
  props: { msg: String },
  setup(props, ctx) {
    const msg = computed(() => {
      return props.msg;
    });
    return {
      msg,
    };
  },
};
</script>
这个时候我们页面效果是:
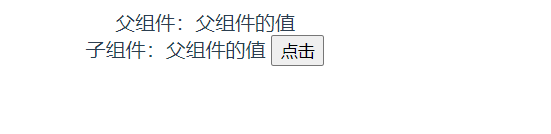
这个时候值就成功的传到了子组件里,
| props | 它是响应式的,里面包含了父组件传递过来的信息, |
| context | 普通的JavaScript对象,暴露了在setup里面可能有用的一些方法 |
| computed | 计算属性,监听值发生改变了进行同步,没有改变走缓存 |
子向父传值
子组件
<template>
  <div>
    子组件:{{msg}}
    <button @click="setParentStr">点击</button>
  </div>
</template>
<script>
import { computed, onMounted, ref } from "vue"
export default {
  components: {},
  props: { msg: String },
  setup(props, ctx) {
      //子向父传值的方法
    const setParentStr = () => {
      ctx.emit("parentStr", "点击成功");
    };

    const msg = computed(() => {
      return props.msg;
    });


    return {
      msg,setParentStr
    };
  },
};
</script>
这里是给我们的按钮添加了一个点击事件,在点击的时候触发setParentStr方法,在setup里面定义了方法 , 一定要在 return 抛出, ctx.emit("传递名称",传过去的值)
父组件
<template>
  <div>
    父组件:{{parentStr}}
    <Child :msg="parentStr" @parentStr="appectStr"></Child>
  </div>
</template>
<script>
import Child from "../components/Child.vue";
import { ref } from "vue";
export default {
  components: { Child },
  data() {
    const parentStr = ref("父组件的值");
    const appectStr=(val)=>{
parentStr.value=val
    }
    return {
      parentStr,appectStr
    };
  },
};
</script>
我们在接收值得时候 利用 @子组件传递的名称="触发的方法名称",这样在我们的方法里就能进行操作我们传递的值
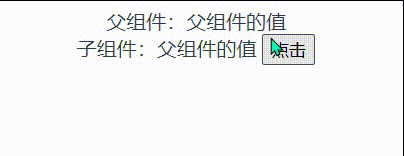
效果图
兄弟传值
由于子组件 的值是父组件传递过去的 , 所以 这个兄弟组件 操作了父组件的值,那么子组件也跟着变化 代码如下
父组件 引入 兄弟组件
<template>
  <div>
    父组件:{{parentStr}}
    <Child :msg="parentStr" @parentStr="appectStr"></Child>
    <ChildBrother @setChildStr="setChildStr"></ChildBrother>
  </div>
</template>
<script>
import Child from "../components/Child.vue";
import { ref } from "vue";
import ChildBrother from '../components/childBrother'
export default {
  components: { Child,ChildBrother },
  data() {
    const parentStr = ref("父组件的值");
    const appectStr=(val)=>{
parentStr.value=val
    }
    const setChildStr=(val)=>{
parentStr.value=val
    }
    return {
      parentStr,appectStr,setChildStr
    };
  },
};
</script>
ChildBrother 兄弟组件
<template>
  <div>兄弟组件:{{Str}}
<button @click="setBrotherStr">点点</button>

  </div>
</template>

<script>
import { ref } from "vue";
export default {
  props: {},
  setup(props,ctx) {
    const Str = ref("我是兄弟组件");
    const setBrotherStr=()=>{
      ctx.emit('setChildStr','我是兄弟组件传过来的值')
    }
    return {
      Str,setBrotherStr
    }
  }
}
</script>
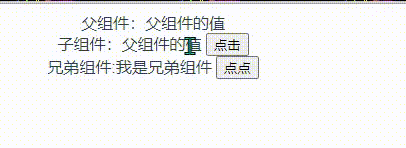
效果图
那怎么把兄弟组件的值直接传给子组件呢
这个时候我们需要下载一个插件
npm install --save vue3-eventbus
安装完毕 在main.js里面进行挂载
import { createApp } from 'vue'
import App from './App.vue'
import router from './router'
import store from './store'
import eventBus from 'vue3-eventbus'//引入vue3-eventbus

createApp(App).use(eventBus).use(store).use(router).mount('#app')
Child 子组件
<template>
  <div>
    子组件:{{ChildStr}}
    <button @click="setParentStr">点击</button>
  </div>
</template>
<script>
import {  ref } from "vue"
import bus from 'vue3-eventbus'
export default {
  components: {},
  props: {  },
  setup(props, ctx) {
    const ChildStr = ref('Child的值')
    bus.on('setChildStr',(val)=>{
      ChildStr.value=val
    })
    return {
      ChildStr
    };
  },
};
</script>
兄弟组件 ChildBrother
<template>
  <div>兄弟组件:{{Str}}
<button @click="setChildStr">点点</button>
  </div>
</template>

<script>
import { ref } from "vue";
import bus from 'vue3-eventbus'
export default {
  props: {},
  setup(props,ctx) {
    const Str = ref("我是兄弟组件")
    const setChildStr=()=>{
      bus.emit('setChildStr','我是兄弟组件传过来的值')
    }
    return {
      Str,setChildStr
    }
  }
}
</script>
在这两个文件里面 分别引入 vue3-eventbus 这个插件
传递:bus.emit('传递名称',传递的值)
接收: bus.on('传递名称',(传递的值)=>{
要进行的操作
})
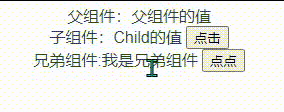
效果图下方
战士的意志要像礁石一样坚定 战士的性格要像和风一样温柔


 3433
3433

 被折叠的 条评论
为什么被折叠?
被折叠的 条评论
为什么被折叠?
 到【灌水乐园】发言


