


 本文介绍了一个基于SpringCloud Finchley版本的Feign微服务调用示例,包含注册中心、服务提供者和服务消费者的搭建过程及关键配置。
Spring Cloud Feign 简单的demo
准备三个服务
分别为:
一个父项目:
ihrm
三个子项目:
ihrm_company (被调用)
ihrm_eureka(注册中心)
ihrm_system (调用)
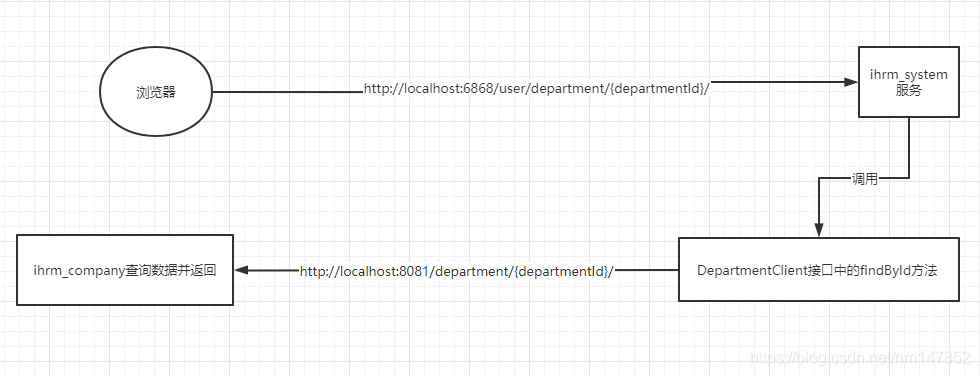
使用 ihrm_system 服务调取 ihrm_company中的接口
首先父项目导入依赖
<dependencyManagement>
        <dependencies>
            <dependency>
                <groupId>org.springframework.cloud</groupId>
                <artifactId>spring-cloud-dependencies</artifactId>
                <version>Finchley.SR1</version>
                <type>pom</type>
                <scope>import</scope>
            </dependency>
        </dependencies>
    </dependencyManagement>
  <dependencies>
        <dependency>
            <groupId>org.springframework.boot</groupId>
            <artifactId>spring-boot-starter-web</artifactId>
        </dependency>
  </dependencies>
建议dependencyManagement标签写在dependencies标签上面
ihrm_eureka(注册中心) 导入依赖
<dependencies>
        <dependency>
            <groupId>org.springframework.cloud</groupId>
            <artifactId>spring-cloud-starter-netflix-eureka-server</artifactId>
        </dependency>
</dependencies>
application.yml 配置
#eureka服务的配置文件
server:
  port: 6868 #服务端口
eureka:
  client:
    registerWithEureka: false #是否将自己注册到Eureka服务中,本身就是所有无需注册
    fetchRegistry: false #是否从Eureka中获取注册信息
    serviceUrl: #Eureka客户端与Eureka服务端进行交互的地址
      defaultZone: http://127.0.0.1:${server.port}/eureka/
启动类
@EnableEurekaServer  // 声明这是注册中心
@SpringBootApplication
public class EurekaServer {
    public static void main(String[] args) {
        SpringApplication.run(EurekaServer.class, args);
    }
}
ihrm_company 依赖
<!--eureka client 依赖-->
<dependency>
    <groupId>org.springframework.cloud</groupId>
    <artifactId>spring-cloud-starter-netflix-eureka-client</artifactId>
</dependency>
配置application.yml
#注册到eureka的服务地址
eureka:
  client:
    service-url:
      defaultZone: http://localhost:6868/eureka/
server:
  port: 8081
配置启动类
@EnableEurekaClient  // 声明这是服务,并且把这个服务注册到注册中心
@SpringBootApplication
public class CompanyApplication {
    public static void main(String[] args) {
        SpringApplication.run(CompanyApplication.class,args);
    }
}
配置对外开放的接口
本demo就在DepartmentController中配置一个外部调用的接口
   /**
     * 根据ID查询department
     * departmentService就不写了,都是MybatisPlus自带的方法
     */
    @PutMapping("/department/{departmentId}")
    public String findById(@PathVariable("departmentId") String departmentId, @RequestBody Department department) {
    	// 构造条件
        QueryWrapper<Department> queryWrapper = new QueryWrapper<>();
        queryWrapper.eq("company_id", "1").eq("id", departmentId);
        // 根据狗仔条件查询部门信息
        Department department = departmentService.getOne(queryWrapper);
        if (StringUtils.checkValNotNull(department)) {
            return new Result(ResultCode.SUCCESS, department);
        }
        return new Result(ResultCode.FAIL);
    }
ihrm_system服务导入依赖
<!--eureka client依赖-->
<dependency>
   <groupId>org.springframework.cloud</groupId>
   <artifactId>spring-cloud-starter-netflix-eureka-client</artifactId>
</dependency>
<!--openfeign依赖-->
<dependency>
   <groupId>org.springframework.cloud</groupId>
   <artifactId>spring-cloud-starter-openfeign</artifactId>
</dependency>
配置application.yml
#微服务注册到eureka配置
eureka:
  client:
    service-url:
      defaultZone: http://localhost:6868/eureka/
server:
  port: 9002
配置启动类
@EnableEurekaClient
@EnableDiscoveryClient
@EnableFeignClients
@SpringBootApplication
public class SystemApplication {
    public static void main(String[] args) {
        SpringApplication.run(SystemApplication.class,args);
    }

}
@EnableDiscoveryClient与@EnableEurekaClient区别:
spring cloud中discovery service有许多种实现(eureka、consul、zookeeper等等),@EnableDiscoveryClient基于spring-cloud-commons, @EnableEurekaClient基于spring-cloud-netflix。
其实用更简单的话来说,就是如果选用的注册中心是eureka,那么就推荐@EnableEurekaClient,如果是其他的注册中心,那么推荐使用@EnableDiscoveryClient。
写一个远程调用其他微服务的接口
@FeignClient("ihrm-company")
public interface DepartmentClient {

    @RequestMapping(value = "/department/{departmentId}", method = RequestMethod.GET)
    Result findById(@PathVariable("departmentId") String departmentId) throws Exception;
}
注意路径,返回值,参数要与被调用的接口一致
写一个本服务对外调用的接口
@RestController
@RequestMapping("user")
public class UserController  {
	// 注入调用其他微服务的接口
	@Autowired
    DepartmentClient departmentClient;

	/**
     * 测试
     */
    @GetMapping("/department/{departmentId}")
    public void tert(@PathVariable("departmentId")String departmentId) throws Exception {
        Result result = departmentClient.findById(departmentId);
        System.out.println(result.getData());
    }
}
这样就可以通过外部访问UserController 中的tert方法进行调用了
调用关系图


 167万+
167万+

 被折叠的 条评论
为什么被折叠?
被折叠的 条评论
为什么被折叠?
 到【灌水乐园】发言


