


实时同步服务
rsync
inotify
sersync
1. rsync安装部署
2 inotify的安装部署
2.1 安装
yum -y install inotify-tools
安装失败解决办法:yum没有进行优化:
yum源的优化,点击查看
rpm -ql inotify-tools

命令 的使用
/usr/bin/inotifuwait  监控目录数据的信息变化
/usr/bin/inotifywatch 对监控的变化信息进行统计
2.2 inotifywait的命令使用参数
inotifywait [参数] 监控的目录
-m  实现一直监控目录的数据变化
-r  进行递归监控
-q  尽量减少信息的输出
--format 指定信息输出的格式
--timefmt 指定时间信息的输出格式
-e 指定监控的时间信息
2.3 信息的输出
创建文件
/data/ CREATE yq02.txt   创建
/data/ OPEN yq02.txt     打开
/data/ ATTRIB yq02.txt    修改文件的属性
/data/ CLOSE_WRITE,CLOSE yq02.txt   保存关闭一个文件
修改文件
/data/ MODIFY yq02.txt
/data/ OPEN yq02.txt
/data/ MODIFY yq02.txt
/data/ CLOSE_WRITE,CLOSE yq02.txt
删除文件
/data/ DELETE yq01.txt
sed命令修改文件
data/ OPEN yq02.txt
/data/ CREATE sed3f2SNZ
/data/ OPEN sed3f2SNZ
/data/ ACCESS yq02.txt
/data/ MODIFY sed3f2SNZ
/data/ ATTRIB sed3f2SNZ
/data/ CLOSE_NOWRITE,CLOSE yq02.txt
/data/ CLOSE_WRITE,CLOSE sed3f2SNZ
/data/ MOVED_FROM sed3f2SNZ
/data/ MOVED_TO yq02.txt
2.4 命令格式
监控命令格式
inotifywait -rmq --timefmt "%F" --format "%T %w %f 事件信息:%e" /data
%T 将前面的时间格式拿过来
%w 进行监控的目录
%f 改变的文件
%e 改变的事件
3. sersync的安装与部署
3.1 安装
下载sersync:
https://github.com/wsgzao/sersync
下载之后,上传解压:
上传的工具:lrzsz
yum -y install lrzsz

上传:
rz -y

推送:
sz -y 文件名称
tar zxvf sersync2.5.4_64bit_binary_stable_final.tar.gz
解压完成后:可以将目录移动到/usr/local
可以重新命名一下
mv GNU-Linux-x86/ sersync
移动到/usr/local/目录的下边
mv /server/tools/sersync /usr/local/
3.2 配置
编写配置文件
vim confxml.xml
1.排除指定信息不需要监控
默认是false,关闭的
<filter start="false">
	<exclude expression="(.*)\.svn"></exclude>
	<exclude expression="(.*)\.gz"></exclude>
	<exclude expression="^info/*"></exclude>
	<exclude expression="^static/*"></exclude>
    </filter>
2.定义要监控的事件
<inotify>
	<delete start="true"/>
	<createFolder start="true"/>
	<createFile start="false"/>
	<closeWrite start="true"/>
	<moveFrom start="true"/>
	<moveTo start="true"/>
	<attrib start="false"/>
	<modify start="false"/>
    </inotify>
3.ip端口的配置
watch 要进行监控的目录
ip 备份服务器的地址 name 备份的模块(可有多个备份服务器)
params rsync的传送参数 -az即可
user 进行验证的账户 passwordfile验证密码文件的位置
port 端口验证,默认端口873,打开false变为true,但是要和rsync的配置文件中的port一致
time 连接延迟的最大时间
<sersync>
	<localpath watch="/opt/tongbu">
	    <remote ip="127.0.0.1" name="tongbu1"/>
	    <!--<remote ip="192.168.8.39" name="tongbu"/>-->
	    <!--<remote ip="192.168.8.40" name="tongbu"/>-->
	</localpath>
	<rsync>
	    <commonParams params="-artuz"/>
	    <auth start="false" users="root" passwordfile="/etc/rsync.pas"/>
	    <userDefinedPort start="false" port="874"/><!-- port=874 -->
	    <timeout start="false" time="100"/><!-- timeout=100 -->
	    <ssh start="false"/>
	</rsync>
4.修改失败后日志文件的位置
	<failLog path="/tmp/rsync_fail_log.sh" timeToExecute="60"/><!--default every 60mins execute once-->
	<crontab start="false" schedule="600"><!--600mins-->
	    <crontabfilter start="false">
		<exclude expression="*.php"></exclude>
		<exclude expression="info/*"></exclude>
	    </crontabfilter>
	</crontab>
5.完整的配置文件
<?xml version="1.0" encoding="ISO-8859-1"?>
<head version="2.5">
   <host hostip="172.16.1.31" port="8008"></host>
    <debug start="false"/>
    <fileSystem xfs="false"/>
    <filter start="false">
	<exclude expression="(.*)\.svn"></exclude>
	<exclude expression="(.*)\.gz"></exclude>
	<exclude expression="^info/*"></exclude>
	<exclude expression="^static/*"></exclude>
    </filter>
    <inotify>
	<delete start="true"/>
	<createFolder start="true"/>
	<createFile start="false"/>
	<closeWrite start="true"/>
	<moveFrom start="true"/>
	<moveTo start="true"/>
	<attrib start="false"/>
	<modify start="false"/>
    </inotify>

    <sersync>
	<localpath watch="/data1">
	    <remote ip="172.16.1.41" name="backup"/>
	    <!--<remote ip="192.168.8.39" name="tongbu"/>-->
	    <!--<remote ip="192.168.8.40" name="tongbu"/>-->
	</localpath>
	<rsync>
	    <commonParams params="-artuz"/>
	    <auth start="true" users="rsync_backup" passwordfile="/etc/rsync.password"/>
	    <userDefinedPort start="false" port="874"/><!-- port=874 -->
	    <timeout start="true" time="100"/><!-- timeout=100 -->
	    <ssh start="false"/>
	</rsync>
	<failLog path="/tmp/rsync_fail_log.sh" timeToExecute="60"/><!--default every 60mins execute once-->
	<crontab start="false" schedule="600"><!--600mins-->
	    <crontabfilter start="false">
		<exclude expression="*.php"></exclude>
		<exclude expression="info/*"></exclude>
	    </crontabfilter>
	</crontab>
	<plugin start="false" name="command"/>
    </sersync>

    <plugin name="command">
	<param prefix="/bin/sh" suffix="" ignoreError="true"/>	<!--prefix /opt/tongbu/mmm.sh suffix-->
	<filter start="false">
	    <include expression="(.*)\.php"/>
	    <include expression="(.*)\.sh"/>
	</filter>
    </plugin>

    <plugin name="socket">
	<localpath watch="/opt/tongbu">
	    <deshost ip="192.168.138.20" port="8009"/>
	</localpath>
    </plugin>
    <plugin name="refreshCDN">
	<localpath watch="/data0/htdocs/cms.xoyo.com/site/">
	    <cdninfo domainname="ccms.chinacache.com" port="80" username="xxxx" passwd="xxxx"/>
	    <sendurl base="http://pic.xoyo.com/cms"/>
	    <regexurl regex="false" match="cms.xoyo.com/site([/a-zA-Z0-9]*).xoyo.com/images"/>
	</localpath>
    </plugin>
</head>
特别说明:过滤器最好不要true
会报错
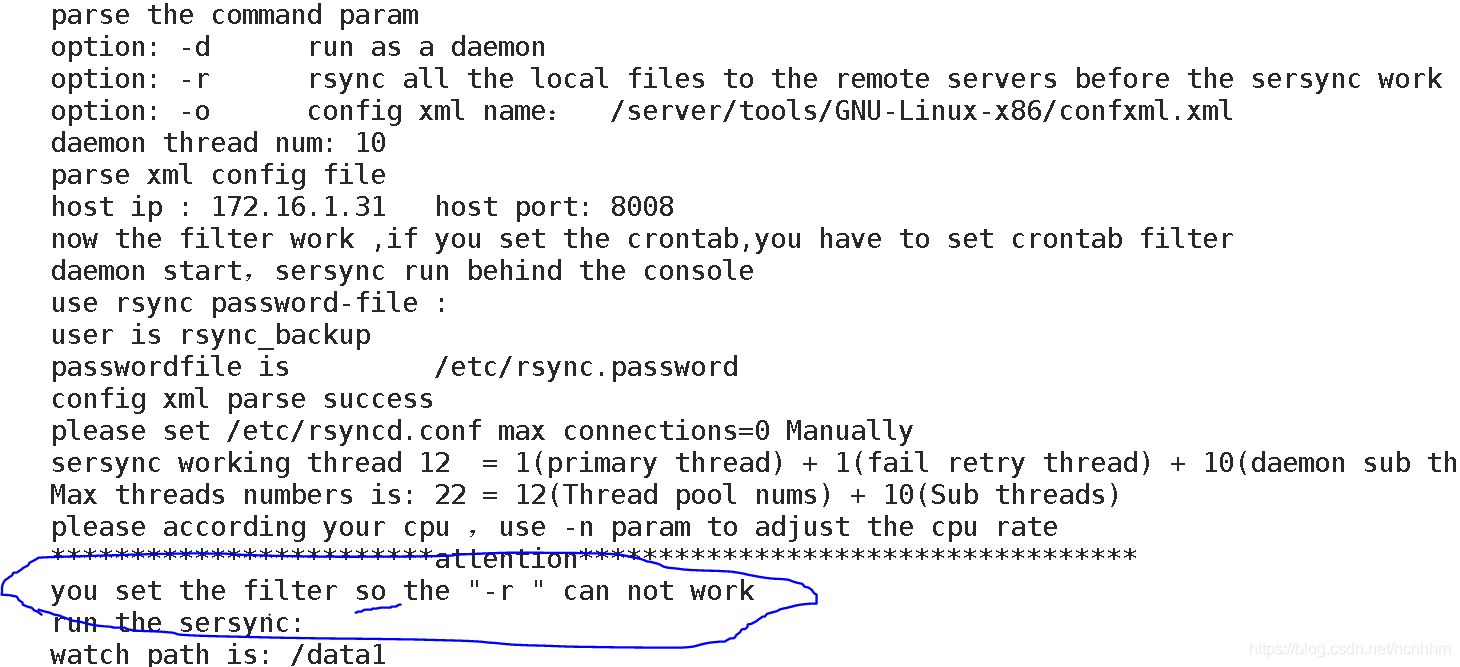
这个就是过滤器开了
4. 服务的启动
rsync的启动
4.1 sersync的启动配置
首先sersync的启动是一个可执行的文件:serync2

它并不在环境变量PATH里边
所以我们要添加:
方法一:
vim /etc/profile
添加
export PATH="/usr/local/sbin:/usr/local/bin:/usr/sbin:/usr/bin:/root/bin:/usr/local/sersync"
source /etc/profile
方法二:
将执行的文件拷贝到/usr/bin下即可
cp /usr/local/sersync/sersync2 /usr/bin
4.2 启动
启动参数
参数-d:  启用守护进程模式
参数-r:  在监控前,将监控目录与远程主机用rsync命令推送一遍
      进行同步测试
参数-o:  指定配置文件,默认使用confxml.xml文件
启动实时同步服务
sersync2 -dro /usr/local/sersync/confxml.xml
还可以添加快捷的启动方式
vim /etc/profile

添加
alias sersync2start="sersync2 -dro /usr/local/sersync/confxml.xml"

source /etc/profile
通过命令sersync2start就可任意启动实时同步服务
sersync2start
4.3关闭
yum provides killall
yum -y install psmisc
关闭
killall sersync2


 1156
1156

 被折叠的 条评论
为什么被折叠?
被折叠的 条评论
为什么被折叠?
 到【灌水乐园】发言


