


在Java开发过程中,会和上下游系统产生大量的交互接口。接口解决了什么问题?是POST请求还是GET请求?有什么入参和出参?参数格式又分别是什么样的格式?怎么快速调式接口?这些问题和上下游系统对接人沟通起来非常繁琐,而且接口也不是一成不变的,每次变更都需要重新提供文档。
Swagger2提供了简洁的界面展示接口相关信息,通过定义可以提供请求demo,并提供了接口请求的功能,类似postman,还不需要自己组装请求格式。
以下demo简单说明springBoot整合swagger的情况。
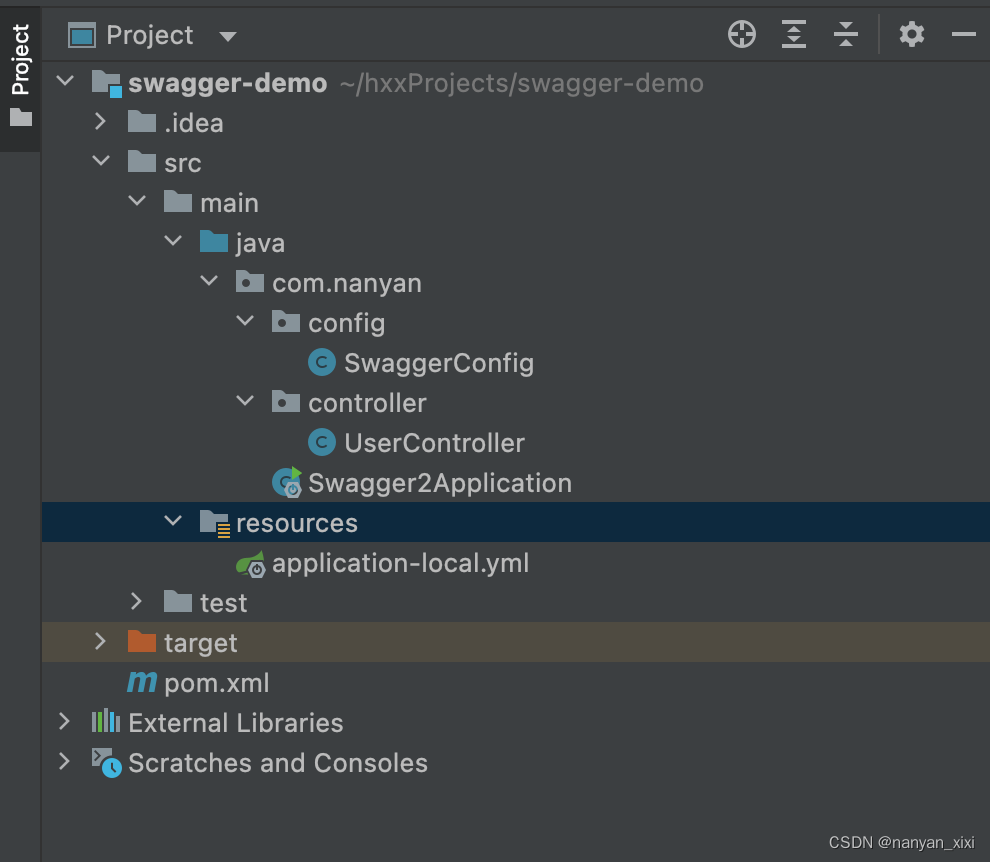
1. 项目结构
2. pom依赖
<?xml version="1.0" encoding="UTF-8"?>
<project xmlns="http://maven.apache.org/POM/4.0.0"
         xmlns:xsi="http://www.w3.org/2001/XMLSchema-instance"
         xsi:schemaLocation="http://maven.apache.org/POM/4.0.0 http://maven.apache.org/xsd/maven-4.0.0.xsd">
    <modelVersion>4.0.0</modelVersion>

    <parent>
        <groupId>org.springframework.boot</groupId>
        <artifactId>spring-boot-starter-parent</artifactId>
        <version>2.0.9.RELEASE</version>
        <relativePath/>
    </parent>

    <groupId>com.nanyan</groupId>
    <artifactId>swagger-demo</artifactId>
    <version>1.0-SNAPSHOT</version>
    <description>Swagger Demo project for Spring Boot</description>

    <properties>
        <maven.compiler.source>8</maven.compiler.source>
        <maven.compiler.target>8</maven.compiler.target>
    </properties>

    <dependencies>
        <!-- springboot start -->
        <dependency>
            <groupId>org.springframework.boot</groupId>
            <artifactId>spring-boot-starter-web</artifactId>
        </dependency>
        <dependency>
            <groupId>org.springframework.boot</groupId>
            <artifactId>spring-boot-starter-test</artifactId>
        </dependency>
        <!-- springBoot end -->

        <!-- Swagger Mvc Begin -->
        <dependency>
            <groupId>io.springfox</groupId>
            <artifactId>springfox-swagger2</artifactId>
            <version>2.9.2</version>
        </dependency>
        <!-- swagger老界面 /swagger-ui.html-->
        <dependency>
            <groupId>io.springfox</groupId>
            <artifactId>springfox-swagger-ui</artifactId>
            <version>2.9.2</version>
        </dependency>
        <!-- swagger新界面 /doc.html 提供basic鉴权认证,需要开启注解@EnableSwaggerBootstrapUI-->
        <dependency>
            <groupId>com.github.xiaoymin</groupId>
            <artifactId>swagger-bootstrap-ui</artifactId>
            <version>1.9.5</version>
        </dependency>
        <!-- Swagger Mvc End -->

        <!-- lombok: the java code brief tools -->
        <dependency>
            <groupId>org.projectlombok</groupId>
            <artifactId>lombok</artifactId>
            <version>1.18.2</version>
        </dependency>
    </dependencies>

    <build>
        <plugins>
            <plugin>
                <groupId>org.springframework.boot</groupId>
                <artifactId>spring-boot-maven-plugin</artifactId>
                <version>2.1.5.RELEASE</version>
            </plugin>
        </plugins>
    </build>

    <profiles>
        <profile>
            <id>local</id>
            <properties>
                <profileActive>local</profileActive>
            </properties>
        </profile>
        <profile>
            <id>pro</id>
            <properties>
                <profileActive>pro</profileActive>
            </properties>
        </profile>

    </profiles>

</project>
3. 配置文件
server:
  port: 8888

swagger:
  #swagger.production 不可设置为true,否则将屏蔽所有资源
  production: false
  basic:
    #enable: true开启鉴权
    enable: true
    username: admin
    password: 123456
4. Swagger配置类
package com.nanyan.config;

import com.github.xiaoymin.swaggerbootstrapui.annotations.EnableSwaggerBootstrapUI;
import org.springframework.context.annotation.Bean;
import org.springframework.context.annotation.Configuration;
import org.springframework.context.annotation.Profile;
import org.springframework.web.servlet.config.annotation.ResourceHandlerRegistry;
import org.springframework.web.servlet.config.annotation.ViewControllerRegistry;
import org.springframework.web.servlet.config.annotation.WebMvcConfigurerAdapter;
import springfox.documentation.builders.ApiInfoBuilder;
import springfox.documentation.builders.PathSelectors;
import springfox.documentation.builders.RequestHandlerSelectors;
import springfox.documentation.service.ApiInfo;
import springfox.documentation.service.Contact;
import springfox.documentation.spi.DocumentationType;
import springfox.documentation.spring.web.plugins.Docket;
import springfox.documentation.swagger2.annotations.EnableSwagger2;

/**
 * Swagger 配置文件,通过本配置文件可以实现swagger访问
 * 访问地址(原界面):http://127.0.0.1:8888/swagger-ui.html
 * 访问地址(新界面):http://127.0.0.1:8888/doc.html
 * @Profile 本注解说明适用环境类型
 * @EnableSwaggerBootstrapUI 在1.9.0版本时,针对Swagger的资源接口,SwaggerBootstrapUi提供了简单的Basic认证功能。
 *
 * @Author :nanyan
 * @Date :created in 2022/10/9 15:44
 * @Description :
 * @Version : 1.0
 */
@Configuration
@EnableSwagger2
@EnableSwaggerBootstrapUI
@Profile({"local", "dev", "test"})
public class SwaggerConfig extends WebMvcConfigurerAdapter {

    @Bean
    public Docket createRestApi() {
        return new Docket(DocumentationType.SWAGGER_2).apiInfo(apiInfo()).select()
                .apis(RequestHandlerSelectors.basePackage("com.nanyan.controller"))
                .paths(PathSelectors.any()).build();
    }

    /**
     * 配置说明信息
     * @return
     */
    private ApiInfo apiInfo() {
        String desc = "公共header参数说明(需URLEncoder编码):\r\n"
                + "参数名:Version-Code \r\t 参数类型: String \r\t 参数说明:版本号 \r\n ";
        return new ApiInfoBuilder()
                // 接口文档的名字
                .title("swagger demo")
                // 接口文档的描述
                .description(desc)
                // 服务条款网址
                .termsOfServiceUrl("")
                // 接口文档维护联系信息
                .contact(new Contact("nanyan", "", ""))
                // 接口文档的版本
                .version("1.0")
                .build();
    }


    /**
     * swagger ui资源映射
     * 实现了WebMvcConfigurerAdapter的方法,使用了swagger新版本需要添加拦截,否则访问404
     *
     * @param registry
     */
    @Override
    public void addResourceHandlers(ResourceHandlerRegistry registry) {
        registry.addResourceHandler("swagger-ui.html").addResourceLocations("classpath:/META-INF/resources/");

        registry.addResourceHandler("/webjars/**").addResourceLocations("classpath:/META-INF/resources/webjars/");
    }

    /**
     * swagger-ui.html路径映射,浏览器中使用/api-docs访问
     * 实现了WebMvcConfigurerAdapter的方法,不做映射可以不写
     *
     * @param registry
     */
    @Override
    public void addViewControllers(ViewControllerRegistry registry) {
        registry.addRedirectViewController("/api-docs", "/swagger-ui.html");
    }

}
5. Controller
package com.nanyan.controller;

import io.swagger.annotations.Api;
import io.swagger.annotations.ApiOperation;
import org.springframework.web.bind.annotation.GetMapping;
import org.springframework.web.bind.annotation.RequestParam;
import org.springframework.web.bind.annotation.RestController;

/**
 * @Author :nanyan
 * @Date :created in 2022/10/9 15:44
 * @Description :
 * @Version : 1.0
 */
@RestController
@Api(tags = "用户数据相关接口")
public class UserController {

    @ApiOperation(value = "获取用户名", notes = "获取用户名", httpMethod = "GET")
    @GetMapping("/user/getName")
    public String getName(@RequestParam("userName") String userName) {
        return userName;
    }
}
6. 启动类
package com.nanyan;

import org.springframework.boot.SpringApplication;
import org.springframework.boot.autoconfigure.SpringBootApplication;

/**
 * @Author :nanyan
 * @Date :created in 2022/10/9 15:43
 * @Description :
 * @Version : 1.0
 */
@SpringBootApplication
public class Swagger2Application {

    public static void main(String[] args) {
        SpringApplication.run(Swagger2Application.class);
    }

}
7. swagger-ui.html效果
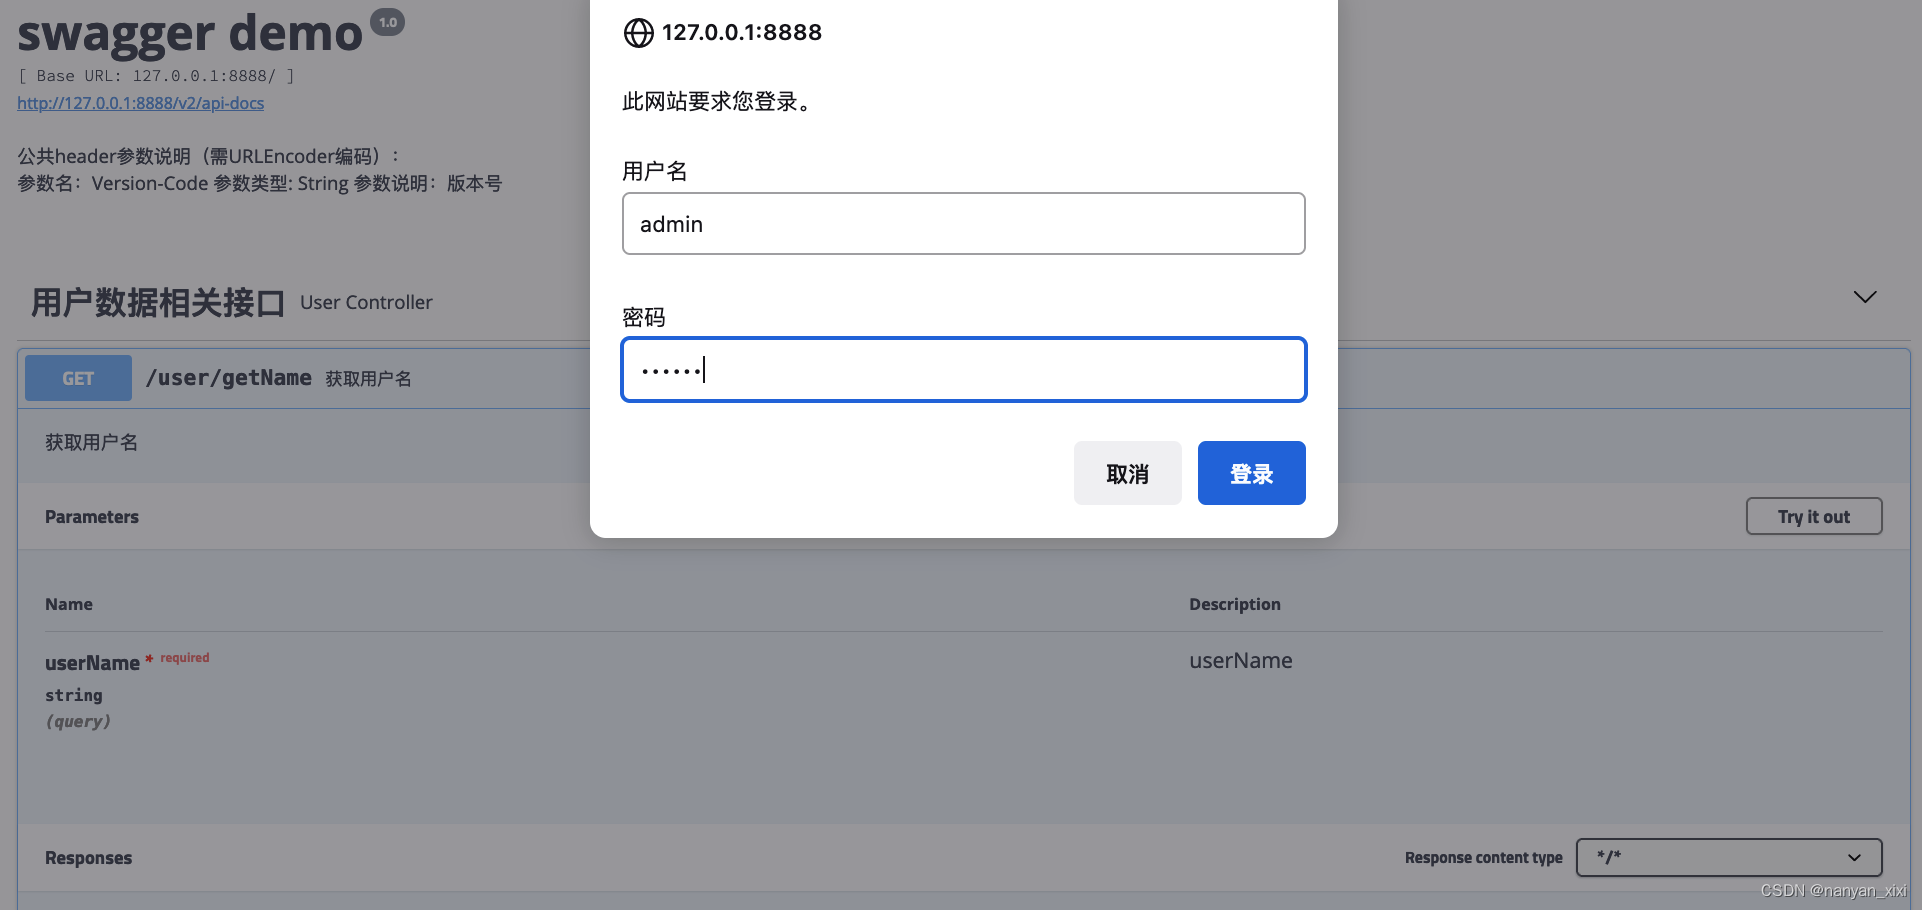
7.1 登录
访问地址(原界面):http://127.0.0.1:8888/swagger-ui.html
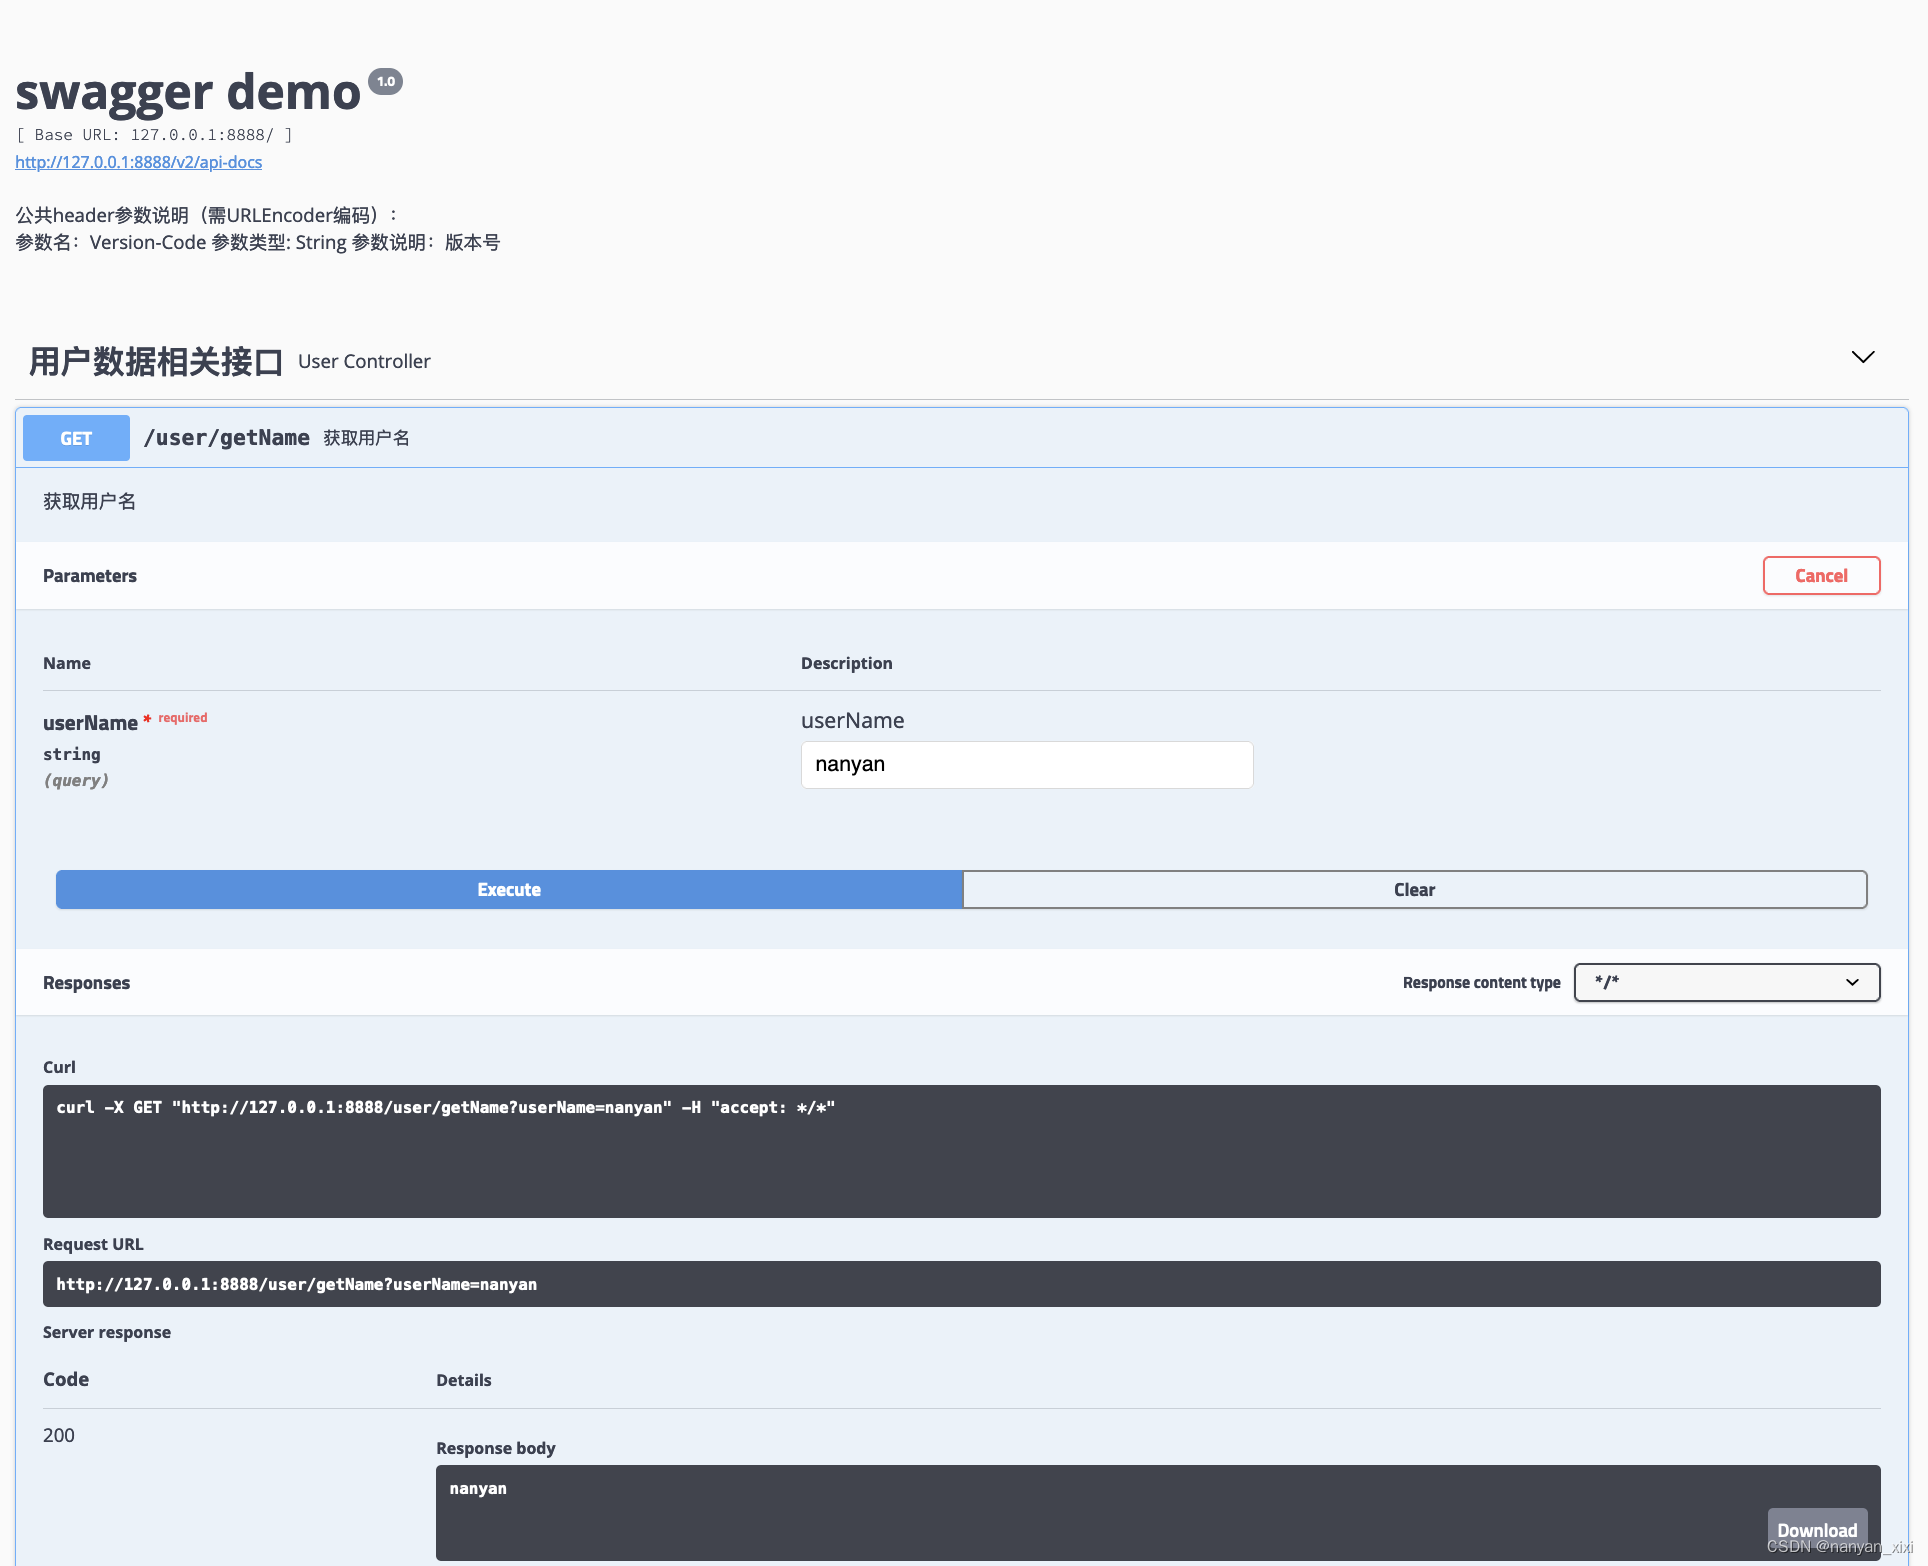
7.2 效果展示
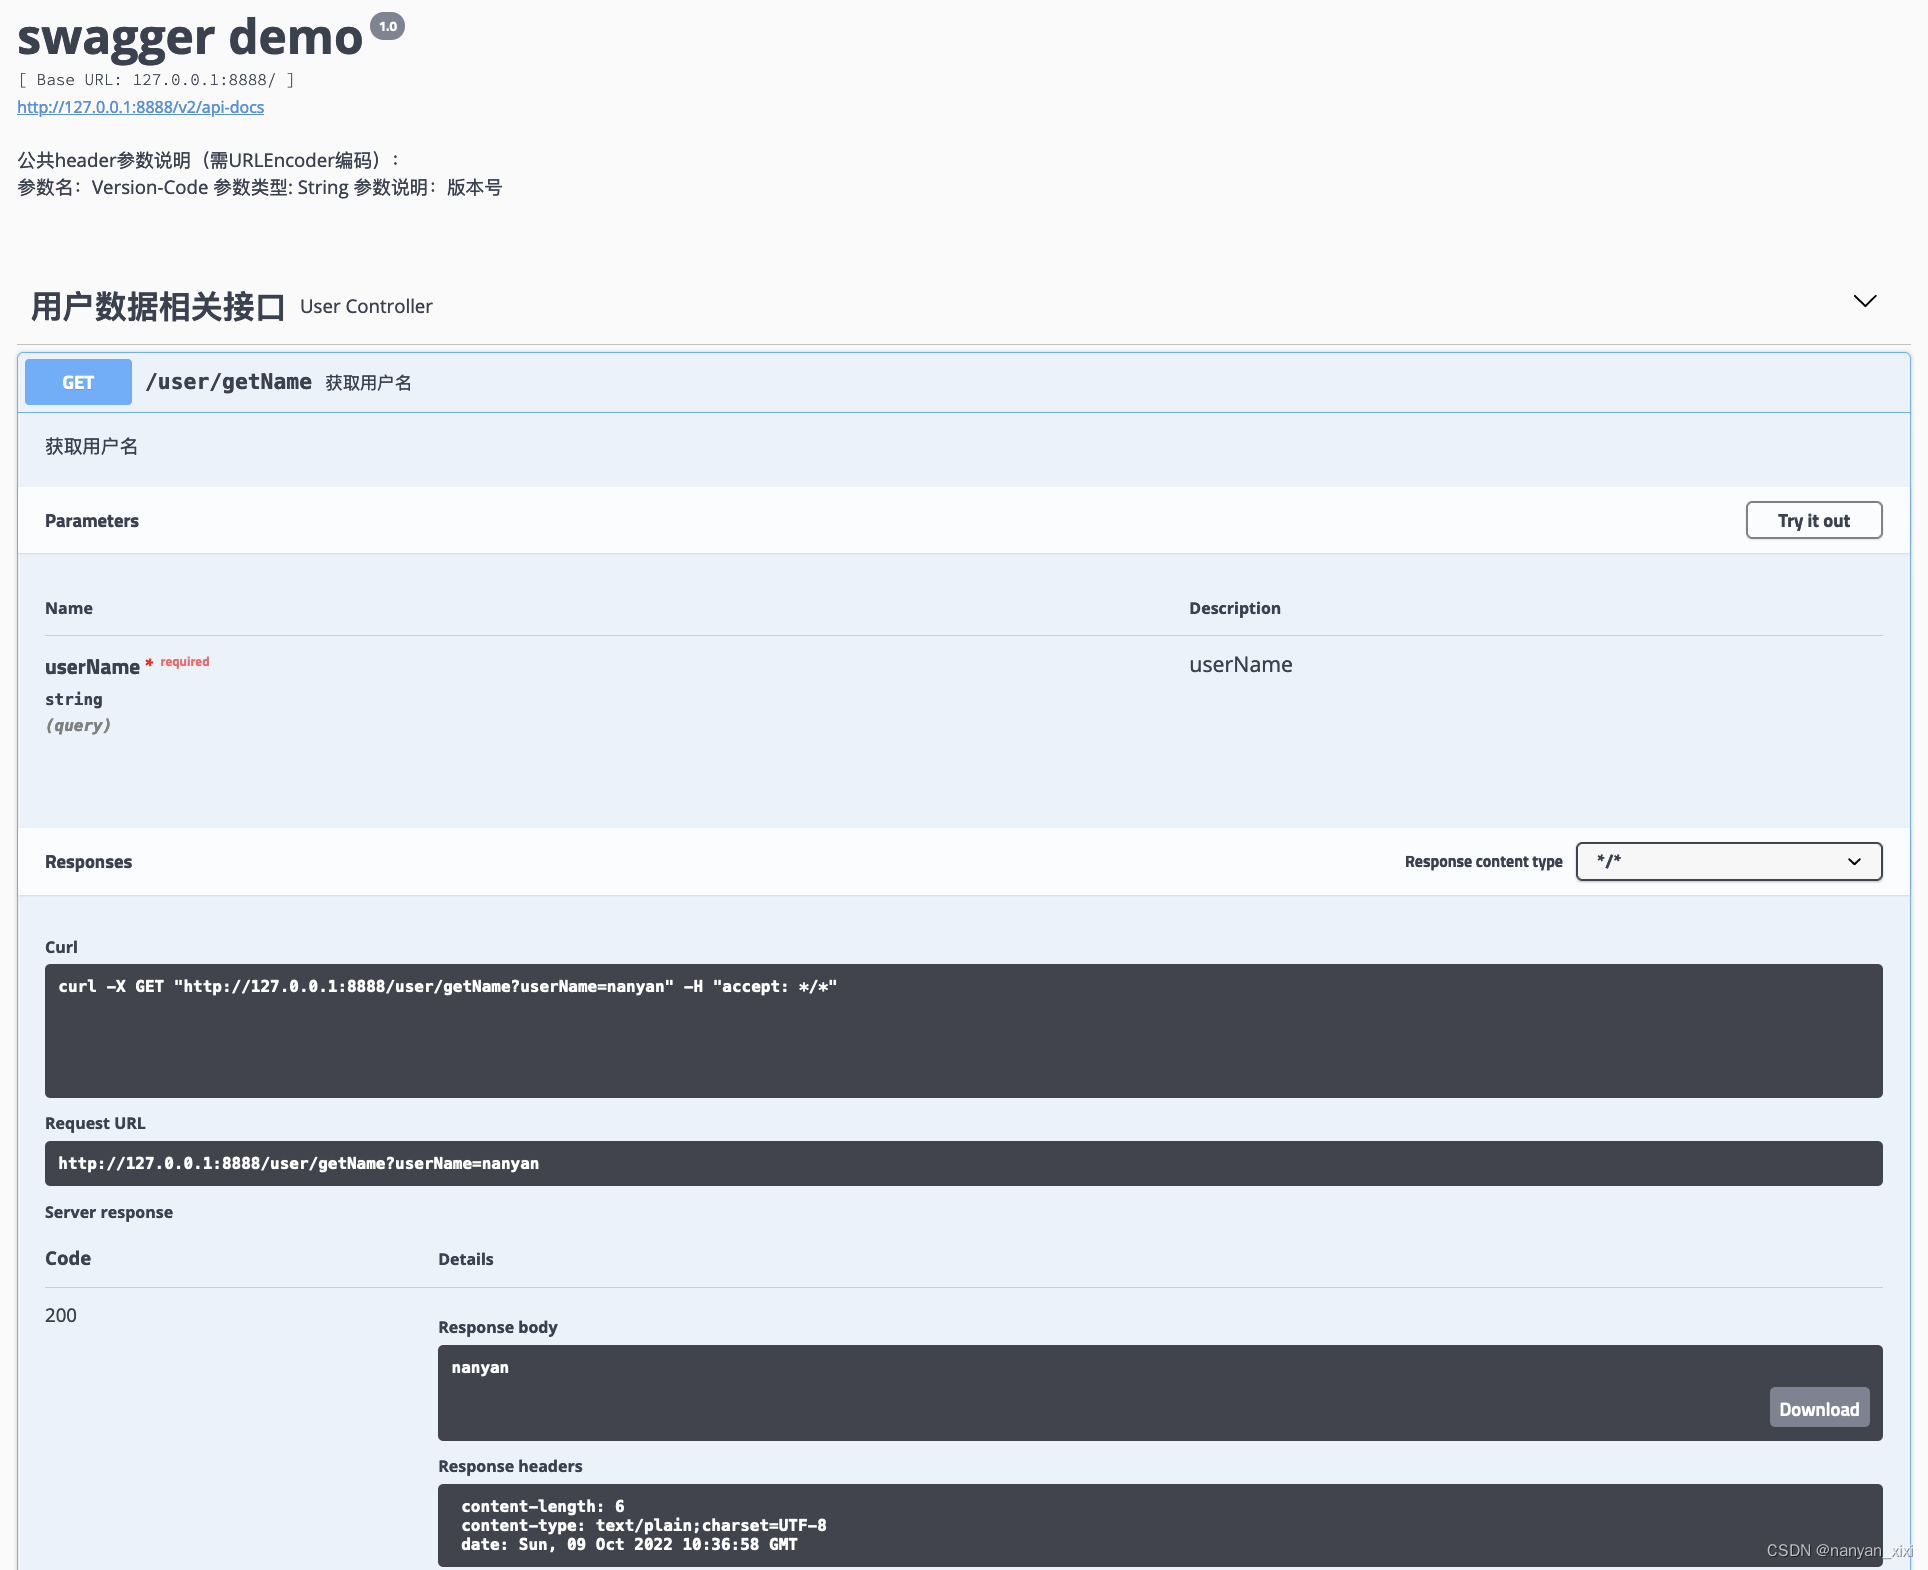
7.3 请求展示
8. doc.html效果
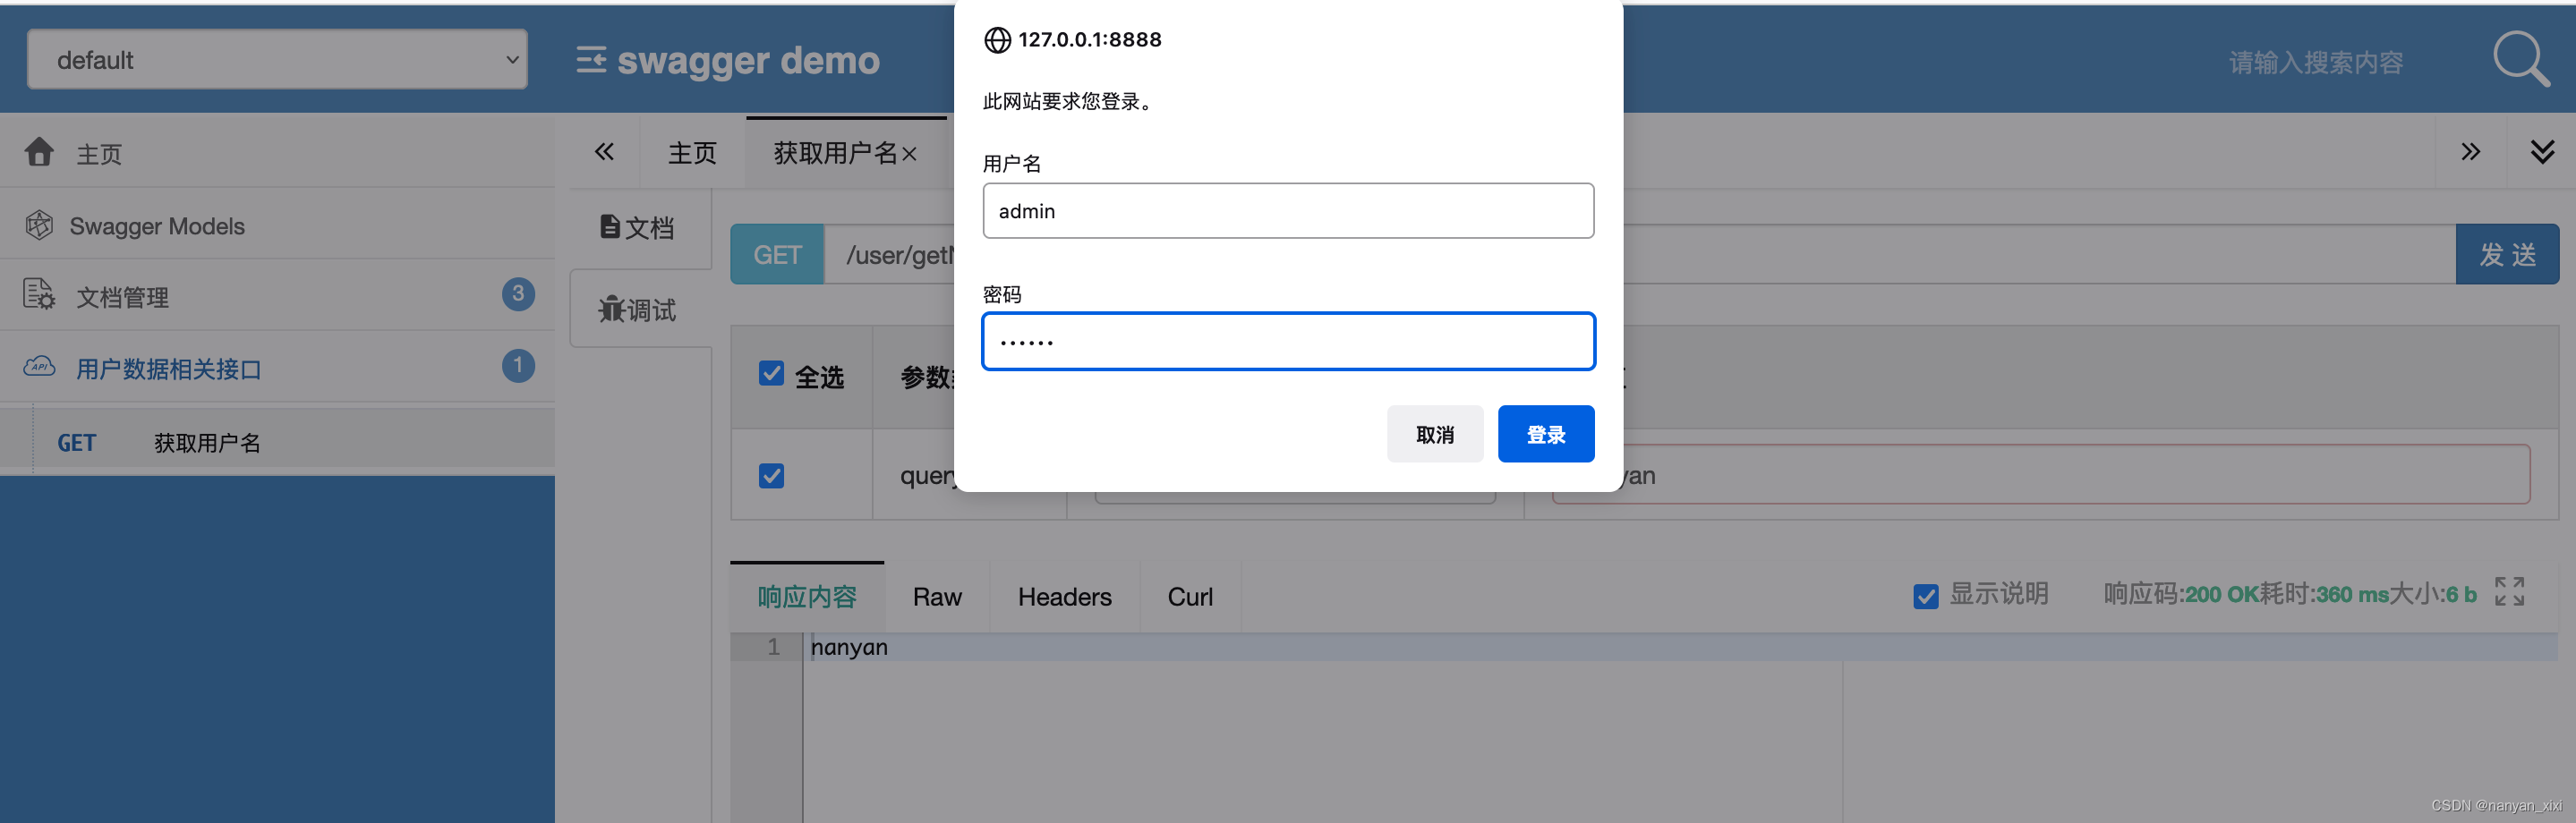
8.1 登录
访问地址(新界面):http://127.0.0.1:8888/doc.html
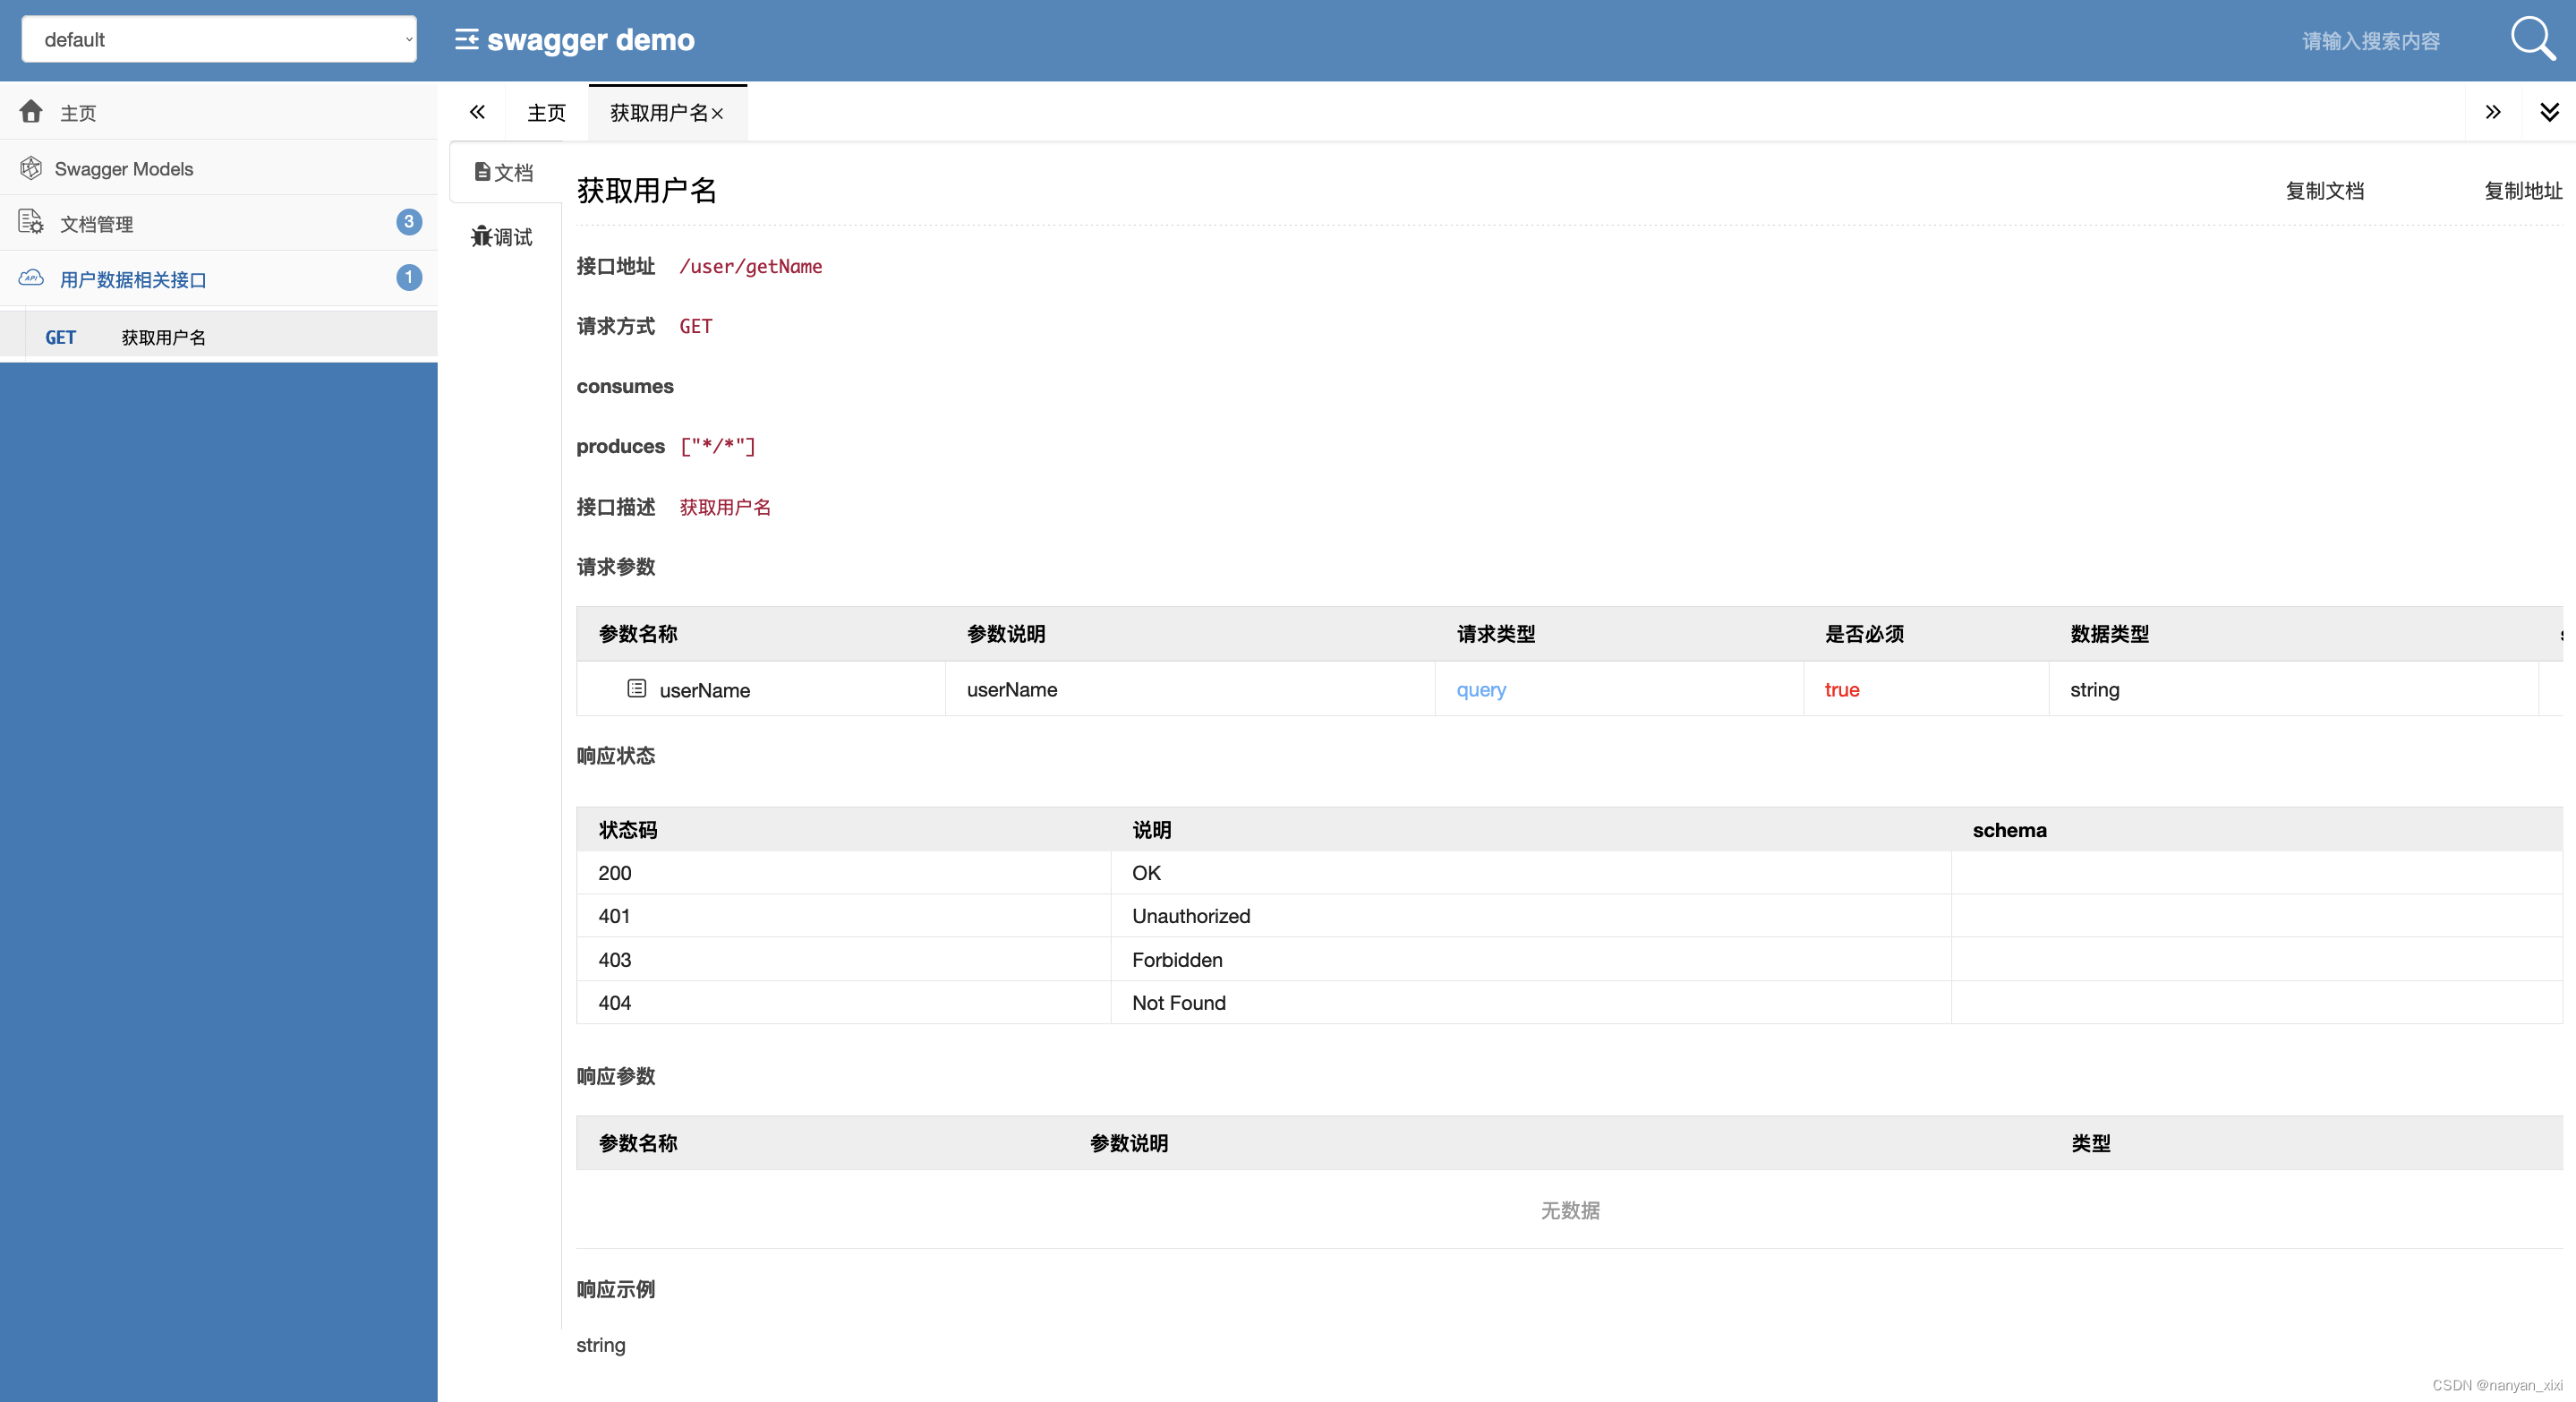
8.2 效果展示
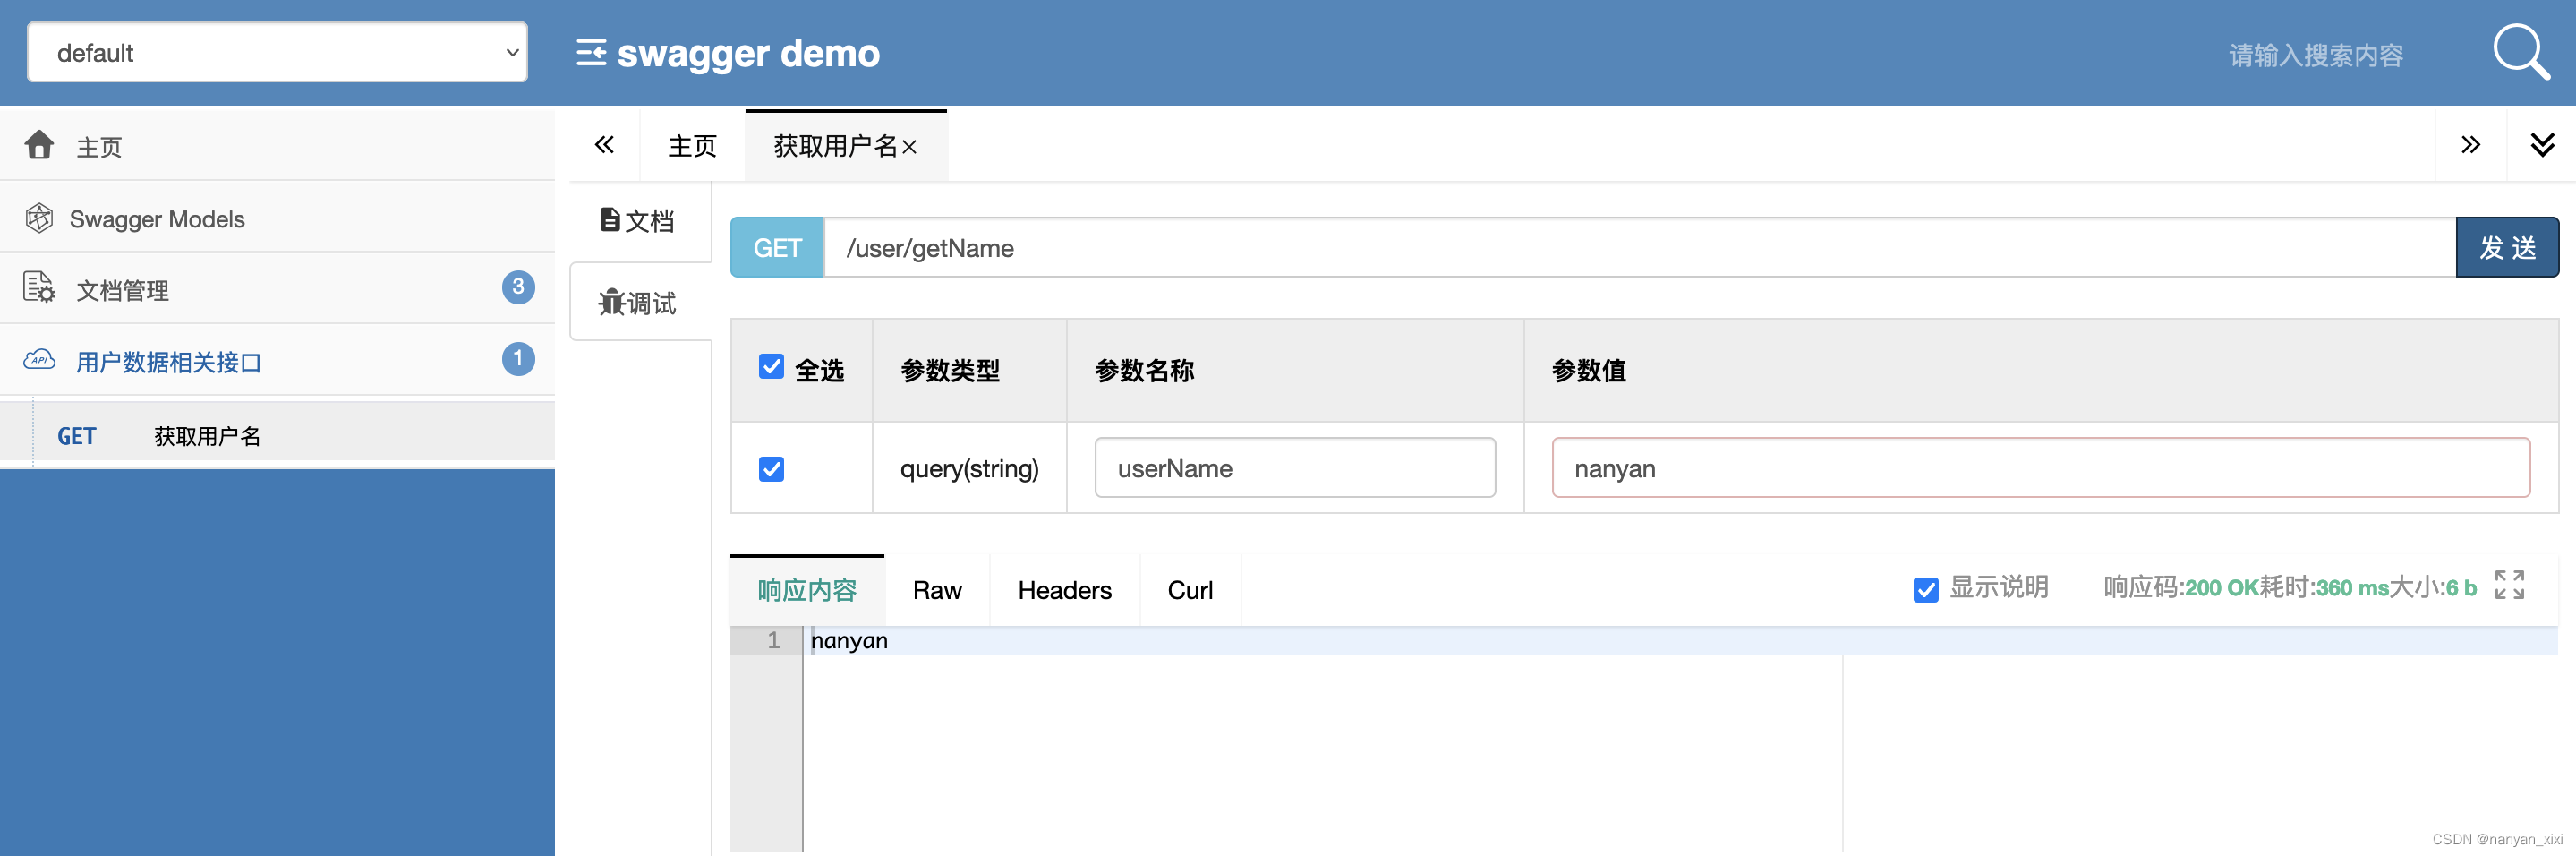
8.3 请求展示
9. swagger注解说明
@Api:修饰整个类,描述Controller的作用
@ApiOperation:描述一个类的一个方法,或者说一个接口
@ApiParam:单个参数描述
@ApiModel:用对象来接收参数
@ApiProperty:用对象接收参数时,描述对象的一个字段
@ApiResponse:HTTP响应其中1个描述
@ApiResponses:HTTP响应整体描述
@ApiIgnore:使用该注解忽略这个API
@ApiError :发生错误返回的信息
@ApiImplicitParam:一个请求参数
@ApiImplicitParams:多个请求参数


 6277
6277

 被折叠的 条评论
为什么被折叠?
被折叠的 条评论
为什么被折叠?
 到【灌水乐园】发言


