 Nginx安装与配置详解


Nginx是一个高性能的HTTP和反向代理服务器,也是一个邮件代理服务器、TCP/UDP代理服务器。
最初是由战斗民族的大佬igorSysoev用C语言写的,第一个公开版本在2004年发布。
Nginx的特点是占用内存资源少,并发处理能力强,以高性能,低系统资源消耗而闻名Nginx最大并发5W。
并发处理在同类型web服务器中表现很好。
 下载Nginx的话从官网下就可以了。
http://nginx.org或者http://nginx.com
nginx有Windows和linux版
Windows的解压缩,双击nginx.exe文件使用。
或者在dos中移动到nginx目录输入 start nginx
 然后就能看到了,一共2个进程。

关闭的话可以直接任务管理器杀掉进程,或者在dos执行 nginx -s stop就能关闭了。
linux的就比较麻烦了。
那个是源码安装
1、解压缩。
2、./configure 配置。
3、编译
4、安装。
1、解压缩
[root@localhost ~]# tar -xf nginx-1.17.6.tar.gz
[root@localhost ~]# ls
anaconda-ks.cfg  nginx-1.17.6  nginx-1.17.6.tar.gz
中间那个就是解压出的目录。
进行一系列操作之前还要安装一大堆软件。
yum install -y pcre-devel openssl openssl-devel zlib zlib-devel gcc gcc-c++ glibc glibc-devel nasm pkgconfig expat-devel gettext-devel libtool perl-Digest-SHA1.x86_64 make cmake ruby wget
其中gcc openssl zlib pcre 是编译时要用到的库,如果没有编译会不通过,不通过也没有关系,看错误信息少什么软件装什么软件就好了。
2、配置
进入解压出的目录下,可以看到目录结构。
[root@localhost nginx-1.17.6]# ls
auto  CHANGES  CHANGES.ru  conf  configure  contrib  html  LICENSE  man  README  src

configure是可执行文件,也就是一会配置要用到的命令

src目录下放到是源码
conf是配置文件目录
README自然是说明了
开始配置:
[root@localhost nginx-1.17.6]# ./configure \
> --prefix=/usr/local/nginx \
> --user=www \
> --group=www \
> --with-http_stub_status_module \
> --with-http_v2_module \
> --with-http_ssl_module \
> --with-http_sub_module \
> --with-http_gzip_static_module \
> --with-http_realip_module \
> --with-stream

Configuration summary
  + using system PCRE library
  + using system OpenSSL library
  + using system zlib library

  nginx path prefix: "/usr/local/nginx"
  nginx binary file: "/usr/local/nginx/sbin/nginx"
  nginx modules path: "/usr/local/nginx/modules"
  nginx configuration prefix: "/usr/local/nginx/conf"
  nginx configuration file: "/usr/local/nginx/conf/nginx.conf"
  nginx pid file: "/usr/local/nginx/logs/nginx.pid"
  nginx error log file: "/usr/local/nginx/logs/error.log"
  nginx http access log file: "/usr/local/nginx/logs/access.log"
  nginx http client request body temporary files: "client_body_temp"
  nginx http proxy temporary files: "proxy_temp"
  nginx http fastcgi temporary files: "fastcgi_temp"
  nginx http uwsgi temporary files: "uwsgi_temp"
  nginx http scgi temporary files: "scgi_temp"
3、编译
[root@localhost nginx-1.17.6]# make

make[1]: Leaving directory `/root/nginx-1.17.6'
可能会出这个问题,我理解是做完操作就离开了这个目录没什么大问题,不是报错
4、安装
[root@localhost nginx-1.17.6]# make install
创建用户
[root@localhost sbin]# groupadd -g 80 www
[root@localhost sbin]# useradd -g 80 -u 80 -s /sbin/nologin www

[root@localhost sbin]# ./nginx -t
//语法检查
[root@localhost nginx]# vim conf/nginx.conf
修改这个配置文件
配置文件分为几个模块 :
【1】全局模块
【2】事务模块
【3】http模块
虚拟主机,虚拟主机在http模块里
全局模块
user  www;  //运行nginx进程的用户
worker_processes  1; //开启的进程数,这个要与机器的CPU的线程数是一致的,或者小于机器的

error_log  logs/error.log;
error_log  logs/error.log  notice;
error_log  logs/error.log  info;
//错误日志,日志级别
pid        logs/nginx.pid;  //进程号文件
[root@localhost /]# vim /proc/cpuinfo
在这个文件中可以查看系统的硬件属性。CPU个数就在这里查看。
事件模块
events {
    worker_connections  1024;
//每个进程能够处理的最大连接数
//nginx能够处理的最大连接数=worker_processes 乘 worker_connections
    use epoll;
//使用高效的网络IO模型 ,支持支持多路复用,SMP
}
[root@localhost ~]# /usr/local/nginx/sbin/nginx
//启动nginx
然后打开浏览器输入nginx的服务的IP。能看到测试页

然后可以将这个东西放到rc.local 文件里,实现开机自动启动nginx。
然后重启测试,发现已经开机启动了。
[root@localhost ~]# netstat -antlup | grep nginx
tcp        0      0 0.0.0.0:80              0.0.0.0:*               LISTEN      875/nginx: master p
Nginx 的一些命令
其实nginx 命令用的不多,也就是重新加载配置文件,启动服务,停止服务。
whereis nginx			查看nginx的目录
ps -ef |grep nginx		查看nginx的进程号
nginx -s reload 		优雅重启nginx,更好的说法是重新加载配置文件,因为有reopen
nginx -t 				查看nginx配置是否正确,测试配置是否有语法错误
nginx -s stop 			nginx停止服务
nginx 					启动nginx服务
sudo nginx				打开nginx
nginx -s reopen 		重启服务 但是重启不会重新读配置文件件
nginx -s quit 			退出
nginx -c /usr/local/nginx/conf/nginx.conf   指定配置文件
http模块
主要用到以下几个属性。
http {
    include       mime.types;        			//支持的文件格式,mime.types是个文件,在nginx.conf的同级目录下,里边都是各种格式。
    default_type  application/octet-stream;		//默认的数据传输模式,二进制模式。设置mime-type时也可以用text/html。

    log_format  main  '$remote_addr - $remote_user [$time_local] "$request" '
                      '$status $body_bytes_sent "$http_referer" '
                      '"$http_user_agent" "$http_x_forwarded_for"';

	//上边这个是日志的格式
    access_log  logs/access.log  main;     		//日志存放位置,在 /nginx/logs目录下的access.log

    sendfile        on;  						//开启高效的文件传输模式
    tcp_nopush     on;							//防止网络阻塞
    keepalive_timeout  65;						//长连接的超时时间

    gzip  on;									//开启传输压缩
虚拟主机的配置:
nginx的虚拟主机有3中模式,
1、基于域名的
2、基于端口的
3、基于IP的
1、基于域名的
在配置文件的http模块的server中写
http{
........中间的在上边,这里略
	server {
        listen       80;						//监听端口信息
        server_name  www.nginx-s1.com;			//访问域名,如果有多个域名要用空格分离。


        location / {							//location控制着访问的具体资源 / 表示访问的根,也就是域名后直接加/
            root   /webserver/nginx-s1; 		//访问资源的文件位置
            index  index.html index.htm;		//文件类型
        }

        error_page   500 502 503 504  /50x.html;//错误类型
        location = /50x.html {
            root   html;
        }

    }
}
创建访问的页面,目录要和root属性匹配。
[root@localhost webserver]# mkdir nginx-s1
[root@localhost webserver]# ls
nginx-s1
[root@localhost webserver]# echo "<h1>nginx-s1<h1>" >> /nginx-s1/index.html
以上就是一个简单的虚拟主机了,每个server都是一个虚拟主机,虚拟主机可以有多个。
然后重新加载配置文件,添加hosts解析或者DNS解析。开浏览器就能看到了。
windows的hosts文件:


2、基于端口的
不同的端口访问不同的虚拟主机,网站需要特殊端口的时候使用
server {
        listen       81;
        server_name  www.nginx-s1.com www.nginx-s3.com;
        location / {
            root   /webserver/nginx-s1;
            index  index.html index.htm;
        }
		error_page   500 502 503 504  /50x.html;
        location = /50x.html {
            root   html;
        }

    }

    server {
        listen       82;
        server_name  www.nginx-s2.com;
		location / {
            root   /webserver/nginx-s2;
            index  index.html index.htm;
        }
        error_page   500 502 503 504  /50x.html;
        location = /50x.html {
            root   html;
        }
    }
然后检查语法重新启动服务
查看端口信息
[root@localhost nginx]# netstat -antlup | grep nginx
tcp        0      0 0.0.0.0:81              0.0.0.0:*               LISTEN      883/nginx: master p
tcp        0      0 0.0.0.0:82              0.0.0.0:*               LISTEN      883/nginx: master p
可以看到81 和82 端口开启了。
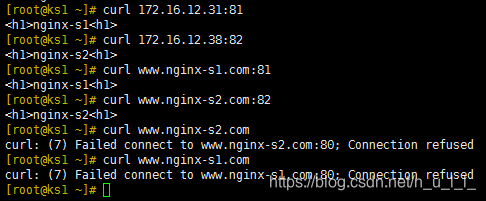
访问测试;
[root@ks1 ~]# curl 172.16.12.31:81
<h1>nginx-s1<h1>
[root@ks1 ~]# curl 172.16.12.31:82
<h1>nginx-s2<h1>

 但是这时用域名失败。
后边加上端口才能生效

3、基于IP的
基于IP的话一块网卡上要写多个IP,我用的是修改配置文件的方式:
[root@localhost nginx]# cat /etc/sysconfig/network-scripts/ifcfg-ens33
IPADDR0=172.16.12.31
NETMASK0=255.255.0.0
GATEWAY=172.16.0.254
IPADDR1=172.16.12.38
NETMASK1=255.255.0.0
GATEWAY=172.16.0.254
[root@localhost nginx]# ip a s ens33
2: ens33: <BROADCAST,MULTICAST,UP,LOWER_UP> mtu 1500 qdisc pfifo_fast state UP qlen 1000
    link/ether 00:0c:29:aa:42:70 brd ff:ff:ff:ff:ff:ff
    inet 172.16.12.31/16 brd 172.16.255.255 scope global ens33
       valid_lft forever preferred_lft forever
    inet 172.16.12.38/16 brd 172.16.255.255 scope global secondary ens33
       valid_lft forever preferred_lft forever
    inet6 fe80::3cbb:45f5:c2b0:c61b/64 scope link
       valid_lft forever preferred_lft forever
查一下网卡信息确是有2 个IP。
server {
        listen       172.16.12.31:81;
        server_name  www.nginx-s1.com www.nginx-s3.com;


        location / {
            root   /webserver/nginx-s1;
            index  index.html index.htm;
        }

        error_page   500 502 503 504  /50x.html;
        location = /50x.html {
            root   html;
        }

    }
配置文件,就直接修改了,在listen那里加个IP。
然后重启服务检查拼写。
输入IP+ 端口就可以访问了。
因为我加了端口,所以访问时没加端口访问不到。
PS :在后边补上一堆的Nginx配置文件的属性。
全局模块
#定义 Nginx 运行的用户和用户组
user nginx;

#进程文件
pid /var/run/nginx.pid;

#错误日志位置和级别,debug、info、notice、warn、error、crit
error_log  /var/log/nginx/error.log warn;

#Nginx worker 的进程数,一般可设置为可用的CPU内核数。
worker_processes 8;

#每个 worker 打开文件描述符的最大数量限制。理论值应该是最多打开文件数(系统的值ulimit -n)与 nginx 进程数相除,但是 nginx 分配请求并不均匀,所以建议与ulimit -n的值保持一致。
worker_rlimit_nofile 65535;
事务模块
events {
    #设置一个worker进程同时打开的最大连接数
    worker_connections 2048;

    #告诉nginx收到一个新连接通知后接受尽可能多的连接
    multi_accept on;

    #设置用于复用客户端线程的轮询方法。如果你使用Linux 2.6+,你应该使用epoll。如果你使用*BSD,你应该使用kqueue。
    use epoll;
}
http模块
#隐藏 Nginx 的版本号,提高安全性。
    server_tokens off;

    #开启高效文件传输模式,sendfile 指令指定 Nginx 是否调用sendfile 函数来输出文件,对于普通应用设为 on,如果用来进行下载等应用磁盘 IO 重负载应用,可设置为 off,以平衡磁盘与网络 I/O 处理速度,降低系统的负载。
    sendfile on;

    #是否开启目录列表访问,默认关闭。
    autoindex off;

    #告诉 Nginx 在一个数据包里发送所有头文件,而不一个接一个的发送
    tcp_nopush on;

    #告诉 Nginx 不要缓存数据,而是一段一段的发送--当需要及时发送数据时,就应该给应用设置这个属性,这样发送一小块数据信息时就不能立即得到返回值。Nginx 默认会始终工作在 tcp nopush 状态下。但是当开启前面的 sendfile on; 时,它的工作特点是 nopush 的最后一个包会自动转转换到 nopush off。为了减小那200ms的延迟,开启 nodelay on; 将其很快传送出去。结论就是 sendfile on; 开启时,tcp_nopush 和 tcp_nodelay 都是on 是可以的。
    tcp_nodelay on;

    #日志格式设定
    log_format  main  '$remote_addr - $remote_user [$time_local] "$request" '
    '$status $body_bytes_sent "$http_referer" '
    '"$http_user_agent" "$http_x_forwarded_for"';
    #定义访问日志,设置为 off 可以关闭日志,提高性能
    access_log /var/log/nginx/access.log main;


    #连接超时时间,单位是秒
    keepalive_timeout 120;

    #读取HTTP头部的超时时间,默认值 60。客户端与服务器建立连接后将开始接收HTTP头部,在这个过程中,如果在一个时间间隔(超时时间)内没有读取到客户端发来的字节,则认为超时,并向客户端返回408 ("Request timed out")响应。
    client_header_timeout 60;

    #默认值 60。与client_header_timeout相似,只是这个超时时间只在读取HTTP包体时才有效。
    client_body_timeout 10;

    #发送响应的超时时间,默认值 60。即Nginx服务器向客户端发送了数据包,但客户端一直没有去接收这个数据包。如果某个连接超过send_timeout定义的超时时间,那么Nginx将会关闭这个连接。
    send_timeout 60;

    #连接超时后将通过向客户端发送RST包来直接重置连接。这个选项打开后,Nginx会在某个连接超时后,不是使用正常情形下的四次握手关闭TCP连接,而是直接向用户发送RST重置包,不再等待用户的应答,直接释放Nginx服务器上关于这个套接字使用的所有缓存(如TCP滑动窗口)。相比正常的关闭方式,它使得服务器避免产生许多处于FIN_WAIT_1、FIN_WAIT_2、TIME_WAIT状态的TCP连接。注意,使用RST重置包关闭连接会带来一些问题,默认情况下不会开启。
    reset_timedout_connection off;

    #要限制连接,必须先有一个容器对连接进行计数,"zone=" 是给它一个名字,可以随便叫,这个名字要跟下面的 limit_conn 一致。$binary_remote_addr 用二进制来储存客户端的地址,1m 可以储存 32000 个并发会话。
    limit_conn_zone $binary_remote_addr zone=addr:5m;

    #给定的key设置最大连接数。这里key是addr,我们设置的值是100,也就是说我们允许每一个IP地址最多同时打开有100个连接。
    limit_conn addr 100;

    #对每个连接限速100k。这如果一个IP允许两个并发连接,那么这个IP就是限速200K。
    limit_rate 100k;

    #include 是一个在当前文件中包含另一个文件内容的指令。这里我们使用它来加载文件扩展名与文件类型映射表。nginx根据映射关系,设置http请求响应头的Content-Type值。当在映射表找不到时,使用nginx.conf中default-type指定的默认值。
    include /etc/nginx/mime.types;

    #设置文件使用的默认的MIME-type
    default_type text/html;

    #默认编码
    charset UTF-8;

    #该模块可以读取预先压缩的gz文件,这样可以减少每次请求进行gzip压缩的CPU资源消耗。该模块启用后,nginx首先检查是否存在请求静态文件的gz结尾的文件,如果有则直接返回该gz文件内容。
    gzip_static off;

    #开启 gzip 压缩。
    gzip on;

    # 禁用客户端为 IE6 时的 gzip功能。
    gzip_disable "msie6";

    #Nginx做为反向代理的时候启用。可选值:off|expired|no-cache|no-sotre|private|no_last_modified|no_etag|auth|any
    gzip_proxied any;

    #设置允许压缩的页面最小字节数,页面字节数从header头中的Content-Length中进行获取。建议设置成大于1k的字节数,小于1k可能会越压越大。
    gzip_min_length 1024;

    #设置数据的压缩等级。这个等级可以是1-9之间的任意数值,9是最慢但是压缩比最大的。
    gzip_comp_level 5;

    #设置系统获取几个单位的缓存用于存储gzip的压缩结果数据流。 例如 4 4k 代表以4k为单位,按照原始数据大小以4k为单位的4倍申请内存。如果没有设置,默认值是申请跟原始数据相同大小的内存空间去存储gzip压缩结果。
    gzip_buffers 4 16k;

    #设置需要压缩的数据格式。Nginx默认只对text/html进行压缩。
    gzip_types text/plain text/css application/json application/x-javascript text/xml application/xml application/xml+rss text/javascript;

    #为打开文件指定缓存,默认是没有启用的,max 指定缓存数量,建议和打开文件数一致,inactive 是指经过多长时间文件没被请求后删除缓存。
    open_file_cache max=65535 inactive=30s;

    #多长时间检查一次缓存的有效信息
    open_file_cache_valid 30s;

    #open_file_cache指令中的inactive参数时间内文件的最少使用次数,如果超过这个数字,文件描述符一直是在缓存中打开的。出现 Last-Modified 不变的情况,就是因为当nginx对一个静态文件缓存后,如果30s内还在访问它,那么它的缓存就一直存在,直到30s内你不访问了为止。
    open_file_cache_min_uses 2;
    #是否记录cache错误
    open_file_cache_errors on;

    include /etc/nginx/conf.d/*.conf;
    include /etc/nginx/sites-enabled/*;
Server模块
#监听端口,nginx 会根据请求的 HOST 来决定使用哪个 SERVER 段的配置。如果没有匹配的 server_name,则默认使用配置文件中第一个。加上 default_server 则可以以指定没有匹配时的默认规则。
    #listen 80;
    listen 80 default_server;

    #域名可以有多个,用空格隔开
    server_name www.test.com test.com;
    root /user/share/nginx/html/test;

    #404页面配置
    error_page   404   /404.html;

    #配置 ssl,有需要时开启。
    ssl on;
    ssl_certificate /etc/nginx/ssl/server.crt;
    ssl_certificate_key /etc/nginx/ssl/server.key;

    location / {
        index   index.html index.php;
    }

    #图片缓存时间设置
    location ~ .*.(gif|jpg|jpeg|png|bmp|swf)$ {
        expires 10d;
    }

    #JS和CSS缓存时间设置
    location ~ .*.(js|css)?$ {
        expires 1h;
    }

    location ~ [^/]\.php(/|$) {
        fastcgi_index   index.php;
        #开启 PATH_INFO 支持,作用就是把参数按照给定的正则表达式分割成 $fastcgi_script_name 和 $fastcgi_path_info。
        #例如:请求 index.php/id/1 不加此行配置时,fastcgi_script_name 是 /index.php/id/1,fastcgi_path_info 是空。
        #加上之后,fastcgi_script_name 是 index.php,fastcgi_path_info 是 /id/1
        fastcgi_split_path_info ^(.+\.php)(.*)$;

        #此值即是 PHP 中 $_SERVER['SCRIPT_FILENAME'] 的值
        fastcgi_param   SCRIPT_FILENAME $document_root$fastcgi_script_name;
        fastcgi_param   PATH_INFO               $fastcgi_path_info;
        fastcgi_param   PATH_TRANSLATED $document_root$fastcgi_path_info;

        #指定FastCGI服务器监听端口与地址。须和 PHP-FPM 的设置相同。
        #fastcgi_pass   127.0.0.1:9000;
        fastcgi_pass    unix:/var/run/php5-fpm.sock;
        include fastcgi_params;


 2013
2013


 到【灌水乐园】发言


