


最近,我一直在研究如何使用来自 Rust 的Whisper文本转语音模型。虽然像burn或candle这样的包确实看起来 相当有前景,并且确实提供 Whisper 模型,我决定坚持使用 ONNX 目前对我来说非常合适,因为它在过去为我提供了很好的帮助。在这篇文章中,我想讨论将 Whisper 模型转换为 ONNX 的必要步骤。
要将模型转换为ONNX,我通常遵循三个主要步骤:
- 在 Python 中执行模型以生成参考输入和输出
- 将模型转换为 ONNX
- 在 ONNX 中执行模型并比较结果
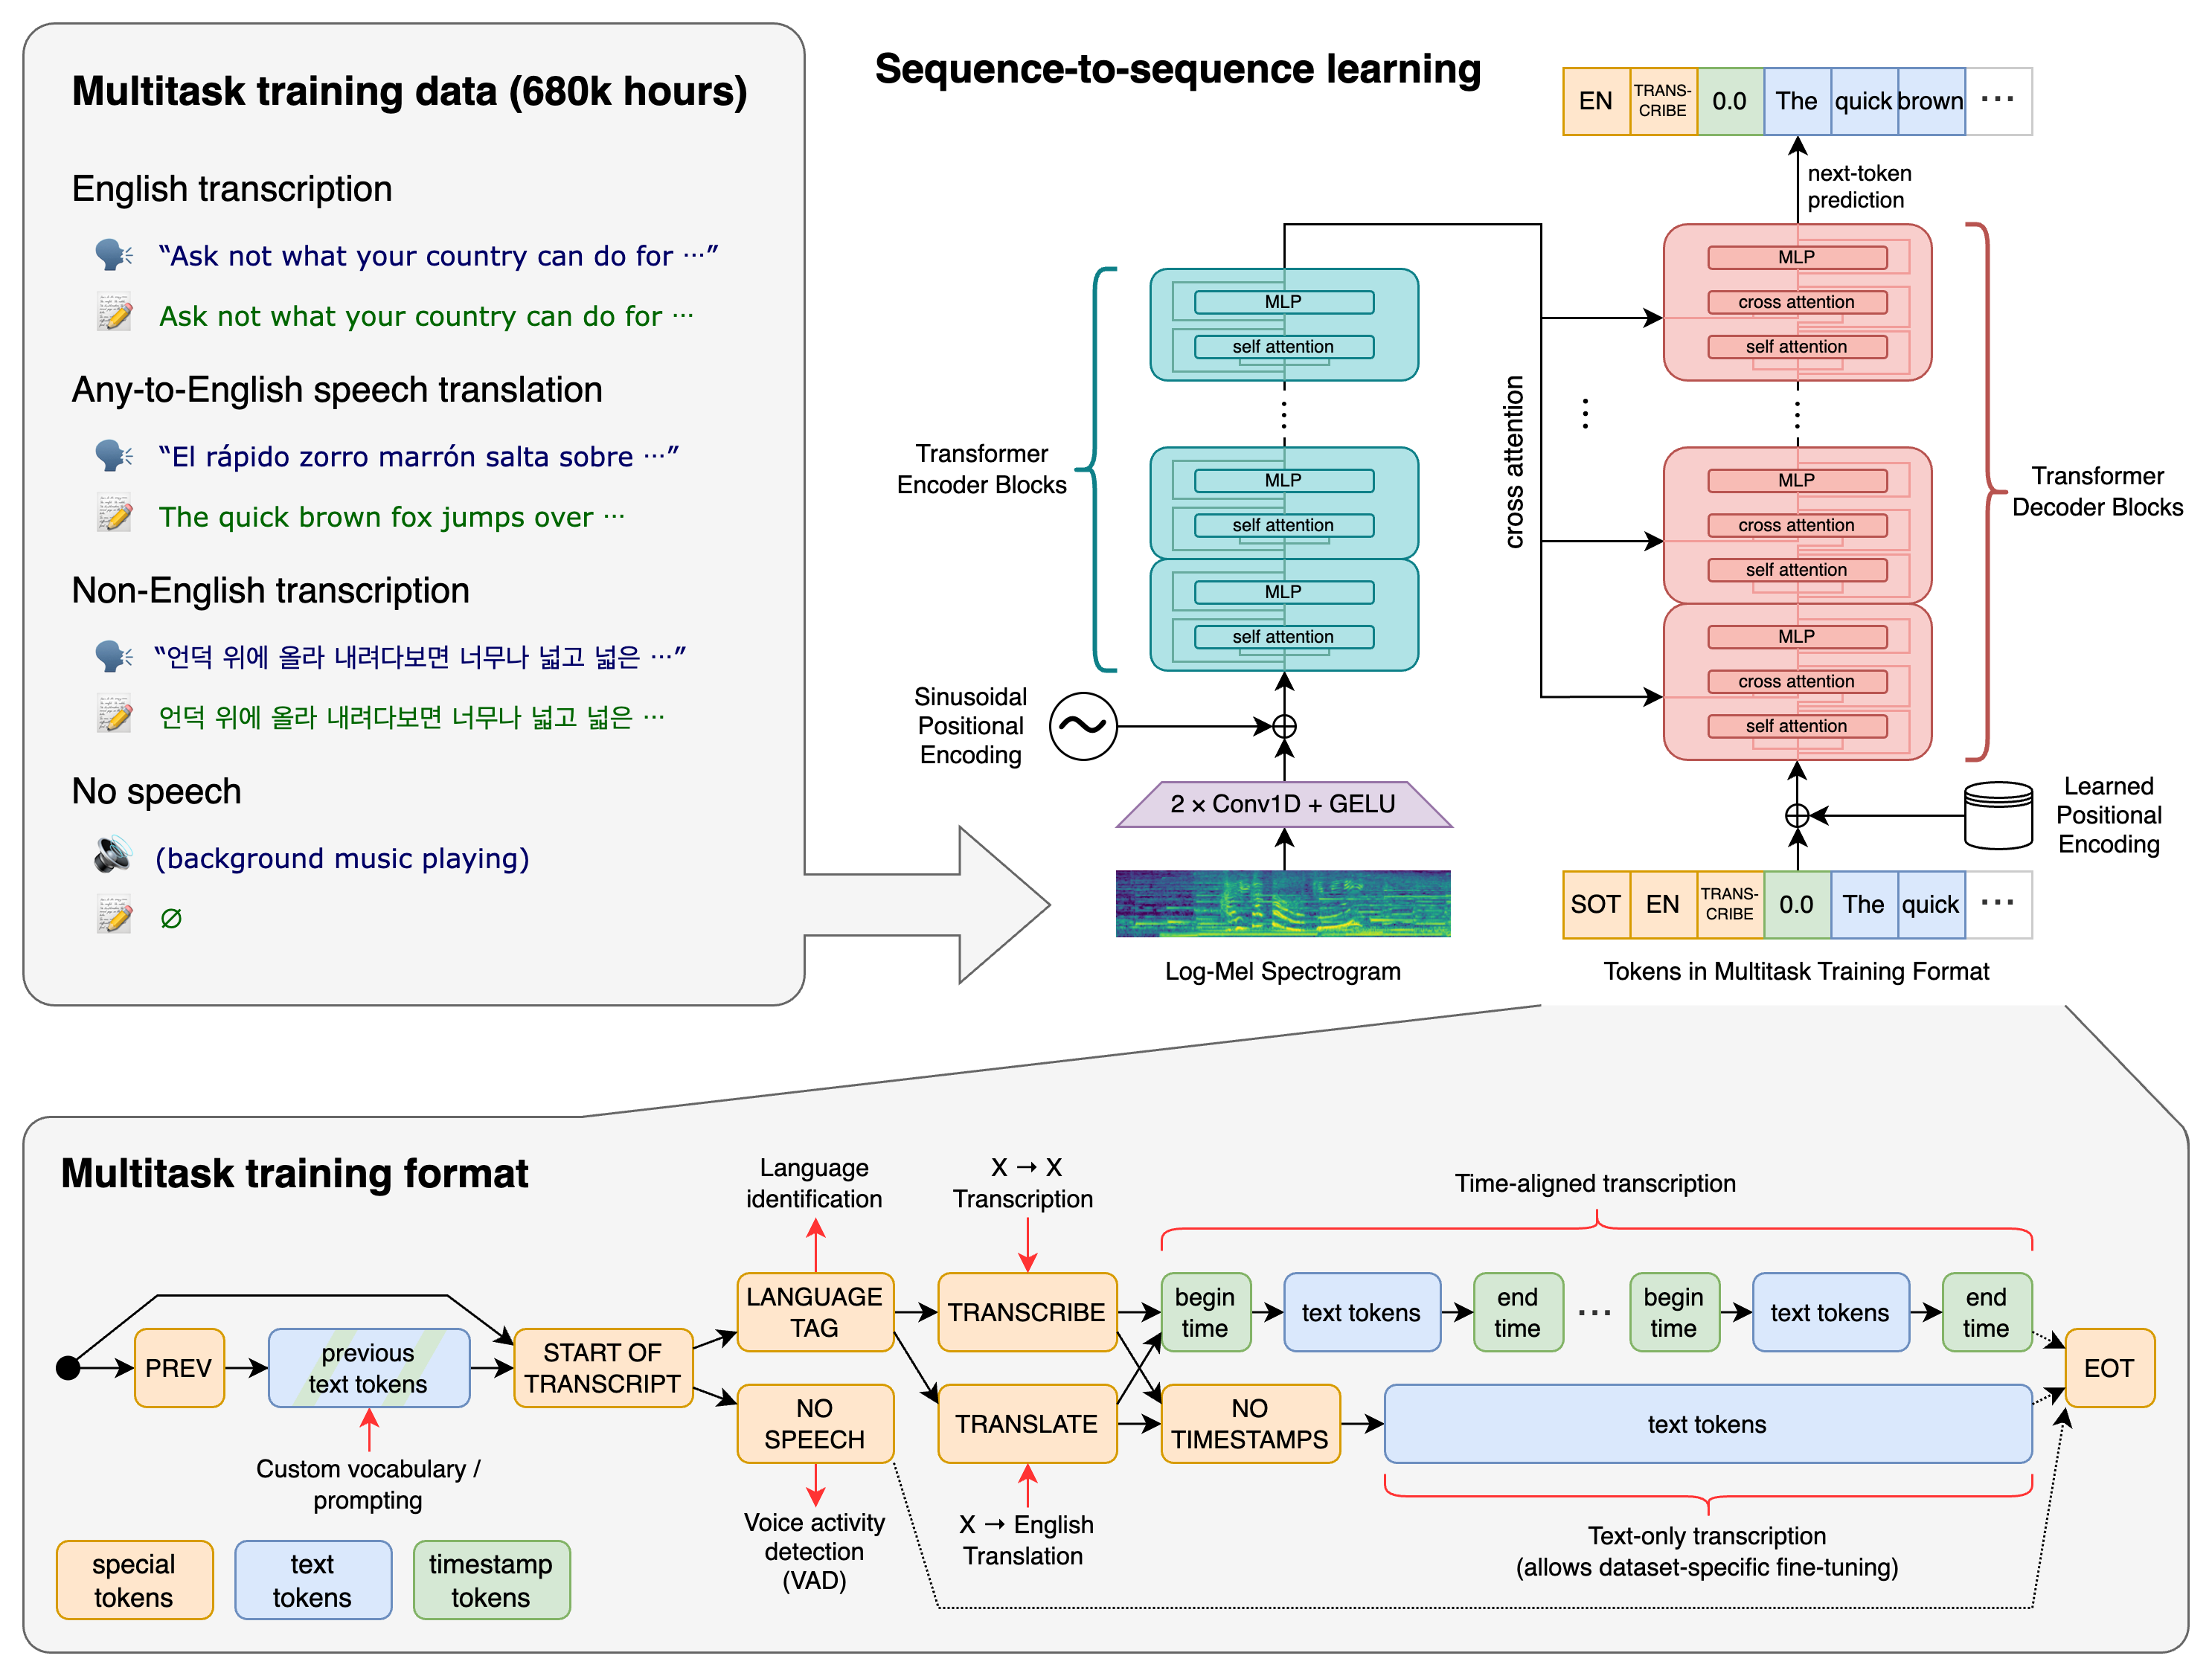
Whisper模型有些复杂。它使用了带有交叉注意力的编码器-解码器架构(架构图)。首先,输入音频被转换为梅尔频率倒谱,然后通过卷积堆栈,接着是一个变换器编码器。编码后的音频信号随后作为条件输入用于自回归变换器解码器模型,类似于 GPT。
OpenAI 的实现大部分关注于获取 从模型中获得最佳性能和准确性。该仓库提供了很多 解码选项,并且还使用了键值缓存作为性能优化。在接下来的内容中,我将专注于最简单的解码方法,即不带时间戳预测的贪婪解码,并忽略键值缓存。
为了说明 Whisper 模型是如何工作的,查看最简单的纯 Python 推理是很有启发性的(另见完整转换脚本)。Whisper 模型需要 30 秒的音频输入。我使用了一个小的 Rust 程序从我的麦克风捕获了 30 秒的样本,并将其转换为梅尔频率倒谱。然后将该输入传递给编码器模型。
# x_mel shape: [batch, coeff=80, time=3000]
# x_audio shape: [batch, time=1500, feature=512]
x_audio = model.encoder(x_mel)
文本通过自回归地应用解码器模型进行解码。我们用一个固定的序列初始化预测的标记,以指示模型任务。
# shape: [batch, seq<=448]
x_tokens = torch.tensor(
    [tokenizer.sot_sequence_including_notimestamps],
    dtype=torch.long,
)
然后使用解码器在循环中预测下一个标记,直到预测到文本结束标记或达到最大标记数
# run the decoding loop using greedy decoding
next_token = tokenizer.sot
while x_tokens.shape[1] <= model.dims.n_text_ctx and next_token != tokenizer.eot:
    y_tokens = model.decoder(x_tokens, x_audio)

    next_token = y_tokens[0, -1].argmax()
    x_tokens = torch.concat(
        [x_tokens, next_token.reshape(1, 1)],
        axis=1,
    )
最后,我们可以使用分词器将生成的标记映射回文本
print(tokenizer.decode(x_tokens[0]))
在手头有运行推理示例的情况下,我们可以进行 ONNX 转换。PyTorch 提供了两个主要 API用于将模型转换为 ONNX:torch.onnx.export 和更新的 torch.onnx.dynamo_export。在这里我将使用前者,因为后者在我的实验中失败了。对于 torch.onnx.export,我们需要明确指定动态轴。对于编码器,只有批次维度是动态的,因为 whisper 使用固定的 30 秒音频窗口。对于解码器,批次和序列维度,即生成的标记数量,都是动态的。完整的导出看起来像
torch.onnx.export(
    model.encoder,
    (x_mel,),
    "./tmp/encoder.onnx",
    input_names=["x"],
    output_names=["out"],
    dynamic_axes={
        "x": {0: "batch"},
        "out": {0: "batch"},
    },
)

torch.onnx.export(
    model.decoder,
    (x_tokens, x_audio),
    "./tmp/decoder.onnx",
    input_names=["tokens", "audio"],
    output_names=["out"],
    dynamic_axes={
        "tokens": {0: "batch", 1: "seq"},
        "audio": {0: "batch"},
        "out": {0: "batch", 1: "seq"},
    },
)
要执行模型,我们首先构建推理会话
import onnxruntime

sess_encoder = onnxruntime.InferenceSession("./tmp/encoder.onnx")
sess_decoder = onnxruntime.InferenceSession("./tmp/decoder.onnx")
然后可以像我们在 PyTorch 中一样执行模型
out_encoder, = sess_encoder.run(["out"], {"x": x_mel.numpy()})

# initialize the tokens
tokens = list(tokenizer.sot_sequence_including_notimestamps)

next_token = tokenizer.sot
while x_tokens.shape[1] <= max_tokens and next_token != tokenizer.eot:
    out_decoder, = sess_decoder.run(
        ["out"],
        {
            "tokens": np.asarray([tokens], dtype="int64"),
            "audio": out_encoder,
        },
    )
    next_token = out_decoder[0, -1].argmax()
    tokens.append(next_token)

print(tokenizer.decode(x_tokens[0]))
在我的 CPU 上,使用 ONNX 转换可以获得适度的加速。然而,请注意,ONNX 版本仍然比使用 kv-caching 的 PyTorch 模型慢 4 倍。接下来的步骤将是将 kv-caching 包含在 ONNX 模型中,以及研究distill-whisper,并使用 ort Rust 库来 从 Rust 执行模型。您可以找到完整的转换脚本。 这里。


 720
720

 被折叠的 条评论
为什么被折叠?
被折叠的 条评论
为什么被折叠?
 到【灌水乐园】发言


