


Spring Security 汇总篇
这篇文章侧重于原理分析和运行流程追踪,这篇文章的每个章节都有 demo,帮大家更好的学习和了解 Spring Security 的各个功能
文章目录
第一章 权限管理
- 权限管理
- SpringSecurity 简介
- 整体架构
权限管理
基本上涉及到用户参与的系统都要进行权限管理,权限管理属于系统安全的范畴,权限管理实现对用户访问系统的控制,按照安全规则或者安全策略控制用户可以访问而且只能访问自己被授权的资源。
权限管理包括用户身份认证和授权两部分,简称认证授权。对于需要访问控制的资源用户首先经过身份认证,认证通过后用户具有该资源的访问权限方可访问。
认证
身份认证,就是判断一个用户是否为合法用户的处理过程。最常用的简单身份认证方式是系统通过核对用户输入的用户名和口令,看其是否与系统中存储的该用户的用户名和口令一致,来判断用户身份是否正确。
授权
授权,即访问控制,控制谁能访问哪些资源。主体进行身份认证后需要分配权限方可访问系统的资源,对于某些资源没有权限是无法访问的
解决方案
和其他领域不同,在 Java 企业级开发中,安全管理框架非常少,目前比较常见的就是:
- Shiro
- Shiro 本身是一个老牌的安全管理框架,有着众多的优点,例如轻量、简单、易于集成、可以在JavaSE环境中使用等。不过,在微服务时代,Shiro 就显得力不从心了,在微服务面前和扩展方面,无法充分展示自己的优势。
- 开发者自定义
- 也有很多公司选择自定义权限,即自己开发权限管理。但是一个系统的安全,不仅仅是登录和权限控制这么简单,我们还要考虑种各样可能存在的网络政击以及防彻策略,从这个角度来说,开发者白己实现安全管理也并非是一件容易的事情,只有大公司才有足够的人力物力去支持这件事情。
- Spring Security
- Spring Security,作为spring 家族的一员,在和 Spring 家族的其他成员如 Spring Boot Spring Clond等进行整合时,具有其他框架无可比拟的优势,同时对 OAuth2 有着良好的支持,再加上Spring Cloud对 Spring Security的不断加持(如推出 Spring Cloud Security ),让 Spring Securiy 不知不觉中成为微服务项目的首选安全管理方案。
简介
官方定义
- https://spring.io/projects/spring-security
Spring Security是一个功能强大、可高度定制的身份验证和访问控制框架。它是保护基于Spring的应用程序的事实标准。
Spring Security是一个面向Java应用程序提供身份验证和安全性的框架。与所有Spring项目一样,Spring Security的真正威力在于它可以轻松地扩展以满足定制需求。
- 总结
Spring Security是一个功能强大、可高度定制的
身份验证和访问控制的框架。或者说用来实现系统中权限管理的框架。
整体架构
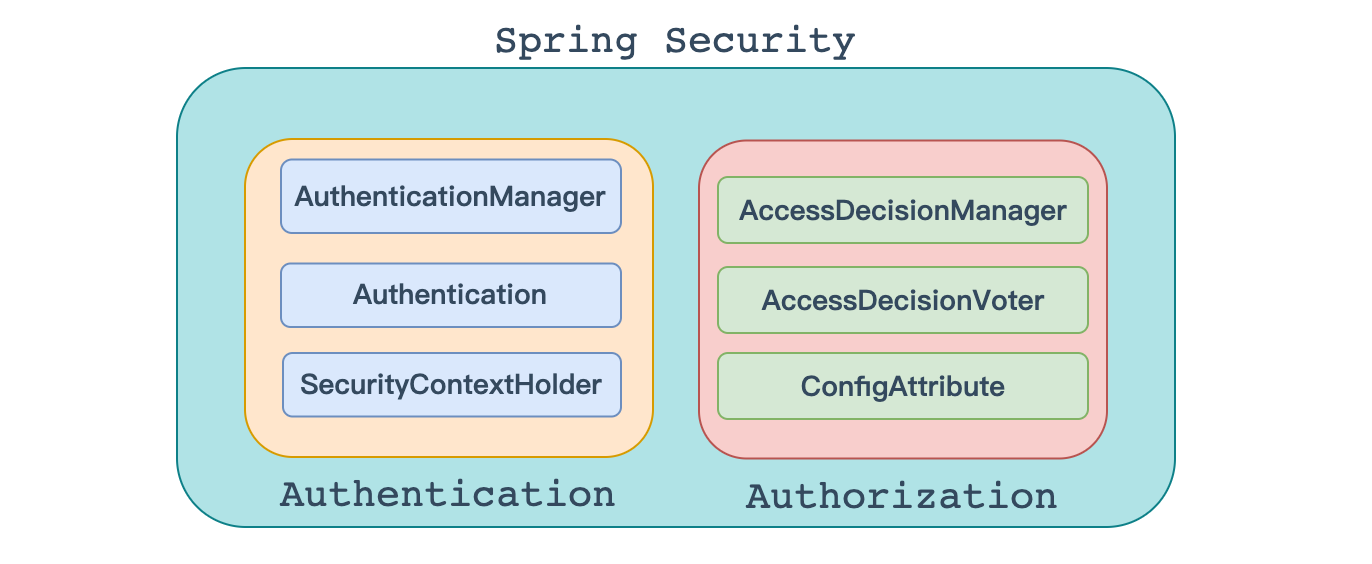
在<Spring Security>的架构设计中,认证<Authentication>和**授权** <Authorization>是分开的,无论使用什么样的认证方式。都不会影响授权,这是两个独立的存在,这种独立带来的好处之一,就是可以非常方便地整合一些外部的解决方案。
认证
AuthenticationManager
在Spring Security中认证是由AuthenticationManager接口来负责的,接口定义为:

public interface AuthenticationManager {
	Authentication authenticate(Authentication authentication)
  														throws AuthenticationException;
}
- 返回 Authentication 表示认证成功
- 返回 AuthenticationException 异常,表示认证失败。
AuthenticationManager 主要实现类为 ProviderManager,在 ProviderManager 中管理了众多 AuthenticationProvider 实例。在一次完整的认证流程中,Spring Security 允许存在多个 AuthenticationProvider ,用来实现多种认证方式,这些 AuthenticationProvider 都是由 ProviderManager 进行统一管理的。

Authentication
认证以及认证成功的信息主要是由 Authentication 的实现类进行保存的,其接口定义为:
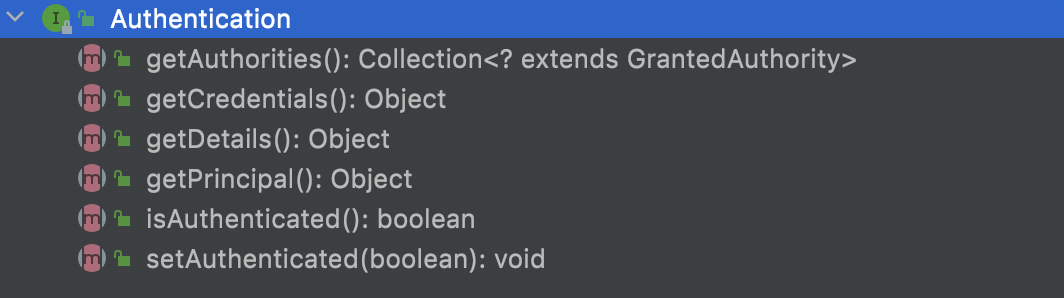
public interface Authentication extends Principal, Serializable {
	Collection<? extends GrantedAuthority> getAuthorities();
	Object getCredentials();
	Object getDetails();
	Object getPrincipal();
	boolean isAuthenticated();
	void setAuthenticated(boolean isAuthenticated) throws IllegalArgumentException;
}
- getAuthorities 获取用户权限信息
- getCredentials 获取用户凭证信息,一般指密码
- getDetails 获取用户详细信息
- getPrincipal 获取用户身份信息,用户名、用户对象等
- isAuthenticated 用户是否认证成功
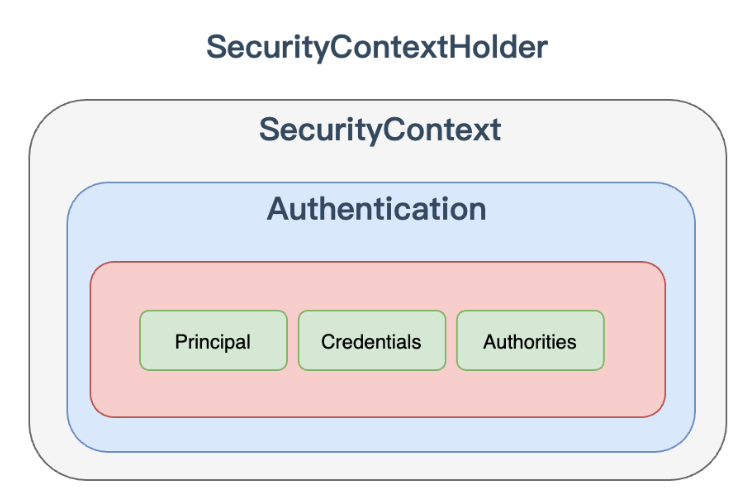
SecurityContextHolder
SecurityContextHolder 用来获取登录之后用户信息。Spring Security 会将登录用户数据保存在 Session 中。但是,为了使用方便,Spring Security在此基础上还做了一些改进,其中最主要的一个变化就是线程绑定。当用户登录成功后,Spring Security 会将登录成功的用户信息保存到 SecurityContextHolder 中。SecurityContextHolder 中的数据保存默认是通过ThreadLocal 来实现的,使用 ThreadLocal 创建的变量只能被当前线程访问,不能被其他线程访问和修改,也就是用户数据和请求线程绑定在一起。当登录请求处理完毕后,Spring Security 会将 SecurityContextHolder 中的数据拿出来保存到 Session 中,同时将 SecurityContexHolder 中的数据清空。以后每当有请求到来时,Spring Security 就会先从 Session 中取出用户登录数据,保存到 SecurityContextHolder 中,方便在该请求的后续处理过程中使用,同时在请求结束时将 SecurityContextHolder 中的数据拿出来保存到 Session 中,然后将 Security SecurityContextHolder 中的数据清空。这一策略非常方便用户在 Controller、Service 层以及任何代码中获取当前登录用户数据。
授权
当完成认证后,接下来就是授权了。在 Spring Security 的授权体系中,有两个关键接口,
AccessDecisionManager
AccessDecisionManager (访问决策管理器),用来决定此次访问是否被允许。

AccessDecisionVoter
AccessDecisionVoter (访问决定投票器),投票器会检查用户是否具备应有的角色,进而投出赞成、反对或者弃权票。

AccesDecisionVoter 和 AccessDecisionManager 都有众多的实现类,在 AccessDecisionManager 中会换个遍历 AccessDecisionVoter,进而决定是否允许用户访问,因而 AaccesDecisionVoter 和 AccessDecisionManager 两者的关系类似于 AuthenticationProvider 和 ProviderManager 的关系。
ConfigAttribute
ConfigAttribute,用来保存授权时的角色信息

在 Spring Security 中,用户请求一个资源(通常是一个接口或者一个 Java 方法)需要的角色会被封装成一个 ConfigAttribute 对象,在 ConfigAttribute 中只有一个 getAttribute方法,该方法返回一个 String 字符串,就是角色的名称。一般来说,角色名称都带有一个 ROLE_ 前缀,投票器 AccessDecisionVoter 所做的事情,其实就是比较用户所具各的角色和请求某个
资源所需的 ConfigAtuibute 之间的关系。
第二章 环境搭建
整合Spring Security
- 当我们引入Spring Security依赖时,所有接口都会被默认保护
<!--引入spring security依赖-->
<dependency>
  <groupId>org.springframework.boot</groupId>
  <artifactId>spring-boot-starter-security</artifactId>
</dependency>
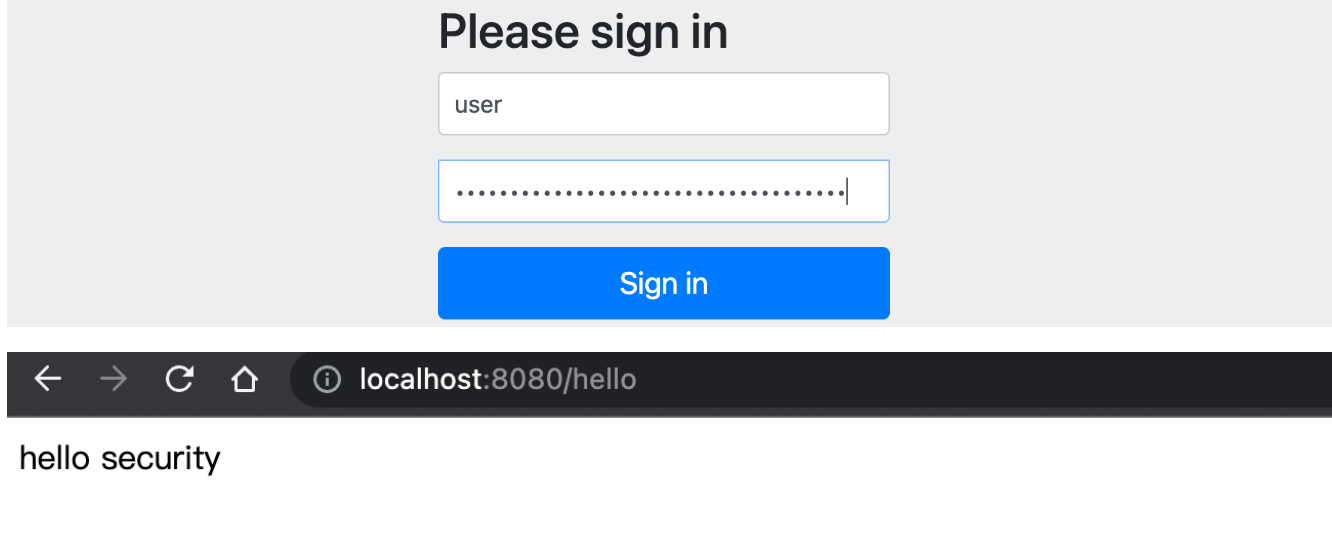
2.再次启动项目
- 1.启动完成后控制台生成一个密码
- 2.访问 hello 发现直接跳转到登录页面
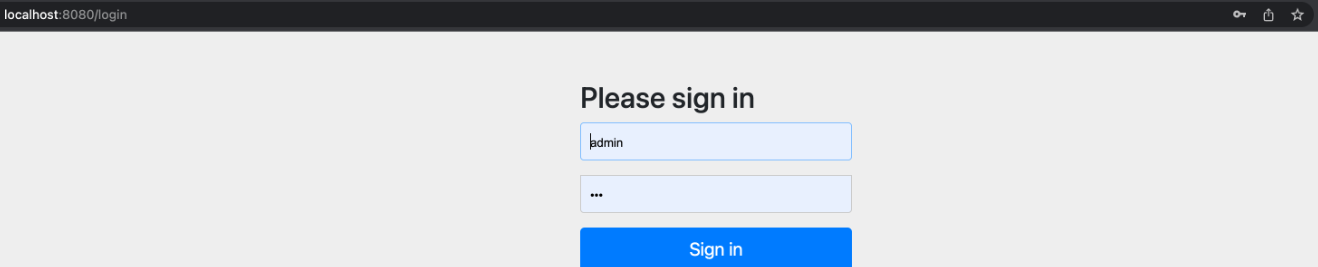
3.登录系统
- 默认用户名为: user
- 默认密码为: 控制台打印的 uuid
实现原理
虽然开发者只需要引入一个依赖,就可以让 Spring Security 对应用进行保护。Spring Security 又是如何做到的呢?
在 Spring Security 中
认证、授权等功能都是基于过滤器完成的。
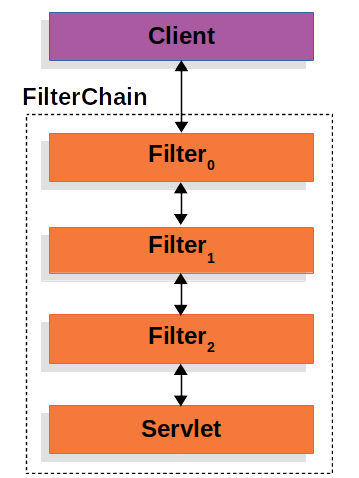
- 过滤器Filter是java web组件,在请求到达Servlet前进行处理
- Spring Boot 中的Filter并不是直接放在java web的filter中,而是通过一个 D e l e g a t i n g F i l t e r P r o x y DelegatingFilterProxy DelegatingFilterProxy (授权过滤器代理) 进行代理。因为java web原生的 filter 无法使用一些 Spring Boot 的特性,所以使用了一个这样的代理同时方便管理。
- D e l e g a t i n g F i l t e r P r o x y DelegatingFilterProxy DelegatingFilterProxy 顶层代理,管理所有的Spring Boot过滤器,通过它转发给我们的 Spring Boot 的过滤器
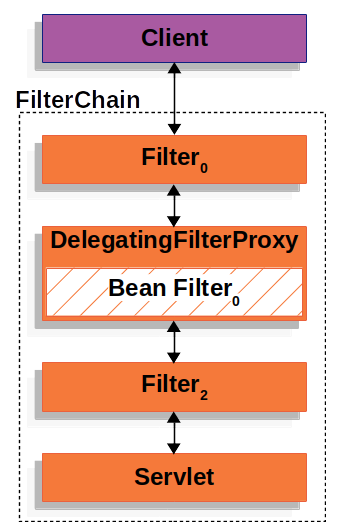
- D e l e g a t i n g F i l t e r P r o x y DelegatingFilterProxy DelegatingFilterProxy 顶层代理,肯定不能只管理一个Filter,所以在它下面还有一个 $ FilterChainProxy$ 过滤器链代理
- $ FilterChainProxy$ (过滤器链代理) 二级代理,管理所有的过滤器链,通过它转发给所有的过滤器链
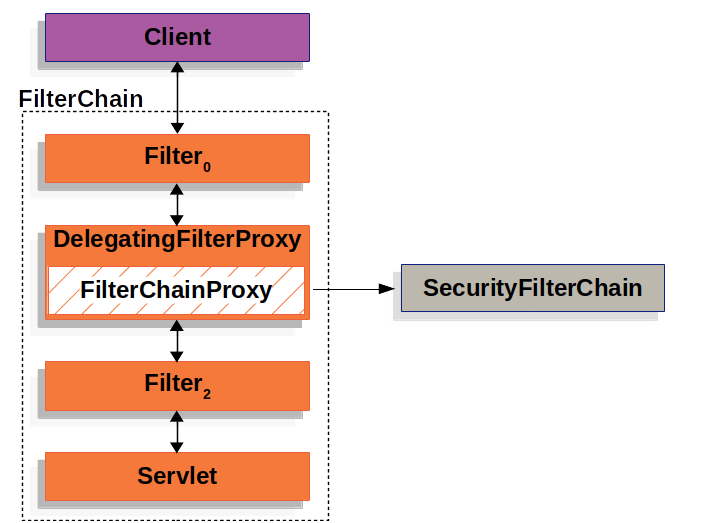
- S e c u r i t y F i l t e r C h a i n SecurityFilterChain SecurityFilterChain Spring Security过滤器链,由它来管理我们的Spring Security的过滤器链,过滤器链中可以有多个过滤器
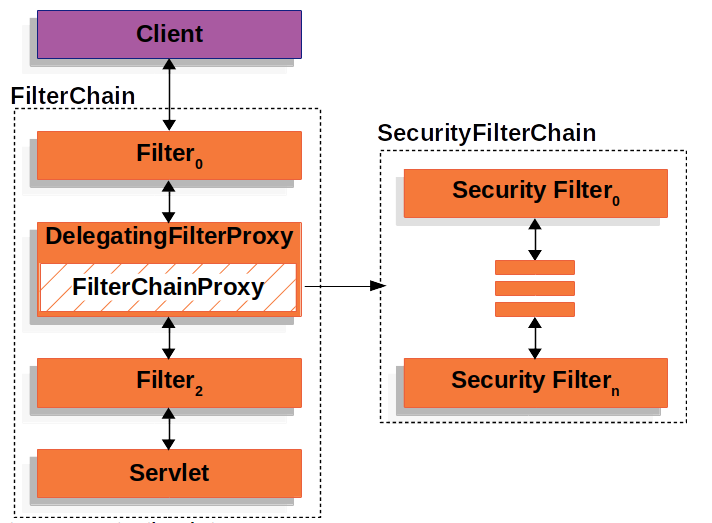
- 可以根据url的不同配置多个Spring Security的过滤器链
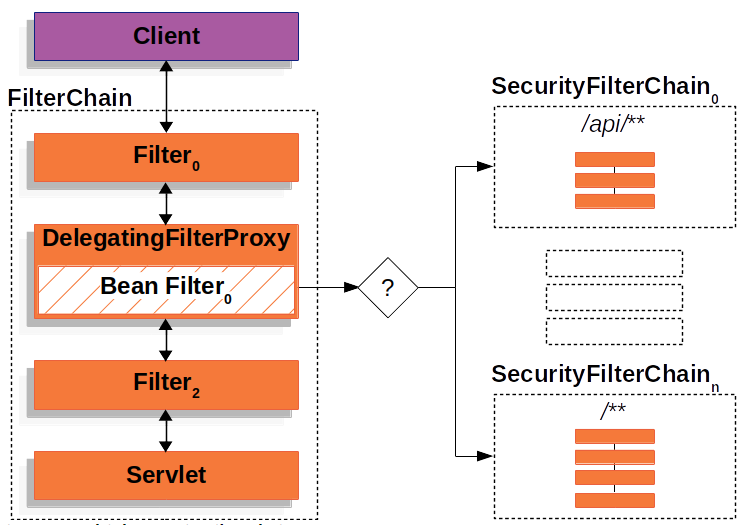
需要注意的是,默认过滤器并不是直接放在 Web 项目的原生过滤器链中,而是通过一个
FlterChainProxy 来统一管理。Spring Security 中的过滤器链通过 FilterChainProxy 嵌入到 Web项目的原生过滤器链中。FilterChainProxy 作为一个顶层的管理者,将统一管理 Security Filter。FilterChainProxy 本身是通过 Spring 框架提供的 DelegatingFilterProxy 整合到原生的过滤器链中。
默认用户生成
- U s e r n a m e P a s s w o r d A u t h e n t i c a t i o n F i l t e r UsernamePasswordAuthenticationFilter UsernamePasswordAuthenticationFilter 这个过滤器不是java web的原生过滤器,是Spring Boot的过滤器,所以可以没有doFilter方法。
源码分析为什么没有doFilter方法
- a t t e m p t A u t h e n t i c a t i o n attemptAuthentication attemptAuthentication 是 U s e r n a m e P a s s w o r d A u t h e n t i c a t i o n F i l t e r UsernamePasswordAuthenticationFilter UsernamePasswordAuthenticationFilter 过滤器的主要功能方法,主要作用:从request中取出用户名密码,形成token,交给 A u t h e n t i c a t i o n M a n a g e r AuthenticationManager AuthenticationManager 中的 a u t h e n t i c a t e authenticate authenticate 方法去处理认证的流程。但是它没有doFilter方法,又是怎么运行到这里的呢
    public Authentication attemptAuthentication(HttpServletRequest request, HttpServletResponse response) throws AuthenticationException {
        if (this.postOnly && !request.getMethod().equals("POST")) {
            throw new AuthenticationServiceException("Authentication method not supported: " + request.getMethod());
        } else {
            String username = this.obtainUsername(request);
            username = username != null ? username : "";
            username = username.trim();
            String password = this.obtainPassword(request);
            password = password != null ? password : "";
            UsernamePasswordAuthenticationToken authRequest = new UsernamePasswordAuthenticationToken(username, password);
            this.setDetails(request, authRequest);
            return this.getAuthenticationManager().authenticate(authRequest);
        }
    }
- 可以看到他继承了父类(抽象类),可能是父类中实现了doFilter方法,我们去查看父类源码
public class UsernamePasswordAuthenticationFilter extends AbstractAuthenticationProcessingFilter {
- 可以看到父类的结构,确实有doFilter方法,那么又是怎么调用了我们的 a t t e m p t A u t h e n t i c a t i o n attemptAuthentication attemptAuthentication 方法呢?我们去看这里的doFilter源码
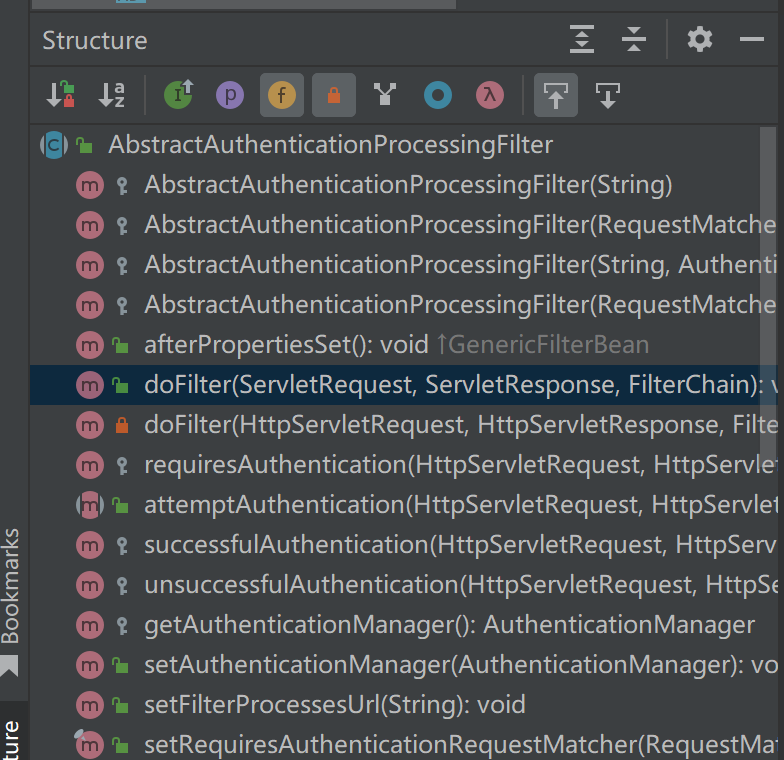
- doFilter源码,可以看到在第十行调用了 a t t e m p t A u t h e n t i c a t i o n attemptAuthentication attemptAuthentication 方法,我们看父类中的这个方法源码
public void doFilter(ServletRequest request, ServletResponse response, FilterChain chain) throws IOException, ServletException {
        this.doFilter((HttpServletRequest)request, (HttpServletResponse)response, chain);
    }

    private void doFilter(HttpServletRequest request, HttpServletResponse response, FilterChain chain) throws IOException, ServletException {
        if (!this.requiresAuthentication(request, response)) {
            chain.doFilter(request, response);
        } else {
            try {
                Authentication authenticationResult = this.attemptAuthentication(request, response);
                if (authenticationResult == null) {
                    return;
                }

                this.sessionStrategy.onAuthentication(authenticationResult, request, response);
                if (this.continueChainBeforeSuccessfulAuthentication) {
                    chain.doFilter(request, response);
                }

                this.successfulAuthentication(request, response, chain, authenticationResult);
            } catch (InternalAuthenticationServiceException var5) {
                this.logger.error("An internal error occurred while trying to authenticate the user.", var5);
                this.unsuccessfulAuthentication(request, response, var5);
            } catch (AuthenticationException var6) {
                this.unsuccessfulAuthentication(request, response, var6);
            }

        }
    }
- 可以看到父类中的这个方法是个抽象方法,因为这也是个抽象类。所以我们可以明白它的调用流程了
在 U s e r n a m e P a s s w o r d A u t h e n t i c a t i o n F i l t e r UsernamePasswordAuthenticationFilter UsernamePasswordAuthenticationFilter 过滤器对象中调用doFilter方法,因为子类没有实现这个方法,所以会自动继承了父类中的doFilter方法,调用父类的doFilter方法,然后在doFilter方法中调用 a t t e m p t A u t h e n t i c a t i o n attemptAuthentication attemptAuthentication 方法
public abstract Authentication attemptAuthentication(HttpServletRequest var1, HttpServletResponse var2) throws AuthenticationException, IOException, ServletException;
第三章 自定义认证
自定义Spring Security 认证实现
自定义资源权限规则
- 资源分为公共资源(common)和受限资源

- /portal 公共资源
- /hello … 受保护资源 权限管理
我们继承 W e b S e c u r i t y C o n f i g u r e r A d a p t e r WebSecurityConfigurerAdapter WebSecurityConfigurerAdapter 类即可自定义配置
@Configuration
public class WebSecurityConfigurer extends WebSecurityConfigurerAdapter {
    @Override
    protected void configure(HttpSecurity http) throws Exception {
        http.authorizeHttpRequests()
                .mvcMatchers("/index").permitAll()
                .anyRequest().authenticated()
                .and().formLogin();
    }
}
# 说明
- permitAll() 代表放行该资源,该资源为公共资源 无需认证和授权可以直接访问
- anyRequest().authenticated() 代表所有请求,必须认证之后才能访问
- formLogin() 代表开启表单认证
## 注意: 放行资源必须放在所有认证请求之前!
自定义登录界面
前后端分离和前后端不分离
前后端不分离(thymeleaf)
我们先使用thymeleaf
- 引入thymeleaf依赖
<!--thymeleaf-->
<dependency>
  <groupId>org.springframework.boot</groupId>
  <artifactId>spring-boot-starter-thymeleaf</artifactId>
</dependency>
- 自定义登录的contriller
解释一下这个return “login”:他会自动的去寻找resources目录下的templates目录下的login.html文件,thymeleaf会自动加上文件路径前缀和html的文件后缀
@Controller
public class LoginController {

    @RequestMapping("/login.html")
    public String login() {
        return "login";
    }
}
- 在 templates 中定义登录界面
<!DOCTYPE html>
<html lang="en" xmlns:th="https://www.thymeleaf.org">
<head>
    <meta charset="UTF-8">
    <title>登录</title>
</head>
<body>
<h1>用户登录</h1>
<form method="post" th:action="@{/login}">
    用户名:<input name="username" type="text"/><br>
    密码:<input name="password" type="password"/><br>
    <input type="submit" value="登录"/>
</form>
</body>
</html>
需要注意的是
- 登录表单 method 必须为
post,action 的请求路径为/login- 用户名的 name 属性必须为
username- 密码的 name 属性必须为
password至于原因,我们可以去查看源码,当我们使用formLogin时,我们实际上处理这个请求的Filter是 U s e r n a m e P a s s w o r d A u t h e n t i c a t i o n F i l t e r UsernamePasswordAuthenticationFilter UsernamePasswordAuthenticationFilter 在这个Filter中我们默认登录的请求必须是Post方法,请求的url必须是
/login,用户名和密码的参数必须是username,password。
- 配置 Spring Security 配置类
@Configuration
public class WebSecurityConfigurer extends WebSecurityConfigurerAdapter {
    @Override
    protected void configure(HttpSecurity http) throws Exception {
         http.authorizeHttpRequests()
                .mvcMatchers("/login.html").permitAll()
                .mvcMatchers("/index").permitAll()
                .anyRequest().authenticated()
                .and()
                .formLogin()
                .loginPage("/login.html")
                .and()
                .csrf().disable();//这里先关闭 CSRF
    }
}
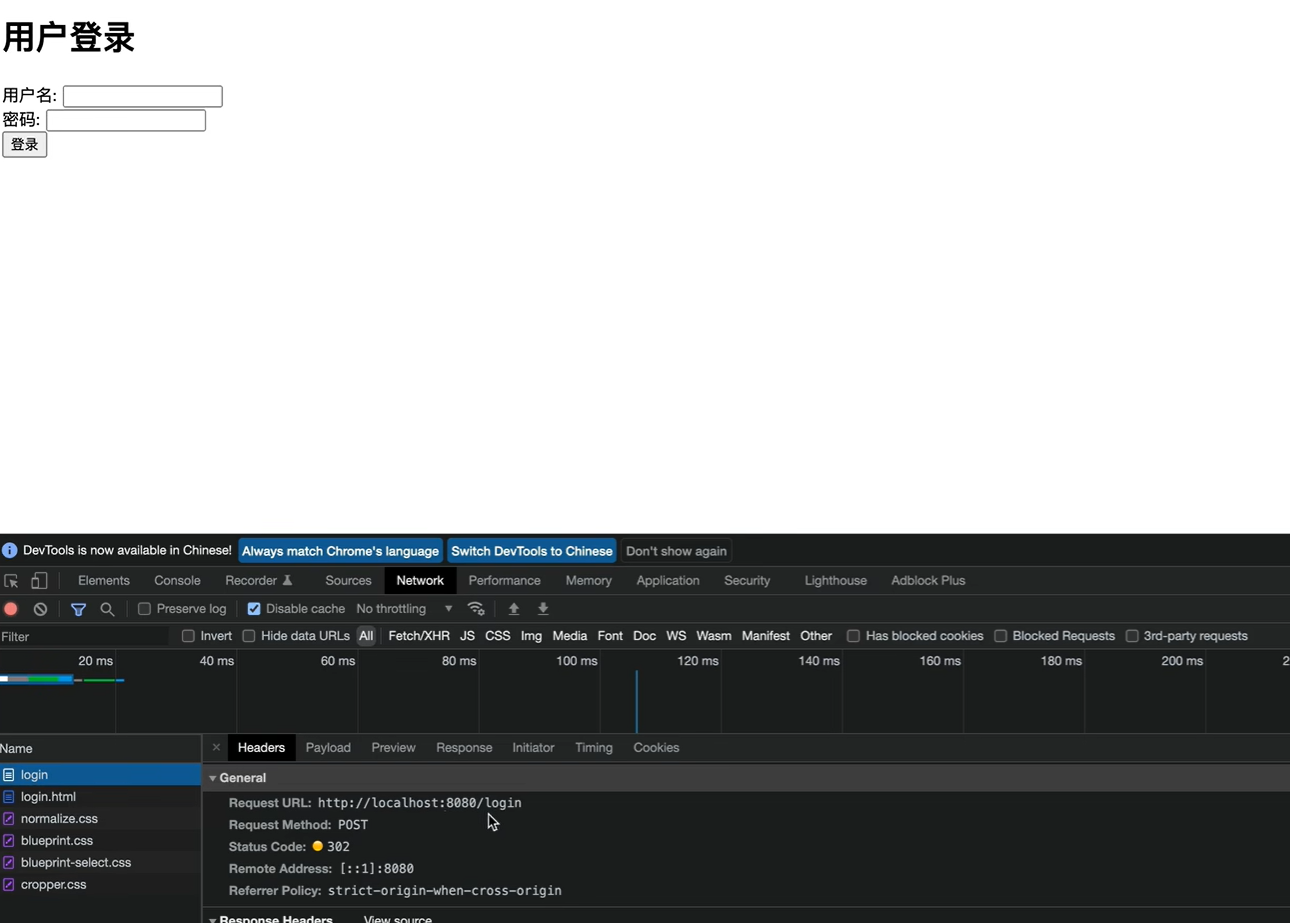
- 当我们完成了上述配置后我们尝试进行登录认证,我们使用配置文件中指定的用户名和密码登录我们会发现,返回了http状态码302又重定向到了登陆界面
这是因为我们的登陆操作(点击登录按钮),请求的url为
/login这个url也是被保护的所以我们又重定向到了登录页面。这时候小伙伴们肯定又有疑问了,之前的 U s e r n a m e P a s s w o r d A u t h e n t i c a t i o n F i l t e r UsernamePasswordAuthenticationFilter UsernamePasswordAuthenticationFilter 过滤器不是会默认处理/login的请求吗?是的!但是!当我们自己指定了我们自定义的登录页面之后,这个处理登录请求的url我们也必须要显示的自己指定!
- 修改 Spring Security 配置类
我们可以自己制定处理登录操作的url,这里指定为
/doLogin,并且可以指定前端的用户名和密码的参数名称,还可以指定登陆成功后默认跳转的页面(前后端不分离项目中使用,在前后端分离项目中不适用)
@Configuration
public class WebSecurityConfigurer extends WebSecurityConfigurerAdapter {
    @Override
    protected void configure(HttpSecurity http) throws Exception {
         http.authorizeHttpRequests()
                .mvcMatchers("/login.html").permitAll() //放行资源写在任何前面
                .mvcMatchers("/index").permitAll()
                .anyRequest().authenticated()
                .and()
                .formLogin()
                .loginPage("/login.html") //用来指定默认登录页面 注意: 一旦自定义登录页面以后必须指定登录url
                .loginProcessingUrl("/doLogin") //指定处理登录请求 url
                .usernameParameter("uname")
                .passwordParameter("passwd")
                //.successForwardUrl("/index") 		 //认证成功 forward 跳转路径  始终在认证成功之后跳转到指定请求
                .defaultSuccessUrl("/index")   //认证成功 redirect 之后跳转   根据上一保存请求进行成功跳转
                .failureUrl("/login.html")
                .and()
                .csrf().disable();//这里先关闭 CSRF
    }
}
关于forward跳转和redirect跳转
- forward
在Java Web中,forward跳转是一种服务器端跳转的方式。当一个页面或者一个Servlet请求转发到另外一个页面或者Servlet时,就可以使用forward跳转。在forward跳转中,浏览器只发出一次请求,服务器端将请求转发到另外一个页面或者Servlet,并且将响应返回给浏览器,这样浏览器就可以看到另外一个页面或者Servlet的内容了。在forward跳转中,请求转发后的页面或者Servlet无法获得浏览器的地址栏中的URL信息。
- redirect
重定向跳转是一种通过发送HTTP重定向响应来引导用户浏览器跳转到新页面的机制。在重定向跳转中,浏览器会向服务器发出第一次请求,服务器接收请求后响应一个302状态码和新的Location头部指向目标页面的URL。浏览器接收到这个响应后会自动向新的URL发送第二次请求,从而实现页面的跳转。与 forward 跳转不同的是,重定向跳转是两个独立的请求,因此在第二个请求中不会再次调用原先的处理器。重定向跳转的优点是可以保持URL的更改,同时可以在新页面重新加载数据,缺点是会增加网络请求的开销。
自定义登录成功处理
前后端分离
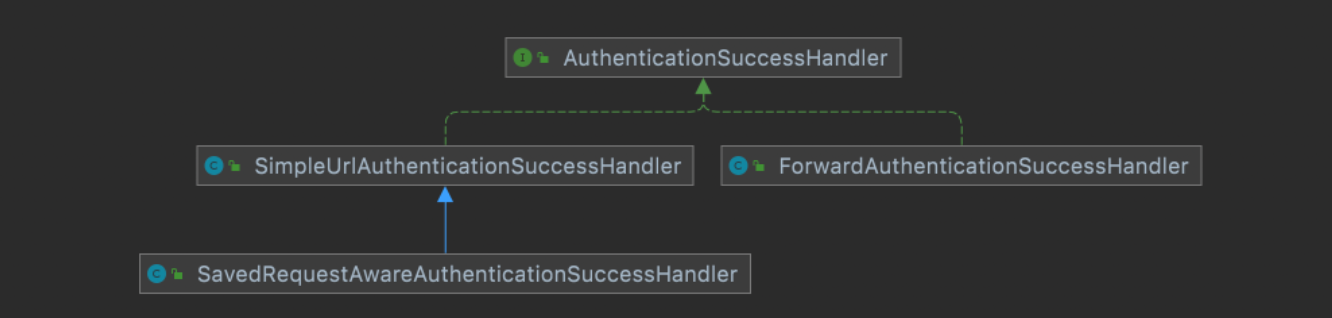
- 有时候页面跳转并不能满足我们,特别是在前后端分离开发中就不需要成功之后跳转页面。只需要给前端返回一个 JSON 通知登录成功还是失败与否。这个时候可以通过自定义 A u t h e n t i c a t i o n S u c c c e s s H a n d l e r AuthenticationSucccessHandler AuthenticationSucccessHandler 实现
public interface AuthenticationSuccessHandler {

	/**
	 * Called when a user has been successfully authenticated.
	 * @param request the request which caused the successful authentication
	 * @param response the response
	 * @param authentication the <tt>Authentication</tt> object which was created during
	 * the authentication process.
	 */
	void onAuthenticationSuccess(HttpServletRequest request, HttpServletResponse response,
			Authentication authentication) throws IOException, ServletException;
}
- 根据接口的描述信息,也可以得知登录成功会自动回调这个方法,进一步查看它的默认实现,你会发现successForwardUrl、defaultSuccessUrl也是由它的子类实现的
- 自定义 A u t h e n t i c a t i o n S u c c e s s H a n d l e AuthenticationSuccessHandle AuthenticationSuccessHandle 实现登录成功的处理
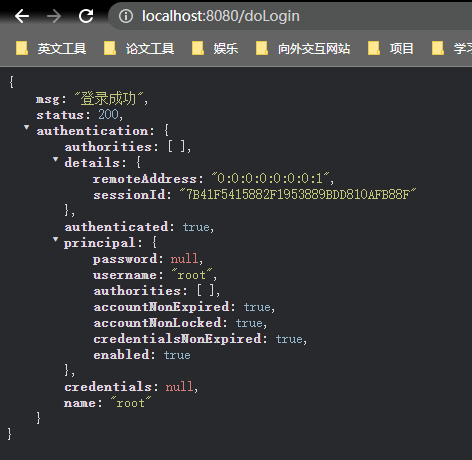
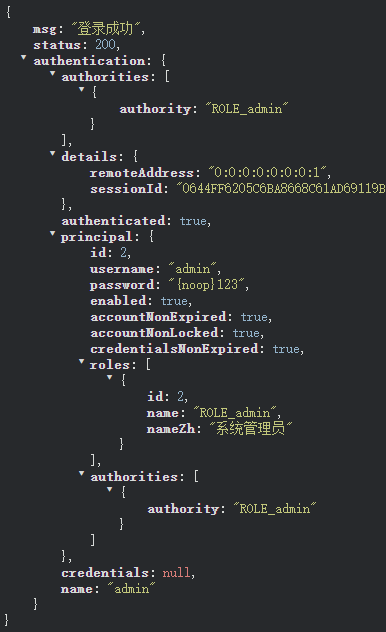
其实前后端分离项目的交互方式也是通过http协议的,只是在http协议的body部分约定了其中的数据格式为application/json因为json格式轻量级,解析方便,即使我们在controller层返回的可能只是一个java实体或者字符串,但是 spring boot 底层可以自动进行解析,把实体解析为json对象放回到response对象的body中(通过获取到ServletRequest对象的输出流进行写入JSON)。所以在一些处理中我们可以直接向response对象输出流中中写入数据进行返回
public class MyAuthenticationSuccessHandler implements AuthenticationSuccessHandler {
    @Override
    public void onAuthenticationSuccess(HttpServletRequest request, HttpServletResponse response, Authentication authentication) throws IOException, ServletException {
        Map<String, Object> result = new HashMap<String, Object>();
        result.put("msg", "登录成功");
        result.put("status", 200);
        result.put("authentication", authentication);
        response.setContentType("application/json;charset=UTF-8");
        String s = new ObjectMapper().writeValueAsString(result);
        response.getWriter().println(s);
    }
}
- 配置 AuthenticationSuccessHandler
@Configuration
public class WebSecurityConfigurer extends WebSecurityConfigurerAdapter {
    @Override
    protected void configure(HttpSecurity http) throws Exception {
        http.authorizeHttpRequests()
                //...
                .and()
                .formLogin()
                //....
                .successHandler(new MyAuthenticationSuccessHandler())//前后端分离时的登陆成功处理方式
                .failureUrl("/login.html")
                .and()
                .csrf().disable();//这里先关闭 CSRF
    }
}
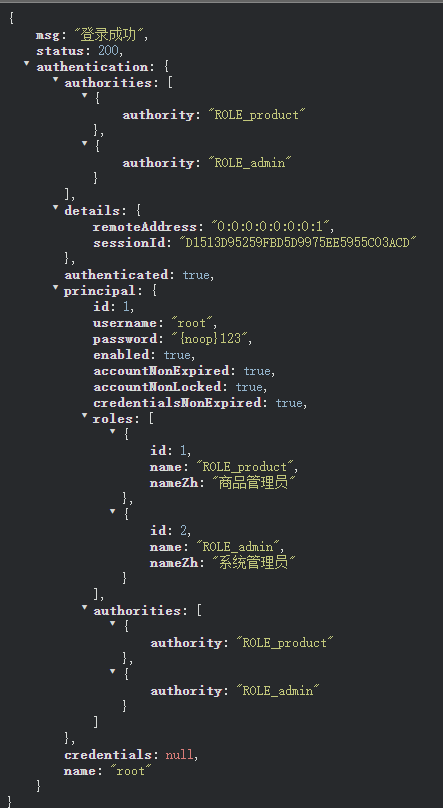
- 登陆成功返回信息
显示登录失败信息
分为前后端分离与不分离版本
前后端不分离
- 配置
@Configuration
public class WebSecurityConfigurer extends WebSecurityConfigurerAdapter {

    @Override
    protected void configure(HttpSecurity http) throws Exception {
        http.authorizeHttpRequests()
              	//..
                .and()
                .formLogin()
                //....
                //.failureUrl("/login.html") // 默认 认证失败之后 redirect 跳转
                .failureForwardUrl("/login.html") //认证失败之后 forward 跳转
                .and()
                .csrf().disable();//这里先关闭 CSRF
    }
}
failureUrl、failureForwardUrl 关系类似于之前提到的 successForwardUrl 、defaultSuccessUrl 方法
- failureUrl 失败以后的重定向跳转
- failureForwardUrl 失败以后的 forward 跳转
注意:因此获取 request 中异常信息,这里只能使用failureForwardUrl
自定义登录失败处理
前后端分离
- 和自定义登录成功处理一样,Spring Security 同样为前后端分离开发提供了登录失败的处理,这个类就是 AuthenticationFailureHandler,源码为:
public interface AuthenticationFailureHandler {

	/**
	 * Called when an authentication attempt fails.
	 * @param request the request during which the authentication attempt occurred.
	 * @param response the response.
	 * @param exception the exception which was thrown to reject the authentication
	 * request.
	 */
	void onAuthenticationFailure(HttpServletRequest request, HttpServletResponse response,
			AuthenticationException exception) throws IOException, ServletException;

}
- 根据接口的描述信息,也可以得知登录失败会自动回调这个方法,进一步查看它的默认实现,你会发现failureUrl、failureForwardUrl也是由它的子类实现的。

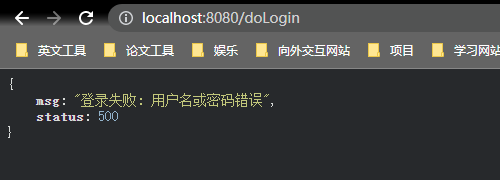
- 自定义 AuthenticationFailureHandler 实现
public class SecurityAuthenticationFailureHandler implements AuthenticationFailureHandler {

    @Override
    public void onAuthenticationFailure(HttpServletRequest request, HttpServletResponse response, AuthenticationException exception) throws IOException, ServletException {

        Authentication authentication; //认证对象

        Map<String, Object> result = new HashMap<>();
        result.put("msg", "登录失败: " + exception.getMessage());
        result.put("status", 500);
        response.setContentType("application/json;charset=UTF-8");
        String s = new ObjectMapper().writeValueAsString(result);
        response.getWriter().println(s);
    }
}
- 配置 AuthenticationFailureHandler
@Configuration
public class WebSecurityConfigurer extends WebSecurityConfigurerAdapter {

    @Override
    protected void configure(HttpSecurity http) throws Exception {
        http.authorizeHttpRequests()
	              //...
                .and()
                .formLogin()
               	//..
                .failureHandler(new MyAuthenticationFailureHandler())
                .and()
                .csrf().disable();//这里先关闭 CSRF
    }
}
- 登录失败返回信息
注销登录
分为前后端分离与不分离版本
前后端不分离
注销登录后跳转
Spring Security 中也提供了默认的注销登录配置,在开发时也可以按照自己需求对注销进行个性化定制。
- 开启注销登录
默认开启
@Configuration
public class WebSecurityConfigurer extends WebSecurityConfigurerAdapter {
  @Override
      protected void configure(HttpSecurity http) throws Exception {
          http.authorizeHttpRequests()
                  //...
                  .and()
                  .formLogin()
                  //...
                  .and()
                  .logout()
                  .logoutUrl("/logout")
                  .invalidateHttpSession(true)
                  .clearAuthentication(true)
                  .logoutSuccessUrl("/login.html")
                  .and()
                  .csrf().disable();//这里先关闭 CSRF
      }
  }
-
通过 logout() 方法开启注销配置
-
logoutUrl 指定退出登录请求地址,默认是 GET 请求,路径为
/logout -
invalidateHttpSession 退出时是否是 session 失效,默认值为 true
-
clearAuthentication 退出时是否清除认证信息,默认值为 true
-
logoutSuccessUrl 退出登录时跳转地址
-
配置多个注销登录请求
如果项目中有需要,开发者还可以配置多个注销登录的请求,同时还可以指定请求的方法:
@Configuration
public class WebSecurityConfigurer extends WebSecurityConfigurerAdapter {
  		@Override
      protected void configure(HttpSecurity http) throws Exception {
          http.authorizeHttpRequests()
                  //...
                  .and()
                  .formLogin()
                  //...
                  .and()
                  .logout()
                  .logoutRequestMatcher(new OrRequestMatcher(
                          new AntPathRequestMatcher("/logout1","GET"),
                          new AntPathRequestMatcher("/logout","GET")
                  ))
                  .invalidateHttpSession(true)
                  .clearAuthentication(true)
                  .logoutSuccessUrl("/login.html")
                  .and()
                  .csrf().disable();//这里先关闭 CSRF
      }
  }
前后端分离注销登录配置
如果是前后端分离开发,注销成功之后就不需要页面跳转了,只需要将注销成功的信息返回前端即可,此时我们可以通过自定义 LogoutSuccessHandler 实现来返回注销之后信息:
public class MyLogoutSuccessHandler implements LogoutSuccessHandler {
      @Override
      public void onLogoutSuccess(HttpServletRequest request, HttpServletResponse response, Authentication authentication) throws IOException, ServletException {
          Map<String, Object> result = new HashMap<String, Object>();
          result.put("msg", "注销成功");
          result.put("status", 200);
          response.setContentType("application/json;charset=UTF-8");
          String s = new ObjectMapper().writeValueAsString(result);
          response.getWriter().println(s);
      }
  }
@Configuration
public class WebSecurityConfigurer extends WebSecurityConfigurerAdapter {
      @Override
      protected void configure(HttpSecurity http) throws Exception {
          http.authorizeHttpRequests()
            			//....
                  .and()
                  .formLogin()
   								//...
                  .and()
                  .logout()
                  //.logoutUrl("/logout")
                  .logoutRequestMatcher(new OrRequestMatcher(
                          new AntPathRequestMatcher("/logout1","GET"),
                          new AntPathRequestMatcher("/logout","GET")
                  ))
                  .invalidateHttpSession(true)
                  .clearAuthentication(true)
                  //.logoutSuccessUrl("/login.html")
                  .logoutSuccessHandler(new MyLogoutSuccessHandler())
                  .and()
                  .csrf().disable(;//这里先关闭 CSRF
      }
  }
- 注销登录返回信息

登录用户数据获取
获取登陆后的用户个人信息
SecurityContextHolder
Spring Security 会将登录用户数据保存在 Session 中。但是,为了使用方便,Spring Security在此基础上还做了一些改进,其中最主要的一个变化就是线程绑定。当用户登录成功后,Spring Security 会将登录成功的用户信息保存到 SecurityContextHolder 中。
SecurityContextHolder 中的数据保存默认是通过ThreadLocal 来实现的,使用 ThreadLocal 创建的变量只能被当前线程访问,不能被其他线程访问和修改,也就是用户数据和请求线程绑定在一起。当登录请求处理完毕后,Spring Security 会将 SecurityContextHolder 中的数据拿出来保存到 Session 中,同时将 SecurityContexHolder 中的数据清空。以后每当有请求到来时,Spring Security 就会先从 Session 中取出用户登录数据,保存到SecurityContextHolder 中,方便在该请求的后续处理过程中使用,同时在请求结束时将 SecurityContextHolder 中的数据拿出来保存到 Session 中,然后将SecurityContextHolder 中的数据清空。
实际上 SecurityContextHolder 中存储是 SecurityContext,在 SecurityContext 中存储是 Authentication。
- 这种设计是典型的策略设计模式:
public class SecurityContextHolder {
	public static final String MODE_THREADLOCAL = "MODE_THREADLOCAL";
	public static final String MODE_INHERITABLETHREADLOCAL = "MODE_INHERITABLETHREADLOCAL";
	public static final String MODE_GLOBAL = "MODE_GLOBAL";
	private static final String MODE_PRE_INITIALIZED = "MODE_PRE_INITIALIZED";
    public static final String SYSTEM_PROPERTY = "spring.security.strategy";

	private static String strategyName = System.getProperty(SYSTEM_PROPERTY);
	private static SecurityContextHolderStrategy strategy;
  //....
	private static void initializeStrategy() {
		if (MODE_PRE_INITIALIZED.equals(strategyName)) {
			Assert.state(strategy != null, "When using " + MODE_PRE_INITIALIZED
					+ ", setContextHolderStrategy must be called with the fully constructed strategy");
			return;
		}
		if (!StringUtils.hasText(strategyName)) {
			// Set default
			strategyName = MODE_THREADLOCAL;
		}
		if (strategyName.equals(MODE_THREADLOCAL)) {
			strategy = new ThreadLocalSecurityContextHolderStrategy();
			return;
		}
		if (strategyName.equals(MODE_INHERITABLETHREADLOCAL)) {
			strategy = new InheritableThreadLocalSecurityContextHolderStrategy();
			return;
		}
		if (strategyName.equals(MODE_GLOBAL)) {
			strategy = new GlobalSecurityContextHolderStrategy();
			return;
		}
    //.....
  }
}
MODE THREADLOCAL:这种存放策略是将 SecurityContext 存放在 ThreadLocal中,大家知道 Threadlocal 的特点是在哪个线程中存储就要在哪个线程中读取,这其实非常适合 web 应用,因为在默认情况下,一个请求无论经过多少 Filter 到达 Servlet,都是由一个线程来处理的。这也是 SecurityContextHolder 的默认存储策略,这种存储策略意味着如果在具体的业务处理代码中,开启了子线程,在子线程中去获取登录用户数据,就会获取不到。MODE INHERITABLETHREADLOCAL:这种存储模式适用于多线程环境,如果希望在子线程中也能够获取到登录用户数据,那么可以使用这种存储模式。MODE GLOBAL:这种存储模式实际上是将数据保存在一个静态变量中,在 JavaWeb开发中,这种模式很少使用到。
public static final String SYSTEM_PROPERTY = “spring.security.strategy”;
private static String strategyName = System.getProperty(SYSTEM_PROPERTY);
从这段代码可以看出我们的strategy是使用System.getProperty方法获取的名为spring.security.strategy的参数,我们可以通过指定这个参数来指定对应的模式。
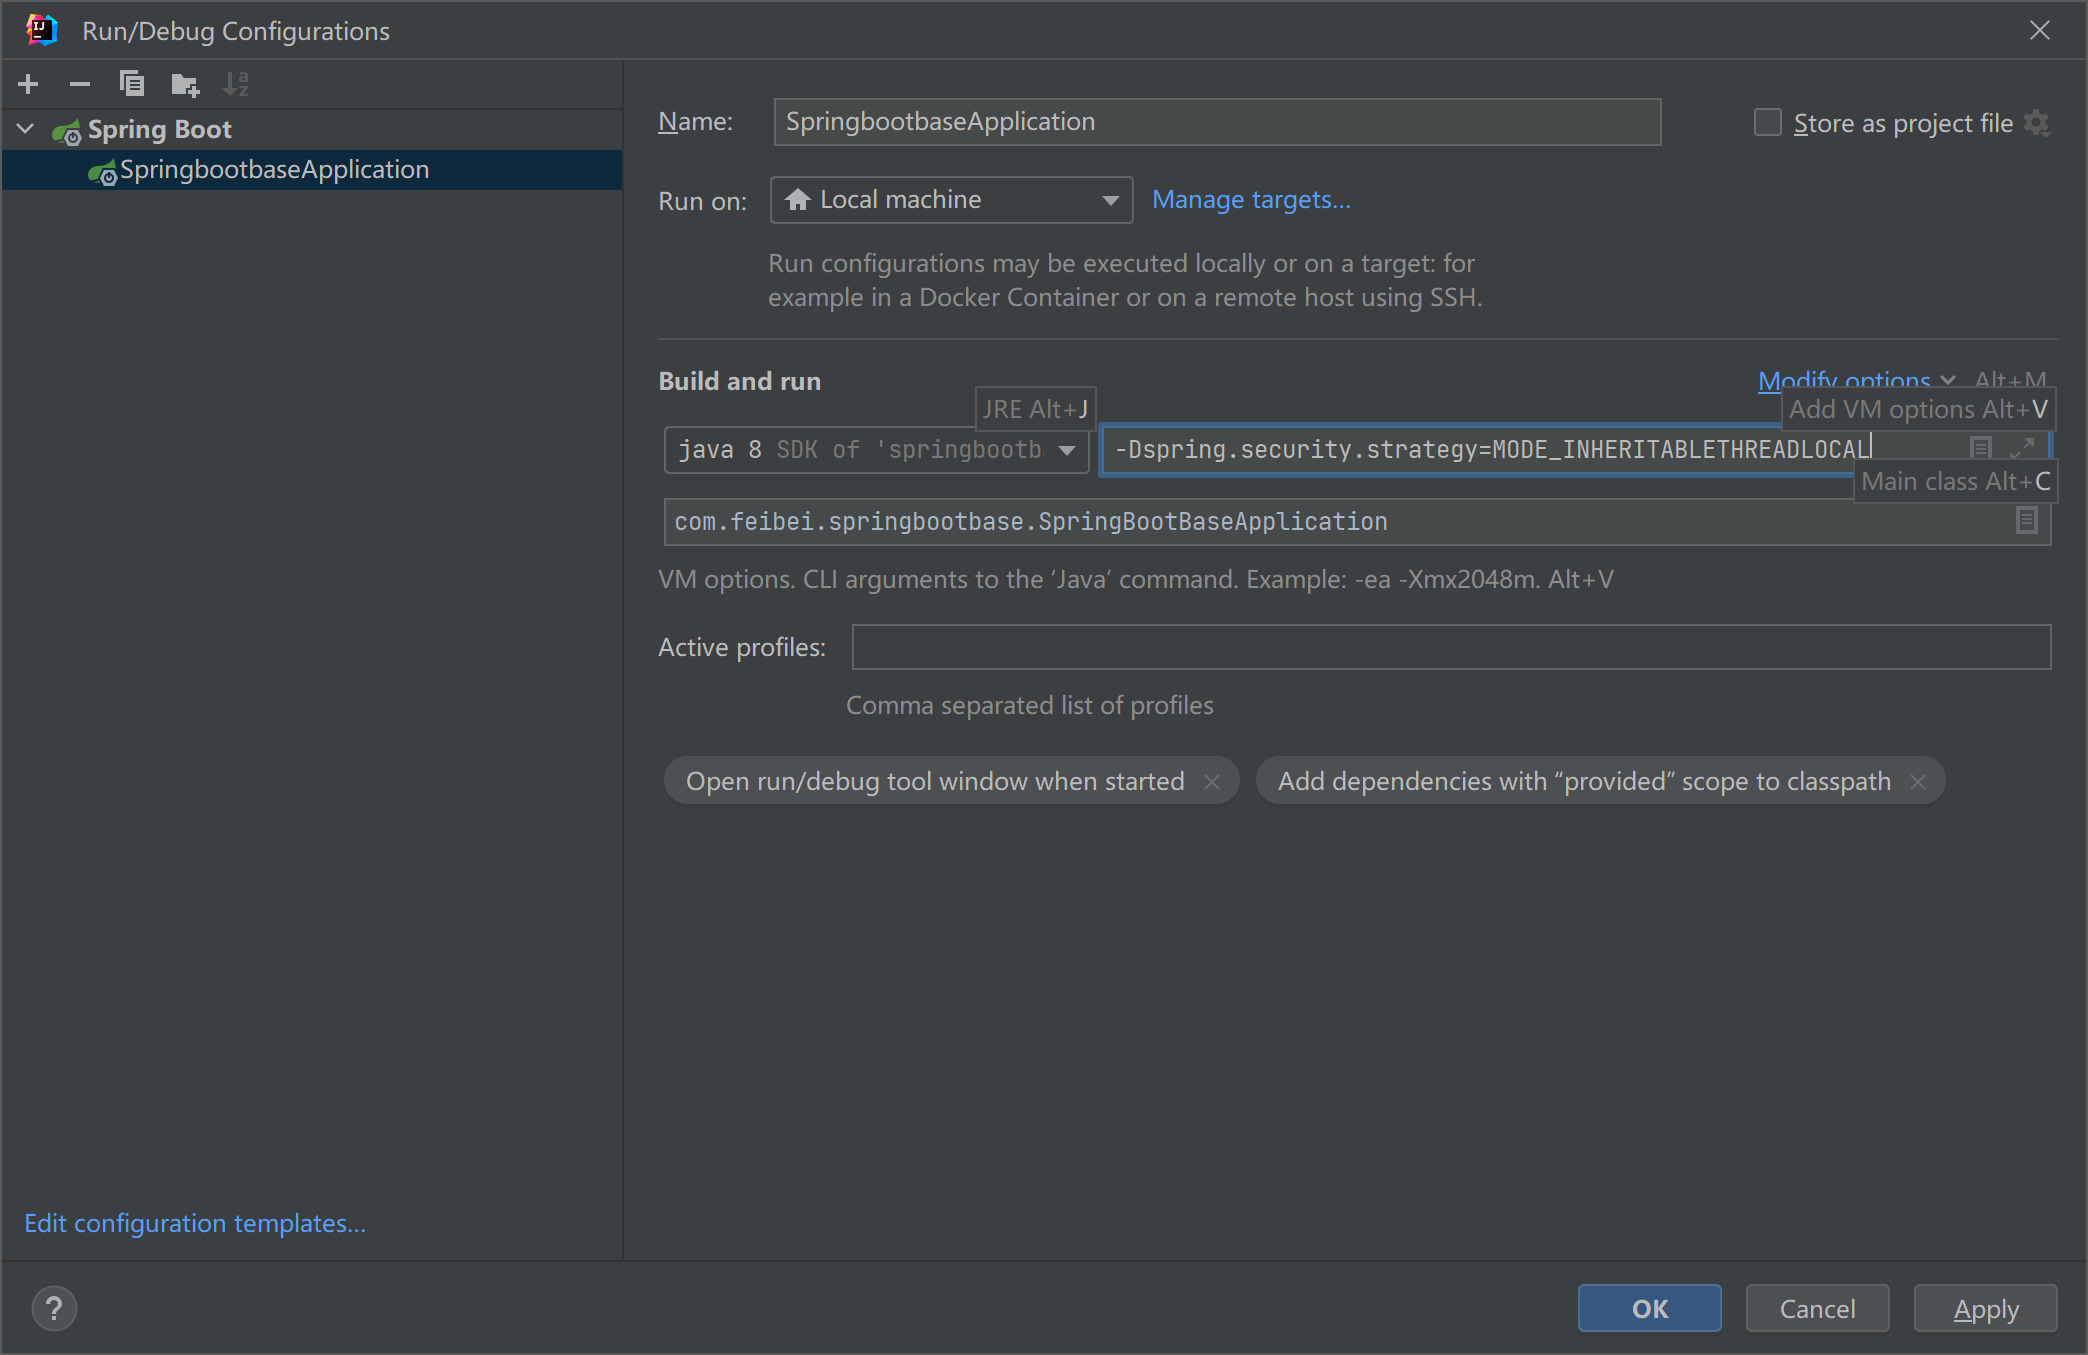
那么这个参数如何指定呢?这个参数并不是我们常见的配置文件yml中的参数而是虚拟机的参数,那么我们要如何指定呢?其实就在我们的启动配置中的 VM options 中配置即可(后面会有截图)。
- Springboot项目中的System.getProperty是什么意思
在Spring Boot项目中,System.getProperty()是Java中的一个方法,用于获取系统属性的值。
系统属性是与Java虚拟机(JVM)相关的一些配置参数,可以通过System类的getProperty()方法获取它们的值。这些属性包括了一些与操作系统、运行环境或Java虚拟机相关的信息,比如操作系统的名称、Java版本、文件路径分隔符等。
当在Spring Boot项目中调用System.getProperty()方法时,它通常用于获取一些与系统环境相关的配置参数。例如,可以使用它来获取当前操作系统的名称或版本,以便在应用程序中根据不同的操作系统执行不同的逻辑。另外,还可以使用它来获取一些自定义的系统属性,这些属性可能在应用程序的配置文件中定义。
以下是一些使用System.getProperty()方法的示例:
String osName = System.getProperty("os.name");
String javaVersion = System.getProperty("java.version");
String customProperty = System.getProperty("custom.property");
在这些示例中,第一个调用获取了当前操作系统的名称,第二个调用获取了Java的版本,第三个调用获取了名为"custom.property"的自定义系统属性的值。
需要注意的是,System.getProperty()方法返回的是一个字符串,表示指定系统属性的值。如果指定的系统属性不存在,则返回null。
- SpringBoot项目启动时的VM options是什么
在Spring Boot项目中,VM options(虚拟机选项)是在启动应用程序时向Java虚拟机(JVM)传递的命令行参数。这些选项可以用于配置JVM的行为和应用程序的运行环境。
在启动Spring Boot应用程序时,可以通过在命令行或集成开发环境(IDE)中的配置中指定VM options来设置JVM的参数。这些参数会在JVM启动时传递给它,并影响应用程序的运行。
常见的VM options包括:
- 内存相关参数:用于配置JVM的堆内存大小、堆外内存大小、永久代大小等,例如-Xmx、-Xms、-XX:MaxPermSize等。
- 垃圾回收相关参数:用于配置JVM的垃圾回收器类型、垃圾回收策略等,例如-XX:+UseG1GC、-XX:+CMSParallelRemarkEnabled等。
- 系统属性参数:用于设置系统属性的值,可以在应用程序中通过System.getProperty()方法获取,例如-Dspring.profiles.active=dev。
- 日志相关参数:用于配置应用程序的日志系统,例如-Dlogging.level.root=INFO、-Dlogging.file=/path/to/log/file.log等。
- 线程相关参数:用于配置线程池的大小、线程堆栈大小等,例如-XX:ThreadStackSize、-Djava.util.concurrent.ForkJoinPool.common.parallelism等。
请注意,VM options的具体选项和语法取决于所使用的JVM版本和供应商。可以根据具体的需求和环境来选择合适的选项进行配置。
SecurityContextHolderStrategy
通过 SecurityContextHolder 可以得知,SecurityContextHolderStrategy 接口用来定义存储策略方法
public interface SecurityContextHolderStrategy {
	void clearContext();
	SecurityContext getContext();
	void setContext(SecurityContext context);
	SecurityContext createEmptyContext();
}
接口中一共定义了四个方法:
clearContext:该方法用来清除存储的 SecurityContext对象。getContext:该方法用来获取存储的 SecurityContext 对象。setContext:该方法用来设置存储的 SecurityContext 对象。create Empty Context:该方法则用来创建一个空的 SecurityContext 对象。

从上面可以看出每一个实现类对应一种策略的实现。
后台获取认证后的用户数据
@RequestMapping("/hello")
    public String hello() {
        System.out.println("hello spring security!");
        //1 获取认证完的用户信息
        Authentication authentication = SecurityContextHolder.getContext().getAuthentication();
        User user = (User) authentication.getPrincipal();
        System.out.println("authentication = " + authentication);
        System.out.println("名字信息:" + authentication.getName());
        System.out.println("身份信息:" + user.getAuthorities());
        new Thread(() -> {
            Authentication authentication1 = SecurityContextHolder.getContext().getAuthentication();
            System.out.println("子线程获取: " + authentication1);
        }).start();
        return "hello spring security!";
    }
关于这段线程代码(防止有像我一样的初学者看不懂)
-
new Thread(() -> { Authentication authentication1 = SecurityContextHolder.getContext().getAuthentication(); System.out.println("子线程获取: " + authentication1); }).start();这段java代码是什么意思
这段Java代码是创建一个新的线程,并在该线程中执行一段代码块。具体来说,代码块使用Lambda表达式定义了一个匿名的Runnable对象。
在这段代码中,代码块中的内容包括以下几个步骤:
- 获取当前线程的安全上下文(SecurityContextHolder.getContext())。
- 从安全上下文中获取认证对象(Authentication)。
- 使用System.out.println()方法将认证对象打印到控制台。
在这个新创建的线程中,将执行以上这些操作,并将认证对象打印到控制台。由于是在子线程中执行的,所以这段代码可能会以并行或异步的方式与主线程同时运行。
需要注意的是,这段代码提供的信息很有限,无法确定其整体的上下文和目的。然而,可以看出它是在处理与安全认证相关的操作,可能用于检查当前用户的身份验证信息或执行一些与权限相关的操作。具体的逻辑需要结合代码的其他部分来进行分析。
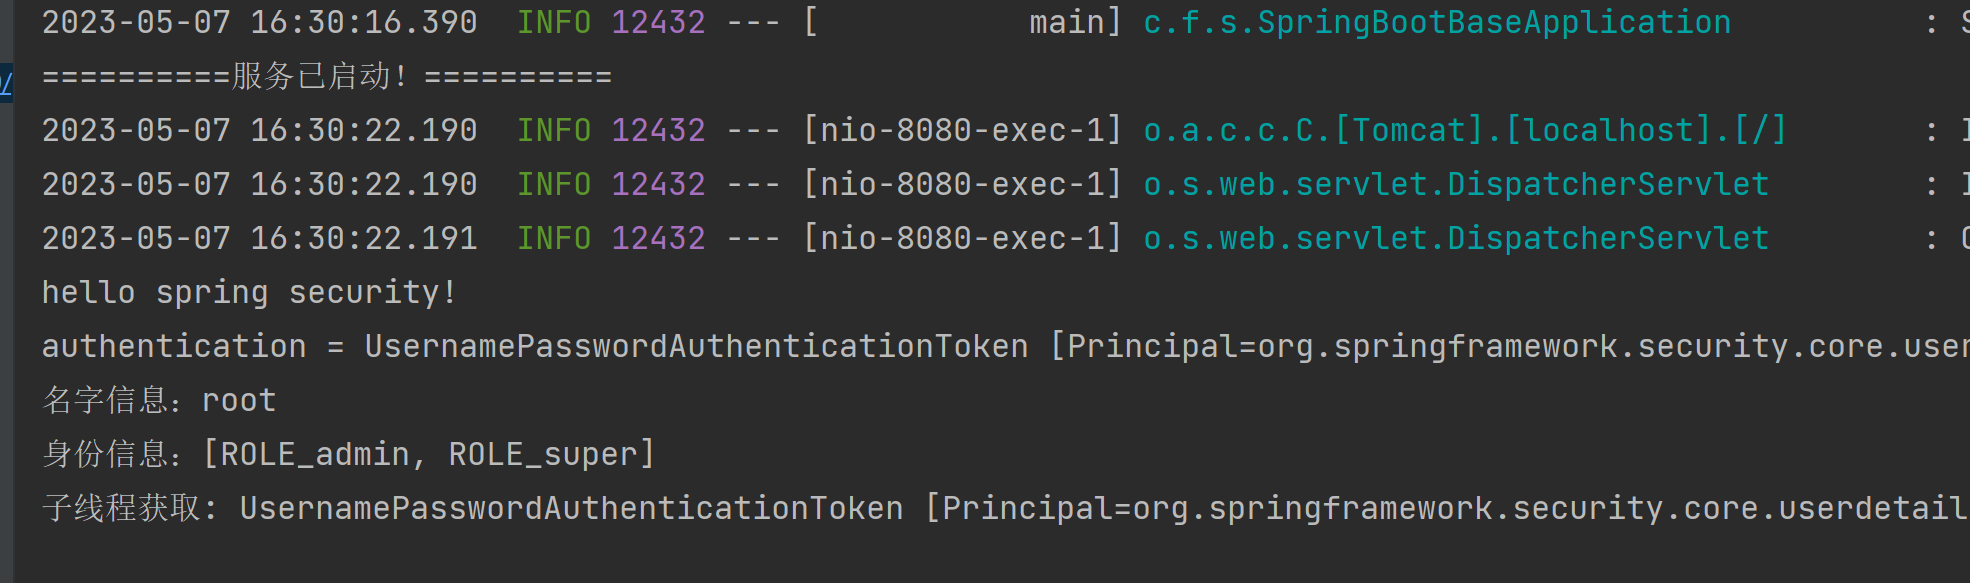
- 控制台输出
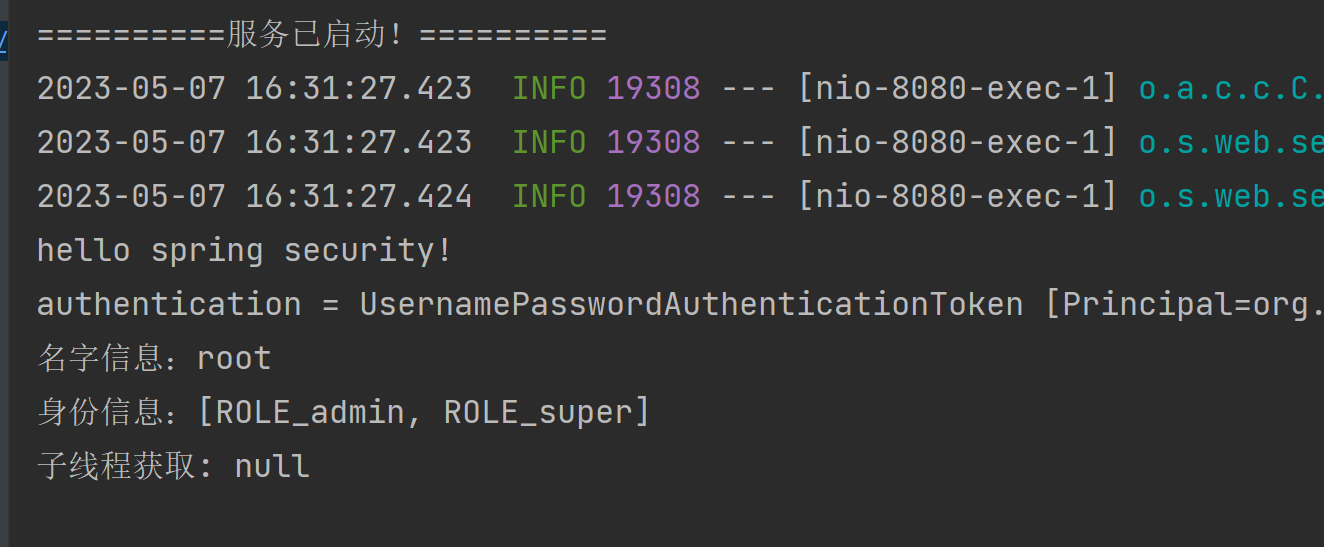
可以看到我们的子线程无法获取用户信息,这是因为我们的默认策略为 M O D E T H R E A D L O C A L MODE\quad THREADLOCAL MODETHREADLOCAL 我们需要把策略更改为 M O D E I N H E R I T A B L E T H R E A D L O C A L MODE INHERITABLETHREADLOCAL MODEINHERITABLETHREADLOCAL 才可以让我们的子线程也能获取到用户信息,那么怎么更改策略呢?
- 我们只需要在启动配置中的VM options中加入以下命令就可以改变策略
-Dspring.security.strategy=MODE_INHERITABLETHREADLOCAL
- 改变策略后的控制台输出
自定义认证数据源
认证流程分析
https://docs.spring.io/spring-security/reference/servlet/authentication/architecture.html
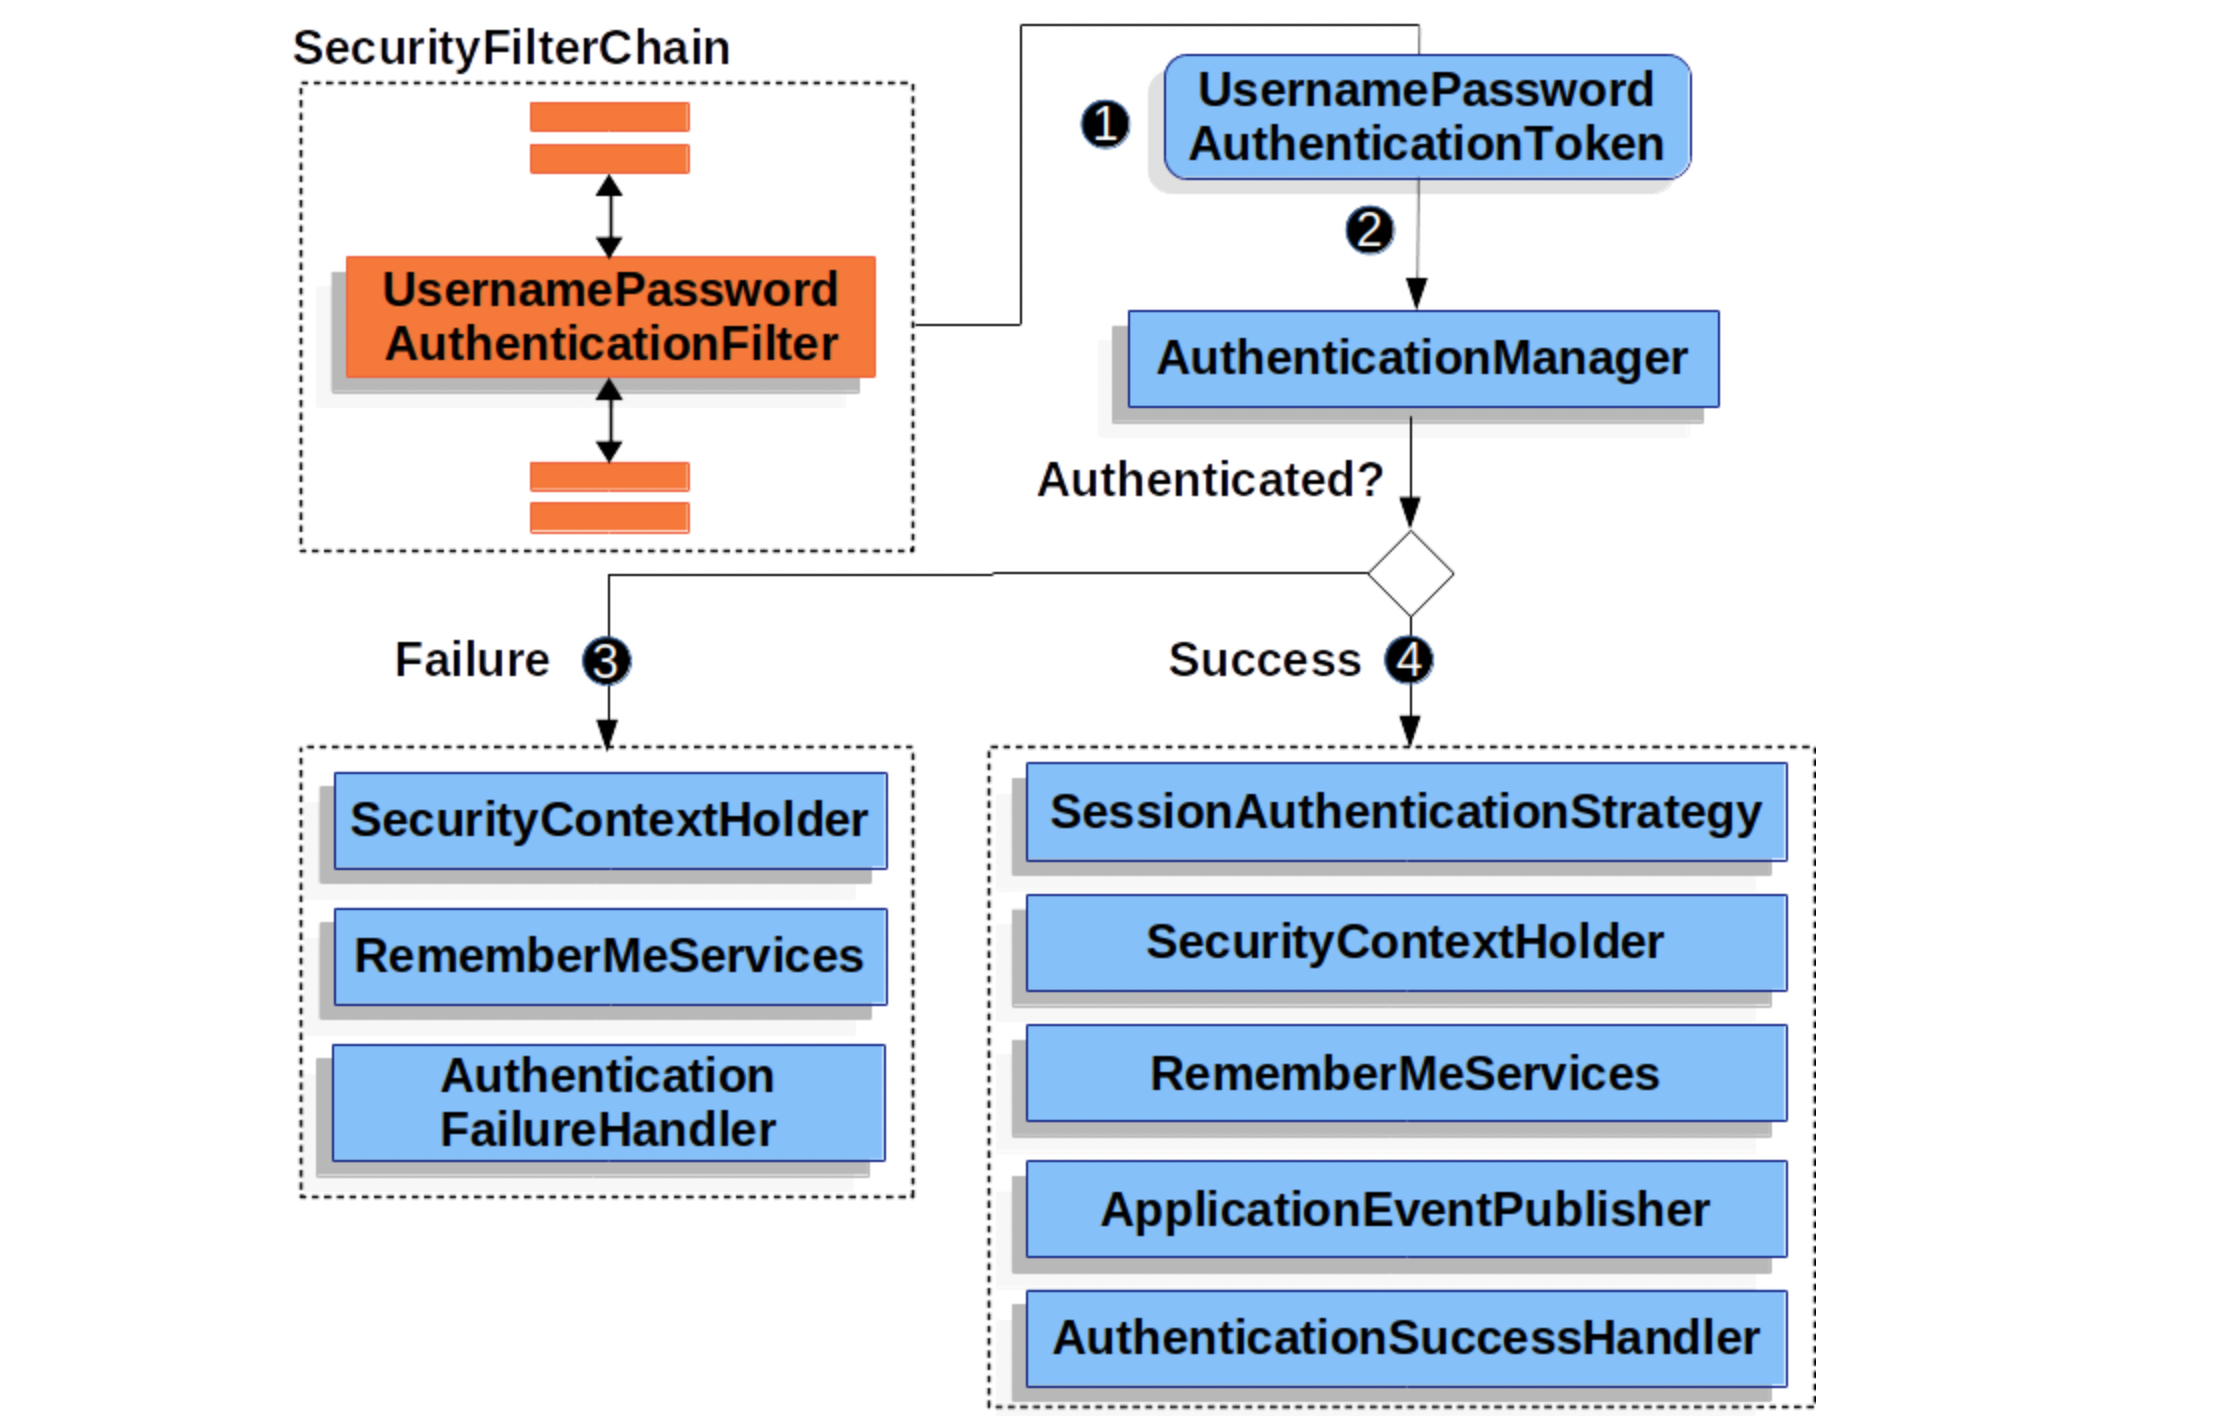
- 发起认证请求,请求中携带用户名、密码,该请求会被
UsernamePasswordAuthenticationFilter拦截 - 在
UsernamePasswordAuthenticationFilter的attemptAuthentication方法中将请求中用户名和密码,封装为Authentication对象(其实就是UsernamePasswordAuthenticationToken对象,这是Authentication的实现类),并交给AuthenticationManager进行认证 - 认证成功,将认证信息存储到 SecurityContextHodler 以及调用记住我等,并回调
AuthenticationSuccessHandler处理 - 认证失败,清除 SecurityContextHodler 以及 记住我中信息,回调
AuthenticationFailureHandler处理
三者关系
从上面分析中得知,AuthenticationManager 是认证的核心类,但实际上在底层真正认证时还离不开 ProviderManager 以及 AuthenticationProvider 。他们三者关系是样的呢?
AuthenticationManager是一个认证管理器,它定义了 Spring Security 过滤器要执行认证操作。ProviderManagerAuthenticationManager接口的实现类。Spring Security 认证时默认使用就是 ProviderManager。AuthenticationProvider就是针对不同的身份类型执行的具体的身份认证。
AuthenticationManager 与 ProviderManager

ProviderManager 是 AuthenticationManager 的唯一实现,也是 Spring Security 默认使用实现。从这里不难看出默认情况下AuthenticationManager 就是一个ProviderManager。
ProviderManager 与 AuthenticationProvider
摘自官方: https://docs.spring.io/spring-security/reference/servlet/authentication/architecture.html
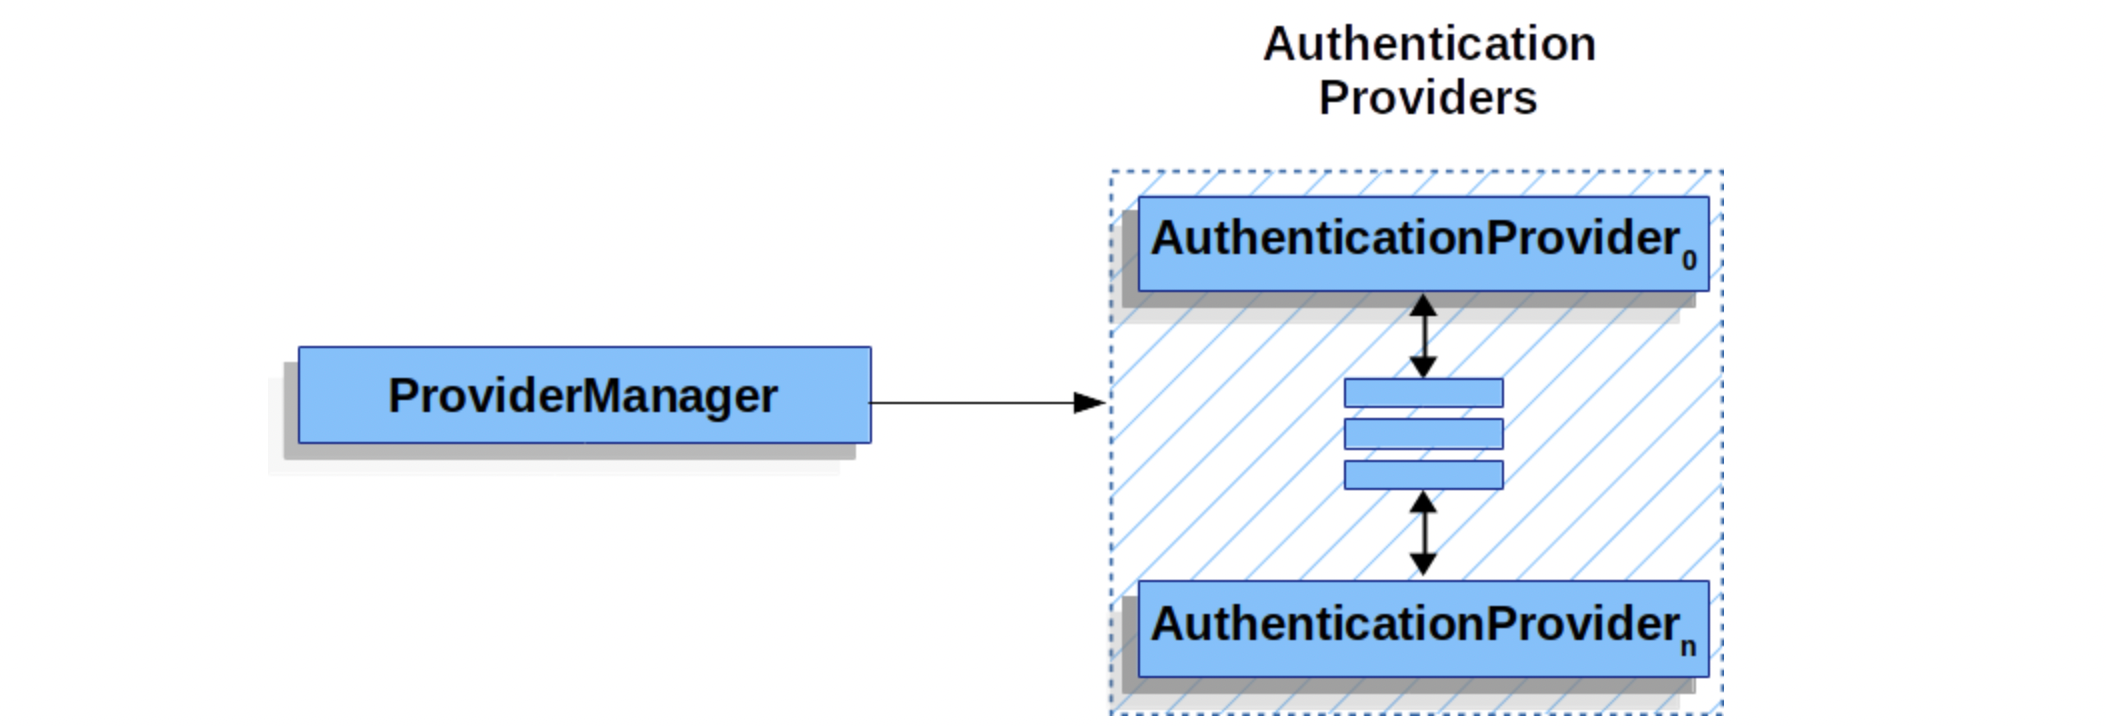
在 Spring Seourity 中,允许系统同时支持多种不同的认证方式,例如同时支持用户名/密码认证、ReremberMe 认证、手机号码动态认证等,而不同的认证方式对应了不同的 AuthenticationProvider,所以一个完整的认证流程可能由多个 AuthenticationProvider 来提供。
多个 AuthenticationProvider 将组成一个列表,这个列表将由 ProviderManager 代理。换句话说,在ProviderManager 中存在一个 AuthenticationProvider 列表,在Provider Manager 中遍历列表中的每一个 AuthenticationProvider 去执行身份认证,最终得到认证结果。
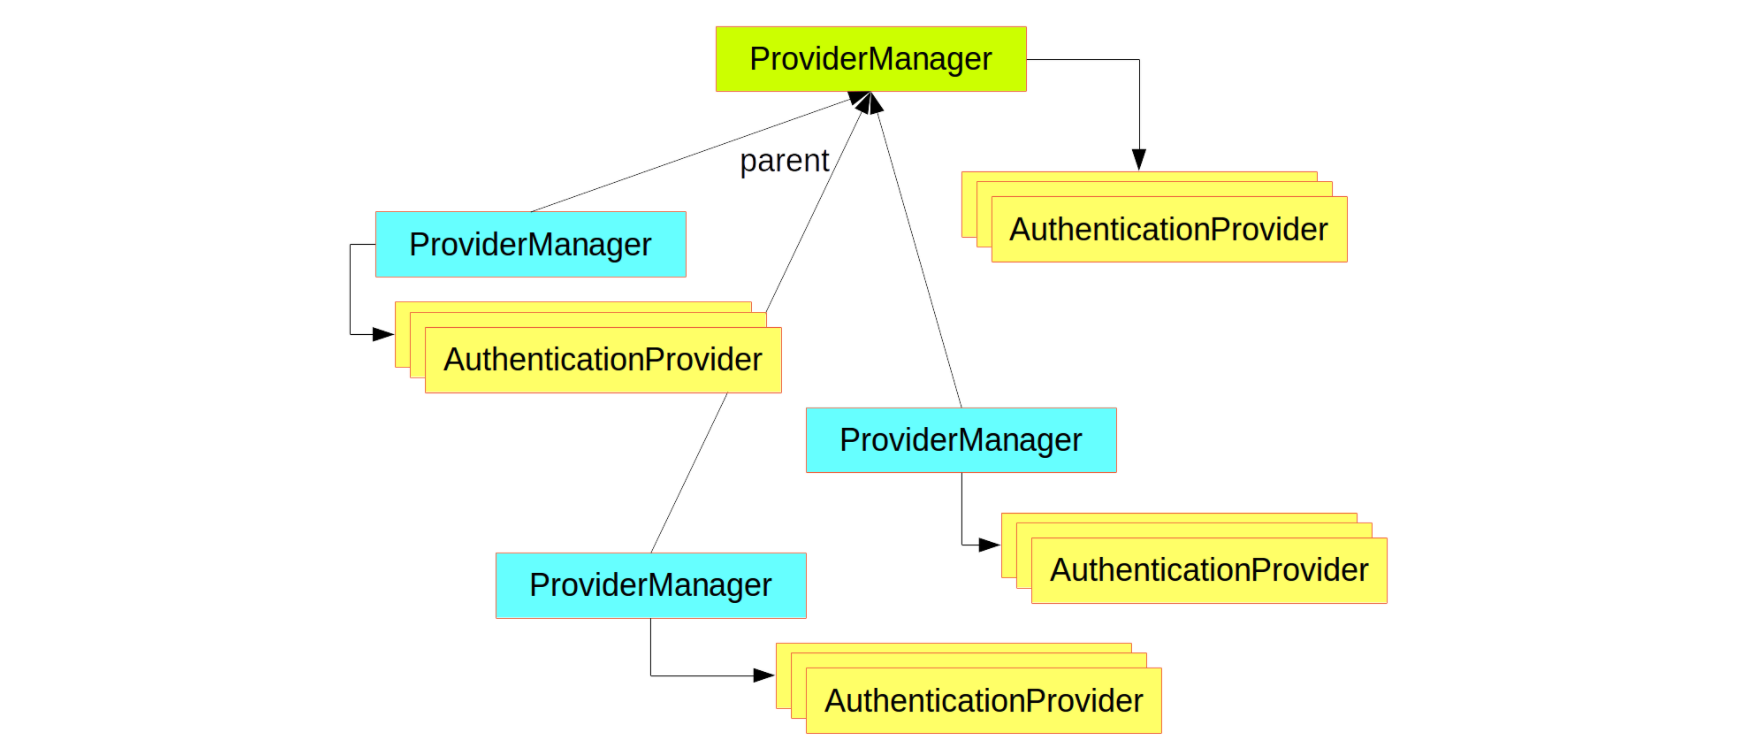
ProviderManager 本身也可以再配置一个 AuthenticationManager 作为 parent,这样当ProviderManager 认证失败之后,就可以进入到 parent 中再次进行认证。理论上来说,ProviderManager 的 parent 可以是任意类型的 AuthenticationManager,但是通常都是由
ProviderManager 来扮演 parent 的角色,也就是 ProviderManager 是 ProviderManager 的 parent。
ProviderManager 本身也可以有多个,多个ProviderManager 共用同一个 parent。有时,一个应用程序有受保护资源的逻辑组(例如,所有符合路径模式的网络资源,如/api/**),每个组可以有自己的专用 AuthenticationManager。通常,每个组都是一个ProviderManager,它们共享一个父级。然后,父级是一种 全局资源,作为所有提供者的后备资源。
根据上面的介绍,我们绘出新的 AuthenticationManager、ProvideManager 和 AuthentictionProvider 关系
摘自官网: https://spring.io/guides/topicals/spring-security-architecture
弄清楚认证原理之后我们来看下具体认证时数据源的获取。默认情况下 AuthenticationProvider 是由AbstractUserDetailsAuthenticationProvider 类来实现认证的,DaoAuthenticationProvider类是AbstractUserDetailsAuthenticationProvider类的实现类,在DaoAuthenticationProvider 认证时又通过 UserDetailsService 完成数据源的校验。他们之间调用关系如下:
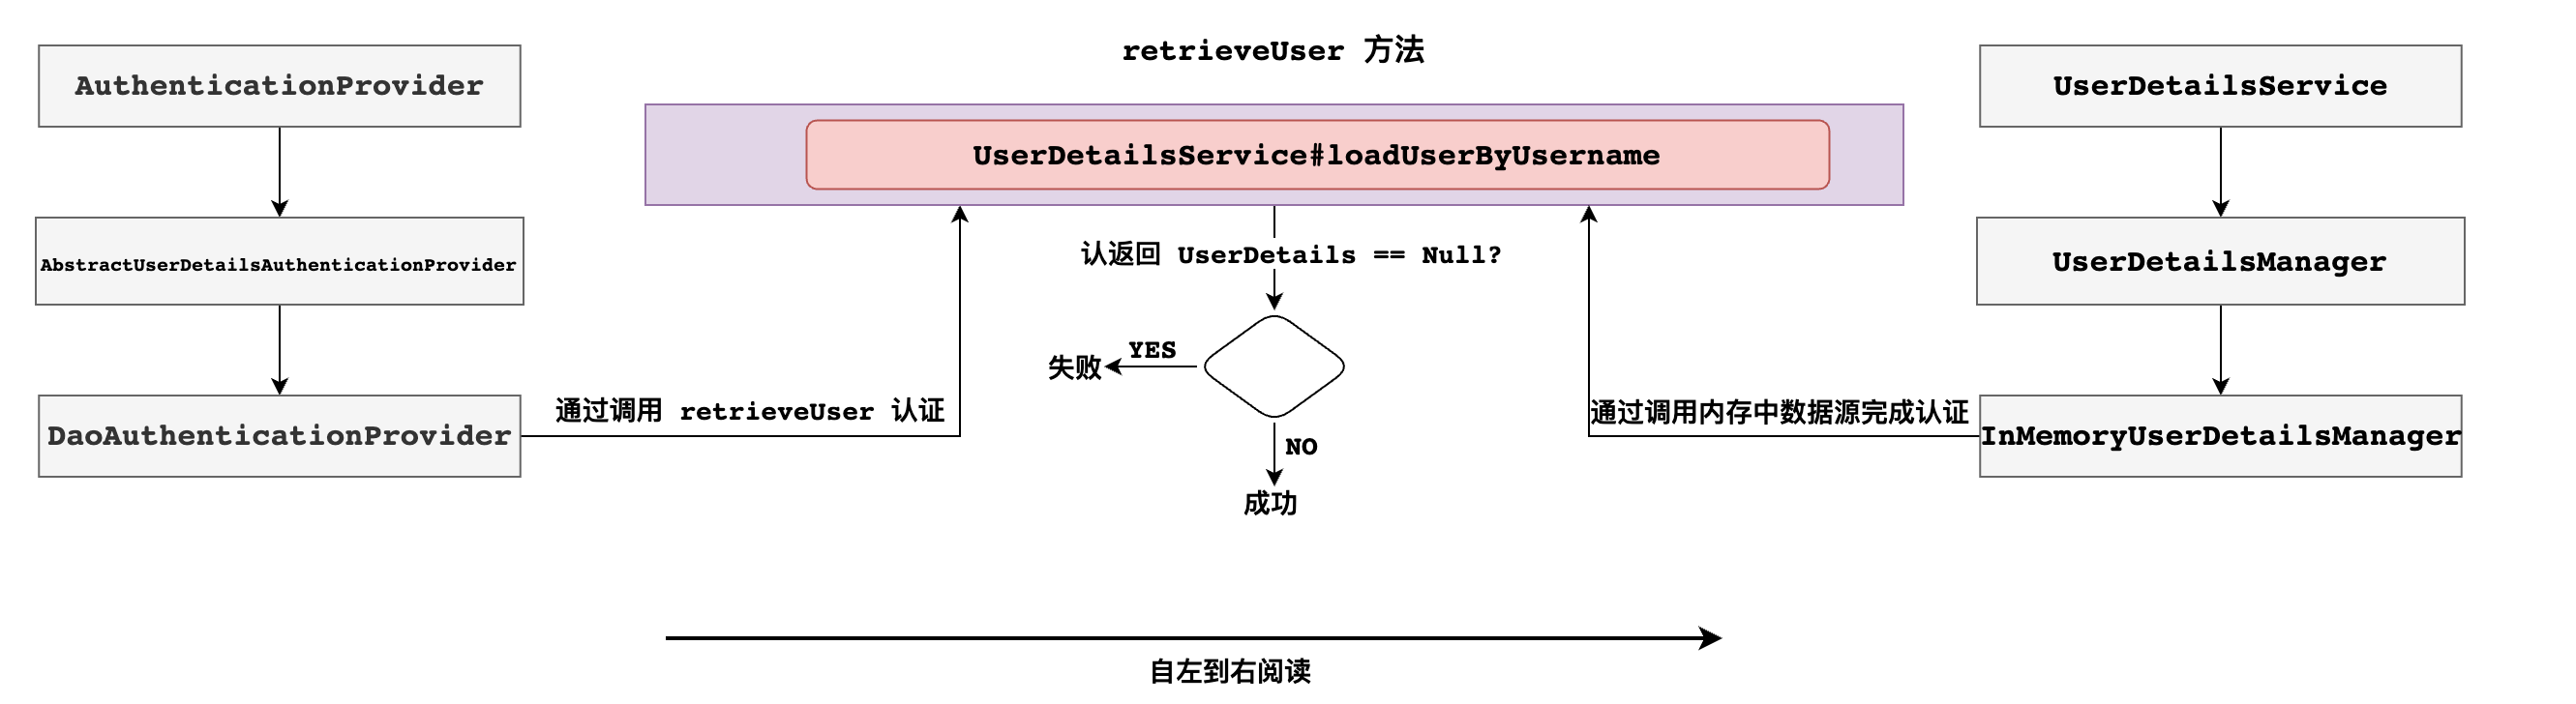
总结: AuthenticationManager 是认证管理器,在 Spring Security 中有全局AuthenticationManager,也可以有局部AuthenticationManager。全局的AuthenticationManager用来对全局认证进行处理,局部的AuthenticationManager用来对某些特殊资源认证处理。当然无论是全局认证管理器还是局部认证管理器都是由 ProviderManger 进行实现。 每一个ProviderManger中都代理一个AuthenticationProvider的列表,列表中每一个实现代表一种身份认证方式。认证时底层数据源需要调用 UserDetailService 来实现。
配置全局 AuthenticationManager
https://spring.io/guides/topicals/spring-security-architecture
-
默认的全局 AuthenticationManager
@Configuration public class WebSecurityConfigurer extends WebSecurityConfigurerAdapter { @Autowired public void initialize(AuthenticationManagerBuilder builder) throws Exception { System.out.println("springboot 默认配置: " + builder); } }- springboot 对 security 进行自动配置时自动在工厂中创建一个全局AuthenticationManager
总结
- 默认自动配置创建全局AuthenticationManager 默认找当前项目中是否存在自定义 UserDetailService 实例 自动将当前项目 UserDetailService 实例设置为数据源
- 默认自动配置创建全局AuthenticationManager 在工厂中使用时直接在代码中注入即可
为什么会有这样的现象呢?其实观察代码就可以发现这个方法并不是什么override的方法就是我们自定义的一个方法,使用@Autowired注解将AuthenticationManagerBuilder类从我们的Bean工厂中自动注入了,而这个类其实就是我们SpringBoot初始化AuthenticationManager使用的Bean,其实就是在我们默认初始化的AuthenticationManager中做加法,他本来就有一些楚华的步骤还是会执行的。
-
自定义全局 AuthenticationManager 推荐
@Configuration public class WebSecurityConfigurer extends WebSecurityConfigurerAdapter { @Override public void configure(AuthenticationManagerBuilder builder) { //builder .... } }- 自定义全局 AuthenticationManager
总结
- 一旦通过 configure 方法自定义 AuthenticationManager实现 就会将工厂中自动配置AuthenticationManager 进行覆盖
- 一旦通过 configure 方法自定义 AuthenticationManager实现 需要在实现中指定认证数据源对象 UserDetaiService 实例
- 一旦通过 configure 方法自定义 AuthenticationManager实现 这种方式创建AuthenticationManager对象工厂内部本地一个 AuthenticationManager 对象 不允许在其他自定义组件中进行注入
为什么这个方法会有这样的特性呢?我们看他重写的方法源码上的注解
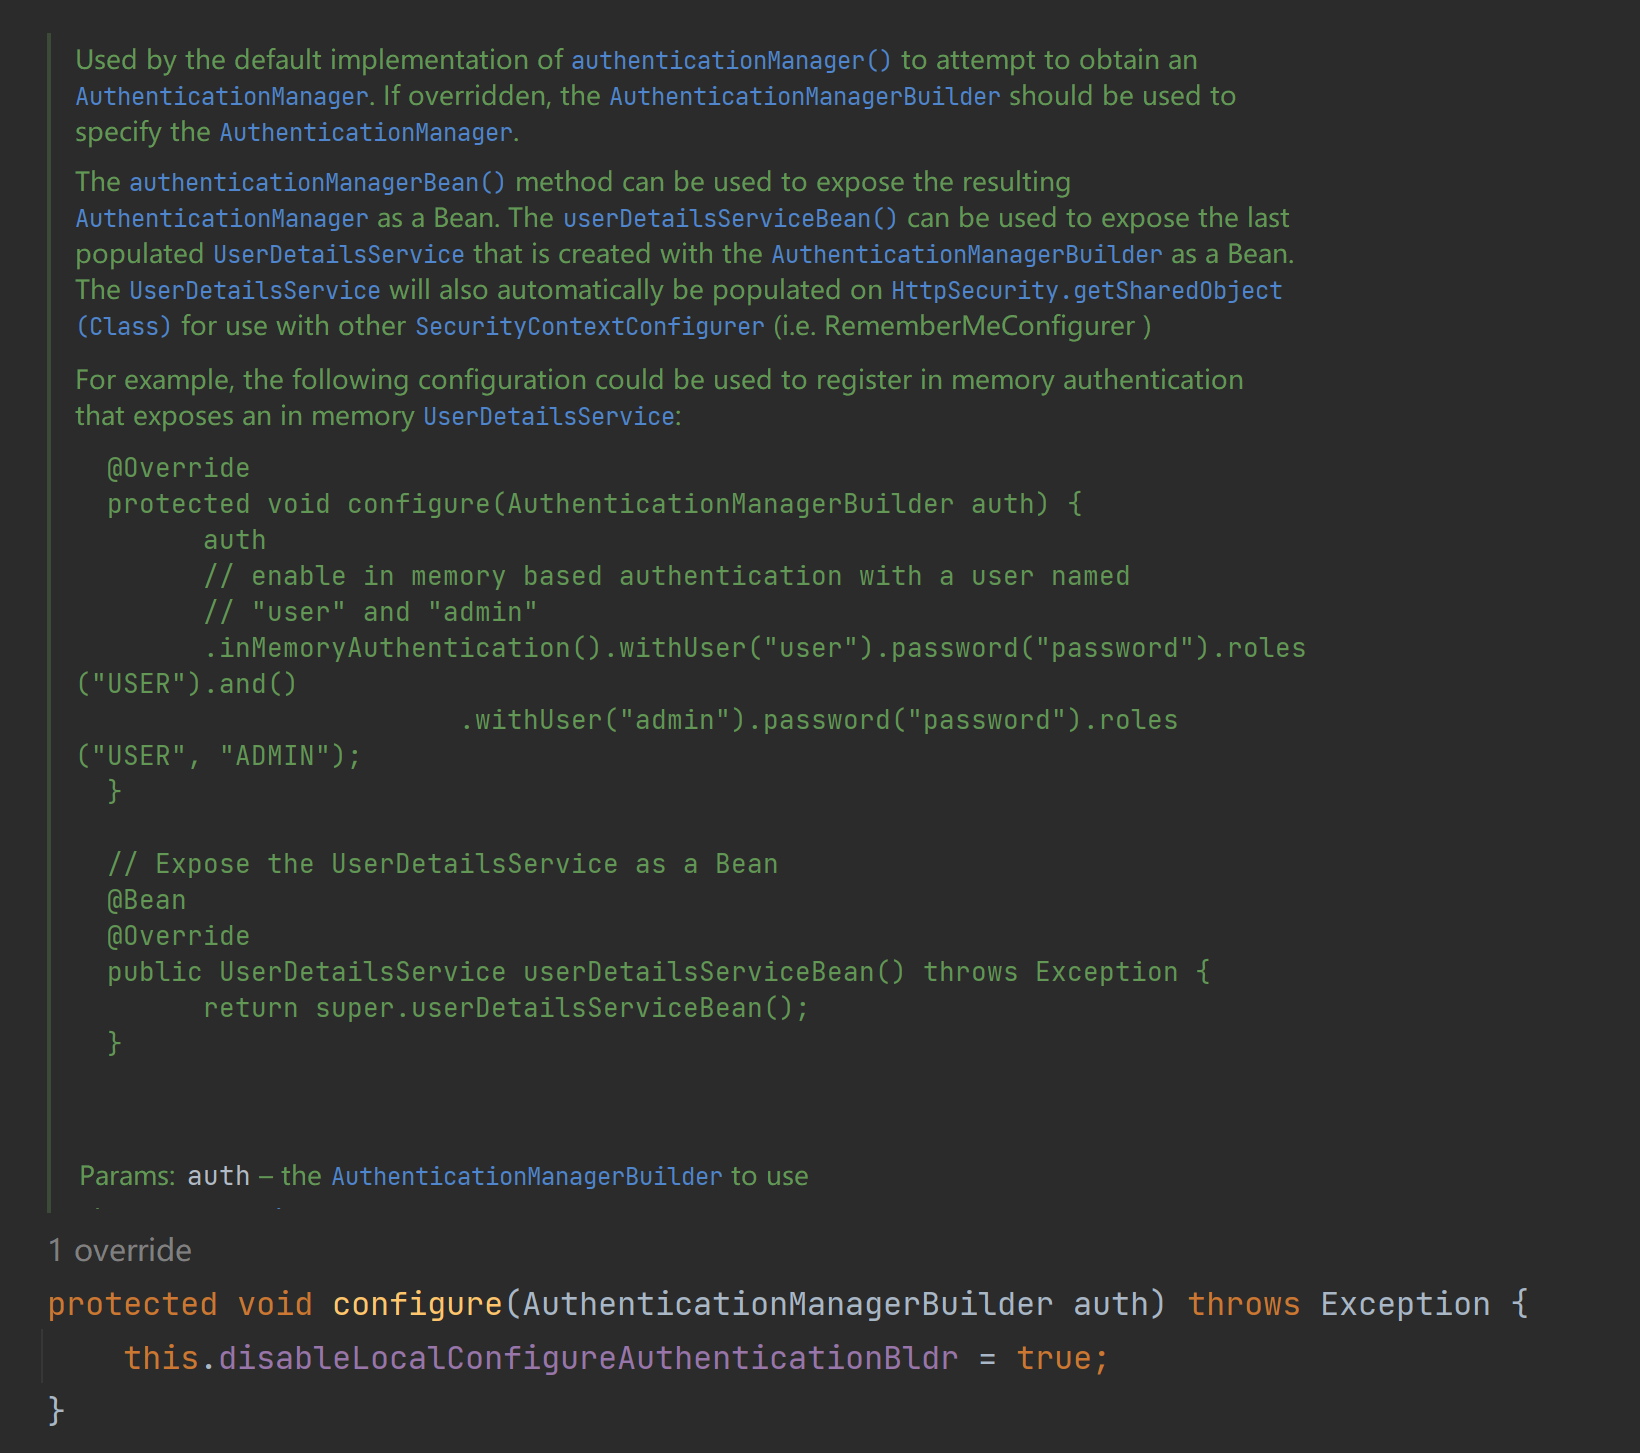
被authenticationManager()的默认实现所使用,以试图获得一个AuthenticationManager。如果被重载,应该使用AuthenticationManagerBuilder来指定AuthenticationManager。
authenticationManagerBean()方法可以用来将得到的AuthenticationManager作为一个Bean公开。userDetailsServiceBean()可以用来将最后填充的UserDetailsService作为一个Bean公开,该服务是用AuthenticationManagerBuilder创建的。当我们重写了这个方法之后,它会被authenticationManager()的默认实现所默认调用,他会自动执行并且会覆盖掉原本默认的本地的身份验证配置(Spring Security的默认AuthenticationManager),因为
this.disableLocalConfigureAuthenticationBldr = true;这条语句的执行。这个方法被重写时这条语句才会执行,不被重写则不执行。如果你没有显式地重写
configure(AuthenticationManagerBuilder auth)方法,而是保留了WebSecurityConfigurerAdapter类中的默认实现,那么该方法将不会被调用。在
WebSecurityConfigurerAdapter类中,configure(AuthenticationManagerBuilder auth)方法被定义为一个空方法(默认实现)。这意味着如果你不重写该方法,它不会执行任何操作。当你的应用程序启动时,Spring Security会加载配置类,并自动实例化继承自
WebSecurityConfigurerAdapter的配置类。然后,它会检查是否有configure(AuthenticationManagerBuilder auth)方法的重写,如果有,则会调用该方法以应用自定义的身份验证配置。如果没有重写该方法,它将保留空的默认实现,并不会被调用。因此,如果你不需要自定义身份验证配置,可以选择不重写
configure(AuthenticationManagerBuilder auth)方法,让框架使用默认的身份验证机制。 -
用来在工厂中暴露自定义AuthenticationManager 实例
@Configuration
public class WebSecurityConfigurer extends WebSecurityConfigurerAdapter {

    //1.自定义AuthenticationManager  推荐  并没有在工厂中暴露出来
    @Override
    public void configure(AuthenticationManagerBuilder builder) throws Exception {
        System.out.println("自定义AuthenticationManager: " + builder);
        builder.userDetailsService(userDetailsService());
    }

    //作用: 用来将自定义AuthenticationManager在工厂中进行暴露,可以在任何位置注入
    @Override
    @Bean
    public AuthenticationManager authenticationManagerBean() throws Exception {
        return super.authenticationManagerBean();
    }
}
自定义内存数据源
@Configuration
public class WebSecurityConfigurer extends WebSecurityConfigurerAdapter {

    @Bean
    public UserDetailsService userDetailsService(){
        InMemoryUserDetailsManager inMemoryUserDetailsManager
                = new InMemoryUserDetailsManager();
        UserDetails u1 = User.withUsername("zhangs")
                .password("{noop}111").roles("USER").build();
        inMemoryUserDetailsManager.createUser(u1);
        return inMemoryUserDetailsManager;
    }

    @Override
    protected void configure(AuthenticationManagerBuilder auth)
      throws Exception {
        auth.userDetailsService(userDetailsService());
    }
}
自定义数据库数据源
使用mysql数据库
- 设计表结构
-- 用户表
CREATE TABLE `user`
(
    `id`                    int(11) NOT NULL AUTO_INCREMENT,
    `username`              varchar(32)  DEFAULT NULL,
    `password`              varchar(255) DEFAULT NULL,
    `enabled`               tinyint(1) DEFAULT NULL,
    `accountNonExpired`     tinyint(1) DEFAULT NULL,
    `accountNonLocked`      tinyint(1) DEFAULT NULL,
    `credentialsNonExpired` tinyint(1) DEFAULT NULL,
    PRIMARY KEY (`id`)
) ENGINE=InnoDB AUTO_INCREMENT=4 DEFAULT CHARSET=utf8;
-- 角色表
CREATE TABLE `role`
(
    `id`      int(11) NOT NULL AUTO_INCREMENT,
    `name`    varchar(32) DEFAULT NULL,
    `name_zh` varchar(32) DEFAULT NULL,
    PRIMARY KEY (`id`)
) ENGINE=InnoDB AUTO_INCREMENT=4 DEFAULT CHARSET=utf8;
-- 用户角色关系表
CREATE TABLE `user_role`
(
    `id`  int(11) NOT NULL AUTO_INCREMENT,
    `uid` int(11) DEFAULT NULL,
    `rid` int(11) DEFAULT NULL,
    PRIMARY KEY (`id`),
    KEY   `uid` (`uid`),
    KEY   `rid` (`rid`)
) ENGINE=InnoDB AUTO_INCREMENT=5 DEFAULT CHARSET=utf8;
- 插入测试数据
-- 插入用户数据
BEGIN;
  INSERT INTO `user`
  VALUES (1, 'root', '{noop}123', 1, 1, 1, 1);
  INSERT INTO `user`
  VALUES (2, 'admin', '{noop}123', 1, 1, 1, 1);
  INSERT INTO `user`
  VALUES (3, 'blr', '{noop}123', 1, 1, 1, 1);
COMMIT;
-- 插入角色数据
BEGIN;
  INSERT INTO `role`
  VALUES (1, 'ROLE_product', '商品管理员');
  INSERT INTO `role`
  VALUES (2, 'ROLE_admin', '系统管理员');
  INSERT INTO `role`
  VALUES (3, 'ROLE_user', '用户管理员');
COMMIT;
-- 插入用户角色数据
BEGIN;
  INSERT INTO `user_role`
  VALUES (1, 1, 1);
  INSERT INTO `user_role`
  VALUES (2, 1, 2);
  INSERT INTO `user_role`
  VALUES (3, 2, 2);
  INSERT INTO `user_role`
  VALUES (4, 3, 3);
COMMIT;
- 项目pom文件中加入依赖
<!--mybatis plus-->
<dependency>
    <groupId>com.baomidou</groupId>
    <artifactId>mybatis-plus-boot-starter</artifactId>
    <version>3.3.1</version>
</dependency>

<!--mysql-->
<dependency>
    <groupId>mysql</groupId>
    <artifactId>mysql-connector-java</artifactId>
    <version>8.0.27</version>
</dependency>

<!--JDBC-->
<dependency>
    <groupId>mysql</groupId>
    <artifactId>mysql-connector-java</artifactId>
</dependency>

<!--druid-->
<dependency>
    <groupId>com.alibaba</groupId>
    <artifactId>druid</artifactId>
    <version>1.2.16</version>
</dependency>

<!--        lombok       -->
<dependency>
    <groupId>org.projectlombok</groupId>
    <artifactId>lombok</artifactId>
    <optional>true</optional>
</dependency>
- 配置springboot配置文件
#数据源配置
spring.datasource.type=com.alibaba.druid.pool.DruidDataSource
spring.datasource.driver-class-name=com.mysql.cj.jdbc.Driver
spring.datasource.url=jdbc:mysql://localhost:3306/security?useUnicode=true&characterEncoding=utf8&nullCatalogMeansCurrent=true&zeroDateTimeBehavior=convertToNull&useSSL=true&serverTimezone=GMT%2B8&autoReconnect=true&rewriteBatchedStatements=true
spring.datasource.username=root
spring.datasource.password=*******
#mybatis配置
mybatis.mapper-locations=classpath:mapper/*.xml
mybatis.type-aliases-package=com.feibei.springbootbase.entity.DO
- 创建entity
- 创建 user 对象
@TableName("user")
@Data
public class User implements UserDetails {

    private Integer id;
    private String username;
    private String password;
    private Boolean enabled;//账户是否激活
    private Boolean accountNonExpired;//账户是否过期
    private Boolean accountNonLocked; //账户是否被锁定
    private Boolean credentialsNonExpired;//密码是否过期
    private List<Role> roles = new ArrayList<>();//关系属性 用来存储当前用户所有角色信息

    @Override
    public Collection<? extends GrantedAuthority> getAuthorities() {
        Set<SimpleGrantedAuthority> authorities = new HashSet<>();
        roles.forEach(role -> {
            SimpleGrantedAuthority simpleGrantedAuthority = new SimpleGrantedAuthority(role.getName());
            authorities.add(simpleGrantedAuthority);
        });
        return authorities;
    }

    @Override
    public String getPassword() {
        return password;
    }

    @Override
    public String getUsername() {
        return username;
    }

    @Override
    public boolean isAccountNonExpired() {
        return accountNonExpired;
    }

    @Override
    public boolean isAccountNonLocked() {
        return accountNonLocked;
    }

    @Override
    public boolean isCredentialsNonExpired() {
        return credentialsNonExpired;
    }

    @Override
    public boolean isEnabled() {
        return enabled;
    }
}
- 创建role对象
@Data
@TableName("role")
public class Role {
    @TableId
    private Integer id;
    private String name;
    private String nameZh;
}
- 创建UserDao接口
@Mapper
public interface UserDao {
    //根据用户名返回用户
    User loadUserByUsername(String username);

    //根据用户id查询角色信息
    List<Role> getRolesByUid(Integer uid);
}
- 创建 UserMapper 实现
<?xml version="1.0" encoding="utf-8" ?>
<!DOCTYPE mapper PUBLIC "-//mybatis.org//DTD Mapper 3.0//EN" "http://mybatis.org/dtd/mybatis-3-mapper.dtd" >
<mapper namespace="com.feibei.springbootbase.dao.UserDao">


    <select id="loadUserByUsername" resultType="com.feibei.springbootbase.entity.DO.User">
        select id,
               username,
               password,
               enabled,
               accountNonExpired,
               accountNonLocked,
               credentialsNonExpired
        from user
        where username = #{username}

    </select>
    <select id="getRolesByUid" resultType="com.feibei.springbootbase.entity.DO.Role">
        select r.id,
               r.name,
               r.name_zh nameZh
        from role r,
             user_role ur
        where r.id = ur.rid
          and ur.uid = #{uid}
    </select>
</mapper>
- 创建 UserDetailService 实现
@Component
@Service
public class SecurityUserDetailService implements UserDetailsService {

    @Autowired
    private UserDao userDao;

    @Override
    public UserDetails loadUserByUsername(String username) throws UsernameNotFoundException {
        //1 查询用户
        User user = userDao.loadUserByUsername(username);
        if (ObjectUtils.isEmpty(user)) throw new UsernameNotFoundException("用户名不正确");
        //2 查询权限信息
        List<Role> roles = userDao.getRolesByUid(user.getId());
        user.setRoles(roles);

        return user;
    }
}
- 配置 AuthenticationManager 使用自定义 SecurityUserDetailService
@Configuration
public class WebSecurityConfigurer extends WebSecurityConfigurerAdapter {

    @Autowired
    private SecurityUserDetailService securityUserDetailService;

    //自定义AuthenticationManager  推荐  并没有在工厂中暴露出来
    @Override
    public void configure(AuthenticationManagerBuilder builder) throws Exception {
        System.out.println("自定义AuthenticationManager: " + builder);
        builder.userDetailsService(securityUserDetailService);
    }

      	@Override
    protected void configure(HttpSecurity http) throws Exception {
      //web security..
    }
}
- 测试效果
- root登录
- admin登录
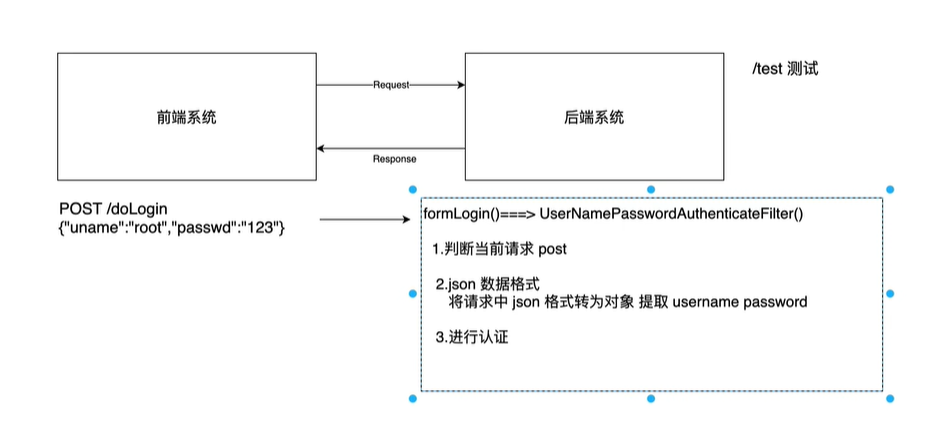
登录请求处理(前后端分离)
基本架构图
添加验证码认证
第四章 密码加密
- 随机盐
在密码加密中,随机盐(random salt)是一个随机生成的字符串或数字,用于增加密码的安全性。它在密码加密过程中与密码结合使用,增加了密码的复杂度和唯一性。
盐的作用是在密码加密过程中为每个用户生成唯一的密码哈希值。密码哈希是密码经过一种不可逆的数学函数处理后的结果,通常用于存储和验证用户密码,而不是以明文形式存储密码本身。使用随机盐可以防止两个用户使用相同的密码时产生相同的哈希值,从而避免常见的密码攻击,如彩虹表攻击。
随机盐会与用户的密码结合起来,然后通过一个密码哈希函数(如SHA-256或bcrypt)生成最终的密码哈希值。在验证密码时,系统会使用相同的盐值和哈希函数来重新计算输入密码的哈希值,并与存储的哈希值进行比较。
通过使用随机盐,即使两个用户使用相同的密码,最终存储的哈希值也会因为盐的不同而产生不同的结果。这样即使黑客获得了存储的密码哈希值,他们也无法通过简单的比对来确定用户的密码,因为他们不知道使用的盐值是什么。
综上所述,随机盐是在密码加密过程中生成的一个随机值,用于增加密码的唯一性和安全性,防止常见的密码攻击。
常见加密算法
Hash 算法
最早我们使用类似 SHA-256 、SHA-512 、MD5等这样的单向 Hash 算法。用户注册成功后,保存在数据库中不再是用户的明文密码,而是经过 SHA-256 加密计算的一个字行串,当用户进行登录时,用户输入的明文密码用 SHA-256 进行加密,加密完成之后,再和存储在数据库中的密码进行比对,进而确定用户登录信息是否有效。如果系统遭遇攻击,最多也只是存储在数据库中的密文被泄漏。
这样就绝对安全了吗?由于彩虹表这种攻击方式的存在以及随着计算机硬件的发展,每秒执行数十亿次 HASH计算己经变得轻轻松松,这意味着即使给密码加密加盐也不再安全。
参考: [彩虹表
单向自适应函数
在Spring Security 中,我们现在是用一种自适应单向函数 (Adaptive One-way Functions)来处理密码问题,这种自适应单向函数在进行密码匹配时,会有意占用大量系统资源(例如CPU、内存等),这样可以增加恶意用户攻击系统的难度。在Spring Securiy 中,开发者可以通过 bcrypt、PBKDF2、sCrypt 以及 argon2 来体验这种自适应单向函数加密。由于自适应单向函数有意占用大量系统资源,因此每个登录认证请求都会大大降低应用程序的性能,但是 Spring Secuity 不会采取任何措施来提高密码验证速度,因为它正是通过这种方式来增强系统的安全性。
参考 1: https://byronhe.gitbooks.io/libsodium/content/password_hashing/
参考 2: https://github.com/xitu/gold-miner/blob/master/TODO1/password-hashing-pbkdf2-scrypt-bcrypt-and-argon2.md
-
BCryptPasswordEncoder
BCryptPasswordEncoder 使用 bcrypt 算法对密码进行加密,为了提高密码的安全性,bcrypt算法故意降低运行速度,以增强密码破解的难度。同时 BCryptP asswordEncoder “为自己带盐”开发者不需要额外维护一个“盐” 字段,使用 BCryptPasswordEncoder 加密后的字符串就已经“带盐”了,即使相同的明文每次生成的加密字符串都不相同。
-
Argon2PasswordEncoder
Argon2PasswordEncoder 使用 Argon2 算法对密码进行加密,Argon2 曾在 Password Hashing Competition 竞赛中获胜。为了解决在定制硬件上密码容易被破解的问题,Argon2也是故意降低运算速度,同时需要大量内存,以确保系统的安全性。
-
Pbkdf2PasswordEncoder
Pbkdf2PasswordEncoder 使用 PBKDF2 算法对密码进行加密,和前面几种类似,PBKDF2
算法也是一种故意降低运算速度的算法,当需要 FIPS (Federal Information Processing Standard,美国联邦信息处理标准)认证时,PBKDF2 算法是一个很好的选择。
-
SCryptPasswordEncoder
SCryptPasswordEncoder 使用scrypt 算法对密码进行加密,和前面的几种类似,serypt 也是一种故意降低运算速度的算法,而且需要大量内存。
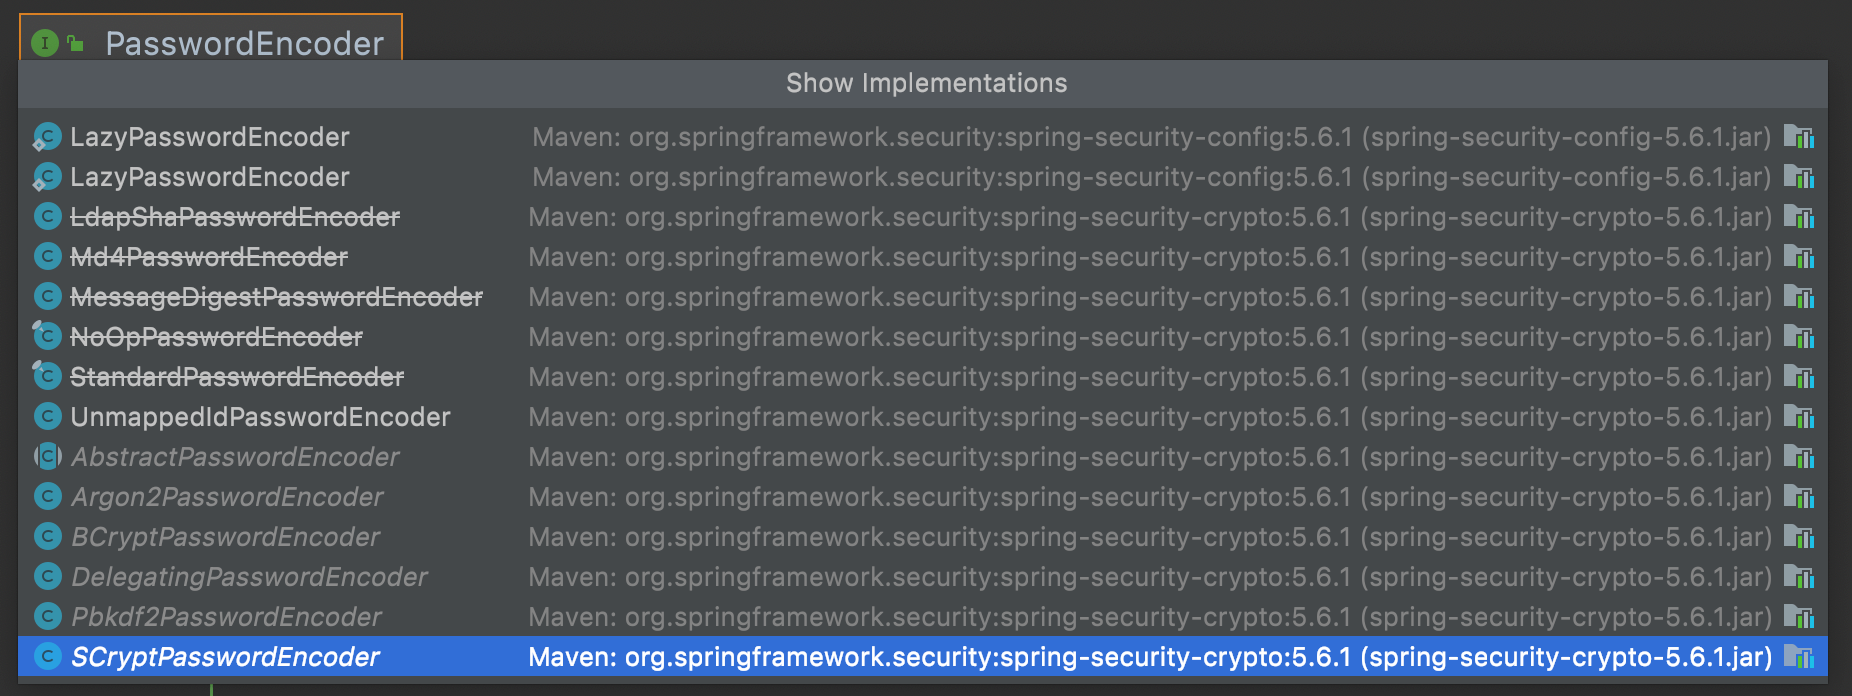
PasswordEncoder
通过对认证流程源码分析得知,实际密码比较是由PasswordEncoder完成的,因此只需要使用PasswordEncoder 不同实现就可以实现不同方式加密。
public interface PasswordEncoder {
	String encode(CharSequence rawPassword);
	boolean matches(CharSequence rawPassword, String encodedPassword);
	default boolean upgradeEncoding(String encodedPassword) {
		return false;
	}
}
- encode 用来进行明文加密的
- matches 用来比较密码的方法
- upgradeEncoding 用来给密码进行升级的方法
默认提供加密算法如下:
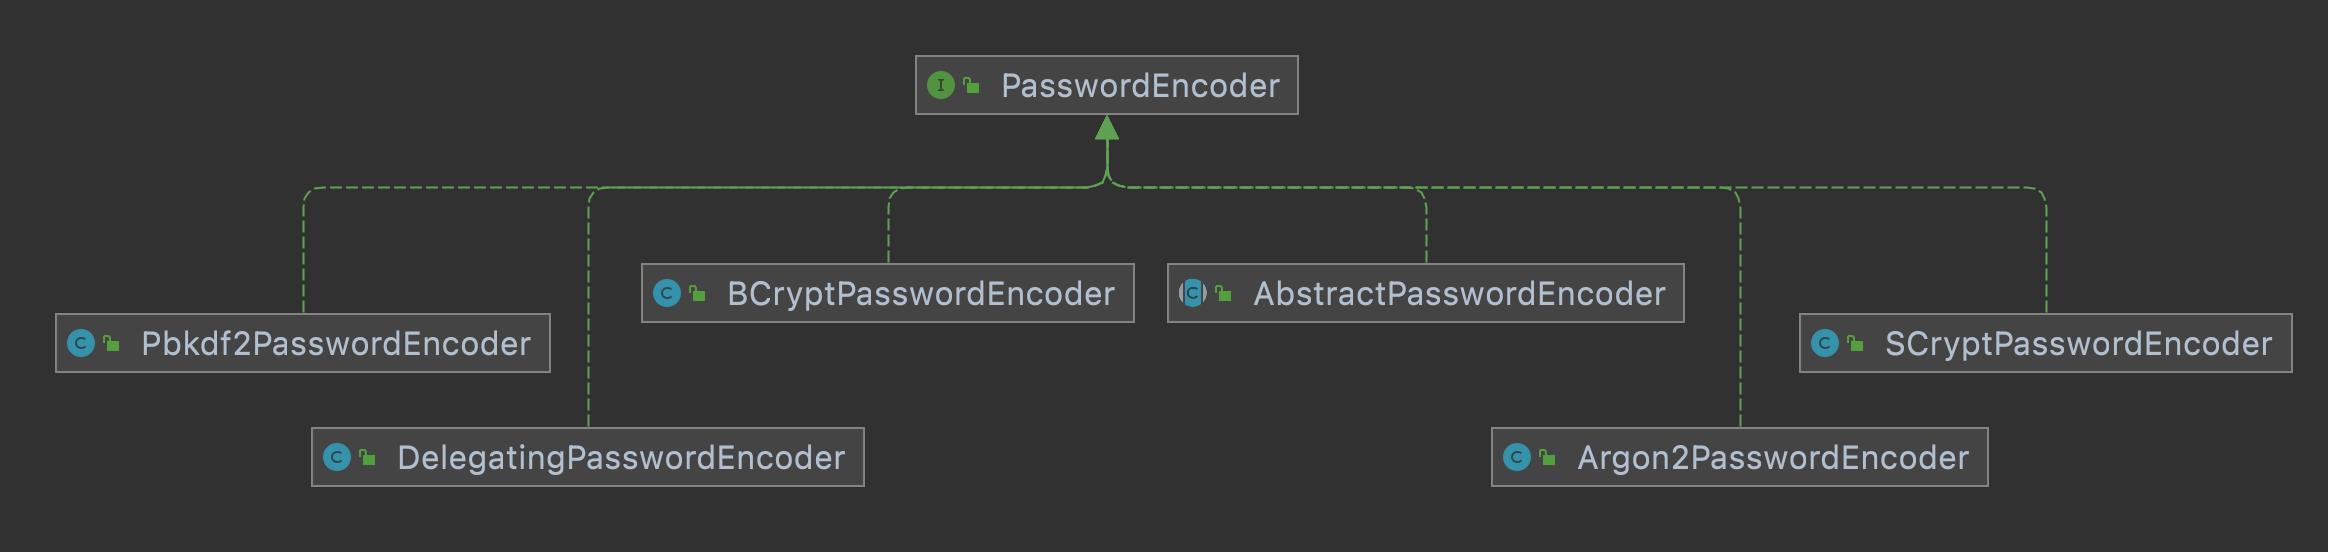
DelegatingPasswordEncoder
根据上面 PasswordEncoder的介绍,可能会以为 Spring security 中默认的密码加密方案应该是四种自适应单向加密函数中的一种,其实不然,在 spring Security 5.0之后,默认的密码加密方案其实是 DelegatingPasswordEncoder。从名字上来看,DelegatingPaswordEncoder 是一个代理类,而并非一种全新的密码加密方案,DeleggtinePasswordEncoder 主要用来代理上面介绍的不同的密码加密方案。为什么采DelegatingPasswordEncoder 而不是某一个具体加密方式作为默认的密码加密方案呢?主要考虑了如下两方面的因素:
-
兼容性:使用 DelegatingPasswrordEncoder 可以帮助许多使用旧密码加密方式的系统顺利迁移到 Spring security 中,它允许在同一个系统中同时存在多种不同的密码加密方案。
-
便捷性:密码存储的最佳方案不可能一直不变,如果使用 DelegatingPasswordEncoder作为默认的密码加密方案,当需要修改加密方案时,只需要修改很小一部分代码就可以实现。
如何使用 PasswordEncoder
在工厂中指定了PasswordEncoder(其实就是注册一个PasswordEncoder的Bean在工厂中),就会使用指定PasswordEncoder,否则就会使用默认DelegatingPasswordEncoder。DelegatingPasswordEncoder 会根据我们数据库中取出的密码的前缀来使用对应的 PasswordEncoder,如果我们的密码没有前缀指定加密方式,则会默认调用其配置中的第一个密码编码器进行加密和验证,默认的第一个密码编码器就是 BCryptPasswordEncoder。
- 使用固定密码加密(自定义注册一个 xxxPasswordEncoder 在容器中就可以)
- 这种方式的缺点就是所有的密码都是用着一种方式加密(扩展性,灵活性差)
@Configuration
public class SecurityConfig extends WebSecurityConfigurerAdapter {
     @Bean
     public PasswordEncoder BcryptPasswordEncoder() {
         return new BCryptPasswordEncoder();
     }
}
- 使用灵活密码加密方案 推荐
- 就是在我们的密码中存储加密方式的前缀字段 (例:
{Bcrypt}),这样就会自动根据前缀使用对应的加密编码器
- 就是在我们的密码中存储加密方式的前缀字段 (例:
@Configuration
public class SecurityConfig extends WebSecurityConfigurerAdapter {
  	 @Bean
    public UserDetailsService userDetailsService() {
        InMemoryUserDetailsManager inMemoryUserDetailsManager = new InMemoryUserDetailsManager();
        inMemoryUserDetailsManager.createUser(User.withUsername("root").password("{bcrypt}$2a$10$WGFkRsZC0kzafTKOPcWONeLvNvg2jqd3U09qd5gjJGSHE5b0yoy6a").roles("xxx").build());
        return inMemoryUserDetailsManager;
    }
}
SpringSevurity默认使用的PasswordEncoder是哪个
在Spring Security中,默认使用的密码编码器是
BCryptPasswordEncoder。BCryptPasswordEncoder是Spring Security提供的一种强大的密码加密器,它使用了BCrypt哈希算法来对密码进行加密和验证。BCrypt是一种基于Blowfish密码算法的哈希函数,它采用了适应性哈希算法(adaptive hashing algorithm),可以根据需要调整计算强度。这意味着它可以通过增加计算成本来抵抗密码破解的攻击,以适应计算能力的提高。
当使用
BCryptPasswordEncoder进行密码加密时,它会自动为每个密码生成一个随机盐,并将盐和密码一起进行哈希运算得到最终的密码哈希值。在验证密码时,BCryptPasswordEncoder会从存储的哈希值中提取盐值,并将输入的密码与盐值一起进行哈希运算,然后将结果与存储的哈希值进行比对。下面是一个使用
BCryptPasswordEncoder进行密码加密和验证的示例:import org.springframework.security.crypto.bcrypt.BCryptPasswordEncoder; String password = "myPassword"; // 创建密码编码器 BCryptPasswordEncoder encoder = new BCryptPasswordEncoder(); // 加密密码 String hashedPassword = encoder.encode(password); // 打印加密后的密码哈希值 System.out.println("Hashed Password: " + hashedPassword); // 验证密码 boolean isPasswordMatch = encoder.matches(password, hashedPassword); System.out.println("Password Match: " + isPasswordMatch);以上示例中,
encoder.encode(password)将会返回一个包含哈希密码的字符串,encoder.matches(password, hashedPassword)用于验证密码是否匹配,返回一个布尔值表示密码是否正确。值得注意的是,
BCryptPasswordEncoder还支持通过调用encoder.encode(password, salt)方法来使用自定义的盐值进行密码加密。默认情况下,如果没有指定盐值,BCryptPasswordEncoder会使用一个随机生成的盐值。这个passwordencoder是通过DelegatingPasswordEncoder调用的吗
是的,Spring Security在较新的版本中使用了
DelegatingPasswordEncoder作为默认的PasswordEncoder。DelegatingPasswordEncoder是一个密码编码器的委派器,它可以根据提供的密码前缀来选择相应的密码编码器进行密码的加密和验证。在
DelegatingPasswordEncoder中,可以配置多个密码编码器,并为每个密码编码器指定一个唯一的密码前缀。当对密码进行加密时,DelegatingPasswordEncoder会根据密码前缀选择对应的密码编码器进行处理。对于
BCryptPasswordEncoder而言,它的密码前缀是"{bcrypt}"。因此,当使用DelegatingPasswordEncoder时,如果密码的前缀为"{bcrypt}",则会委派给BCryptPasswordEncoder进行加密和验证。以下是一个使用
DelegatingPasswordEncoder的示例:import org.springframework.security.crypto.factory.PasswordEncoderFactories; import org.springframework.security.crypto.password.PasswordEncoder; String password = "myPassword"; // 创建密码编码器 PasswordEncoder encoder = PasswordEncoderFactories.createDelegatingPasswordEncoder(); // 加密密码 String hashedPassword = encoder.encode(password); // 打印加密后的密码哈希值 System.out.println("Hashed Password: " + hashedPassword); // 验证密码 boolean isPasswordMatch = encoder.matches(password, hashedPassword); System.out.println("Password Match: " + isPasswordMatch);在上述示例中,
PasswordEncoderFactories.createDelegatingPasswordEncoder()会创建一个DelegatingPasswordEncoder实例作为密码编码器。然后,根据密码的前缀选择相应的密码编码器进行加密和验证。需要注意的是,
DelegatingPasswordEncoder还支持其他密码编码器,例如NoOpPasswordEncoder、StandardPasswordEncoder、Pbkdf2PasswordEncoder等,它们都具有不同的密码前缀和哈希算法。根据具体的需求,可以选择合适的密码编码器并配置到DelegatingPasswordEncoder中。如果密码中没有前缀。会调用哪个PasswordEncoder
如果密码中没有前缀,
DelegatingPasswordEncoder会默认使用其配置中的第一个密码编码器进行加密和验证。这意味着,在没有指定密码前缀的情况下,将使用配置的第一个密码编码器来处理密码。以下是一个使用
DelegatingPasswordEncoder配置多个密码编码器的示例:import org.springframework.security.crypto.factory.PasswordEncoderFactories; import org.springframework.security.crypto.password.PasswordEncoder; String password = "myPassword"; // 创建密码编码器 PasswordEncoder encoder = PasswordEncoderFactories.createDelegatingPasswordEncoder(); // 配置密码编码器 encoder.setDefaultPasswordEncoderForMatches(new BCryptPasswordEncoder()); // 默认使用 BCryptPasswordEncoder encoder.addPasswordEncoder(new MyCustomPasswordEncoder(), "custom"); // 添加自定义密码编码器 // 加密密码 String hashedPassword = encoder.encode(password); // 打印加密后的密码哈希值 System.out.println("Hashed Password: " + hashedPassword); // 验证密码 boolean isPasswordMatch = encoder.matches(password, hashedPassword); System.out.println("Password Match: " + isPasswordMatch);在上述示例中,
encoder.setDefaultPasswordEncoderForMatches(new BCryptPasswordEncoder())配置了默认的密码编码器为BCryptPasswordEncoder。如果密码中没有前缀,将使用BCryptPasswordEncoder进行加密和验证。另外,通过调用
encoder.addPasswordEncoder(new MyCustomPasswordEncoder(), "custom")可以添加自定义的密码编码器,并指定一个自定义的密码前缀,例如"custom"。这样,如果密码中包含前缀"{custom}",将会使用自定义密码编码器进行加密和验证。总结起来,如果密码中没有前缀,
DelegatingPasswordEncoder会使用默认配置的第一个密码编码器进行加密和验证,而具体是哪个密码编码器取决于配置顺序。
密码自动升级
推荐使用DelegatingPasswordEncoder 的另外一个好处就是自动进行密码加密方案的升级,这个功能在整合一些老的系统时非常有用。
只需要继承 UserDetailsPasswordService 接口,重写其中的唯一方法 updatePassword 方法即可
@Service
public class MyUserDetailService implements UserDetailsService,UserDetailsPasswordService {
    private final UserDao userDao;

    @Autowired
    public MyUserDetailService(UserDao userDao) {
        this.userDao = userDao;
    }

    @Override
    public UserDetails loadUserByUsername(String username) throws UsernameNotFoundException {
        User user = userDao.loadUserByUsername(username);
        if (ObjectUtils.isEmpty(user)) {
            throw new RuntimeException("用户不存在!");
        }
        user.setRoles(userDao.getRolesByUid(user.getId()));
        return user;
    }

    /*
    **这个 newPassword 就是 Spring Security 调用默认的加密算法后的password,并且会自动添加前缀
    */
  	 @Override
    public UserDetails updatePassword(UserDetails user, String newPassword) {
        Integer result = userDao.updatePassword(user.getUsername(), newPassword);
        if (result == 1) {
            ((User) user).setPassword(newPassword);
        }
        return user;
    }
}
第五章 RememberMe
记住我功能,一定会有安全问题(无法避免)
简介
RememberMe 这个功能非常常见,下图就是QQ 邮箱登录时的“记住我” 选项。
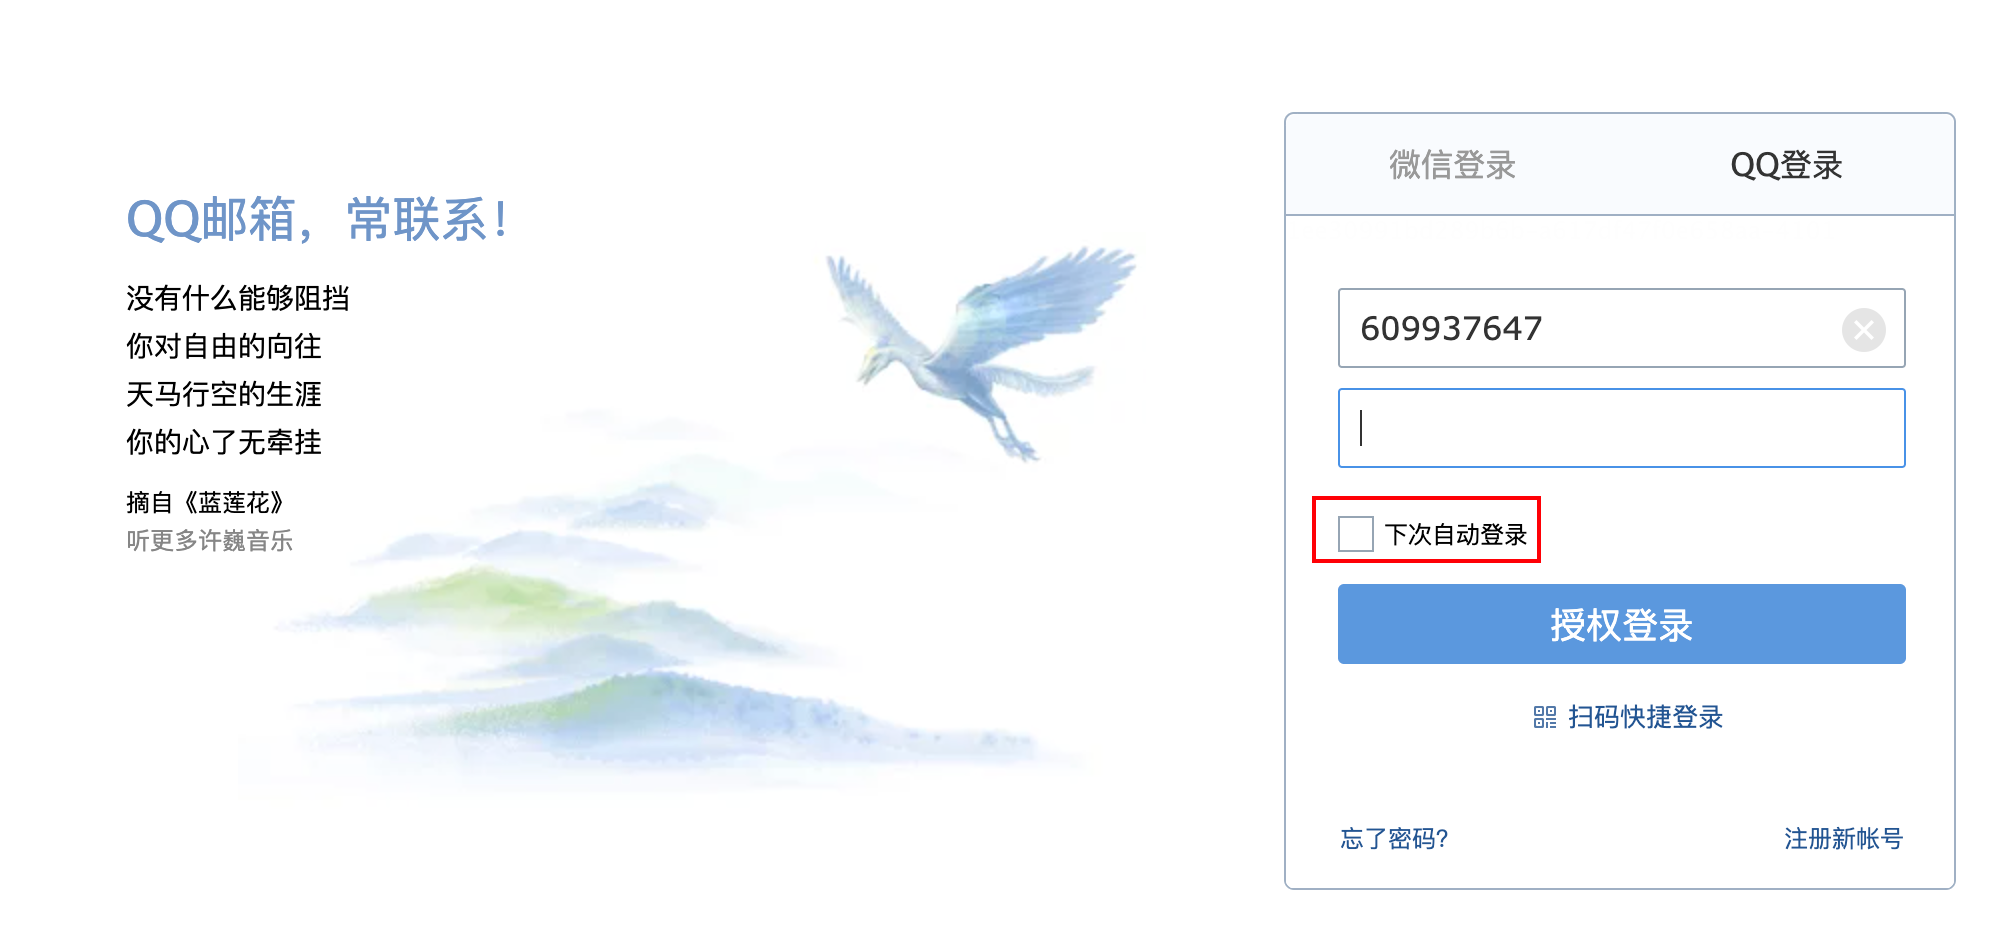
具体的实现思路就是通过 Cookie 来记录当前用户身份。当用户登录成功之后,会通过一定算法,将用户信息、时间戳等进行加密,加密完成后,通过响应头带回前端存储在cookie中,当浏览器会话过期之后,如果再次访问该网站,会自动将 Cookie 中的信息发送给服务器,服务器对 Cookie中的信息进行校验分析,进而确定出用户的身份,Cookie中所保存的用户信息也是有时效的,例如三天、一周等。
基本使用
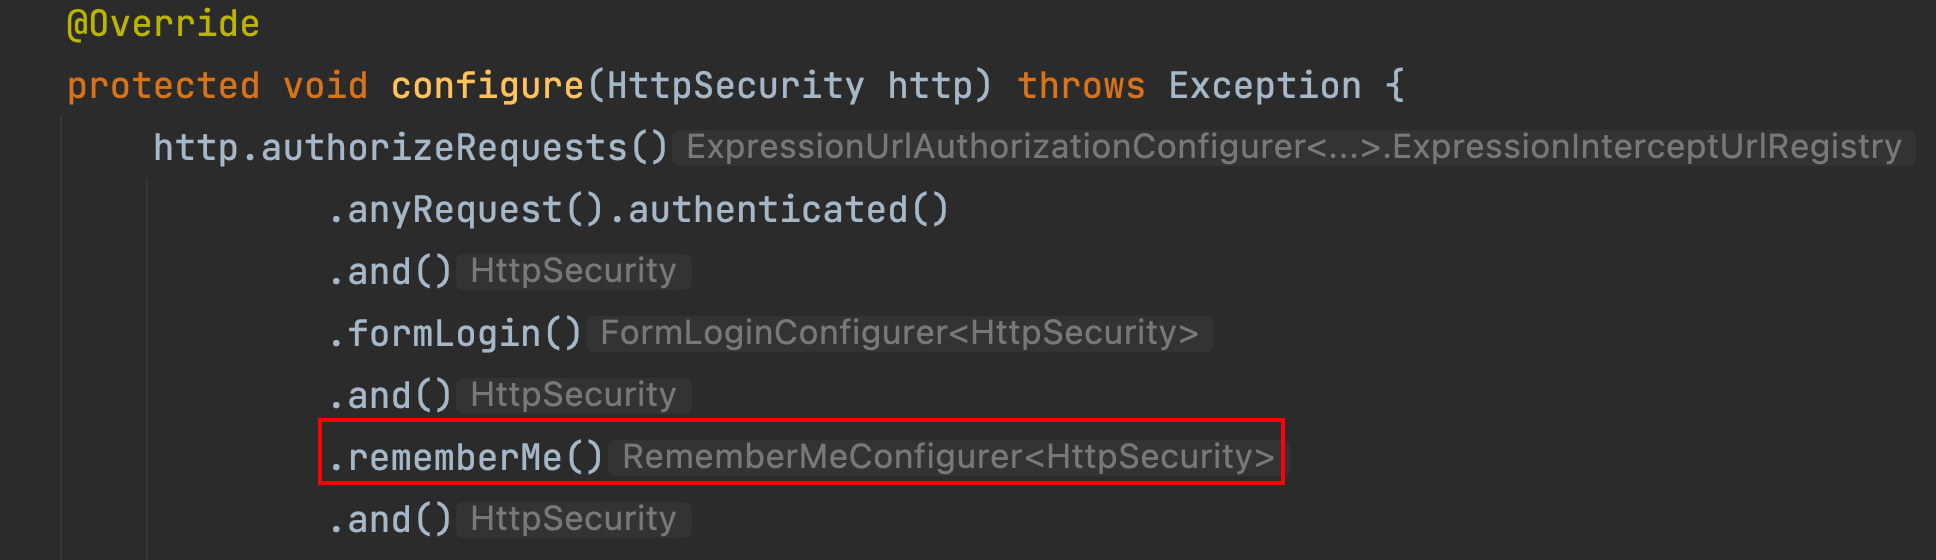
@Configuration
public class SecurityConfig extends WebSecurityConfigurerAdapter {
    @Override
    protected void configure(HttpSecurity http) throws Exception {
        http.authorizeRequests()
                .mvcMatchers("/login.html").permitAll()
                .anyRequest().authenticated()
                .and()
                .formLogin()
                .and()
                .rememberMe() //开启记住我功能
                .and()
                .csrf().disable();
    }
}
原理分析
流程图
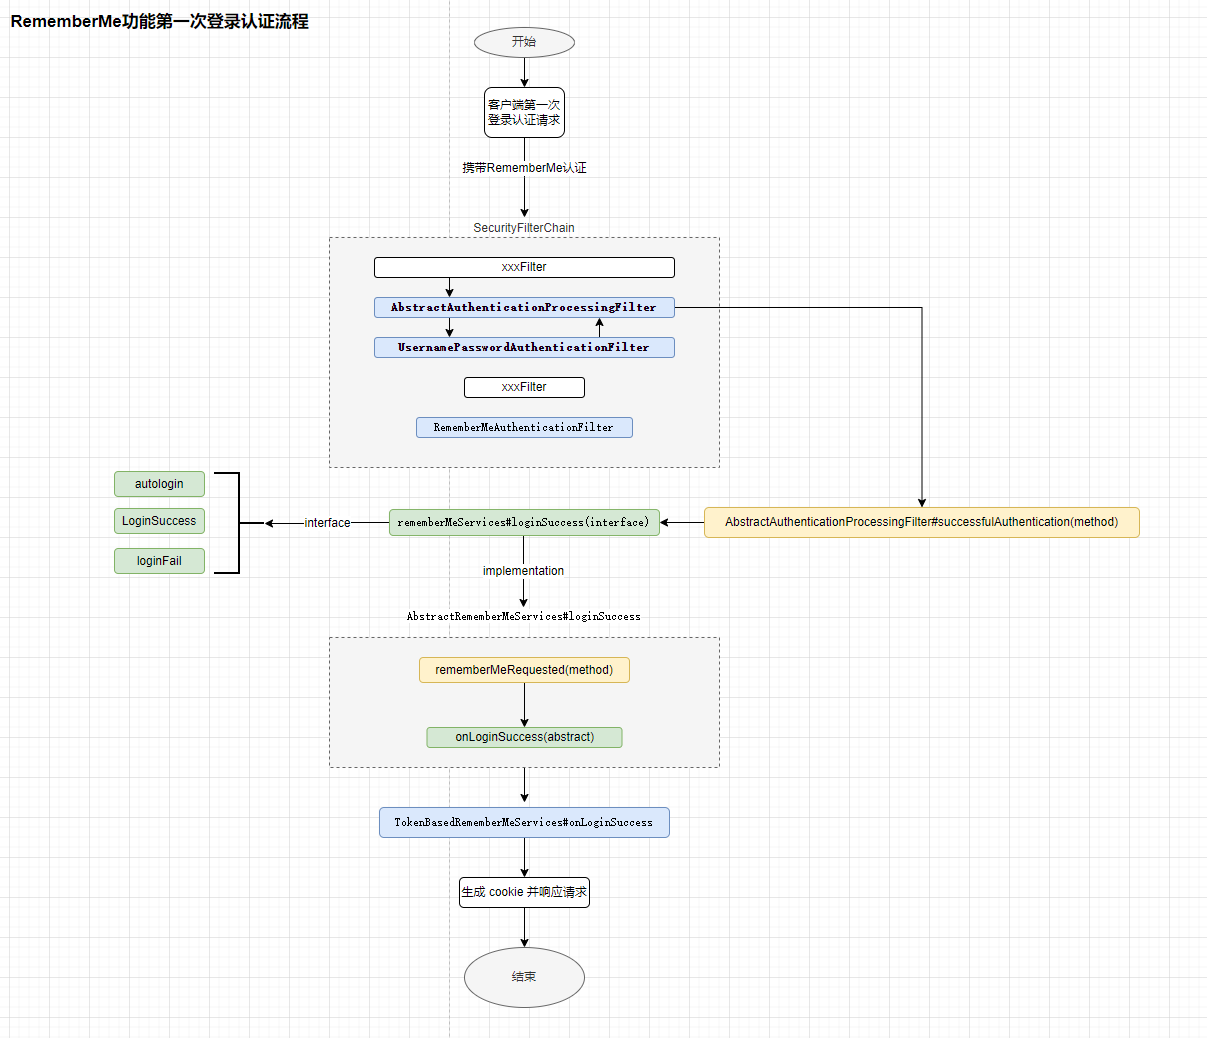
- 客户端第一次登录认证流程图
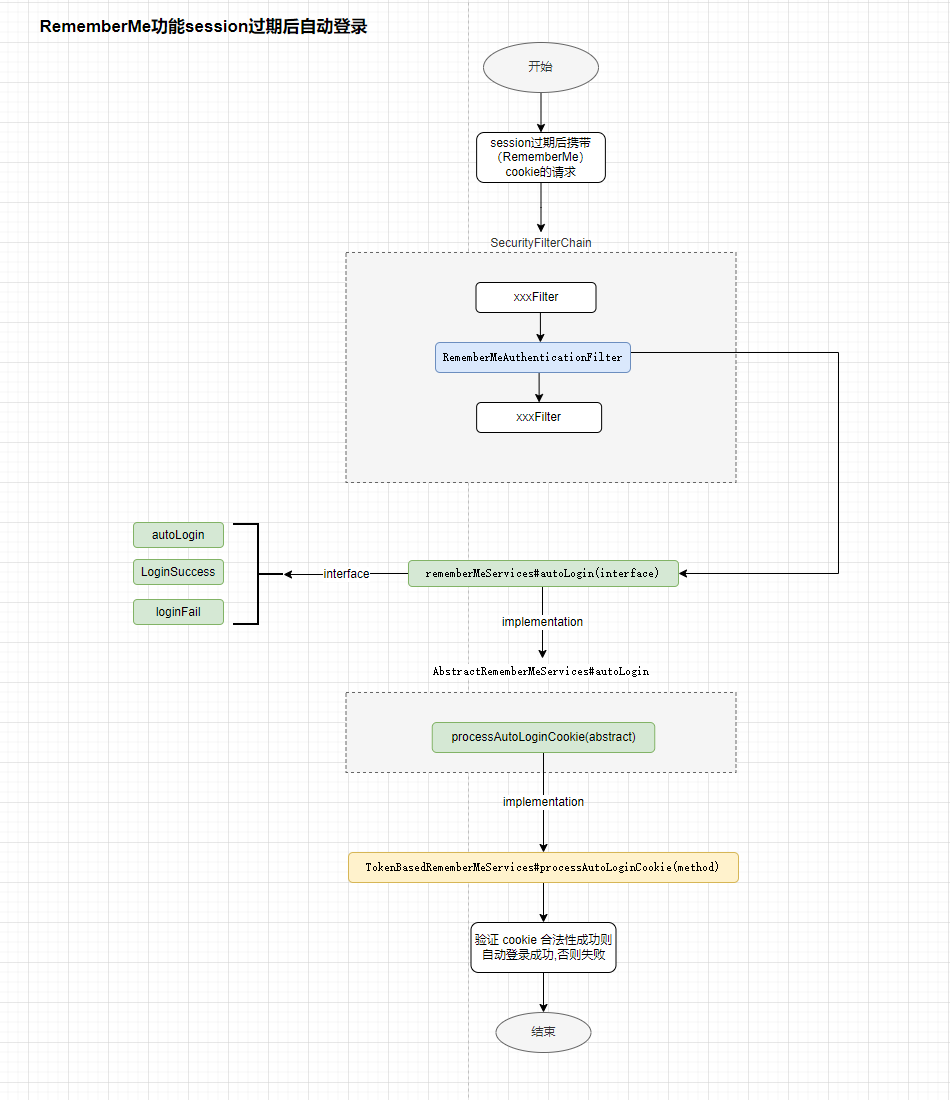
- session过期后的请求(携带)
主要涉及类介绍
RememberMeAuthenticationFilter
实际上这个Filter在session过期后进行自动登录时才会使用
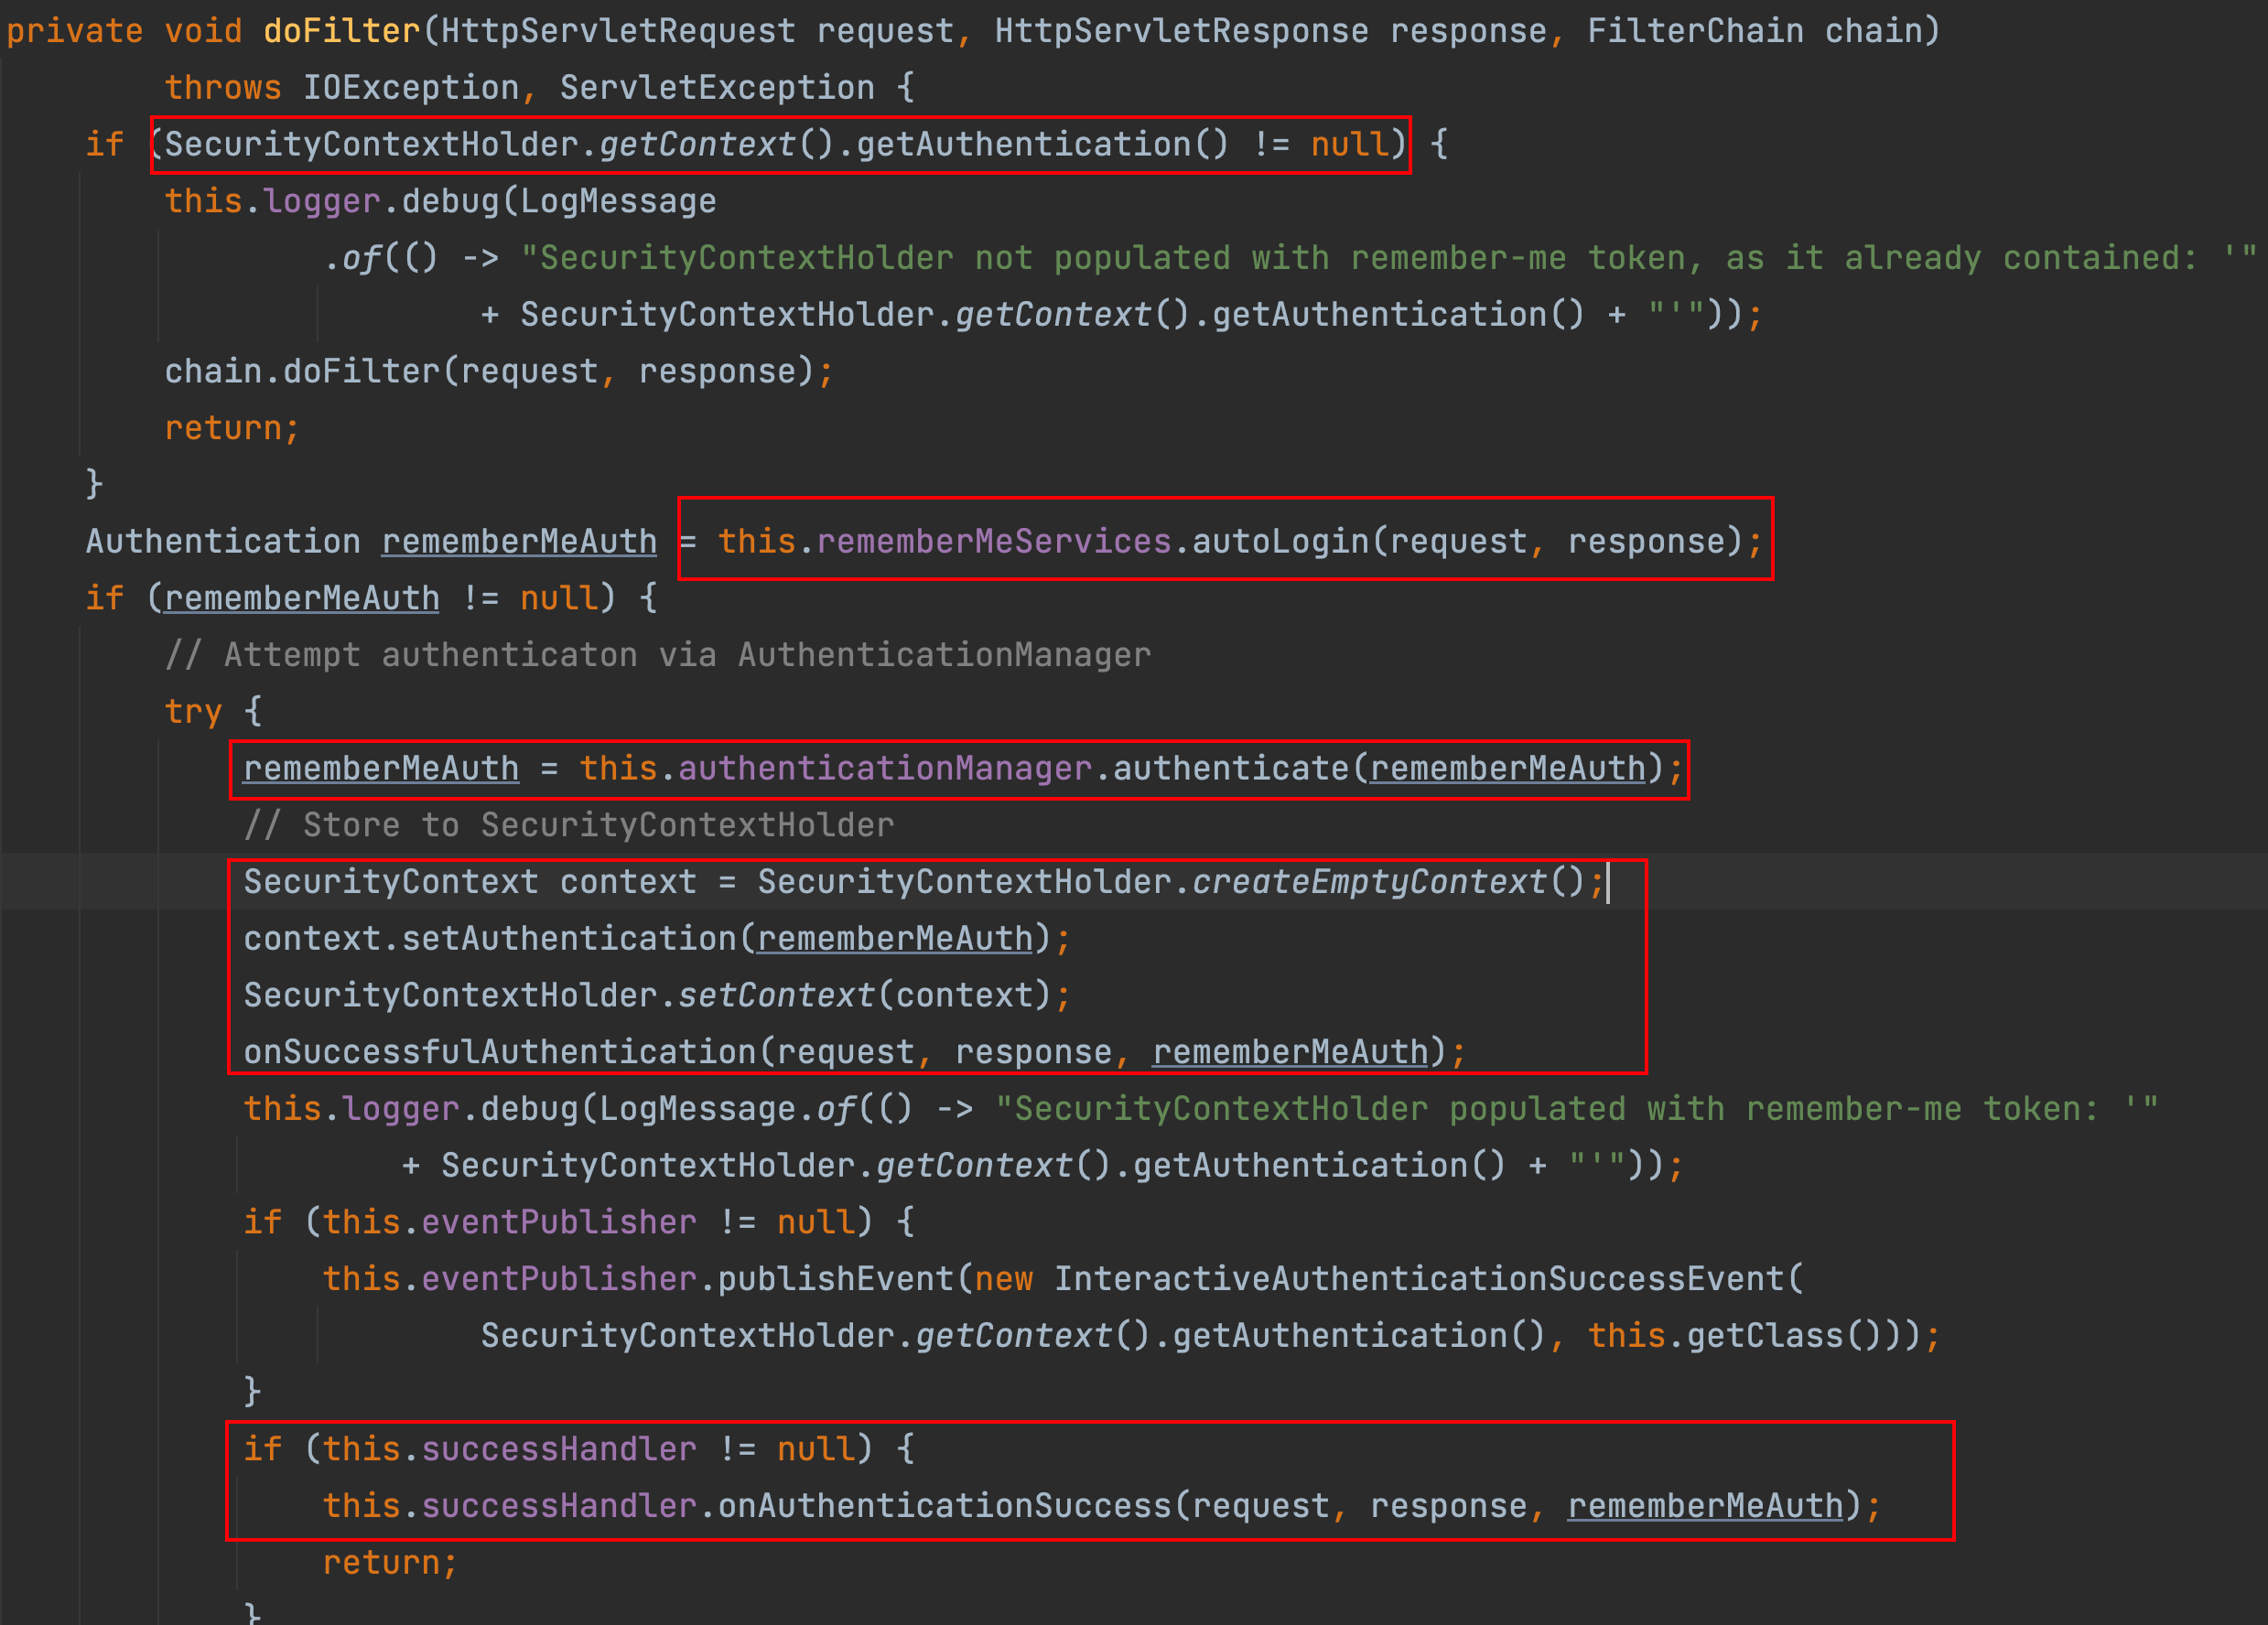
session 过期后的请求会被 RememberMeAuthenticationFilter进行拦截然后自动登录具体参见源码:
-
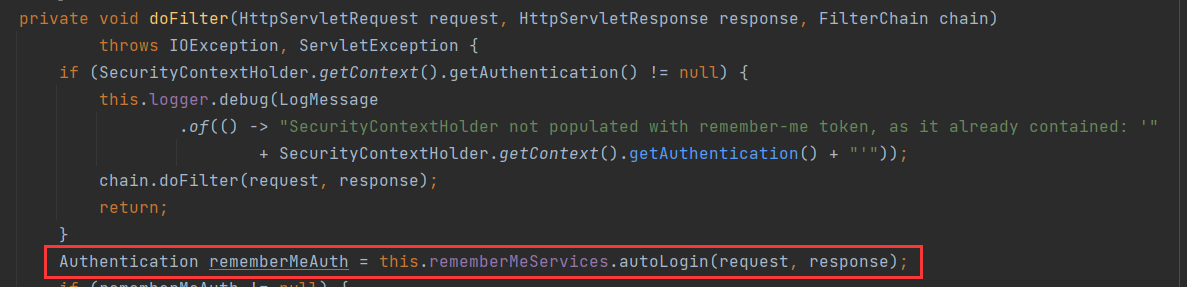
请求到达过滤器之后,首先判断 SecurityContextHolder 中是否有值,没值的话表示用户尚未登录,此时调用 autoLogin 方法进行自动登录。
-
当自动登录成功后返回的rememberMeAuth 不为null 时,表示自动登录成功,此时调用 authenticate 方法对 key 进行校验,并且将登录成功的用户信息保存到 SecurityContextHolder 对象中,然后调用登录成功回调,并发布登录成功事件。需要注意的是,登录成功的回调并不包含 RememberMeServices 中的 loginSuccess 方法。
-
如果自动登录失败,则调用 remenberMeServices.loginFail方法处理登录失败回调。onUnsuccessfulAuthentication 和 onSuccessfulAuthentication 都是该过滤器中定义的空方法,并没有任何实现这就是 RememberMeAuthenticationFilter 过滤器所做的事情,成功将 RememberMeServices的服务集成进来。
RememberMeServices
这里一共定义了三个方法:
- autoLogin 方法可以从请求中提取出需要的参数,完成自动登录功能。
- loginFail 方法是自动登录失败的回调。
- 1oginSuccess 方法是自动登录成功的回调。
TokenBasedRememberMeServices
在开启记住我后如果没有加入额外配置默认实现就是由TokenBasedRememberMeServices进行的实现。查看这个类源码中 processAutoLoginCookie 方法实现:
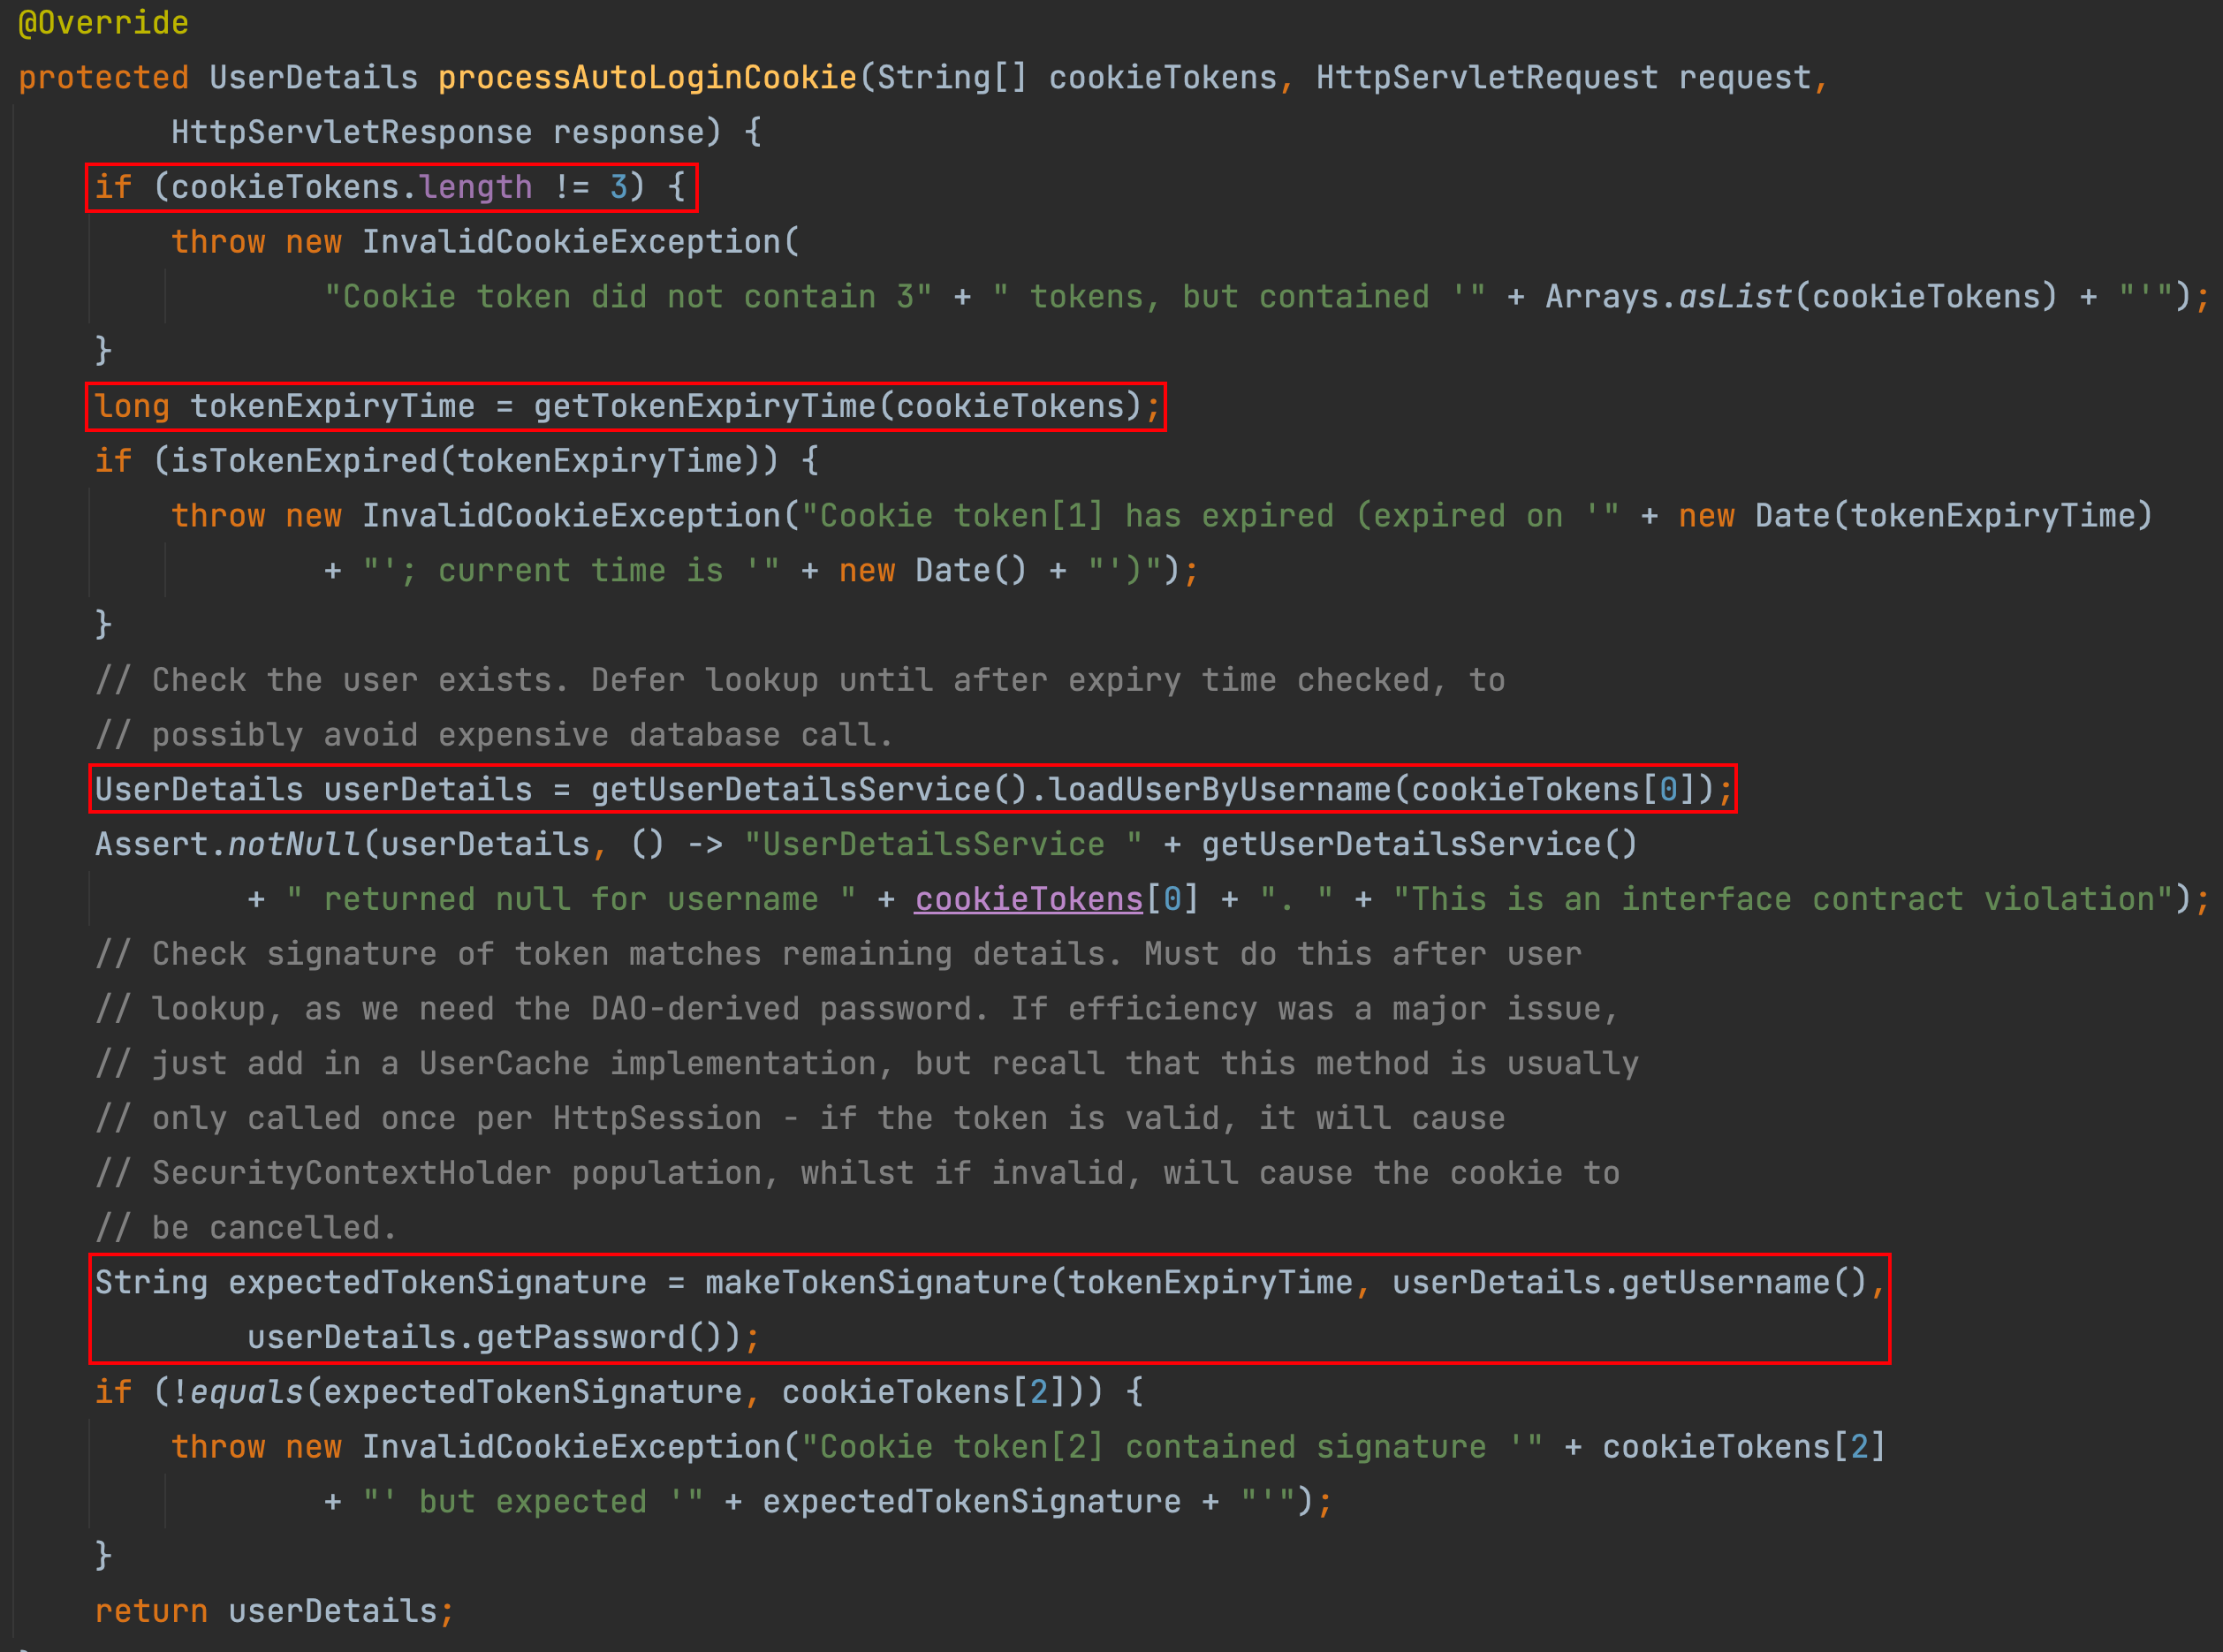
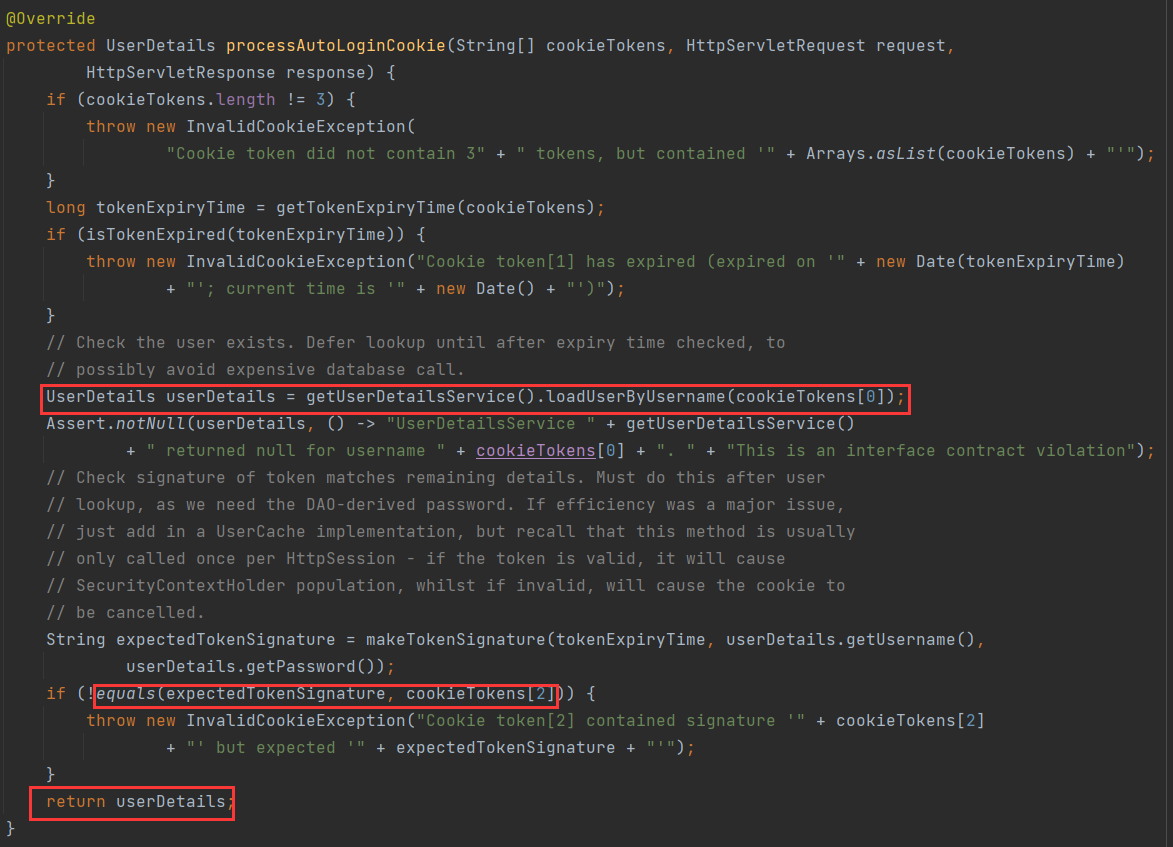
processAutoLoginCookie 方法主要用来验证 Cookie 中的令牌信息是否合法:
-
首先判断 cookieTokens 长度是否为了,不为了说明格式不对,则直接抛出异常。
-
从cookieTokens 数组中提取出第 1项,也就是过期时间,判断令牌是否过期,如果己经过期,则拋出异常。
-
根据用户名 (cookieTokens 数组的第。项)查询出当前用户对象。
-
调用 makeTokenSignature 方法生成一个签名,签名的生成过程如下:首先将用户名、令牌过期时间、用户密码以及 key 组成一个宇符串,中间用“:”隔开,然后通过 MD5 消息摘要算法对该宇符串进行加密,并将加密结果转为一个字符串返回。
-
判断第4 步生成的签名和通过 Cookie 传来的签名是否相等(即 cookieTokens 数组
的第2项),如果相等,表示令牌合法,则直接返回用户对象,否则拋出异常。
-
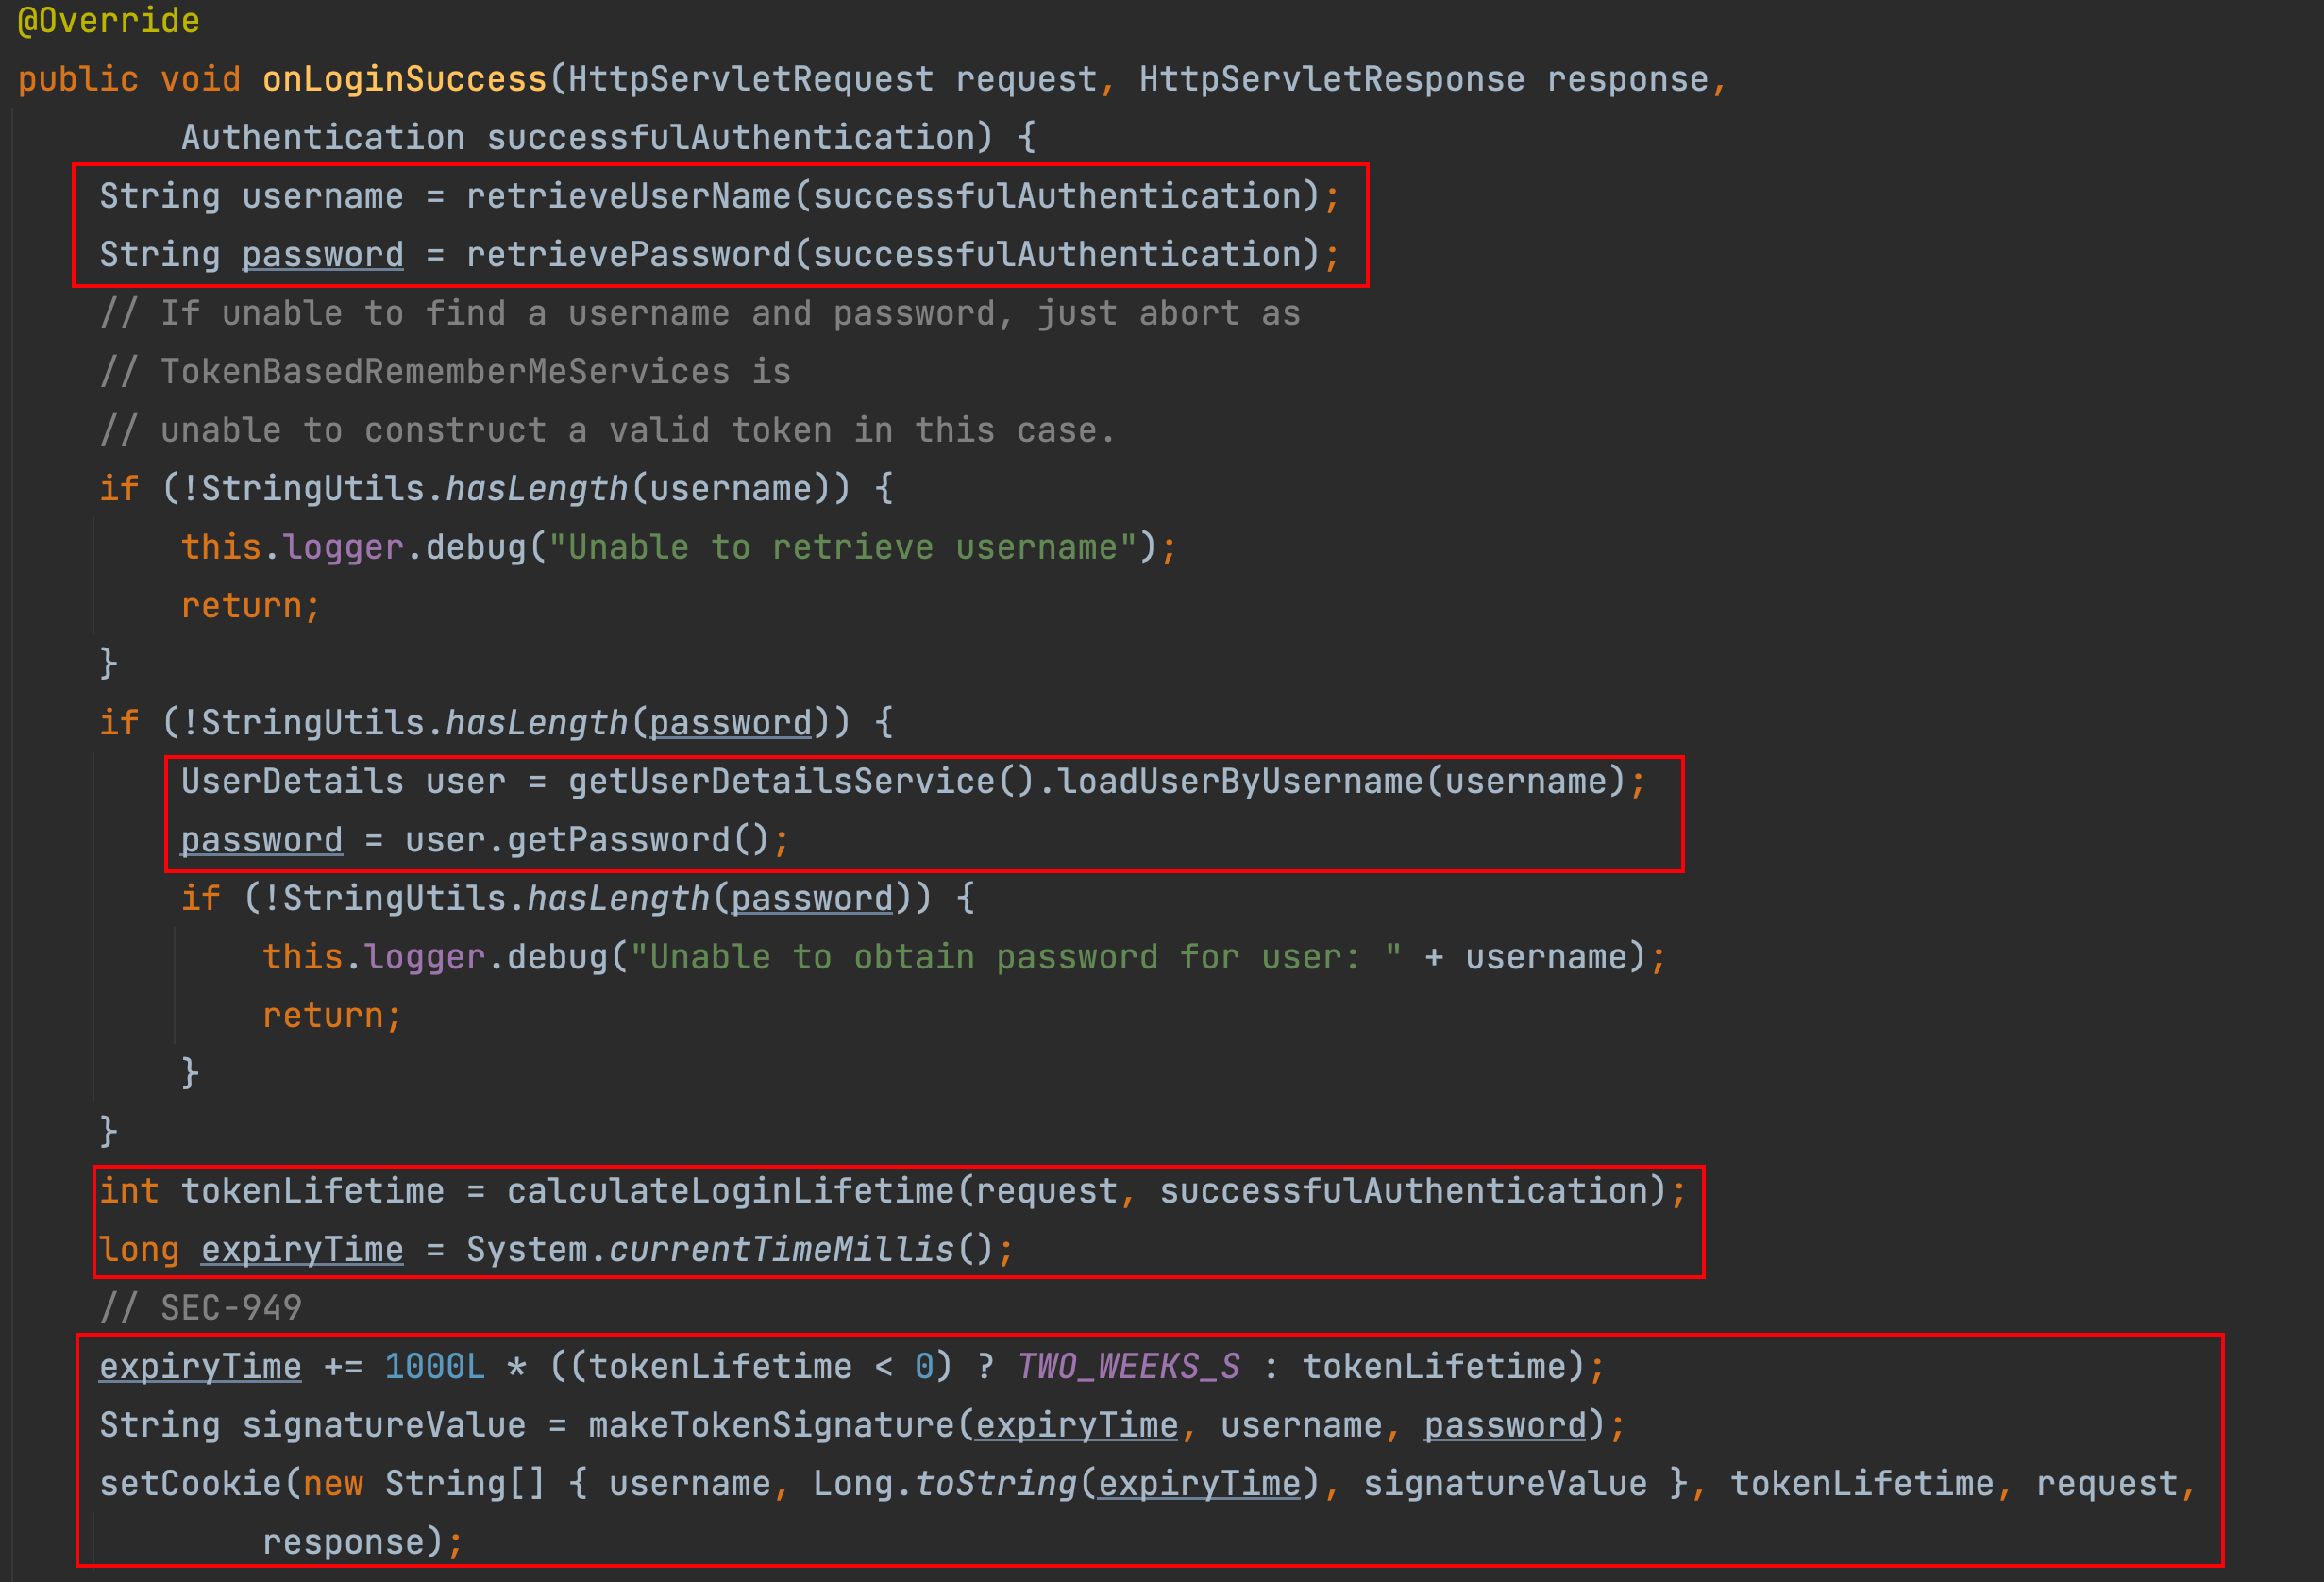
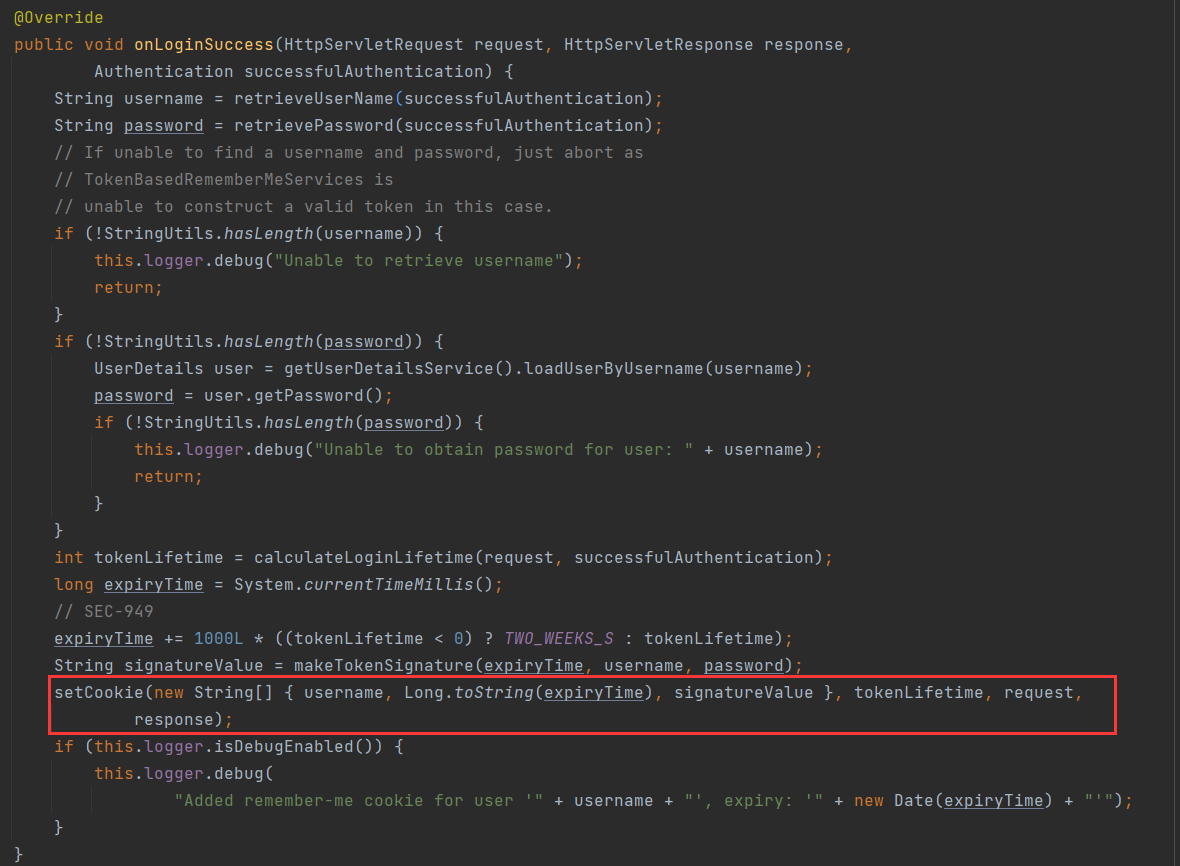
在这个回调中,首先获取用户经和密码信息,如果用户密码在用户登录成功后从successfulAuthentication对象中擦除,则从数据库中重新加载出用户密码。
-
计算出令牌的过期时间,令牌默认有效期是两周。
-
根据令牌的过期时间、用户名以及用户密码,计算出一个签名。
-
调用 setCookie 方法设置 Cookie, 第一个参数是一个数组,数组中一共包含三项。用户名、过期时间以及签名,在setCookie 方法中会将数组转为字符串,并进行 Base64编码后响应给前端。
首次登录认证
流程比较复杂,结合流程图理解
- 从上图中,当在SecurityConfig配置中开启了"rememberMe"功能之后,在进行认证时如果勾选了"记住我"选项,此时打开浏览器控制台,分析整个登录过程。首先当我们登录时,在登录请求中多了一个 RememberMe 的参数。
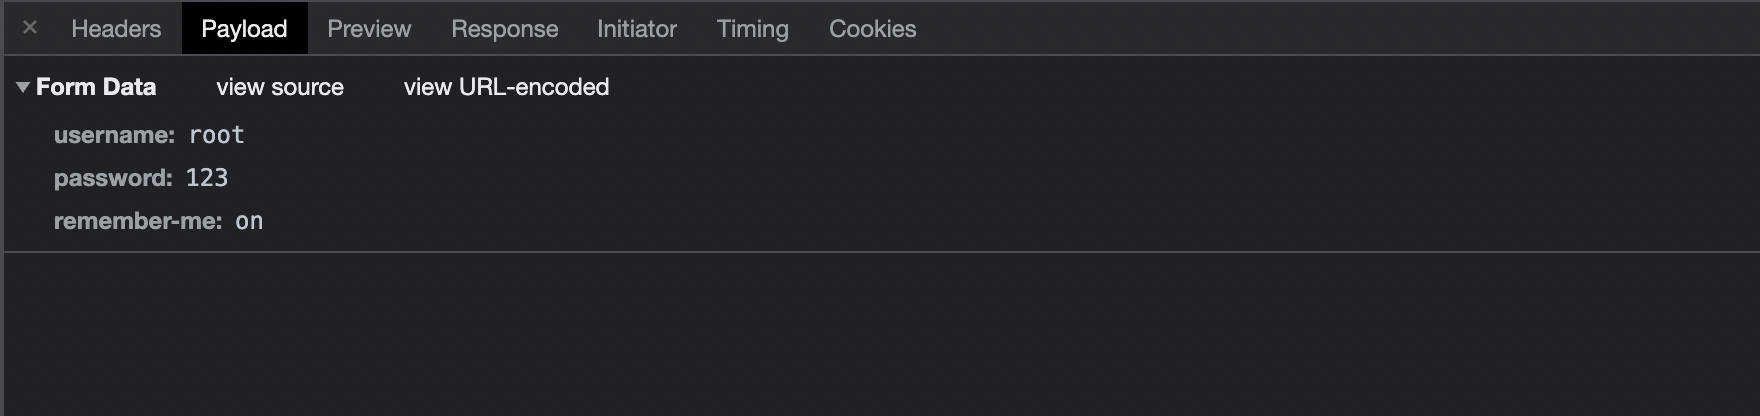
-
很显然,这个参数就是告诉服务器应该开启 RememberMe功能的。如果自定义登录页面开启 RememberMe 功能应该多加入一个一样的请求参数就可以啦。
-
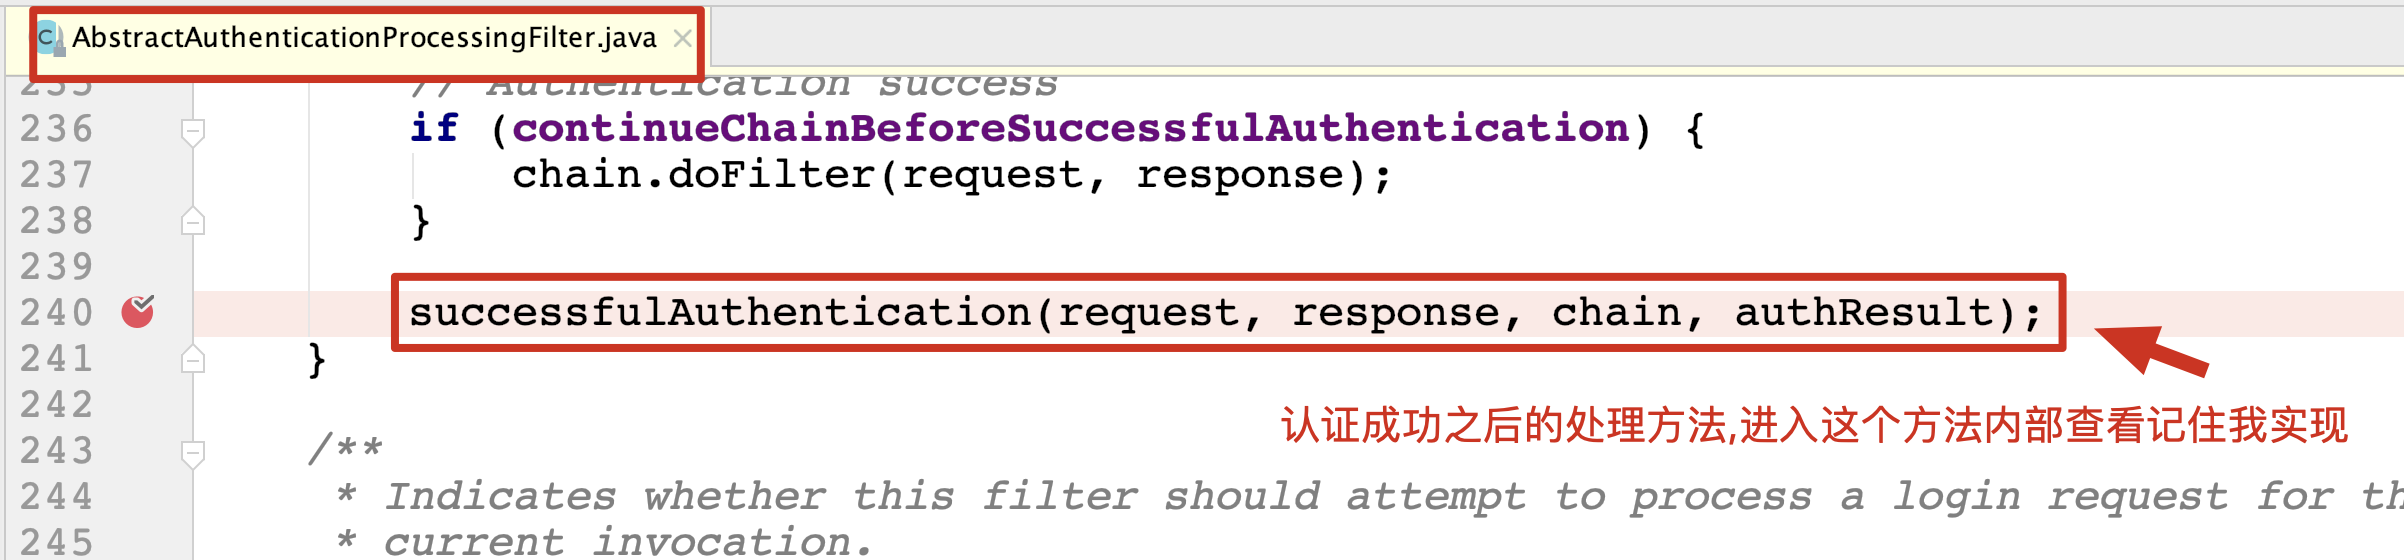
这个请求会在通过 U s e r n a m e P a s s w o r d A u t h e n t i c a t i o n F i l t e r UsernamePasswordAuthenticationFilter UsernamePasswordAuthenticationFilter 的登录认证 a t t e m p t A u t h e n t i c a t i o n attemptAuthentication attemptAuthentication 后返回到它的父类 A b s t r a c t A u t h e n t i c a t i o n P r o c e s s i n g F i l t e r AbstractAuthenticationProcessingFilter AbstractAuthenticationProcessingFilter 并调用 s u c c e s s f u l A u t h e n t i c a t i o n successfulAuthentication successfulAuthentication 方法
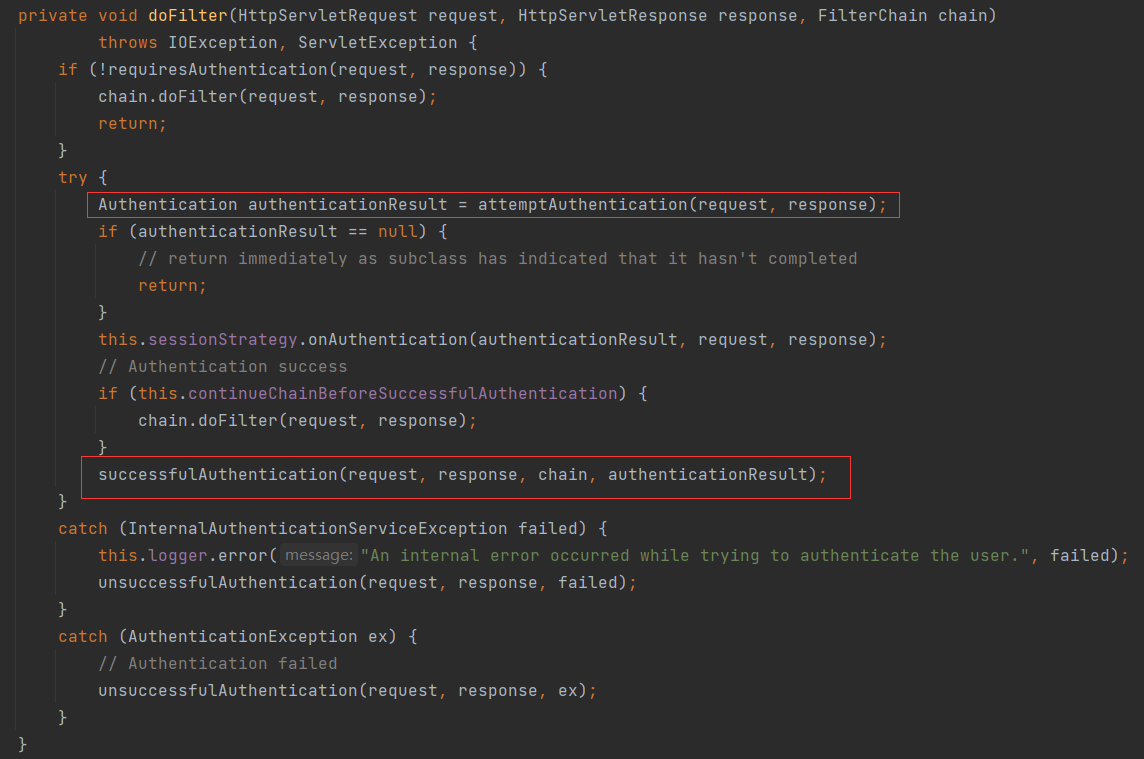
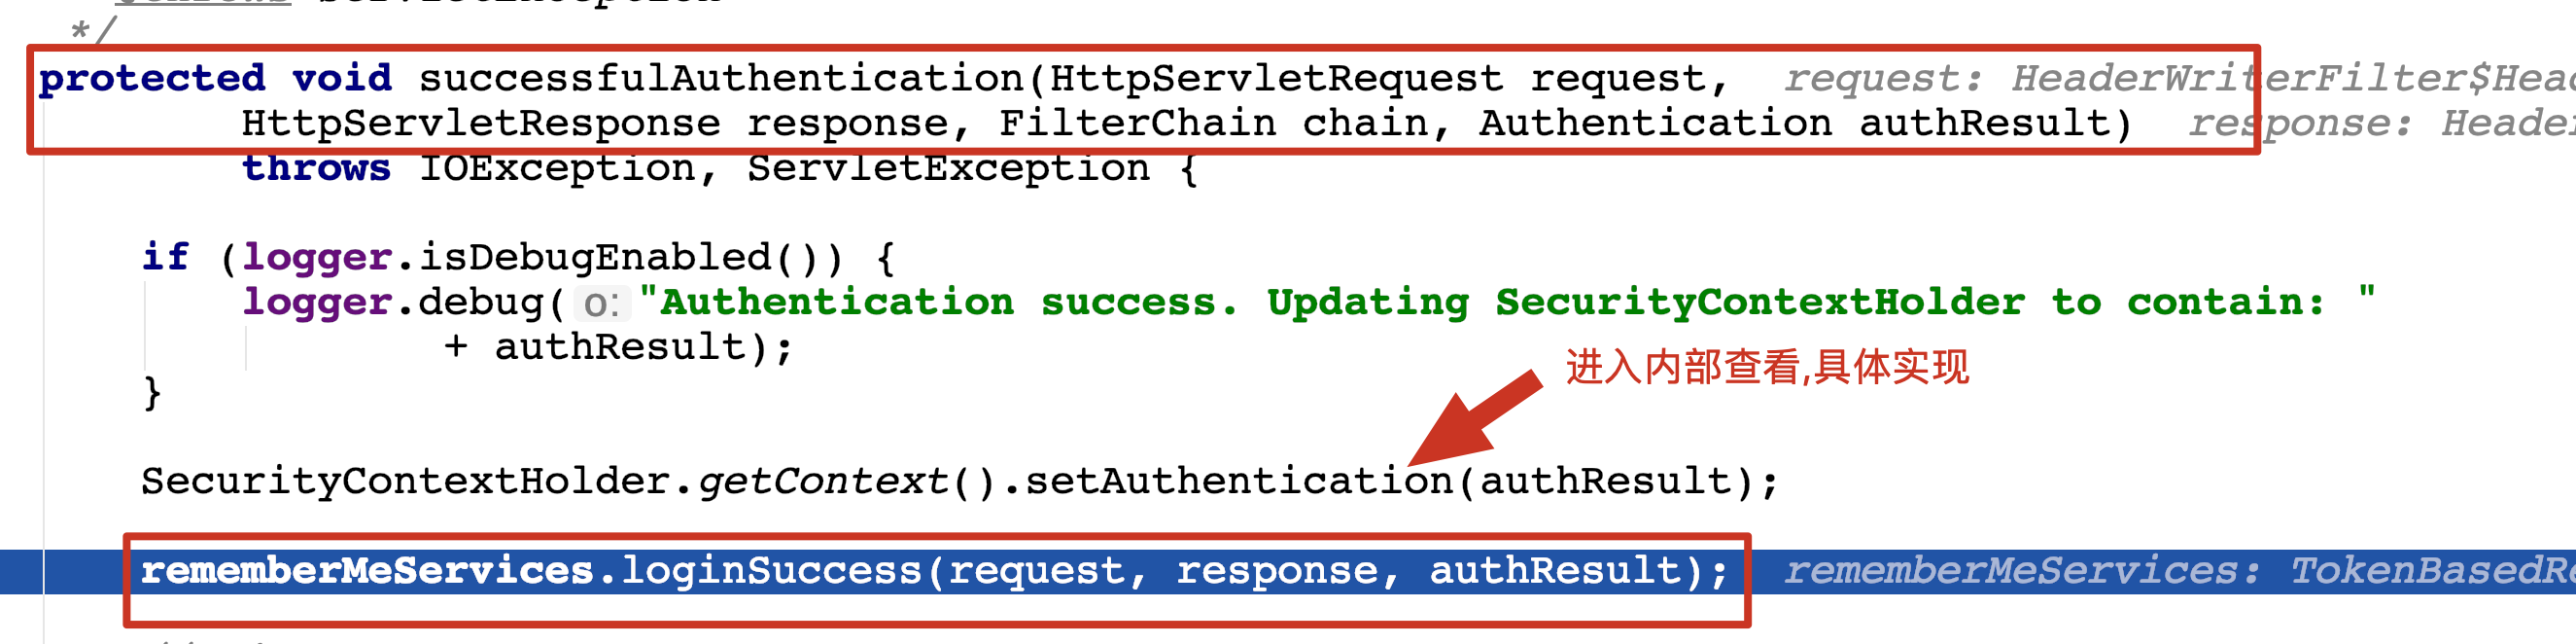
- 在 s u c c e s s f u l A u t h e n t i c a t i o n successfulAuthentication successfulAuthentication 方法中又会调用 r e m e m b e r M e S e r v i c e s . l o g i n S u c c e s s rememberMeServices.loginSuccess rememberMeServices.loginSuccess 方法,这样就回到了我们的 r e m e m b e r M e S e r v i c e rememberMeService rememberMeService 了

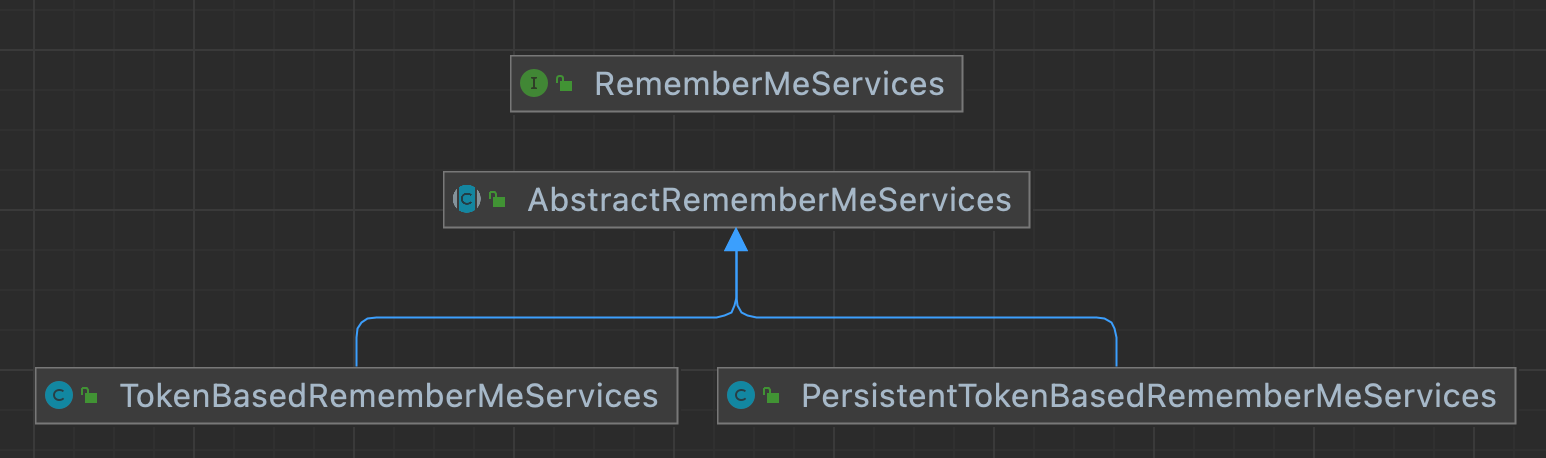
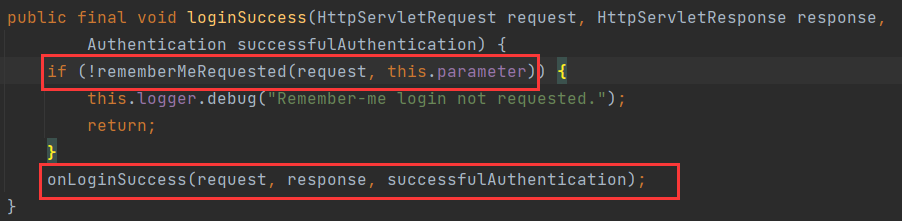
- r e m e m b e r M e S e r v i c e rememberMeService rememberMeService 中的 l o g i n S u c c e s s loginSuccess loginSuccess 方法是个接口,我们去找它的实现。默认调用的是 A b s t r a c t R e m e m b e r M e S e r v i c e s AbstractRememberMeServices AbstractRememberMeServices 中的实现

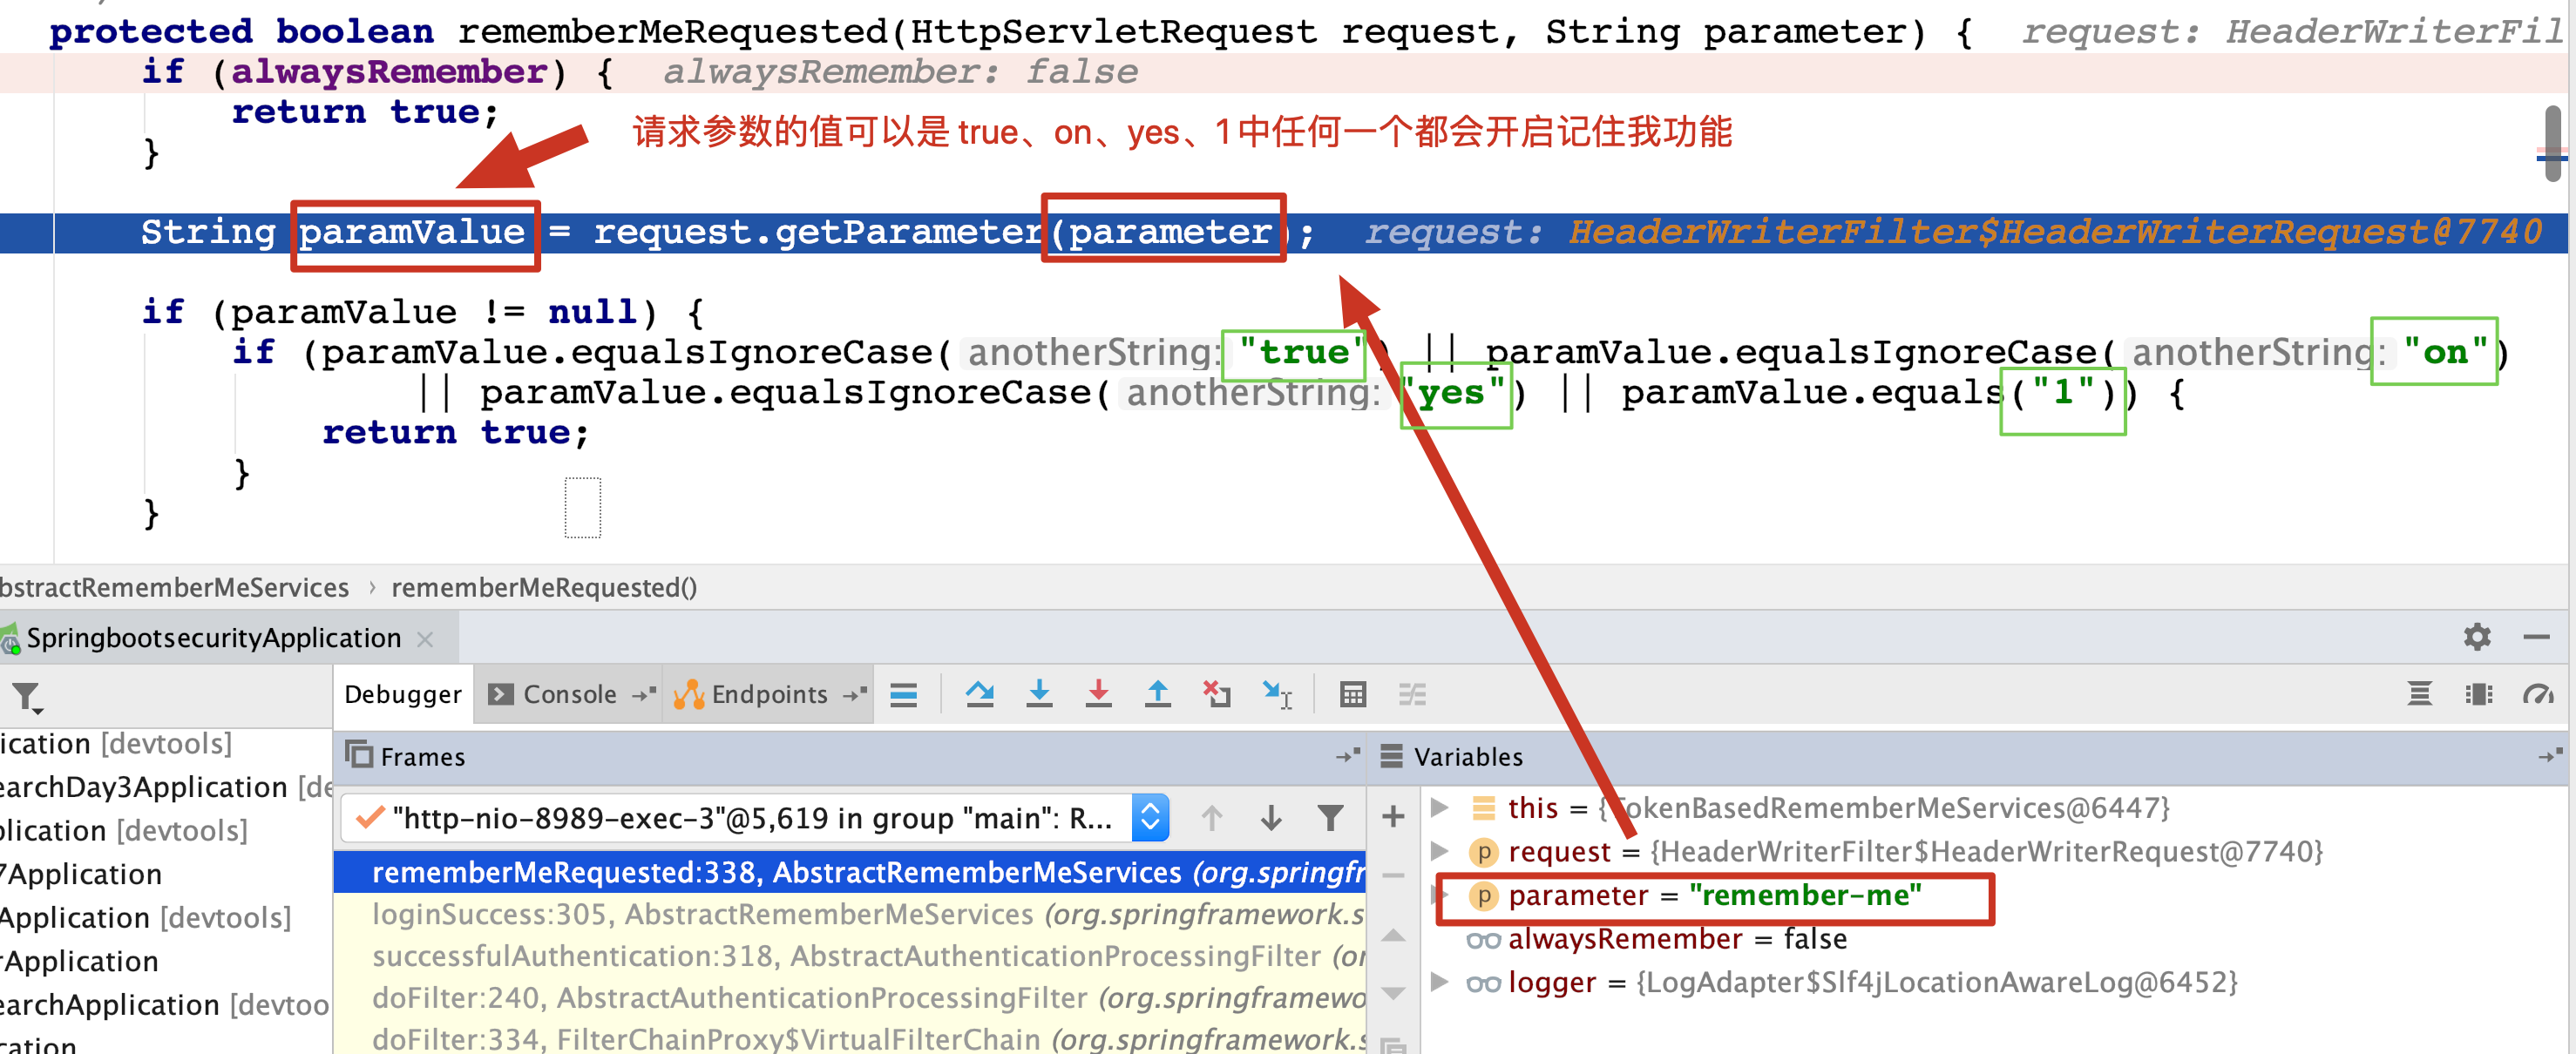
- l o g i n S u c c e s s loginSuccess loginSuccess 的实现中会先调用 r e m e m b e r M e R e q u e s t e d rememberMeRequested rememberMeRequested 方法,判断这个请求是否为启用 rememberMe 的请求(前端是否勾选记住我选项)
-
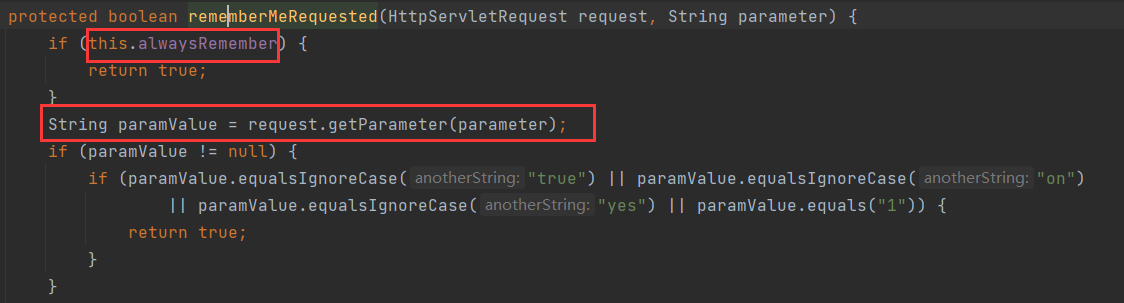
在 r e m e m b e r M e R e q u e s t e d rememberMeRequested rememberMeRequested 方法中,我们先判断是不是 alwayRemember,我们可以在初始化 Spring Security 的配置时指定是否为 alwayRemember,若不是就要通过前端传来的参数判断是否启用 RememberMe 登录,默认情况下这个参数用 application/x-www-form-urlencoded 格式传递,我们可以默认获取。如果用 Json 字符串传递,我们需要重写这个方法,来自定义参数获取的方法。参数值为 ‘真’ ,即视为启用了 RememberMe。
- 关于这个 RememberMe 参数的名字,默认是
public static final String DEFAULT_PARAMETER = "remember-me" 也可以在初始化配置中指定。
- 当我们开启了 RememberMe 功能时,就会返回 true 然后会返回上层去调用 o n L o g i n S u c c e s s onLoginSuccess onLoginSuccess 方法,这是本类中的抽象方法,我们去找它的实现。在上面的继承关系图中可以看到 A b s t r a c t R e m e m b e r M e S e r v i c e s AbstractRememberMeServices AbstractRememberMeServices 有两个实现类,默认调用的是 T o k e n B a s e d R e m e m b e r M e S e r v i c e s TokenBasedRememberMeServices TokenBasedRememberMeServices ,关于另一个实现类在后面会说明使用场合。

- 在 T o k e n B a s e d R e m e m b e r M e S e r v i c e s TokenBasedRememberMeServices TokenBasedRememberMeServices 的实现中,我们会用:用户名、过期时间以及签名,来设置一个 cookie,等这个 session 过期后,我们会利用这个 cookie 进行自动登录。但是这样只要这个 cookie 被黑客劫持到就会有安全问题,所以有相对应的改进措施,但是只用使用 RememberMe 就一定会存在安全问题。
Session 过期后登录
- 登录请求会被 R e m e m b e r M e A u t h e n t i c a t i o n F i l t e r RememberMeAuthenticationFilter RememberMeAuthenticationFilter 拦截,然后调用 r e m e m b e r M e S e r v i c e s . a u t o L o g i n rememberMeServices.autoLogin rememberMeServices.autoLogin 方法,同样找这个接口的默认实现,在 A b s t r a c t R e m e m b e r M e S e r v i c e s AbstractRememberMeServices AbstractRememberMeServices 类中
- 在实现方法中,主要的处理是在 $ processAutoLoginCookie$ 类中,同样这也是个接口,我们去找它的实现,也在
T
o
k
e
n
B
a
s
e
d
R
e
m
e
m
b
e
r
M
e
S
e
r
v
i
c
e
s
TokenBasedRememberMeServices
TokenBasedRememberMeServices 类中
- 要注意在我们这里的认证成功处理操作中并没有再调用 R e m e m b e r M e S e r v i c e s RememberMeServices RememberMeServices 的loginSuccess 方法,所以并没有再次生成我们的 cookie,这个 cookie 第一次生成后,直到它过期前都不会变换,安全风险很大
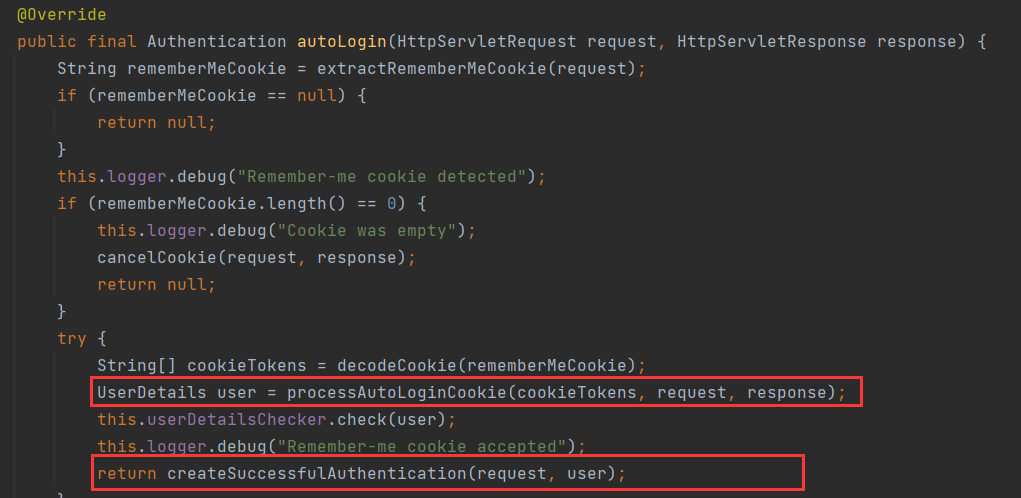
- 这个方法主要的操作是,用我们 cookie 中的 username 从 UserDetailService 中取出个人信息然后生成签名,和我们传入的签名对比,相同则返回当前认证用户信息,否则抛出异常
总结
当用户通过用户名/密码的形式登录成功后,系统会根据用户的用户名、密码以及令牌的过期时间计算出一个签名,这个签名使用 MD5 消息摘要算法生成,是不可逆的。然后再将用户名、令牌过期时间以及签名拼接成一个字符串,中间用“:” 隔开,对拼接好的字符串进行Base64 编码,然后将编码后的结果返回到前端,也就是我们在浏览器中看到的令牌。当会话过期之后,访问系统资源时会自动携带上Cookie中的令牌,服务端拿到 Cookie中的令牌后,先进行 Bae64解码,解码后分别提取出令牌中的三项数据:接着根据令牌中的数据判断令牌是否已经过期,如果没有过期,则根据令牌中的用户名查询出用户信息:接着再计算出一个签名和令牌中的签名进行对比,如果一致,表示会牌是合法令牌,自动登录成功,否则自动登录失败。

内存令牌(更高安全性的token)
PersistentTokenBasedRememberMeServices
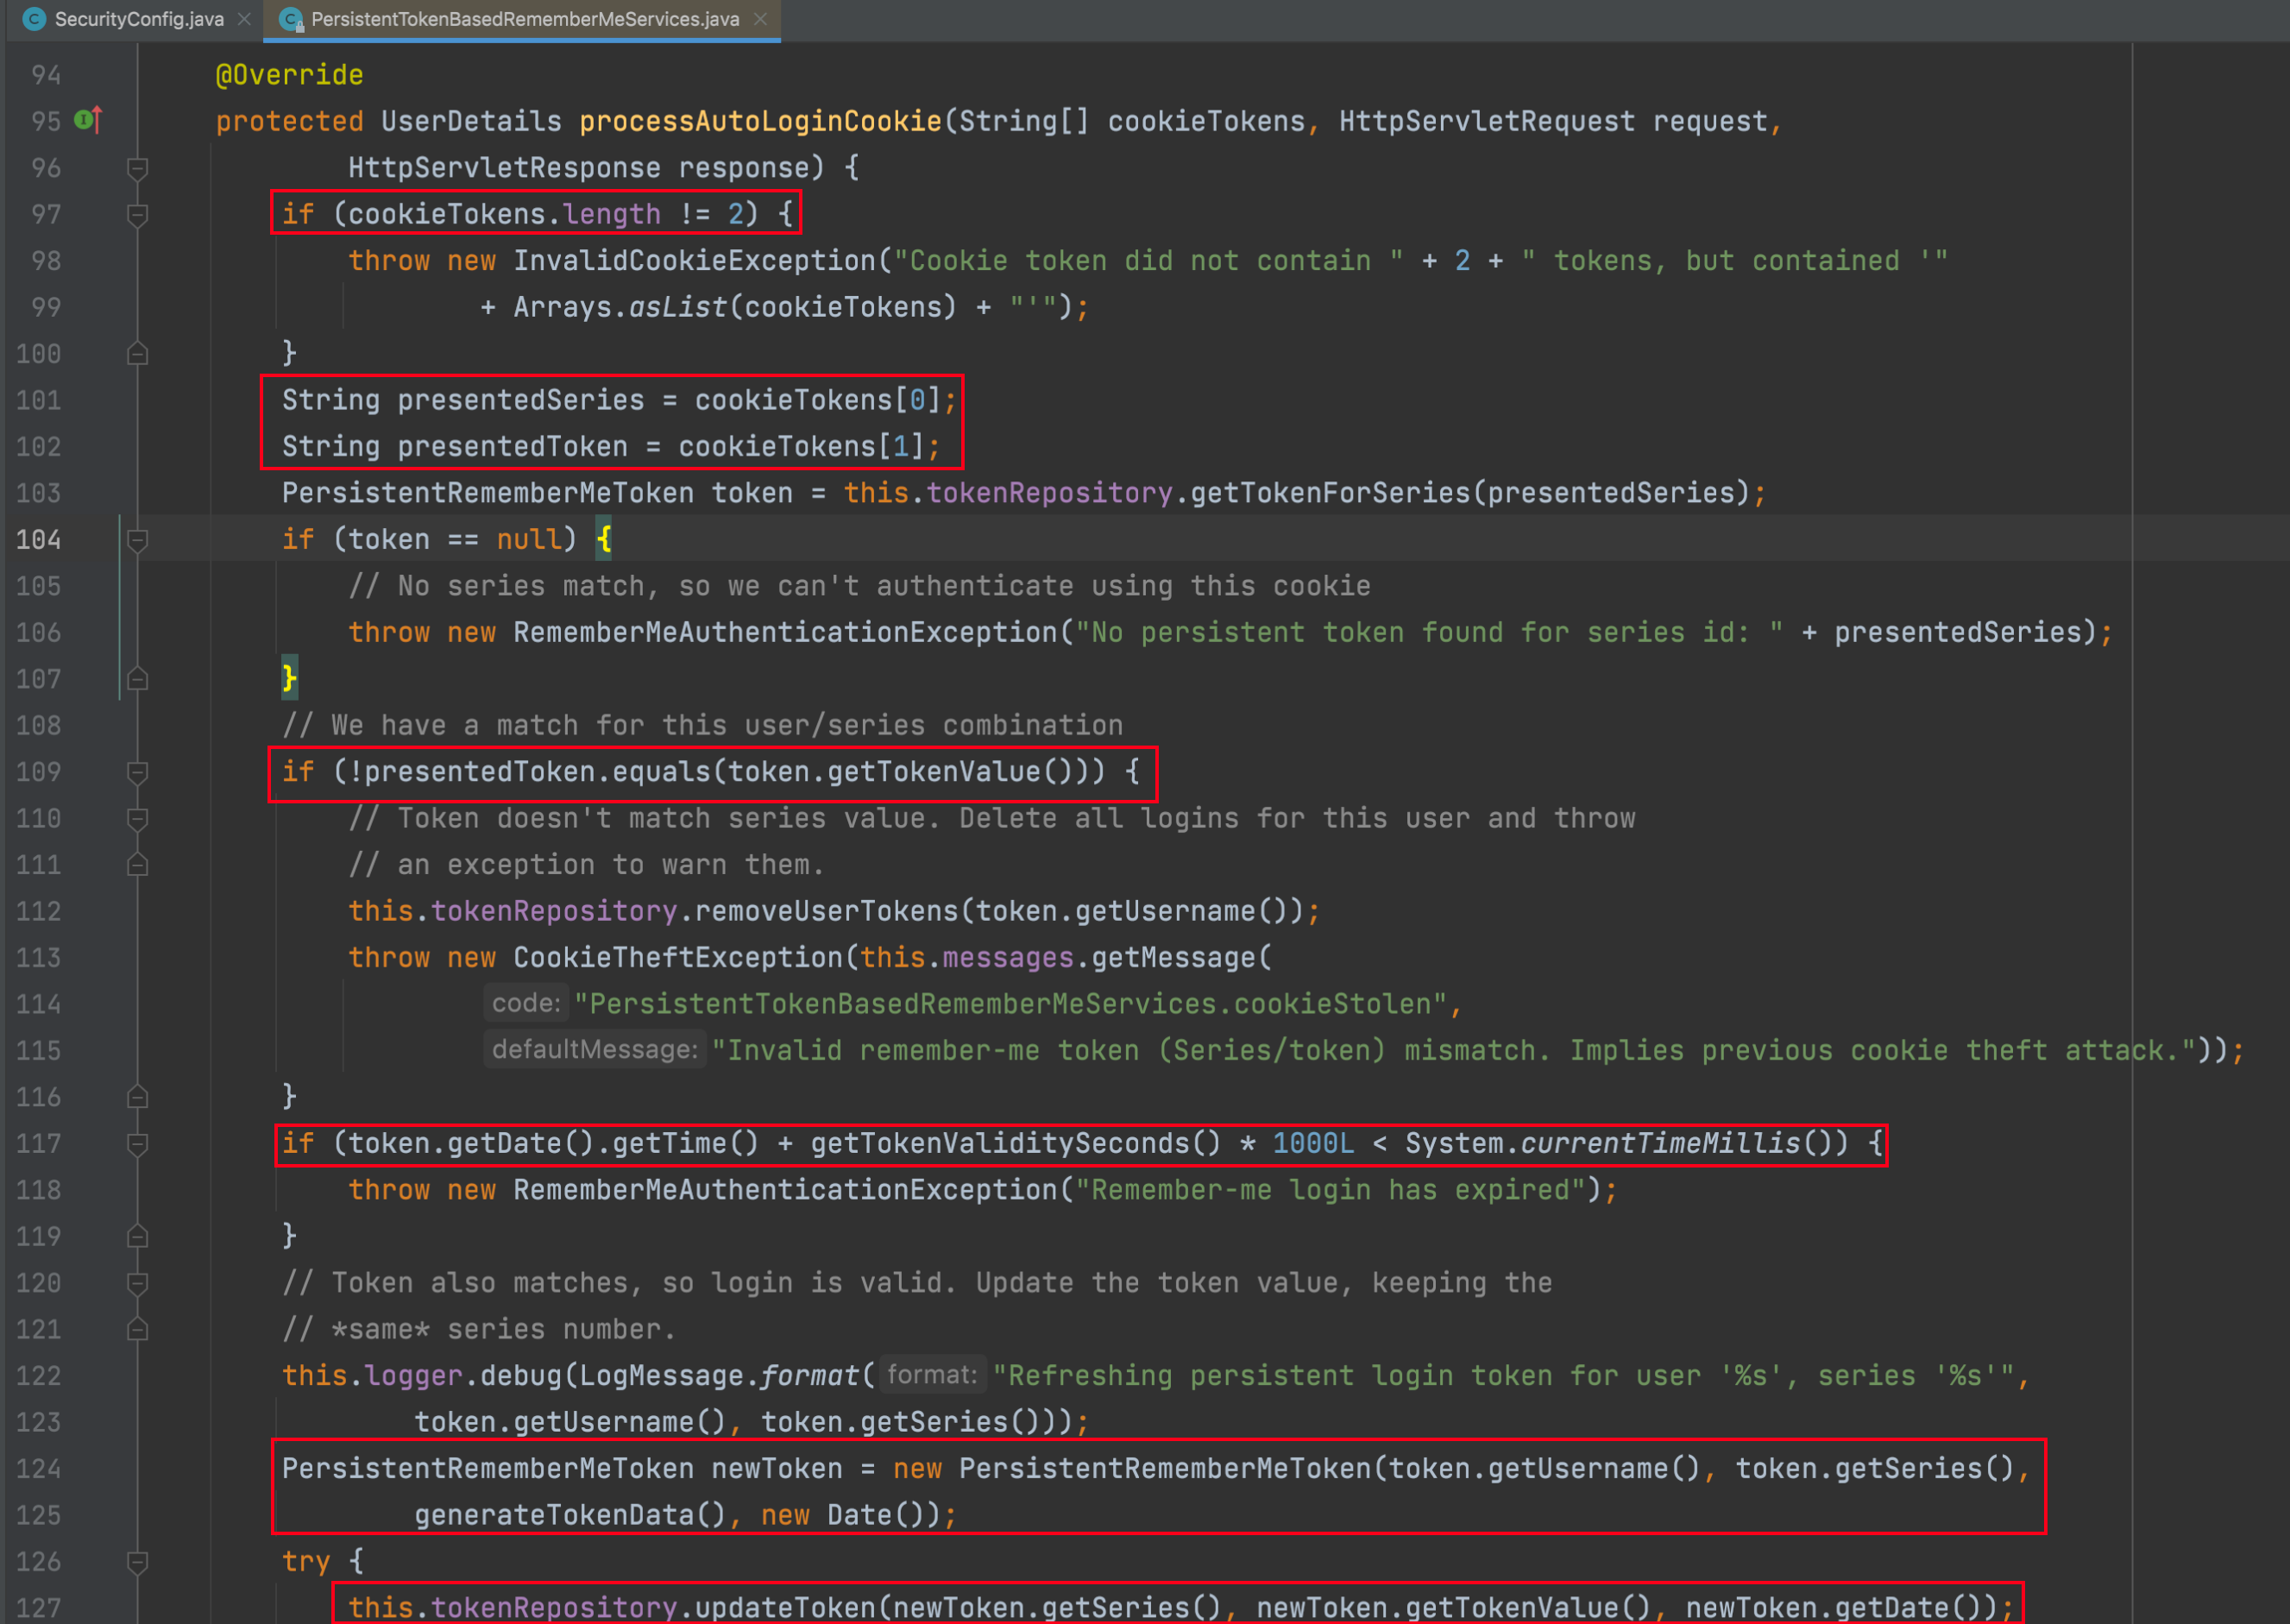
- 不同于 TokonBasedRemornberMeServices 中的 processAutologinCookie 方法,这里cookieTokens 数组的长度为2,第一项是series,第二项是 token。
- 从cookieTokens数组中分到提取出 series 和 token. 然后根据 series 去内存中查询出一个 PersistentRememberMeToken对象。如果查询出来的对象为null,表示内存中并没有series对应的值,本次自动登录失败。如果查询出来的 token 和从 cookieTokens 中解析出来的token不相同,说明自动登录会牌已经泄漏(恶意用户利用令牌登录后,内存中的token变了),此时移除当前用户的所有自动登录记录并抛出异常。
- 根据数据库中查询出来的结果判断令牌是否过期,如果过期就抛出异常。
- 生成一个新的 PersistentRememberMeToken 对象,用户名和series 不变,token 重新
生成,date 也使用当前时间。newToken 生成后,根据 series 去修改内存中的 token 和 date(即每次自动登录后都会产生新的 token 和 date) - 调用 addCookie 方法添加 Cookie, 在addCookie 方法中,会调用到我们前面所说的
setCookie 方法,但是要注意第一个数组参数中只有两项:series 和 token(即返回到前端的令牌是通过对 series 和 token 进行 Base64 编码得到的) - 最后将根据用户名查询用户对象并返回。
使用
查看记住我源码
AbstractUserDetailsAuthenticationProvider类中authenticate方法在最后认证成功之后实现了记住我功能,但是查看源码得知如果开启记住我,必须进行相关的设置

前后端分离开发记住我实现
自定义认证类 LoginFilter
/**
 * 自定义前后端分离认证 Filter
 */
public class LoginFilter extends UsernamePasswordAuthenticationFilter {

    @Override
    public Authentication attemptAuthentication(HttpServletRequest request, HttpServletResponse response) throws AuthenticationException {
        System.out.println("========================================");
        //1.判断是否是 post 方式请求
        if (!request.getMethod().equals("POST")) {
            throw new AuthenticationServiceException("Authentication method not supported: " + request.getMethod());
        }
        //2.判断是否是 json 格式请求类型
        if (request.getContentType().equalsIgnoreCase(MediaType.APPLICATION_JSON_VALUE)) {
            //3.从 json 数据中获取用户输入用户名和密码进行认证 {"uname":"xxx","password":"xxx","remember-me":true}
            try {
                Map<String, String> userInfo = new ObjectMapper().readValue(request.getInputStream(), Map.class);
                String username = userInfo.get(getUsernameParameter());
                String password = userInfo.get(getPasswordParameter());
                String rememberValue = userInfo.get(AbstractRememberMeServices.DEFAULT_PARAMETER);
                if (!ObjectUtils.isEmpty(rememberValue)) {
                    request.setAttribute(AbstractRememberMeServices.DEFAULT_PARAMETER, rememberValue);
                }
                System.out.println("用户名: " + username + " 密码: " + password + " 是否记住我: " + rememberValue);
                UsernamePasswordAuthenticationToken authRequest = new UsernamePasswordAuthenticationToken(username, password);
                setDetails(request, authRequest);
                return this.getAuthenticationManager().authenticate(authRequest);
            } catch (IOException e) {
                e.printStackTrace();
            }
        }
        return super.attemptAuthentication(request, response);
    }
}
自定义 RememberMeService
/**
 * 自定义记住我 services 实现类
 */
public class MyPersistentTokenBasedRememberMeServices extends PersistentTokenBasedRememberMeServices {
    public MyPersistentTokenBasedRememberMeServices(String key, UserDetailsService userDetailsService, PersistentTokenRepository tokenRepository) {
        super(key, userDetailsService, tokenRepository);
    }
    /**
     * 自定义前后端分离获取 remember-me 方式
     */
    @Override
    protected boolean rememberMeRequested(HttpServletRequest request, String parameter) {
        String paramValue = request.getAttribute(parameter).toString();
        if (paramValue != null) {
            if (paramValue.equalsIgnoreCase("true") || paramValue.equalsIgnoreCase("on")
                    || paramValue.equalsIgnoreCase("yes") || paramValue.equals("1")) {
                return true;
            }
        }
        return false;
    }
}
配置记住我
@Configuration
public class SecurityConfig extends WebSecurityConfigurerAdapter {
    @Bean
    public UserDetailsService userDetailsService() {
        //.....
        return inMemoryUserDetailsManager;
    }
    @Override
    protected void configure(AuthenticationManagerBuilder auth) throws Exception {
        auth.userDetailsService(userDetailsService());
    }

    @Override
    @Bean
    public AuthenticationManager authenticationManagerBean() throws Exception {
        return super.authenticationManagerBean();
    }

    //自定义 filter 交给工厂管理
    @Bean
    public LoginFilter loginFilter() throws Exception {
        LoginFilter loginFilter = new LoginFilter();
        loginFilter.setFilterProcessesUrl("/doLogin");//指定认证 url
        loginFilter.setUsernameParameter("uname");//指定接收json 用户名 key
        loginFilter.setPasswordParameter("passwd");//指定接收 json 密码 key
        loginFilter.setAuthenticationManager(authenticationManagerBean());
        loginFilter.setRememberMeServices(rememberMeServices()); //设置认证成功时使用自定义rememberMeService
        //认证成功处理
        loginFilter.setAuthenticationSuccessHandler((req, resp, authentication) -> {
            Map<String, Object> result = new HashMap<String, Object>();
            result.put("msg", "登录成功");
            result.put("用户信息", authentication.getPrincipal());
            resp.setContentType("application/json;charset=UTF-8");
            resp.setStatus(HttpStatus.OK.value());
            String s = new ObjectMapper().writeValueAsString(result);
            resp.getWriter().println(s);
        });
        //认证失败处理
        loginFilter.setAuthenticationFailureHandler((req, resp, ex) -> {
            Map<String, Object> result = new HashMap<String, Object>();
            result.put("msg", "登录失败: " + ex.getMessage());
            resp.setStatus(HttpStatus.INTERNAL_SERVER_ERROR.value());
            resp.setContentType("application/json;charset=UTF-8");
            String s = new ObjectMapper().writeValueAsString(result);
            resp.getWriter().println(s);
        });
        return loginFilter;
    }

    @Override
    protected void configure(HttpSecurity http) throws Exception {
        http.authorizeHttpRequests()
                .anyRequest().authenticated()//所有请求必须认证
                .and()
                .formLogin()
                .and()
                .rememberMe() //开启记住我功能  cookie 进行实现  1.认证成功保存记住我 cookie 到客户端   2.只有 cookie 写入客户端成功才能实现自动登录功能
                .rememberMeServices(rememberMeServices())  //设置自动登录使用哪个 rememberMeServices
                .and()
                .exceptionHandling()
                .authenticationEntryPoint((req, resp, ex) -> {
                    resp.setContentType(MediaType.APPLICATION_JSON_UTF8_VALUE);
                    resp.setStatus(HttpStatus.UNAUTHORIZED.value());
                    resp.getWriter().println("请认证之后再去处理!");
                })
                .and()
                .logout()
                .logoutRequestMatcher(new OrRequestMatcher(
                        new AntPathRequestMatcher("/logout", HttpMethod.DELETE.name()),
                        new AntPathRequestMatcher("/logout", HttpMethod.GET.name())
                ))
                .logoutSuccessHandler((req, resp, auth) -> {
                    Map<String, Object> result = new HashMap<String, Object>();
                    result.put("msg", "注销成功");
                    result.put("用户信息", auth.getPrincipal());
                    resp.setContentType("application/json;charset=UTF-8");
                    resp.setStatus(HttpStatus.OK.value());
                    String s = new ObjectMapper().writeValueAsString(result);
                    resp.getWriter().println(s);
                })
                .and()
                .csrf().disable();


        // at: 用来某个 filter 替换过滤器链中哪个 filter
        // before: 放在过滤器链中哪个 filter 之前
        // after: 放在过滤器链中那个 filter 之后
        http.addFilterAt(loginFilter(), UsernamePasswordAuthenticationFilter.class);
    }


    @Bean
    public RememberMeServices rememberMeServices() {
        return new MyPersistentTokenBasedRememberMeServices(UUID.randomUUID().toString(), userDetailsService(), new InMemoryTokenRepositoryImpl());
    }
}
第六章 会话管理
session已经过时了,旧时代的产物,现在都是使用 JWT(token),因为app端,不支持cookie机制,并且使用 jwt 并将其放在 header 中,再加上redis的帮助,我们可以直接完成跨域,并且防止 CSRF 攻击,所以第六、七、八章其实可以跳过。
话是这么说的,但是也稍微记录一下,技术都是一步步发展的,了解一下也没坏处,主要原因是,不然我不是白学了!哈哈哈哈哈哈哈
简介
当浏览器调用登录接口登录成功后,服务端会和浏览器之间建立一个会话 (Session) 浏览器在每次发送请求时都会携带一个 Sessionld(cookie),服务端则根据这个 Sessionld 来判断用户身份。当浏览器关闭后,服务端的 Session 并不会自动销毁,需要开发者手动在服务端调用 Session销毁方法,或者等 Session 过期时间到了自动销毁。在Spring Security 中,与HttpSession相关的功能由 SessionManagementFiter 和SessionAutheaticationStrateey 接口来处理,SessionManagomentFilter 过滤器将 Session 相关操作委托给 SessionAuthenticationStrateey 接口去完成。
会话并发管理
简介
会话并发管理就是指在当前系统中,同一个用户可以同时创建多少个会话,如果一个设备对应一个会话,那么也可以简单理解为同一个用户可以同时在多少台设备上进行登录。默认情况下,同一用户在多少台设备上登录并没有限制,不过开发者可以在 Spring Security 中对此进行配置。
开启会话管理
@Configuration
public class SecurityConfig extends WebSecurityConfigurerAdapter {

  	//...
    @Override
    protected void configure(HttpSecurity http) throws Exception {
        http.authorizeRequests()
                .anyRequest().authenticated()
                .and()
                .formLogin()
                .and()
                .rememberMe()
                .and()
                .csrf().disable()
                .sessionManagement()  //开启会话管理
                .maximumSessions(1);  //设置会话并发数为 1
    }
}
- sessionManagement() 用来开启会话管理、maximumSessions 指定会话的并发数为 1。
会话失效处理
前后端分离开发处理
@Override
protected void configure(HttpSecurity http) throws Exception {
  http.authorizeRequests()
    .anyRequest().authenticated()
    .....
    .sessionManagement()  //开启会话管理
    .maximumSessions(1)  //允许同一个用户只允许创建一个会话
    //.expiredUrl("/login")//会话过期处理  传统 web 开发
    .expiredSessionStrategy(event -> {
      HttpServletResponse response = event.getResponse();
      response.setContentType("application/json;charset=UTF-8");
      Map<String, Object> result = new HashMap<>();
      result.put("status", 500);
      result.put("msg", "当前会话已经失效,请重新登录!");
      String s = new ObjectMapper().writeValueAsString(result);
      response.setContentType("application/json;charset=UTF-8");
      response.getWriter().println(s);
      response.flushBuffer();
    });//前后端分离开发处理
}
禁止再次登录
默认的效果是一种被 “挤下线”的效果,后面登录的用户会把前面登录的用户 “挤下线”。还有一种是禁止后来者登录,即一旦当前用户登录成功,后来者无法再次使用相同的用户登录,直到当前用户主动注销登录,配置如下:
@Override
protected void configure(HttpSecurity http) throws Exception {
  http.authorizeRequests()
    .anyRequest().authenticated()
    .and()
    ....
    .sessionManagement()  //开启会话管理
    .maximumSessions(1)  //允许同一个用户只允许创建一个会话
    //.expiredUrl("/login")//会话过期处理  传统 web 开发
    .expiredSessionStrategy(event -> {
      HttpServletResponse response = event.getResponse();
      response.setContentType("application/json;charset=UTF-8");
      Map<String, Object> result = new HashMap<>();
      result.put("status", 500);
      result.put("msg", "当前会话已经失效,请重新登录!");
      String s = new ObjectMapper().writeValueAsString(result);
      response.getWriter().println(s);
      response.flushBuffer();
    })//前后端分离开发处理
    .maxSessionsPreventsLogin(true);//登录之后禁止再次登录
}
会话共享
前面所讲的会话管理都是单机上的会话管理,如果当前是集群环境,前面所讲的会话管
理方案就会失效。此时可以利用 spring-session 结合 redis 实现 session 共享。
实战
- 引入依赖
<dependency>
  <groupId>org.springframework.boot</groupId>
  <artifactId>spring-boot-starter-data-redis</artifactId>
</dependency>
<dependency>
  <groupId>org.springframework.session</groupId>
  <artifactId>spring-session-data-redis</artifactId>
</dependency>
- 编写配置
spring.redis.host=localhost
spring.redis.port=6379
- 配置Security
@Configuration
public class SecurityConfig extends WebSecurityConfigurerAdapter {


    private final FindByIndexNameSessionRepository sessionRepository;


    @Autowired
    public SecurityConfig(FindByIndexNameSessionRepository sessionRepository) {
        this.sessionRepository = sessionRepository;
    }

    @Bean
    public UserDetailsService userDetailsService() {
        ....
    }

    @Override
    protected void configure(AuthenticationManagerBuilder auth) throws Exception {
        auth.userDetailsService(userDetailsService());
    }

    @Override
    protected void configure(HttpSecurity http) throws Exception {
        http.authorizeRequests()
                .anyRequest().authenticated()
                .and()
                .formLogin()
                .and()
                .rememberMe()
                .and()
                .csrf().disable()
                .sessionManagement()  //开启会话管理
                .maximumSessions(1)  //允许同一个用户只允许创建一个会话*/
                .expiredUrl("/login")//会话过期处理  传统 web 开发
                .expiredSessionStrategy(event -> {
                    HttpServletResponse response = event.getResponse();
                    response.setContentType("application/json;charset=UTF-8");
                    Map<String, Object> result = new HashMap<>();
                    result.put("status", 500);
                    result.put("msg", "当前会话已经失效,请重新登录!");
                    String s = new ObjectMapper().writeValueAsString(result);
                    response.getWriter().println(s);
                    response.flushBuffer();
                }).sessionRegistry(sessionRegistry());//前后端分离开发处理
        //.maxSessionsPreventsLogin(true);//登录之后禁止再次登录*/
    }

    @Bean
    public SpringSessionBackedSessionRegistry sessionRegistry() {
        return new SpringSessionBackedSessionRegistry(sessionRepository);
    }

}
第八章 CSRF 漏洞保护
使用 JWT(token) 可以直接防止 CSRF 攻击,知识拓展了解一下
简介
CSRF (Cross-Site Request Forgery 跨站请求伪造),也可称为一键式攻击 (one-click-attack),通常缩写为 CSRF 或者 XSRF。
CSRF 攻击是一种挟持用户在当前已登录的浏览器上发送恶意请求的攻击方法。相对于XSS利用用户对指定网站的信任,CSRF则是利用网站对用户网页浏览器的信任。简单来说,CSRF是致击者通过一些技术手段欺骗用户的浏览器,去访问一个用户曾经认证过的网站并执行恶意请求,例如发送邮件、发消息、甚至财产操作 (如转账和购买商品)。由于客户端(浏览器)已经在该网站上认证过,所以该网站会认为是真正用户在操作而执行请求(实际上这个并非用户的本意)。
举个简单的例子:
假设 blr 现在登录了某银行的网站准备完成一项转账操作,转账的链接如下:
https: //bank .xxx .com/withdraw?account=blr&amount=1000&for=zhangsan
可以看到,这个链接是想从 blr 这个账户下转账 1000 元到 zhangsan 账户下,假设blr 没有注销登录该银行的网站,就在同一个浏览器新的选项卡中打开了一个危险网站,这个危险网站中有一幅图片,代码如下:
一旦用户打开了这个网站,这个图片链接中的请求就会自动发送出去。由于是同一个浏览器并且用户尚未注销登录,所以该请求会自动携带上对应的有效的 Cookie 信息(浏览器的默认行为),进而完成一次转账操作。这就是跨站请求伪造。
CSRF 防御
CSRF攻击的根源在于浏览器默认的身份验证机制(自动携带当前网站的Cookie信息),这种机制虽然可以保证请求是来自用户的某个浏览器,但是无法确保这请求是用户授权发送。攻击者和用户发送的请求一模一样,这意味着我们没有办法去直接拒绝这里的某一个请求。如果能在合法清求中额外携带一个攻击者无法获取的参数,就可以成功区分出两种不同的请求,进而直接拒绝掉恶意请求。在 SpringSecurity 中就提供了这种机制来防御 CSRF 攻击,这种机制我们称之为令牌同步模式。其实就是加入token
前后端分离使用 CSRF
前后端分离开发时,只需要将生成 token 放入到cookie 中,并在请求时获取 token 中令牌信息进行提交即可。
第九章 跨域
跨域问题,可以帮助我们了解前端调试时总是出现的 options 请求到底是什么
简介
跨域问题是实际应用开发中一个非常常见的需求,在 Spring 框架中对于跨域问题的处理方案有好几种,引 了 Spring Security 之后,跨域问题的处理方案又增加了。
CORS
CORS (Cross-Origin Resource Sharing )是由 W3C制定的一种跨域资源共享技术标准,其目的就是为了解决前端的跨域请求。在JavaEE 开发中,最常见的前端跨域请求解决方案是早期的JSONP,但是 JSONP 只支持 GET 请求,这是一个很大的缺陷,而 CORS 则支特多种 HTTP请求方法,也是目前主流的跨域解决方案。
CORS 中新增了一组HTTP 请求头字段,通过这些字段,服务器告诉浏览器,那些网站通过浏览器有权限访问哪些资源。同时规定,对那些可能修改服务器数据的HTTP请求方法 (如GET以外的HTTP 请求等),浏览器必须首先使用 OPTIONS 方法发起一个预检请求(prenightst),预检请求的目的是查看服务端是否支持即将发起的跨域请求,如果服务端允许,才发送实际的 HTTP 请求。在预检请求的返回中,服务器端也可以通知客户端,是否需要携带身份凭证(如 Cookies、HTTP 认证信息等)。
CORS: 同源/同域 = 协议+主机+端口
简单请求
GET 请求为例,如果需要发起一个跨域请求,则请求头如下:
Host: localhost:8080
Origin: http://localhost:8081
Referer:http://localhost:8081/index.html
如果服务端支持该跨域请求,那么返回的响应头中将包含如下字段:
Access-Control-Allow-Origin:http://localhost: 8081
Access-Control-Allow-Origin 字段用来告诉浏览器可以访问该资源的域,当浏览器收到这样的响应头信息之后,提取出 Access-Control-Allow-Origin 字段中的值, 发现该值包含当前页面所在的域,就知道这个跨域是被允许的,因此就不再对前端的跨域请求进行限制。这属于简单请求,即不需要进行预检请求的跨域。
非简单请求
对于一些非简单请求,会首先发送一个预检请求。预检请求类似下面这样:
OPTIONS /put HTTP/1.1
Host: localhost:8080
Connection: keep-alive
Accept: */*
Access-Control-Request-Method:PUT
Origin: http://localhost: 8081
Referer:http://localhost:8081/index.html
请求方法是 OPTIONS,请求头Origin 就告诉服务端当前页面所在域,请求头 Access-Control-Request-Methods 告诉服务器端即将发起的跨域请求所使用的万法。服务端对此进行判断,如果允许即将发起的跨域请求,则会给出如下响应:
HTTP/1.1 200
Access-Control-Allow-Origin:http://localhost: 8081
Access-Control-Request-Methods: PUT
Access-Control-Max-Age: 3600
Access-Control-Allow-Metbods 字段表示允许的跨域方法:Access-Control-Max-Age 字段表示预检请求的有效期,单位为秒,在有效期内如果发起该跨域请求,则不用再次发起预检请求。预检请求结朿后,接下来就会发起一个真正的跨域请求,跨域请求和前面的简单请求跨域步骤类似。
Spring 跨域解决方案
使用注解和 mvc 配置的解决方案都是基于 Interceptor 的,而 Interceptor 是基于 MVC 的,会在Filter 之后执行
@CrossOrigin
Spring 中第一种处理跨域的方式是通过@CrossOrigin 注解来标记支持跨域,该注解可以添加在方法上,也可以添加在 Controller 上。当添加在 Controller 上时,表示 Controller 中的所
有接口都支持跨域,具体配置如下:
@RestController
public Class HelloController{
	@CrossOrigin (origins ="http://localhost:8081")
	@PostMapping ("/post")
	public String post (){
		return "hello post";
	}
}
@CrossOrigin 注解各属性含义如下:
-
alowCredentials:浏览器是否应当发送凭证信息,如 Cookie。
-
allowedHeaders: 请求被允许的请求头字段,
*表示所有字段。 -
exposedHeaders:哪些响应头可以作为响应的一部分暴露出来。
注意,这里只可以一一列举,通配符 * 在这里是无效的。 -
maxAge:预检请求的有效期,有效期内不必再次发送预检请求,默认是
1800秒。 -
methods:允许的请求方法,
*表示允许所有方法。 -
origins:允许的域,
*表示允许所有域。
addCrosMapping
@CrossOrigin 注解需要添加在不同的 Controller 上。所以还有一种全局配置方法,就是通过重写 WebMvcConfigurerComposite#addCorsMappings方法来实现,具体配置如下:
Configuration
public class WebMvcConfig implements WebMvcConfigurer{
  Override
  public void addCorsMappings (CorsRegistry registry){
    registry.addMapping("/**") //处理的请求地址
    .allowedMethods ("*")
    •allowedorigins("*")
    .allowedHeaders ("*")
    .allowCredentials (false)
    •exposedHeaders ("")
    .maxAge (3600) ;
  }
}
CrosFilter
Cors Filter 是Spring Web 中提供的一个处理跨域的过滤器,开发者也可以通过该过该过滤器处理跨域。
@Configuration
public class WebMvcConfig {
    @Bean
    FilterRegistrationBean<CorsFilter> corsFilter() {
        FilterRegistrationBean<CorsFilter> registrationBean = new FilterRegistrationBean<>();
        CorsConfiguration corsConfiguration = new CorsConfiguration();
        corsConfiguration.setAllowedHeaders(Arrays.asList("*"));
        corsConfiguration.setAllowedMethods(Arrays.asList("*"));
        corsConfiguration.setAllowedOrigins(Arrays.asList("*"));
        corsConfiguration.setMaxAge(3600L);
        UrlBasedCorsConfigurationSource source = new UrlBasedCorsConfigurationSource();
        source.registerCorsConfiguration("/**", corsConfiguration);
        registrationBean.setFilter(new CorsFilter(source));
        registrationBean.setOrder(-1);//filter 0 1
        return registrationBean;
    }
}
Spring Security 跨域解决方案
原理分析
当我们为项目添加了 Spring Security 依赖之后,发现上面三种跨域方式有的失效了,有
则可以继续使用,这是怎么回事?
通过@CrossOrigin 注解或者重写 addCorsMappings 方法配置跨域,统统失效了,通
CorsFilter 配置的跨域,有没有失效则要看过滤器的优先级,如果过滤器优先级高于 Spring
Security 过滤器,即先于 Spring Security 过滤器执行,则 CorsFiter 所配置的跨域处理依然有效;如果过滤器优先级低于 Spring Security 过滤器,则 CorsFilter 所配置的跨域处理就会失效。
为了理清楚这个问题,我们先简略了解一下 Filter、DispatchserServlet 以及Interceptor 执行顺序。
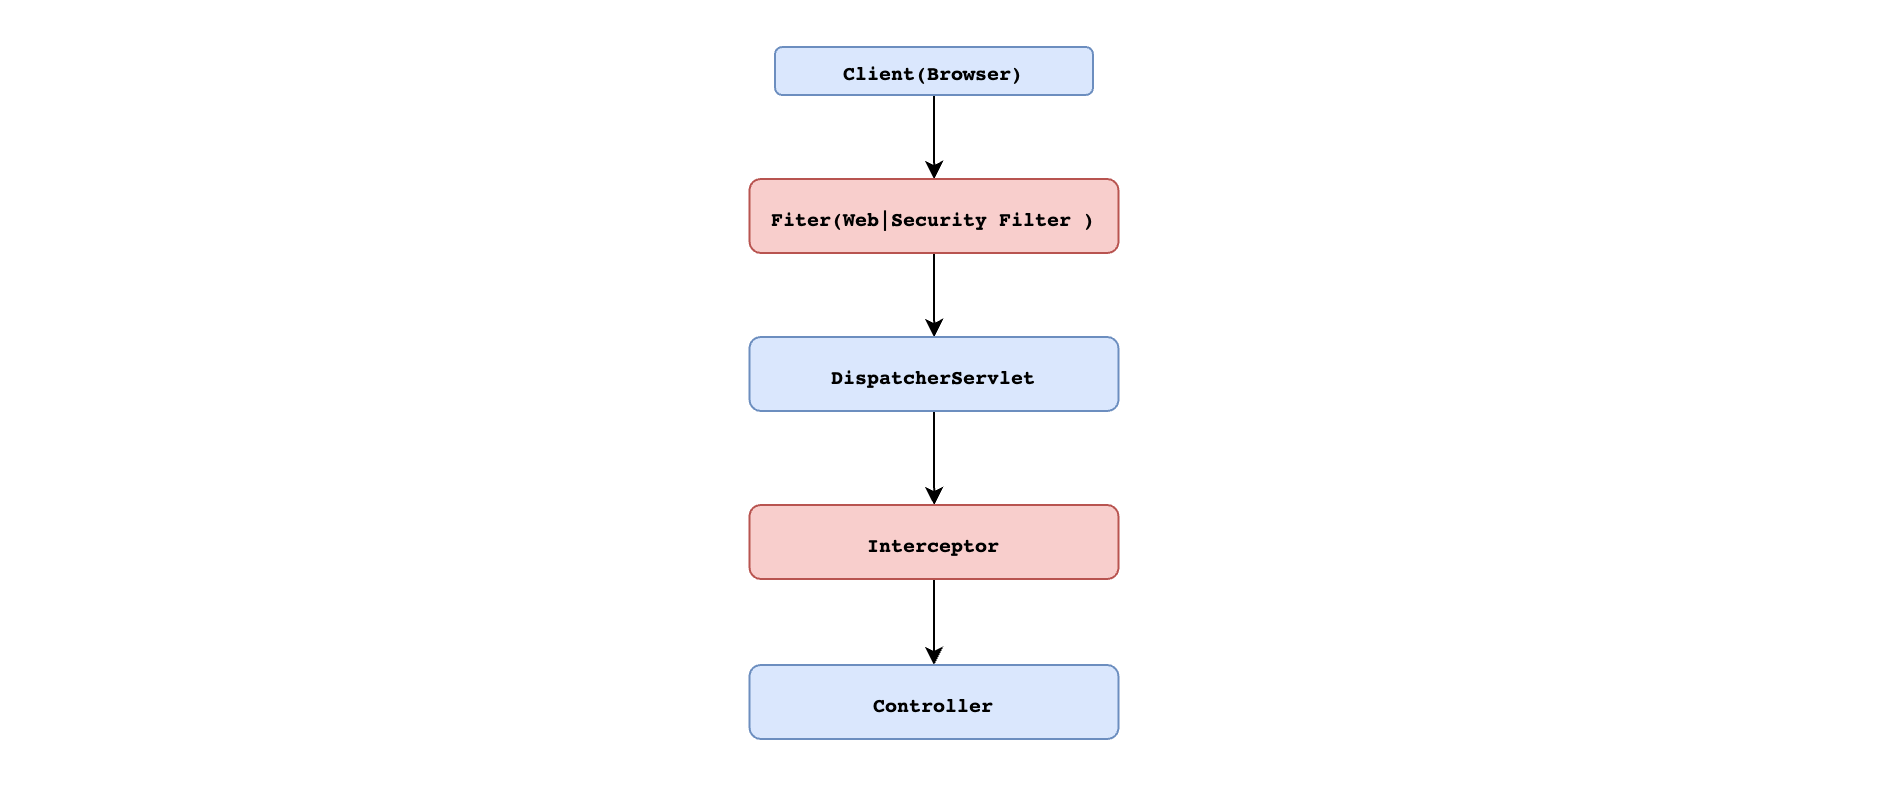
理清楚了执行顺序,我们再来看跨域请求过程。由于非简单请求都要首先发送一个预检请求
request),而预检请求并不会携带认证信息,所以预检请求就有被 Spring Security 拦截的可能。因此通过@CrossOrigin 注解或者重写 addCorsMappings 方法配置跨域就会失效。如果使用 CorsFilter 配置的跨域,只要过滤器优先级高于 SpringSecurity 过滤器就不会有问题。反之同样会出现问题。
解决方案
Spring Security 中也提供了更专业的方式来解决预检请求所面临的问题。如:
@Configuration
public class SecurityConfig extends WebSecurityConfigurerAdapter {
		@Override
    protected void configure(HttpSecurity http) throws Exception {
        http.authorizeRequests().anyRequest()
                .authenticated()
                .and()
                .formLogin()
                .and()
                .cors() //跨域处理方案
                .configurationSource(configurationSource())
                .and()
                .csrf().disable();
    }

    CorsConfigurationSource configurationSource() {
        CorsConfiguration corsConfiguration = new CorsConfiguration();
        corsConfiguration.setAllowedHeaders(Arrays.asList("*"));
        corsConfiguration.setAllowedMethods(Arrays.asList("*"));
        corsConfiguration.setAllowedOrigins(Arrays.asList("*"));
        corsConfiguration.setMaxAge(3600L);
        UrlBasedCorsConfigurationSource source = new UrlBasedCorsConfigurationSource();
        source.registerCorsConfiguration("/**", corsConfiguration);
        return source;
    }
}
第十章 异常处理
异常体系
Spring Security 中异常主要分为两大类:
- AuthenticationException: 认证异常
- AccessDeniedException: 授权异常
其中认证所涉及异常类型比较多,默认提供的异常类型如下:
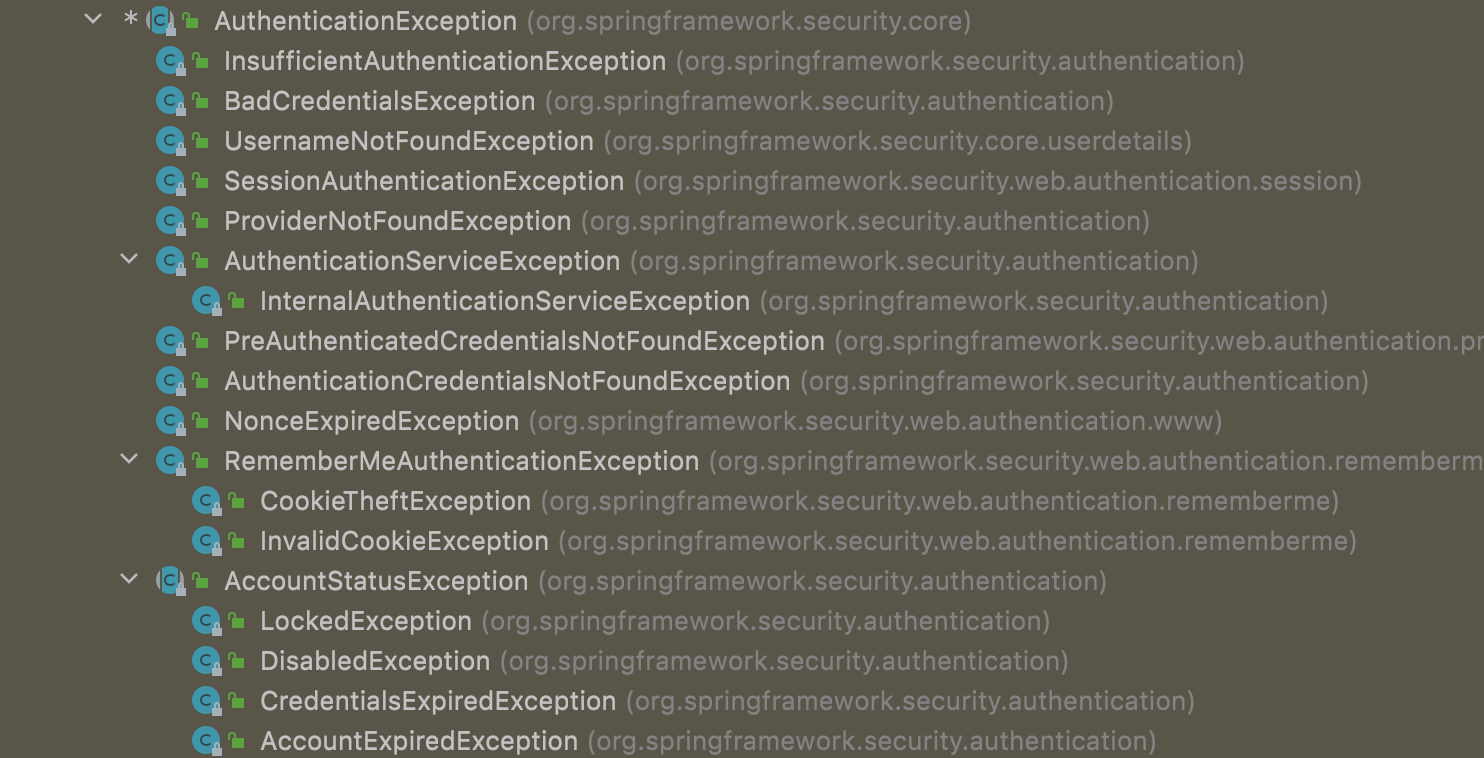
相比于认证异常,权限异常类就要少了很多,默认提供的权限异常如下:

在实际项目开发中,如果默认提供异常无法满足需求时,就需要根据实际需要来自定义异常类。
自定义异常处理配置
@Configuration
public class SecurityConfig extends WebSecurityConfigurerAdapter {
    @Override
    protected void configure(HttpSecurity http) throws Exception {
        http.authorizeRequests().anyRequest()
                .authenticated()
          			//.....
                .and()
                .exceptionHandling()//异常处理
                .authenticationEntryPoint((request, response, e) -> {
                  response.setContentType("application/json;charset=UTF-8");
                  response.setStatus(HttpStatus.UNAUTHORIZED.value());
                  response.getWriter().write("尚未认证,请进行认证操作!");
                })//认证异常处理
                .accessDeniedHandler((request, response, e) -> {
                  response.setContentType("application/json;charset=UTF-8");
                  response.setStatus(HttpStatus.FORBIDDEN.value());
                  response.getWriter().write("无权访问!");
                });//授权异常处理
    }
}
第十一章 授权
安全管理的另一大部分,其实比较简单。在编程不良人老师的视频中讲的比较全面涉及的面比较广,也比较复杂,但在实际生产中其实不需要那么复杂。视频中复杂的部分主要是在基于URL的授权配置中,要从 DB 中取得 url 与角色或者权限的关系并写入 Spring Security 的 SecurityMetadataSource 中,导致授权部分复杂,但在实际生产中绝大部分都是直接使用基于方法的权限控制。所以我们这里对于基于url的权限控制也只做简述。
权限管理
认证
身份认证,就是判断一个用户是否为合法用户的处理过程。Spring Security 中支持多种不同方式的认证,但是无论开发者使用那种方式认证,都不会影响授权功能使用。因为 Spring Security 很好做到了认证和授权解耦。
授权
授权,即访问控制,控制谁能访问哪些资源。简单的理解授权就是根据系统提前设置好的规则,给用户分配可以访问某一个资源的权限,用户根据自己所具有权限,去执行相应操作。
授权核心概念
在前面学习认证过程中,我们得知认证成功之后会将当前登录用户信息保存到 Authentication 对象中,Authentication 对象中有一个 getAuthorities() 方法,用来返回当前登录用户具备的权限信息,也就是当前用户具有权限信息。该方法的返回值为 Collection<? extends GrantedAuthority>,当需要进行权限判断时,就会根据集合返回权限信息调用相应方法进行判断。

那么问题来了,针对于这个返回值 GrantedAuthority 应该如何理解呢? 是角色还是权限?
我们针对于授权可以是基于角色权限管理和基于资源权限管理 ,从设计层面上来说,角色和权限是两个完全不同的东西:权限是一些具体操作,角色则是某些权限集合。如:READ_BOOK 和 ROLE_ADMIN 是完全不同的。因此至于返回值是什么取决于你的业务设计情况:
-
基于角色权限设计就是:
用户<=>角色<=>资源三者关系 返回就是用户的角色 -
基于资源权限设计就是:
用户<=>权限<=>资源三者关系 返回就是用户的权限 -
基于角色和资源权限设计就是:
用户<=>角色<=>权限<=>资源返回统称为用户的权限
为什么可以统称为权限,因为从代码层面角色和权限没有太大不同都是权限,特别是在 Spring Security 中,角色和权限处理方式基本上都是一样的。唯一区别 SpringSecurity 在很多时候会自动给角色添加一个ROLE_前缀,而权限则不会自动添加。
我们来深入源码分析:
其实在 Spring Security 中对于角色和权限的处理其实是一样的!
在基于方法的权限控制中主要使用的注解 @PreAuthorize 中的两个最常用的两个权限表达式就是 hasAuthority 和 hasRole 如同名字一样,一个对应的是角色一个对应的是权限,我们进入分析就可以找到两者的区别。
hasAuthority:
- 首先都是调用的 SecurityExpressionRoot 这个类中的功能,先在 hasAuthority 中直接调用 hasAnyAuthority
- 在 hasAnyAuthority 中调用 hasAnyAuthorityName 传入一个为 null 的前缀
- 在 hasAnyAuthorityName 中我们可以看到是由 getAuthoritySet 方法获取当前角色授权信息的,后面的代码都是做校验的,验证 roleSet是否存在这个权限,所以我们进入 getAuthoritySet 这个方法中看
- 在 getAuthoritySet 方法中我们可以看到是由 authentication 调用它的 getAuthorities 方法实现的获取权限信息,Authentication 对象在我们讲述 Spring Security 架构时就说过,它是用来保存我们的登录用户的信息的,就相当于调用我们的实现了 UserDetails 接口的类的重写的 getAuthorities 方法,我们只需要在我们自己重写的方法中,获取到我们的权限信息集合就可以
hasRole:
- 我们也可以看到基本和 hasAuthority 的调用流程相同,也是 hasRole 调用 hasAnyRole 然后再 调用 hasAnyAuthorityName ,这时候就已经和刚在的 hasAuthority 调用到了同一个方法,唯一的不同是这次传入了一个不为 null 的前缀 defaultRolePrefix
- 可以看到这个默认前缀被固定为 Role_ ,这就是我们的 基于角色的架构设计 与 基于 权限的架构设计的不同点,我们在注解上使用的角色会被自动加上一个 ROLE_ 的前缀,所以我们从数据库中取出的角色也应该带有 ROLE_ 的前缀
综上,可以看出我们的 Spring Security 在角色和权限架构上的处理基本相同,所以我们示例时,只用基于角色的架构示例,权限的架构基本一致


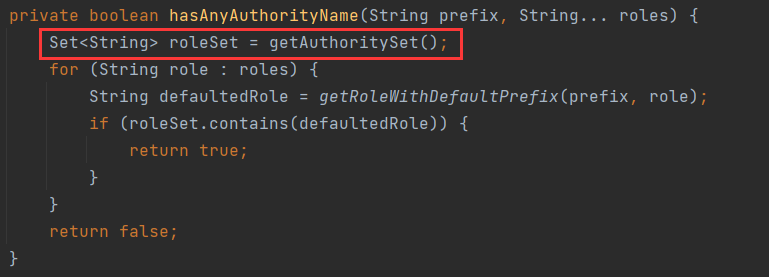
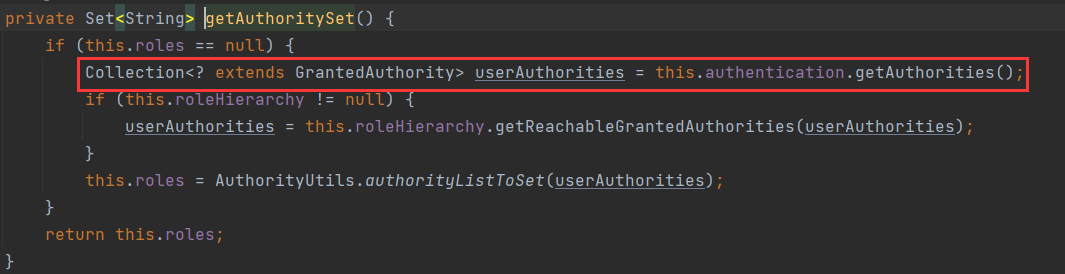


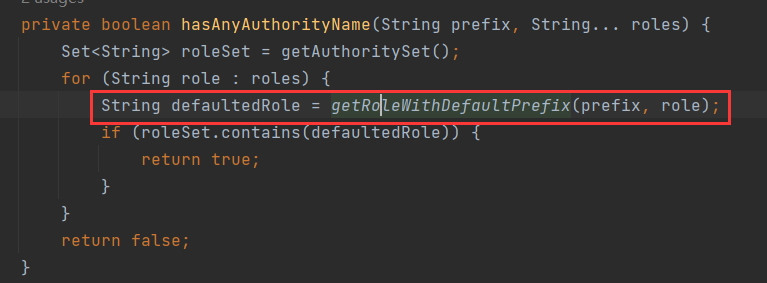
权限管理策略
Spring Security 中提供的权限管理策略主要有两种类型:
-
基于过滤器的权限管理 (FilterSecurityInterceptor)
- 基于过滤器的权限管理主要是用来拦截 HTTP 请求,拦截下来之后,根据 HTTP 请求地址进行权限校验。
- 对比原理:拦截到这次的请求 url,根据 url 我们从数据库中取出能访问对应 url 的所有角色或权限信息,然后由 AccessDecisionManager 判断我们的登录用户是否有这些角色/权限中的一个
-
基于 AOP 的权限管理 (MethodSecurityInterceptor)
- 基于 AOP 权限管理主要是用来处理方法级别的权限问题。当需要调用某一个方法时,通过 AOP 将操作拦截下来,然后判断用户是否具备相关的权限。
- 对比原理:由 AOP 拦截下来添加了对应注解的方法的请求信息,然后获取当前登录用户的所有权限信息,判断我们的用户所有权限中是否有在注解中写死的权限,有的话就允许访问
基于过滤器的权限管理
这里只是一个最基本的演示,我们把 url 和对应的权限直接在代码中写死
- 开发 controller
@RestController
public class DemoController {

    @GetMapping("/admin")
    public String admin() {
        return "admin ok";
    }

    @GetMapping("/user")
    public String user() {
        return "user ok";
    }

    @GetMapping("/getInfo")
    public String getInfo() {
        return "info ok";
    }
}
- 配置授权
package com.blr.config;

import org.springframework.context.annotation.Configuration;
import org.springframework.security.config.annotation.authentication.builders.AuthenticationManagerBuilder;
import org.springframework.security.config.annotation.web.builders.HttpSecurity;
import org.springframework.security.config.annotation.web.configuration.WebSecurityConfigurerAdapter;
import org.springframework.security.core.userdetails.User;
import org.springframework.security.core.userdetails.UserDetailsService;
import org.springframework.security.provisioning.InMemoryUserDetailsManager;

@Configuration
public class SecurityConfig extends WebSecurityConfigurerAdapter {


    //创建内存数据源
    public UserDetailsService userDetailsService() {
        InMemoryUserDetailsManager inMemoryUserDetailsManager = new InMemoryUserDetailsManager();
        inMemoryUserDetailsManager.createUser(User.withUsername("root").password("{noop}123").roles("ADMIN").build());
        inMemoryUserDetailsManager.createUser(User.withUsername("win7").password("{noop}123").roles("USER").build());
        inMemoryUserDetailsManager.createUser(User.withUsername("lisi").password("{noop}123").authorities("READ_BOOK").build());
        return inMemoryUserDetailsManager;
    }

    @Override
    protected void configure(AuthenticationManagerBuilder auth) throws Exception {
        auth.userDetailsService(userDetailsService());
    }

    @Override
    protected void configure(HttpSecurity http) throws Exception {
        http.authorizeHttpRequests()
                .antMatchers("/admin/**").hasRole("ADMIN")
                .antMatchers("/user/**").hasAnyRole("USER", "ADMIN")
                .antMatchers("/getInfo").hasAuthority("READ_BOOK")
                .anyRequest().authenticated()
                .and().formLogin()
                .and().csrf().disable();
    }
}
- 启动项目测试
权限表达式
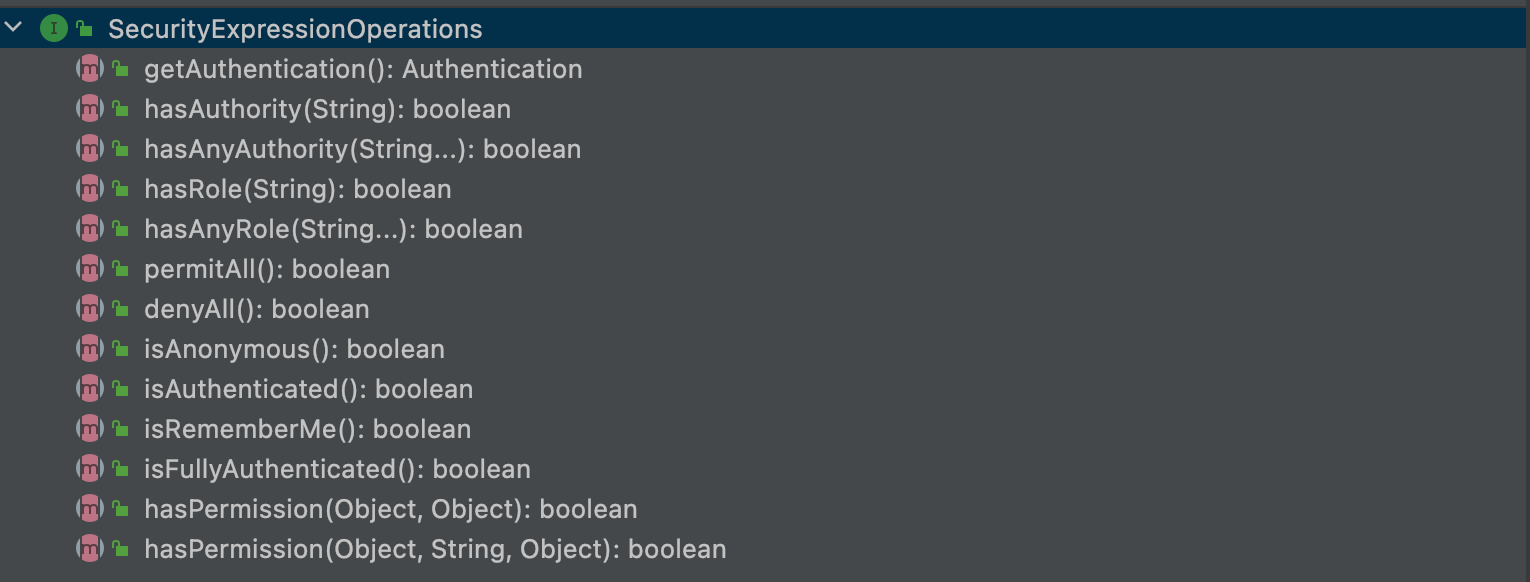
| 方法 | 说明 |
|---|---|
| hasAuthority(String authority) | 当前用户是否具备指定权限 |
| hasAnyAuthority(String… authorities) | 当前用户是否具备指定权限中任意一个 |
| hasRole(String role) | 当前用户是否具备指定角色 |
| hasAnyRole(String… roles); | 当前用户是否具备指定角色中任意一个 |
| permitAll(); | 放行所有请求/调用 |
| denyAll(); | 拒绝所有请求/调用 |
| isAnonymous(); | 当前用户是否是一个匿名用户 |
| isAuthenticated(); | 当前用户是否已经认证成功 |
| isRememberMe(); | 当前用户是否通过 Remember-Me 自动登录 |
| isFullyAuthenticated(); | 当前用户是否既不是匿名用户又不是通过 Remember-Me 自动登录的 |
| hasPermission(Object targetId, Object permission); | 当前用户是否具备指定目标的指定权限信息 |
| hasPermission(Object targetId, String targetType, Object permission); | 当前用户是否具备指定目标的指定权限信息 |
基于 方法 权限管理
基于方法的权限管理主要是通过 A0P 来实现的,Spring Security 中通过 MethodSecurityInterceptor 来提供相关的实现。不同在于 FilterSecurityInterceptor 只是在请求之前进行前置处理,MethodSecurityInterceptor 除了前置处理之外还可以进行后置处理。前置处理就是在请求之前判断是否具备相应的权限,后置处理则是对方法的执行结果进行二次过滤。前置处理和后置处理分别对应了不同的实现类。
@EnableGlobalMethodSecurity
EnableGlobalMethodSecurity 该注解是用来开启权限注解,用法如下:
@Configuration
@EnableGlobalMethodSecurity(prePostEnabled=true,securedEnabled=true, jsr250Enabled=true)
public class SecurityConfig extends WebsecurityConfigurerAdapter{}
- perPostEnabled: 开启 Spring Security 提供的四个权限注解,@PostAuthorize、@PostFilter、@PreAuthorize 以及@PreFilter。
- securedEnabled: 开启 Spring Security 提供的 @Secured 注解支持,该注解不支持权限表达式
- jsr250Enabled: 开启 JSR-250 提供的注解,主要是@DenyAll、@PermitAll、@RolesAll 同样这些注解也不支持权限表达式
# 以上注解含义如下(一般只需要使用前四个):
- @PostAuthorize: 在目前标方法执行之后进行权限校验。
- @PostFiter: 在目标方法执行之后对方法的返回结果进行过滤。
- @PreAuthorize:在目标方法执行之前进行权限校验。
- @PreFiter:在目前标方法执行之前对方法参数进行过滤。
- @Secured:访问目标方法必须具各相应的角色。
- @DenyAll:拒绝所有访问。
- @PermitAll:允许所有访问。
- @RolesAllowed:访问目标方法必须具备相应的角色。
这些基于方法的权限管理相关的注解,一般来说只要设置 prePostEnabled=true 就够用了。
基本用法
- 开启注解使用
@Configuration
@EnableGlobalMethodSecurity(prePostEnabled=true)
public class SecurityConfig extends WebsecurityConfigurerAdapter{}
- 使用注解
@RestController
@RequestMapping("/hello")
public class AuthorizeMethodController {

    @PreAuthorize("hasRole('ADMIN') and authentication.name=='root'")
    @GetMapping
    public String hello() {
        return "hello";
    }

    @PreAuthorize("authentication.name==#name")
    @GetMapping("/name")
    public String hello(String name) {
        return "hello:" + name;
    }

    @PreFilter(value = "filterObject.id%2!=0",filterTarget = "users")
    @PostMapping("/users")  //filterTarget 必须是 数组  集合
    public void addUsers(@RequestBody List<User> users) {
        System.out.println("users = " + users);
    }

    @PostAuthorize("returnObject.id==1")
    @GetMapping("/userId")
    public User getUserById(Integer id) {
        return new User(id, "blr");
    }

    @PostFilter("filterObject.id%2==0")
    @GetMapping("/lists")
    public List<User> getAll() {
        List<User> users = new ArrayList<>();
        for (int i = 0; i < 10; i++) {
            users.add(new User(i, "blr:" + i));
        }
        return users;
    }
}
基于过滤器的权限管理的原理分析
我觉的大家可能很好奇,使用基于 AOP 的权限管理,我们只需要在对应的 controller 层上的每个接口,添加对应的注解就可以做到权限控制,为什么我们现在还要深入的进行 基于过滤器的权限管理的原理分析 呢?其实我在学习的时候也有这种疑问,我觉得这种基于过滤器的全息管理根本没有学习的价值,它的使用要比 AOP 复杂的多,还要自己继承一个类重写方法,还需要每写一个接口就在数据库加上对应的允许访问的角色信息。我当时觉得这种的方法如此繁琐肯定没人用啊,其实不然。基于过滤器的权限管理无论是在耦合度上还是灵活性上都要远高于基于 AOP 的方法,基于 AOP 时,我们直接在方法上加注解,其一:我们其实写死了每个接口的访问权限,以后如果业务变动我们需要一个接口一个接口的修改,而且是直接修改代码,不灵活。写入数据库,我们甚至可以让系统管理员来可视化配置每个接口的访问权限!其二:虽说 AOP 本来就是为了解耦而存在的,但是你添加了注解也是增加了耦合,直接用过滤器,连切面都不需要了,耦合度更低!
综上所属,我来带大家分析一下基于过滤器的权限管理的原理,并追一下源码,看看整体流程,帮助大家理解一下
简介
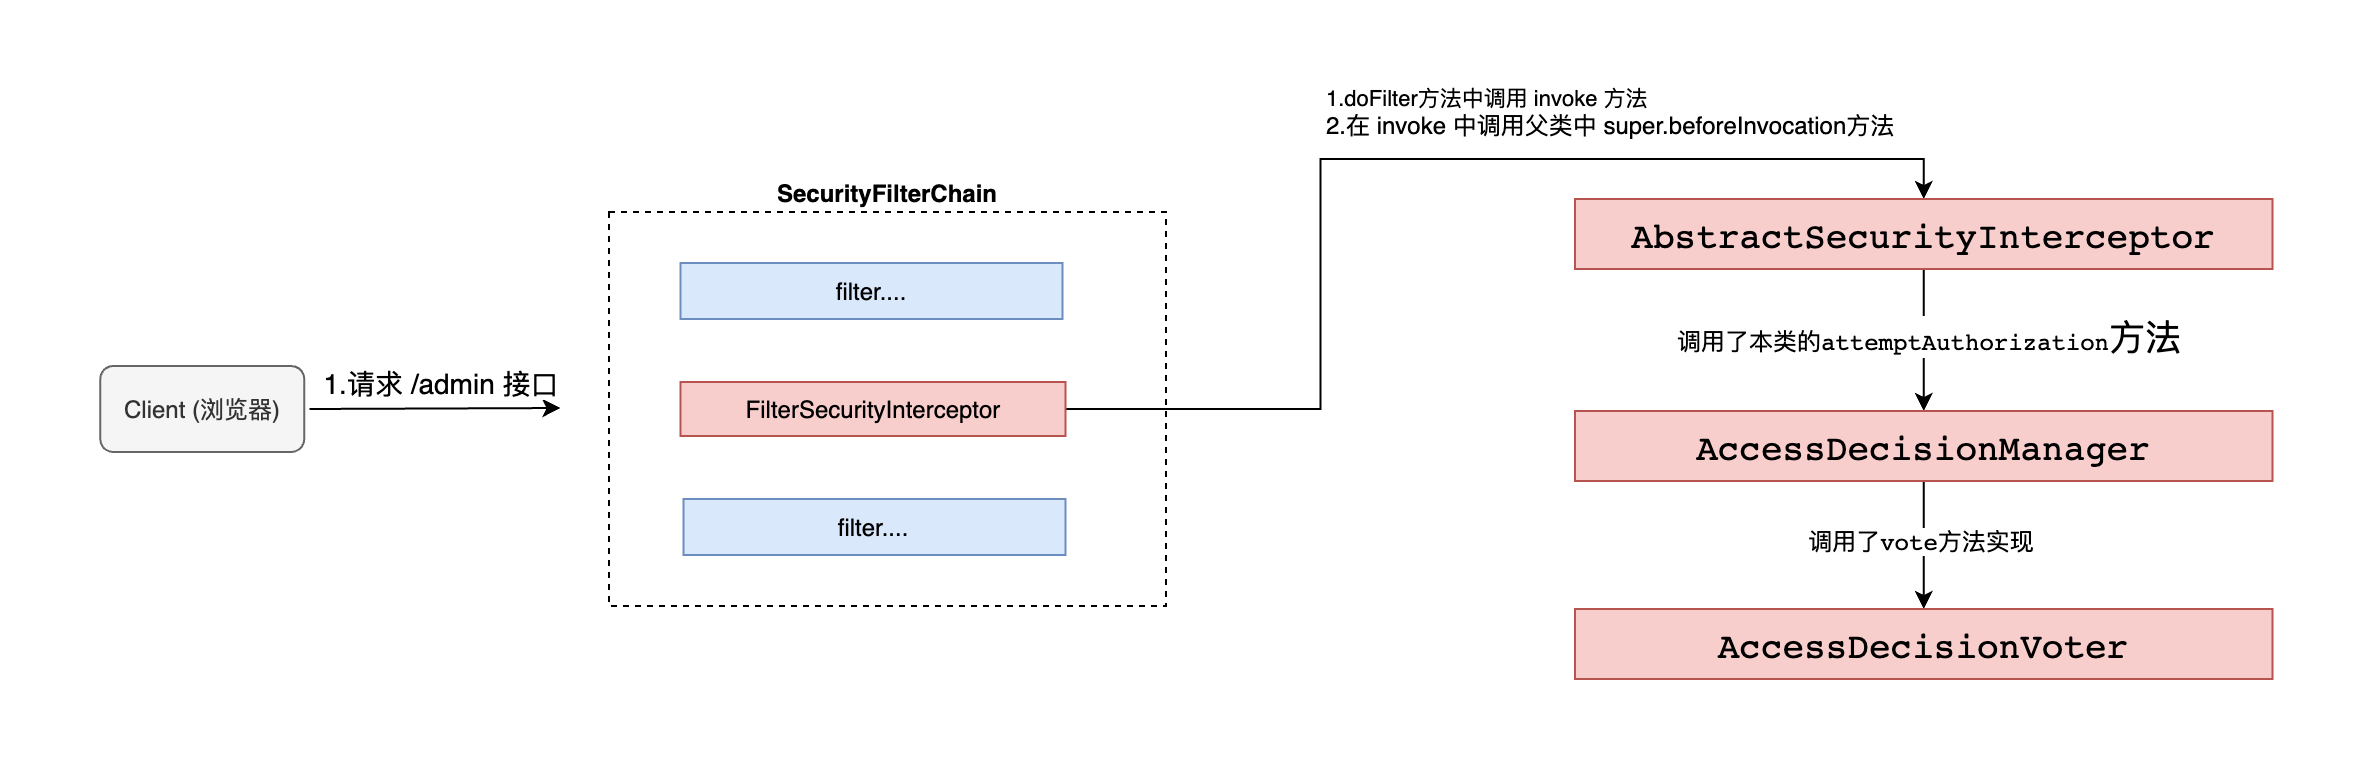
-
C
o
n
f
i
g
A
t
t
r
i
b
u
t
e
ConfigAttribute
ConfigAttribute 在 Spring Security 中,用户请求一个资源(通常是一个接口或者一个 Java 方法)需要的角色会被封装成一个 ConfigAttribute 对象,在 ConfigAttribute 中只有一个 getAttribute方法,该方法返回一个 String 字符串,就是角色的名称。一般来说,角色名称都带有一个
ROLE_前缀,投票器 AccessDecisionVoter 所做的事情,其实就是比较用户所具各的角色和请求某个资源所需的 ConfigAtuibute 之间的关系。 - A c c e s D e c i s i o n V o t e r AccesDecisionVoter AccesDecisionVoter 和 A c c e s s D e c i s i o n M a n a g e r AccessDecisionManager AccessDecisionManager 都有众多的实现类,在 AccessDecisionManager 中会换个遍历 AccessDecisionVoter,进而决定是否允许用户访问,因而 AaccesDecisionVoter 和 AccessDecisionManager 两者的关系类似于 AuthenticationProvider 和 ProviderManager 的关系。
认证流程图

认证流程追踪
- 先是 F i l t e r S e c u r i t y I n t e r c e p t o r FilterSecurityInterceptor FilterSecurityInterceptor 过滤器中的 d o F i l t e r doFilter doFilter 调用 i n v o k e invoke invoke 方法

- 可以看到调用 i n v o k e invoke invoke 方法时,传入的参数就是请求方式和请求路径,然后调用 b e f o r e I n v o c a t i o n beforeInvocation beforeInvocation
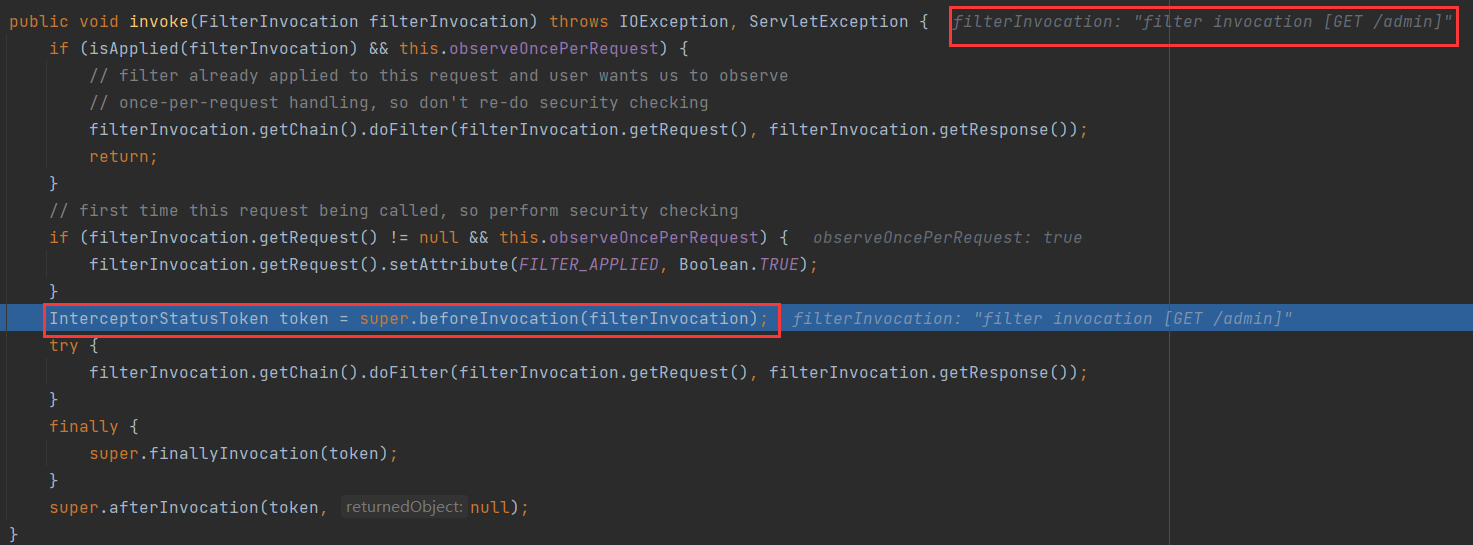
- 在 b e f o r e I n v o c a t i o n beforeInvocation beforeInvocation 中调用 o b t a i n S e c u r i t y M e t a d a t a S o u r c e obtainSecurityMetadataSource obtainSecurityMetadataSource 方法获取 F i l t e r I n v o c a t i o n S e c u r i t y M e t a d a t a S o u r c e FilterInvocationSecurityMetadataSource FilterInvocationSecurityMetadataSource 对象,再调用这个对象的 g e t A t t r i b u t e s getAttributes getAttributes 方法,通过这个方法我们获得了允许访问当前接口的 角色/权限 信息,之后再通过调用 a t t e m p t A u t h o r i z a t i o n attemptAuthorization attemptAuthorization 方法去授权,即判断当前用户是否拥有这些权限中的一个(这主要由 A c c e s D e c i s i o n V o t e r AccesDecisionVoter AccesDecisionVoter 和 A c c e s s D e c i s i o n M a n a g e r AccessDecisionManager AccessDecisionManager 来实现)
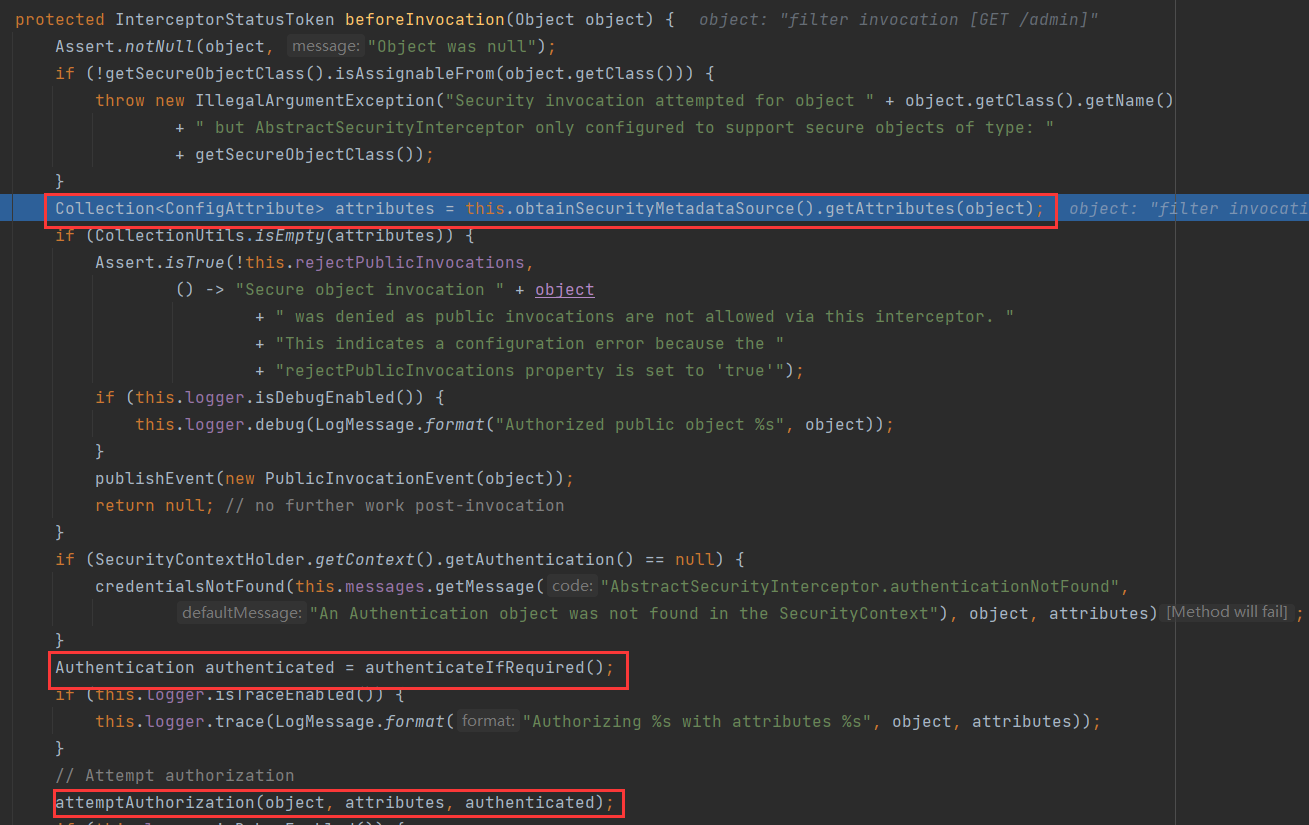
- 这里默认调用的是 D e f a u l t F i l t e r I n v o c a t i o n S e c u r i t y M e t a d a t a S o u r c e DefaultFilterInvocationSecurityMetadataSource DefaultFilterInvocationSecurityMetadataSource 这个实现类中的 g e t A t t r i b u t e s getAttributes getAttributes 方法,获取我们代码中配置的权限信息,我们自定义数据源实现的时候只需要继承 F i l t e r I n v o c a t i o n S e c u r i t y M e t a d a t a S o u r c e FilterInvocationSecurityMetadataSource FilterInvocationSecurityMetadataSource 接口并重写 g e t A t t r i b u t e s getAttributes getAttributes 方法,来获取我们数据库中的 角色/权限 信息集合就可以
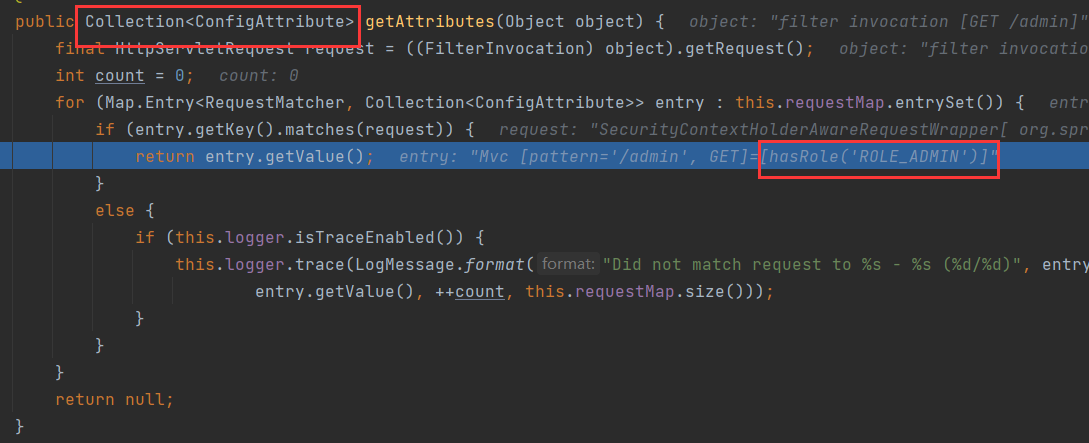
- 通过 A c c e s s D e c i s i o n M a n a g e r AccessDecisionManager AccessDecisionManager 的 d e c i d e decide decide 方法来进行是否授权的判断
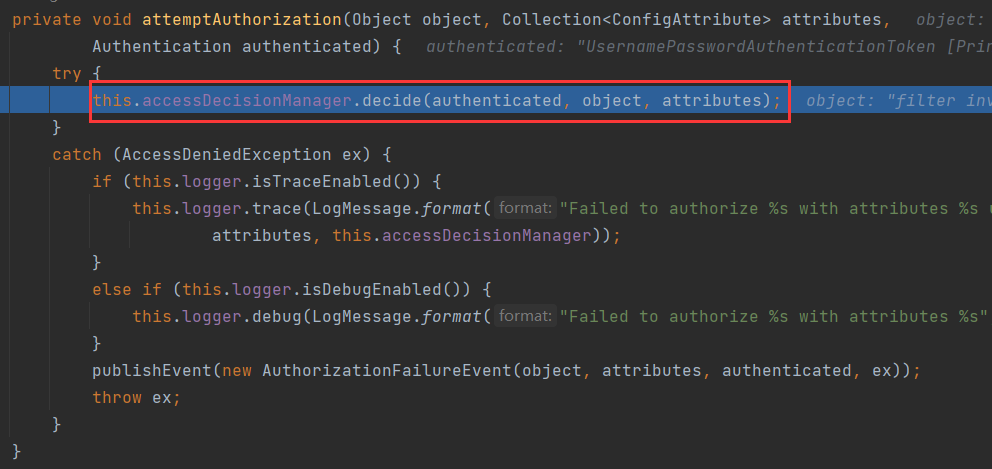
- 最后由 A c c e s D e c i s i o n V o t e r AccesDecisionVoter AccesDecisionVoter 决定是否授权
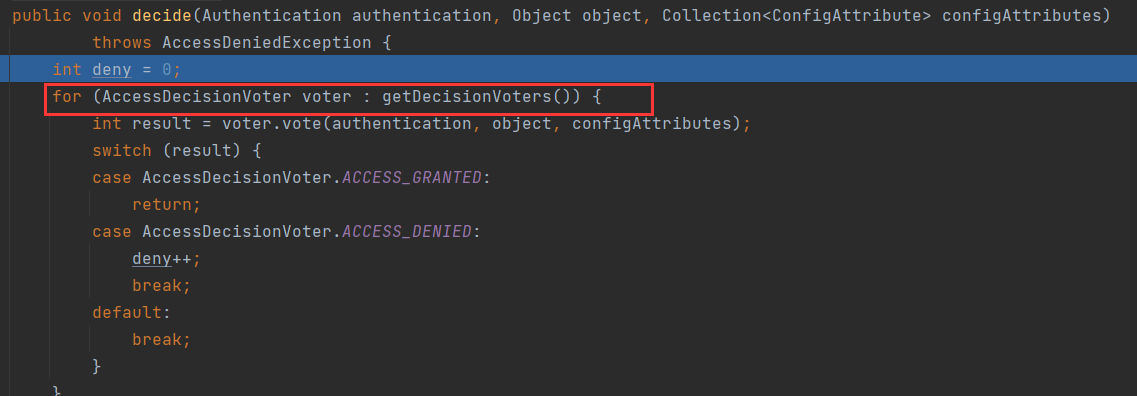
实战
在前面的案例中,我们配置的过滤器拦截规则和请求 URL 所需要的权限都是通过代码来配置的,这样就比较死板,如果想要调整访问某一个 URL 所需要的权限,就需要修改代码。
动态管理权限规则就是我们将 URL 拦截规则和访问 URI 所需要的权限都保存在数据库中,这样,在不修改源代码的情况下,只需要修改数据库中的数据,就可以对权限进行调整。
用户<--中间表--> 角色 <--中间表--> 菜单
库表设计
SET NAMES utf8mb4;
SET FOREIGN_KEY_CHECKS = 0;
-- ----------------------------
-- Table structure for menu
-- ----------------------------
DROP TABLE IF EXISTS `menu`;
CREATE TABLE `menu` (
  `id` int(11) NOT NULL AUTO_INCREMENT,
  `pattern` varchar(128) DEFAULT NULL,
  PRIMARY KEY (`id`)
) ENGINE=InnoDB AUTO_INCREMENT=4 DEFAULT CHARSET=utf8;

-- ----------------------------
-- Records of menu
-- ----------------------------
BEGIN;
INSERT INTO `menu` VALUES (1, '/admin/**');
INSERT INTO `menu` VALUES (2, '/user/**');
INSERT INTO `menu` VALUES (3, '/guest/**');
COMMIT;

-- ----------------------------
-- Table structure for menu_role
-- ----------------------------
DROP TABLE IF EXISTS `menu_role`;
CREATE TABLE `menu_role` (
  `id` int(11) NOT NULL AUTO_INCREMENT,
  `mid` int(11) DEFAULT NULL,
  `rid` int(11) DEFAULT NULL,
  PRIMARY KEY (`id`),
  KEY `mid` (`mid`),
  KEY `rid` (`rid`),
  CONSTRAINT `menu_role_ibfk_1` FOREIGN KEY (`mid`) REFERENCES `menu` (`id`),
  CONSTRAINT `menu_role_ibfk_2` FOREIGN KEY (`rid`) REFERENCES `role` (`id`)
) ENGINE=InnoDB AUTO_INCREMENT=5 DEFAULT CHARSET=utf8;

-- ----------------------------
-- Records of menu_role
-- ----------------------------
BEGIN;
INSERT INTO `menu_role` VALUES (1, 1, 1);
INSERT INTO `menu_role` VALUES (2, 2, 2);
INSERT INTO `menu_role` VALUES (3, 3, 3);
INSERT INTO `menu_role` VALUES (4, 3, 2);
COMMIT;

-- ----------------------------
-- Table structure for role
-- ----------------------------
DROP TABLE IF EXISTS `role`;
CREATE TABLE `role` (
  `id` int(11) NOT NULL AUTO_INCREMENT,
  `name` varchar(32) DEFAULT NULL,
  `nameZh` varchar(32) DEFAULT NULL,
  PRIMARY KEY (`id`)
) ENGINE=InnoDB AUTO_INCREMENT=4 DEFAULT CHARSET=utf8;

-- ----------------------------
-- Records of role
-- ----------------------------
BEGIN;
INSERT INTO `role` VALUES (1, 'ROLE_ADMIN', '系统管理员');
INSERT INTO `role` VALUES (2, 'ROLE_USER', '普通用户');
INSERT INTO `role` VALUES (3, 'ROLE_GUEST', '游客');
COMMIT;

-- ----------------------------
-- Table structure for user
-- ----------------------------
DROP TABLE IF EXISTS `user`;
CREATE TABLE `user` (
  `id` int(11) NOT NULL AUTO_INCREMENT,
  `username` varchar(32) DEFAULT NULL,
  `password` varchar(255) DEFAULT NULL,
  `enabled` tinyint(1) DEFAULT NULL,
  `locked` tinyint(1) DEFAULT NULL,
  PRIMARY KEY (`id`)
) ENGINE=InnoDB AUTO_INCREMENT=4 DEFAULT CHARSET=utf8;

-- ----------------------------
-- Records of user
-- ----------------------------
BEGIN;
INSERT INTO `user` VALUES (1, 'admin', '{noop}123', 1, 0);
INSERT INTO `user` VALUES (2, 'user', '{noop}123', 1, 0);
INSERT INTO `user` VALUES (3, 'blr', '{noop}123', 1, 0);
COMMIT;

-- ----------------------------
-- Table structure for user_role
-- ----------------------------
DROP TABLE IF EXISTS `user_role`;
CREATE TABLE `user_role` (
  `id` int(11) NOT NULL AUTO_INCREMENT,
  `uid` int(11) DEFAULT NULL,
  `rid` int(11) DEFAULT NULL,
  PRIMARY KEY (`id`),
  KEY `uid` (`uid`),
  KEY `rid` (`rid`),
  CONSTRAINT `user_role_ibfk_1` FOREIGN KEY (`uid`) REFERENCES `user` (`id`),
  CONSTRAINT `user_role_ibfk_2` FOREIGN KEY (`rid`) REFERENCES `role` (`id`)
) ENGINE=InnoDB AUTO_INCREMENT=5 DEFAULT CHARSET=utf8;

-- ----------------------------
-- Records of user_role
-- ----------------------------
BEGIN;
INSERT INTO `user_role` VALUES (1, 1, 1);
INSERT INTO `user_role` VALUES (2, 1, 2);
INSERT INTO `user_role` VALUES (3, 2, 2);
INSERT INTO `user_role` VALUES (4, 3, 3);
COMMIT;
SET FOREIGN_KEY_CHECKS = 1;
创建 springboot 应用
-
引入依赖
<dependency> <groupId>org.springframework.boot</groupId> <artifactId>spring-boot-starter-security</artifactId> </dependency> <dependency> <groupId>org.springframework.boot</groupId> <artifactId>spring-boot-starter-web</artifactId> </dependency> <dependency> <groupId>mysql</groupId> <artifactId>mysql-connector-java</artifactId> <version>5.1.38</version> </dependency> <dependency> <groupId>com.alibaba</groupId> <artifactId>druid</artifactId> <version>1.2.8</version> </dependency> <dependency> <groupId>org.mybatis.spring.boot</groupId> <artifactId>mybatis-spring-boot-starter</artifactId> <version>2.2.2</version> </dependency> -
配置配置文件
server.port=8080 spring.datasource.type=com.alibaba.druid.pool.DruidDataSource spring.datasource.driver-class-name=com.mysql.jdbc.Driver spring.datasource.url=jdbc:mysql://localhost:3306/security?characterEncoding=UTF-8 spring.datasource.username=root spring.datasource.password=root mybatis.mapper-locations=classpath:com/blr/mapper/*.xml mybatis.type-aliases-package=com.blr.entity -
创建实体类
public class User implements UserDetails {
    private Integer id;
    private String password;
    private String username;
    private boolean enabled;
    private boolean locked;
    private List<Role> roles;

    @Override
    public Collection<? extends GrantedAuthority> getAuthorities() {
        return roles.stream().map(r -> new SimpleGrantedAuthority(r.getName())).collect(Collectors.toList());
    }

    @Override
    public String getPassword() {
        return password;
    }

    @Override
    public String getUsername() {
        return username;
    }

    @Override
    public boolean isAccountNonExpired() {
        return true;
    }

    @Override
    public boolean isAccountNonLocked() {
        return !locked;
    }

    @Override
    public boolean isCredentialsNonExpired() {
        return true;
    }

    @Override
    public boolean isEnabled() {
        return enabled;
    }

    public void setId(Integer id) {
        this.id = id;
    }

    public void setPassword(String password) {
        this.password = password;
    }

    public void setUsername(String username) {
        this.username = username;
    }

    public void setEnabled(boolean enabled) {
        this.enabled = enabled;
    }

    public void setLocked(boolean locked) {
        this.locked = locked;
    }

    public void setRoles(List<Role> roles) {
        this.roles = roles;
    }

    public Integer getId() {
        return id;
    }

    public List<Role> getRoles() {
        return roles;
    }
}
public class Role { private Integer id; private String name; private String nameZh; public Integer getId() { return id; } public void setId(Integer id) { this.id = id; } public String getName() { return name; } public void setName(String name) { this.name = name; } public String getNameZh() { return nameZh; } public void setNameZh(String nameZh) { this.nameZh = nameZh; } }public class Menu { private Integer id; private String pattern; private List<Role> roles; public List<Role> getRoles() { return roles; } public void setRoles(List<Role> roles) { this.roles = roles; } public Integer getId() { return id; } public void setId(Integer id) { this.id = id; } public String getPattern() { return pattern; } public void setPattern(String pattern) { this.pattern = pattern; } } -
创建 mapper 接口
@Mapper
public interface UserMapper {
    List<Role> getUserRoleByUid(Integer uid);
    User loadUserByUsername(String username);
}
@Mapper public interface MenuMapper { List<Menu> getAllMenu(); } -
创建 mapper 文件
<!DOCTYPE mapper PUBLIC "-//mybatis.org//DTD Mapper 3.0//EN" "http://mybatis.org/dtd/mybatis-3-mapper.dtd"> <mapper namespace="com.blr.mapper.UserMapper"> <select id="loadUserByUsername" resultType="com.blr.entity.User"> select * from user where username = #{username}; </select> <select id="getUserRoleByUid" resultType="com.blr.entity.Role"> select r.* from role r, user_role ur where ur.uid = #{uid} and ur.rid = r.id </select> </mapper><mapper namespace="com.blr.mapper.MenuMapper"> <resultMap id="MenuResultMap" type="com.blr.entity.Menu"> <id property="id" column="id"/> <result property="pattern" column="pattern"></result> <collection property="roles" ofType="com.blr.entity.Role"> <id column="rid" property="id"/> <result column="rname" property="name"/> <result column="rnameZh" property="nameZh"/> </collection> </resultMap> <select id="getAllMenu" resultMap="MenuResultMap"> select m.*, r.id as rid, r.name as rname, r.nameZh as rnameZh from menu m left join menu_role mr on m.`id` = mr.`mid` left join role r on r.`id` = mr.`rid` </select> </mapper> -
创建 service 接口
@Service
public class UserService implements UserDetailsService {
    private final UserMapper userMapper;

    @Autowired
    public UserService(UserMapper userMapper) {
        this.userMapper = userMapper;
    }

    @Override
    public UserDetails loadUserByUsername(String username) throws UsernameNotFoundException {
        User user = userMapper.loadUserByUsername(username);
        if (user == null) {
            throw new UsernameNotFoundException("用户不存在");
        }
        user.setRoles(userMapper.getUserRoleByUid(user.getId()));
        return user;
    }
}
@Service public class MenuService { private final MenuMapper menuMapper; @Autowired public MenuService(MenuMapper menuMapper) { this.menuMapper = menuMapper; } public List<Menu> getAllMenu() { return menuMapper.getAllMenu(); } } -
创建测试 controller
@RestController public class HelloController { @GetMapping("/admin/hello") public String admin() { return "hello admin"; } @GetMapping("/user/hello") public String user() { return "hello user"; } @GetMapping("/guest/hello") public String guest() { return "hello guest"; } @GetMapping("/hello") public String hello() { return "hello"; } } -
创建 CustomSecurityMetadataSource
@Component public class CustomSecurityMetadataSource implements FilterInvocationSecurityMetadataSource { private final MenuService menuService; @Autowired public CustomSecurityMetadataSource(MenuService menuService) { this.menuService = menuService; } AntPathMatcher antPathMatcher = new AntPathMatcher(); @Override public Collection<ConfigAttribute> getAttributes(Object object) throws IllegalArgumentException { String requestURI = ((FilterInvocation) object).getRequest().getRequestURI(); List<Menu> allMenu = menuService.getAllMenu(); for (Menu menu : allMenu) { if (antPathMatcher.match(menu.getPattern(), requestURI)) { String[] roles = menu.getRoles().stream().map(r -> r.getName()).toArray(String[]::new); return SecurityConfig.createList(roles); } } return null; } @Override public Collection<ConfigAttribute> getAllConfigAttributes() { return null; } @Override public boolean supports(Class<?> clazz) { return FilterInvocation.class.isAssignableFrom(clazz); } } -
配置 Security 配置
@Configuration public class SecurityConfig extends WebSecurityConfigurerAdapter { private final CustomSecurityMetadataSource customSecurityMetadataSource; private final UserService userService; @Autowired public SecurityConfig(CustomSecurityMetadataSource customSecurityMetadataSource, UserService userService) { this.customSecurityMetadataSource = customSecurityMetadataSource; this.userService = userService; } @Override protected void configure(AuthenticationManagerBuilder auth) throws Exception { auth.userDetailsService(userService); } @Override protected void configure(HttpSecurity http) throws Exception { ApplicationContext applicationContext = http.getSharedObject(ApplicationContext.class); http.apply(new UrlAuthorizationConfigurer<>(applicationContext)) .withObjectPostProcessor(new ObjectPostProcessor<FilterSecurityInterceptor>() { @Override public <O extends FilterSecurityInterceptor> O postProcess(O object) { object.setSecurityMetadataSource(customSecurityMetadataSource); object.setRejectPublicInvocations(true); return object; } }); http.formLogin() .and() .csrf().disable(); } } -
启动入口类进行测试
第十二章 OAuth2
常见的第三方登录方式
OAuth2 简介
OAuth 是一个开放的非常重要的认证标准/协议,该标准允许用户让第三方应用访问该用户在某一网站上存储的私密资源(如头像、照片、视频等),并且在这个过程中无须将用户名和密码提供给第三方应用。通过令牌(token)可以实现这一功能,每一个令牌授权一个特定的网站在特定的时段内允许可特定的资源。OAuth 让用户可以授权第三方网站灵活访问它们存储在另外一些资源服务器上的特定信息,而非所有内容。对于用户而言,我们在互联网应用中最常见的 OAuth 应用就是各种第三方登录,例如QQ授权登录、微信授权登录、微博授权登录、GitHub 授权登录等。
例如用户想登录 Ruby China,传统方式是使用用户名密码但是这样并不安全,因为网站会存储你的用户名密码,这样可能会导致密码泄露。这种授权方式安全隐患很大,如果使用 OAuth 协议就能很好地解决这一问题。
注意: OAuth2 是OAuth 协议的下一版本,但不兼容 OAuth 1.0。 OAuth2 关注客户端开发者的简易性,同时为 Web 应用、桌面应用、移动设备、IoT 设备提供专门的认证流程。
OAuth2 授权总体流程
角色梳理: 第三方应用 <----> 存储用户私密信息应用 ----> 授权服务器 ----> 资源服务器
整体流程如下:(图片来自 RFC6749文档 https://tools.ietf.org/html/rfc6749)
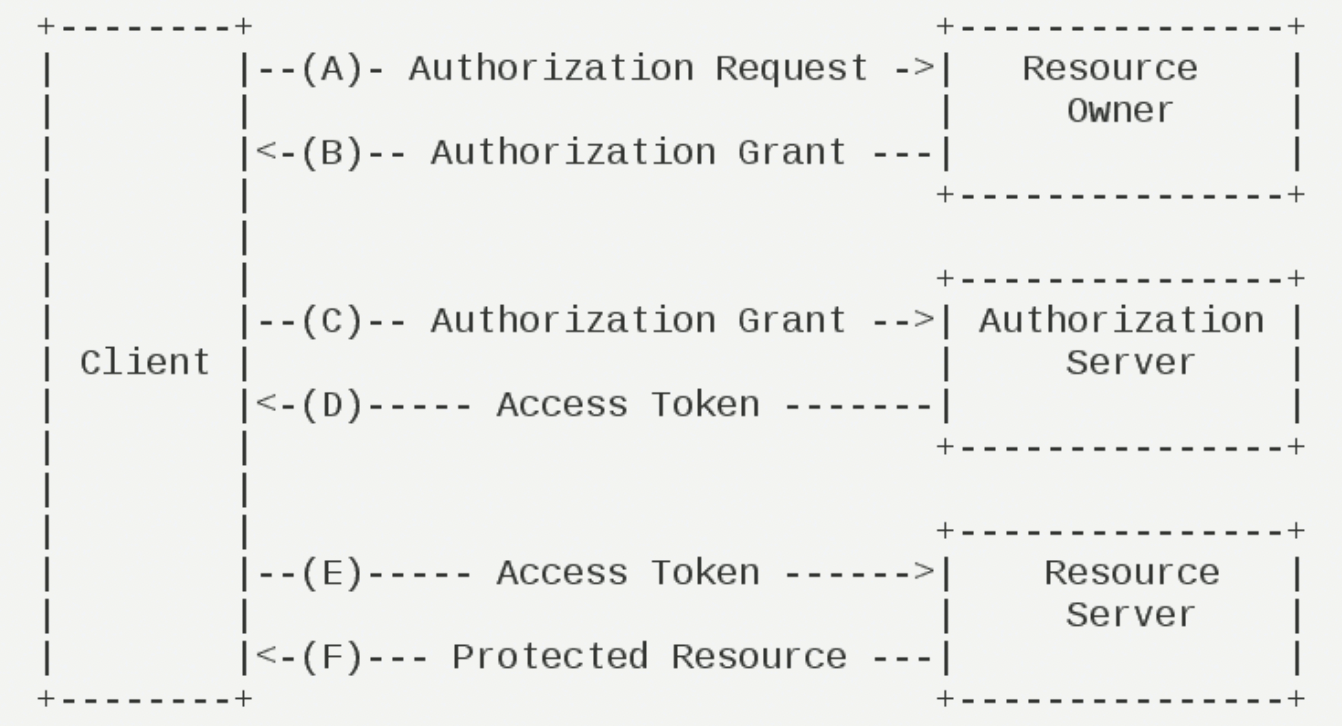
- (A)用户打开客户端以后,客户端要求用户给予授权。
- (B)用户同意给予客户端授权。
- (C)客户端使用上一步获得的授权,向认证服务器申请令牌。
- (D)认证服务器对客户端进行认证以后,确认无误,同意发放令牌。
- (E)客户端使用令牌,向资源服务器申请获取资源。
- (F)资源服务器确认令牌无误,同意向客户端开放资源。
从上图中我们可以看出六个步骤之中,B是关键,即用户怎样才能给于客户端授权。同时会发现 OAuth2 中包含四种不同的角色:
- **Client:**第三方应用。
- Resource Owner:资源所有者。
- Authorization Server :授权服务器。
- Resource Server: 资源服务器。
四种授权模式
授权码模式
授权码模式(Authorization Code) 是功能最完整、流程最严密、最安全并且使用最广泛的一种OAuth2授权模式。同时也是最复杂的一种授权模式,它的特点就是通过客户端的后台服务器,与服务提供商的认证服务器进行互动。其具体的授权流程如图所示(图片来自 RFC6749文档 https://tools.ietf.org/html/rfc6749)
- Third-party application:第三方应用程序,简称"客户端"(client);
- Resource Owner:资源所有者,简称"用户"(user);
- User Agent:用户代理,是指浏览器;
- Authorization Server:认证服务器,即服务端专门用来处理认证的服务器;
- Resource Server:资源服务器,即服务端存放用户生成的资源的服务器。它与认证服务器,可以是同一台服务器,也可以是不同的服务器。

具体流程如下:
-
(A)用户访问第三方应用,第三方应用通过浏览器导向认证服务器。
-
(B)用户选择是否给予客户端授权。
-
(C)假设用户给予授权,认证服务器将用户导向客户端事先指定的"重定向URI"(redirection URI),同时附上一个授权码。
-
(D)客户端收到授权码,附上早先的"重定向URI",向认证服务器申请令牌。这一步是在客户端的后台的服务器上完成的,对用户不可见。
-
(E)认证服务器核对了授权码和重定向URI,确认无误后,向客户端发送访问令牌(access token)和更新令牌(refresh token)。
核心参数:
https://wx.com/oauth/authorize?response_type=code&client_id=CLIENT_ID&redirect_uri=http://www.baidu.com&scope=read
| 字段 | 描述 |
|---|---|
| client_id | 授权服务器注册应用后的唯一标识 |
| response_type | 必须 固定值 在授权码中必须为 code |
| redirect_uri | 必须 通过客户端注册的重定向URL |
| scope | 必须 令牌可以访问资源权限 read 只读 all 读写 |
| state | 可选 存在原样返回客户端 用来防止 CSRF跨站攻击 |
简化模式
**简化模式(implicit grant type)**不通过第三方应用程序的服务器,直接在浏览器中向认证服务器申请令牌,跳过了"授权码"这个步骤,因此得名。所有步骤在浏览器中完成,令牌对访问者是可见的,且客户端不需要认证。其具体的授权流程如图所示(图片来自 RFC6749文档 https://tools.ietf.org/html/rfc6749)
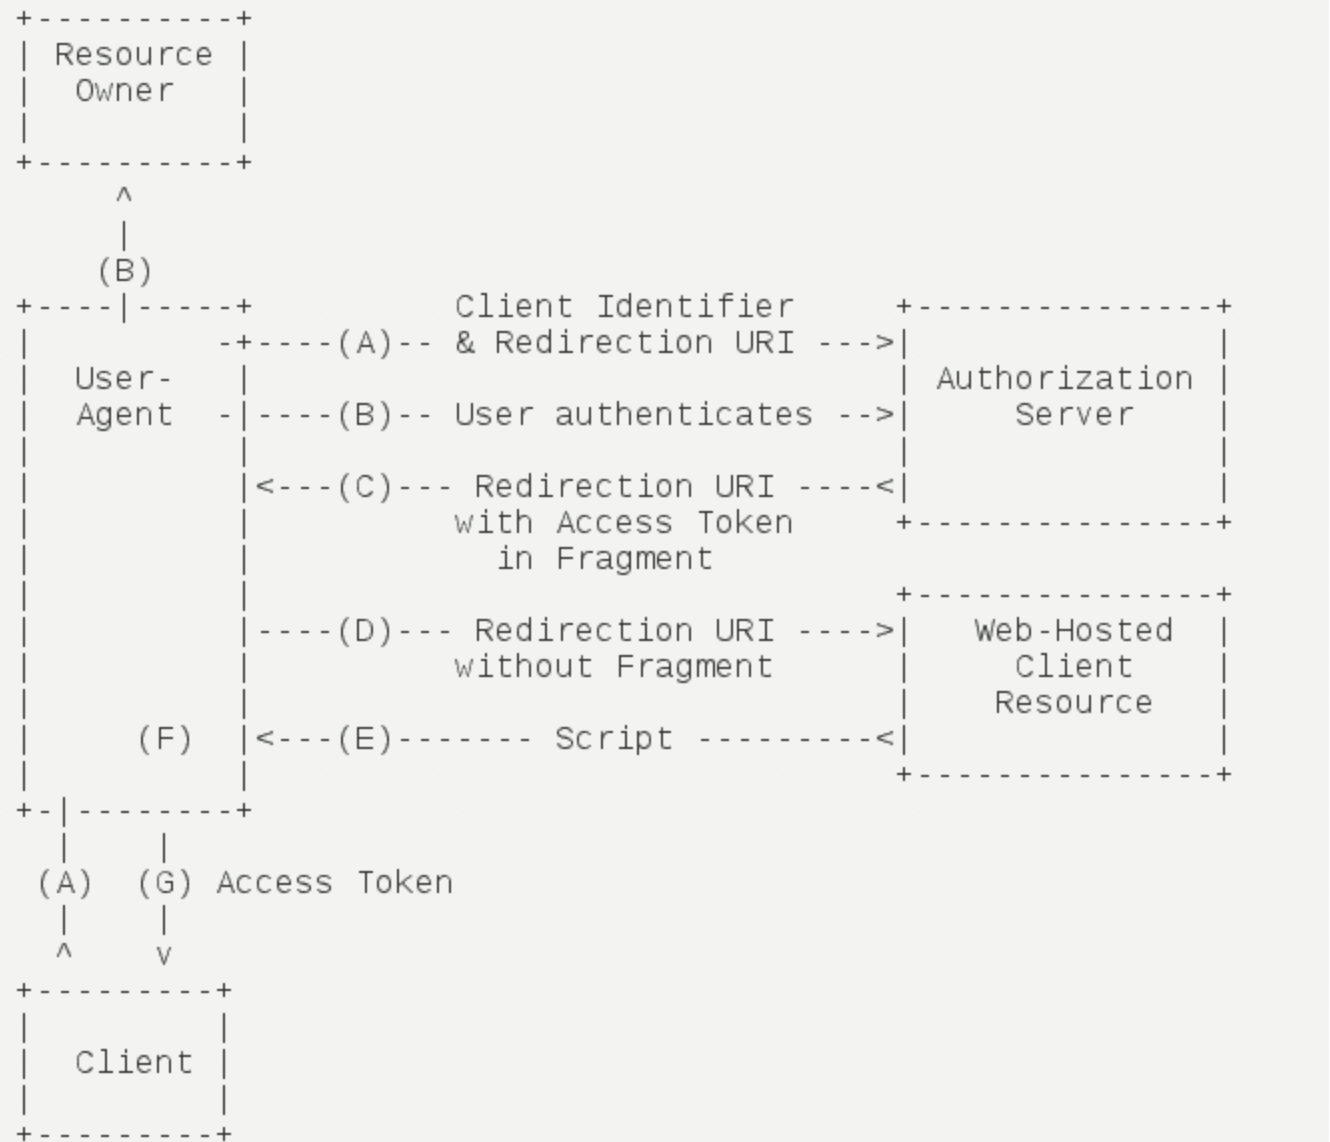
具体步骤如下:
- (A)第三方应用将用户导向认证服务器。
- (B)用户决定是否给于客户端授权。
- (C)假设用户给予授权,认证服务器将用户导向客户端指定的"重定向URI",并在URI的Hash部分包含了访问令牌。#token
- (D)浏览器向资源服务器发出请求,其中不包括上一步收到的Hash值。
- (E)资源服务器返回一个网页,其中包含的代码可以获取Hash值中的令牌。
- (F)浏览器执行上一步获得的脚本,提取出令牌。
- (G)浏览器将令牌发给客户端。
核心参数:
https://wx.com/oauth/authorize?response_type=token&client_id=CLIENT_ID&redirect_uri=http://www.baidu.com&scope=read
| 字段 | 描述 |
|---|---|
| client_id | 授权服务器注册应用后的唯一标识 |
| response_type | 必须 固定值 在授权码中必须为 token |
| redirect_uri | 必须 通过客户端注册的重定向URL |
| scope | 必须 令牌可以访问资源权限 |
| state | 可选 存在原样返回客户端 用来防止 CSRF跨站攻击 |
密码模式
**密码模式(Resource Owner Password Credentials Grant)**中,用户向客户端提供自己的用户名和密码。客户端使用这些信息,向"服务商提供商"索要授权。在这种模式中,用户必须把自己的密码给客户端,但是客户端不得储存密码。这通常用在用户对客户端高度信任的情况下,比如客户端是操作系统的一部分,或者由一个相同公司出品。而认证服务器只有在其他授权模式无法执行的情况下,才能考虑使用这种模式。其具体的授权流程如图所示(图片来自 RFC6749文档 https://tools.ietf.org/html/rfc6749)
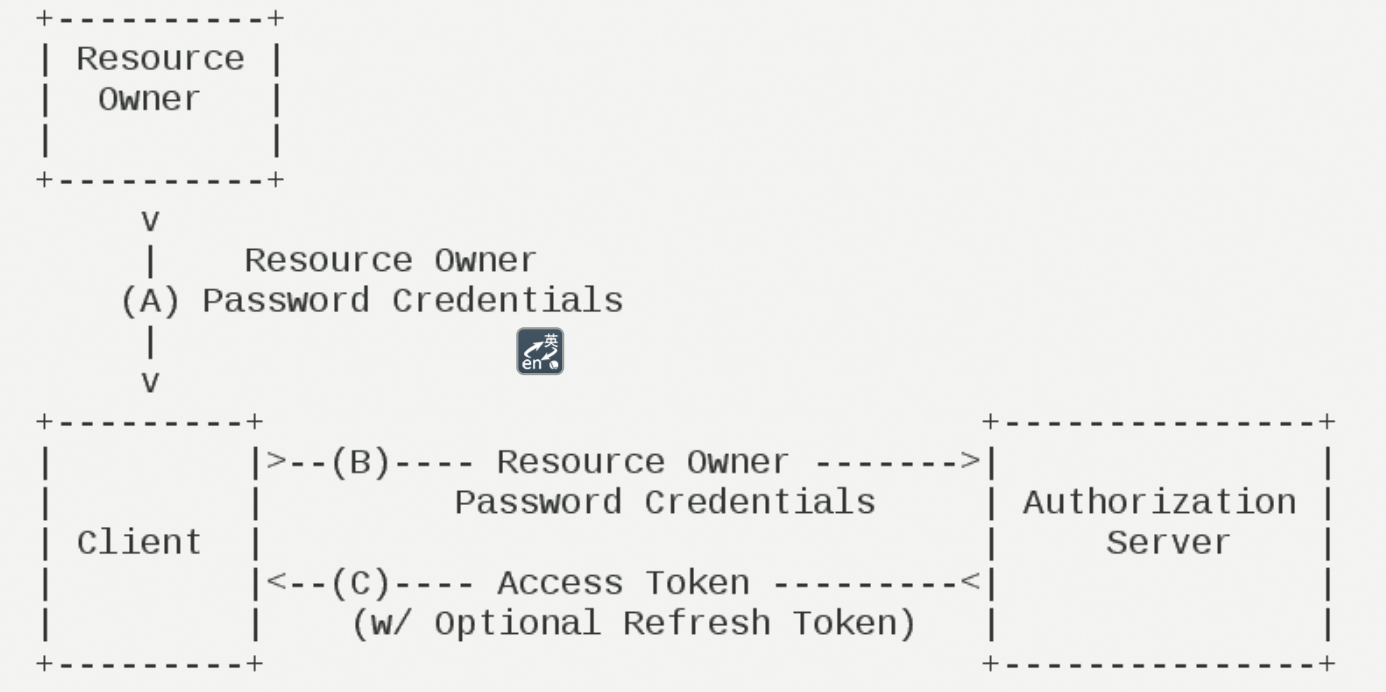
具体步骤如下:
-
(A)用户向客户端提供用户名和密码。
-
(B)客户端将用户名和密码发给认证服务器,向后者请求令牌。
-
(C)认证服务器确认无误后,向客户端提供访问令牌。
核心参数:
https://wx.com/token?grant_type=password&username=USERNAME&password=PASSWORD&client_id=CLIENT_ID
客户端模式
**客户端模式(Client Credentials Grant)**指客户端以自己的名义,而不是以用户的名义,向"服务提供商"进行认证。严格地说,客户端模式并不属于OAuth框架所要解决的问题。在这种模式中,用户直接向客户端注册,客户端以自己的名义要求"服务提供商"提供服务,其实不存在授权问题。
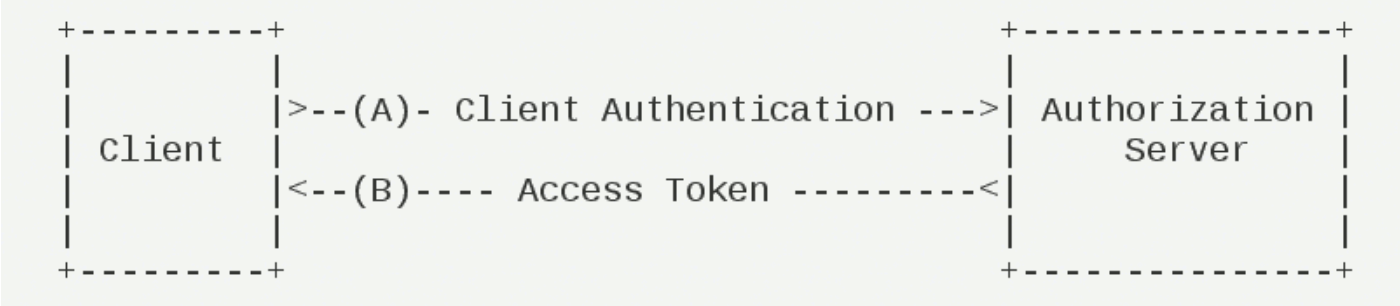
具体步骤如下:
-
(A)客户端向认证服务器进行身份认证,并要求一个访问令牌。
-
(B)认证服务器确认无误后,向客户端提供访问令牌。
https://wx.com/token?grant_type=client_credentials&client_id=CLIENT_ID&client_secret=CLIENT_SECRET
OAuth2 标准接口
-
/oauth/authorize:授权端点 -
/oauth/token:获取令牌端点 -
/oauth/confirm_access:用户确认授权提交端点
-
/oauth/error:授权服务错误信息端点
-
/oauth/check_token:用于资源服务访问的令牌解析端点
-
/oauth/token_key:提供公有密匙的端点,如果使用JWT令牌的话
GitHub 授权登录
创建 OAuth 应用
访问 github 并登录,在https://github.com/settings/profile中找到 Developer Settings 选项
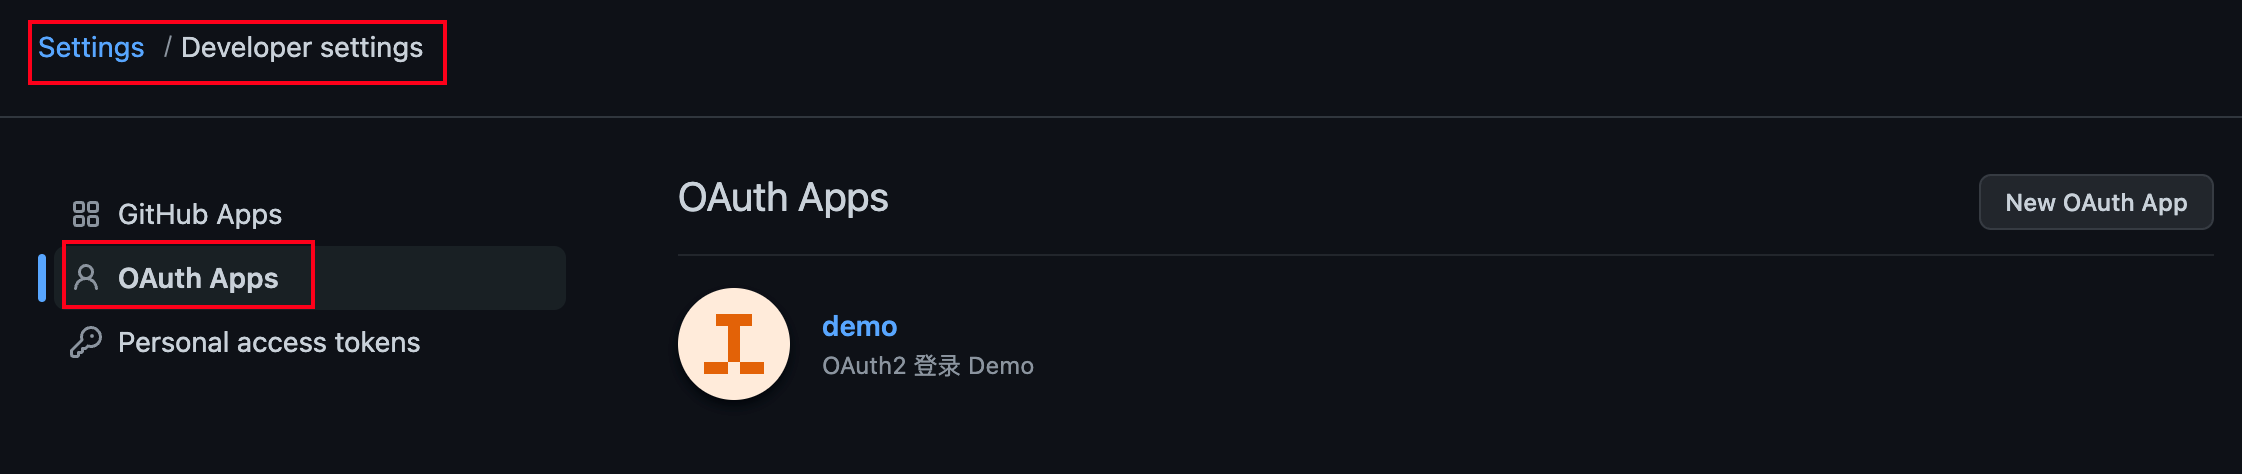
- 创建 OAuth App并输入一下基本信息:
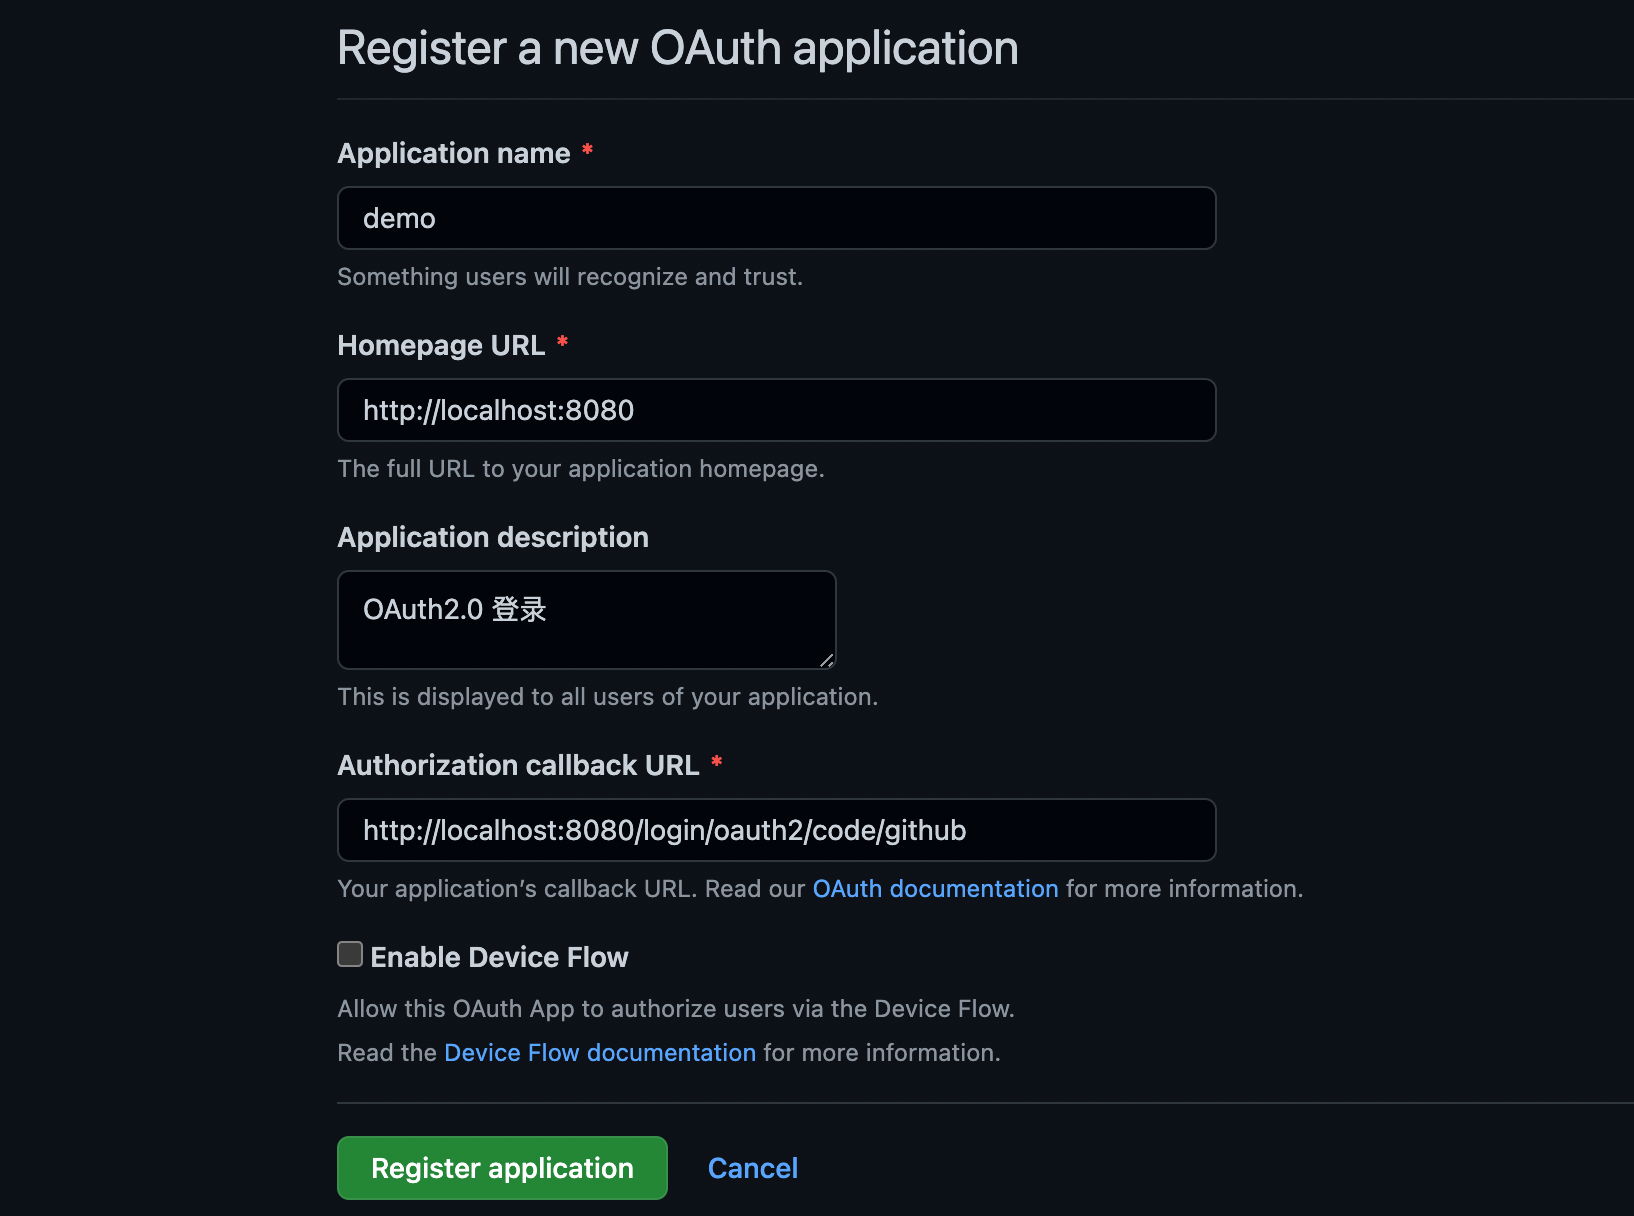
- 注册成功后会获取到对应的 Client ID 和 Client Secret。
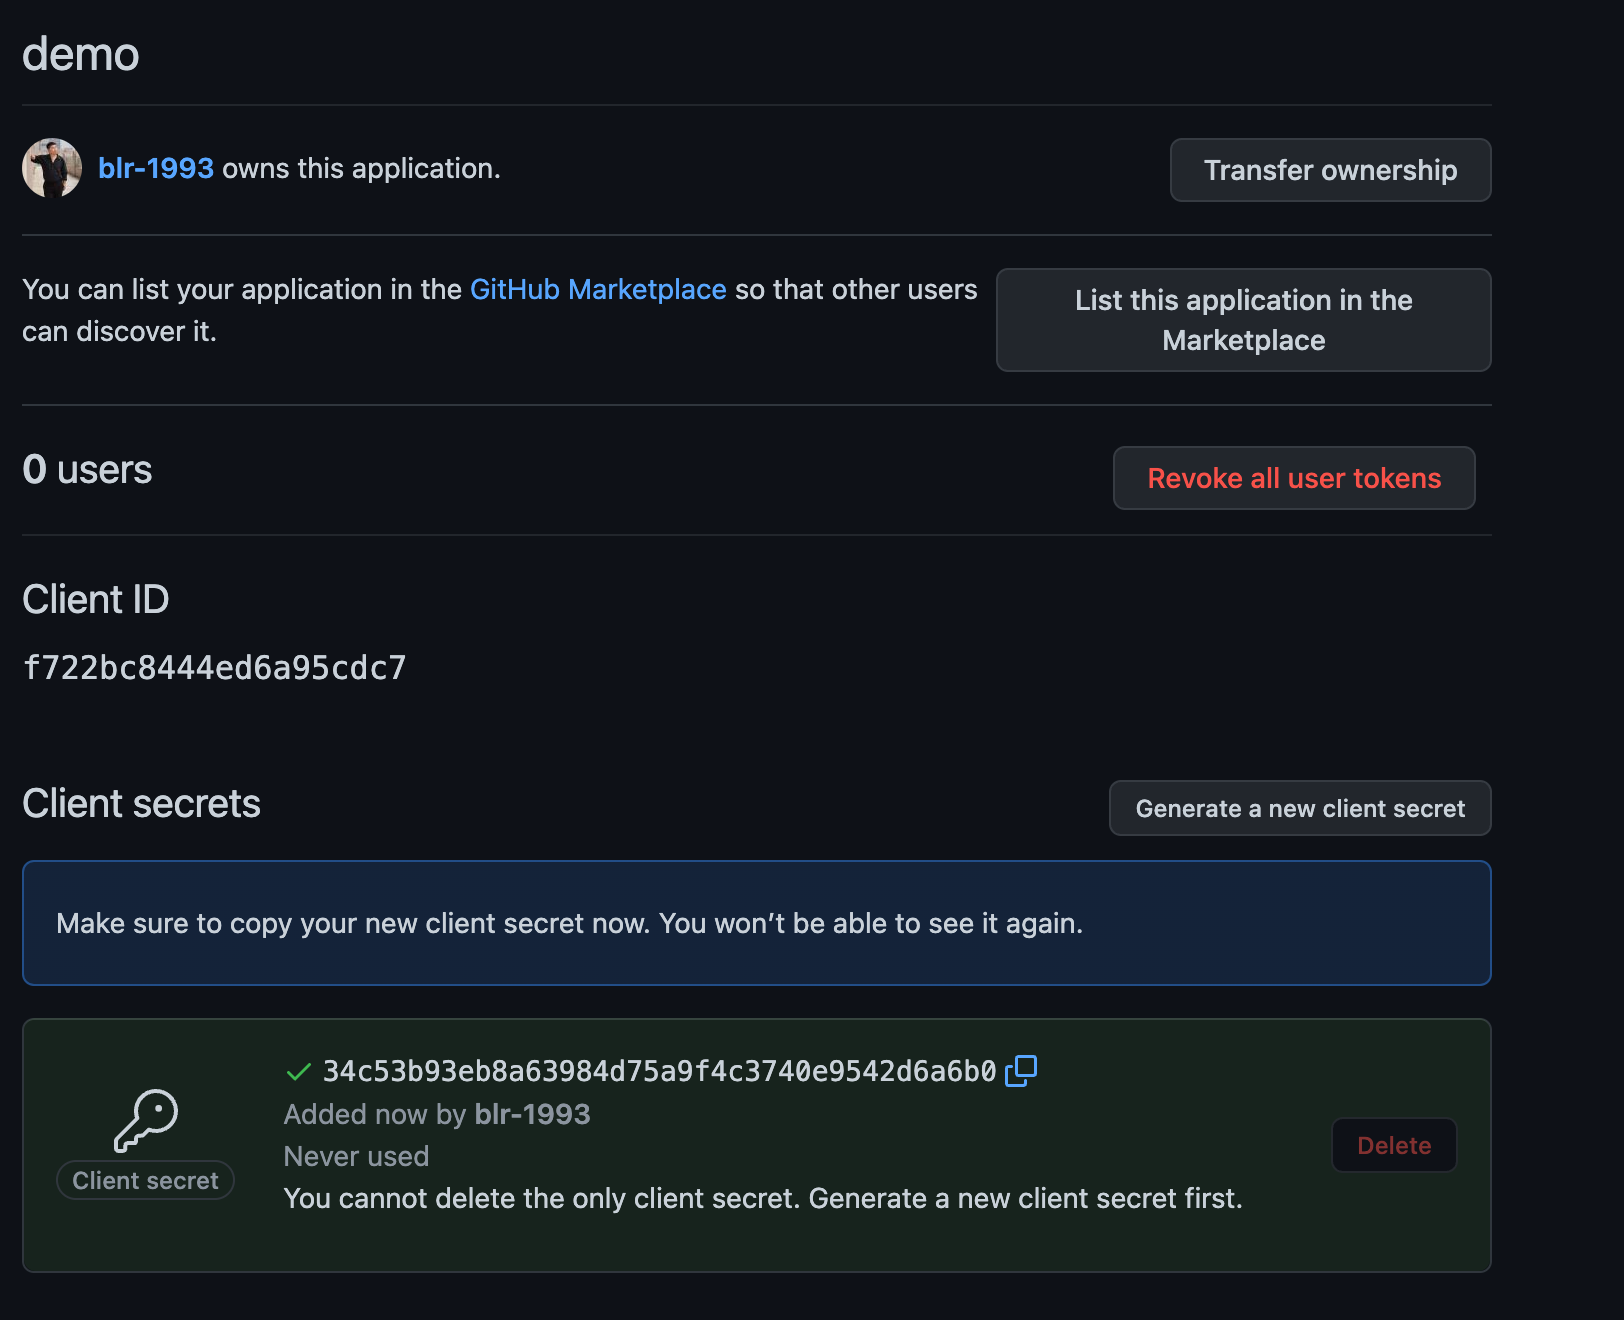
项目开发
- 创建 springboot 应用,并引入依赖
<dependency>
  <groupId>org.springframework.boot</groupId>
  <artifactId>spring-boot-starter-oauth2-client</artifactId>
</dependency>
<dependency>
  <groupId>org.springframework.boot</groupId>
  <artifactId>spring-boot-starter-security</artifactId>
</dependency>
<dependency>
  <groupId>org.springframework.boot</groupId>
  <artifactId>spring-boot-starter-web</artifactId>
</dependency>
- 创建测试 controller
@RestController
public class HelloController {

    @GetMapping("/hello")
    public DefaultOAuth2User hello(){
        System.out.println("hello ");
        Authentication authentication = SecurityContextHolder.getContext().getAuthentication();
        return (DefaultOAuth2User) authentication.getPrincipal();
    }
}
- 配置 security
@Configuration
public class SecurityConfig extends WebSecurityConfigurerAdapter {
    @Override
    protected void configure(HttpSecurity http) throws Exception {
        http.authorizeRequests()
                .anyRequest().authenticated()
                .and()
                .oauth2Login();
    }
}
- 配置配置文件
server.port=8080

spring.security.oauth2.client.registration.github.client-id=d6ea299b9ade3cd3b97d
spring.security.oauth2.client.registration.github.client-secret=aaa44b2675a7b636b1b43371e509e88ee9013816
#  一定要与重定向回调 URL 一致
spring.security.oauth2.client.registration.github.redirect-uri=http://localhost:8080/login/oauth2/code/github
- 启动测试
- 点击 github 登录,点击授权 访问 hello 接口
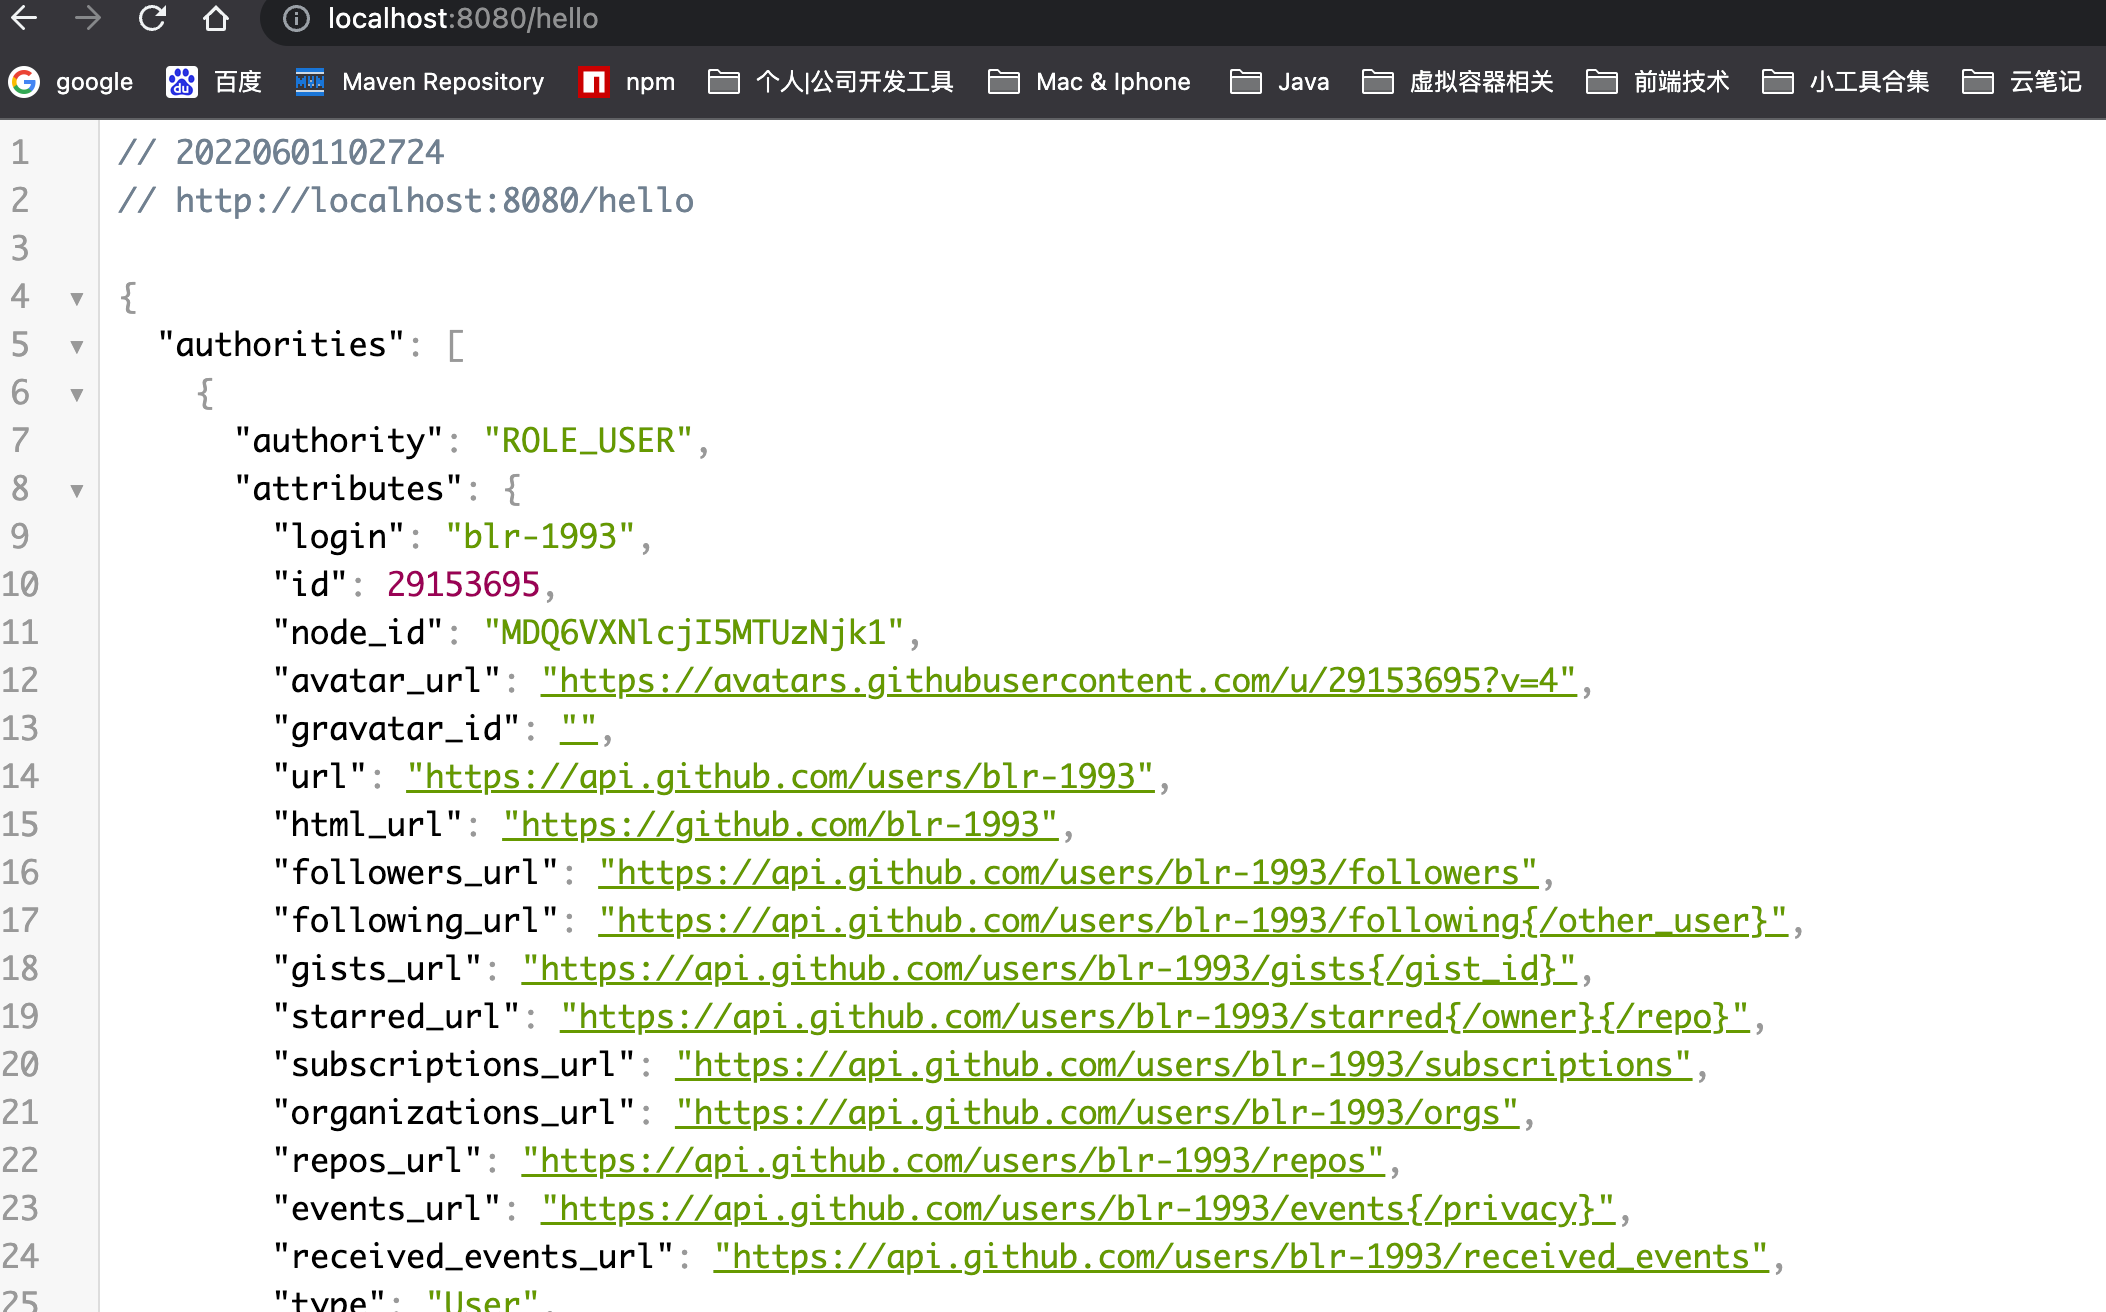
授权、资源服务器
前面的 GitHub 授权登录主要向大家展示了 OAuth2 中客户端的工作模式。对于大部分的开发者而言,日常接触到的 OAuth2 都是开发客户端,例如接入 QQ 登录、接入微信登录等。不过也有少量场景,可能需要开发者提供授权服务器与资源服务器。
搭建授权服务器,我们可以选择一些现成的开源项目,直接运行即可,例如:
- Keycloak: RedFat 公司提供的开源工具,提供了很多实用功能,倒如单点登录、支持OpenID、可视化后台管理等。
- Apache Oltu: Apache 上的开源项目,最近几年没怎么维护了。。
源代码
参考
【编程不良人】SpringSecurity 最新实战教程,知识点完结!
提供商"索要授权。在这种模式中,用户必须把自己的密码给客户端,但是客户端不得储存密码。这通常用在用户对客户端高度信任的情况下,比如客户端是操作系统的一部分,或者由一个相同公司出品。而认证服务器只有在其他授权模式无法执行的情况下,才能考虑使用这种模式。其具体的授权流程如图所示(图片来自 RFC6749文档 https://tools.ietf.org/html/rfc6749)
[外链图片转存中…(img-bskJC4B0-1692088147548)]
具体步骤如下:
-
(A)用户向客户端提供用户名和密码。
-
(B)客户端将用户名和密码发给认证服务器,向后者请求令牌。
-
(C)认证服务器确认无误后,向客户端提供访问令牌。
核心参数:
https://wx.com/token?grant_type=password&username=USERNAME&password=PASSWORD&client_id=CLIENT_ID
客户端模式
**客户端模式(Client Credentials Grant)**指客户端以自己的名义,而不是以用户的名义,向"服务提供商"进行认证。严格地说,客户端模式并不属于OAuth框架所要解决的问题。在这种模式中,用户直接向客户端注册,客户端以自己的名义要求"服务提供商"提供服务,其实不存在授权问题。
[外链图片转存中…(img-nGeFqTFE-1692088147548)]
具体步骤如下:
-
(A)客户端向认证服务器进行身份认证,并要求一个访问令牌。
-
(B)认证服务器确认无误后,向客户端提供访问令牌。
https://wx.com/token?grant_type=client_credentials&client_id=CLIENT_ID&client_secret=CLIENT_SECRET
OAuth2 标准接口
-
/oauth/authorize:授权端点 -
/oauth/token:获取令牌端点 -
/oauth/confirm_access:用户确认授权提交端点
-
/oauth/error:授权服务错误信息端点
-
/oauth/check_token:用于资源服务访问的令牌解析端点
-
/oauth/token_key:提供公有密匙的端点,如果使用JWT令牌的话
GitHub 授权登录
创建 OAuth 应用
访问 github 并登录,在https://github.com/settings/profile中找到 Developer Settings 选项
[外链图片转存中…(img-ZSgtUjXr-1692088147549)]
- 创建 OAuth App并输入一下基本信息:
[外链图片转存中…(img-BielP4SN-1692088147549)]
- 注册成功后会获取到对应的 Client ID 和 Client Secret。
[外链图片转存中…(img-225eZWag-1692088147550)]
项目开发
- 创建 springboot 应用,并引入依赖
<dependency>
  <groupId>org.springframework.boot</groupId>
  <artifactId>spring-boot-starter-oauth2-client</artifactId>
</dependency>
<dependency>
  <groupId>org.springframework.boot</groupId>
  <artifactId>spring-boot-starter-security</artifactId>
</dependency>
<dependency>
  <groupId>org.springframework.boot</groupId>
  <artifactId>spring-boot-starter-web</artifactId>
</dependency>
- 创建测试 controller
@RestController
public class HelloController {

    @GetMapping("/hello")
    public DefaultOAuth2User hello(){
        System.out.println("hello ");
        Authentication authentication = SecurityContextHolder.getContext().getAuthentication();
        return (DefaultOAuth2User) authentication.getPrincipal();
    }
}
- 配置 security
@Configuration
public class SecurityConfig extends WebSecurityConfigurerAdapter {
    @Override
    protected void configure(HttpSecurity http) throws Exception {
        http.authorizeRequests()
                .anyRequest().authenticated()
                .and()
                .oauth2Login();
    }
}
- 配置配置文件
server.port=8080

spring.security.oauth2.client.registration.github.client-id=d6ea299b9ade3cd3b97d
spring.security.oauth2.client.registration.github.client-secret=aaa44b2675a7b636b1b43371e509e88ee9013816
#  一定要与重定向回调 URL 一致
spring.security.oauth2.client.registration.github.redirect-uri=http://localhost:8080/login/oauth2/code/github
- 启动测试
[外链图片转存中…(img-eGcbBmYH-1692088147551)]
- 点击 github 登录,点击授权 访问 hello 接口
[外链图片转存中…(img-MjcUi5iE-1692088147551)]
授权、资源服务器
前面的 GitHub 授权登录主要向大家展示了 OAuth2 中客户端的工作模式。对于大部分的开发者而言,日常接触到的 OAuth2 都是开发客户端,例如接入 QQ 登录、接入微信登录等。不过也有少量场景,可能需要开发者提供授权服务器与资源服务器。
搭建授权服务器,我们可以选择一些现成的开源项目,直接运行即可,例如:
- Keycloak: RedFat 公司提供的开源工具,提供了很多实用功能,倒如单点登录、支持OpenID、可视化后台管理等。
- Apache Oltu: Apache 上的开源项目,最近几年没怎么维护了。。


 1316
1316

 被折叠的 条评论
为什么被折叠?
被折叠的 条评论
为什么被折叠?
 到【灌水乐园】发言


