


先说结论:CLCameraXConverter,使用这个开源工具,即可实现所见即所得、优化的性能体验!
一. 当前CameraX结合实际使用的问题
CameraX 是Google的官方库Jitpack中的一个组件,可以快速便捷的使用Android设备相机进行预览、拍照、图像分析与录制视频。告别繁琐的Camera2与弃用的Camera。
使用虽然方便,但是依然有不少需要工程中去处理的问题,比如,想通过CameraX的ImageAnalysis图像分析通道进行帧数据提取,再进行一些图像操作(人脸识别、OCR等),它默认输出的是一张完整的相机视野图片,而不是“预览视野图片”。
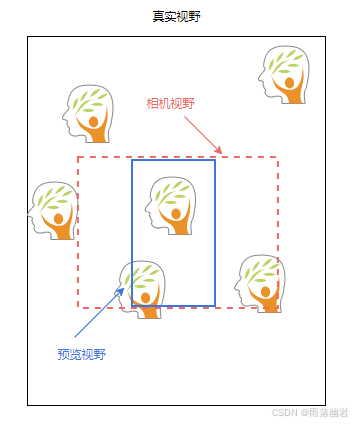
如上图,所以多出去的部分,是“浪费”。画面中都看不到的地方,还需要拿来做识别浪费计算资源吗?右侧被裁掉的也识别出一个人脸,有用吗?现在的机器学习都需要占用大量CPU时间,多出去的部分去除也可以提高不少识别速度。
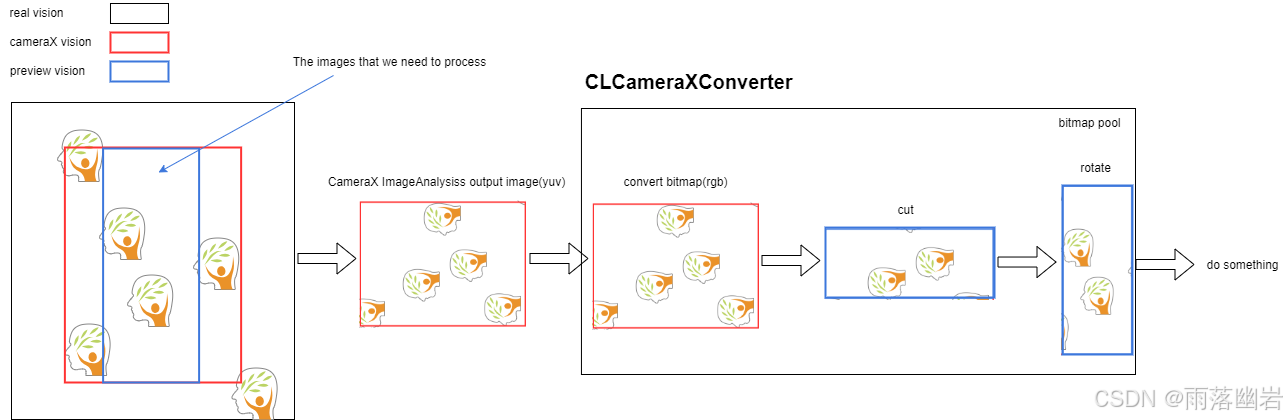
CLCameraXConverter架构图如下:
二. CameraX1.0.0稳定版前的做法
稳定版本之前,如果想将CameraX输出的ImageProxy转换为Bitmap再进行裁剪、旋转等操作,需要使用 RenderScript 进行转换,做过Android原生图像运算的兄弟们应该知道它。简单来说就是将yuv420数据转为rgb,注意下面的工具,在转换前我就进行了裁剪处理,找到预览视野的边界矩形,比全图转换要更省内存速度也更快一些。
public class YuvToRgbConverter {

    private Context mContext;
    private RenderScript rs;
    private ScriptIntrinsicYuvToRGB scriptYuvToRgb;
    private int pixelCount = -1;
    private ByteBuffer yuvBuffer;
    private Allocation inputAllocation;
    private Allocation outputAllocation;

    public YuvToRgbConverter(Context context) {
        mContext = context;
        rs = RenderScript.create(context);
        scriptYuvToRgb = ScriptIntrinsicYuvToRGB.create(rs, Element.U8_4(rs));
    }

    public synchronized void yuvToRgb(Image image, Bitmap output) {
        // Ensure that the intermediate output byte buffer is allocated
        if (null == yuvBuffer) {
            pixelCount = image.getCropRect().width() * image.getCropRect().height();
            // Bits per pixel is an average for the whole image, so it's useful to compute the size
            // of the full buffer but should not be used to determine pixel offsets
            int pixelSizeBits = ImageFormat.getBitsPerPixel(ImageFormat.YUV_420_888);
            yuvBuffer = ByteBuffer.allocateDirect(pixelCount * pixelSizeBits / 8);
        }
        // Rewind the buffer; no need to clear it since it will be filled
        yuvBuffer.rewind();
        // Get the YUV data in byte array form using NV21 format
        imageToByteBuffer(image, yuvBuffer.array());

        // Ensure that the RenderScript inputs and outputs are allocated
        if (null == inputAllocation) {
            // Explicitly create an element with type NV21, since that's the pixel format we use
            Type elemType = new Type.Builder(rs, Element.YUV(rs))
                    .setYuvFormat(ImageFormat.NV21).create();
            inputAllocation = Allocation.createSized(rs, elemType.getElement(),
                    yuvBuffer.array().length);
        }
        if (null == outputAllocation) {
            outputAllocation = Allocation.createFromBitmap(rs, output);
        }

        // Convert NV21 format YUV to RGB
        inputAllocation.copyFrom(yuvBuffer.array());
        scriptYuvToRgb.setInput(inputAllocation);
        scriptYuvToRgb.forEach(outputAllocation);
        outputAllocation.copyTo(output);
    }

    private void imageToByteBuffer(Image image, byte[] outputBuffer) {
        assert(image.getFormat() == ImageFormat.YUV_420_888);

        Rect imageCrop = image.getCropRect();
        Image.Plane[] imagePlanes = image.getPlanes();
        for (int i = 0; i < imagePlanes.length; i++) {
            int planeIndex = i;
            Image.Plane plane = imagePlanes[i];
            // How many values are read in input for each output value written
            // Only the Y plane has a value for every pixel, U and V have half the resolution i.e.
            //
            // Y Plane            U Plane    V Plane
            // ===============    =======    =======
            // Y Y Y Y Y Y Y Y    U U U U    V V V V
            // Y Y Y Y Y Y Y Y    U U U U    V V V V
            // Y Y Y Y Y Y Y Y    U U U U    V V V V
            // Y Y Y Y Y Y Y Y    U U U U    V V V V
            // Y Y Y Y Y Y Y Y
            // Y Y Y Y Y Y Y Y
            // Y Y Y Y Y Y Y Y
            int outputStride;

            // The index in the output buffer the next value will be written at
            // For Y it's zero, for U and V we start at the end of Y and interleave them i.e.
            //
            // First chunk        Second chunk
            // ===============    ===============
            // Y Y Y Y Y Y Y Y    V U V U V U V U
            // Y Y Y Y Y Y Y Y    V U V U V U V U
            // Y Y Y Y Y Y Y Y    V U V U V U V U
            // Y Y Y Y Y Y Y Y    V U V U V U V U
            // Y Y Y Y Y Y Y Y
            // Y Y Y Y Y Y Y Y
            // Y Y Y Y Y Y Y Y
            int outputOffset;

            switch (planeIndex) {
                case 0:
                    outputStride = 1;
                    outputOffset = 0;
                    break;
                case 1:
                    outputStride = 2;
                    // For NV21 format, U is in odd-numbered indices
                    outputOffset = pixelCount + 1;
                    break;
                case 2:
                    outputStride = 2;
                    // For NV21 format, V is in even-numbered indices
                    outputOffset = pixelCount;
                    break;
                default:
                    // Image contains more than 3 planes, something strange is going on
                    continue;
            }

            ByteBuffer planeBuffer = plane.getBuffer();
            int rowStride = plane.getRowStride();
            int pixelStride = plane.getPixelStride();

            // We have to divide the width and height by two if it's not the Y plane
            Rect planeCrop = null;
            if (0 == planeIndex) {
                planeCrop = imageCrop;
            } else {
                planeCrop = new Rect(
                        imageCrop.left / 2,
                        imageCrop.top / 2,
                        imageCrop.right / 2,
                        imageCrop.bottom / 2);
            }

            int planeWidth = planeCrop.width();
            int planeHeight = planeCrop.height();

            // Intermediate buffer used to store the bytes of each row
            byte[] rowBuffer = new byte[plane.getRowStride()];

            // Size of each row in bytes
            int rowLength;
            if (pixelStride == 1 && outputStride == 1) {
                rowLength = planeWidth;
            } else {
                // Take into account that the stride may include data from pixels other than this
                // particular plane and row, and that could be between pixels and not after every
                // pixel:
                //
                // |---- Pixel stride ----|                    Row ends here --> |
                // | Pixel 1 | Other Data | Pixel 2 | Other Data | ... | Pixel N |
                //
                // We need to get (N-1) * (pixel stride bytes) per row + 1 byte for the last pixel
                rowLength = (planeWidth - 1) * pixelStride + 1;
            }

            for (int row = 0; row < planeHeight; row++) {
                // Move buffer position to the beginning of this row
                planeBuffer.position(
                        (row + planeCrop.top) * rowStride + planeCrop.left * pixelStride);

                if (pixelStride == 1 && outputStride == 1) {
                    // When there is a single stride value for pixel and output, we can just copy
                    // the entire row in a single step
                    planeBuffer.get(outputBuffer, outputOffset, rowLength);
                    outputOffset += rowLength;
                } else {
                    // When either pixel or output have a stride > 1 we must copy pixel by pixel
                    planeBuffer.get(rowBuffer, 0, rowLength);
                    for (int col = 0; col < planeWidth; col++) {
                        outputBuffer[outputOffset] = rowBuffer[col * pixelStride];
                        outputOffset += outputStride;
                    }
                }
            }
        }
    }
}
基于以上工具,进行转换,然后再去旋转。需要注意的是,频繁分配堆外内存也会导致内存抖动和频繁GC。
三. CameraX1.4.0版本优化
升级CameraX版本到1.4.0以后发现,库代码里已经包含了ImageProxy转Bitmap的代码,C++实现,查了一下 源代码 是基于chromium的libyuv库实现的,直接导入的话后续升级可能有冲突,最终还是考虑用反射的方式,调用ImageProcessingUtil私有jni代码进行实现。也就产生了现在这个库 CLCameraXConverter。
- ImageAnalysis输出的图像Bitmap复用,避免频繁GC与内存抖动。
- 根据传入角度自动旋转图像,这在后续识别步骤比如OCR、一维条码处理等步骤时是必要的。
- 根据预览效果裁剪图像,所见即所得,不再是相机输出的原始大图,可以缩短后续图像处理的时间。
        clCameraXConverter.imageProxyToBitmapFormPool(imageProxy,
            rotationAngle,
            object : CLCameraXCallback{
            override fun onCLCameraXBitmap(clCameraXBitmap: CLCameraXBitmap) {
                // 1. 从CLCameraXBitmap获取Bitmap
                val bitmap = clCameraXBitmap.getBitmap()
                bitmap?.run {
                    binding.ivMain.post {
                        // 2. 使用Bitmap做事,比如显示、人脸识别...
                        binding.ivMain.setImageBitmap(this)
                        // 3. 确定Bitmap不再使用了,主动释放,此操作会放回复用池
                        oldCameraXBitmap?.run {
                            release()
                        }
                        oldCameraXBitmap = clCameraXBitmap
                    }
                }
            }

        })
可能会有兄弟疑惑,这个旋转角度怎么传。这里的处理比较复杂,如果应用是锁定竖屏,那么固定传入旋转90即可,如果应用支持横竖屏切换等操作,可以参考 官方文档 确定旋转角度。
性能上避免了频繁申请Bitmap内存,避免内存抖动与频繁GC。
使用官方的CameraX的ImageProxy.toBitmap获取Bitmap,再进行裁剪、旋转获取视野中Bitmap的内存表现如下:

使用CLCameraXConverter库的一个方法完成以上三个步骤的内存表现如下:

PS:别问我为什么没把库推到Jitpack好方便直接gradle引用,因为新版的Gradle插件推不上去...
* Where:
Settings file '/home/jitpack/build/settings.gradle' line: 8

* What went wrong:
A problem occurred evaluating settings 'build'.
> Could not find method dependencyResolutionManagement() for arguments [settings_du0w93dyya4mvuwk4xgqxxi8a$_run_closure1@43fff918] on settings 'build' of type org.gradle.initialization.DefaultSettings.

* Try:
Run with --stacktrace option to get the stack trace. Run with --info or --debug option to get more log output. Run with --scan to get full insights.

* Get more help at https://help.gradle.org

BUILD FAILED in 0s


 1435
1435

 被折叠的 条评论
为什么被折叠?
被折叠的 条评论
为什么被折叠?
 到【灌水乐园】发言


