


VSOMEIP中自带helloWorld代码编译及代码解析
前言
vsomeip的编译上一篇说过了,这一篇讲一下VSOMEIP中自带helloWoeld代码编译及分析。
编译helloWorld
其实在VSOMEIP/source/vsomeip-master/examples/hello_world中的readme中已经写的很清楚要如何编译了。
1. Build whole project at first:
________________________________
cd <root directory of vSomeIP-Lib>$:

mkdir build
cd build
cmake ..
make
sudo make install

2. Build hello_world target
___________________________
cmake --build . --target hello_world
cd ./examples/hello_world/
make

Running Hello World Example
---------------------------

The Hello World Example should be run on the same host.
The network addresses within the configuration files need to be adapted to match
the devices addresses.

To start the hello world client and service from their build-directory do:

HOST1:
VSOMEIP_CONFIGURATION=../helloworld-local.json \
VSOMEIP_APPLICATION_NAME=hello_world_service \
./hello_world_service

HOST1:
VSOMEIP_CONFIGURATION=../helloworld-local.json \
VSOMEIP_APPLICATION_NAME=hello_world_client \
./hello_world_client
这里为了方便,直接写了个shell脚本来编译。这个脚本放在build目录下面执行
#!/bin/sh

echo "cmake start"
echo "123456"|sudo cmake --build . --target hello_world
echo "cmake end"

echo "make start"
echo "123456"|sudo make -f ./examples/hello_word/Makefile
echo "make end"
echo后面换成你自己的密码
编译完成之后到build/example/helloworld中就可以看到编号的两个可执行文件,这个时候还需要设置环境变量才能够执行成功,为了麻烦直接上shell脚本,一个client.sh,一个server.sh,这两个脚本放在可执行文件的同级目录下。
server.sh:
#!/bin/sh
echo "config start"
export LD_LIBRARY_PATH=vsomeip库存放的位置
export VSOMEIP_CONFIGURATION=helloworld-local.json文件的位置,一般在helloworld源代码同级目录下。
export VSOMEIP_APPLICATION_NAME=hello_world_service
echo "config end"

./hello_world_service
client.sh:
#!/bin/sh
echo "config start"
export LD_LIBRARY_PATH=vsomeip库存放的位置
export VSOMEIP_CONFIGURATION=helloworld-local.json文件的位置,一般在helloworld源代码同级目录下。
export VSOMEIP_APPLICATION_NAME=hello_world_client
echo "config end"

./hello_world_client
注意:client.sh和server.sh这两个shell脚本不能直接./client.sh执行,需要source client.sh这样执行。
在同一台电脑开两个终端,一个执行client.sh,一个执行server.sh,结果如下图所示:
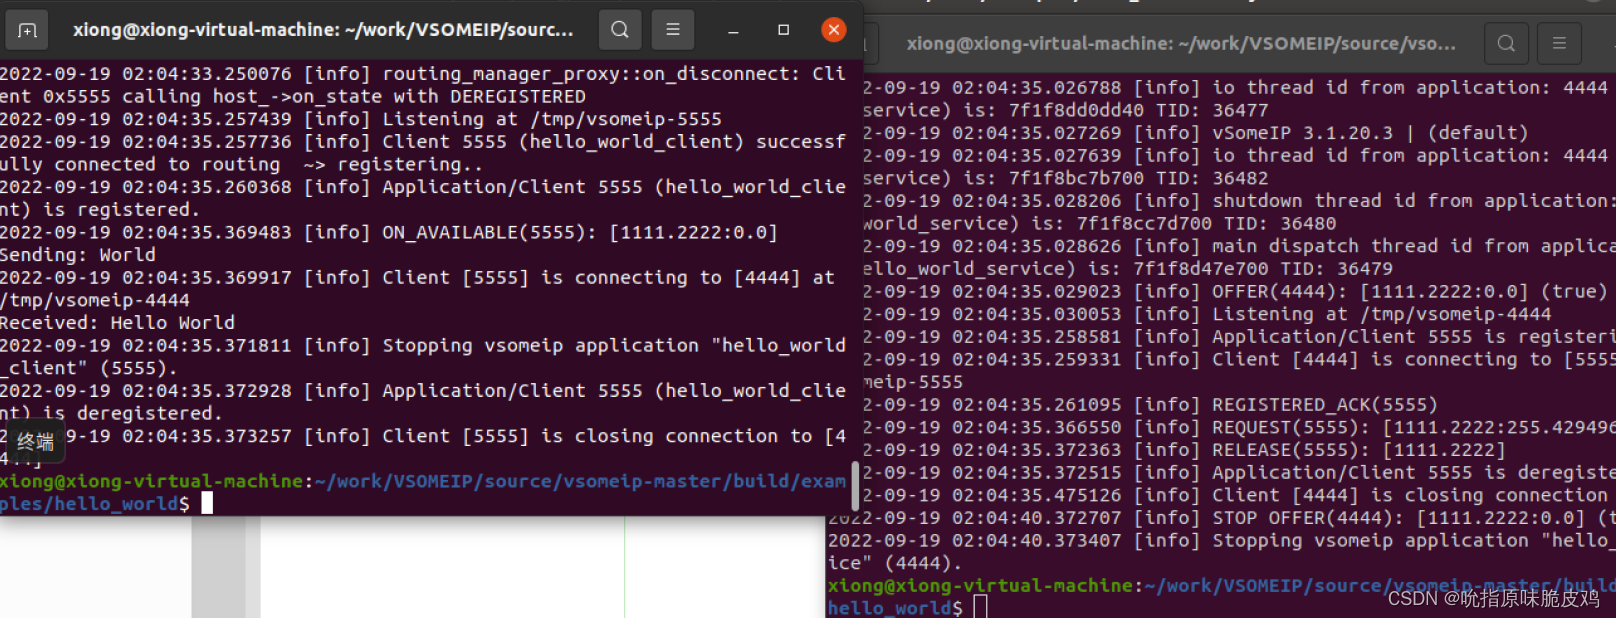
看到Client端显示Sending:World 和Received:Hello World的时候,就表示运行成功了,也就表示vsomeip的库能够正常的使用了。
代码解析
Server端
主要就是两个文件:hello_world_service_main.cpp和hello_world_service.hpp
先从main函数开始看,main函数在hello_world_service_main.cpp中
int main(int argc, char **argv)
{
    (void)argc;
    (void)argv;

    hello_world_service hw_srv;  //创建了一个hello_world_service 类对象
#ifndef VSOMEIP_ENABLE_SIGNAL_HANDLING
    hw_srv_ptr = &hw_srv;
    signal(SIGINT, handle_signal);
    signal(SIGTERM, handle_signal);
#endif
    if (hw_srv.init()) {     //执行类内init函数
        hw_srv.start();      //执行类内start函数
        return 0;
    } else {
        return 1;
    }
}
这里略过信号处理这一段,对整体框架的理解作用不大。
从main来看,其实就是实例化了hello_world_service 类的一个对象,然后调用了init和start两个类内函数,主要代码都是在类中定义的。直接去看定义类的文件hello_world_service.hpp。
先看构造函数:
// Get the vSomeIP runtime and
    // create a application via the runtime, we could pass the application name
    // here otherwise the name supplied via the VSOMEIP_APPLICATION_NAME
    // environment variable is used
    hello_world_service() :
                    rtm_(vsomeip::runtime::get()),
                    app_(rtm_->create_application()),
                    stop_(false),
                    stop_thread_(std::bind(&hello_world_service::stop, this))
    {
    }
主要是创建了application的对象,这个是最主要的。
然后看一下类内init函数:
bool init()
    {
        // init the application
        if (!app_->init()) {
            LOG_ERR("Couldn't initialize application");
            return false;
        }

        // register a message handler callback for messages sent to our service
        app_->register_message_handler(service_id, service_instance_id,
                service_method_id,
                std::bind(&hello_world_service::on_message_cbk, this,
                        std::placeholders::_1));

        // register a state handler to get called back after registration at the
        // runtime was successful
        app_->register_state_handler(
                std::bind(&hello_world_service::on_state_cbk, this,
                        std::placeholders::_1));
        return true;
    }
主要是注册了on_message_cbk和on_state_cbk两个回调函数。
1)当server接收到client发送过来的request请求之后,会进入on_message_cbk这个回调函数去执行相应的功能。
void on_message_cbk(const std::shared_ptr<vsomeip::message> &_request)
    {
        // Create a response based upon the request
        std::shared_ptr<vsomeip::message> resp = rtm_->create_response(_request);

        // Construct string to send back
        std::string str("Hello ");
        str.append(
                reinterpret_cast<const char*>(_request->get_payload()->get_data()),
                0, _request->get_payload()->get_length());

        // Create a payload which will be sent back to the client
        std::shared_ptr<vsomeip::payload> resp_pl = rtm_->create_payload();
        std::vector<vsomeip::byte_t> pl_data(str.begin(), str.end());
        resp_pl->set_data(pl_data);
        resp->set_payload(resp_pl);

        // Send the response back
        app_->send(resp);
        // we have finished
        terminate();
    }
这个函数的主要功能就是接收到client端的request,然后把里面的payload前面加上Hello之后再发回给client,就比如说client发过来一个World,server接收到之后在前面加上一个Hello发送回去。
2)当服务在路由中注册成功之后,会进入on_state_cbk这个回调函数中去执行相应的功能。
void on_state_cbk(vsomeip::state_type_e _state)
    {
        if(_state == vsomeip::state_type_e::ST_REGISTERED)
        {
            // we are registered at the runtime and can offer our service
            app_->offer_service(service_id, service_instance_id);
        }
    }
这个函数的功能就很简单,就是服务在路由中注册成功后就去提供服务。
然后来看一下start函数:
void start()
    {
        // start the application and wait for the on_event callback to be called
        // this method only returns when app_->stop() is called
        app_->start();
    }
很简单,就是app->start(),在这个函数中就会开启相关线程以及建立和路由之间通信相关socket,并一直循环等到调用stop或者相关信号停止。
最后看一下stop函数:
void stop()
    {
        std::unique_lock<std::mutex> its_lock(mutex_);
        while(!stop_) {
            condition_.wait(its_lock);
        }
        std::this_thread::sleep_for(std::chrono::seconds(5));
        // Stop offering the service
        app_->stop_offer_service(service_id, service_instance_id);
        // unregister the state handler
        app_->unregister_state_handler();
        // unregister the message handler
        app_->unregister_message_handler(service_id, service_instance_id,
                service_method_id);
        // shutdown the application
        app_->stop();
    }
其实就是停止提供服务和注销一些资源。
Client端
client端和server端其实都一样,流程都差不多,client的main函数和server是一样的,都是实例化之后调用类内函数init和start
client在init函数中同样注册了回调函数,如下所示:
bool init(){
        // init the application
        if (!app_->init()) {
            LOG_ERR ("Couldn't initialize application");
            return false;
        }

        // register a state handler to get called back after registration at the
        // runtime was successful
        app_->register_state_handler(
                std::bind(&hello_world_client::on_state_cbk, this,
                        std::placeholders::_1));

        // register a callback for responses from the service
        app_->register_message_handler(vsomeip::ANY_SERVICE,
                service_instance_id, vsomeip::ANY_METHOD,
                std::bind(&hello_world_client::on_message_cbk, this,
                        std::placeholders::_1));

        // register a callback which is called as soon as the service is available
        app_->register_availability_handler(service_id, service_instance_id,
                std::bind(&hello_world_client::on_availability_cbk, this,
                        std::placeholders::_1, std::placeholders::_2,
                        std::placeholders::_3));
        return true;
    }
一共注册了三个回调函数:on_state_cbk、on_message_cbk和on_availability_cbk,前面两个在server端已经讲过了,功能都一样,on_availability_cbk这个回调函数是在server端offer_server后,会通知client端,调用到这个回调函数里面去。
来看一下这个回调函数里面是什么:
void on_availability_cbk(vsomeip::service_t _service,
            vsomeip::instance_t _instance, bool _is_available)
    {
        // Check if the available service is the the hello world service
        if(service_id == _service && service_instance_id == _instance
                && _is_available)
        {
            // The service is available then we send the request
            // Create a new request
            std::shared_ptr<vsomeip::message> rq = rtm_->create_request();
            // Set the hello world service as target of the request
            rq->set_service(service_id);
            rq->set_instance(service_instance_id);
            rq->set_method(service_method_id);

            // Create a payload which will be sent to the service
            std::shared_ptr<vsomeip::payload> pl = rtm_->create_payload();
            std::string str("World");
            std::vector<vsomeip::byte_t> pl_data(std::begin(str), std::end(str));

            pl->set_data(pl_data);
            rq->set_payload(pl);
            // Send the request to the service. Response will be delivered to the
            // registered message handler
            LOG_INF("Sending: %s", str.c_str());
            app_->send(rq);
        }
    }
这个函数的主要作用就是先确定提供的服务是不是我需要的,如果是,那就去request,然后payload里面写上World,发送给server。
总结
`总结一下helloWorld交互流程:
(1)server端把服务注册到路由上,然后发布服务。
(2)这个时候server会通知client,client接收到这个通知后,会进入on_availability_cbk这个回调函数request服务,带上World的payload。
(3)server端接收到client的request后进入on_message_cbk回调函数在World前面加上一个Hello然后又response给client
(4)client收到response后进入on_message_cbk回调函数,把payload里面打印出来,就是Hello World
这个helloworld只能在一台主机上实现,下一章总结一下双机通信过程。


 被折叠的 条评论
为什么被折叠?
被折叠的 条评论
为什么被折叠?
 到【灌水乐园】发言


