


注:本篇文章主要参考周阳老师讲解的cloud进行整理的!
是什么
官网
openfeign是一个声明式的Web服务客户端
只需要船舰一个Rest接口并在该接口上添加注解@FeignClient即可
OpenFeign基本上就是当前微服务之间调用的事实标准。
OpenFeign能干什么
前面在使用SpringCloud LoadBalancer+RestTemplate时,利用RestTemplate对http请求的封装处理形成了一套模版化的调用方法。但是在实际开发中,
由于对服务依赖的调用可能不止一处,往往一个接口会被多处调用,所以通常都会针对每个微服务自行封装一些客户端类来包装这些依赖服务的调用。所以,OpenFeign在此基础上做了进一步封装,由他来帮助我们定义和实现依赖服务接口的定义。在OpenFeign的实现下,我们只需创建一个接口并使用注解的方式来配置它(在一个微服务接口上面标注一个 @FeignClient 注解即可),即可完成对服务提供方的接口绑定,统一对外暴露可以被调用的接口方法,大大简化和降低了调用客户端的开发量,也即由服务提供者给出调用接口清单,消费者直接通过OpenFeign调用即可,O(∩_∩)O。
OpenFeign同时还集成SpringCloud LoadBalancer可以在使用OpenFeign时提供Http客户端的负载均衡,也可以集成阿里巴巴Sentinel来提供熔断、降级等功能。而与SpringCloud LoadBalancer不同的是,通过OpenFeign只需要定义服务绑定接口且以声明式的方法,优雅而简单的实现了服务调用。
- 可插拔的注解支持,包括Feign注解和JAX-RS注解
- 支持可插拔的HTTP编码器和解码器
- 支持Sentinel和它的Fallback
- 支持SpringCloudLoadBalancer的负载均衡
- 支持HTTP请求和响应的压缩
流程步骤
新建Module
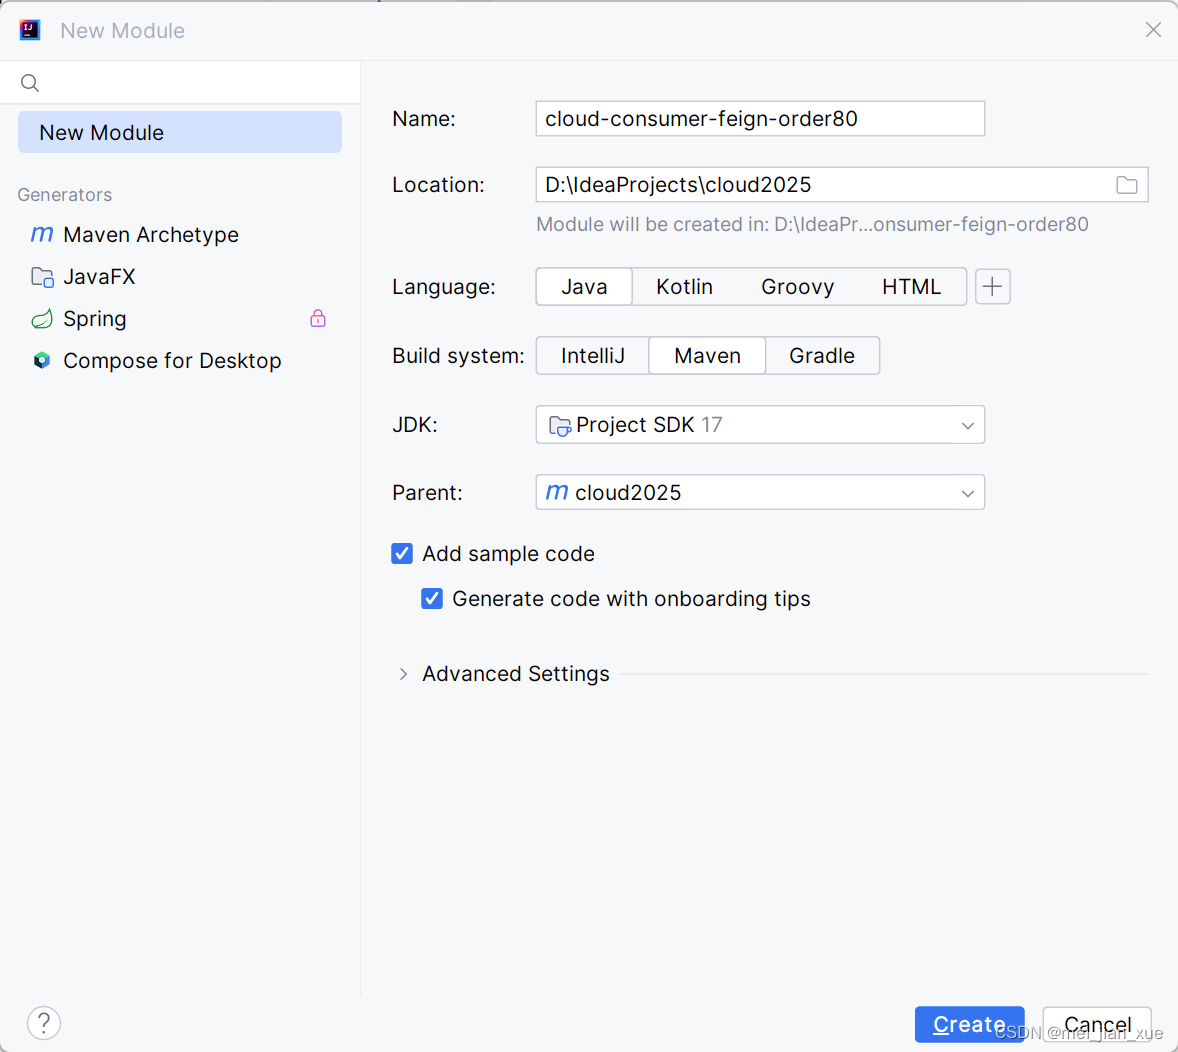
修改POM
<?xml version="1.0" encoding="UTF-8"?>
<project xmlns="http://maven.apache.org/POM/4.0.0"
         xmlns:xsi="http://www.w3.org/2001/XMLSchema-instance"
         xsi:schemaLocation="http://maven.apache.org/POM/4.0.0 http://maven.apache.org/xsd/maven-4.0.0.xsd">
    <modelVersion>4.0.0</modelVersion>
    <parent>
        <groupId>com.mui.cloud</groupId>
        <artifactId>cloud2025</artifactId>
        <version>1.0-SNAPSHOT</version>
    </parent>

    <artifactId>cloud-consumer-feign-order80</artifactId>

    <properties>
        <maven.compiler.source>17</maven.compiler.source>
        <maven.compiler.target>17</maven.compiler.target>
        <project.build.sourceEncoding>UTF-8</project.build.sourceEncoding>
    </properties>

    <dependencies>
        <!--openfeign-->
        <dependency>
            <groupId>org.springframework.cloud</groupId>
            <artifactId>spring-cloud-starter-openfeign</artifactId>
        </dependency>
        <!--SpringCloud consul discovery-->
        <dependency>
            <groupId>org.springframework.cloud</groupId>
            <artifactId>spring-cloud-starter-consul-discovery</artifactId>
        </dependency>
        <!-- 引入自己定义的api通用包 -->
        <dependency>
            <groupId>com.mui.cloud</groupId>
            <artifactId>cloud-api-commons</artifactId>
            <version>1.0-SNAPSHOT</version>
        </dependency>
        <!--web + actuator-->
        <dependency>
            <groupId>org.springframework.boot</groupId>
            <artifactId>spring-boot-starter-web</artifactId>
        </dependency>
        <dependency>
            <groupId>org.springframework.boot</groupId>
            <artifactId>spring-boot-starter-actuator</artifactId>
        </dependency>
        <!--lombok-->
        <dependency>
            <groupId>org.projectlombok</groupId>
            <artifactId>lombok</artifactId>
            <optional>true</optional>
        </dependency>
        <!--hutool-all-->
        <dependency>
            <groupId>cn.hutool</groupId>
            <artifactId>hutool-all</artifactId>
        </dependency>
        <!--fastjson2-->
        <dependency>
            <groupId>com.alibaba.fastjson2</groupId>
            <artifactId>fastjson2</artifactId>
        </dependency>
        <!-- swagger3 调用方式 http://你的主机IP地址:5555/swagger-ui/index.html -->
        <dependency>
            <groupId>org.springdoc</groupId>
            <artifactId>springdoc-openapi-starter-webmvc-ui</artifactId>
        </dependency>
    </dependencies>

    <build>
        <plugins>
            <plugin>
                <groupId>org.springframework.boot</groupId>
                <artifactId>spring-boot-maven-plugin</artifactId>
            </plugin>
        </plugins>
    </build>

</project>
写application.yml
server:
  port: 80

spring:
  application:
    name: cloud-consumer-openfeign-order
  ####Spring Cloud Consul for Service Discovery
  cloud:
    consul:
      host: localhost
      port: 8500
      discovery:
        prefer-ip-address: true #优先使用服务ip进行注册
        service-name: ${spring.application.name}
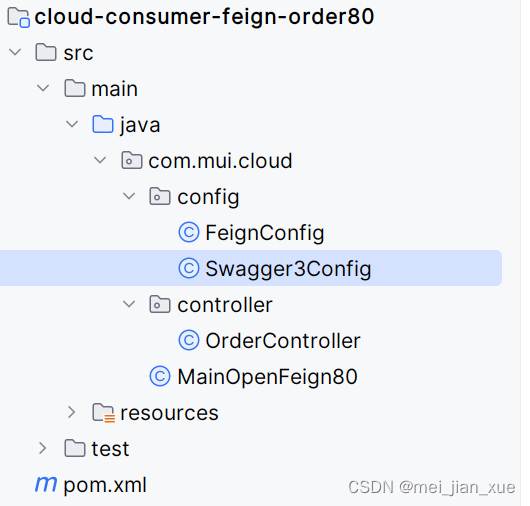
主启动类MainOpenFeign80
package com.mui.cloud;

import org.springframework.boot.SpringApplication;
import org.springframework.boot.autoconfigure.SpringBootApplication;
import org.springframework.cloud.client.discovery.EnableDiscoveryClient;
import org.springframework.cloud.openfeign.EnableFeignClients;
import org.springframework.cloud.openfeign.FeignClient;

@SpringBootApplication
//该注解用于向使用consul为注册中心时注册服务
@EnableDiscoveryClient
//启用feign客户端,定义服务+绑定接口,以声明式的方法优雅而简单的实现服务调用
@EnableFeignClients
public class MainOpenFeign80 {
    public static void main(String[] args) {
        SpringApplication.run(MainOpenFeign80.class, args);
    }
}
业务类
修改cloud-api-comms通用模块
引入openfeign依赖
<!--openfeign-->
<dependency>
    <groupId>org.springframework.cloud</groupId>
    <artifactId>spring-cloud-starter-openfeign</artifactId>
</dependency>
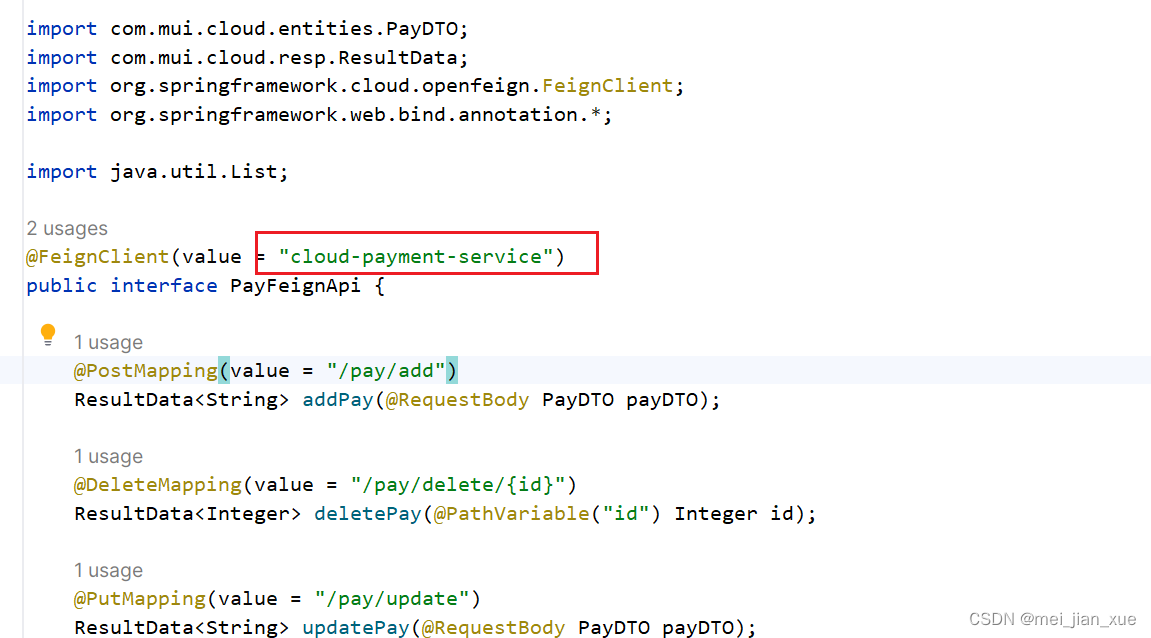
新建服务接口PayFeignApi,配置@FeignClient注解
package com.mui.cloud.api;

import com.mui.cloud.entities.PayDTO;
import com.mui.cloud.resp.ResultData;
import org.springframework.cloud.openfeign.FeignClient;
import org.springframework.web.bind.annotation.*;

import java.util.List;

@FeignClient(value = "cloud-payment-service")
public interface PayFeignApi {

    @PostMapping(value = "/pay/add")
    ResultData<String> addPay(@RequestBody PayDTO payDTO);

    @DeleteMapping(value = "/pay/delete/{id}")
    ResultData<Integer> deletePay(@PathVariable("id") Integer id);

    @PutMapping(value = "/pay/update")
    ResultData<String> updatePay(@RequestBody PayDTO payDTO);

    @GetMapping(value = "/pay/get/{id}")
    ResultData getById(@PathVariable("id") Integer id);

    @GetMapping(value = "/pay/getAll")
    ResultData<List> getAll();

    @GetMapping(value = "/pay/get/info")
    String mylb();

    @GetMapping(value = "/pay/circuit/{id}")
    String myCircuit(@PathVariable(value = "id") Integer id);

}
拷贝之前的80工程进cloud-consumer-feign-order80,记得去掉部分代码和LoadLBalancer不相关特性
修改Controller层的调用
package com.mui.cloud.controller;
import com.mui.cloud.api.PayFeignApi;
import com.mui.cloud.entities.PayDTO;
import com.mui.cloud.resp.ResultData;
import io.swagger.v3.oas.annotations.Operation;
import io.swagger.v3.oas.annotations.tags.Tag;
import org.springframework.beans.factory.annotation.Autowired;
import org.springframework.web.bind.annotation.*;
@RestController
@Tag(name = "订单微服务模块", description = "订单模块")
public class OrderController {
@Autowired
private PayFeignApi payFeignApi;
@GetMapping(value = "/feign/pay/add")
@Operation(summary = "新增订单", description = "新增订单, json串做参数")
public ResultData addOrder(PayDTO payDTO) {
return payFeignApi.addPay(payDTO);
}
@GetMapping("/feign/pay/get/{id}")
@Operation(summary = "根据id查询订单")
public ResultData getPayInfo(@PathVariable("id") Integer id) {
System.out.println("-------支付微服务远程调用,按照id查询订单支付流水信息");
ResultData resultData = payFeignApi.getById(id);
return resultData;
}
@PutMapping("/feign/pay/update")
@Operation(summary = "修改订单")
public ResultData updateOrder(PayDTO payDTO) {
return payFeignApi.updatePay(payDTO);
}
@DeleteMapping("/feign/pay/delete/{id}")
@Operation(summary = "删除订单")
public ResultData deleteOrder(@PathVariable("id") Integer id) {
return payFeignApi.deletePay(id);
}
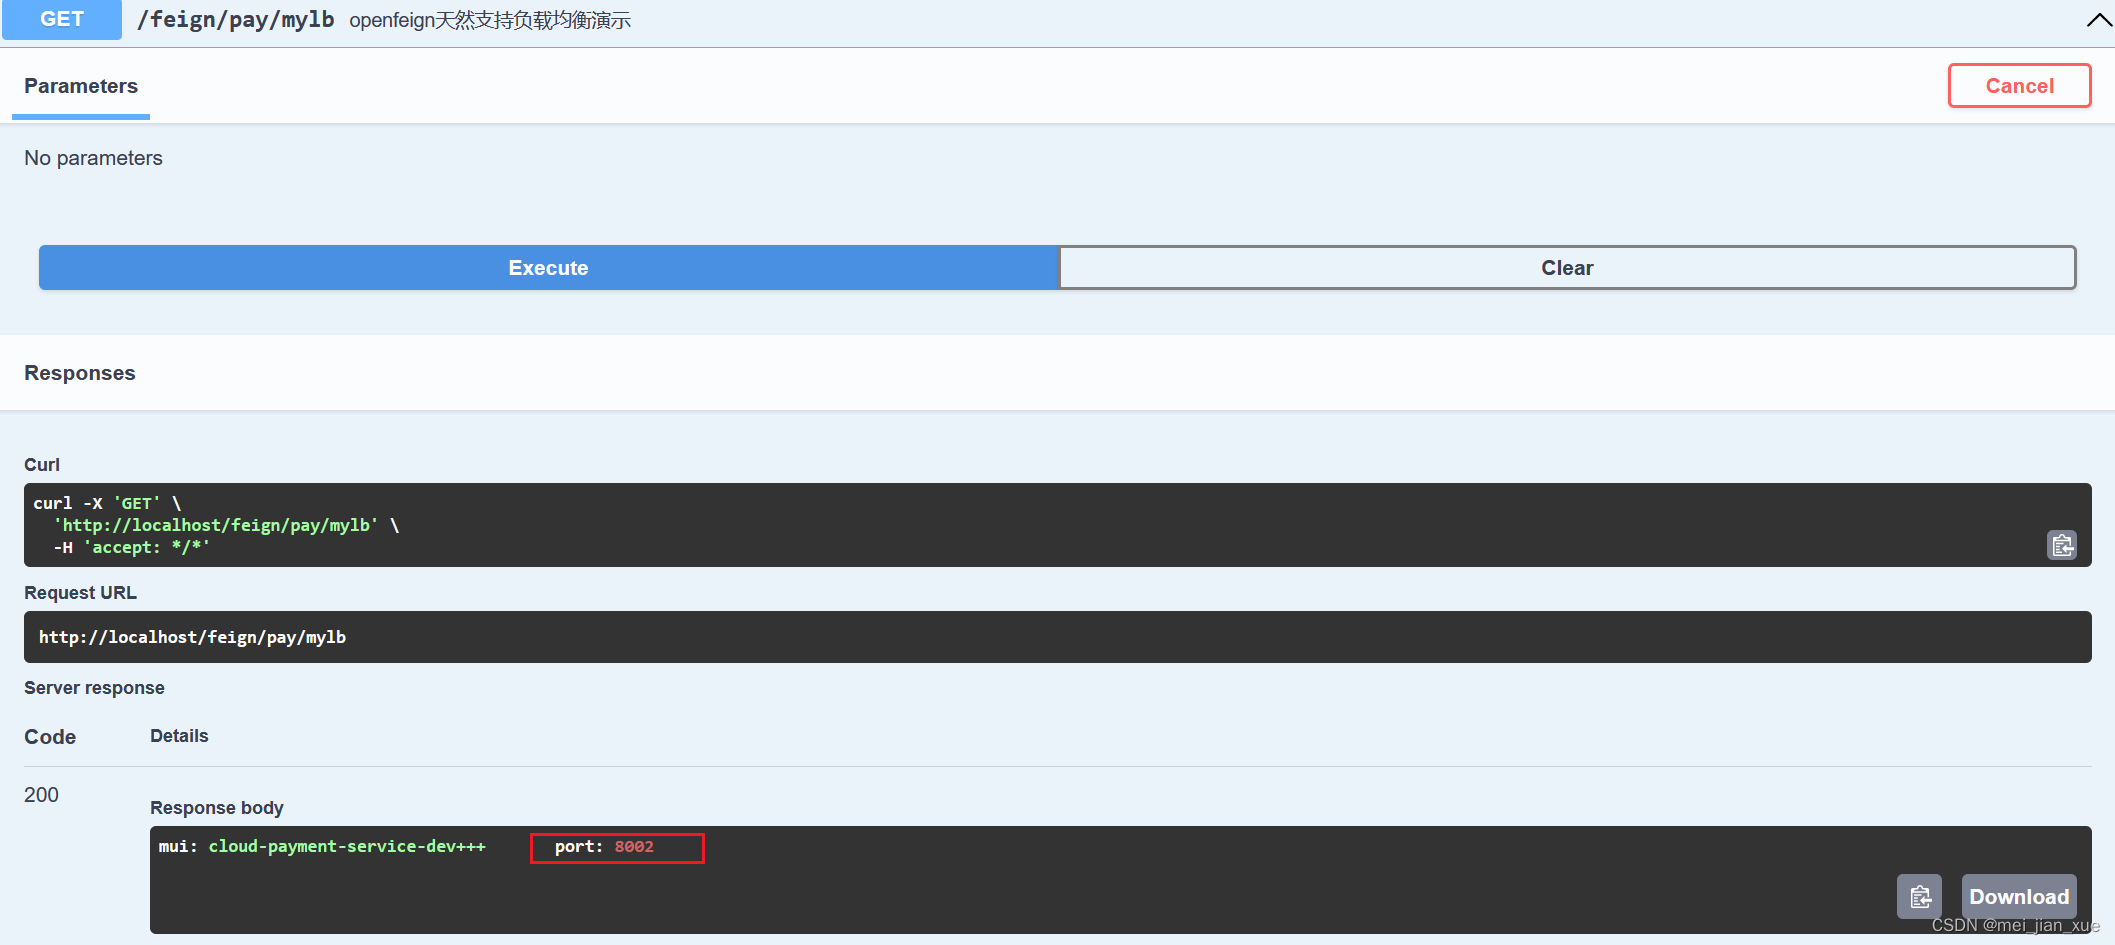
@GetMapping(value = "/feign/pay/mylb")
@Operation(summary = "openfeign天然支持负载均衡演示")
public String mylb() {
return payFeignApi.mylb();
}
}
测试
- 先启动Consul服务器
- 再启动微服务8001
- 最后启动cloud-consumer-feign-order80
- PostMan测试
- 新增 http://localhost/feign/pay/add
- 查询 http://localhost/feign/pay/get/{id}
- 再启动微服务8002,测试http://localhost/feign/pay/mylb
- OpenFeign默认继承了LoadBalancer
OpenFeign高级特性
1、OpenFeign超时控制
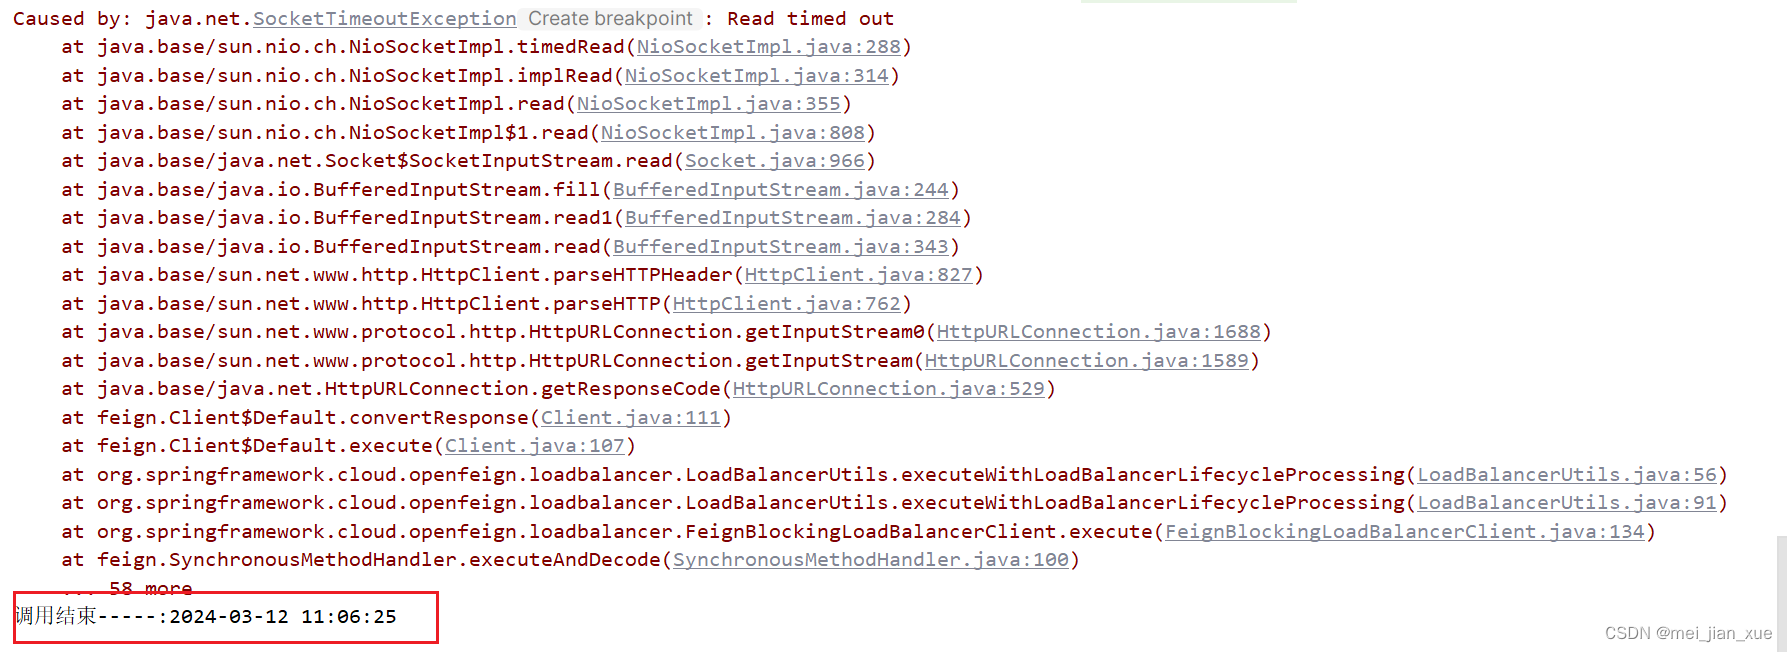
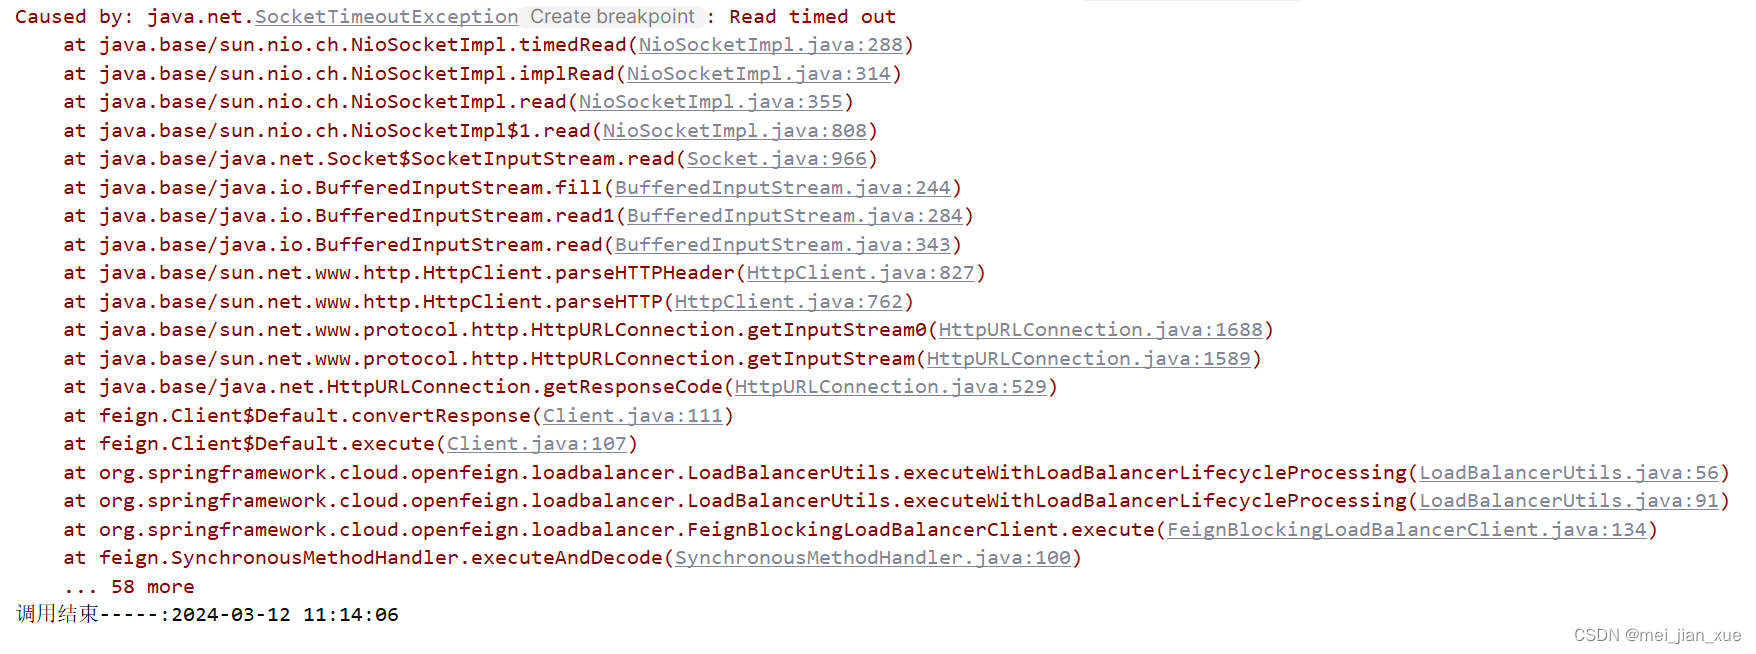
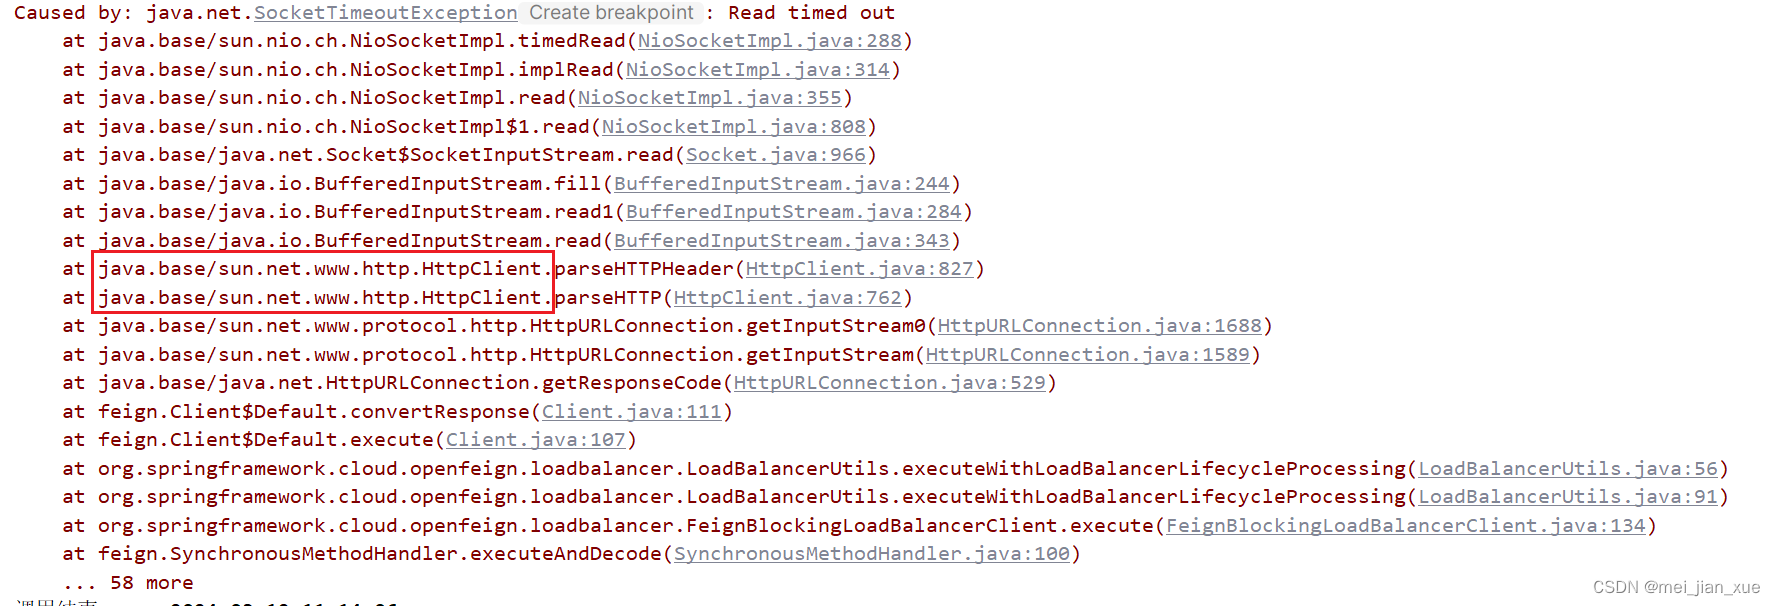
在Spring Cloud微服务架构中,大部分公司都是利用OpenFeign进行服务间的调用,而比较简单的业务使用默认配置是不会有多大问题的,但是如果是业务比较复杂,服务要进行比较繁杂的业务计算,那后台很有可能会出现Read Timeout这个异常,因此定制化配置超时时间就有必要了。
-
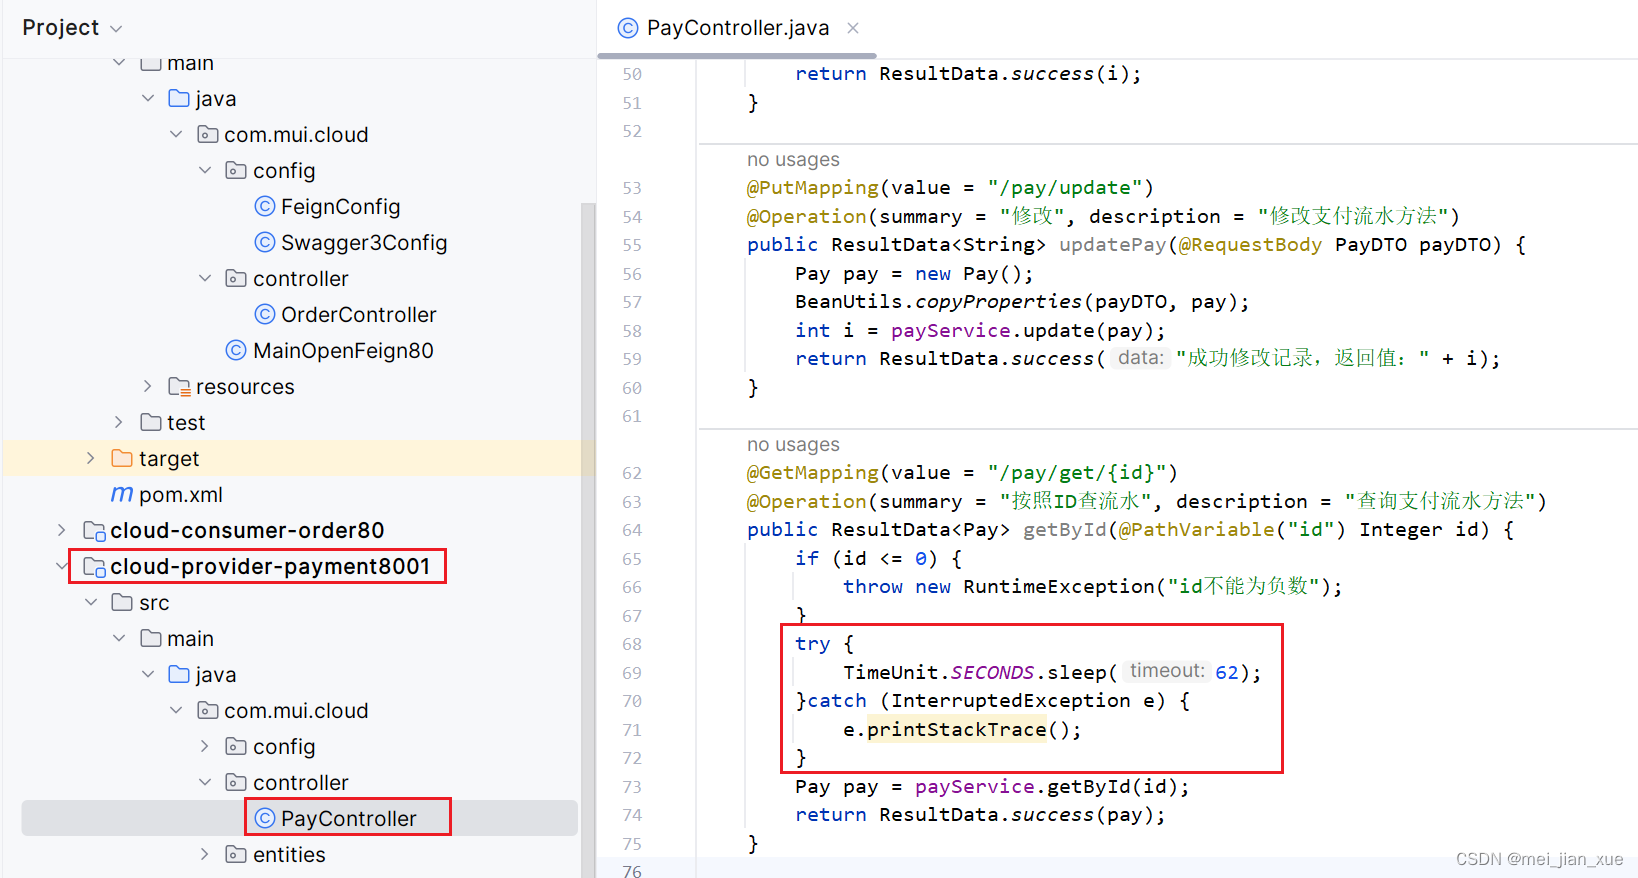
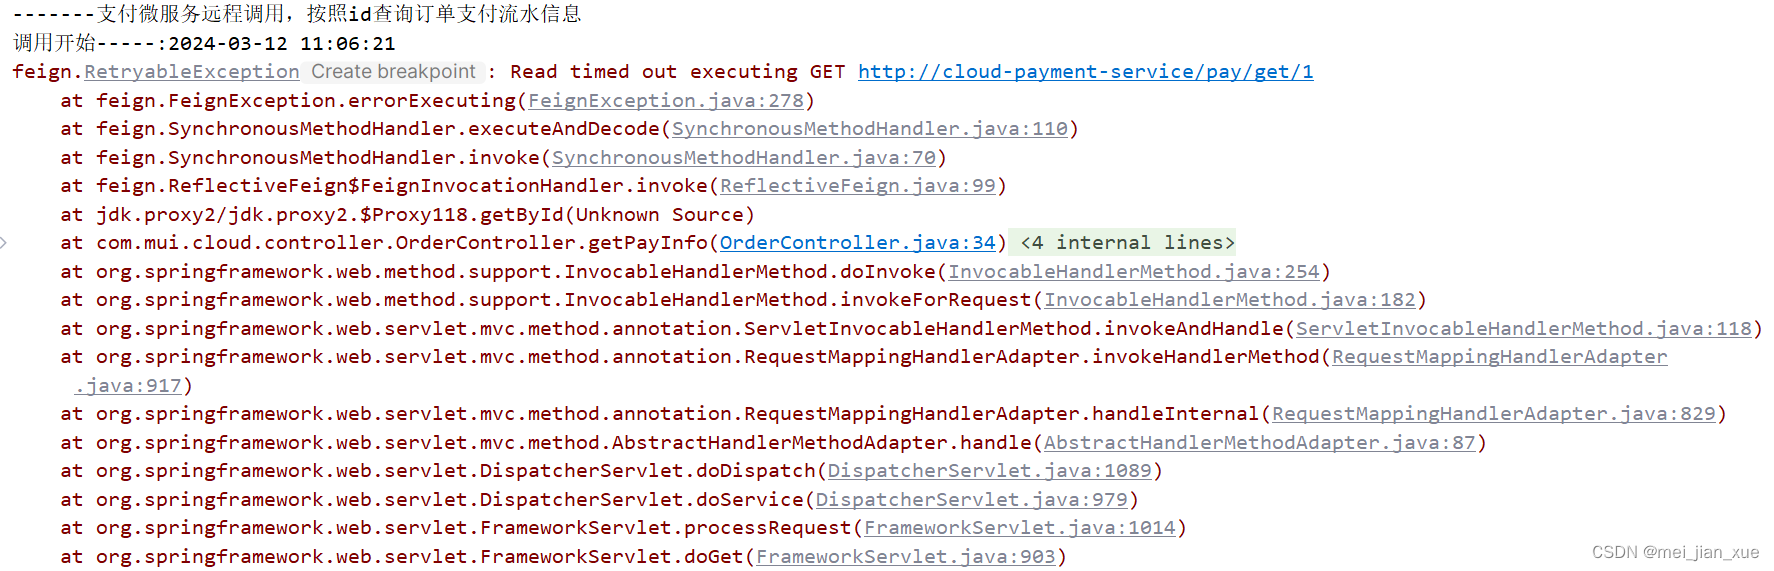
超时设置,故意设置超时演示出错情况
服务提供方cloud-provider-payment8001故意写暂停62秒
-
服务调用方cloud-consumer-feign-order80写好捕捉超时异常(OrderController)
@GetMapping("/feign/pay/get/{id}")
@Operation(summary = "根据id查询订单")
public ResultData getPayInfo(@PathVariable("id") Integer id) {
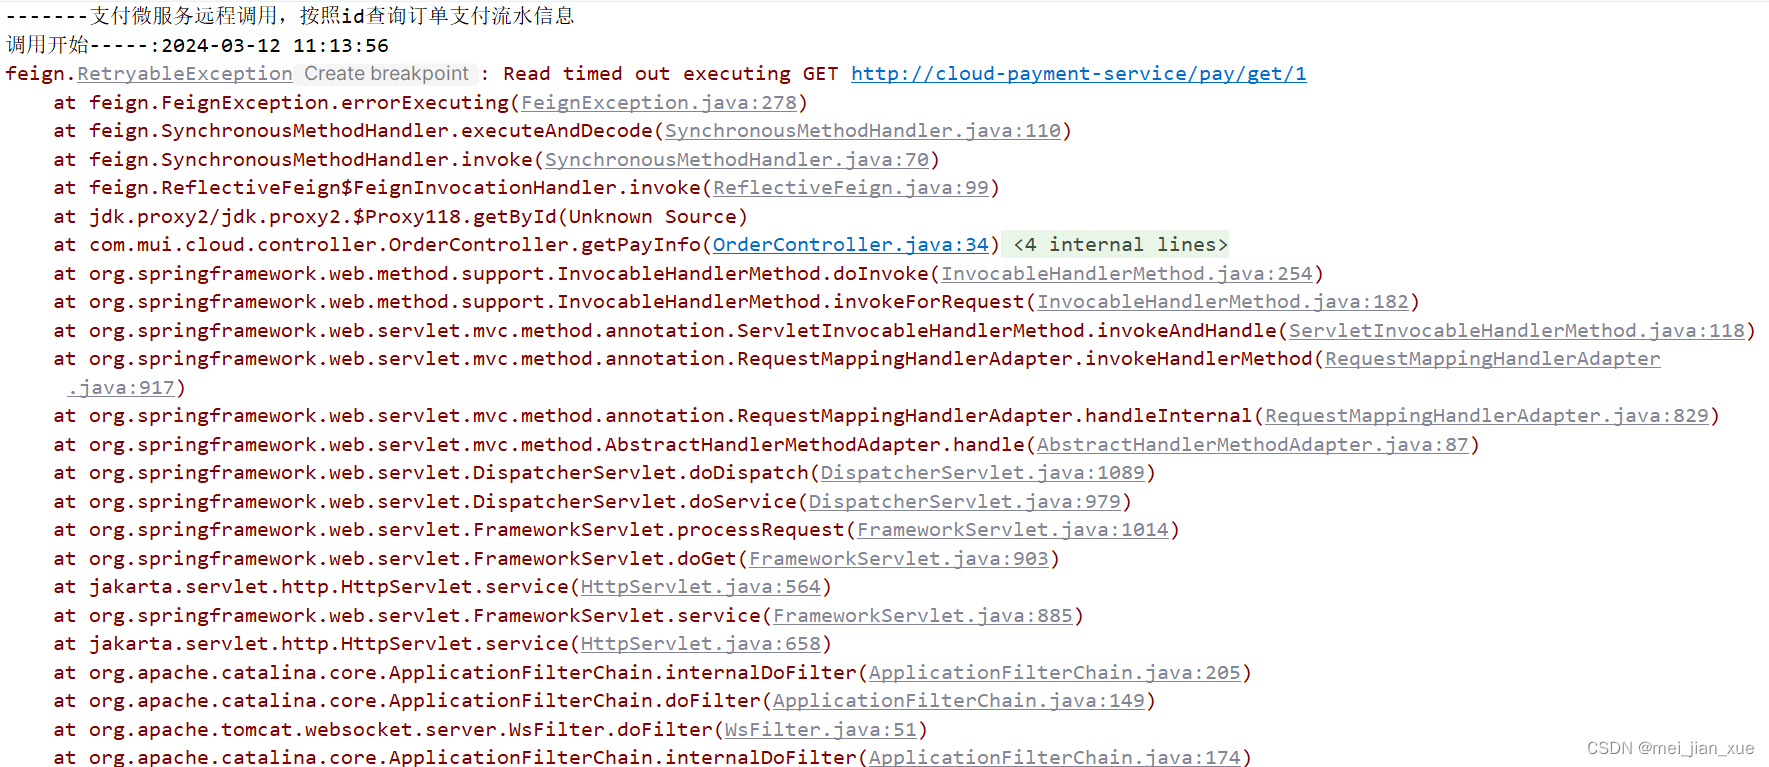
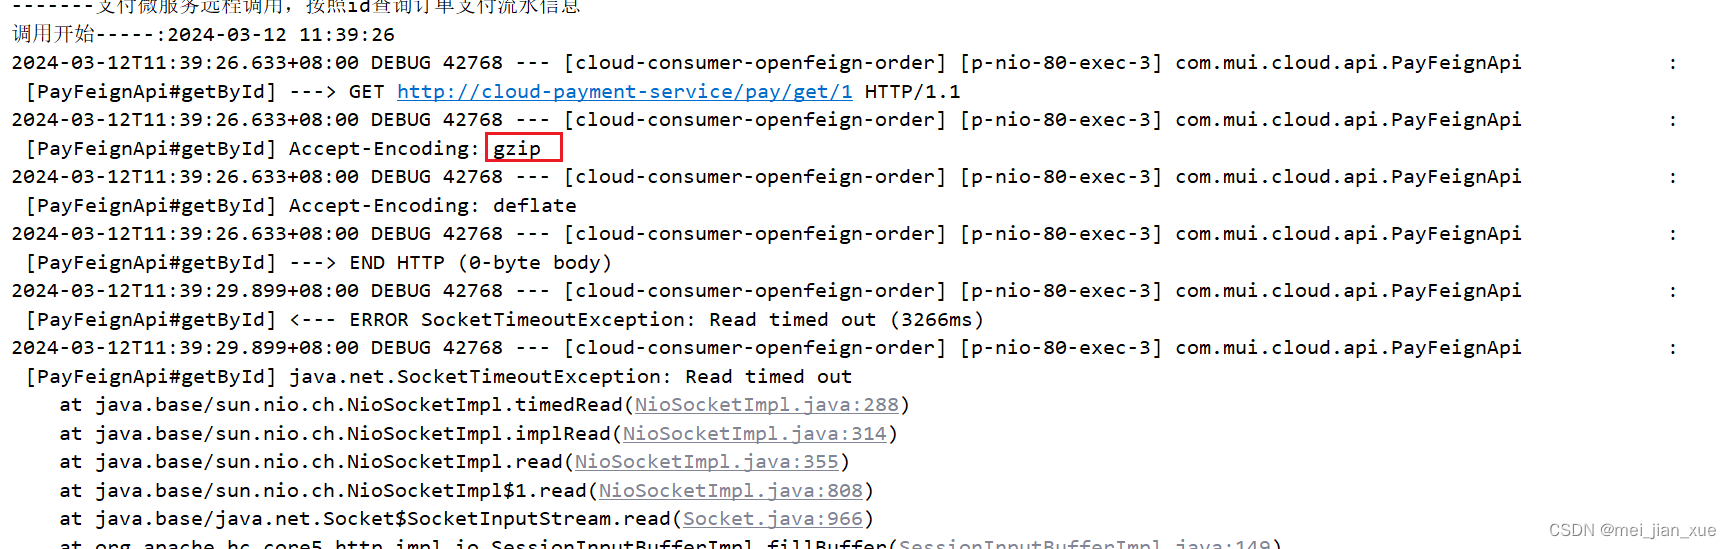
System.out.println("-------支付微服务远程调用,按照id查询订单支付流水信息");
ResultData resultData = null;
try {
System.out.println("调用开始-----:" + DateUtil.now());
resultData = payFeignApi.getById(id);
} catch (Exception e) {
e.printStackTrace();
System.out.println("调用结束-----:" + DateUtil.now());
ResultData.fail(ReturnCodeEnum.RC500.getCode(), e.getMessage());
}
return resultData;
}
-
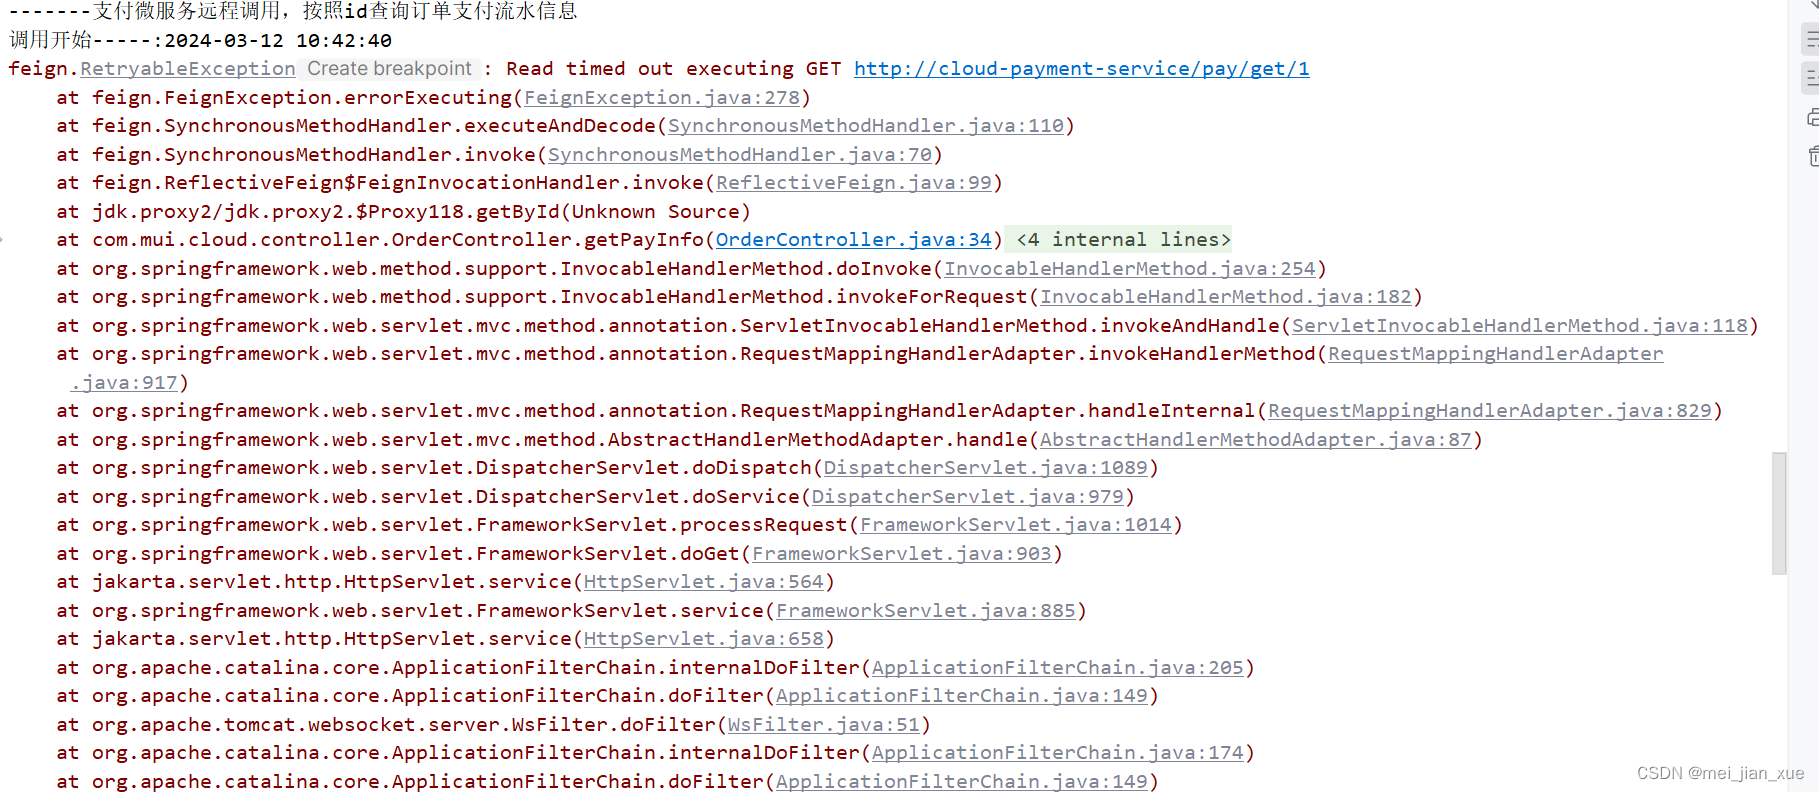
测试
http://localhost/feign/pay/get/1
-
结论
OpenFeign默认等待60秒钟,超过后报错 -
默认OpenFeign客户端等待60秒钟,但是服务端处理超过规定时间会导致Feign客户端返回报错。
为了避免这样的情况,有时候我们需要设置Feign客户端的超时控制,默认60秒太长或者业务时间太短都不好
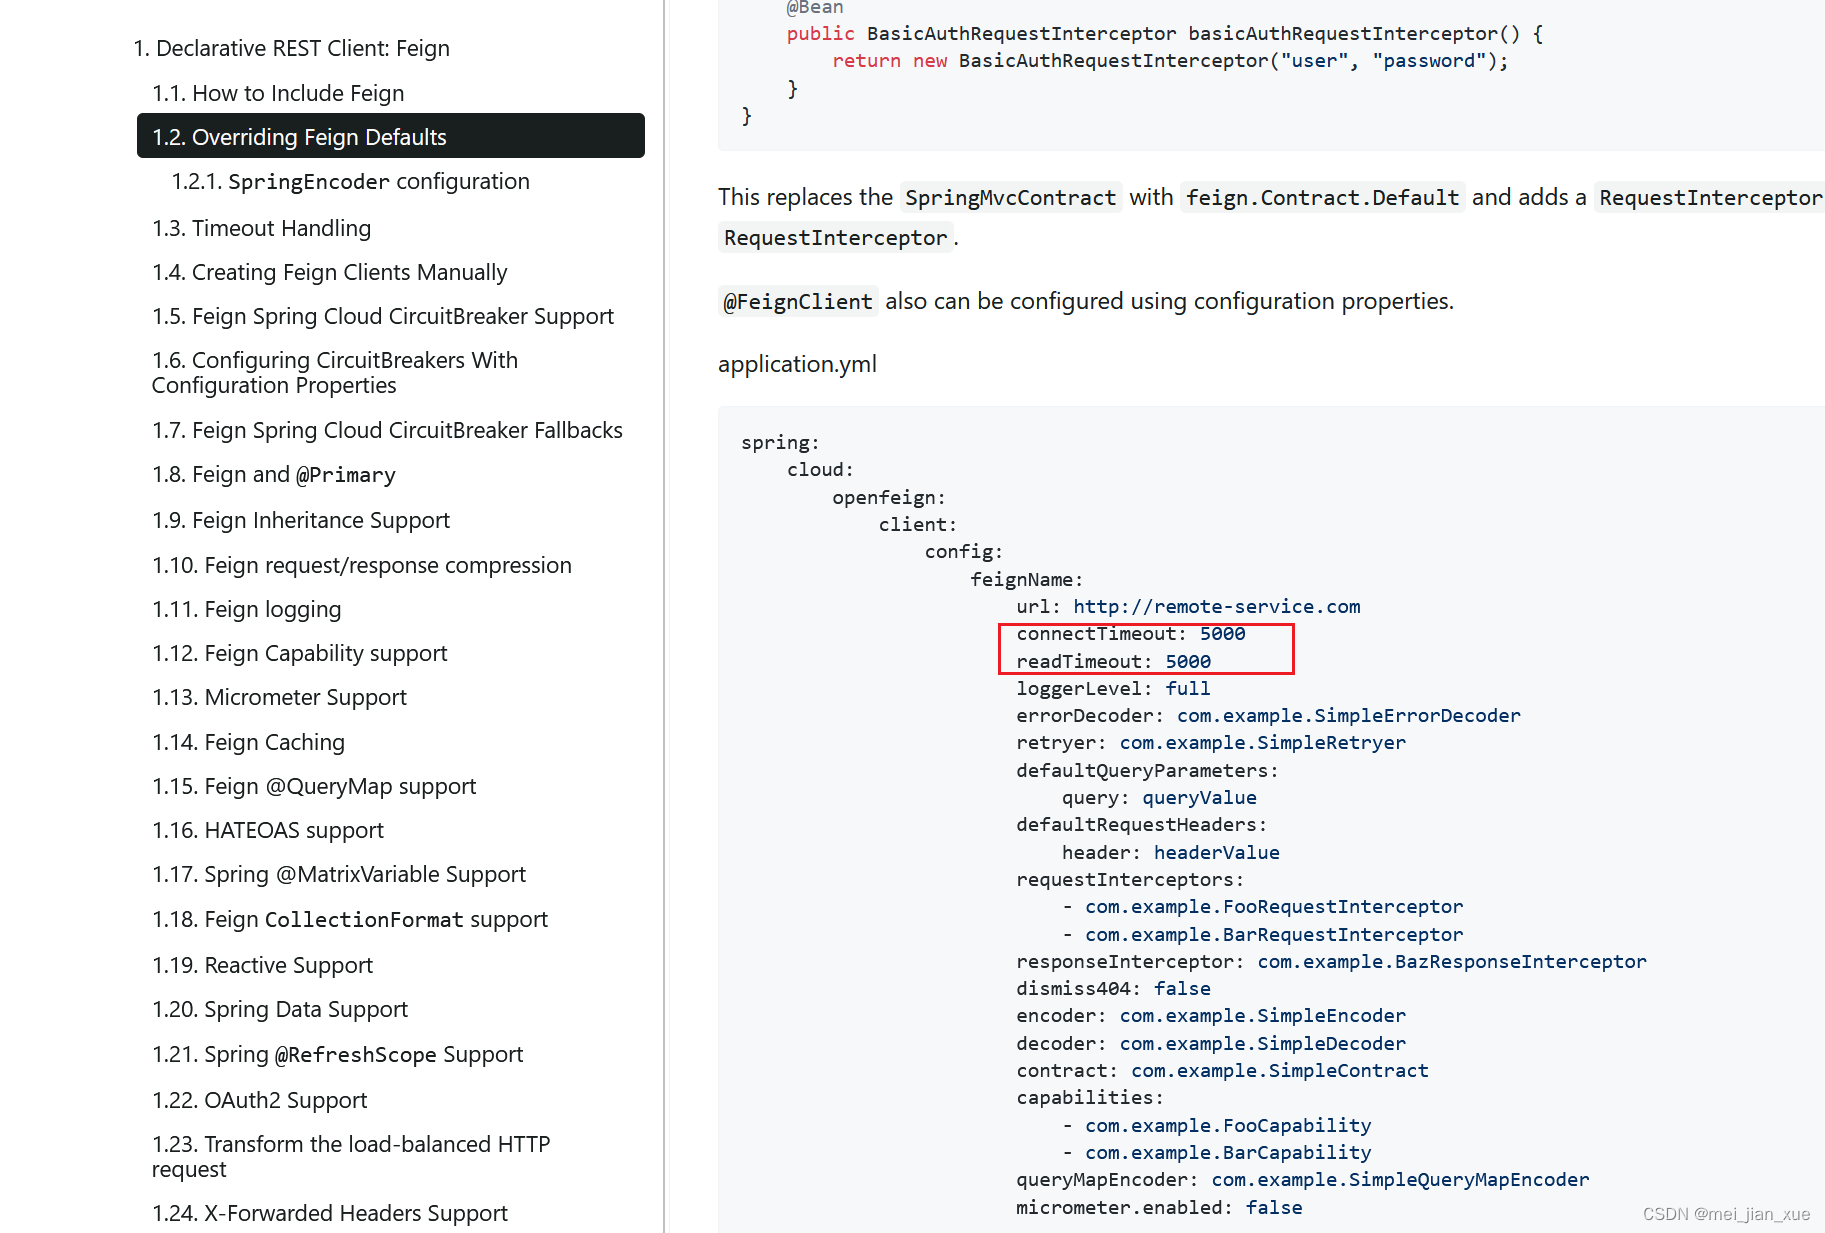
yml文件中开启配置:
connectTimeout 连接超时时间
readTimeout 请求处理超时时间
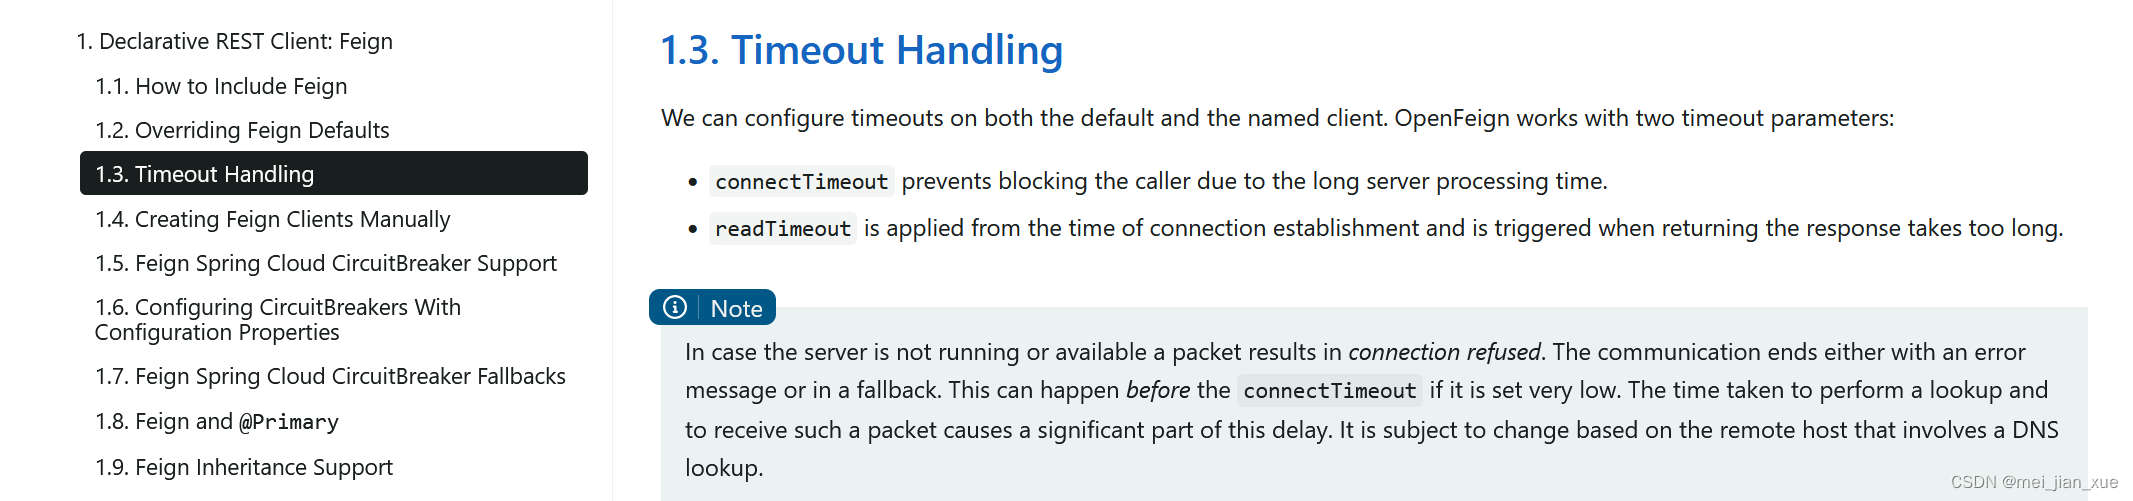
-
修改cloud-consumer-feign-order80YML文件里需要开启OpenFeign客户端超时控制
- 全局配置
server:
  port: 80

spring:
  application:
    name: cloud-consumer-openfeign-order
  ####Spring Cloud Consul for Service Discovery
  cloud:
    consul:
      host: localhost
      port: 8500
      discovery:
        prefer-ip-address: true #优先使用服务ip进行注册
        service-name: ${spring.application.name}
    openfeign:
      client:
        config:
          default:
            # 连接超时时间
            connectTimeout: 3000
            # 读取超时时间
            readTimeout: 3000
- 指定配置
server:
  port: 80

spring:
  application:
    name: cloud-consumer-openfeign-order
  ####Spring Cloud Consul for Service Discovery
  cloud:
    consul:
      host: localhost
      port: 8500
      discovery:
        prefer-ip-address: true #优先使用服务ip进行注册
        service-name: ${spring.application.name}
    openfeign:
      client:
        config:
          # 指定配置
          cloud-payment-service:
            # 连接超时时间
            connectTimeout: 3000
            # 读取超时时间
            readTimeout: 3000
2、OpenFeign重试机制
- 默认重试是关闭的,给了默认值
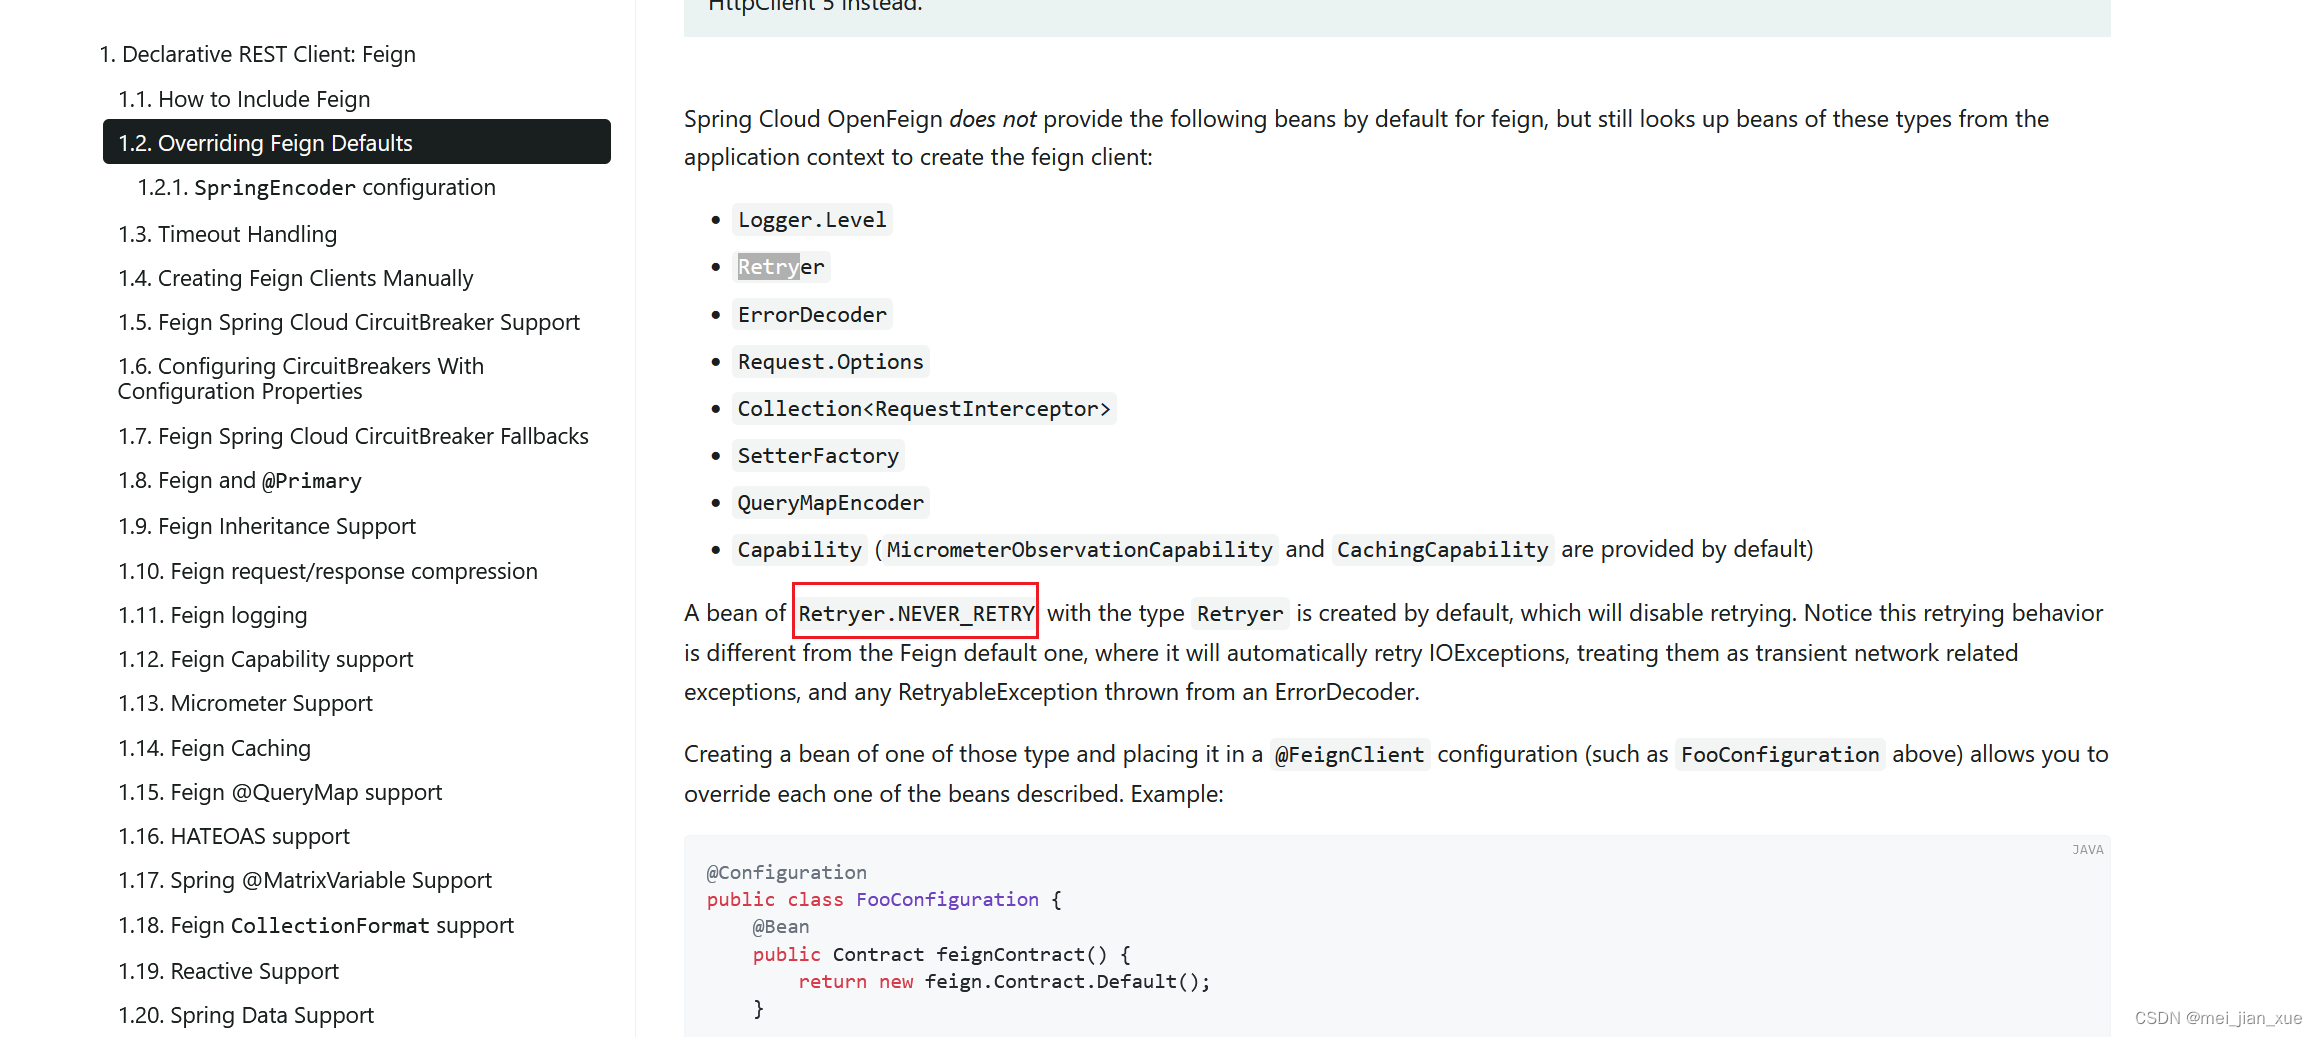
- 开启Retryer功能
package com.mui.cloud.config;

import feign.Logger;
import feign.Retryer;
import org.springframework.context.annotation.Bean;
import org.springframework.context.annotation.Configuration;

@Configuration
public class FeignConfig {

    @Bean
    public Retryer myRetryer() {
        // 默认配置是不走重试策略
//        return Retryer.NEVER_RETRY;

        // 最大请求次数为3(1+2),初始间隔时间为100ms,重试间最大间隔时间为1s
        return new Retryer.Default(100,1,3);
    }

}
结果,总体调用3次
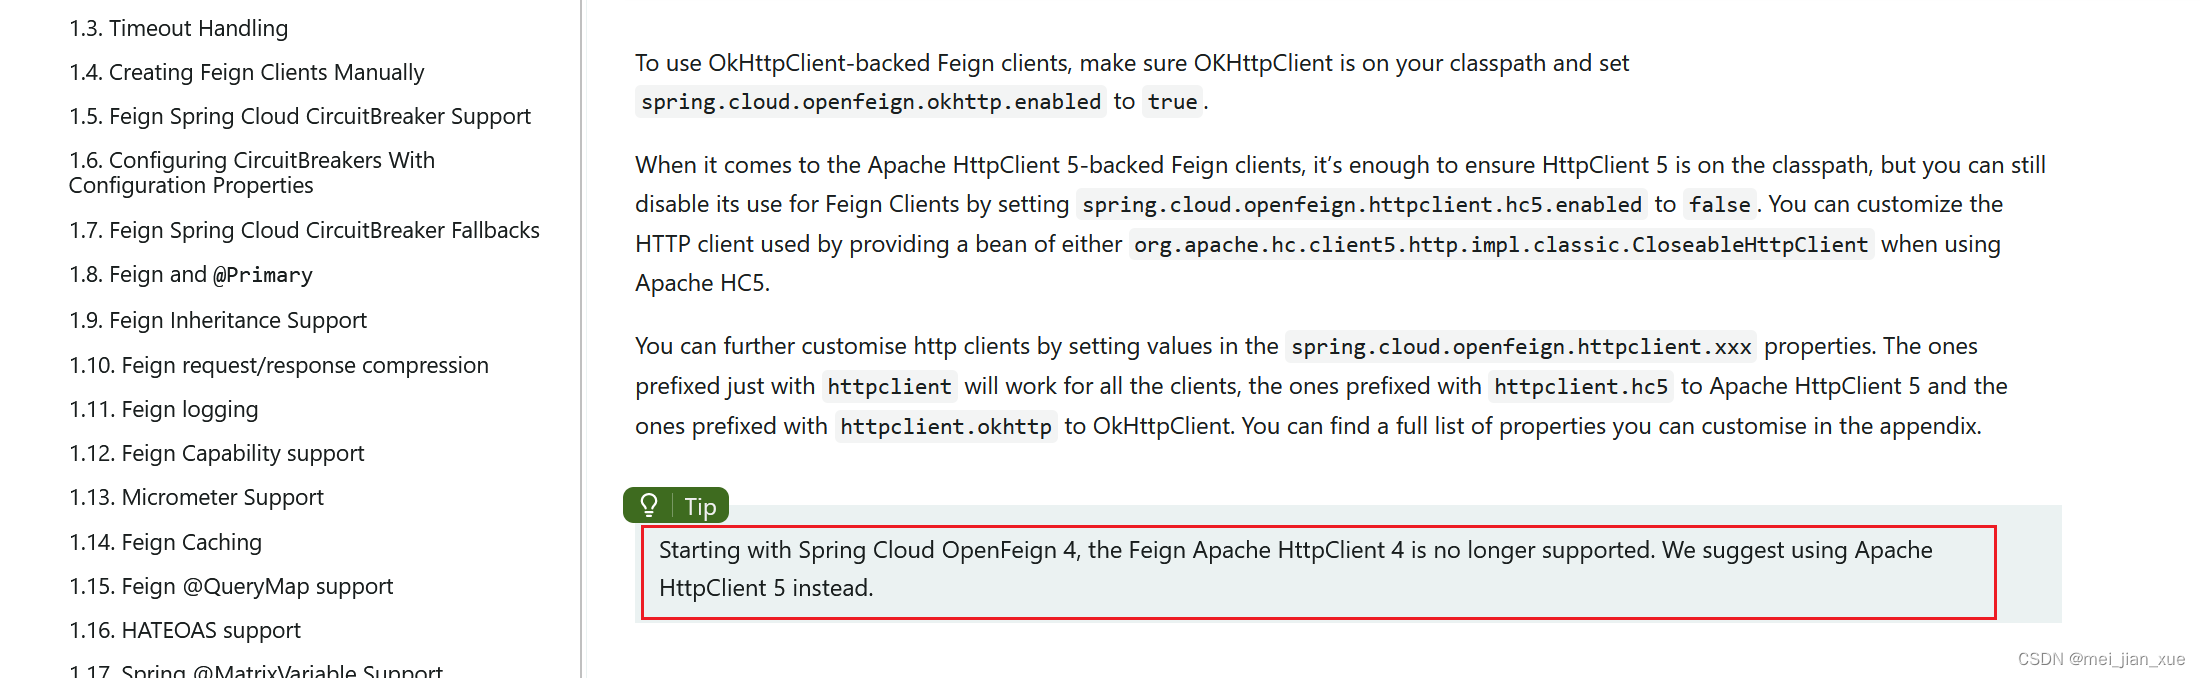
3、OpenFeign默认HttpClient修改
OpenFeign中http client
如果不做特殊配置,OpenFeign默认使用JDK自带的HttpURLConnection发送HTTP请求,
由于默认HttpURLConnection没有连接池、性能和效率比较低,如果采用默认,性能上不是最牛B的,所以加到最大。
-
替换之前,默认用的是什么?
-
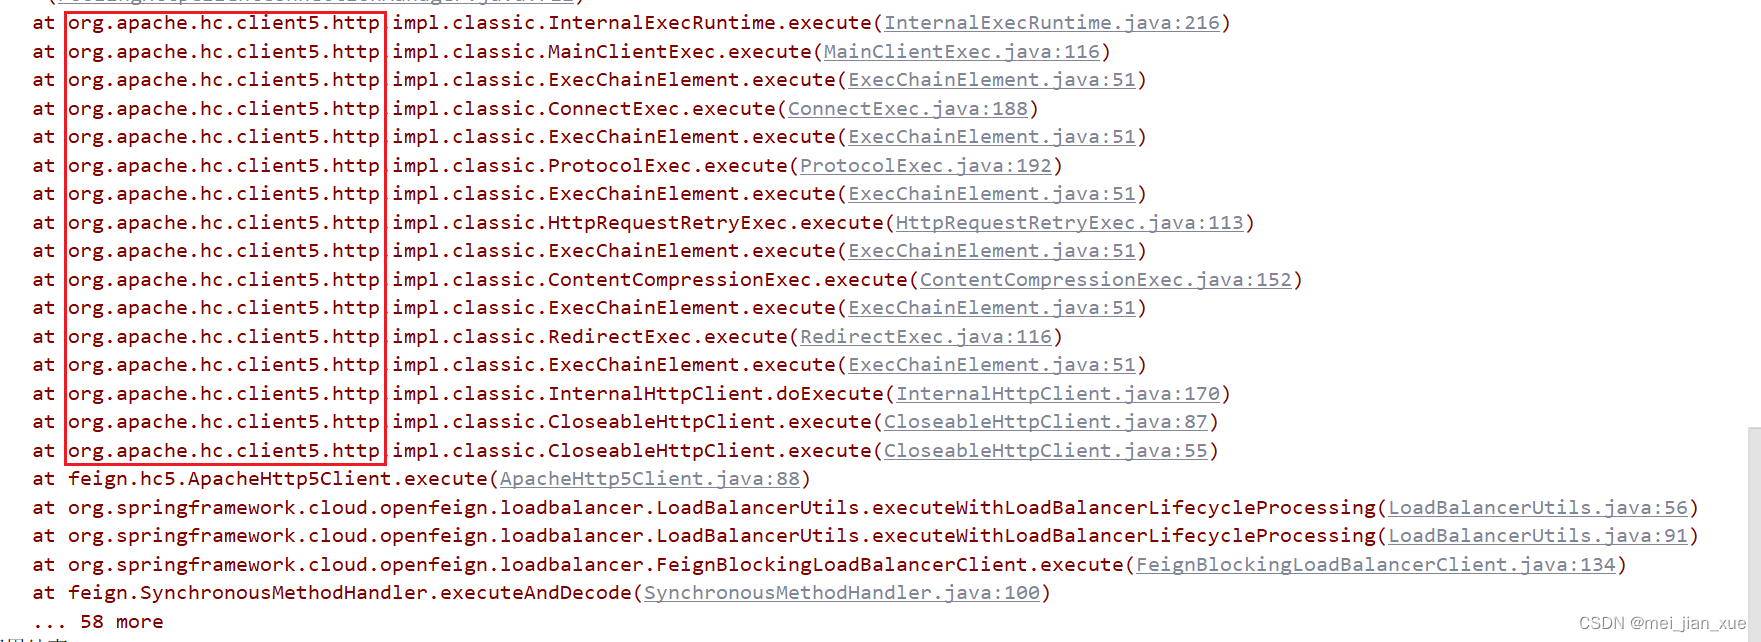
Apache HttpClient 5替换OpenFeign默认的HttpURLConnection
 修改微服务feign80
 -
FeignConfig类里面将Retryer属性修改为默认
package com.mui.cloud.config;

import feign.Logger;
import feign.Retryer;
import org.springframework.context.annotation.Bean;
import org.springframework.context.annotation.Configuration;

@Configuration
public class FeignConfig {

    @Bean
    public Retryer myRetryer() {
        // 默认配置是不走重试策略
        return Retryer.NEVER_RETRY;

        // 最大请求次数为3(1+2),初始间隔时间为100ms,重试间最大间隔时间为1s
//        return new Retryer.Default(100,1,3);
    }

}
- pom修改
<!-- httpclient5-->
<dependency>
    <groupId>org.apache.httpcomponents.client5</groupId>
    <artifactId>httpclient5</artifactId>
    <version>5.3</version>
</dependency>
<!-- feign-hc5-->
<dependency>
    <groupId>io.github.openfeign</groupId>
    <artifactId>feign-hc5</artifactId>
    <version>13.1</version>
</dependency>
- Apache HttpClient5 配置开启说明, application.yml
server:
  port: 80

spring:
  application:
    name: cloud-consumer-openfeign-order
  ####Spring Cloud Consul for Service Discovery
  cloud:
    consul:
      host: localhost
      port: 8500
      discovery:
        prefer-ip-address: true #优先使用服务ip进行注册
        service-name: ${spring.application.name}
    openfeign:
      client:
        config:
          default:
            # 连接超时时间
            connectTimeout: 3000
            # 读取超时时间
            readTimeout: 3000
          cloud-payment-service:
            # 连接超时时间
            connectTimeout: 3000
            # 读取超时时间
            readTimeout: 3000
      httpclient:
        hc5:
          enabled: true
4、OpenFeign请求/响应压缩
- 官网说明
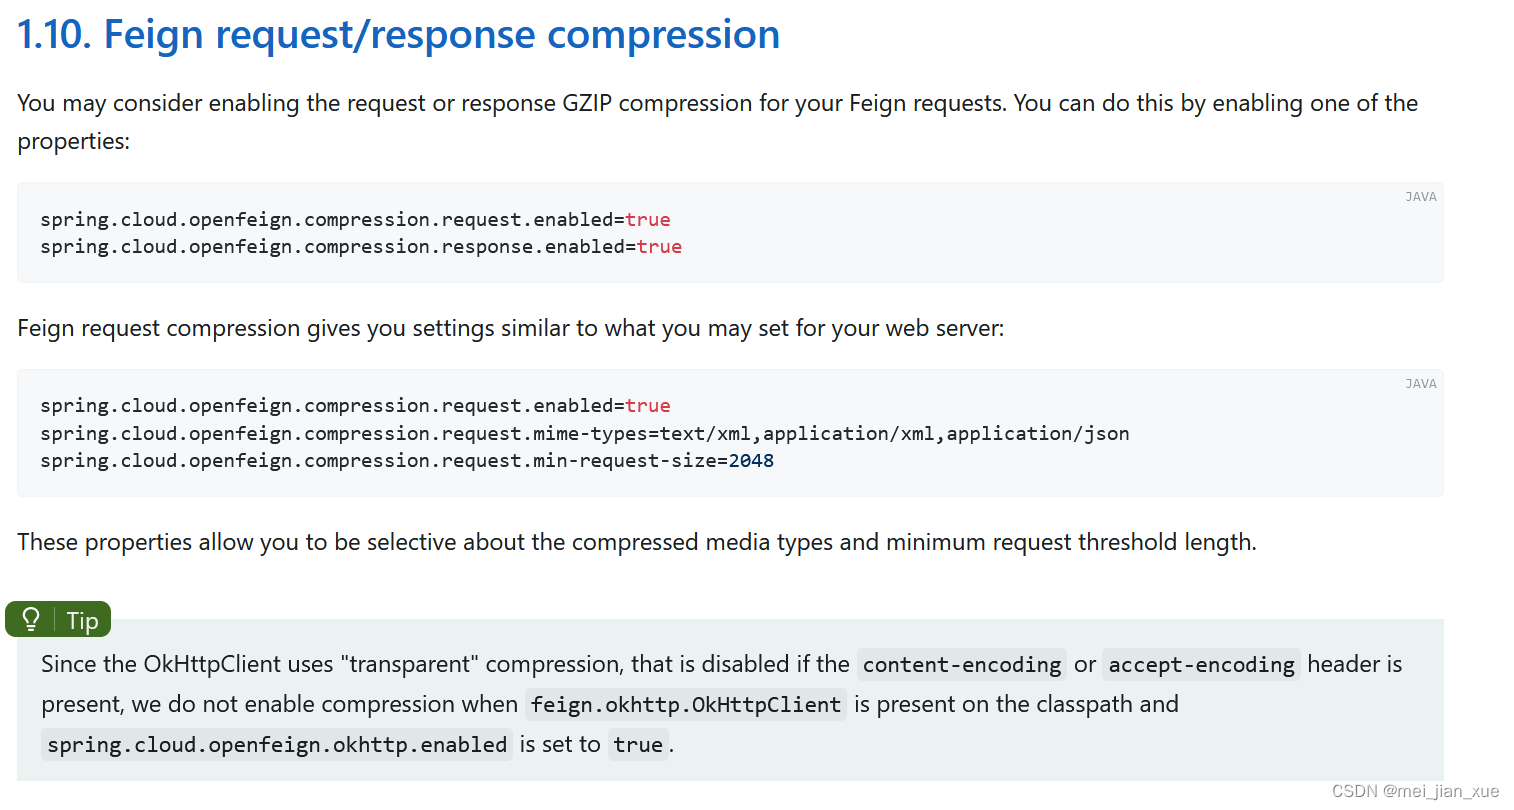
对请求和响应进行GZIP压缩
Spring Cloud OpenFeign支持对请求和响应进行GZIP压缩,以减少通信过程中的性能损耗。
通过下面的两个参数设置,就能开启请求与相应的压缩功能:
spring.cloud.openfeign.compression.request.enabled=true
spring.cloud.openfeign.compression.response.enabled=true
细粒度化设置
对请求压缩做一些更细致的设置,比如下面的配置内容指定压缩的请求数据类型并设置了请求压缩的大小下限,
只有超过这个大小的请求才会进行压缩:
spring.cloud.openfeign.compression.request.enabled=true
spring.cloud.openfeign.compression.request.mime-types=text/xml,application/xml,application/json #触发压缩数据类型
spring.cloud.openfeign.compression.request.min-request-size=2048 #最小触发压缩的大小
- 修改application.yml
server:
  port: 80

spring:
  application:
    name: cloud-consumer-openfeign-order
  ####Spring Cloud Consul for Service Discovery
  cloud:
    consul:
      host: localhost
      port: 8500
      discovery:
        prefer-ip-address: true #优先使用服务ip进行注册
        service-name: ${spring.application.name}
    openfeign:
      client:
        config:
          default:
            # 连接超时时间
            connectTimeout: 3000
            # 读取超时时间
            readTimeout: 3000
          cloud-payment-service:
            # 连接超时时间
            connectTimeout: 3000
            # 读取超时时间
            readTimeout: 3000
      httpclient:
        hc5:
          enabled: true
      compression:
        request:
          enabled: true
          # 最小触发压缩的大小
          min-request-size: 2048
          # 触发压缩的数据类型
          mime-types:
            - text/xml
            - application/xml
            - application/json
        response:
          enabled: true
5、OpenFeign日志打印功能
Feign 提供了日志打印功能,我们可以通过配置来调整日志级别,从而了解 Feign 中 Http 请求的细节,说白了就是对Feign接口的调用情况进行监控和输出
-
日志级别
NONE:默认的,不显示任何日志;
BASIC:仅记录请求方法、URL、响应状态码及执行时间;
HEADERS:除了 BASIC 中定义的信息之外,还有请求和响应的头信息;
FULL:除了 HEADERS 中定义的信息之外,还有请求和响应的正文及元数据。 -
配置日志Bean
package com.mui.cloud.config;

import feign.Logger;
import feign.Retryer;
import org.springframework.context.annotation.Bean;
import org.springframework.context.annotation.Configuration;

@Configuration
public class FeignConfig {

    @Bean
    public Retryer myRetryer() {
        // 默认配置是不走重试策略
        return Retryer.NEVER_RETRY;

        // 最大请求次数为3(1+2),初始间隔时间为100ms,重试间最大间隔时间为1s
//        return new Retryer.Default(100,1,3);
    }

    @Bean
    Logger.Level feignLoggerLevel() {
        return Logger.Level.FULL;
    }

}
- YML文件里需要开启日志的Feign客户端
server:
  port: 80

spring:
  application:
    name: cloud-consumer-openfeign-order
  ####Spring Cloud Consul for Service Discovery
  cloud:
    consul:
      host: localhost
      port: 8500
      discovery:
        prefer-ip-address: true #优先使用服务ip进行注册
        service-name: ${spring.application.name}
    openfeign:
      client:
        config:
          default:
            # 连接超时时间
            connectTimeout: 3000
            # 读取超时时间
            readTimeout: 3000
          cloud-payment-service:
            # 连接超时时间
            connectTimeout: 3000
            # 读取超时时间
            readTimeout: 3000
      httpclient:
        hc5:
          enabled: true
      compression:
        request:
          enabled: true
          # 最小触发压缩的大小
          min-request-size: 2048
          # 触发压缩的数据类型
          mime-types:
            - text/xml
            - application/xml
            - application/json
        response:
          enabled: true
logging:
  level:
    com:
      mui:
        cloud:
          api:
            PayFeignApi: debug
- 带压缩调用结果
 - 重置机制可以看到3次重试触发效果过程


 2666
2666

 被折叠的 条评论
为什么被折叠?
被折叠的 条评论
为什么被折叠?
 到【灌水乐园】发言


