


命令模式的概念
命令模式把请求封装成对象,这让你可以使用不同的请求,队列或者日志来参数化其他对象,命令模式也支持撤销操作。
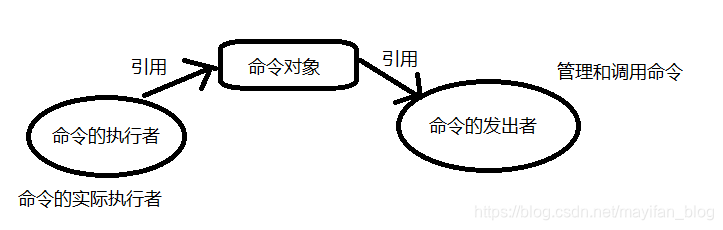
命令模式包括三大组成部分:命令的执行者,命令,命令的发出者。通过具体的命令来实现命令的发出者和执行者之间的解耦,命令的发出者只负责管理和调用这些命令,而不关心命令的具体内容是什么;同样,命令的执行者只知道执行自己的方法,而不知道方法在上层被如何调用;命令这个环节灵活性很强,它对命令地执行者进行封装,并把自身的引用提供给命令的发出者管理。思维导图如下:
实现一个命令模式
接下来我们实现一个简单地遥控器,它有多组按钮,每组按钮包括开启和关闭两个部分,另外还有一个撤销按钮。
一、实现的功能:
1、可以为按钮设置命令,让各命令组分别控制不同的家电。
2、可以撤销最后一条命令,防止误操作。
3、开启按钮和关闭按钮分别实现家电的开关。
二、代码实现:
命令的执行者:
灯:
public class Light {
    public Light(){
    }
	public void on(){
		System.out.println("灯被打开了");
	}
	public void off(){
		System.out.println("灯被关闭了");
	}
}
门:
public class Door {
       public Door(){
       }
       public void open(){
    	   System.out.println("门被打开了");
       }
       public void close(){
    	   System.out.println("门被关闭了");
       }
}
命令部分:
命令的接口(包含两个方法,一个是执行的方法,一个是撤销的方法,两种在具体化的时候会实现相反的功能):
public interface Command {
     public void execute();
     public void undo();
}
灯打开命令:
public class LightOnCommand implements Command{
	private Light light;
	/**
	 * 构造方法,传入命令的执行者
	 * @param light
	 */
	public LightOnCommand(Light light){
		this.light=light;
	}
	/**
	 * 执行命令
	 */
	public void execute() {
		light.on();
	}
	/**
	 * 撤销的方法
	 */
	public void undo() {
		light.off();
	}
}
灯关闭命令:
public class LightOffCommand implements Command{
	private Light light;
	public LightOffCommand(Light light){
		this.light=light;
	}
	public void execute() {
		light.off();
	}
	public void undo() {
		light.on();
	}
}
门打开命令:
public class LightOnCommand implements Command{
	private Light light;
	/**
	 * 构造方法,传入命令的执行者
	 * @param light
	 */
	public LightOnCommand(Light light){
		this.light=light;
	}
	/**
	 * 执行命令
	 */
	public void execute() {
		light.on();
	}
	/**
	 * 撤销的方法
	 */
	public void undo() {
		light.off();
	}
}
门关闭命令:
public class DoorCloseCommand implements Command{
	private Door door;
	public DoorCloseCommand(Door door){
		this.door=door;
	}
	public void execute() {
		door.close();
	}
	public void undo() {
	    door.open();
	}
}
没有具体的命令(遥控器刚刚出厂的命令设置):
public class NoCommand implements Command{
	public NoCommand(){
	}
	public void execute() {
		System.out.println("没有命令");
	}
	public void undo() {
		System.out.println("没有命令");
	}
}
命令的发出者
控制器:
public class RemoteControl {
	Command[] onCommand;//打开命令
	Command[] offCommand;//关闭命令
	Command lastCommand;//上一条命令
	/**
	 * 有参构造方法,初始化指定按钮组,默认无命令
	 */
	public RemoteControl(int number){
		onCommand=new Command[number];
		offCommand=new Command[number];
		NoCommand noCommand=new NoCommand();
		for(int i=0;i<number;i++){
			this.onCommand[i]=noCommand;
		    this.offCommand[i]=noCommand;
		}
		lastCommand=noCommand;
	}
	/**
	 * 设定相应组号的开关命令
	 * @param number
	 * @param onCommand
	 * @param offCommand
	 */
	public void setCommand(int number,Command onCommand,Command offCommand){
		this.onCommand[number]=onCommand;
	    this.offCommand[number]=offCommand;
	}
	/**
	 * 撤销操作
	 * 回到上一条指令
	 * @param number
	 */
	public void unDoButtonPush(int number){
         lastCommand.undo();
	}
	/**
	 * 打开按钮按下
	 */
	public void onButtonPush(int number){
		onCommand[number].execute();
		lastCommand=onCommand[number];
	}
	/**
	 * 关闭按钮按下
	 */
	public void offButtonPush(int number){
		offCommand[number].execute();
		lastCommand=offCommand[number];
	}
	/**
	 * 打印控制器的信息
	 */
	public String toString(){
		StringBuffer stringBuffer=new StringBuffer();
		stringBuffer.append("\r\n---------Remote Control--------\r\n");
		for(int i=0;i<onCommand.length;i++){
			stringBuffer.append("number:"+i+" onCommand:"+onCommand[i].getClass().getSimpleName()+" offCommand:"+offCommand[i].getClass().getSimpleName()+"\r\n");
		}
		return stringBuffer.toString();
	}
}
测试类:
public class Test {
public static void main(String[] args){
//实例化发出命令的对象
RemoteControl rc=new RemoteControl(2);
//实例化执行命令的对象
Door door=new Door();
Light light=new Light();
//实例化一些具体的命令
DoorOpenCommand doc=new DoorOpenCommand(door);
DoorCloseCommand dcc=new DoorCloseCommand(door);
LightOnCommand loc=new LightOnCommand(light);
LightOffCommand lfc=new LightOffCommand(light);
//使得命令发出方获得这些命令
rc.setCommand(0, doc, dcc);
rc.setCommand(1, loc, lfc);
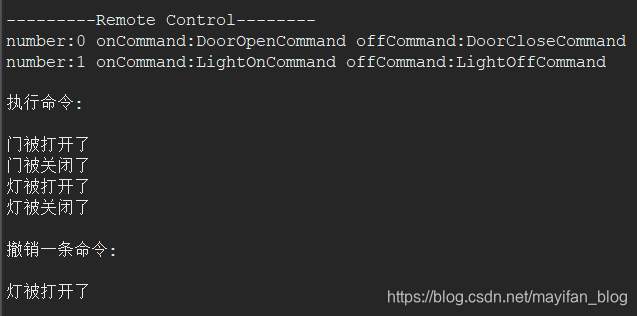
System.out.println(rc.toString());//打印遥控器的命令信息
System.out.println("执行命令:\r\n");
//执行这些命令
rc.onButtonPush(0);
rc.offButtonPush(0);
rc.onButtonPush(1);
rc.offButtonPush(1);
System.out.println("\r\n撤销一条命令:\r\n");
//撤销最后一条命令
rc.unDoButtonPush(0);
}
}
运行结果:
命令模式实现队列请求和日志请求
队列请求:基于命令模式的命令管理者(也就是命令的发出者)可以实现非常丰富的命令管理功能,比较常见的就是实现命令的处理队列,例如线程池、日程安排、工作队列等等,这都是在解耦命令的的发送与执行之火实现的更加丰富的应用。
日志请求:日志请求的应用在电子表格上可以体现出来,需要有一个队列来存储近期的一些操作命令,它有一定的数量上限,在需要的时候可以撤销操作,返回上一步的结果。
在上述代码的基础上改写命令管理代码,添加队列请求和日志请求的功能(支持撤销操作):
改写后的遥控器:
public class ListCommandControl {
		ArrayList<Command> cList;//命令处理队列
		ArrayList<Command> logList;//日志队列
		private final int cListMax;//命令处理队列容量
		private final int logListMax;//日志队列容量
		/**
		 * 有参构造方法,初始化指定按钮组,默认无命令
		 */
		public ListCommandControl(int cListMax,int logListMax){
			this.cListMax=cListMax;
			this.logListMax=logListMax;
			cList=new ArrayList<Command>();//实例化命令处理队列
			logList=new ArrayList<Command>();//实例化日志队列
		}
		/*
		 * 添加命令到命令处理队列
		 */
		public boolean addCommand(Command command){
			if(cList.size()<cListMax){
				cList.add(command);
				return true;
			}else{
				return false;
			}
		}
		/**
		 * 添加命令到日志
		 * @param command
		 * @return
		 */
		public synchronized void addCommandToLog(Command command){
			if(logList.size()<logListMax){
				logList.add(command);
			}else{
			    logList.remove(0);//已满则移除第一个再添加
			    logList.add(command);
			}
		}
		/**
		 * 处理命令的方法
		 */
		public synchronized void handleMessage(){
			if(cList.size()>0){
				Command command=cList.remove(0);
                command.execute();//移除并取出首个命令,执行命令
				addCommandToLog(command);//添加到日志
			}
		}
		/**
		 * 撤销一条命令
		 */
		public synchronized void backOutCommand(){
			if(logList.size()>0){
				Command command=logList.remove(logList.size()-1);//日志非空,取出最后一条命令
				command.undo();//撤销一条命令
			}
		}
		/**
		 * 打印日志
		 */
		public String toString(){
			StringBuffer stringBuffer=new StringBuffer();
			stringBuffer.append("\r\n---------Remote Control--------\r\n");
			for(int i=0;i<logList.size();i++){
				stringBuffer.append("number:"+i+" onCommand:"+logList.get(i).getClass().getSimpleName()+" offCommand:"+logList.get(i).getClass().getSimpleName()+"\r\n");
			}
			return stringBuffer.toString();
		}
}
main方法:
public static void main(String[] args){
		//实例化命令控制器
		ListCommandControl lcc=new ListCommandControl(20, 5);
		//实例化执行命令的对象
		Door door=new Door();
		Light light=new Light();
		//实例化一些具体的命令
		DoorOpenCommand doc=new DoorOpenCommand(door);
		DoorCloseCommand dcc=new DoorCloseCommand(door);
		LightOnCommand loc=new LightOnCommand(light);
		LightOffCommand lfc=new LightOffCommand(light);
		//添加命令到队列
		for(int i=0;i<8;i++){
		lcc.addCommand(doc);
		lcc.addCommand(dcc);
		lcc.addCommand(loc);
		lcc.addCommand(lfc);
		}
		//开三个线程处理消息
		for(int i=0;i<3;i++){
			new Thread(){
				public void run(){
					while(true){
					lcc.handleMessage();
					}
				}
		    }.start();
		}
		try {
			Thread.sleep(1000);
		} catch (InterruptedException e) {
			// TODO Auto-generated catch block
			e.printStackTrace();
		}
		System.out.println("\r\n撤销5条命令\r\n");
		//撤销5步
        for(int i=0;i<5;i++){
        	lcc.backOutCommand();
        }
	}
运行结果:
门被打开了
门被关闭了
灯被打开了
灯被关闭了
门被打开了
门被关闭了
灯被打开了
灯被关闭了
门被打开了
门被关闭了
灯被打开了
灯被关闭了
门被打开了
门被关闭了
灯被打开了
灯被关闭了
门被打开了
门被关闭了
灯被打开了
灯被关闭了

撤销5条命令

灯被打开了
灯被关闭了
门被打开了
门被关闭了
灯被打开了
以上代码实现了多线程处理命令队列中的命令,并且通过日志队列实现撤销操作。


 1858
1858

 被折叠的 条评论
为什么被折叠?
被折叠的 条评论
为什么被折叠?
 到【灌水乐园】发言


