


 本文介绍PyQt5中的QTimer定时器使用方法,包括基本使用、通过按钮控制启动与停止及实现倒计时等功能。
定时器
本文将介绍 Python PyQt5 QTimer 定时器的使用方法和示例。QTimer 定时器可以用于需要定期执行任务的应用场景,例如制作时钟、更新摄像头显示画面或倒计时计时器等。
基本使用方法与事件绑定
QTimer 的事件可以通过 QTimer.timeout.connect() 信号槽绑定到对应的处理函数上。例如,在下面的示例中,定义了一个 onTimer() 函数,每当定时器时间到达时,就会执行这个函数。
要启动 QTimer 定时器,需要调用 QTimer.start() 方法,并传入时间间隔,单位为毫秒(ms)。例如,传入 1000 表示每隔 1000 毫秒(即 1 秒)会触发一次 onTimer()。需要注意的是,定时器不仅仅是触发一次,而是持续按照设定的时间间隔触发,直到调用 QTimer.stop() 方法停止。
以下是一个完整的示例代码:
import sys
from PyQt5.QtWidgets import QApplication, QWidget, QLabel
from PyQt5.QtGui import QFont
from PyQt5.QtCore import QTimer
class MyWidget(QWidget):
def __init__(self):
super().__init__()
self.initUI()
def initUI(self):
self.setWindowTitle('我的窗口')
self.setGeometry(50, 50, 200, 150)
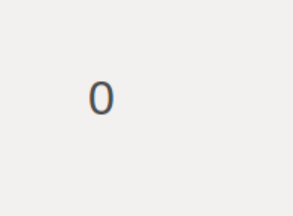
self.mylabel = QLabel('0', self)
self.mylabel.setFont(QFont('Arial', 24))
self.mylabel.move(60, 50)
self.counter = 0
self.mytimer = QTimer(self)
self.mytimer.timeout.connect(self.onTimer)
self.mytimer.start(1000)
def onTimer(self):
self.counter += 1
self.mylabel.setText(str(self.counter))
if __name__ == '__main__':
app = QApplication(sys.argv)
w = MyWidget()
w.show()
sys.exit(app.exec_())
上面的示例运行之后,会显示一个标签控件,并在每秒更新一次显示的数字。
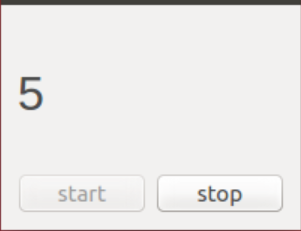
使用按钮事件启动定时器
使用按钮事件来启动和停止 QTimer 定时器。在这个示例中,将使用两个按钮,一个用于启动定时器,另一个用于停止定时器。
为了防止用户重复点击启动按钮,在启动定时器时将其设为禁用状态,并启用停止按钮。当用户点击停止按钮时,定时器停止,两个按钮的状态也会相应切换。
以下是使用按钮控制 QTimer 定时器的示例代码:
import sys
from PyQt5.QtWidgets import QApplication, QWidget, QGridLayout, QLabel, QPushButton
from PyQt5.QtGui import QFont
from PyQt5.QtCore import QTimer

class MyWidget(QWidget):
    def __init__(self):
        super().__init__()
        self.initUI()

    def initUI(self):
        self.setWindowTitle('我的窗口')
        self.setGeometry(50, 50, 200, 150)
        self.gridlayout = QGridLayout()
        self.setLayout(self.gridlayout)
        self.mylabel = QLabel('0', self)
        self.mylabel.setFont(QFont('Arial', 24))
        self.gridlayout.addWidget(self.mylabel, 0, 0, 1, 2)
        self.mybutton1 = QPushButton('开始', self)
        self.mybutton1.clicked.connect(self.startTimer)
        self.gridlayout.addWidget(self.mybutton1, 1, 0)
        self.mybutton2 = QPushButton('停止', self)
        self.mybutton2.clicked.connect(self.stopTimer)
        self.mybutton2.setDisabled(True)
        self.gridlayout.addWidget(self.mybutton2, 1, 1)
        self.mytimer = QTimer(self)
        self.mytimer.timeout.connect(self.onTimer)

    def startTimer(self):
        self.counter = 0
        self.mylabel.setText('开始计时...')
        self.mybutton1.setDisabled(True)
        self.mybutton2.setDisabled(False)
        self.mytimer.start(1000)

    def stopTimer(self):
        self.mylabel.setText('停止计时')
        self.mybutton1.setDisabled(False)
        self.mybutton2.setDisabled(True)
        self.mytimer.stop()

    def onTimer(self):
        self.counter += 1
        self.mylabel.setText(str(self.counter))

if __name__ == '__main__':
    app = QApplication(sys.argv)
    w = MyWidget()
    w.show()
    sys.exit(app.exec_())
在这个示例中,使用了 QGridLayout 来对 UI 组件进行布局。
实现倒计时计时器
除了作为常规定时器使用,QTimer 还可以实现倒计时计时器的功能。例如,可以设置一个倒计时 5 秒的计时器,在倒计时结束时停止定时器并执行特定的函数或程序逻辑。
以下是一个使用 QTimer 实现 5 秒倒计时的示例代码:
import sys
from PyQt5.QtWidgets import QApplication, QWidget, QLabel
from PyQt5.QtGui import QFont
from PyQt5.QtCore import QTimer

class MyWidget(QWidget):
    def __init__(self):
        super().__init__()
        self.initUI()

    def initUI(self):
        self.setWindowTitle('我的窗口')
        self.setGeometry(50, 50, 200, 150)
        self.counter = 5
        self.mylabel = QLabel(str(self.counter), self)
        self.mylabel.setFont(QFont('Arial', 24))
        self.mylabel.move(60, 50)
        self.mytimer = QTimer(self)
        self.mytimer.timeout.connect(self.onTimer)
        self.mytimer.start(1000)

    def onTimer(self):
        self.counter -= 1
        self.mylabel.setText(str(self.counter))
        if self.counter == 0:
            self.mytimer.stop()
            print('时间到')

if __name__ == '__main__':
    app = QApplication(sys.argv)
    w = MyWidget()
    w.show()
    sys.exit(app.exec_())
运行上述代码,将看到一个标签控件显示的数字每秒递减,直到计数结束。


 2040
2040

 被折叠的 条评论
为什么被折叠?
被折叠的 条评论
为什么被折叠?
 到【灌水乐园】发言


