


1. 安装概述
因为是离线安装,必须要安装编译工具(gcc,g++)下面有软件连接,
不然安装报以下错误
configure: error: no acceptable C compiler found in $PATH 问题解决
https://pan.baidu.com/s/1D7Z7uBVyzzui88LzyJ7WnA
提取码:aurx
①. 环境需求
| 名称 | 版本 | 下载地址 |
|---|---|---|
| gcc | gcc | 上面连接👆 |
| g++ | g++ | 上面连接👆 |
| postgis | postgis-2.5.1.tar.gz | 上面连接👆 |
| Postgres | Postgres10 | 自行下载👆 |
| gdal | gdal-2.0.0 | http://trac.osgeo.org/gdal/wiki/DownloadSource |
| geos | geos-3.6.3 | http://trac.osgeo.org/geos/ |
| libxml | libxml2-2.9.9.tar.gz | http://xmlsoft.org/downloads.html |
| proj | proj-5.2.0.tar.gz | http://trac.osgeo.org/proj/ |
| json-c-json-c | json-c-json-c-0.13.120180305.tar.gz | https://github.com/json-c/json-c/releases/ |
2. 安装gdal扩展
//解压tar包到/opt目录下
[root@test gdal-2.0.0]#tar -zxvf gdal-2.0.0.tar.gz -p /opt

//进入目录
[root@test gdal-2.0.0]#cd /opt/gdal-2.0.0

//将gdal安装到/usr/local/gdal-2.0.0目录下 注: (这个目录不要和上传目录一样,否则会报错)
[root@test gdal-2.0.0]#./configure --prefix=/usr/local/gdal-2.0.0

//编译
[root@test gdal-2.0.0]#make

//安装
[root@test gdal-2.0.0]#make install
3. 安装geos扩展
//解压tar包到/opt目录下
[root@test source]# tar -jxf geos-3.6.3.tar.bz2 -p /opt

//进入目录
[root@test source]#cd /opt/geos-3.6.3

//将geos安装到/usr/local/geos-3.6.3目录下 注: (这个目录不要和上传目录一样,否则会报错)
[root@test geos-3.6.3]#./configure --prefix=/usr/local/geos-3.6.3

//编译
[root@test geos-3.6.3]#make

//安装
[root@test geos-3.6.3]#make install
注意:
如果make失败: 错误:ERROR: could not find libpq
[root@test postgis-2.1.1]# ./configure
...
...
...
checking for library containing GDALAllRegister... no
configure: error: could not find GDAL

解决办法:将PostgreSQL的lib目录(/postgresql/lib)和GDAL的lib文件目录(/usr/local/lib)添加到系统的库文件目录中

echo '/usr/local/pgsql/lib' >> /etc/ld.so.conf
echo '/usr/local/lib' >> /etc/ld.so.conf

ldconfig

检查是否生效
[root@test postgis-2.1.1]# ldconfig -p | grep libpq
    libpqwalreceiver.so (libc6,x86-64) => /postgresql/lib/libpqwalreceiver.so
    libpq.so.5 (libc6,x86-64) => /postgresql/lib/libpq.so.5
    libpq.so (libc6,x86-64) => /postgresql/lib/libpq.so

[root@test postgis-2.1.1]# ldconfig -p | grep gdal
    libgdal.so.1 (libc6,x86-64) => /usr/local/lib/libgdal.so.1
    libgdal.so (libc6,x86-64) => /usr/local/lib/libgdal.so

再执行./configure就正常了。
4. 安装libxml2扩展
//解压tar包到/opt目录下
[root@test source]#tar -zxvf libxml2-git-snapshot.tar.gz -p /opt

//进入目录
[root@test source]#cd /opt/libxml2-2.9.2

//将libxml2安装到/usr/local/libxml2-2.9.2目录下 注: (这个目录不要和上传目录一样,否则会报错)
[root@test libxml2-2.9.2]#./configure --prefix=/usr/local/libxml2-2.9.2

//编译
[root@test libxml2-2.9.2]#make

//安装
[root@test libxml2-2.9.2]#make install
5. 安装proj扩展
//解压tar包到/opt目录下
[root@test source]#tar -zxvf proj-5.2.0.tar.gz  -p /opt

//进入目录
[root@test source]#cd /opt/proj-5.2.0

//将proj安装到/usr/local/proj-5.2.0目录下 注: (这个目录不要和上传目录一样,否则会报错)
[root@test proj-5.2.0]#./configure --prefix=/usr/local/proj-5.2.0

//编译
[root@test proj-5.2.0]#make

//安装
[root@test proj-5.2.0]#make install
6. 安装json-c扩展
//解压tar包到/opt目录下
[root@test source]#tar xzf json-c-json-c-0.13.1-20180305.tar.gz -p /opt

//进入目录
[root@test source]#cd /opt/json-c-json-c-0.13.1-20180305

//将json-0.12安装到/usr/local/json-0.12目录下 注: (这个目录不要和上传目录一样,否则会报错)
[root@test json-c-json-c-0.13.1-20180305]#./configure --prefix=/usr/local/json-0.12

//编译
[root@test json-c-json-c-0.13.1-20180305]#make

//安装
[root@test json-c-json-c-0.13.1-20180305]#make install
7. 安装postgis
//解压tar包到/opt目录下
[root@test source]#tar -zxvf postgis-2.5.1.tar.gz -p /opt

//进入目录
[root@test source]#cd /opt/postgis-2.5.1

//将postgis安装到/usr/local/postgis-2.5.1目录下 注: (这个目录不要和上传目录一样,否则会报错)
[root@test postgis-2.5.1]#./configure --prefix=/usr/local/postgis  \
--with-pgconfig=/usr/local/FlyingDB/11/08k/bin/pg_config 	\							//数据库pg_config目录
--with-xml2config=/usr/local/libxml2-2.9.9/bin/xml2-config 	\
--with-geosconfig=/usr/local/geos-3.6.3/bin/geos-config 	\
--with-gdalconfig=/usr/local/gdal-2.0.0/bin/gdal-config   	\
--with-projdir=/usr/local/proj-5.2.0

//编译
[root@test postgis-2.5.1]#make

//安装
[root@test postgis-2.5.1]#make install
8. 安装postgis扩展
换用户进入数据库:
su – postgres

//进入postgreSQL数据库bin目录
cd /usr/local/pgsql/bin

//进入数据库
./psql

postgres=# create database postgis;
postgres=# \c postgis
postgis=# create extension postgis;
#为了更好的使用postgis功能,决定把所有的扩展都装了
postgis=# create extension postgis_topology;
postgis=#\q
注意:
如果创建postgis扩展失败: 错误:ERROR: could not load library “/usr/local/FlyingDB/11/08k/lib/postgresql/postgis-2.5.so”: libgeos_c.so.1: cannot open shared object file: No such file or directory(错误中的文件路径根据实际情况为准,解决方法一致);

在任意目录运行 ldd /usr/local/pgsql/lib/postgis-2.5.so ,即可发现缺少文件 ,如图:
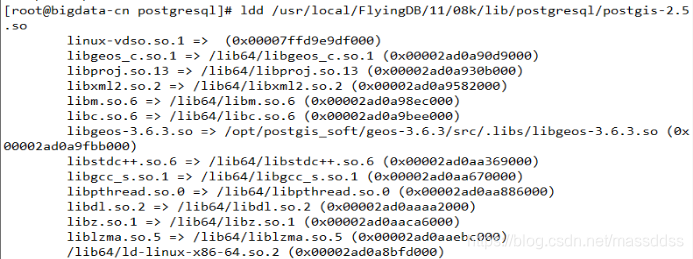
如果缺失 能看见 not found 字样,然后全局查找文件,例如:
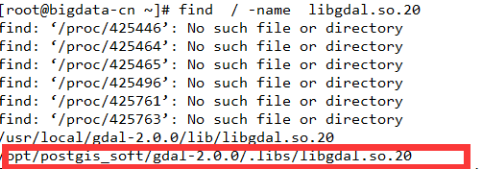
将查找到的文件拷贝至 /usr/lib64 目录下,cp /opt/postgis_soft/gdal-2.0.0/.libs/libgdal.so.20 /usr/lib64/。
文件可能缺少多个,可以重复这个步骤直至完成
以上方法 均可适用于这种错误方法。


 被折叠的 条评论
为什么被折叠?
被折叠的 条评论
为什么被折叠?
 到【灌水乐园】发言


