


 本文详细介绍了如何利用TrustZone内核代码执行漏洞手动解锁Motorola MotoX (2nd Gen)设备的Bootloader,包括对Bootloader各阶段的分析、QFuses的工作原理及其在解锁过程中的作用。
原文地址:http://bits-please.blogspot.co.il/2016/02/unlocking-motorola-bootloader.html
In this blog post, we'll explore the Motorola bootloader on recent Qualcomm Snapdragon devices. Our goal will be to unlock the bootloader of a Moto X (2nd Gen), by using the TrustZone kernel code execution vulnerability from the
previous blog posts. Note that although we will show the complete unlocking process for this specific device, it should be general enough to work at-least for most modern Motorola devices.
After reporting the previous TrustZone kernel privilege escalation to Qualcomm, I was gifted a shiny new Moto X. However... There was one little snag - they accidentally sent me a locked device. This was a completely honest mistake, and they did offer many times to unlock the device - but where's the fun in that? So without further ado, let's dive into the Motorola bootloader and see what it takes to unlock it.

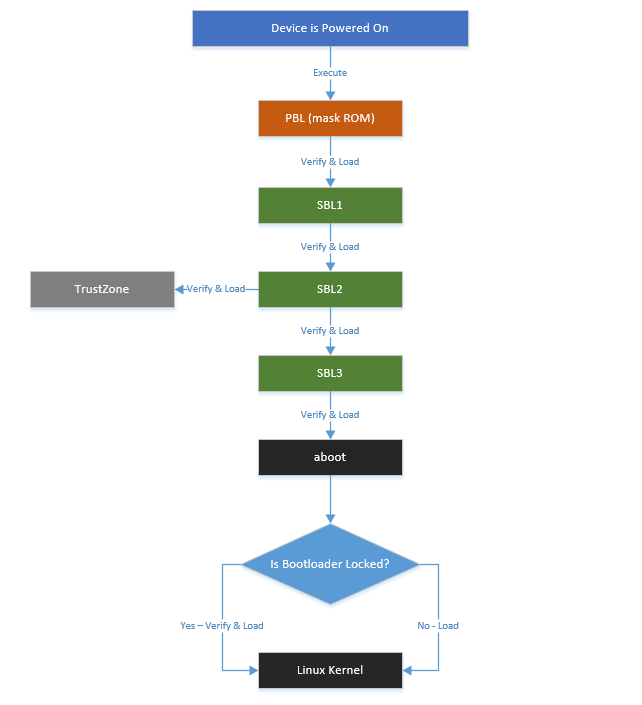
Before we start our research, let's begin with a short introduction to the boot process - starting right at the point at which a device is powered on.
First - the PBL ( Primary Boot Loader), also known as the "BootROM" is executed. Since the PBL is stored within an internal mask ROM, it cannot be modified or provisioned, and is therefore an intrinsic part of the device. As such, it only serves the very minimal purpose of allowing the device to boot, and authenticating and loading the next part of the boot-chain.
Then, two secondary bootloaders are loaded, SBL1 ( Secondary Boot Loader), followed by SBL2. Their main responsibility is to boot up the various processors on the SoC and configure them so that they're ready to operate.
Next up in the boot-chain, the third and last secondary bootloader, SBL3, is loaded. This bootloader, among other tasks, verifies and loads the Android Bootloader - "aboot".
Now this is where we get to the part relevant for our unlocking endeavours; the Android Bootloader is the piece of software whose responsibility is, as its name suggests, to load the Android operating system and trigger its execution.
This is also the piece of boot-chain that OEMs tend to customize the most, mainly because while the first part of the boot-chain is written by Qualcomm and deals with SoC specifics, the Android bootloader can be used to configure the way the Android OS is loaded.
Among the features controlled by aboot is the "bootloader lock" - in other words, aboot is the first piece of the boot-chain which can opt to break the chain of trust (in which each bootloader stage verifies the next) and load an unsigned operating system.
For devices with an unlockable bootloader, the unlocking process is usually performed by rebooting the device into a special ("bootloader") mode, and issuing the relevant fastboot command. However, as we will later see, this interface is also handled by aboot. This means that not only does aboot query the lock status during the regular boot process, but it also houses the code responsible for the actual unlocking process.
 As you may know, different OEMs take different stances on this issue. In short, "Nexus" devices always ship with an "unlockable" bootloader. In contrast, Samsung doesn't allow bootloader unlocking for most of its devices. Other OEMs, Motorola included, ship their devices locked, but certain devices deemed "eligible" can be unlocked using a "magic" (signed) token supplied by the OEM (although this also voids the warranty for most devices).
So... it's all very complex, but also irrelevant. That's because we're going to do the whole process manually - if aboot can control the lock status of the device, this means we should probably be able to do so as well, given an elevated enough set of privileges.
Now that we have a general grasp of the components involved and of our goal, the next stage is to analyse the actual aboot code.
Since the binaries for all stages of the boot-chain are contained within the factory firmware image, that would naturally be a good place to start. There are several download links available - here are a few. In case you would like to follow along with me, I'm going to refer to the symbols in the version "ATT_XT1097_4.4.4_KXE21.187-38".
After downloading the firmware image, we are faced with our first challenge - the images are all packed using a proprietary format, in a file called "motoboot.img". However, opening the file up in a hex-editor reveals it has a pretty simple format we can deduce:

As you can see above, the sought-after aboot image is stored within this file, along with the TrustZone image, and various stages of the boot-chain. Good.
After analysing the structure above, I've written a python script which can be used to unpack all the images from a given Motorola bootloader image, you can find it here.
We'll start by inspecting the aboot image. Discouragingly, it is 1MB large, so going over it all would be a waste of time. However, as we've mentioned above, when booting the device into the special "bootloader" mode, the actual interaction with the user is provided by aboot itself. This means that we can start by searching for the strings which are displayed when the unlocking process is performed - and continue from there.
A short search for the "unlock..." string which is printed after starting the unlock process brings us straight to the function (@0xFF4B874) which deals with the unlocking logic:
 That was pretty fast!
As you can see, after printing the string to the console, three functions are called consecutively, and if all three of them succeed, the device is considered unlocked.
Going over the last two functions reveals their purpose is to erase the user's data partitions (which is always performed after the bootloader is unlocked, in order to protect the device owner's privacy). In any case, this means they are irrelevant to the unlocking process itself and are simply side-effects.
This leaves us with a single function which, when called, should unlock the bootloader.
So does this mean we're done already? Can we just call this function and unlock the device?
Actually, not yet. Although the TrustZone exploit allows us to achieve code-execution within the TrustZone kernel, this is only done after the operating system is loaded, at which point, executing aboot code directly could cause all sorts of side-effects (since, for example, the code might assume that there is no operating system/the MMU could be disabled, etc.). And even if it were that simple, perhaps there is something interesting to be learned by fully understanding the locking mechanism itself.
Regardless, if we can understand the logic behind the code, we can simply emulate it ourselves, and perform the meaningful parts of it from our TrustZone exploit. Analysing the unlocking function reveals a surprisingly simple high-level logic:

Unfortunately, these two functions wreak havoc within IDA (which fails to even display a meaningful call-graph for them).
Manually analysing the functions reveals that they are in fact quite similar to one another. They both don't contain much logic of their own, but instead they prepare arguments and call the following function:
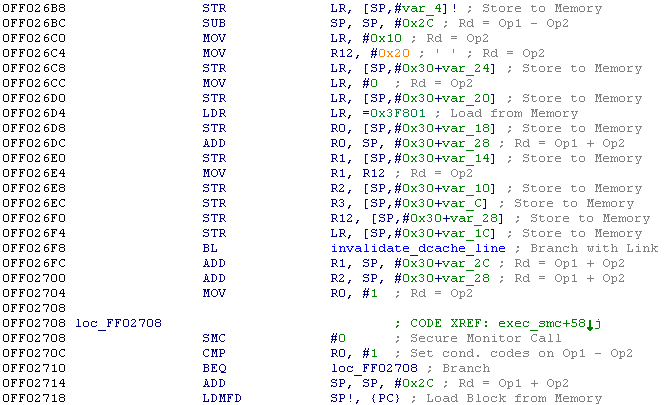
This is a little surprising - instead of handling the logic itself, this function issues an an SMC ( Supervisor Mode Call) in order to invoke a TrustZone system-call from aboot itself! (as we've discussed in previous blog posts). In this case, both functions issue an SMC with the request code 0x3F801. Here is the relevant pseudo-code for each of them:
 At this point we've gleaned all the information we need from
aboot, now lets switch over to the TrustZone kernel to find out what this SMC call does.
At this point we've gleaned all the information we need from
aboot, now lets switch over to the TrustZone kernel to find out what this SMC call does.
Now that we've established that an SMC call is made with the command-code 0x3F801, we are left with the task of finding this command within the TrustZone kernel.
Going over the TrustZone kernel system calls, we arrive at the following entry:

This is a huge function which performs widely different tasks based on the first argument supplied, which we'll call the "command code" from now on.
It should be noted an additional flag is passed into this system-call indicating whether or not it was called from a "secure" context. This means that if we try invoking it from the Android OS itself, an argument will be passed marking our invocation is insecure, and will prevent us from performing these operations ourselves. Of course, we can get around this limitation using our TrustZone exploit, but we'll go into that later!
As we've seen above, this SMC call is triggered twice, using the command codes #1 and #2 (I've annotated the functions below to improve readability):

In short, we can see both commands are used to read and write (respectively) values from something called a "QFuse".
Much like a real-life fuse, a QFuse is a hardware component which facilitates a "one-time-writeable" piece of memory. Each fuse represents a single bit; fuses which are in-tact represent the bit zero, and "blown" fuses represent the bit one. However, as the name suggests, this operation is irreversible - once a fuse is blown it cannot be "un-blown".
Each SoC has it's own arrangement of QFuses, each with it's own unique purpose. Some fuses are already blown when a device is shipped, but others can be blown depending on the user's actions in order to change the way a specific device feature operates.
Unfortunately, the information regarding the role of each fuse is not public, and we are therefore left with the single option of reversing the various software components to try and deduce their role.
In our case, we call a specific function in order to decide which fuse we are going to read and write:

Since we call this function with the second syscall argument, in our case "4", this means we will operate on the fuse at address 0xFC4B86E8.
Now that we understand the aboot and the TrustZone logic, we can put them together to get the full flow:
But how can QFuses be written?
Luckily the TrustZone kernel exposes a pair of system-call which allow us to read and write a restricted set of QFuses - tzbsp_qfprom_read_row and tzbsp_qfprom_write_row, respectively. If we can lift those restrictions using our TrustZone exploit, we should be able to use this API in order to blow the wanted QFuse.
Lets take a look at these restrictions within the tzbsp_qfprom_write_row system-call:

So first, there's a DWORD at 0xFE823D5C which must be set to zero in order for the function's logic to continue. Normally this flag is in fact set to one, thus preventing the usage of the QFuse calls, but we can easily enough overwrite the flag using the TrustZone exploit.
Then, there's an additional function called, which is used to make sure that the ranges of fuses being written are "allowed":
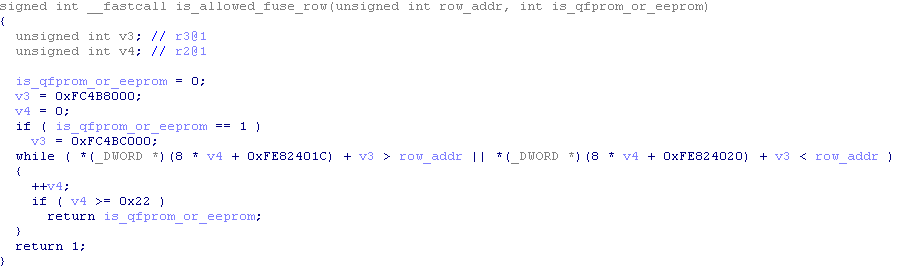 As we can see, this function goes over a static list of pairs, each denoting the start and end address of the allowed QFuses. This means that in order to pass this check, we can overwrite this static list to include all QFuses (setting the start address to zero and the end address to the maximal QFuse relative address - 0xFFFF).

Have fun!
On the one hand, blowing a fuse is really "dangerous" - making one small mistake can permanently brick you device. On the other hand, some fuses might facilitate a special set of features that we would like to enable.
One such example is the "engineering" fuse; this fuse is mentioned throughout the aboot image, and can be used to enable an amazing range of capabilities such as skipping secure boot, loading unsigned peripheral images, having an unsigned GPT, and much more.
However, this fuse is blown in all consumer devices, marking the device as a "non-engineer" device, and disabling these features. But who knows, maybe there are other fuses which are just as important, which have not yet been discovered...
WHY MOTOROLA?
After reporting the previous TrustZone kernel privilege escalation to Qualcomm, I was gifted a shiny new Moto X. However... There was one little snag - they accidentally sent me a locked device. This was a completely honest mistake, and they did offer many times to unlock the device - but where's the fun in that? So without further ado, let's dive into the Motorola bootloader and see what it takes to unlock it.

SETTING THE STAGE
Before we start our research, let's begin with a short introduction to the boot process - starting right at the point at which a device is powered on.
First - the PBL ( Primary Boot Loader), also known as the "BootROM" is executed. Since the PBL is stored within an internal mask ROM, it cannot be modified or provisioned, and is therefore an intrinsic part of the device. As such, it only serves the very minimal purpose of allowing the device to boot, and authenticating and loading the next part of the boot-chain.
Then, two secondary bootloaders are loaded, SBL1 ( Secondary Boot Loader), followed by SBL2. Their main responsibility is to boot up the various processors on the SoC and configure them so that they're ready to operate.
Next up in the boot-chain, the third and last secondary bootloader, SBL3, is loaded. This bootloader, among other tasks, verifies and loads the Android Bootloader - "aboot".
Now this is where we get to the part relevant for our unlocking endeavours; the Android Bootloader is the piece of software whose responsibility is, as its name suggests, to load the Android operating system and trigger its execution.
This is also the piece of boot-chain that OEMs tend to customize the most, mainly because while the first part of the boot-chain is written by Qualcomm and deals with SoC specifics, the Android bootloader can be used to configure the way the Android OS is loaded.
Among the features controlled by aboot is the "bootloader lock" - in other words, aboot is the first piece of the boot-chain which can opt to break the chain of trust (in which each bootloader stage verifies the next) and load an unsigned operating system.
For devices with an unlockable bootloader, the unlocking process is usually performed by rebooting the device into a special ("bootloader") mode, and issuing the relevant fastboot command. However, as we will later see, this interface is also handled by aboot. This means that not only does aboot query the lock status during the regular boot process, but it also houses the code responsible for the actual unlocking process.
So... it's all very complex, but also irrelevant. That's because we're going to do the whole process manually - if aboot can control the lock status of the device, this means we should probably be able to do so as well, given an elevated enough set of privileges.
GETTING STARTED
Now that we have a general grasp of the components involved and of our goal, the next stage is to analyse the actual aboot code.
Since the binaries for all stages of the boot-chain are contained within the factory firmware image, that would naturally be a good place to start. There are several download links available - here are a few. In case you would like to follow along with me, I'm going to refer to the symbols in the version "ATT_XT1097_4.4.4_KXE21.187-38".
After downloading the firmware image, we are faced with our first challenge - the images are all packed using a proprietary format, in a file called "motoboot.img". However, opening the file up in a hex-editor reveals it has a pretty simple format we can deduce:
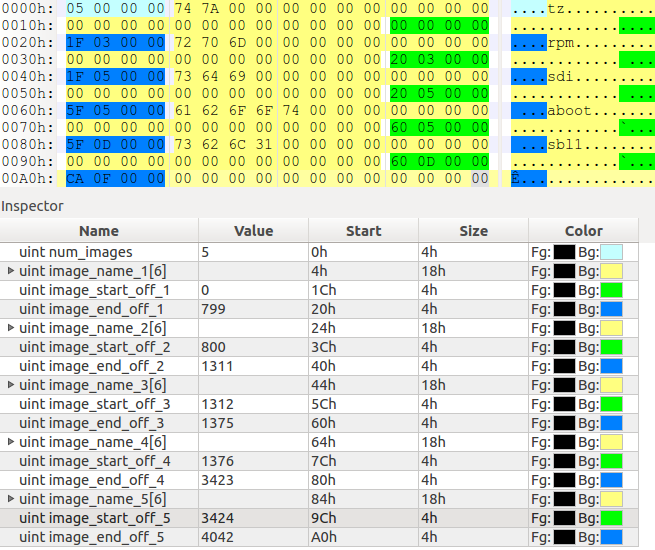
As you can see above, the sought-after aboot image is stored within this file, along with the TrustZone image, and various stages of the boot-chain. Good.
After analysing the structure above, I've written a python script which can be used to unpack all the images from a given Motorola bootloader image, you can find it here.
MUCH ADO ABOOT NOTHING
We'll start by inspecting the aboot image. Discouragingly, it is 1MB large, so going over it all would be a waste of time. However, as we've mentioned above, when booting the device into the special "bootloader" mode, the actual interaction with the user is provided by aboot itself. This means that we can start by searching for the strings which are displayed when the unlocking process is performed - and continue from there.
A short search for the "unlock..." string which is printed after starting the unlock process brings us straight to the function (@0xFF4B874) which deals with the unlocking logic:
As you can see, after printing the string to the console, three functions are called consecutively, and if all three of them succeed, the device is considered unlocked.
Going over the last two functions reveals their purpose is to erase the user's data partitions (which is always performed after the bootloader is unlocked, in order to protect the device owner's privacy). In any case, this means they are irrelevant to the unlocking process itself and are simply side-effects.
This leaves us with a single function which, when called, should unlock the bootloader.
So does this mean we're done already? Can we just call this function and unlock the device?
Actually, not yet. Although the TrustZone exploit allows us to achieve code-execution within the TrustZone kernel, this is only done after the operating system is loaded, at which point, executing aboot code directly could cause all sorts of side-effects (since, for example, the code might assume that there is no operating system/the MMU could be disabled, etc.). And even if it were that simple, perhaps there is something interesting to be learned by fully understanding the locking mechanism itself.
Regardless, if we can understand the logic behind the code, we can simply emulate it ourselves, and perform the meaningful parts of it from our TrustZone exploit. Analysing the unlocking function reveals a surprisingly simple high-level logic:
Unfortunately, these two functions wreak havoc within IDA (which fails to even display a meaningful call-graph for them).
Manually analysing the functions reveals that they are in fact quite similar to one another. They both don't contain much logic of their own, but instead they prepare arguments and call the following function:
This is a little surprising - instead of handling the logic itself, this function issues an an SMC ( Supervisor Mode Call) in order to invoke a TrustZone system-call from aboot itself! (as we've discussed in previous blog posts). In this case, both functions issue an SMC with the request code 0x3F801. Here is the relevant pseudo-code for each of them:
ENTER STAGE LEFT, TRUSTZONE
Now that we've established that an SMC call is made with the command-code 0x3F801, we are left with the task of finding this command within the TrustZone kernel.
Going over the TrustZone kernel system calls, we arrive at the following entry:
This is a huge function which performs widely different tasks based on the first argument supplied, which we'll call the "command code" from now on.
It should be noted an additional flag is passed into this system-call indicating whether or not it was called from a "secure" context. This means that if we try invoking it from the Android OS itself, an argument will be passed marking our invocation is insecure, and will prevent us from performing these operations ourselves. Of course, we can get around this limitation using our TrustZone exploit, but we'll go into that later!
As we've seen above, this SMC call is triggered twice, using the command codes #1 and #2 (I've annotated the functions below to improve readability):
In short, we can see both commands are used to read and write (respectively) values from something called a "QFuse".
QFUSES
Much like a real-life fuse, a QFuse is a hardware component which facilitates a "one-time-writeable" piece of memory. Each fuse represents a single bit; fuses which are in-tact represent the bit zero, and "blown" fuses represent the bit one. However, as the name suggests, this operation is irreversible - once a fuse is blown it cannot be "un-blown".
Each SoC has it's own arrangement of QFuses, each with it's own unique purpose. Some fuses are already blown when a device is shipped, but others can be blown depending on the user's actions in order to change the way a specific device feature operates.
Unfortunately, the information regarding the role of each fuse is not public, and we are therefore left with the single option of reversing the various software components to try and deduce their role.
In our case, we call a specific function in order to decide which fuse we are going to read and write:
Since we call this function with the second syscall argument, in our case "4", this means we will operate on the fuse at address 0xFC4B86E8.
PUTTING IT ALL TOGETHER
Now that we understand the aboot and the TrustZone logic, we can put them together to get the full flow:
- First, aboot calls SMC 0x3F801 with command-code #1
- This causes the TrustZone kernel to read and return the QFuse at address 0xFC4B86E8
- Then, iff the first bit in the QFuse is disabled, aboot calls SMC 0x3F801 once more, this time with command-code #2
- This causes the TrustZone kernel to write the value 1 to the LSB of the aforementioned QFuse.
But how can QFuses be written?
DIY QFUSES
Luckily the TrustZone kernel exposes a pair of system-call which allow us to read and write a restricted set of QFuses - tzbsp_qfprom_read_row and tzbsp_qfprom_write_row, respectively. If we can lift those restrictions using our TrustZone exploit, we should be able to use this API in order to blow the wanted QFuse.
Lets take a look at these restrictions within the tzbsp_qfprom_write_row system-call:
So first, there's a DWORD at 0xFE823D5C which must be set to zero in order for the function's logic to continue. Normally this flag is in fact set to one, thus preventing the usage of the QFuse calls, but we can easily enough overwrite the flag using the TrustZone exploit.
Then, there's an additional function called, which is used to make sure that the ranges of fuses being written are "allowed":
TRYING IT OUT
Now that we have everything figured out, it's time to try it out ourselves! I've written some code which does the following:
- Achieves code-execution within TrustZone
- Disables the QFuse protections
- Writes the LSB QFuse in QFuse 0xFC4B86E8
Have fun!
FINAL THOUGHTS
In this blog post we went over the flow controlled by a single QFuse. But, as you can probably guess, there are many different interesting QFuses out there, waiting to be discovered.
On the one hand, blowing a fuse is really "dangerous" - making one small mistake can permanently brick you device. On the other hand, some fuses might facilitate a special set of features that we would like to enable.
One such example is the "engineering" fuse; this fuse is mentioned throughout the aboot image, and can be used to enable an amazing range of capabilities such as skipping secure boot, loading unsigned peripheral images, having an unsigned GPT, and much more.
However, this fuse is blown in all consumer devices, marking the device as a "non-engineer" device, and disabling these features. But who knows, maybe there are other fuses which are just as important, which have not yet been discovered...


 1046
1046


 到【灌水乐园】发言


Lol, love the warning message. Injury to users!?
ReplyThose allergic to excessive warning messages, maybe?
Hold Up! Did you really just do this
ReplyHi, I'm wondering how did you did the trustzone exploit on this device. As I can remember your trustzone exploit needed a modified kernel (or can I load it as a kernel module?) And if the device is bootloader locked how did you get the custom kernel to run?
ReplyThank you for the research :D If this is double on by loading a kernel module. I'm going to try adjust this to my Fire Phone(It'll probably brick :P But I'm going to do it anyway)
This wouldnt apply to the firephone, iirc the boot unlock mechanism on that is a signed blob, not a qfuse.
Hi Madushan,
I read your question and got a little curious, so I downloaded the Fire Phone aboot and had a look at it.
As Justin said, the bootloader lock there is facilitated by using a signed blob. Here is the unlocking code: http://imgur.com/OZeTqNC
That said, it might still be possible to craft a blob that'll cause the verification to pass, ultimately depends on how the verification is done (let me know if you take a look at it!).
Anyway, as for the unlocking code I provided - you're right, this version of the code depends on my modified kernel. I also have another version, written in C, which uses a kernel exploit to directly execute code in the kernel and issue SMCs from there. I'll publish that as well (just need to clean it up a little).
Gal.
UPDATE: Dug a little bit deeper; seems like a 2048-bit RSA signature. I carved out the certificate: http://imgur.com/1a2TY0P
So unless there's some kind of bug in the verification itself or an alternative unlocking flow, seems like a no-go.
UPDATE2: So the code actually calls RSA_public_decrypt (with PKCS1 padding) on the given token, then makes sure that the content in it is 0x[SOME_WORD][SOME_DWORD][zero_pad_to_length_256]. I'm still thinking about this a little... I don't know what these DWORDs are (could try and find out), but if they can be changed, then you could modify them to fit any given signed token (for any other phone).
UPDATE3: Okay - a lot of the code there is borrowed from LK (https://www.codeaurora.org/cgit/external/gigabyte/qrd-gb-dsds-7225/plain/bootable/bootloader/lk/platform/msm_shared/mmc.c) which makes following the flow easier.
Anyway, these DWORDs are read in from the MMC - in the version of aboot that I analysed (http://forum.xda-developers.com/attachment.php?attachmentid=3437011&d=1439413035), they are fetched in from: (byte)0xF967AA4+0x4A4, (DWORD)0xF967AA4+0x4B8.
If you want to play around with the TrustZone exploit and read those addresses, we can try and figure out what they are. In any case, we can always call the MMC flashing code to overwrite them, and then supply *any* signed token to unlock.
Just so you know, though, this is quite dangerous - if anything else depends on these values we may brick the device.
This is impressive :) I'm tempted to puck up a cheap Moto E LTE just to try and see if it works there too!
ReplyWhere are you finding a Moto E using MSM8974/SD810?
--beaups
Thanks for the interesting articles!
ReplyGot a small question - what do you use to get comments with ARM opcodes description?
Thanks for reading!
The comments are a builtin feature in IDA (Options->General->Disassembly->Comments).
P.S - I usually don't use this (as I find the clutter a little annoying), but for the purpose of the blog posts I enable it so that it'll be easier for people without an ARM background to read.
Why would your C exploit need cleaned up, I can do it in 4 lines of code :P Nice writeup, as always.
Reply--beaups
Right now I have a C file with all my TZ experiments and *lots* of irrelevant code, I wouldn't wish it on anyone to try and figure out what's going on there ;)
Is there an easy way to remap ram over the qfuse range for experimentation purposes?
ReplyOr alternately a central place to patch a read-qfuse function?
To make it less dangerous to explore the different fuse settings...
You can overwrite the read-QFuse function by setting the DACR and overwriting the TrustZone function I detailed above, such as tzbsp_qfprom_read_row (see the TrustZone exploit post for more info), but this won't be of much help...
Since a lot of these QFuses are checked during the boot process by components which are loaded way before the HLOS is executed (such as aboot, SBL and PBL), hooking this function won't let you observe the behaviours which would be exhibited by those components.
That said, there may be an option to overwrite the function and then attempt to jump directly into the SBL3 or aboot - I've never tried to do this, but in practice there should be some support for a "warm boot", which means this might work. Of course, in practice this is probably a lot harder, since SBL3/aboot may depend a lot on the current state which should be set by previous stages of the boot-chain, and directly handing over control to them might have unpredictable results.