


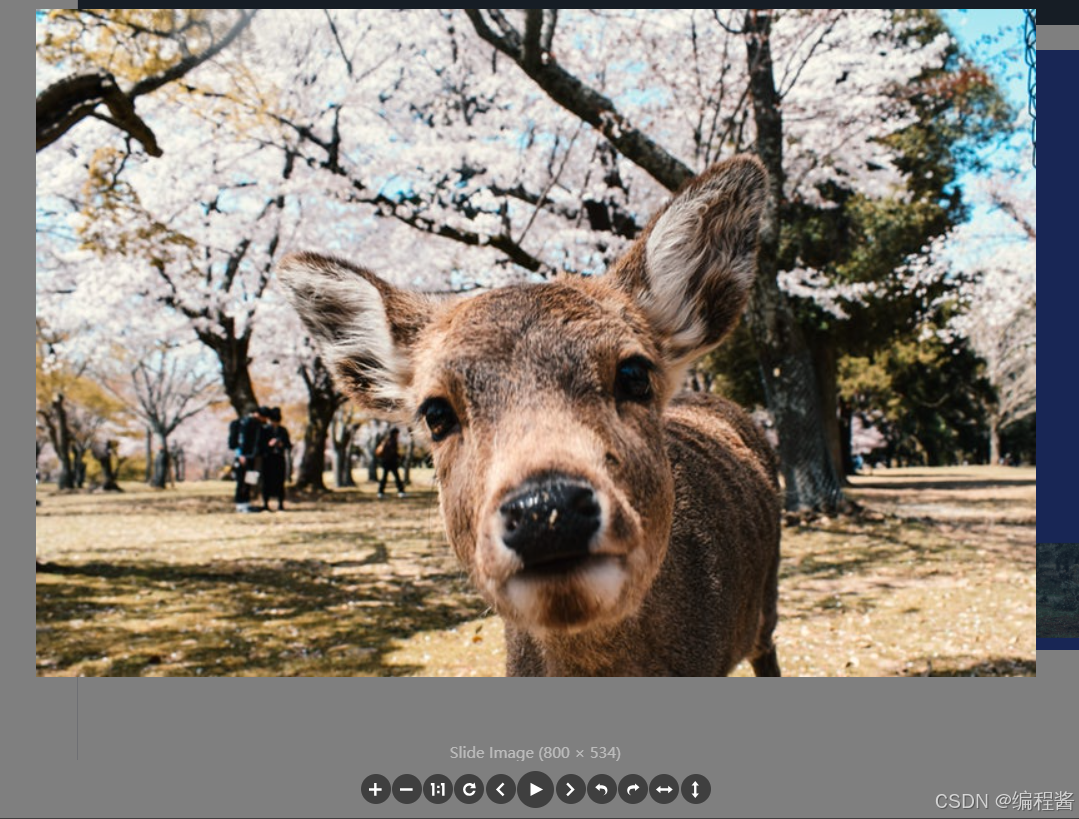
一、效果展示

二、前期准备
因毕设需要参考了以下链接:
swiper组件:
vue-awesome-swiper 实现轮播图和缩略图联动_vue-awesome-swiper 缩略图-优快云博客
放大组件:
vue点击图片预览放大(可旋转、翻转、缩放、上下切换、键盘操作)_vue.js轮播图点击放大-优快云博客
做了一些改进。
关于swiper组件
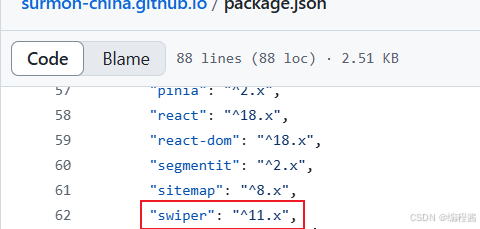
看了原作者的swiper版本是11以上的,当时版本太老以至于在切换轮播发现一堆问题。
三、安装组件
(1)swiper组件安装
执行以下命令:
npm install swiper@11.x --save(2)放大组件安装
执行以下命令:
npm install v-viewer --save在main.js引入
// 放大
import Viewer from 'v-viewer'
import 'viewerjs/dist/viewer.css'
createApp(App).use(Viewer).mount('#app')
四、代码实现
<template>
  <div class="thumb-example">
    <!-- 顶部主轮播图 -->
    <swiper
      class="top-swiper"
      :style="{
        '--swiper-navigation-color': '#fff',
        '--swiper-pagination-color': '#fff',
      }"
      :modules="modules"
      :space-between="10"
      :navigation="true"
      :thumbs="{ swiper: thumbsSwiper }"
    >
      <!-- 动态渲染轮播图幻灯片,遍历 fileList 数组 -->
      <swiper-slide
        class="slide"
        v-for="(imageUrl, index) in fileList"
        :key="index"
      >
        <viewer class="sile-viewer">
          <img :src="imageUrl" alt="Slide Image" />
        </viewer>
      </swiper-slide>
    </swiper>
    <!-- 缩略图轮播图 -->
    <swiper
      class="thumbs-swiper"
      :modules="modules"
      :space-between="10"
      :slides-per-view="4"
      :watch-slides-progress="true"
      :prevent-clicks="false"
      :prevent-clicks-propagation="false"
      @swiper="setThumbsSwiper"
    >
      <!-- 动态渲染缩略图幻灯片,遍历 fileList 数组 -->
      <swiper-slide
        class="slide"
        v-for="(imageUrl, index) in fileList"
        :key="index"
      >
        <img :src="imageUrl" alt="Thumbnail Image" />
      </swiper-slide>
    </swiper>
  </div>
</template>

<script setup>
import { ref } from "vue";
import { Navigation, Thumbs } from "swiper/modules";
import { Swiper, SwiperSlide } from "swiper/vue";
import "swiper/css";
import "swiper/css/navigation";
import "swiper/css/thumbs";

// 定义一个 ref 来存储缩略图 Swiper 实例
const thumbsSwiper = ref(null);

// 定义一个函数,用于设置缩略图 Swiper 实例
const setThumbsSwiper = (swiper) => {
  thumbsSwiper.value = swiper;
};

// 定义要使用的 Swiper 模块
const modules = [Navigation, Thumbs];

// 定义图片文件列表
const fileList = [
  "https://fuss10.elemecdn.com/a/3f/3302e58f9a181d2509f3dc0fa68b0jpeg.jpeg",
  "https://fuss10.elemecdn.com/1/34/19aa98b1fcb2781c4fba33d850549jpeg.jpeg",
  "https://fuss10.elemecdn.com/0/6f/e35ff375812e6b0020b6b4e8f9583jpeg.jpeg",
  "https://fuss10.elemecdn.com/9/bb/e27858e973f5d7d3904835f46abbdjpeg.jpeg",
  "https://fuss10.elemecdn.com/d/e6/c4d93a3805b3ce3f323f7974e6f78jpeg.jpeg",
  "https://fuss10.elemecdn.com/3/28/bbf893f792f03a54408b3b7a7ebf0jpeg.jpeg",
  "https://fuss10.elemecdn.com/2/11/6535bcfb26e4c79b48ddde44f4b6fjpeg.jpeg",
];
</script>

<style lang="scss" scoped>
.thumb-example {
  height: 480px;
  background-color: rgba(14, 47, 157, 0.858);
}

.top-swiper,
.thumbs-swiper {
  .slide {
    img {
      display: block;
      width: 100%;
      height: 100%;
      object-fit: contain;
    }
  }
}
.sile-viewer {
  img {
    position: absolute;
  }
}

.top-swiper {
  height: 80%;
  width: 100%;
}

.thumbs-swiper {
  height: 20%;
  box-sizing: border-box;
  padding: 10px 0;

  .slide {
    width: 25%;
    height: 100%;
    opacity: 1;
    border: 1px solid #fff;
    &:not(.swiper-slide-thumb-active) {
      opacity: 0.8;
      border: none;
    }
  }
}

</style>


 3232
3232

 被折叠的 条评论
为什么被折叠?
被折叠的 条评论
为什么被折叠?
 到【灌水乐园】发言


