


 本文介绍了MyBatis的历史、优点,详细阐述了其快速入门步骤,包括安装、构建SqlSessionFactory和使用SqlSession。还讲解了MyBatis的优化方法,如Mapper代理实现、类型别名和参数设置。此外,介绍了动态SQL的几种用法,以及注解开发的查询、增加、修改和删除操作。
Mybatis
前言
Mybatis历史:Mybatis本来是Apache下的开源项目IBatis,2010年该项目由Apache Software Foundation 迁移到了 Google Code,随着在 Google Code的发展,IBatis3.x正式改名为Mybatis,最终在2013年11月迁移到了Github。
Mybatis简介
- Mybatis是一款优秀的持久层框架 (持久层:把数据可以永久保存在存储的设备中,直接的理解就是负责将数据保存到数据库的那一层代码),是用于简化JDBC开发
- 支持自定义SQL、存储过程以及高级映射
- 通过简单的XML或注解来配置和映射原始类型、接口和Java POJO 作为数据库中的记录。
官网链接:点击去Mybatis中文文档
Mybatis的优点
JDBC的缺点
- 注册驱动,获取连接以及 sql语句的使用 都是使用硬编码在Java程序中,不利于系统的维护。
- 手动设置参数 和 手动封装结果集
Mybatis免除了几乎所有多的JDBC代码以及设置参数和获取结果集的工作
Mybatis的快速入门
1.安装
- 使用Mybatis只需导入mybatis-x.x.x.jar 文件置于类路径(classpath)中即可。
- 使用Maven来构建项目,只需导入mybatis的坐标置于pom.xml 文件中即可。
<dependency>
  <groupId>org.mybatis</groupId>
  <artifactId>mybatis</artifactId>
  <version>x.x.x</version> <!--mybatis版本号-->
</dependency>
2. 从XML中构建SqlSessionFactory
每个基于Mybatis的应用都是以一个SqlSessionFactory的实例为核心的。SqlSessionFactory的实例可以通过 SqlSessionFactoryBulider获得。而 SqlSessionFactoryBulider可以从XML配置文件或预先配置的Configuration实例来构建出 SqlSessionFactory的实例。
示例代码:
-
XML的配置文件(mybatis-config.xml):
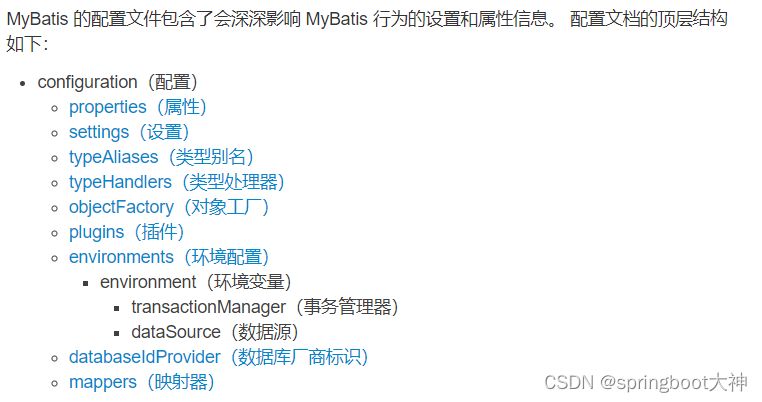
XML配置文件中包含了Mybatis系统的核心设置,包括获取数据库连接实例的数据源(DataSource)以及决定事务作用域和控制方式的事务管理器(TransactionManager)<!-- xml头部的声明,用来验证XML文档的正确性 --> <?xml version="1.0" encoding="UTF-8" ?> <!DOCTYPE configuration PUBLIC "-//mybatis.org//DTD Config 3.0//EN" "https://mybatis.org/dtd/mybatis-3-config.dtd"> <configuration> <environments default="development"> <!-- 包含了事物的管理和连接池的配置 --> <environment id="development"> <transactionManager type="JDBC"/> <dataSource type="POOLED"> <property name="driver" value="${driver}"/> <property name="url" value="${url}"/> <property name="username" value="${username}"/> <property name="password" value="${password}"/> </dataSource> </environment> </environments> <!-- 映射器 --> <mappers> <!-- XMl映射文件包含了SQL代码和映射定义信息 --> <mapper resource="StudentMapper.xml"></mapper> </mappers> </configuration> -
编写Sql映射文件
命名空间(namespace)的作用:- 利用更长的全限定名来将不同的语句隔离开来
- 对接口进行绑定
<?xml version="1.0" encoding="UTF-8" ?> <!DOCTYPE mapper PUBLIC "-//mybatis.org//DTD Mapper 3.0//EN" "https://mybatis.org/dtd/mybatis-3-mapper.dtd"> <!-- namespace属性为命名空间--> <mapper namespace="test"> <!-- sql映射语句 id为sql语句的唯一标识--> <select id="selectAll" resultType="com.maoge.pojo.Student"> select * from student </select> </mapper> -
MyBatis 包含了一个名叫 Resources 的工具类,它包含一些实用方法,使得从类路径或其它位置加载资源文件更加容易。
String resource="mybatis-config.xml";
InputStream inputStream = Resources.getResourceAsStream(resource);
SqlSessionFactory sqlSessionFactory = new SqlSessionFactoryBuilder().build(inputStream);
3.SqlSessionFactory中获取SqlSession并使用已映射的SQL语句
SqlSession提供了在数据库执行SQL命令所需的所有方法。可以通过SqlSession实例来直接执行已映射的Sql语句
//openSession():默认开启事务,进行增删改操作需要使用sqlSession.commit();手动提交事务
//openSession(true):可以设置为自动提交事务(关闭事务)
SqlSession sqlSession = sqlSessionFactory.openSession();
//查询所有学生  全限定名:namespace+id
List<Student> studentList = sqlSession.selectList("[全限定名]");
Mybatis的优化
1.使用Mapper代理实现
- 定义与SQL映射文件同名的Mapper接口,并且将Mapper接口和SQL映射文件放置在同一目录下
- 设置SQL映射文件的命名空间(namespace)属性为Mapper接口的全限定名
- 在Mapper接口中定义方法,方法名就是SQL映射文件中的sql语句的id,并保持参数类型和返回值一致
- 通过SqlSession的getMapper方法获取Mapper接口的代理对象
- 调用对应方法完成sql的执行
细节要点:如果Mapper接口名称和SQL映射文件名称相同,并在同一目录下,则可以使用包扫描的方式简化SQL映射文件的加载
<mappers>
     <package name="com.maoge.mapper"/>
</mappers>
2.使用类型别名
在Mybatis的核心配置文件(mybatis-config.xml)中加入:
<typeAliases>
        <package name="com.maoge.pojo"/>
</typeAliases>
加入类型别名之后,我们在书写Mapper映射文件的时候,Sq语句的resultType可以简写:
<mapper namespace="com.maoge.mapper.StudentMapper">
    <select id="selectAll" resultType="Student">
        select * from student
    </select>
</mapper>
细节要点:在配置各个标签时,需要遵守前后顺序
3.参数设置
1. 参数占位符
-
#{}:执行SQL时,会将 #{} 占位符替换为?,将来自动设置参数值
-
${}:会存在SQL注入问题
-
使用方式:
- 参数传递,都使用 #{}
- 对表名、列名进行动态设置,只能使用 ${} 进行sql拼接
2.参数传递
Mybatis接口方法中可以接收各种各样的参数,Mybatis的底层对于这些参数进行不同的封装处理方式:
-
单个参数
- POJO类型:直接使用,属性名和参数占位符一致
- Map集合:直接使用,键名和参数占位符一致
- Collection:封装为Map集合,可以使用@Param注解,替换掉Map集合中中默认的arg键名
- List:封装为Map集合,可以使用@Param注解,替换掉Map集合中中默认的arg键名
- Array:封装为Map集合,可以使用@Param注解,替换掉Map集合中中默认的arg键名
- 基本数据类型可直接使用
-
多个参数:封装为Map集合,可以使用@Param注解,替换掉Map集合中默认的arg键名
动态SQL
动态Sql是Mybatis强大特性之一。在使用JDBC时,根据不同条件拼接SQL语句很痛苦,比如:拼接时要确保不能忘记添加必要的空格,还要注意去掉列表最后一个列名的逗号。利用动态SQL,可以彻底摆脱这种痛苦。
1.if
例如:
<select id="selectConditional" resultType="student">
        select * from student
        where stusex='男'
        <if test="stuname!=null and stuname!='' ">
                and stuname like #{stuname}
        </if>
</select>
这条语句提供了可选的查找文本功能。如果不传入"stuname",那么所有stusex处于"男"状态的student都会返回;如果传入了"stuname"参数,那么就会对"stuname"进行模糊查找并返回对应的student的结果(模糊查找的参数值需要包含查找掩码或通配符字符)。
多个条件,以此类推,继续在后面增加与之对应的if条件即可。
2.choose、when、otherwise
有时候,我们不想使用所有的条件,而只是向从多个条件中选择一个使用。针对这种情况,Mybatis提供了choose元素,它有点像Java中的switch语句。
<select id="selectOneConditional" resultType="student">
        select * from student
        where
        <choose>
            <when test="stuname!=null and stuname!='' ">
                stuname like #{stuname}
            </when>
            <when test="stusex!=null and stusex!='' ">
                stusex=#{stusex}
            </when>
            <when test="idcard!=null and idcard!='' ">
                idcard=#{idcard}
            </when>
            <otherwise>
                1=1
            </otherwise>
        </choose>
</select>
3.trim、where、set
回到之前的"if"示例,这次我们将stusex=‘男’ 也设置称动态条件:
<select id="selectConditional" resultType="student">
        select * from student
        where
        <if test="stusex!=null and stusex!='' ">
                and stusex=#{stusex}
            </if>
        <if test="stuname!=null and stuname!='' ">
                and stuname like #{stuname}
        </if>
</select>
如果没有匹配的条件,最终SQL语句会变成这样:
select * from student where
很明显,语法错误,会导致查询失败。如果只匹配第二个条件的SQL语句:
select * from student where and stuname like #{stuname}
也会查询失败
Mybatis有一个简单且适合大多是场景的解决办法:使用where元素
<select id="selectConditional" resultType="student">
        select * from student
        <where>
        <if test="stusex!=null and stusex!='' ">
                and stusex=#{stusex}
            </if>
        <if test="stuname!=null and stuname!='' ">
                and stuname like #{stuname}
        </if>
        </where>
</select>
where 元素只会在子元素返回任何内容的情况下才插入 “WHERE” 子句。而且,若子句的开头为 “AND” 或 “OR”,where 元素也会将它们去除。
如果 where 元素与你期望的不太一样,你也可以通过自定义 trim 元素来定制 where 元素的功能。比如,和 where 元素等价的自定义 trim 元素为:
<!-- prefixOverrides 属性会忽略通过管道符分隔的文本序列(注意此例中的空格是必要的)。
上述例子会移除所有 prefixOverrides 属性中指定的内容,并且插入 prefix 属性中指定的内容。 -->
<trim prefix="WHERE" prefixOverrides="AND |OR ">
  ...
</trim>
用于动态更新语句的类似解决方案叫做set。set元素可以用于动态包含需要更新的列,忽略其他不更新的列:
<update id="updateOne">
        update student
        <set>
        <if test="stuname!=null and stuname!='' ">
            stuname=#{stuname},
        </if>
        <if test="stusex!=null and stusex!='' ">
            stusex=#{stusex},
        </if>
        <if test="idcard!=null and idcard!='' ">
            idcard=#{idcard}
        </if>
        </set>
        where
        stuid=#{stuid}
</update>
set元素会动态地在行首插入SET关键字,并会删掉额外的逗号(这些逗号是在使用条件语句给列赋值时引入的)。
或者通过使用trim元素达到同样的效果
<trim prefix="SET" suffixOverrides=",">
  ...
</trim>
4.foreach
动态SQL的另一个使用场景是对集合进行遍历,一般的应用场景是是对多个数据进行操作的时候:
比如批量添加学生:
<insert id="insertAll">
        insert into student
        values
        <foreach collection="studentList" separator="," item="stu" >
            null,#{stu.stuname},#{stu.stusex},#{stu.idcard},#{stu.cid}
        </foreach>
</insert>
foreach 元素的功能非常强大,它允许你指定一个集合,声明可以在元素体内使用的集合项(item)和索引(index)变量。它也允许你指定开头(open)与结尾(close)的字符串以及集合项迭代之间的分隔符(separator)。
细节要点:你可以将任何可迭代对象(如 List、Set 等)、Map 对象或者数组对象作为集合参数传递给 foreach。当使用可迭代对象或者数组时,index 是当前迭代的序号,item 的值是本次迭代获取到的元素。当使用 Map 对象(或者 Map.Entry 对象的集合)时,index 是键,item 是值。
注解开发
使用注解开发就不需要再编写Mapper映射文件,只需在对应的接口中使用注解编写sql语句。
1.查询
例如:
//查询单个学生
@Select("select * from student where stuid=#{stuid}")
Student selectOne(@Param("stuid") int id);

//查询所有学生
@Select("select * from student")
List<Student> selectAll();
2.增加
例如:
//插入一个学生
@Insert("insert into student values(null,#{stuname},#{stusex},#{idcard},#{cid})")
int insertOne(Student student);
细节要点:
注解方式(返回添加数据的主键):
@Options(useGeneratedKeys = true,keyProperty = "stuid")
Mapper映射文件方式:
<insert useGeneratedKeys="true" keyProperty="id">
3.修改
例如:
@Update("update student set stuname=#{stuname},stusex=#{stusex} where stuid=#{stuid}")
int updateOne(Student student);
4.删除
例如:
@Delete("delete from student where stuid=#{stuid}")
    int deleteOne(@Param("stuid") int stuid);


 36万+
36万+

 被折叠的 条评论
为什么被折叠?
被折叠的 条评论
为什么被折叠?
 到【灌水乐园】发言


