


 本文是一篇关于Spring Boot 2.0的快速入门教程,涵盖从创建项目到整合多种技术的详细步骤。首先介绍了Spring Boot的基础,包括使用IDEA创建项目和简化部署。接着讲解了配置文件值注入,比较了@Value和@ConfigurationProperties的使用。进一步讨论了Profile的管理,如多环境配置和激活。介绍了JRebel热部署插件的安装与激活。在web开发部分,涵盖了servlet、filter、监听器的配置,以及静态资源管理和Spring MVC的扩展。此外,文章还涉及了Thymeleaf模板引擎的介绍、使用和语法。最后,探讨了Spring Boot与数据访问的结合,包括JDBC、自定义Druid数据源、多数据源动态切换以及Spring Boot整合MyBatis的实践。
spring boot快速入门
一、Spring Boot 2.0入门
文章目录
中文文档 https://github.com/DocsHome
1、介绍Spring Boot
Spring Boot使创建可运行的独立,生产级基于Spring的应用程序变得容易。大多数Spring Boot应用程序只需要很少的Spring配置。
开发第一个Spring Boot应用程序
实现功能:
浏览器发送hello请求,服务器接受请求并处理,响应Hello World字符串;
1、创建一个maven工程
2、导入spring boot相关的依赖
    <parent>
        <groupId>org.springframework.boot</groupId>
        <artifactId>spring-boot-starter-parent</artifactId>
        <version>2.2.0.RELEASE</version>
        <relativePath/> <!-- lookup parent from repository -->
    </parent>

    <dependencies>
        <dependency>
        <groupId>org.springframework.boot</groupId>
            <artifactId>spring-boot-starter-web</artifactId>
        </dependency>
    </dependencies>
3、编写一个主程序;启动Spring Boot应用
package study;

import org.springframework.boot.SpringApplication;
import org.springframework.boot.autoconfigure.SpringBootApplication;

/**
 *  @SpringBootApplication 来标注一个主程序类,说明这是一个Spring Boot应用
 */
@SpringBootApplication
public class HelloMain {


    public static void main(String[] args) {


        // Spring应用启动起来
        SpringApplication.run(HelloMain.class,args);
    }
}
4、编写相关的Controller
package study.controller;

import org.springframework.stereotype.Controller;
import org.springframework.web.bind.annotation.RequestMapping;
import org.springframework.web.bind.annotation.ResponseBody;

//@ResponseBody   //写在这里表示:这个类的所有方法返回的数据直接写给浏览器(是对象转为jason数据)
//@Controller
@RestController   //就是 @Controller + @ResponseBody
public class HelloController {


    //@ResponseBody
    @RequestMapping("/hello")
    public String hello(){

        return "Hello World!";
    }
}
5、运行主程序测试
访问http://localhost:8080/hello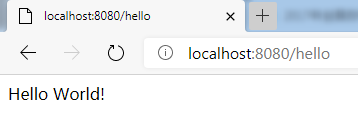
@RestController。这被称为stereotype注解。它为人们阅读代码提供了提示,对于Spring来说,类扮演了特定角色。在这种情况下,我们的类是一个Web @Controller,因此Spring在处理传入的Web请求时会考虑使用它。
@RestController 和 @RequestMapping 注解是Spring MVC注释(它们不是Spring Boot专有的注解)。
Main方法:
是遵循Java约定的应用程序入口点的标准方法。 我们的主要方法通过调用run委托给Spring Boot的SpringApplication类。 SpringApplication会引导我们的应用程序,并启动Spring,后者反过来又会启动自动配置的Tomcat Web服务器。 我们需要将HelloMain.class作为参数传递给run方法,以告诉SpringApplication哪个是主要的Spring组件。 args数组也通过传递以公开任何命令行参数。
6、简化部署
 <!-- 这个插件,可以将应用打包成一个可执行的jar包;-->
    <build>
        <plugins>
            <plugin>
                <groupId>org.springframework.boot</groupId>
                <artifactId>spring-boot-maven-plugin</artifactId>
            </plugin>
        </plugins>
    </build>
将这个应用打成jar包,直接使用java -jar的命令进行执行;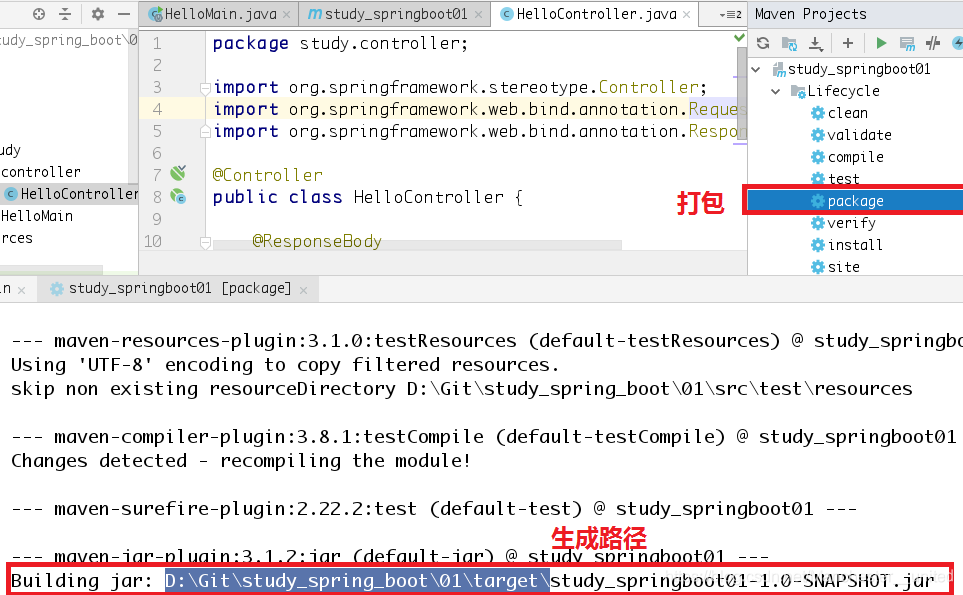
2、使用IDEA Spring Initializer快速创建Spring Boot项目
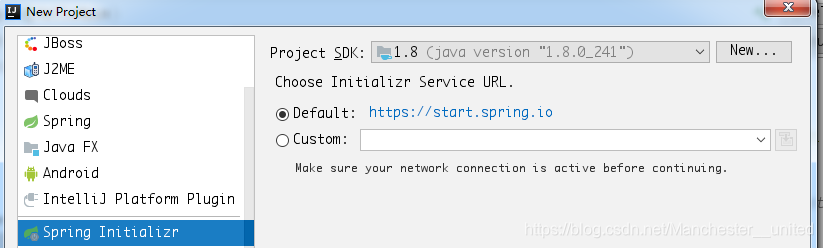
IDEA都支持使用Spring的项目创建向导快速创建一个Spring Boot项目; 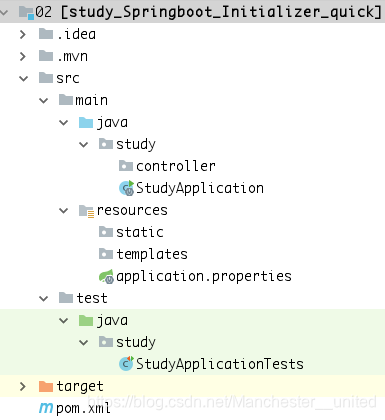
选择我们需要的模块;向导会联网创建Spring Boot项目;
默认生成的Spring Boot项目;
- 主程序已经生成好了,我们只需要写我们自己的逻辑
- resources文件夹中目录结构
- static:保存所有的静态资源; js css images;
- templates:保存所有的模板页面;(Spring Boot默认jar包使用嵌入式的Tomcat,默认不支持JSP页面);可以使用模板引擎(freemarker、thymeleaf);
- application.properties:Spring Boot应用的配置文件;可以修改一些默认设置;
二、配置文件值注入
导入配置文件处理器,以后编写配置就有提示了
<!--导入配置文件处理器,配置文件进行绑定就会有提示-->
		<dependency>
			<groupId>org.springframework.boot</groupId>
			<artifactId>spring-boot-configuration-processor</artifactId>
			<optional>true</optional>
		</dependency>
javaBean
package study.bean;

import org.springframework.boot.context.properties.ConfigurationProperties;
import org.springframework.stereotype.Component;

import java.util.Date;

/**
 * 将配置文件中配置的每一个属性的值,映射到这个组件中
 * @ConfigurationProperties:告诉SpringBoot将本类中的所有属性和配置文件中相关的配置进行绑定;
 *      prefix = "person":配置文件中哪个key下面的所有属性进行一一映射
 *
 * 只有这个组件是容器中的组件,才能容器提供的@ConfigurationProperties功能;(加入@Component)
 *
 */

@Component
@ConfigurationProperties(prefix = "person")
public class Person {


    private String lastName;
    private Integer age;
    private Date birth;

   /*下面省略构造、setter、getter、toString方法*/
}
1、使用yaml的方式
application.yml
person:
  lastName: zhangsan    #或者  last-name: zhangsan
  age: 20
  birth: 9013/1/1
测试
package study;

import org.junit.jupiter.api.Test;
import org.springframework.beans.factory.annotation.Autowired;
import org.springframework.boot.test.context.SpringBootTest;
import study.bean.Person;

/*
* spring boot 单元测试
*
* 可以在测试期间很方便的完成自动注入容器等的功能
* */
@SpringBootTest
class StudyApplicationTests {


    @Autowired
    Person person;

    @Test
    void contextLoads() {

        System.out.println(person);
    }

}
控制台输出:
Person{
   lastName='zhangsan', age=20, birth=Fri Jan 01 00:00:00 CST 9013}
2、使用properties的方式
person.lastName=lisi
person.age=22
person.birth=9013/1/1
3、@Value获取值和@ConfigurationProperties获取值比较
@Value和@ConfigurationProperties都能完成类属性和配置文件的相关配置的映射
| @ConfigurationProperties | @Value | |
|---|---|---|
| 功能 | 批量注入配置文件中的属性 | 一个个指定 |
| 松散绑定(松散语法) | 支持 | 不支持 |
| SpEL | 不支持 | 支持 |
| JSR303数据校验 | 支持 | 不支持 |
| 复杂类型封装 | 支持 | 不支持 |
配置文件yml还是properties他们都能获取到值;
三、Profile
Profile是Srping对不同环境提供不同配置功能的支持,可以通过激活、指定参数等方式快速切换环境
1、多Profile文件
我们在主配置文件编写的时候,文件名可以是 application-{profile}.properties/yml
例如:application-dev.properties、application-prod.properties
默认使用application.properties的配置;
2、yml支持多文档块方式
使用 — 划分文档快
server:
  port: 8081
spring:
  profiles:
    active: prod  #激活prod环境

---  #划分文档快

server:
  port: 8083
spring:
  profiles: dev  #指定属于哪个环境

---  #划分文档快

server:
  port: 8084
spring:
  profiles: prod  #指定属于哪个环境
3、激活指定profile
1.1、properties激活:在配置文件中指定 spring.profiles.active=dev
1.2、yaml激活:见上
2、命令行:
2.1、java -jar spring-boot-02-config-0.0.1-SNAPSHOT.jar --spring.profiles.active=dev;
*、idea 热部署插件JRebel
当开始开发web项目的时候,需要频繁的修改web页面,此时如果频繁的重启变得很麻烦,因此,可以在idea中集成JRebel插件,改动代码之后不需要重新启动应用程序。
1、安装JRebel
(1)在IDEA中一次点击 File->Settings->Plugins->Brows Repositories
(2)在搜索框中输入JRebel进行搜索
(3)找到JRebel for intellij
(4)install
(5)安装好之后需要restart IDEA
2、激活JRebel
JRebel并非是免费的插件,需要激活之后才可以使用
(1)生成一个GUID:https://www.guidgen.com/
(2)根据反向代理服务器地址拼接激活地址: https://jrebel.qekang.com/{GUID}
(3)打开JRebel激活面板,选择Connect to online licensing service.
(4)点击work offline
四、springboot web开发
springboot在开发web项目的时候具备天然的优势,现在的很多企业级开发都是依托于springboot的。
使用springboot的步骤:
1、创建一个SpringBoot应用,选择我们需要的模块,SpringBoot就会默认将我们的需要的模块自动配置好
2、手动在配置文件中配置部分配置项目就可以运行起来了
3、专注编写业务代码,不需要考虑以前那样一大堆的配置了。
1、springboot整合servlet
(1)编写servlet类
package study.servlet;

import javax.servlet.ServletException;
import javax.servlet.annotation.WebServlet;
import javax.servlet.http.HttpServlet;
import javax.servlet.http.HttpServletRequest;
import javax.servlet.http.HttpServletResponse;
import java.io.IOException;

@WebServlet(name = "myServlet",urlPatterns = "/srv")
public class MyServlet extends HttpServlet {

    @Override
    protected void doGet(HttpServletRequest req, HttpServletResponse resp) throws ServletException, IOException {

        System.out.println("111");
        super.doGet(req, resp);
    }

}
在启动类上添加如下配置
package study;

import org.springframework.boot.SpringApplication;
import org.springframework.boot.autoconfigure.SpringBootApplication;
import org.springframework.boot.web.servlet.ServletComponentScan;
import org.springframework.boot.web.servlet.ServletRegistrationBean;
import org.springframework.context.annotation.Bean;
import study.servlet.MyServlet;

@SpringBootApplication
@ServletComponentScan
public class SpringbootWebApplication {


    public static void main(String[] args) {

        SpringApplication.run(SpringbootWebApplication.class, args);
    }

    //将自定义的servlet添加到springboot容器中,当配置了urlmappings之后,servlet自己的配置就不会生效
    @Bean
    public ServletRegistrationBean<MyServlet> getServletRegistrationBean(){

        ServletRegistrationBean<MyServlet> bean = new ServletRegistrationBean<>(new MyServlet(),"/s2");
        bean.setLoadOnStartup(1);
        return bean;
    }

}
浏览器访问http://localhost:8080/srv,控制台会输出111两次
(2)编写filter类
package study.filter;

import javax.servlet.*;
import javax.servlet.annotation.WebFilter;
import java.io.IOException;

@WebFilter(filterName = "MyFilter", urlPatterns = "/filter")
public class MyFilter implements Filter {

    @Override
    public void init(FilterConfig filterConfig) throws ServletException {

        System.out.println("init");
    }

    @Override
    public void doFilter(ServletRequest request, ServletResponse response, FilterChain chain) throws IOException, ServletException {

        System.out.println("filter");
        chain.doFilter(request,response);
    }

    @Override
    public void destroy() {

        System.out.println("destory");
    }
}
(3)编写监听器
listener是servlet规范定义的一种特殊类,用于监听servletContext,HttpSession和ServletRequest等域对象的创建和销毁事件。监听域对象的属性发生修改的事件,用于在事件发生前、发生后做一些必要的处理。
可用于以下方面:1、统计在线人数和在线用户2、系统启动时加载初始化信息3、统计网站访问量4、记录用户访问路径。
编写监听器类
package study.listener;

import javax.servlet.http.HttpSessionEvent;
import javax.servlet.http.HttpSessionListener;

public class MyHttpSessionListener implements HttpSessionListener {


    public static int online=0;

    @Override
    public void sessionCreated(HttpSessionEvent se) {

        System.out.println("创建session");
        online++;
    }

    @Override
    public void sessionDestroyed(HttpSessionEvent se) {

        System.out.println("销毁session");
    }
}
添加到配置类
    @Bean
    public ServletListenerRegistrationBean listenerRegist(){

        ServletListenerRegistrationBean srb = new ServletListenerRegistrationBean();
        srb.setListener(new MyHttpSessionListener());
        System.out.println("listener");
        return srb;
    }
添加控制层代码
package study.controller;

import org.springframework.web.bind.annotation.RequestMapping;
import org.springframework.web.bind.annotation.RestController;
import study.listener.MyHttpSessionListener;
import javax.servlet.http.HttpSession;

@RestController
public class MyController {

    @RequestMapping("/hello")
    public String hello(HttpSession session){

        session.setAttribute("aa","aa");
        return "hello";
    }

    @RequestMapping("/online")
    public String online(){

        return "当前在线人数:"+ MyHttpSessionListener.online +"人";
    }

}
运行Rebel时,会看到控制台打印listener和init filter
先发送login请求,然后再发送online的请求
2、静态资源的配置
默认情况下,Spring Boot 将在 classpath 或者 ServletContext 根目录下从名为 /static (/public、/resources 或 /META-INF/resources)目录中服务静态内容。它使用了 Spring MVC 的 ResourceHttpRequestHandler,因此您可以通过添加自己的 WebMvcConfigurerAdapter 并重写 addResourceHandlers 方法来修改此行为。
//源码
		@Override
		public void addResourceHandlers(ResourceHandlerRegistry registry) {

			if (!this.resourceProperties.isAddMappings()) {

				logger.debug("Default resource handling disabled");
				return;
			}
			Duration cachePeriod = this.resourceProperties.getCache().getPeriod();
			CacheControl cacheControl = this.resourceProperties.getCache().getCachecontrol().toHttpCacheControl();
			if (!registry.hasMappingForPattern("/webjars/**")) {

				customizeResourceHandlerRegistration(registry.addResourceHandler("/webjars/**")
						.addResourceLocations("classpath:/META-INF/resources/webjars/")
						.setCachePeriod(getSeconds(cachePeriod)).setCacheControl(cacheControl));
			}
			String staticPathPattern = this.mvcProperties.getStaticPathPattern();
			if (!registry.hasMappingForPattern(staticPathPattern)) {

				customizeResourceHandlerRegistration(registry.addResourceHandler(staticPathPattern)
						.addResourceLocations(getResourceLocations(this.resourceProperties.getStaticLocations()))
						.setCachePeriod(getSeconds(cachePeriod)).setCacheControl(cacheControl));
			}
		}
(1)加载webjars文件
在pom文件中添加jquery的相关依赖,直接可以通过浏览器访问到http://localhost:
 最低0.47元/天 解锁文章


 1031
1031

 被折叠的 条评论
为什么被折叠?
被折叠的 条评论
为什么被折叠?
 到【灌水乐园】发言


