


 本文介绍了一个基于Spring MVC和Hibernate的项目结构及配置过程,包括环境搭建、依赖管理、数据库操作等关键技术点。
一、 项目环境
1.1、环境
Intellij Idea+Spring4.0+SpringMVC4.0+Hibernate4.0+Mysql5.1
1.2、包结构
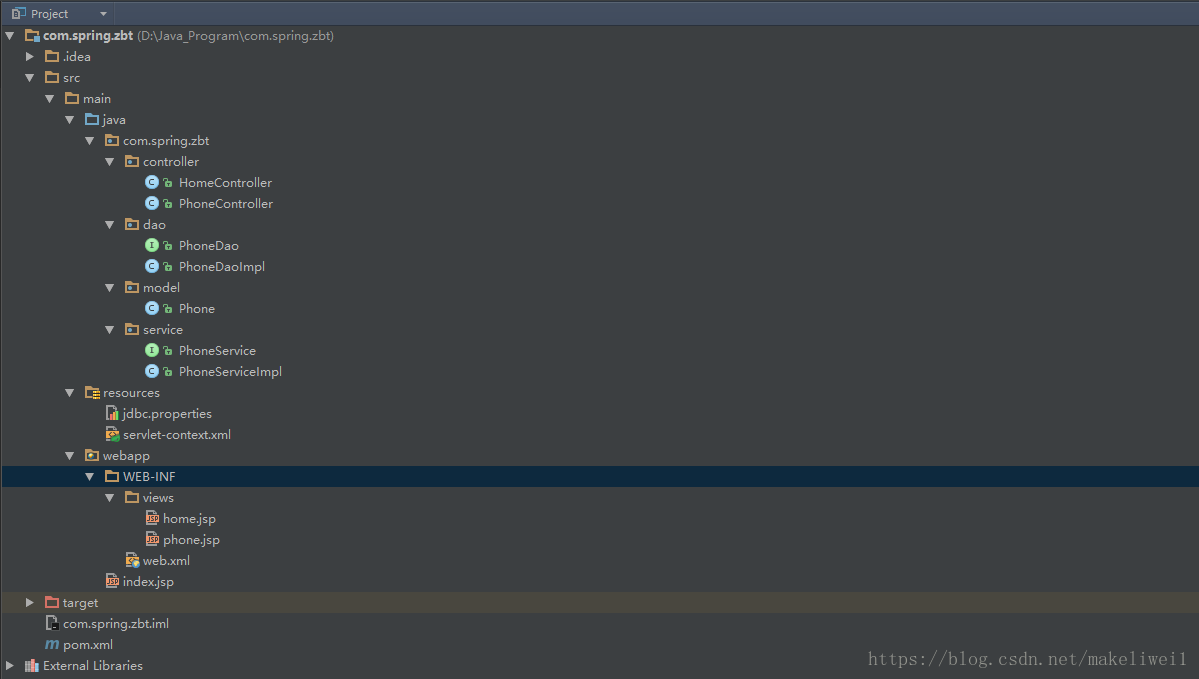
1.3、包功能
- 1)com.spring.zbt.controller:Phone应用的Controller层,主要用来处理浏览器的请求;
- 2)com.spring.zbt.service:Phone应用的Service层,主要有一个PhoneService接口和实现了该接口的类PhoneServiceImpl。Service层的目的主要是解耦DAO层和Controller层;
3)com.spring.zbt.dao:Phone应用的DAO层,包含PhoneDaO接口和实现了该接口的类PhoneDaoImpl。DAO层使用Hibernate的API和数据库进行交互;
4)com.spring.zbt.model:包含一个简单的POJO类,主要的属性有id、name、review
二、依赖
2.1使用Maven工具管理我们的项目依赖的Jar包;主要引入的包有
//Spring相关
spring-context、spring-webmvc、spring-tx、spring-orm
//Hibernate相关
hibernate-core、hibernate-entitymanager
//数据源和数据库相关
com.mchange.c3p0、mysql-connector-java
//servlet相关
javax.servlet-api、javax.servlet.jsp-api、javax.servlet.jstl
taglibs-standard-jstlel、taglibs-standard-impl
//日志相关
slf4j-api
//javax注入相关
javax.inject
2.2、pom.xml详情
<?xml version="1.0" encoding="UTF-8"?>

<project xmlns="http://maven.apache.org/POM/4.0.0" xmlns:xsi="http://www.w3.org/2001/XMLSchema-instance"
  xsi:schemaLocation="http://maven.apache.org/POM/4.0.0 http://maven.apache.org/xsd/maven-4.0.0.xsd">
  <modelVersion>4.0.0</modelVersion>

  <groupId>com.spring.demo</groupId>
  <artifactId>SpringMVC</artifactId>
  <version>1.0-SNAPSHOT</version>
  <packaging>war</packaging>

  <name>SpringMVC Maven Webapp</name>
  <!-- FIXME change it to the project's website -->
  <url>http://www.example.com</url>

  <properties>
    <project.build.sourceEncoding>UTF-8</project.build.sourceEncoding>
    <maven.compiler.source>1.8</maven.compiler.source>
    <maven.compiler.target>1.8</maven.compiler.target>
    <org.springframework-version>4.0.3.RELEASE</org.springframework-version>
    <org.aspectj-version>1.7.4</org.aspectj-version>
    <org.slf4j-version>1.7.5</org.slf4j-version>
    <hibernate.version>4.3.5.Final</hibernate.version>
    <c3p0.version>0.9.5.2</c3p0.version>
    <mysql.version>5.1.44</mysql.version>
    <taglibs.version>1.2.5</taglibs.version>
  </properties>

  <dependencies>
    <!--Spring-->
    <dependency>
      <groupId>org.springframework</groupId>
      <artifactId>spring-context</artifactId>
      <version>${org.springframework-version}</version>
    </dependency>
    <dependency>
      <groupId>org.springframework</groupId>
      <artifactId>spring-webmvc</artifactId>
      <version>${org.springframework-version}</version>
    </dependency>
    <dependency>
      <groupId>org.springframework</groupId>
      <artifactId>spring-tx</artifactId>
      <version>${org.springframework-version}</version>
    </dependency>
    <dependency>
      <groupId>org.springframework</groupId>
      <artifactId>spring-orm</artifactId>
      <version>${org.springframework-version}</version>
    </dependency>
    <!--Hibernate-->
    <dependency>
      <groupId>org.hibernate</groupId>
      <artifactId>hibernate-core</artifactId>
      <version>${hibernate.version}</version>
    </dependency>
    <dependency>
      <groupId>org.hibernate</groupId>
      <artifactId>hibernate-entitymanager</artifactId>
      <version>${hibernate.version}</version>
    </dependency>
    <!--C3P0-->
    <dependency>
      <groupId>com.mchange</groupId>
      <artifactId>c3p0</artifactId>
      <version>${c3p0.version}</version>
    </dependency>
    <dependency>
      <groupId>mysql</groupId>
      <artifactId>mysql-connector-java</artifactId>
      <version>${mysql.version}</version>
    </dependency>
    <!--Aspectj
    <dependency>
      <groupId>org.aspectj</groupId>
      <artifactId>aspectjrt</artifactId>
      <version>${org.aspectj-version}</version>
    </dependency>-->
    <!--Logging-->
    <dependency>
      <groupId>org.slf4j</groupId>
      <artifactId>slf4j-api</artifactId>
      <version>${org.slf4j-version}</version>
    </dependency>

    <!--@Inject-->
    <dependency>
      <groupId>javax.inject</groupId>
      <artifactId>javax.inject</artifactId>
      <version>1</version>
    </dependency>
    <!--Servlet-->
    <dependency>
      <groupId>javax.servlet</groupId>
      <artifactId>servlet-api</artifactId>
      <version>2.5</version>
      <scope>provided</scope>
    </dependency>
    <dependency>
      <groupId>javax.servlet.jsp</groupId>
      <artifactId>jsp-api</artifactId>
      <version>2.1</version>
      <scope>provided</scope>
    </dependency>
    <dependency>
      <groupId>javax.servlet</groupId>
      <artifactId>jstl</artifactId>
      <version>1.2</version>
      <scope>provided</scope>

    </dependency>
    <dependency>
      <groupId>org.apache.taglibs</groupId>
      <artifactId>taglibs-standard-impl</artifactId>
      <version>${taglibs.version}</version>
    </dependency>
    <dependency>
      <groupId>org.apache.taglibs</groupId>
      <artifactId>taglibs-standard-jstlel</artifactId>
      <version>${taglibs.version}</version>
    </dependency>

    <dependency>
      <groupId>junit</groupId>
      <artifactId>junit</artifactId>
      <version>4.11</version>
      <scope>test</scope>
    </dependency>
  </dependencies>
  <build>
    <finalName>SpringMVC</finalName>
    <pluginManagement><!-- lock down plugins versions to avoid using Maven defaults (may be moved to parent pom) -->
      <plugins>
        <plugin>
          <artifactId>maven-clean-plugin</artifactId>
          <version>3.0.0</version>
        </plugin>
        <!-- see http://maven.apache.org/ref/current/maven-core/default-bindings.html#Plugin_bindings_for_war_packaging -->
        <plugin>
          <artifactId>maven-resources-plugin</artifactId>
          <version>3.0.2</version>
        </plugin>
        <plugin>
          <artifactId>maven-compiler-plugin</artifactId>
          <version>3.7.0</version>
        </plugin>
        <plugin>
          <artifactId>maven-surefire-plugin</artifactId>
          <version>2.20.1</version>
        </plugin>
        <plugin>
          <artifactId>maven-war-plugin</artifactId>
          <version>3.2.0</version>
        </plugin>
        <plugin>
          <artifactId>maven-install-plugin</artifactId>
          <version>2.5.2</version>
        </plugin>
        <plugin>
          <artifactId>maven-deploy-plugin</artifactId>
          <version>2.8.2</version>
        </plugin>
      </plugins>
    </pluginManagement>
  </build>
</project>
三、创建数据库和表
3.1创建spring数据库
 create database spring;
 use spring
3.2创建phone表
 create table phone(id int(11) auto_increment not null primariy key,
                    name varchar(50) not null,
                    review varchar(20) default null);
 desc phone;
+--------+-------------+------+-----+---------+----------------+
| Field  | Type        | Null | Key | Default | Extra          |
+--------+-------------+------+-----+---------+----------------+
| id     | int(11)     | NO   | PRI | NULL    | auto_increment |
| name   | varchar(50) | NO   |     | NULL    |                |
| review | varchar(20) | YES  |     | NULL    |                |
+--------+-------------+------+-----+---------+----------------+
四、实体类
首先创建一个Hibernate POJO用于存储Phone的信息,同时我们需要将这个类映射到数据库中相应的表
package com.spring.zbt.model;

import javax.persistence.*;
@Entity
@Table(name="phone")
public class Phone {
    @Id
    @Column(name="id")
    @GeneratedValue(strategy = GenerationType.IDENTITY)
    private int id;

    @Column(name="name")
    private String name;

    @Column(name="review")
    private String review;

    public int getId() {
        return id;
    }

    public void setId(int id) {
        this.id = id;
    }

    public String getName() {
        return name;
    }

    public void setName(String name) {
        this.name = name;
    }

    public String getReview() {
        return review;
    }

    public void setReview(String review) {
        this.review = review;
    }
}@Entity:主要是告诉Hibernate这个类代表一个可持久化的对象
@Table:告诉Hibernate这个类与数据库中哪张表进行映射
@GenerateValue:表明这个被注解的属性的值是由dataSource决定的,而不是由编程写入的
@Column(name=”name”):用于映射Phone这个类中的name属性到phone表中的name这一column
@Column(name=”review”):用于映射Phone这个类中的review属性到phone表中的review这一column
五、 DAO层
Phone.Dao
import com.spring.zbt.model.Phone;

import java.util.List;

public interface PhoneDao {
    public void addPhone(Phone phone);
    public void updatePhone(Phone phone);
    public List<Phone> listPhones();
    public Phone getPhoneById(int id);
    public void removePhone(int id);
}
2、PhoneDaoImpl.java
package com.spring.zbt.dao;

import com.spring.zbt.model.Phone;
import com.spring.zbt.service.PhoneService;
import org.hibernate.SessionFactory;
import org.slf4j.Logger;
import org.slf4j.LoggerFactory;
import org.springframework.context.ApplicationContext;
import org.springframework.context.support.ClassPathXmlApplicationContext;
import org.springframework.stereotype.Repository;
import org.springframework.transaction.annotation.Transactional;

import java.util.List;

@Repository
public class PhoneDaoImpl implements PhoneDao {
    //private static final Logger logger = LoggerFactory.getLogger(PhoneDaoImpl.class);

    private SessionFactory sessionFactory;

    public void setSessionFactory(SessionFactory sessionFactory){
        this.sessionFactory = sessionFactory;
    }
    public void addPhone(Phone phone) {
        this.sessionFactory.getCurrentSession().save(phone);
    }

    public void updatePhone(Phone phone) {
        this.sessionFactory.getCurrentSession().update(phone);
    }

    public List<Phone> listPhones() {
        String hql ="select phone from Phone phone";
        return this.sessionFactory.getCurrentSession().createQuery(hql).list();
    }

    public Phone getPhoneById(int id) {
        String hql = "select phone from Phone phone where id= :id";
        return (Phone) this.sessionFactory.getCurrentSession().createQuery(hql).setParameter("id",id).uniqueResult();
    }

    public void removePhone(int id) {
        Phone phone = this.sessionFactory.getCurrentSession.load(Person.class,new Integer(id));
        if(phone != null){
            this.sessionFactory.getCurrentSession().delete(phone);
        }
    }

}
@Repository:
六、Service层
PhoneSerivce.java
package com.spring.zbt.service;

import com.spring.zbt.model.Phone;

import java.util.List;


public interface PhoneService {
    public void addPhone(Phone phone);
    public void updatePhone(Phone phone);
    public List<Phone> listPhones();
    public Phone getPhoneById(int id);
    public void removePhone(int id);
}
PhoneServiceImpl.java
package com.spring.zbt.service;

import com.spring.zbt.dao.PhoneDao;
import com.spring.zbt.dao.PhoneDaoImpl;
import com.spring.zbt.model.Phone;
import org.springframework.beans.factory.annotation.Autowired;
import org.springframework.stereotype.Service;
import org.springframework.transaction.annotation.Propagation;
import org.springframework.transaction.annotation.Transactional;

import java.util.List;

/**
 * Created by luckyboy on 2018/7/12.
 */
@Service
@Transactional(propagation = Propagation.SUPPORTS,readOnly = true)
public class PhoneServiceImpl implements PhoneService {
    @Autowired
    private PhoneDao phoneDao;

    public void setPhoneDao(PhoneDaoImpl phoneDao){
        this.phoneDao = phoneDao;
    }
    @Transactional
    public void addPhone(Phone phone) {
        this.phoneDao.addPhone(phone);
    }

    @Transactional
    public void updatePhone(Phone phone) {
        this.phoneDao.updatePhone(phone);
    }

    @Transactional
    public List<Phone> listPhones() {
        return this.phoneDao.listPhones();
    }

    @Transactional
    public Phone getPhoneById(int id) {
        return this.phoneDao.getPhoneById(id);
    }

    @Transactional
    public void removePhone(int id) {
        this.phoneDao.removePhone(id);
    }
}
@Service
- 表明这个类是一个”Service”类
- 其实我们也可以使用@Component这个注解实现
@Transactional
- 使Spring具有事务的行为
- @Transactional注解可以被用在类、方法、接口上
- 其中readOnly=true属性表明这个事务仅仅是可读的,不能对数据进行任何修改
- 如果要使用这个注解,我们需要在上下文中配置包扫描和事务注解驱动
<context:component-scan base-package="com.spring.zbt.*"/>
<tx:annotation-driven transaction-manager="transactionManager"/>
@Autowired
- 使这个域通过spring依赖注入的方式进行注入
- 使这个域在构造这个域之后注入属性,但是在config方法出发前注入
- 通过配置文件的元数据的数据类型的方式制动装配Bean实例
七、 Presentation 层
package com.spring.zbt.controller;

import com.spring.zbt.model.Phone;
import com.spring.zbt.service.PhoneService;
import org.springframework.beans.factory.annotation.Autowired;
import org.springframework.beans.factory.annotation.Qualifier;
import org.springframework.stereotype.Controller;
import org.springframework.ui.Model;
import org.springframework.web.bind.annotation.ModelAttribute;
import org.springframework.web.bind.annotation.PathVariable;
import org.springframework.web.bind.annotation.RequestMapping;
import org.springframework.web.bind.annotation.RequestMethod;

@Controller
public class PhoneController {
    private PhoneService phoneService;

    @Autowired(required = true)
    @Qualifier(value = "phoneService")
    public void setPhoneService(PhoneService phoneService){
        this.phoneService = phoneService;
    }

    @RequestMapping(value="/phones",method= RequestMethod.GET)
    public String listPhones(Model model){
        model.addAttribute("phone",new Phone());
        model.addAttribute("listPhones",this.phoneService.listPhones());
        return "phone";
    }

    @RequestMapping(value="/phone/add",method=RequestMethod.POST)
    public String addPhones(@ModelAttribute("phone") Phone phone){
        if(phone.getId() == 0){
            this.phoneService.addPhone(phone);
        }else{
            this.phoneService.updatePhone(phone);
        }
        return "redirect:/phones";
    }

    @RequestMapping(value="/remove/{id}")
    public String removePhone(@PathVariable("id") int id){
        this.phoneService.removePhone(id);
        return "redirect:/phones";
    }

    @RequestMapping("/edit/{id}")
    public String editPhone(@PathVariable("id") int id,Model model){
        model.addAttribute("phone",this.phoneService.getPhoneById(id));
        model.addAttribute("listPhones",this.phoneService.listPhones());
        return "phone";
    }
}
@Controller
- 此注解表明PhoneController类充当”Controller”的角色
- 为了能够自动检测到这个注解的controller,应该在配置文件servlet-context.xml中添加
<context:component-scan base-package="com.spring.zbt.*"/>@Autowired
- 通过将一个构造方法或者是setters方法由Spring的依赖注入设备自动注入
- 在bean实例被构造以后被注入,
- 通过匹配配置文件的元数据来注入bean
@Qualifier
- 和@Atuowired注解一起使用,防止出现冲突
- 使用name这个属性去除歧义
@RequestMapping
- DispatcherServlet 通过这个注解以分配request到正确的controller(是一个类)和handler(类中的方法)上
- 在handler方法上使用@RequestMapping使得handler有灵活的返回值
九、web配置文件
<?xml version="1.0" encoding="UTF-8"?>
<web-app xmlns:xsi="http://www.w3.org/2001/XMLSchema-instance"
         xmlns="http://java.sun.com/xml/ns/javaee"
         xsi:schemaLocation="http://java.sun.com/xml/ns/javaee
                             http://java.sun.com/xml/ns/javaee/web-app_2_5.xsd"
          version="2.5">
  <servlet>
    <servlet-name>springMVC</servlet-name>
    <servlet-class>org.springframework.web.servlet.DispatcherServlet</servlet-class>
    <init-param>
      <param-name>contextConfigLocation</param-name>
      <param-value>classpath:/servlet-context.xml</param-value>
    </init-param>
    <load-on-startup>1</load-on-startup>
  </servlet>
  <servlet-mapping>
    <servlet-name>springMVC</servlet-name>
    <url-pattern>/</url-pattern>
  </servlet-mapping>
</web-app>
十、servlet-context.xml
<?xml version="1.0" encoding="UTF-8"?>
<beans xmlns="http://www.springframework.org/schema/beans"
       xmlns:xsi="http://www.w3.org/2001/XMLSchema-instance"
       xmlns:mvc="http://www.springframework.org/schema/mvc"
       xmlns:context="http://www.springframework.org/schema/context"
       xmlns:tx="http://www.springframework.org/schema/tx"
       xsi:schemaLocation="http://www.springframework.org/schema/beans http://www.springframework.org/schema/beans/spring-beans.xsd
       http://www.springframework.org/schema/mvc http://www.springframework.org/schema/mvc/spring-mvc.xsd
       http://www.springframework.org/schema/context http://www.springframework.org/schema/context/spring-context.xsd
       http://www.springframework.org/schema/tx http://www.springframework.org/schema/tx/spring-tx-4.0.xsd">
    <mvc:annotation-driven/>
    <bean class="org.springframework.web.servlet.view.InternalResourceViewResolver">
        <property name="prefix" value="/WEB-INF/views/"/>
        <property name="suffix" value=".jsp"/>
    </bean>

    <context:annotation-config/>
    <!--配置数据源-->
    <bean id="dataSource" class="com.mchange.v2.c3p0.ComboPooledDataSource">
        <property name="driverClass" value="com.mysql.jdbc.Driver"/>
        <property name="jdbcUrl" value="jdbc:mysql://localhost:3306/spring"/>
        <property name="user" value="root"/>
        <property name="password" value="zbt123456"/>
    </bean>
    <!--定义Hibernate4 SessionFactory Bean-->
    <bean id="sessionFactory" class="org.springframework.orm.hibernate4.LocalSessionFactoryBean">
        <property name="dataSource" ref="dataSource"/>
        <property name="annotatedClasses">
            <list>
                <value>com.spring.zbt.model.Phone</value>
            </list>
        </property>
        <property name="hibernateProperties">
            <props>
                <prop key="hibernate.dialect">org.hibernate.dialect.MySQL5Dialect</prop>
                <prop key="hibernate.hbm2ddl.auto">update</prop>
                <prop key="hibernate.show_sql">true</prop>
                <prop key="hibernate.format_sql">false</prop>
            </props>
        </property>
    </bean>
    <bean id="phoneDao" class="com.spring.zbt.dao.PhoneDaoImpl">
        <property name="sessionFactory" ref="sessionFactory"/>
    </bean>

    <bean id="phoneService" class="com.spring.zbt.service.PhoneServiceImpl">
        <property name="phoneDao" ref="phoneDao"/>
    </bean>
    <context:component-scan base-package="com.spring.zbt.*"/>
    <!--因为使用了注解设置事务的方式,因此我们需要设置注解驱动方案-->
    <tx:annotation-driven transaction-manager="transactionManager"/>
    <bean id="transactionManager" class="org.springframework.orm.hibernate4.HibernateTransactionManager">
        <property name="sessionFactory" ref = "sessionFactory"/>
    </bean>
</beans>
翻译文章
https://legacy.gitbook.com/book/ganashree15/spring-mvc-with-hibernate-and-postgresql/details


 5088
5088

 被折叠的 条评论
为什么被折叠?
被折叠的 条评论
为什么被折叠?
 到【灌水乐园】发言


