


 本文深入讲解React组件间通信,包括父子组件、兄弟组件的参数与事件传递,详解React.Children、context及diff算法,探讨高阶组件的应用。
React 深入理解
1.1 React父子组件传参
-
父组件向子组件传参:在父组件中为子组件添加属性,在子组件中通过
this.props.属性名获取。 -
子组件向父组件传参:在父组件中为子组件添加事件属性,在子组件中通过
this.props.事件名(参数),通过回调函数的方式将参数值传递给父组件。 -
兄弟组件传参:兄弟组件无法直接进行参数传递,这时就需要用到状态提升的方式,将兄弟需传递的属性都提升到父组件,然后再由父组件传递给需要的子组件。
redux就是为了解决兄弟组件状态传递的,所以redux定义了统一状态管理store对象。
1.2 React父子事件调用
- 父组件调用子组件事件:父组件是不能直接调用子组件的事件的,组件自身事件相当于是内部属性,只能组件自身去调用,那么要想在父组件中调用子组件的事件,只能获取子组件实例然后用子组件调用自身事件。通常的做法是设置
ref属性,通过ref拿到子组件实例,然后调用方法。 - 子组件调用父组件事件:在父组件中为子组件添加事件属性,在子组件中通过
this.props.事件名(参数),即可触发父组件事件。 - 兄弟组件事件互调:状态提升至父组件,通过父组件管理兄弟事件属性。
1.3 React.Children的使用
React中每个元素都有this.props.children,其值相当于innerHTML,是该元素的子元素集合。
this.props.children有3种返回值,
- 如果无子元素则返回null
- 有一个子元素,返回一个子元素对象
- 大于一个子元素,返回子元素数组。
- 遍历子元素,并返回新的子元素数组。
array React.Children.map(children, function fn [, object context])
常用于对子元素数据劫持,或者统一对子元素进行封装。
因为this.props.children的值类型不确定,所以往往使用map方法来遍历,该方法内部处理了值类型的判断。
- 遍历子元素,但是不返回任何数据,和
map类似。
React.Children.forEach(children, function fn [, object context])
常用于对子元素进行修改。
- 获取子元素个数
number React.Children.count(object children)
因为子元素的值类型不确定,所以可通过该方法确定子元素个数。
- 返回单一一个child,如果不存在则抛出异常
object React.Children.only(object children)
参数只能是一个子元素对象,不能为数组,常用于单一惰性组件的开发,减少单一组件的校验。
- 将子元素转换为数组
array React.Children.toArray(children)
可以将children转换为一个数组。
- 克隆一个元素,返回一个新的元素
element React.cloneElement(element,[props],[...children])
常用于为元素添加新的属性。
其中
props是为元素添加props属性,是一个对象。
children是设置元素的子元素,不可使用this.props.children,否则会进入死循环。
示例代码
app.js
import React, { Component } from 'react';
import './App.css';
import FatherComponet from './components/ReactTest/father';
import ChildComponet from './components/ReactTest/child';

class App extends Component {
  render() {
    return (
      <FatherComponet>
        <ChildComponet />
      </FatherComponet>

    );
  }
}

export default App;
父组件father.js
import React, { Component } from "react";
import PropTypes from 'prop-types';

export default class FatherComponet extends Component {
    constructor(props) {
        super(props);
        this.state = {
            value: 0
        }
    }

    // 声明Context对象属性
    static childContextTypes = {
        ctxData: PropTypes.string
    }

    // 返回Context对象
    getChildContext() {
        return {
            ctxData: '这是全局变量'
        }
    }

    addItem() {

        /*父组件中调用子组件的方法,需先在父组件中获取子组件的实例,然后通过实例调用方法 */
        let childValue = this.childRef.getValue();
        console.log("父调子方法:" + childValue)

        this.setState({
            value: this.state.value + 1
        })
    }

    subItem(name) {
        /*子组件向父组件传参,可通过父组件在引用子组件时绑定事件,在子组件中调用该事件时,将参数带回给父组件*/
        console.log("子向父传参:" + name)   //减法
        this.setState({
            value: this.state.value - 1
        })
    }

    renderChild() {
        //子元素个数
        console.log("子元素个数:" + React.Children.count(this.props.children))

        console.log("仅有的子元素:" + React.Children.only(this.props.children))

        return React.Children.map(this.props.children, (child) => {
            return React.cloneElement(child, {
                data: "这是一个子组件",
                ref: childRef => this.childRef = childRef,
                value: this.state.value,
                addItem: this.addItem.bind(this),
                subItem: this.subItem.bind(this),
            })
        })
    }

    render() {
        /*父组件向子组件参数时,父组件在子组件上绑定传递的参数属性,即可在子组件中通过this.props获取 */
        return (
            <div style={{ display: "flex" }}>
                {this.renderChild()}
            </div>
        )
    }
}
子组件child.js
import React, { Component } from "react";
import { Button } from "antd";
import PropTypes from 'prop-types';

export default class ChildComponet extends Component {

    componentDidMount() {
        console.log("克隆传参:" + this.props.data)
        console.log("全局参数:" + this.context.ctxData)
    }

    // 声明Context对象属性
    static contextTypes = {
        ctxData: PropTypes.string
    }

    getValue() {
        return this.props.value;
    }

    render() {

        return (
            <div>
                <Button onClick={this.props.addItem.bind(this)}>+</Button>
                <div>{this.props.value}</div>
                <Button onClick={this.props.subItem.bind(this, "减法")}>-</Button>
            </div>
        )
    }
}
1.4 React中context的使用
context的作用是共享公共属性和方法避免多层组件间的层层递进传参操作,即我们常说的全局状态管理。
const MyContext = React.createContext(defaultValue);
该方法可以创建一个
Context对象,当渲染一个订阅了该对象的组件时,会优先从最近的Provider组件读取context状态值,如果没有Provider组件则默认值defaultValue生效。
MyClass.contextType = MyContext;
当一个组件(示例为
MyClass)配置contextType为一个Context对象时,即可使用this.context来获取全局状态。contextType会重置当前组件的context使之消费最近的Context对象值。
class App extends React.Component {
  render() {
    const {signedInUser, theme} = this.props;

   // 提供初始 context 值的 App 组件
    return (
      <MyContext.Provider value={theme}>
        <UserContext.Provider value={signedInUser}>
          <Layout />
        </UserContext.Provider>
      </MyContext.Provider>
    );
  }
}
每个
Context对象都有一个Provider组件,该组件接收一个value值传给消费组件。主要实现类组件的订阅操作。
function Content() {
  return (
    <MyContext.Consumer>
      {theme => (//这里的theme为全局变量
        <UserContext.Consumer>	//这里是嵌套使用
          {user => (
            <ProfilePage user={user} theme={theme} />
          )}
        </UserContext.Consumer>
      )}
    </MyContext.Consumer>
);
每个
Context对象都有一个Consumer组件,该组件可以订阅到context的变更。主要实现函数组件的订阅操作。
PropTypes
原生的React.Context使用较为繁琐,PropTypes组件根据这一原理,封装了context的使用,更为清晰简洁。
1.在父组件中声明全局变量及变量类型。
import React from 'react';
import PaymentDomainLayout from './paymentDomain/PaymentDomainLayout.jsx';
import IndexPage from './paymentDomain/index.jsx';
import PropTypes from 'prop-types';

class PaymentDomain extends React.Component {
  // 声明Context对象属性
  static childContextTypes = {
    menuList: PropTypes.array,
    user: PropTypes.object,
    isAdmin:PropTypes.boolean
  }

  // 返回Context对象
  getChildContext() {
    return {
      menuList: this.props.context.menuList,
      user: this.props.context.user,
      isAdmin:this.props.context.isAdmin,
    }
  }

  render() {
    const { context } = this.props;
    return (
      <PaymentDomainLayout showMenu={false}>
        <IndexPage />
      </PaymentDomainLayout>
    );
  }
}

ReactDOM.render(<PaymentDomain context={window.context} />, document.getElementById('ReactApp'));
childContextTypes:声明context的属性名和属性值类型。
getChildContext:设置默认全局属性值。
2.在子组件中通过contextTypes声明属性名和属性值类型,将需要用到的全局变量绑定到this.context上。
// 声明Context对象属性
static contextTypes = {
      user: PropTypes.object,
      isAdmin: PropTypes.boolean,
      superAdmin:PropTypes.string
}
子组件声明后即可用this.context获取声明的全局值了。
1.5 React diff算法
React diff算法的作用是计算出Virtual DOM中真正变化的部分,并只针对变化的部分做原生dom操作。
传统的diff算法是对dom树进行差异查找,其时间复杂度为O(n^3),越复杂的树结构,查找性能越低。
React diff算法基于3大策略将时间复杂度降为了O(n)。
-
tree diff:Web UI中DOM节点跨层级的移动操作特别少,可以忽略不计。
-
component diff:拥有相同类的两个组件生成相似的树形结构,拥有不同类的两个组件生成不同的树形结构。
-
element diff:对于同一层级的一组子节点,通过唯一id区分(key)。
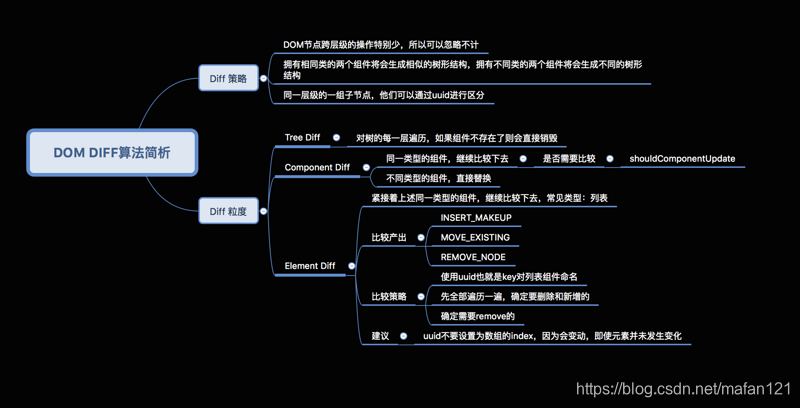
官方不建议对dom进行跨级操作,推荐使用css样式显隐,react的跨级操作只有创建节点和删除节点。
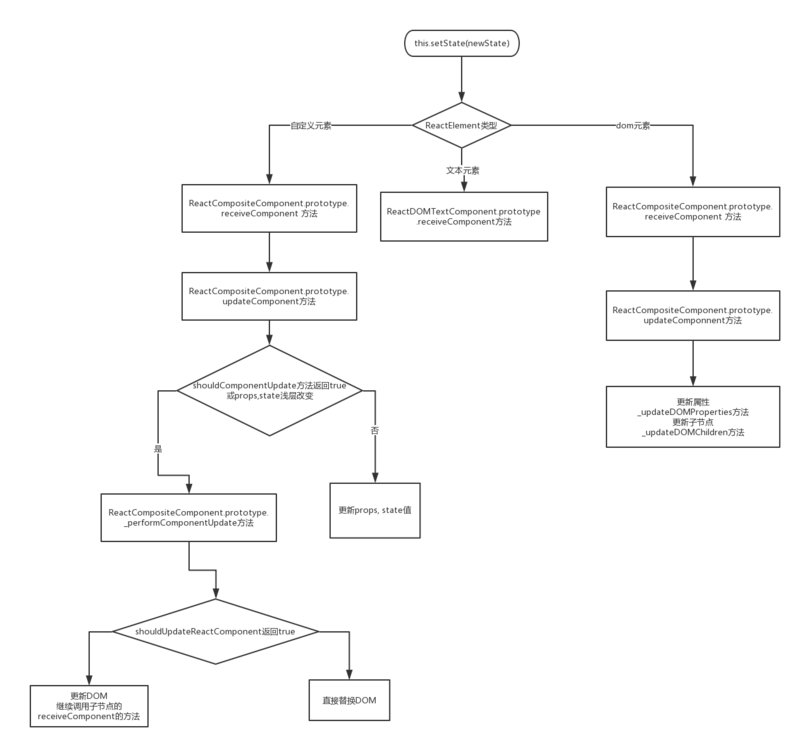
React更新机制
1.6 React高阶组件(HOC)
React高阶组件(HOC)本身并不是一个组件,而是一个函数,它接收一个组件作为参数,返回一个新的组件。
常用的高阶组件写法有2种:
-
属性代理:通过操作传入组件的props来实现具体需求。
常用于操作props(无法直接获取传入组件的props和state,可通过回调函数获取想要的值)
对传入组件设置refs
用其他组件进行包裹,实现统一布局
-
反向继承:被动的继承传入组件,然后反向调用组件的方法。
常用于数据劫持和渲染劫持(因为可以拿到state和props)
可通过
React.Children和React.cloneElement进行props设置。可通过super调用父组件的方法。
import React, { Component } from "react";

class HOCTest extends Component {

    constructor(props) {
        super(props)
        this.state = {
            code: "hoc",
            type: 1
        }
    }

    static defaultProps = {
        name: "高阶组件"
    }

    render() {
        return (
            <div>
                <div>{this.props.name}</div>
                <div>{this.props.title}</div>
                <div>{this.props.code}</div>
            </div>
        )
    }
}

//属性代理
const PropsHOC = (WrappedComponent) => {
    return class HOCComponent extends Component {
        render() {
            return (
                <div>
                    <WrappedComponent {...this.props} title="属性代理" />
                </div>
            )
        }
    }
}

//反向继承
const ExtendsHOC = (WrappedComponent) => {
    return class HOCComponent extends WrappedComponent {
        render() {
            if (this.state.type == 1) {
                return super.render();
            } else {
                return null
            }
        }
    }
}

export default PropsHOC(HOCTest);
// export default ExtendsHOC(HOCTest);


 1028
1028

 被折叠的 条评论
为什么被折叠?
被折叠的 条评论
为什么被折叠?
 到【灌水乐园】发言


